Klark Teknik DN32-LIVE User manual

Quick Start Guide
DN32-LIVE
SD/SDHC and USB 2.0 Expansion Module for 32 Bidirectional Channels of
Live Recording/Playback

Terminals marked with
this symbol carry
electrical current of
sucient magnitude to constitute risk
of electric shock. Use only high-quality
professional speaker cables with ¼" TS
or twist-locking plugs pre-installed.
Allother installation or modication
should be performed only by
qualiedpersonnel.
This symbol, wherever it
appears, alerts you to the
presence of uninsulated
dangerous voltage inside the enclosure
- voltage that may be sucientto
constitute a risk ofshock.
This symbol, wherever it
appears, alerts you to
important operating and
maintenance instructions in the
accompanying literature. Please read
themanual.
Caution
To reduce the risk of
electric shock, do not
remove the top cover (or the rear
section). No user serviceable parts inside.
Refer servicing to qualiedpersonnel.
Caution
To reduce the risk of
re or electric shock, do
not expose this appliance to rain and
moisture. Theapparatus shall not
be exposed to dripping or splashing
liquids and no objects lled with
liquids, such as vases, shall be placed
on the apparatus.
Caution
These service instructions
are for use by qualied
service personnel only. Toreduce
the risk of electric shock do not
perform any servicing other than that
contained in the operation instructions.
Repairshave to be performed by
qualied servicepersonnel.
1. Read these instructions.
2. Keep these instructions.
3. Heed all warnings.
4. Follow all instructions.
5. Do not use this apparatus
near water.
6. Clean only with dry cloth.
7. Do not block any ventilation
openings. Install in accordance with the
manufacturer’sinstructions.
8. Do not install near any heat
sources such as radiators, heat registers,
stoves, or other apparatus (including
ampliers) that produce heat.
9. Do not defeat the safety purpose
of the polarized or grounding-type
plug. A polarized plug has two blades
with one wider than the other.
A grounding-type plug has two blades
and a third grounding prong. The wide
blade or the third prong are provided
for your safety. Ifthe provided plug
does not t into your outlet, consult
an electrician for replacement of the
obsolete outlet.
10. Protect the power cord from being
walked on or pinched particularly
at plugs, convenience receptacles,
and the point where they exit from
the apparatus.
11. Use only attachments/accessories
specied by themanufacturer.
12. Use only with
the cart, stand,
tripod, bracket, or
table specied by
the manufacturer,
orsold with
the apparatus. When a cart is used,
use caution when moving the cart/
apparatus combination to avoid injury
fromtip-over.
13. Unplug this apparatus during
lightning storms or when unused for
long periods of time.
14. Refer all servicing to qualied
service personnel. Servicing is required
when the apparatus has been damaged
in any way, such as power supply cord
or plug is damaged, liquid has been
spilled or objects have fallen into the
apparatus, the apparatus has been
exposed to rain or moisture, does not
operate normally, or has beendropped.
15. The apparatus shall be connected
to a MAINS socket outlet with a
protective earthing connection.
16. Where the MAINS plug or an
appliance coupler is used as the
disconnect device, the disconnect
device shall remain readily operable.
17. Correct disposal of
this product: This
symbol indicates that
this product must not
be disposed of with
household waste, according to the
WEEE Directive (2012/19/EU) and your
national law. This product should be
taken to a collection center licensed for
the recycling of waste electrical and
electronic equipment (EEE).
The mishandling of this type of waste
could have a possible negative impact
on the environment and human health
due to potentially hazardous
substances that are generally
associated with EEE. At the same time,
your cooperation in the correct disposal
of this product will contribute to the
ecient use of natural resources. For
more information about where you can
take your waste equipment for
recycling, please contact your local city
oce, or your household waste
collection service.
18. Do not install in a conned space,
such as a book case or similar unit.
19. Do not place naked ame
sources, such as lighted candles,
on the apparatus.
20. Please keep the environmental
aspects of battery disposal in mind.
Batteries must be disposed-of at a
battery collection point.
21. Use this apparatus in tropical
and/or moderate climates.
MUSIC Tribe accepts no liability for
any loss which may be suered by any
person who relies either wholly or in
part upon any description, photograph,
or statement contained herein.
Technical specications, appearances
and other information are subject to
change without notice. All trademarks
are the property of their respective
owners. MIDAS, KLARK TEKNIK,
LAB GRUPPEN, LAKE, TANNOY,
TURBOSOUND, TC ELECTRONIC,
TC HELICON, BEHRINGER, BUGERA,
AND COOLAUDIO are trademarks
or registered trademarks of
MUSIC Tribe Global Brands Ltd. ©
MUSIC Tribe Global Brands Ltd.
2018 All rights reserved.
For the applicable warranty terms and
conditions and additional information
regarding MUSIC Tribe’s Limited
Warranty, please see complete details
online at musictri.be/warranty.
Las terminales marcadas
con este símbolo
transportan corriente
eléctrica de magnitud suciente como
para constituir un riesgo de descarga
eléctrica. Utilicesolo cables de altavoz
profesionales y de alta calidad con
conectores TS de 6,3 mm o de bayoneta
prejados. Cualquier otra instalación o
modicación debe ser realizada
únicamente por un técnicocualicado.
Este símbolo, siempre que
aparece, leadvierte de la
presencia de voltaje
peligroso sin aislar dentro de la caja;
estevoltaje puede ser suciente para
constituir un riesgo dedescarga.
Este símbolo, siempre que
aparece, leadvierte sobre
instrucciones operativas y
de mantenimiento que aparecen en la
documentación adjunta. Por favor,
leaelmanual.
Atención
Para reducir el riesgo de
descarga eléctrica, no
quite la tapa (olaparte posterior).
Nohay piezas en el interior del equipo
que puedan ser reparadas por el
usuario. Sies necesario, póngase en
contacto con personal cualicado.
Atención
Para reducir el riesgo
de incendio o descarga
eléctrica, no exponga este aparato a la
lluvia, humedad o alguna otra fuente
que pueda salpicar o derramar algún
líquido sobre el aparato. Nocoloque
ningún tipo de recipiente para líquidos
sobre elaparato.
Atención
Las instrucciones
de servicio deben
llevarlas a cabo exclusivamente
personal cualicado. Paraevitar el
riesgo de una descarga eléctrica,
no realice reparaciones que no se
encuentren descritas en el manual de
operaciones. Lasreparaciones deben
ser realizadas exclusivamente por
personalcualicado.
1. Lea las instrucciones.
2. Conserve estas instrucciones.
3. Preste atención a todas
las advertencias.
4. Siga todas las instrucciones.
5. No use este aparato cerca
del agua.
6. Limpie este aparato con un
paño seco.
7. No bloquee las aberturas
de ventilación. Instale el equipo
de acuerdo con las instrucciones
del fabricante.
8. No instale este equipo cerca de
fuentes de calor tales como radiadores,
acumuladores de calor, estufas u otros
aparatos (incluyendo amplicadores)
que puedan producir calor.
9. No elimine o deshabilite nunca
la conexión a tierra del aparato o del
cable de alimentación de corriente.
Unenchufe polarizado tiene dos polos,
uno de los cuales tiene un contacto
más ancho que el otro. Una clavija
con puesta a tierra dispone de tres
contactos: dos polos y la puesta a
tierra. El contacto ancho y el tercer
contacto, respectivamente, son los que
garantizan una mayor seguridad. Si el
enchufe suministrado con el equipo
no concuerda con la toma de corriente,
consulte con un electricista para
cambiar la toma de corriente obsoleta.
10. Coloque el cable de suministro de
energía de manera que no pueda ser
pisado y que esté protegido de objetos
alados. Asegúrese de que el cable de
suministro de energía esté protegido,
especialmente en la zona de la clavija y
en el punto donde sale del aparato.
11. Use únicamente los dispositivos
o accesorios especicados por
el fabricante.
12. Use
únicamente la
carretilla,
plataforma,
trípode, soporte o
Important Safety
Instructions
LEGAL DISCLAIMER
LIMITED WARRANTY
Instrucciones de
seguridad
2 3Quick Start GuideDN32-LIVE

mesa especicados por el fabricante o
suministrados junto con el equipo.
Altransportar el equipo, tenga cuidado
para evitar daños y caídas al tropezar
con algún obstáculo.
13. Desenchufe el equipo durante
tormentas o si no va a utilizarlo durante
un periodo largo.
14. Confíe las reparaciones
únicamente a servicios técnicos
cualicados. La unidad requiere
mantenimiento siempre que haya
sufrido algún daño, si el cable de
suministro de energía o el enchufe
presentaran daños, sehubiera
derramado un líquido o hubieran caído
objetos dentro del equipo, si el aparato
hubiera estado expuesto a la humedad
o la lluvia, si ha dejado de funcionar de
manera normal o si ha sufrido algún
golpe o caída.
15. Al conectar la unidad a la toma de
corriente eléctrica asegúrese de que
la conexión disponga de una unión
atierra.
16. Si el enchufe o conector
de red sirve como único medio
de desconexión, éste debe ser
accesiblefácilmente.
17. Cómo debe
deshacerse de este
aparato: Este símbolo
indica que este aparato
no debe ser tratado
como basura orgánica, según lo
indicado en la Directiva WEEE (2012/19/
EU) y a las normativas aplicables en su
país. En lugar de ello deberá llevarlo al
punto limpio más cercano para el
reciclaje de sus elementos eléctricos/
electrónicos (EEE). Al hacer esto estará
ayudando a prevenir las posibles
consecuencias negativas para el medio
ambiente y la salud que podrían ser
provocadas por una gestión inadecuada
de este tipo de aparatos. Además,
el reciclaje de materiales ayudará a
conservar los recursos naturales. Para
más información acerca del reciclaje de
este aparato, póngase en contacto con
el Ayuntamiento de su ciudad o con el
punto limpio local.
18. No instale esta unidad en un
espacio muy reducido, tal como
encastrada en una librería o similar.
19. No coloque objetos con
llama, como una vela encendida,
sobre este aparato.
20. Tenga presentes todas las
advertencias relativas al reciclaje
y correcta eliminación de las pilas.
Las pilas deben ser siempre eliminadas
en un punto limpio y nunca con el resto
de la basura orgánica.
21. Use este aparato en rangos de
temperatura moderados y/o tropicales.
MUSIC Tribe no admite ningún tipo
de responsabilidad por cualquier
daño o pérdida que pudiera sufrir
cualquier persona por conar total
o parcialmente en la descripciones,
fotografías o armaciones
contenidas en este documento.
Las especicaciones técnicas,
imágenes y otras informaciones
contenidas en este documento
están sujetas a modicaciones
sin previo aviso. Todas las marcas
comerciales que aparecen aquí
son propiedad de sus respectivos
dueños. MIDAS, KLARK TEKNIK,
LAB GRUPPEN, LAKE, TANNOY,
TURBOSOUND, TC ELECTRONIC,
TC HELICON, BEHRINGER,
BUGERA y COOLAUDIO son marcas
comerciales o marcas registradas
de MUSIC Tribe Global Brands Ltd.
© MUSIC Tribe Global Brands Ltd. 2018
Reservados todos los derechos.
Si quiere conocer los detalles y
condiciones aplicables de la garantía
así como información adicional sobre
la Garantía limitada de MUSIC Tribe,
consulte online toda la información en
la web musictri.be/warranty.
Les points repérés par ce
symbole portent une
tension électrique
susante pour constituer un risque
d’électrocution. Utilisez uniquement
des câbles d’enceintes professionnels
de haute qualité avec ches Jack mono
6,35 mm ou ches à verrouillages déjà
installées. Touteautre installation ou
modication doit être eectuée
uniquement par un personnel qualié.
Ce symbole avertit de la
présence d’une tension
dangereuse et non isolée à
l’intérieur de l’appareil - elle peut
provoquer des chocs électriques.
Attention
Ce symbol signale les
consignes d’utilisation
et d’entre ! Tienimportantes dans
la documentation fournie. Lisez les
consignes de sécurité du manuel
d’utilisation del’appareil.
Attention
Pour éviter tout risque
de choc électrique,
ne pas ouvrir le capot de l’appareil
ni démonter le panneau arrière.
L’intérieur de l’appareil ne possède
aucun élément réparable par
l’utilisateur. Laissertoute réparation à
un professionnelqualié.
Attention
Pour réduire les risques
de feu et de choc
électrique, n’exposez pas cet appareil
à la pluie, à la moisissure, auxgouttes
ou aux éclaboussures. Ne posez pas
de récipient contenant un liquide sur
l’appareil (unvase par exemple).
Attention
Ces consignes de
sécurité et d’entretien
sont destinées à un personnel
qualié. Pour éviter tout risque de
choc électrique, n’eectuez aucune
réparation sur l’appareil qui ne soit
décrite par le manuel d’utilisation.
Les éventuelles réparations doivent
être eectuées uniquement par un
technicienspécialisé.
1. Lisez ces consignes.
2. Conservez ces consignes.
3. Respectez tous les avertissements.
4. Respectez toutes les
consignes d’utilisation.
5. N’utilisez jamais l’appareil à
proximité d’un liquide.
6. Nettoyez l’appareil avec un
chion sec.
7. Veillez à ne pas empêcher la
bonne ventilation de l’appareil via ses
ouïes de ventilation. Respectezles
consignes du fabricant concernant
l’installation del’appareil.
8. Ne placez pas l’appareil à
proximité d’une source de chaleur telle
qu’un chauage, une cuisinière ou tout
appareil dégageant de la chaleur (y
compris un ampli depuissance).
9. Ne supprimez jamais la sécurité
des prises bipolaires ou des prises
terre. Les prises bipolaires possèdent
deux contacts de largeur diérente.
Leplus large est le contact de sécurité.
Les prises terre possèdent deux
contacts plus une mise à la terre
servant de sécurité. Si la prise du bloc
d’alimentation ou du cordon d’ali-
mentation fourni ne correspond pas à
celles de votre installation électrique,
faites appel à un électricien pour
eectuer le changement de prise.
10. Installez le cordon d’alimentation
de telle façon que personne ne puisse
marcher dessus et qu’il soit protégé
d’arêtes coupantes. Assurez-vous
que le cordon d’alimentation est
sufsamment protégé, notamment
au niveau de sa prise électrique et
de l’endroit où il est relié à l’appareil;
cela est également valable pour une
éventuelle rallonge électrique.
11. Utilisez exclusivement
des accessoires et des appareils
supplémentaires recommandés par
lefabricant.
12. Utilisez
exclusivement des
chariots, des
diables,
desprésentoirs,
despieds et des
surfaces de travail recommandés par le
fabricant ou livrés avec le produit.
Déplacezprécautionneusement tout
chariot ou diable chargé pour éviter
d’éventuelles blessures en cas dechute.
13. Débranchez l’appareil de la
tension secteur en cas d’orage ou si
l’appareil reste inutilisé pendant une
longue période de temps.
14. Les travaux d’entretien de
l’appareil doivent être eectués
uniquement par du personnel qualié.
Aucunentretien n’est nécessaire sauf si
l’appareil est endommagé de quelque
façon que ce soit (dommagessur le
cordon d’alimentation ou la prise par
exemple), siun liquide ou un objet
a pénétré à l’intérieur du châssis, si
l’appareil a été exposé à la pluie ou
à l’humidité, s’il ne fonctionne pas
correctement ou à la suite d’une chute.
15. L’appareil doit être connecté à une
prise secteur dotée d’une protection
par mise à la terre.
16. La prise électrique ou la prise
IEC de tout appareil dénué de bouton
marche/arrêt doit rester accessible
enpermanence.
17. Mise au rebut
appropriée de ce
produit: Ce symbole
indique qu’en accord
avec la directive DEEE
(2012/19/EU) et les lois en vigueur dans
votre pays, ce produit ne doit pas être
jeté avec les déchets ménagers.
Ce produit doit être déposé dans un
point de collecte agréé pour le
recyclage des déchets d’équipements
électriques et électroniques (EEE).
Une mauvaise manipulation de ce type
de déchets pourrait avoir un impact
négatif sur l’environnement et la santé
à cause des substances potentiellement
dangereuses généralement associées à
ces équipements. En même temps,
votre coopération dans la mise au rebut
de ce produit contribuera à l’utilisation
ecace des ressources naturelles.
Pour plus d’informations sur l’endroit
où vous pouvez déposer vos déchets
d’équipements pour le recyclage,
veuillez contacter votre mairie ou votre
centre local de collecte des déchets.
18. N’installez pas l’appareil dans un
espace conné tel qu’une bibliothèque
ou meuble similaire.
19. Ne placez jamais d’objets
enammés, tels que des bougies
allumées, sur l’appareil.
20. Gardez à l’esprit l’impact
environnemental lorsque vous mettez
des piles au rebus. Les piles usées
doivent être déposées dans un point de
collecte adapté.
21. Utilisez l’appareil dans un climat
tropical et/ou modéré.
MUSIC Tribe ne peut être tenu pour
responsable pour toute perte pouvant
être subie par toute personne se
ant en partie ou en totalité à
toute description, photographie
ou armation contenue dans ce
document. Les caractéristiques,
l’apparence et d’autres informations
peuvent faire l’objet de modications
sans notication. Toutes les marques
appartiennent à leurs propriétaires
respectifs. MIDAS, KLARK TEKNIK,
LAB GRUPPEN, LAKE, TANNOY,
NEGACIÓN LEGAL
GARANTÍA LIMITADA
Consignes de sécurité
DÉNI LÉGAL
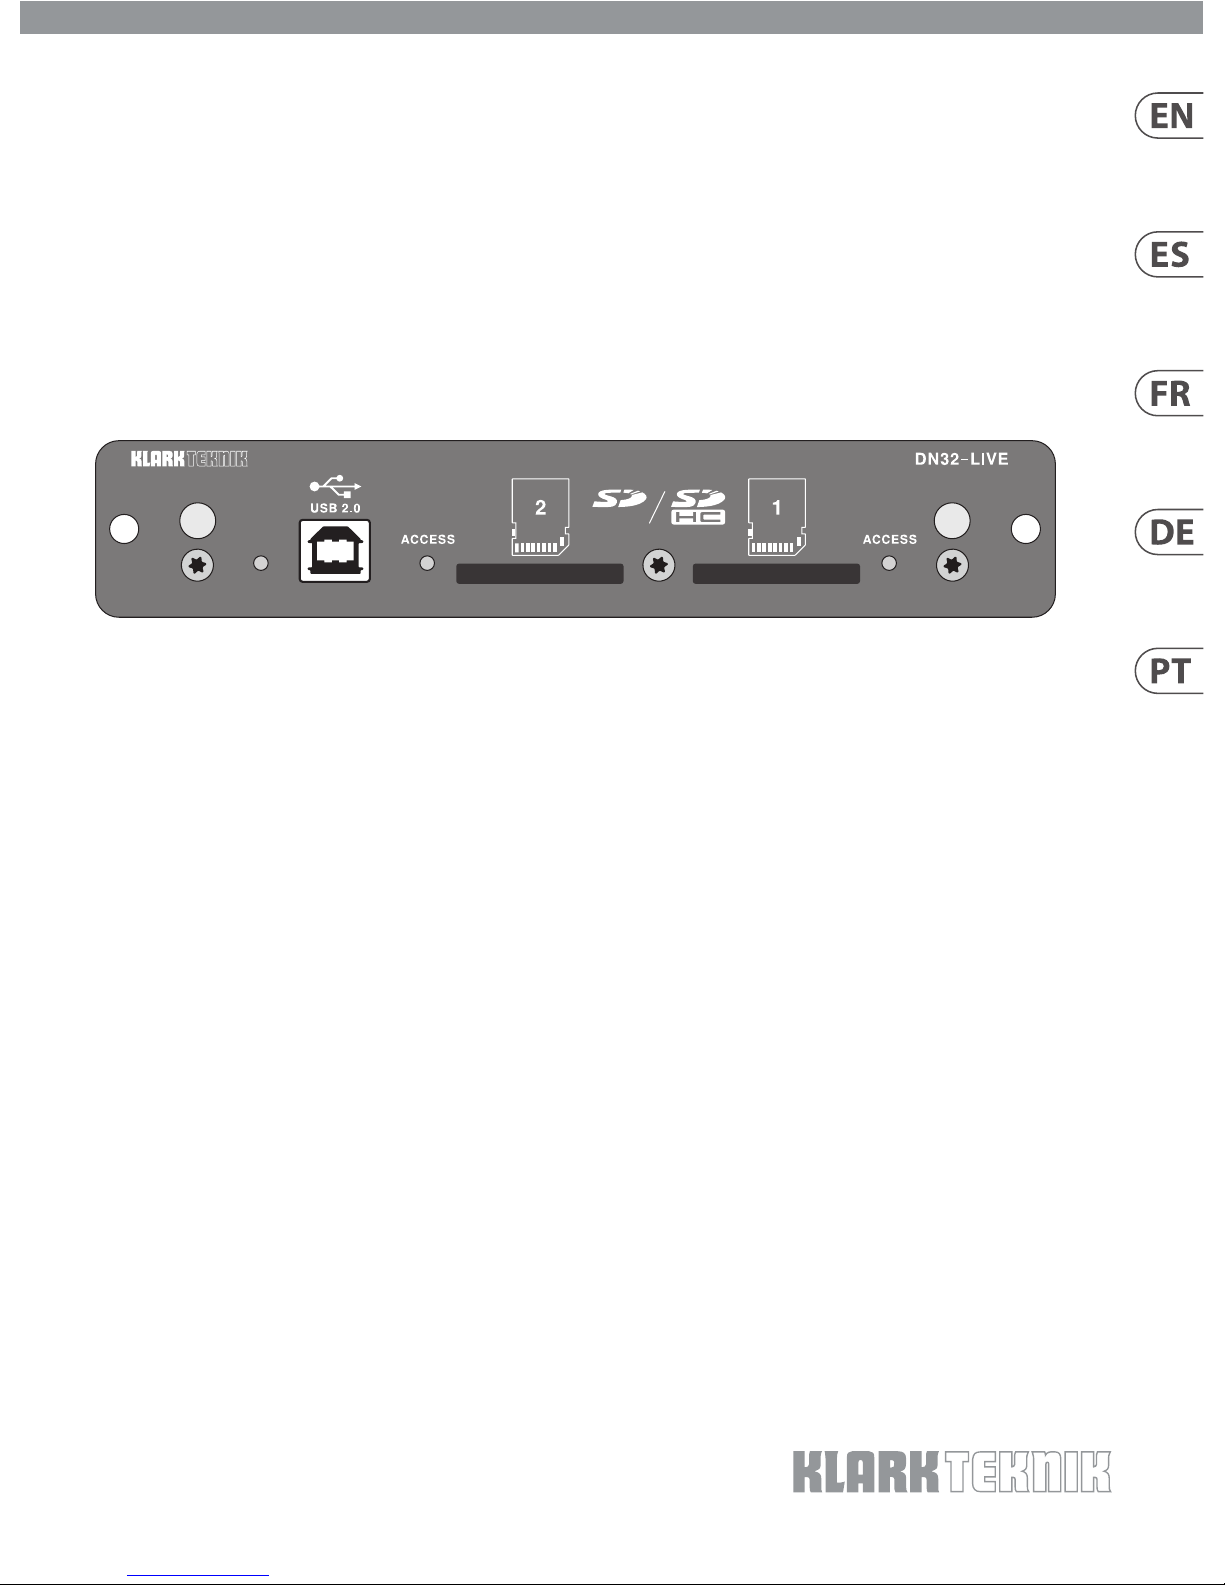
4 5Quick Start GuideDN32-LIVE

TURBOSOUND, TC ELECTRONIC,
TC HELICON, BEHRINGER,
BUGERA et COOLAUDIO sont des
marques ou marques déposées
de MUSIC Tribe Global Brands Ltd.
© MUSIC Tribe Global Brands Ltd.
2018 Tous droits réservés.
Pour connaître les termes et conditions
de garantie applicables, ainsi que
les informations supplémentaires et
détaillées sur la Garantie Limitée de
MUSIC Tribe, consultez le site Internet
musictri.be/warranty.
Vorsicht
Die mit dem Symbol
markierten Anschlüsse
führen so viel Spannung, dassdie
Gefahr eines Stromschlags besteht.
Verwenden Sie nur hochwertige,
professionelle Lautsprecherkabel
mit vorinstallierten 6,35 mm
MONO-Klinkensteckern oder
Lautsprecherstecker mit
Drehverriegelung. Alle anderen
Installationen oder Modikationen
sollten nur von qualiziertem
Fachpersonal ausgeführt werden.
Achtung
Um eine Gefährdung
durch Stromschlag
auszuschließen, darf die
Geräteabdeckung bzw.
Geräterückwandnicht abgenommen
werden. ImInnern des Geräts benden
sich keine vom Benutzer reparierbaren
Teile. Reparaturarbeiten dürfen
nur von qualiziertem Personal
ausgeführtwerden.
Achtung
Um eine Gefährdung
durch Feuer bzw.
Stromschlag auszuschließen, darf
dieses Gerät weder Regen oder
Feuchtigkeit ausgesetzt werden
noch sollten Spritzwasser oder
tropfende Flüssigkeiten in das Gerät
gelangen können. Stellen Sie keine
mit Flüssigkeit gefüllten Gegenstände,
wie z. B. Vasen, aufdasGerät.
Achtung
Die Service-Hinweise sind
nur durch qualiziertes
Personal zu befolgen. Umeine
Gefährdung durch Stromschlag zu
vermeiden, führen Sie bitte keinerlei
Reparaturen an dem Gerät durch,
dienicht in der Bedienungsanleitung
beschrieben sind. Reparaturen
sind nur von qualiziertem
Fachpersonaldurchzuführen.
1. Lesen Sie diese Hinweise.
2. Bewahren Sie diese Hinweise auf.
3. Beachten Sie alle Warnhinweise.
4. Befolgen Sie alle
Bedienungshinweise.
5. Betreiben Sie das Gerät nicht in
der Nähe vonWasser.
6. Reinigen Sie das Gerät mit einem
trockenen Tuch.
7. Blockieren Sie nicht die
Belüftungsschlitze. Beachten
Sie beim Einbau des Gerätes die
Herstellerhinweise.
8. Stellen Sie das Gerät nicht in der
Nähe von Wärmequellen auf. Solche
Wärmequellen sind z. B. Heizkörper,
Herde oder andere Wärme erzeugende
Geräte (auch Verstärker).
9. Entfernen Sie in keinem Fall
die Sicherheitsvorrichtung von
Zweipol- oder geerdeten Steckern. Ein
Zweipolstecker hat zwei unterschiedlich
breite Steckkontakte. Ein geerdeter
Stecker hat zwei Steckkontakte
und einen dritten Erdungskontakt.
Derbreitere Steckkontakt oder der
zusätzliche Erdungskontakt dient
Ihrer Sicherheit. Falls das mitgelieferte
Steckerformat nicht zu Ihrer Steckdose
passt, wenden Sie sich bitte an
einen Elektriker, damit die Steckdose
entsprechend ausgetauscht wird.
10. Verlegen Sie das Netzkabel so,
dass es vor Tritten und scharfen Kanten
geschützt ist und nicht beschädigt
werden kann. Achten Sie bitte
insbesondere im Bereich der Stecker,
Verlängerungskabel und an der Stelle,
an der das Netzkabel das Gerät verlässt,
aufausreichendenSchutz.
11. Das Gerät muss jederzeit mit
intaktem Schutzleiter an das Stromnetz
angeschlossen sein.
12. Sollte der Hauptnetzstecker
oder eine Gerätesteckdose die
Funktionseinheit zum Abschalten sein,
muss diese immer zugänglich sein.
13. Verwenden Sie nur Zusatzgeräte/
Zubehörteile, dielaut Hersteller
geeignet sind.
14. Verwenden
Sie nur Wagen,
Standvorrich-
tungen, Stative,
Halter oder Tische,
die vom Hersteller
benannt oder im Lieferumfang des
Geräts enthalten sind. Falls Sie einen
Wagen benutzen, seien Sie vorsichtig
beim Bewegen der
Wagen-Gerätkombination,
umVerletzungen durch Stolpern
zuvermeiden.
15. Ziehen Sie den Netzstecker bei
Gewitter oder wenn Sie das Gerät
längere Zeit nicht benutzen.
16. Lassen Sie alle Wartungsarbeiten
nur von qualiziertem Service-
Personal ausführen. EineWartung
ist notwendig, wenn das Gerät in
irgendeiner Weise beschädigt wurde
(z. B. Beschädigung des Netzkabels
oder Steckers), Gegenstände oder
Flüssigkeit in das Geräteinnere gelangt
sind, das Gerät Regen oder Feuchtigkeit
ausgesetzt wurde, das Gerät nicht
ordnungsgemäß funktioniert oder auf
den Boden gefallen ist.
17. Korrekte
Entsorgung dieses
Produkts: Dieses Symbol
weist darauf hin, das
Produkt entsprechend
der WEEE Direktive (2012/19/EU) und
der jeweiligen nationalen Gesetze nicht
zusammen mit Ihren Haushaltsabfällen
zu entsorgen. DiesesProdukt sollte bei
einer autorisierten Sammelstelle für
Recycling elektrischer und
elektronischer Geräte (EEE) abgegeben
werden. Wegen bedenklicher
Substanzen, diegenerell mit
elektrischen und elektronischen
Geräten in Verbindung stehen, könnte
eine unsachgemäße Behandlung dieser
Abfallart eine negative Auswirkung auf
Umwelt und Gesundheit haben.
Gleichzeitig gewährleistet Ihr Beitrag
zur richtigen Entsorgung dieses
Produkts die eektive Nutzung
natürlicher Ressourcen. Fürweitere
Informationen zur Entsorgung Ihrer
Geräte bei einer Recycling-Stelle
nehmen Sie bitte Kontakt zum
zuständigen städtischen Büro,
Entsorgungsamt oder zu Ihrem
Haushaltsabfallentsorgerauf.
18. Installieren Sie das Gerät nicht
in einer beengten Umgebung, zum
Beispiel Bücherregal oder ähnliches.
19. Stellen Sie keine Gegenstände mit
oenen Flammen, etwa brennende
Kerzen, auf das Gerät.
20. Beachten Sie bei der Entsorgung
von Batterien den Umweltschutz-
Aspekt. Batterien müssen bei einer
Batterie-Sammelstelle entsorgt
werden.
21. Verwenden Sie das Gerät in
tropischen und/oder gemäßigten
Klimazonen.
MUSIC Tribe übernimmt keine Haftung
für Verluste, die Personen entstanden
sind, die sich ganz oder teilweise auf
hier enthaltene Beschreibungen,
Fotos oder Aussagen verlassen haben.
Technische Daten, Erscheinungsbild
und andere Informationen können
ohne vorherige Ankündigung
geändert werden. Alle Warenzeichen
sind Eigentum der jeweiligen
Inhaber. MIDAS,KLARK TEKNIK,
LABGRUPPEN, LAKE,TANNOY,
TURBOSOUND, TC ELECTRONIC,
TC HELICON, BEHRINGER, BUGERA
und COOLAUDIO sind Warenzeichen
oder eingetragene Warenzeichen
der MUSIC Tribe Global Brands Ltd.
© MUSIC Tribe Global Brands Ltd.
2018 Alle Rechte vorbehalten.
Die geltenden Garantiebedingungen
und zusätzliche Informationen
bezüglich der von MUSIC Tribe
gewährten beschränkten
Garantie nden Sie online unter
musictri.be.com/warranty.
Aviso!
Terminais marcados
com o símbolo carregam
corrente elétrica de magnitude
suciente para constituir um risco de
choque elétrico. Use apenas cabos
de alto-falantes de alta qualidade
com plugues TS de ¼" ou plugues
com trava de torção pré-instalados.
Todas as outras instalações e
modicações devem ser efetuadas por
pessoasqualicadas.
Este símbolo, onde quer
que o encontre, alerta-o
para a leitura das
instruções de manuseamento que
acompanham o equipamento. Por favor
leia o manual deinstruções.
Atenção
De forma a diminuir
o risco de choque
eléctrico, nãoremover a cobertura
(ouasecção de trás). Não existem peças
substituíveis por parte do utilizador no
seu interior. Para esse efeito recorrer a
um técnicoqualicado.
Atenção
Para reduzir o risco de
incêndios ou choques
eléctricos o aparelho não deve ser
exposto à chuva nem à humidade.
Alémdisso, não deve ser sujeito a
salpicos, nem devem ser colocados em
cima do aparelho objectos contendo
líquidos, taiscomojarras.
Atenção
Estas instruções de
operação devem ser
utilizadas, emexclusivo, por técnicos
de assistência qualicados. Para evitar
choques eléctricos não proceda a
reparações ou intervenções, que
não as indicadas nas instruções
de operação, salvo se possuir as
quali-cações necessárias. Para evitar
choques eléctricos não proceda a
reparações ou intervenções, que
não as indicadas nas instruções de
operação. Só o deverá fazer se possuir
as qualicaçõesnecessárias.
1. Leia estas instruções.
2. Guarde estas instruções.
3. Preste atenção a todos os avisos.
4. Siga todas as instruções.
5. Não utilize este dispositivo perto
de água.
6. Limpe apenas com um pano seco.
7. Não obstrua as entradas de
ventilação. Instale de acordo com as
instruções do fabricante.
GARANTIE LIMITÉE
Wichtige
Sicherheitshinweise
HAFTUNGSAUSSCHLUSS
BESCHRÄNKTE GARANTIE
Instruções de
Segurança Importantes
6 7Quick Start GuideDN32-LIVE

8. Não instale perto de quaisquer
fontes de calor tais como radiadores,
bocas de ar quente, fogões de sala
ou outros aparelhos (incluindo
amplicadores) que produzam calor.
9. Não anule o objectivo de
segurança das chas polarizadas ou
do tipo de ligação à terra. Uma cha
polarizada dispõe de duas palhetas
sendo uma mais larga do que a outra.
Uma cha do tipo ligação à terra dispõe
de duas palhetas e um terceiro dente
de ligação à terra. A palheta larga ou
o terceiro dente são fornecidos para
sua segurança. Se a cha fornecida
não encaixar na sua tomada, consulte
um electricista para a substituição da
tomada obsoleta.
10. Proteja o cabo de alimentação de
pisadelas ou apertos, especialmente
nas chas, extensões, e no local de
saída da unidade. Certique-se de
que o cabo eléctrico está protegido.
Verique particularmente nas chas,
nos receptáculos e no ponto em que o
cabo sai doaparelho.
11. O aparelho tem de estar sempre
conectado à rede eléctrica com o
condutor de protecção intacto.
12. Se utilizar uma cha de
rede principal ou uma tomada de
aparelhos para desligar a unidade
de funcionamento, esta deve estar
sempre acessível.
13. Utilize apenas ligações/acessórios
especicados pelofabricante.
14. Utilize apenas
com o carrinho,
estrutura, tripé,
suporte, ou mesa
especicadospelo
fabricanteou
vendidos com o dispositivo.
Quandoutilizar um carrinho, tenha
cuidado ao mover o conjunto carrinho/
dispositivo para evitar danos provocados
pela terpidação.
15. Desligue este dispositivo durante
as trovoadas ou quando não for
utilizado durante longos períodos
detempo.
16. Qualquer tipo de reparação
deve ser sempre efectuado por
pessoal qualicado. É necessária uma
reparação sempre que a unidade tiver
sido de alguma forma danicada,
como por exemplo: no caso do cabo de
alimentação ou cha se encontrarem
danicados; naeventualidade de
líquido ter sido derramado ou objectos
terem caído para dentro do dispositivo;
no caso da unidade ter estado exposta
à chuva ou à humidade; seesta
não funcionar normalmente, ou se
tiver caído.
17. Correcta eliminação
deste produto: este
símbolo indica que o
produto não deve ser
eliminado juntamente
com os resíduos domésticos, segundo a
Directiva REEE (2012/19/EU) e a legislação
nacional. Este produto deverá ser levado
para um centro de recolha licenciado para
a reciclagem de resíduos de
equipamentoseléctricos e electrónicos
(EEE). O tratamento incorrecto deste tipo
de resíduos pode ter um eventual
impacto negativo no ambiente e na
saúde humana devido a substâncias
potencialmente perigosas que estão
geralmente associadas aos EEE. Ao
mesmo tempo, a sua colaboração para a
eliminação correcta deste produto irá
contribuir para a utilização eciente dos
recursos naturais. Paramais informação
acerca dos locais onde poderá deixar o
seu equipamento usadopara reciclagem,
é favor contactar os serviços municipais
locais, a entidade de gestão de resíduos
ou os serviços de recolha de
resíduosdomésticos.
18. Não instale em lugares
connados, tais como estantes ou
unidades similares.
19. Não coloque fontes de
chama, tais como velas acesas,
sobre o aparelho.
20. Favor, obedecer os aspectos
ambientais de descarte de bateria.
Baterias devem ser descartadas em um
ponto de coletas de baterias.
21. Use este aparelho em climas
tropicais e/ou moderados.
O MUSIC Tribe não se responsabiliza
por perda alguma que possa ser
sofrida por qualquer pessoa que
dependa, seja de maneira completa
ou parcial, de qualquer descrição,
fotograa, ou declaração aqui
contidas. Dados técnicos, aparências
e outras informações estão sujeitas
a modicações sem aviso prévio.
Todas as marcas são propriedade
de seus respectivos donos. MIDAS,
KLARK TEKNIK, LAB GRUPPEN,
LAKE, TANNOY, TURBOSOUND,
TC ELECTRONIC, TC HELICON,
BEHRINGER, BUGERA eCOOLAUDIO
são marcas ou marcas registradas
do MUSIC Tribe Global Brands Ltd.
© MUSIC Tribe Global Brands Ltd.
2018 Todos direitos reservados.
Para obter os termos de garantia
aplicáveis e condições e informações
adicionais a respeito da garantia
limitada do MUSIC Tribe, favor vericar
detalhes na íntegra através do website
musictri.be/warranty.
LEGAL RENUNCIANTE
GARANTIA LIMITADA
1. Introduction
The DN32-LIVE interface card expands on the already stellar performance of the DN32-USB card that has been standard in M32 consoles
for years. The same 32-channel bi-directional audio I/O via USB 2.0 is available, providing 32 channels for recording and playback,
plus remote operation of your DAW via HUI/MackieControl emulation. The addition of twin SD/SDHC slots now provides fully independent,
uncompressed recording/playback of up to 32-channels in consistent sessions up to the max capacity of the SD cards. Multi-channel
recording without the need for a laptop, as well as virtual sound checks and live backing track support, accurate marker handling and
adjustments, and full remote operation from apps or X-TOUCH control surfaces are only some of the new possibilities DN32-LIVE o e r s .
2. Installing the DN32-LIVE Card
Please make sure the M32 series mixer rmware is updated to the most recent release version. Check the product page on
klarkteknik.com for the latest available rmware.
CAUTION: Before installing the interface card into the console, make sure that the console’s power switch is turned o.
Malfunctions or electrical shock may occur otherwise.
Installation process:
1. Make sure that the mixer’s power is turned o.
2. Remove the outer screws that hold the current card or slot cover in place.
3. Gently slide the card out of the slot and set it somewhere safe along with the fastening screws.
4. Before removing the DN32-LIVE card from its protective bag, touch the metal chassis of the console to prevent electrostatic discharges
from aecting the sensitive electronic components. Hold the card by the face plate or the two small handles, avoiding contact with
the components on the circuit board.
5. Align both edges of the card with the guide rails inside the slot and carefully insert the card into the slot. Push the card fully into the
slot so that it sits ush against the console’s rear panel, ensuring that the contacts are properly connected internally. The screw holes
should be naturally aligned.
6. Fasten the card with the included screws, or with those that originally held the old card in place. Damage or malfunctions may occur if
the card is not fastened.
7. Place the old card into the protective bag that the DN32-LIVE card was packed in, and repackage for safe storage.
3. Recommended Minimum Hardware
Windows
•
• Core 2 Duo CPU, 2 GHz
•
• USB 2.0
•
• 1 GB RAM
Mac
•
• 1.5 GHz CPU
•
• USB 2.0 port
•
• 512 MB RAM
See Specications for recommended operating systems.
8 9Quick Start GuideDN32-LIVE

4. USB Operation
The USB connection on the DN32-LIVE card provides 32 channels of bi-direction audio I/O via USB 2.0, as well as MIDI I/O and remote DAW
control via HUI/MackieControl emulation. Make sure to download and install the free ASIO driver from klarkteknik.com if you are using a
Windows PC. The DN32-LIVE is CoreAudio compliant and therefore does not need a driver for use on Mac computers.
4.1 Driver Control Panels
Once the driver is installed, you can open the control panel by double-clicking on the small tray icon. These screens will allow conguring
the DN32-LIVE card in the M32 as an audio interface for your computer.
Info – displays the driver version number and device IDs.
Buer Settings – allows the stream and ASIO sound buers to be set. Use small buers for short latency when monitoring
through the PC. Use large buers and longer latency for preventing audio glitches on old, low-performance PCs.
Status / USB Audio Device – displays the card name and serial number.
4.2 USB Conguration
After the console has booted up, you can access the Setup screen and navigate to the Card tab to select the USB interface input/output
conguration. Depending on your application, you may want to select an option other than the maximum 32 x 32 channel count to
preserve system resources.
32 in / 32 out – This mode allows the full potential of the interface to be tapped. Note that the computer needs to be able to handle that
amount of concurrent I/O stream without any glitches. Depending on its speed and memory conguration, some optimization for audio
recording might be required.
It is also possible to run a virtual sound check of all 32 input channels by recording them directly to a computer during a brief line check.
The performers can leave the stage while you play back the recorded instruments from the hard drive and tweak the sound accordingly.
10 11Quick Start GuideDN32-LIVE

16 in / 16 out – If you don’t actually need more than 16 concurrent input and output tracks to be exchanged between the console
and your PC, then this mode might be more appropriate for you. First, it will slow the required bandwidth on the interface down.
Second, there will be no excessive I/O tracks in your DAW conguration that might clutter your setup. Third, it allows you to run a
fully-featured zero-latency overdub setup, which would be impossible if signals were run through the computer. In this case, the 16 input
signals are put on channels 1-16, while the tape (card) returns are put on channels 17-32. The monitoring is directly fed from Ch1-16 as
usual, including all processing and eects. It remains independent from any computer audio latency, even though you can hear back all
the recorded tracks without any re-patching.
32 in / 8 out – This mode is tailored to suit a typical studio and overdub recording situation, with many input channels but only a few
output channels for monitoring of previously recorded takes.
8 in / 32 out – This is a useful mode for utilizing the excellent audio engine and eects processing of the console during nal mixdown
of your project. All 32 tracks would be fed from your DAW into the console where all the magic happens. Then only 2-8 tracks of the
complete mixdown would be sent back to the DAW.
8 in / 8 out – This setting is light on processing power while still providing enough I/O for tracking drums or multiple mics on an acoustic
guitar or piano.
2 in / 2 out – For recording just the main stereo mix, or playing back from typical media player applications where often only two
channels are needed. Use this mode in order to remove all unused channels that would otherwise clutter your PCs audio applications.
Note that the Routing / Home and Card Out tabs allow audio from your computer to be sent to the desired destination. The Routing/home
tab now oers to select two alternative input assignments, separately for Recording and Playback operation. See chapter 5.3 for details.
5. SD Card Operation
The DN32-LIVE card features a pair of SD/SDHC slots that provide 32 channels of multitrack recording and playback. Simple session
management and up to 100 markers allow playback from any desired point, easily cueing up certain songs or backing tracks.
Automatic or manual switching from recording to playback routing presets makes it easy to monitor input channels directly while
recording, and then listen to the playback from the card returns. The SD cards operate independently from the USB connection,
giving you many options for how you incorporate outboard plugins, multichannel input and live recording.
5.1 Overview
Most of the conguration and operation for the SD card slots and USB connection are handled on the Setup/Card page of the console.
From this page, the SD slot or USB can be selected for playback, SD slot 1 or 2 can be selected for recording or marker editing, and the
channel count can be specied for recording.
A properly installed and formatted card will appear near the top with a green square, with its le size and remaining
recording time indicated. SD cards up to 2 GB and SDHC cards up to 32 GB are ocially supported, for use with FAT32 formatting.
It is best practice before important recordings to press the console’s Utility button and format the card. Formatting will delete all data to
remove fragmentation and to ensure proper write performance.
A list of recorded sessions and markers for the currently-selected session are listed below the recorder graphics. Transport functions are
controlled with the rst 3 encoders. Markers can be added to a session during recording or playback to indicate the start of a song or set.
Press the page down to the 2nd layer of controls to make changes to the conguration.
12 13Quick Start GuideDN32-LIVE

The ‘Channel Routing’ section is explained in chapter 5.3.
The SD operation can also be controlled by any of the remote apps, as well as MIDI and the onboard assignable controls.
In the M32-Edit software, most of the conguration settings are made on the Setup/Card page, while the recording functions and marker
management are done in the Recorder window.
5.2 Recording and File Management
Audio recording on the DN32-LIVE card can accommodate either 8, 16, or 32-channel sessions of 44.1/48 kHz / 32-bit PCM WAV les. As
soon as recording is initiated to one of the SD cards, a new session is automatically created, allowing the entire take to be organized
cohesively. To ensure continuous recording of the entire performance, a recording session that has started on one card can seamlessly
span over to the other card slot when the rst becomes full. In this case, the same session name will appear on both cards.
Since a single session may include a full set of songs, markers can be placed during recording or while listening to playback. They can
also be adjusted using the remote apps by using the ‘Edit Marker’ section. This makes it easy to organize the set and quickly jump to a
particular section of the recording for playback.
5.3 Channel Routing
The M32 has a convenient routing preset that allows the input channels to quickly ip between the desired monitoring for the recording
process, and the playback from the DN32-LIVE card once recording is nished. While Playback would typically be used to assign the card
outputs to the mixer inputs, Recording would patch those signals to channel inputs that shall be on mix, i.e. not necessarily the ones
being recorded on DN32-LIVE.
On the Routing/Home page, select ‘Record’ with the 6th encoder and adjust the input routing using encoders 1-5 (most likely Local or
AES50 from a stagebox). Then turn the 6th encoder to select ‘Play’ and press the encoder. Now Card 1-8, 9-16, etc. can be selected using
encoders 1-5 for the playback preset.
On the Setup/Card page, you can now use the ‘Channel Routing’ section to quickly ip between these 2 routing scenarios. Keep in mind
that the Record/Play presets can be toggled using an assignable control button, scene/snippet automation, or even MIDI command.
A third option on the Setup/Card page, ‘Automatic’, allows the shift from input monitoring to playback monitoring to follow the current
operation. When Stop or Record is pressed in the transport control, the ‘Record’ routing will be assigned, and when Play or Pause is active,
the ‘Play’ preset will be used.
5.4 Separating WAV Files
After recording is complete, the session can be separated into individual WAV les in several ways:
•
• Play the audio from the SD card directly into a DAW program, e.g. Tracktion, Reaper, ProTools, Cubase, Logic, Ableton
(just to name a few) via the USB connection
•
• Directly open the multi-channel le using Audacity (brilliant open source audio editor available from www.audacityteam.org/)
•
• Using our Python scripts, downloadable from klarkteknik.com
Visit the wiki page at behringerwiki.music-group.com for more information about separating WAV les.
14 15Quick Start GuideDN32-LIVE

6. Battery Option
The DN32-LIVE has a battery slot that can accommodate a CR123A Lithium cell battery. This provides protection in case of power blackout,
ensuring secure le handling.
To attach the battery, rst turn the console power o and remove the DN32-LIVE card from the expansion slot. Locate the battery slot and
install the battery, making sure to orient the positive end toward the “+” mark on the slot.
Reinstall the DN32-LIVE card as described in chapter 2.
7. Firmware Update
Download the latest rmware package le from the DN32-LIVE product page on klarkteknik.com. Unpack the zip folder and load the
rmware le onto the ash drive’s root directory. Plug the ash drive into the M32’s top panel USB port.
Press and hold the USB View button while powering on the console. The console will automatically begin updating the rmware, which
can take several minutes to complete. When nished, power the console o and on again and resume normal operation.
NOTE: make sure the update les for card rmware and console rmware are not used in the USB root directory at the same time. Do one
update after the other, making sure to remove the rmware le from the ash drive after successful installation. You may, however, copy
the console rmware le into any subfolder on the USB drive and start the update from Setup/Global console UI.
Connectors
USB 2.0 high speed, type-B (audio/MIDI interface) 1
SD card slots, SD/SDHC 2
Battery for power blackout protection (optional) CR123A Lithium cell
Input/Output Characteristics
USB Audio input / output channels, duplex 32, 16, 8, 2
SD card input / output channels 32, 16, 8
Sample rates (console clock) 44.1 kHz / 48 kHz
Sample word length 32 bit PCM
File format (uncompressed multi-channel) WAV 8, 16 or 32 channels
SD/SDHC Card capacity, each slot 1 to 32 GB
Maximum recording time in one consistent session
(32-channel, 44.1 kHz, 32-bit on two 32 GB SDHC media) 200 min
Typical performance recording or playback 32 channels on class 10 media,
8 or 16 channels on class 6 media
Indicators
SD card socket indicator for card activity 2 LEDs, amber
USB 2.0 interface active 1 LED, red
Recommended Operating Systems
Windows DAW applications
(ASIO, WASAPI and WDM audio device interface) Win 7 32/64-bit, Win10 32/64-bit
Mac OSX DAW applications
(Intel CPU only, no PPC support, CoreAudio) Mac OSX 10.6.8*, 10.7.5, 10.8, 10.9, 10.10, 10.11, 10.12
Physical
Dimensions (H x W x D) 30 x 165 x 138 mm (1.2 x 6.5 x 5.4")
Weight 0.14 kg (0.3 lbs)
*OSX 10.6.8 Core Audio supports up to 16x16 channel audio
Specications
16 17Quick Start GuideDN32-LIVE

18 19Quick Start GuideDN32-LIVE

Table of contents
Languages:
Popular Accessories manuals by other brands

Thermo Scientific
Thermo Scientific IMH 60 operating instructions

LEGRAND
LEGRAND PW-100-347 installation instructions

Monacor
Monacor DC-160 Mounting instructions

Masimo
Masimo rainbow R1 Series Operator's manual

LLOYTRON
LLOYTRON A1210WH operating instructions

TREW
TREW 1500 Series Installation & maintenance manual