Klarstein 10030684 User manual

10030684
Induktionskochfeld

2
Sehr geehrter Kunde,
wir gratulieren Ihnen zum Erwerb Ihres Gerätes. Lesen Sie die folgenden Hinweise sorgfältig durch und befol-
gen Sie diese, um möglichen Schäden vorzubeugen. Für Schäden, die durch Missachtung der Hinweise und
unsachgemäßen Gebrauch entstehen, übernehmen wir keine Haftung.
Inhaltsverzeichnis
Technische Daten 2
Sicherheitshinweise 2
Geräteübersicht und Bedienfeld 3
Inbetriebnahme und Bedienung 4
Reinigung und Pflege 5
Fehlersuche und Fehlerbehebung 6
Hinweise zur Entsorgung 7
Konformitätserklärung 7
Technische Daten
Artikelnummer 10030684
Stromversorgung 220-240 V ~ 50-60 Hz
Leistung (große Kochplatte + kleine Kochplatte) 3400 W (2000 W + 1400 W)
Sicherheitshinweise
• Stellen Sie das Gerät nicht in die Nähe von Wärmequellen oder gasbetriebenen Geräten.
• Schließen Sie das Gerät nicht an Steckdosen an, an denen bereits andere Elektrogeräte angeschlossen sind.
• Stellen Sie das Gerät auf einen ebenen Untergrund und lassen Sie um das Gerät herum 10 cm Platz zu
anderen Geräten oder Wänden.
• Tauschen Sie das Gerät, den Stecker und das Netzkabel niemals in Wasser oder andere Flüssigkeiten.
• Decken Sie das Gerät während der Benutzung nicht ab.
• Um gefahren vorzubeugen, nehmen Sie den Deckel an wenn Sie Dosennahrung erwärmen.
• Falls das Gerät nach der Selbstdiagnose immer noch nicht funktioniert, kontaktieren Sie den Kundendienst.
• Falls das Netzkabel oder der Stecker beschädigt sind, müssen sie vom Hersteller, einem autorisierten Fach-
betrieb oder einer ähnlich qualifizierten Person ersetzt werden.
• Legen Sie kein Metall auf die Kochplatte und achten Sie darauf, dass sich in einem Radius von 10 cm um das
Gerät kein Metall befindet.
• Schalten Sie die Kochplatte nicht ein, wenn sich kein Topf oder keine Pfanne darauf befindet.
• Reinigen Sie das Gerät regelmäßig, damit sich die Lüftung nicht zusetzt.
• Fassen Sie während des Betriebs nicht auf die Kochplatte, damit Sie sich nicht verbrennen.
• Kinder dürfen das Gerät nicht bedienen.
• Wenn Sie einen Herzschrittmacher besitzen, lassen Sie sich von Ihrem Hausarzt bestätigen, dass Sie das
Gerät gefahrlos benutzen können.

3
• Stellen Sie das Gerät nicht auf einen Gasofen oder eine Metallplatte.
• Stellen Sie das Gerät nicht auf einen Teppich oder eine Tischdecke.
• Berühren Sie die Oberfläche nicht mit scharfkantigen Küchenutensilien
Hinweise zur Bedienung
• Versichern Sie sich dass ihr Herzschrittmacher oder Ihre Insulinpumpe vom Induktionskochfeld nicht nega-
tiv beeinflusst wird.
• Falls das Netzkabel oder der Stecker beschädigt sind, müssen sie vom Hersteller, einem autorisierten Fach-
betrieb oder einer ähnlich qualifizierten Person ersetzt werden.
• Aufsichtsperson ausführlich mit den Funktionen und den Sicherheitsvorkehrungen vertraut gemacht wur-
den. Halten Sie Kinder vom Gerät fern.
• Kinder dürfen das Gerät nur unter Aufsicht putzen.
• Falls die Oberfläche gebrochen ist, schalten Sie das Gerät umgehend aus.
• Legen Sie keine Metallgegenstände, wie Messer, auf die Kochplatte, da diese sehr heiß werden.
• Die Temperatur der zugänglich Oberflächen kann während des Betriebs sehr hoch sein.
• Schließen Sie das Gerät nicht an eine externe Zeitschaltuhr oder eine ferngesteuerte Steckdose an.
Geräteübersicht und Bedienfeld
1 Luftauslass
2 Netzkabel
3 Bedienfeld
4 Keramikoberfläche
5 [+/-] Tasten
6 Betriebsanzeige
7 Temperaturanzeige
8 Timeranzeige
9 Ein/Aus-Taste
10 Auswahl-Taste
11 Display
12 Kindersicherung
13 Min-Taste
14 Max-Taste

4
Inbetriebnahme und Bedienung
Nachdem Sie das Gerät eingesteckt haben ertönt ein Piepton und alle Anzeigen blinken einmal, um zu sig-
nalisieren, dass das Gerät mit dem Stromnetz verbunden ist. HINWEIS: Stellen Sie keine Gegenstände auf
die Sensoroberflächen und achten Sie darauf, dass die Oberflächen immer sauber sind. Sobald Sie mit dem
Kochen fertig sind, drücken Sie auf die Ein/Aus-Taste, um in den Standby-Modus zu wechseln.
Kochmodus
Drücken Sie auf die Ein/Aus-Taste. Die Betriebsanzeige blinkt geht an und blinkt, das Gerät befindet sich im
Standby-Modus. Drücken Sie erneut auf die Ein/Aus-Taste, um das Gerät wieder auszuschalten.
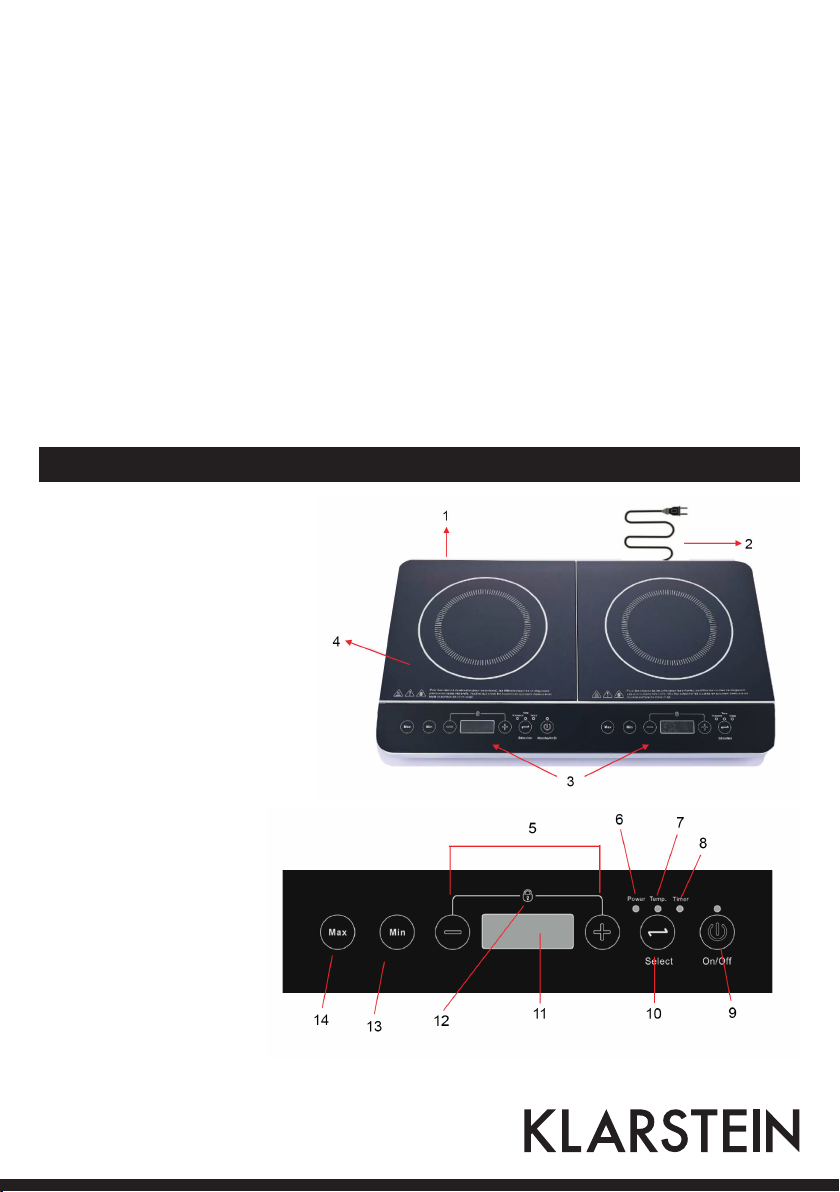
Linke Kochplatte 2000 W
• Drücken Sie im Standby-Modus einmal auf die SELECT-Taste, um das Gerät einzuschalten. Ein Piepton ertönt
und die Betriebsanzeige geht an. Das Display zeigt [1200] an, die voreingestellte Leistung von 1200 W. Be-
nutzen Sie die [+/-] Tasten, um die Leistung anzupassen. Es gibt 10 Leistungsstufen: 200 W, 400 W, 600 W,
800 W, 1000 W, 1200 W, 1400 W, 1600 W, 1800 W, 2000 W.
• Drücken Sie dreimal auf die SELECT-Taste, um die Temperatur einzustellen. Das Display zeigt [180] an, die
voreingestellte Temperatur von 180 °C. Benutzen Sie die [+/-] Tasten, um die Temperatur anzupassen. Es gibt
10 Temperaturstufen: 60 °C, 80 °C, 100 °C, 120 °C, 140 °C, 160 °C, 180 °C, 200 °C, 220 °C, 240 °C.
• Drücken Sie auf die MAX-Taste, das Display zeigt [2000] an, und signalisiert damit, dass die maximale Leistung
von 2000 W eingestellt ist. Drücken Sie auf die MIN-Taste, das Display zeigt [200] an, und signalisiert damit,
dass die minimale Leistung von 200 W eingestellt ist. Die Leistung kann im [Max] oder [Min] Modus mit den
Tasten [+] und [-] eingestellt werden.
Rechte Kochplatte 1400 W
• Drücken Sie im Standby-Modus einmal auf die SELECT-Taste, um das Gerät einzuschalten. Ein Piepton ertönt
und die Betriebsanzeige geht an. Das Display zeigt [1000] an, die voreingestellte Leistung von 1000 W. Be-
nutzen Sie die [+/-] Tasten, um die Leistung anzupassen. Es gibt 10 Leistungsstufen: 200 W, 400 W, 600 W,
800 W, 900 W, 1000 W, 1100 W, 1200 W, 1300 W, 1400 W.
• Drücken Sie dreimal auf die SELECT-Taste, um die Temperatur einzustellen. Das Display zeigt [180] an, die
voreingestellte Temperatur von 180 °C. Benutzen Sie die [+/-] Tasten, um die Temperatur anzupassen. Es gibt
10 Temperaturstufen: 60 °C, 80 °C, 100 °C, 120 °C, 140 °C, 160 °C, 180 °C, 200 °C, 220 °C, 240 °C.
• Drücken Sie auf die MAX-Taste, das Display zeigt [1400] an, und signalisiert damit, dass die maximale Leistung
von 1400 W eingestellt ist. Drücken Sie auf die MIN-Taste, das Display zeigt [200] an, und signalisiert damit, dass
die minimale Leistung von 200 W eingestellt ist. Die Leistung kann im [Max] oder [Min] Modus mit den Tasten
[+] und [-] eingestellt werden.
Timer-Funktionen
Wenn ein bestimmter Koch-Modus aus ausgewählt wurde können Sie den Timer einstellen. Drücken Sie so-
lange auf die SELECT-Taste, bis die Timeranzeige aufleuchtet. Das Display zeigt [0] an. Drücken Sie auf die
[+/-] Taste, um den Timer zu stellen. Mit der [+] Taste stellen Sie die Minuten, mit der [-] Taste die Stunden ein.
Halten Sie die Tasten 3 Sekunden lang gedrückt, um die Zeit schneller einzustellen. Die Zeit kann von 0-180
Minuten eingestellt werden. Nachdem Sie die zeit eingestellt haben, drücken Sie einmal auf die TIMER-Taste,
um die Eingabe zu bestätigen und warten Sie bis das Display aufhört zu blinken. Nachdem die Zeit abgelaufen
ist ertönt ein Piepeton und das Gerät wechselt automatisch in den Standby-Modus.

5
Kindersicherung
Drücken Sie gleichzeitig auf die [+] und [-] Taste, um die Kindersicherung einzuschalten. Ein Piepton ertönt und
alle Tasten werden gesperrt. Um die Kindersicherung zu deaktivieren, halten Sie die [+] und [-] Taste gleich-
zeitig 3 Sekunden lang gedrückt und drücken Sie dann auf die Ein/Aus-Taste, um das Gerät herunterzufahren.
Geeignetes Kochgeschirr
• Verwenden Sie nur Töpfe und Pfannen aus den folgenden Materialien: Stahl, Gusseisen, Emailliertes Eisen,
Edelstahl, Pfannen und Töpfe mit einem flachen Boden und einem Durchmesser zwischen 12 cm und 26
cm.
• Verwenden Sie keine anderen Töpfe, wie beispielsweise Druckkochtöpfe oder folgende:
Edelstahlkessel Eisenpfanne mit
Druckventil
Magnetische
Edelstahlpfanne
Magnetischer
Edelstahltopf
Eiserner
Schmortopf
Bitte beachten Sie auch die folgenden Hinweise:
• Pfannen und Töpfe sollten für Induktionsherde geeignet sein.
• Probieren Sie Pfannen und Töpfe nach dem Kauf aus, um festzustellen ob irgendwelche ungewöhnlichen
Phänomene auftreten.
• Die gekauften Pfannen und Töpfe sollten einen flachen Boden haben und über einen Deckel mit Luftauslass
verfügen.
Reinigung und Pflege
• Ziehen Sie den Stecker aus der Steckdose, bevor Sie das Gerät reinigen.
• Verwenden Sie zur Reinigung der Glasoberfläche und des Bedienfelds einen weichen Lappen. Sollte das
Kochfeld sehr schmutzig sein, verwenden Sie einen feuchten Lappen und etwas Spülmittel.
• Reinigen Sie den Luftauslass regelmäßig mit einer Bürste oder einem Wattestäbchen.
• Tauchen Sie das Gerät niemals zur Reinigung in Wasser.
• Achten Sie darauf, dass der Stecker immer fest eingesteckt ist, bevor Sie das Gerät benutzen.
• Ziehen Sie während des Betriebs nicht den Stecker aus der Steckdose. Drücken Sie zuerst auf die Ein/Aus-
Taste und ziehen Sie dann den Stecker.
• Sollte der Ventilator nach dem Ausschalten noch nachlaufen, warten Sie bis er angehalten hat, bevor Sie
den Stecker aus der Steckdose ziehen.
• Ziehen Sie den Stecker und verstauen Sie das Gerät wenn Sie es länger nicht benutzen.

6
Fehlersuche und Fehlerbehebung
Fehler Mögliche Ursache Lösung
Nachdem Sie den Stecker
eingesteckt haben und die
Ein-Taste gedrückt haben
geht das Gerät nicht an.
Der Strom schwankt. Versichern Sie sich, dass die richtige
Spannung anliegt.
Die Sicherung ist kaputt. Wenn sich das Problem nicht
lösen lässt, kontaktieren Sie den
Kundendienst.
Der Stecker ist nicht richtig
eingesteckt.
im normalen Betrieb wird
das Heizen unterbrochen
und ein Piepton ertönt.
Inkompatibles Kochgeschirr oder kein
Kochgeschirr auf der Kochplatte.
Verwenden Sie nur Kochgeschirr, das
für Induktionsherde geeignet ist.
Das Kochgeschirr wurde nicht in
mittig auf dem Kochfeld platziert.
Platzieren Sie das Kochgeschirr mittig
auf dem Kochfeld.
Das Kochgeschirr ist heiß, wurde aber
mehrmals vom Herd genommen.
Platzieren Sie das Kochgeschirr mittig
auf dem Kochfeld.
Es passiert nichts, obwohl
das Gerät eingeschaltet ist.
Das Kochgeschirr ist leer oder die
Temperatur zu hoch.
Verwenden Sie die richtigen
Einstellungen.
Das Lufteinlass/Luftauslass-Ventil ist
verstopft.
Reinigen Sie die ventile. Lassen Sie
das Gerät abkühlen und starten Sie
es erneut.
Das Gerät läuft seit 2 Stunden,
es wurde aber keine Eingabe
vorgenommen.
Stellen Sie einen Kochmodus oder
den Timer ein.
Fehlercodes
E0 Internes Problem mit dem
Stromkreis Wenn die Fehlercodes E1, E2 und E7
angezeigt werden, überprüfen Sie ob
das Kochgeschirr für Induktionsherde
geeignet ist. Lassen Sie das Gerät
abkühlen und starten Sie es dann
erneut. Wenn die Fehlercodes E0
oder E3-E6 angezeigt werden,
kontaktieren Sie einen Fachbetrieb
und lassen Sie das Gerät überprüfen.
E1 Inkompatibles Kochgeschirr oder kein
Kochgeschirr auf der Kochplatte.
E2 Da Gerät ist überhitzt
E3 Die Stromspannung ist zu hoch.
E4 Die Stromspannung ist zu niedrig.
E5 Kurzschluss
E6 Kurzschluss
E7 Die Platte sind überhitzt.

7
Hinweise zur Entsorgung
Befindet sich die linke Abbildung (durchgestrichene Mülltonne auf Rädern) auf dem Pro-
dukt, gilt die Europäische Richtlinie 2002/96/EG. Diese Produkte dürfen nicht mit dem
normalen Hausmüll entsorgt werden. Informieren Sie sich über die örtlichen Regelungen
zur getrennten Sammlung elektrischer und elektronischer Gerätschaften. Richten Sie sich
nach den örtlichen Regelungen und entsorgen Sie Altgeräte nicht über den Hausmüll.
Durch die regelkonforme Entsorgung der Altgeräte werden Umwelt und die Gesundheit
ihrer Mitmenschen vor möglichen negativen Konsequenzen geschützt. Materialrecycling
hilft, den Verbrauch von Rohstoffen zu verringern.
Konformitätserklärung
Hersteller: Chal-Tec GmbH, Wallstraße 16, 10179 Berlin, Deutschland.
Dieses Produkt entspricht den folgenden Europäischen Richtlinien:
2014/30/EU (EMV)
2014/35/EU (LVD)
2011/65/EU (RoHS)

8
Dear Customer,
Congratulations on purchasing this equipment. Please read this manual carefully and take care of the following
hints to avoid damages. Any failure caused by ignoring the mentioned items and cautions mentioned in the
instruction manual are not covered by our warranty and any liability.
Contents
Technical Data 8
Safety Instructions 8
Product Description 9
Use and Operation 10
Cleaning and Care 11
Troubleshooting 12
Hints on Disposal 13
Declaration of Conformity 13
Technical Data
Item number 10030684
Power supply 220-240 V ~ 50-60 Hz
Power consumtion (big zone + small zone) 3400 W (2000 W + 1400 W)
Safety Instructions
• Do not place the unit in any place that is near gas or hot environment in order to avoid damages or mal-
function. To reduce the risk and damage, this plug should be fit into an individual outlet. The rated electrical
current is not less than 16 A.
• Place the unit on a level surface, the distance between it and its background surrounding must be not less
than 10cm
• Do not immerse the appliance and electric cord in water liquid, or allow liquid to go into the cabinet.
• Do not cover gas vent with anything during cooking, otherwise it will cause danger.
• To avoid danger, please uncap the cover before heating tinned food.
• If it is still not working after the inspection by self, please immediately contact with our service points, do not
apart the unit to avoid any danger.
• Be sure to use the power cord recommended by the appliance manufacturer after it is damaged.
• Do not place any metal on the plate, also the nonmetal pad within 10 cm.
• Do not cook with an empty pot, it will cause malfunction or danger.
• Always clean the unit to avoid any dirt goes into the fan to affect normal working.
• Do not touch the plate while the unit is working, to avoid getting burned.
• Do not let children operating alone to avoid getting burned or danger.
• Who with cardiac pacemaker, please operating the unit after confirm with doctor there‘s no any affect.
• Do not operate the unit on the gas stove or metal surface to avoid any danger.
• Please do not place paper, cloth or other articles under the bottom of the pan to get heated, to avoid the
danger of fire. Do not place the unit on the cloth, carpet to avoid blocking the gas vent.

9
• Please kindly avoid hitting the plate of the unit, in case of getting cracked, should turn off the unit and plug
out immediately, and then contact with service points of our company.
• Do not touch the control panel with any sharp implements.
Hints on Use
• Persons with cardiac pacemakers or implanted insulin pumps must make sure that their implants are not
affected by the induction hob.
• If the supply cord is damaged, it must be replaced by the manufacturer, its service agent or similarly qualified
persons in order to avoid a hazard.
• This appliance can be used by children aged from 8 years and above and persons with reduced physical,
sensory or mental capabilities or lack of experience and knowledge if they have been given supervision or
instruction concerning use of the appliance in a safe wayand understands the hazards involved. Children
shall not play with the appliance. Keep the appliance and its cord out of reach of children less than 8 years.
If surface is cracked, switch off appliance to avoid the possibility of electric shock. Metallic objects such as
knives, forks, spoons and lids should not be placed on the hotplate since they can get hot.
• Appliance is not intended to be operated by means of an external timer or separate remote-control system.
Product Description and Control Panel
1 Exhaust Vent
2 Power cord
3 Control Panel
4 Ceramic Plate
5 [+/-] keys
6 Power indicator
7 Temp indicator
8 Timer indicator
9 On/Off key
10 Selection key
11 Display
12 Child Lock Setting
13 Min key
14 Max key

10
Use and Operation
After inserting the plug into the socket, a “Beep” will emit and all the indicators flash one time, indicating the
appliance in connection with a power source. Place a suitable cookware on the center of the cooking zone.
(Note: Do not place any objects on the sensor surface. Make sure the sensor area is always clean.) Stop the
operation and switch to standby mode by pressing [On/Off] key after cooking.
Cooking Mode
Press [On/Off] key to switch on the cooking hob. The indicator of [On/Off] lights up and the indicator of [Po-
wer] starts to flash, known as standby mode. User can press [On/Off] key to switch off the appliance.
Left cooking zone 2000W
• Press [Selection] key once in the condition of standby mode, the cooking hob will be activated. A ‘Beep”
will emit and the indicator of [Power] lights up. the display will show [1200] indicating the default power is
1200W. It can be adjusted by pressing the [+] or [–] key to set the desired power level. There are 10 power
levels in total (200W, 400W, 600W, 800W, 1000W, 1200W, 1400W, 1600W, 1800W, 2000W).
• In order to specify the cooking temperature, press the [Selection] key the 3rd time and display will show
[180], representing that the default temperature is 180°C. It can be adjusted by pressing the [+] or [–] key
to set the desired temperature level. There are 10 temperature levels in total (60°C, 80°C, 100°C, 120°C,
140°C, 160°C, 180°C, 200°C, 220°C, 240°C).
• Press [Max] key, the display will show [2000] indicating the unit is working at max. power is 2000W. Press
[Min] key, the display will show [200] indicating the unit is working at min. power is 200W. The power still
can be adjusted through [+] or [-] key unter [Max] or [Min] mode.
Right cooking zone 1400W
• Press [Selection] key once in the condition of standby mode, the cooking hob will be activated. A ‘Beep”
will emit and the indicator of [Power] lights up. the display will show [1000] indicating the default power is
1000W. It can be adjusted by pressing the [+] or [–] key to set the desired power level. There are 10 power
levels in total (200W, 400W, 600W, 800W, 900W, 1000W, 1100W, 1200W, 1300W, 1400W).
• In order to specify the cooking temperature, press the [Selection] key the 3rd time and display will show
[180], representing that the default temperature is 180°C. It can be adjusted by pressing the [+] or [–] key
to set the desired temperature level. There are 10 temperature levels in total (60°C, 80°C, 100°C, 120°C,
140°C, 160°C, 180°C, 200°C, 220°C, 240°C).
• Press [Max] key, the display will show [1400] indicating the unit is working at max power is 1400W. Press
[Min] key, the display will show [200] indicating the unit is working at min power is 200W. The power still
can be adjusted through [+] or [-] key unter [Max] or [Min] mode.
Timer Function
User can set the cooking time when specific cooking mode is selected. Press the [Selection] key until the [Ti-
mer] indicator on the left of the key will light up. Display will show [0], user can press [+] or [–] key to set for
the desired time; [+] key to set the minute and [–] to set the hour (press and hold for 3 seconds to access quick
adjustment), the time can be adjusted from 0 minute to 180 minutes. After setting, user can press [Timer]
key once to confirm or wait until the display stop flashing. After the “Beep” signal, the appliance will stop the
operation and change to standby mode automatically when the end of the countdown.

11
Child Lock Function:
To activate the child lock, user can press the [+] and [-] at the same time, a “Beep” will emit. This will lock the
appliance and no operation can be allowed. To deactivate the lock, user can hold both [+] and [-] key for 3
seconds or press [On/Off] to shut down the appliance.
Selection of Cookware
• Material required: Steel, cast iron, enameled iron, stainless steel, flat-bottom pans/pots with bottom dia-
meter from 12cm to 26cm.
• Do not try to use other pot instead (especially pressure sensors vessels.) or such as:
Stainless
steel pot
Iron blast pan Magnetic stainless
steel pan
Magnetic stainless
iron pan
Iron board
pan
Please kindly according to the below requirement:
• Pan/pot must be suitable for induction cooker.
• Pan/pot should be tried out if it‘s bought by self to see if there are unusual phenomena.
• Pan/pot bought by self should be flat and come with the cover with gas vent
Cleaning and Care
• Remove the power plug prior to clean the unit. Do not clean it until the surface cools down.
• Glass plate, panel and the shell: Soft cloth for slight stain. For greasy, dirt, blot by using a clean damp cloth
with neutral detergent.
• While the radiator-fan working, dust and dirt would remain on the gas vent, please clean it by brush or
cotton stick regularly.
• Remember do not washing the unit by water directly to avoid damaging.
• To protect induction cooker, be sure to have a good contact between plug and socket before using.
• Do not pull out the power cord directly during operation. To extend the appliance‘s using life, press the „ON/
OFF“ button first, then pull out the power cord.
• In order to make operating time longer, the fan would still working for cooling the plate, is better to plug out
after the fan stops working.
• Please pull out the power cord and put it away when not used for a long time.
• Some models have structural design to against cockroaches, if needed, can put something like mothball to
expel the cockroaches.

12
Troubleshooting
Problem Possible Cause Solution
After connecting the power
and pressing the “power”
key, the appliance has no
response.
Is the electricity in suspension? Use after resuming the electricity.
Is the fuse broken down? Check the root causes carefully. If
the problem cannot be fixed, please
contact Service Centre for checking
and repairing.
Der Stecker ist nicht richtig
eingesteckt.
Heating being interrupted
in normal use and a “Beep”
will be heard.
Incompatible cookware or no
cookware is used?
Replace compatible cookware for the
induction cooker.
Is the cookware not considerably
placed form the center of the heating
zone?
Place the cookware at the center of
the defined heating zone.
Is the cookware being heated but
continually being removed?
Place a cookware inside the heating
zone.
No operation during the
heating being in use.
Is the cookware empty or the
temperature too high?
Please check whether the appliance
is being misused.
Is the air intake/exhaust vent clogged
or dirt has accumulated?
Remove the stuff clogging the air
intake/exhaust vent. Operate the
appliance again after cooling down.
Is the cooker working over 2 hours
without any external instruction?
Reset cooking modes or use timer
function.
Errot Codes
E0 Internal circuit error
When showing error signal E1, E2
and E7, please check whether the
cookware is not suitable, or switch on
the appliance again after it is cooled
down naturally. When showing E0,
E3-E6, please contact service Centre
for checking and repairing.
E1 Without cookware or Incompatible
cookware used
E2 Internal overheat
E3 Over-voltage
E4 Under-Voltage
E5 Top plate sensor open/short circuit
E6 IGBT sensor open circuit/short circuit
E7 Top plate overheat

13
Hints on Disposal
According to the European waste regulation 2002/96/EG this symbol on the product
or on its packaging indicates that this product may not be treated as household waste.
Instead it should be taken to the appropriate collection point for the recycling of electrical
and electronic equipment. By ensuring this product is disposed of correctly, you will help
prevent potential negative consequences for the environment and human health, which
could otherwise be caused by inappropriate waste handling of this product. For more de-
tailled information about recycling of this product, please contact your local council or your
household waste disposial service.
Declaration of Conformity
Producer: Chal-Tec GmbH, Wallstraße 16, 10179 Berlin, Germany.
This product is conform to the following European Directives:
2014/30/EU (EMC)
2014/35/EU (LVD)
2011/65/EU (RoHS)

14
Estimado cliente,
Le felicitamos por la adquisición de este producto. Lea atentamente el siguiente manual y siga cuidadosamen-
te las instrucciones de uso con el fin de evitar posibles daños. La empresa no se responsabiliza de los daños
ocasionados por un uso indebido del producto o por haber desatendido las indicaciones de seguridad.
Índice
Datos técnicos 14
Indicaciones de seguridad 14
Descripción del aparato y panel de control 15
Puesta en marcha y uso 16
Limpieza y cuidado 19
Detección y resolución de problemas 20
Indicaciones para la retirada del aparato 21
Declaración de conformidad 21
Datos técnicos
Número de artículo 10030684
Suministro eléctrico 220-240 V ~ 50-60 Hz
Potencia (zona de cocción grande + zona de cocción pequeña) 3400 W (2000 W + 1400 W)
Indicaciones de seguridad
• No coloque el aparato cerca de fuentes de calor ni de aparatos que funcionen con gas.
• No conecte el aparato a tomas de corriente en la que ya se encuentren conectados otros dispositivos elé-
ctricos.
• Deje al menos 10 cm de distancia alrededor del aparato con respecto de otros aparatos o paredes y coló-
quelo sobre una superficie plana.
• No sumerja el aparato, el cable de alimentación ni el enchufe en agua ni en ningún otro líquido.
• No cubra el aparato durante su utilización.
• Para evitar riesgos, retire la tapa cuando caliente alimentos enlatados.
• Si el aparato sigue sin funcionar después de un autodiagnóstico, contacte con el servicio de atención al
cliente.
• Si el cable de alimentación o el enchufe están dañados, deberán ser sustituidos por el fabricante, un servicio
técnico autorizado o una persona igualmente cualificada.
• No coloque metal sobre la zona de cocción y asegúrese de que no existe ningún aparato metálico en un
radio de 10 cm.
• No encienda la zona de cocción si no hay ninguna olla ni sartén sobre la misma.
• Limpie el aparato regularmente para que la ventilación no se vea obstruida.
• No toque las zonas de cocción durante su funcionamiento para evitar quemaduras.
• Los niños no podrán utilizar el aparato.
• Si le han implantado un marcapasos, consulte con su médico si puede utilizar este aparato sin ningún riesgo.

15
• No coloque hornos de gas ni placas metálicas sobre el aparato.
• No coloque el aparato sobre una alfombra o mantel.
• No toque la superficie con utensilios de cocina afilados.
Indicaciones de utilización
• Asegúrese de que su marcapasos o bomba de insulina no se ven afectados negativamente por la placa de inducción.
• Si el cable de alimentación o el enchufe están dañados, deberán ser sustituidos por el fabricante, un servicio
técnico autorizado o una persona igualmente cualificada.
• La persona responsable debe familiarizarse con las funciones y las advertencias de seguridad. Mantenga a
los niños alejados del aparato.
• Los niños solamente podrán limpiar el aparato si se encuentran bajo supervisión.
• Si la superficie se ha roto, apague inmediatamente el aparato.
• No coloque objetos metálicos, como cuchillos, sobre la superficie de cocción, pues podrían alcanzar tempe-
raturas muy elevadas.
• La temperatura de las superficies accesibles puede alcanzar temperaturas muy elevadas durante el funcionamiento.
• No conecte el aparato a tomas de corriente manejadas por control remoto ni con temporizador.
Descripción del aparato y panel de control
1 Salida de aire
2 Cable de alimentación
3 Panel de control
4 Superficie cerámica
5 Botones [ +/- ]
6 Indicador de funcionamiento
7 Indicador de temperatura
8 Indicador del temporizador
9 Botón on/off
10 Botón de selección
11 Display
12 Seguro para niños
13 Botón mín
14 Botón máx.

16
Puesta en marcha y uso
Cuando haya enchufado el aparato, escuchará un pitido y todos los indicadores parpadearán una vez para
señalizar que el aparato se encuentra conectado a la red eléctrica. ADVERTENCIA: No coloque ningún objeto
sobre las superficies del sensor y asegúrese de que las superficies siempre estén limpias. Cuando haya termina-
do con el proceso de cocción, pulse el botón on/off para cambiar al modo standby.
Modo cocción
Pulse el botón on/off. El indicador de funcionamiento parpadea y se enciende; el aparato entrará en modo
standby. Pulse de nuevo el botón on/off para apagar el aparato.
Zona de cocción izquierda 2000 W
• Pulse el botón SELECT con el aparato en modo standby para encenderlo. Escuchará un pitido y el indicador
de funcionamiento se enciende. El display muestra [1200], la potencia predeterminada de 1200 W. Utilice
los botones [+/-] para ajustar el nivel de potencia como desee. Existen 10 niveles de potencia: 200 W, 400
W, 600 W, 800 W, 1000 W, 1200 W, 1400 W, 1600 W, 1800 W, 2000 W.
• Pulse tres veces el botón SELECT para configurar la temperatura. El display muestra [180], la temperatura
predeterminada de 180 °C. Utilice los botones [+/-] para ajustar la temperatura como desee. Existen 10
niveles de temperatura: 60 °C, 80 °C, 100 °C, 120 °C, 140 °C, 160 °C, 180 °C, 200 °C, 220 °C, 240 °C.
• Pulse el botón MAX, el display muestra [2000] para indicar que se ha seleccionado la potencia máxima
de 2000 W. Pulse el botón MIN, el display muestra [200] para indicar que se ha seleccionado la potencia
mínima de 200 W. Use las teclas [+] y [-] para ajustar la potencia en el modo [Max] o [Min].
Zona de cocción izquierda 1400 W
• Pulse el botón SELECT con el aparato en modo standby para encenderlo. Escuchará un pitido y el indicador
de funcionamiento se enciende. El display muestra [1000], la potencia predeterminada de 1000 W. Utilice
los botones [+/-] para ajustar el nivel de potencia como desee. Existen 10 niveles de potencia: 200 W, 400
W, 600 W, 800 W, 900 W, 1000 W, 1100 W, 1200 W, 1300 W, 1400 W.
• Pulse tres veces el botón SELECT para configurar la temperatura. El display muestra [180], la temperatura
predeterminada de 180 °C. Utilice los botones [+/-] para ajustar la temperatura como desee. Existen 10
niveles de temperatura: 60 °C, 80 °C, 100 °C, 120 °C, 140 °C, 160 °C, 180 °C, 200 °C, 220 °C, 240 °C.
• Pulse el botón MAX, el display muestra [1400] para indicar que se ha seleccionado la potencia máxima
de 1400 W. Pulse el botón MIN, el display muestra [200] para indicar que se ha seleccionado la potencia
mínima de 200 W. Use las teclas [+] y [-] para ajustar la potencia en el modo [Max] o [Min].
Funcionamiento del temporizador
Cuando se selecciona un modo de cocción determinado, puede configurar el temporizador. Pulse el botón
SELECT hasta que se ilumine el indicador del temporizador. El display muestra [0]. Pulse el botón [+/-] para
ajustar el temporizador. Con el botón [+] puede ajustar los minutos, mientras que el botón [-] se utiliza para
ajustar las horas. Mantenga el botón pulsado durante 3 segundos para configurar el tiempo más rápidamente.
El tiempo puede configurarse de 0 a 180 minutos. Cuando haya ajustado el tiempo, pulse una vez el botón TI-
MER para confirmar la información y espere hasta que el display deje de parpadear. Cuando haya transcurrido
el tiempo seleccionado, el aparato emite un pitido y entra automáticamente en modo standby.

17
Bloqueo para niños
Pulse simultáneamente los botones [+] y [-] para activar el bloqueo para niños. Escuchará un pitido y se blo-
quean todos los botones. Para desactivar el bloqueo para niños, mantenga pulsados los botones [+] y [-] du-
rante tres segundos y pulse el botón on/off para reiniciar el aparato.
Batería de cocina adecuada
• Utilice solamente ollas y sartenes de los siguientes materiales: Acero, hierro fundido, acero esmaltado, acero
inoxidable, sartenes y ollas con un fondo plano y un diámetro comprendido entre 12 y 26 cm.
• No utilice ningún otro tipo de olla, como ollas a presión o las siguientes:
Hervidor de acero
inoxidable
Sartén de hierro
con válvula de
presión
Sartén magnética de
acero inoxidable
Olla magnética
de acero
inoxidable
Olla de
cocción lenta
de hierro
Tenga en cuenta las siguientes indicaciones:
• Las ollas y las sartenes deben ser aptas para placas de inducción.
• Pruebe las sartenes y las ollas tras la compra para asegurarse de que no se produce ningún fenómeno fuera
de lo normal.
• Las ollas y sartenes adquiridas deben tener un fondo plano y contar con una tapa con salida de aire.
Limpieza y cuidado
• Antes de limpiar el aparato, apáguelo y desconecte el enchufe de la toma de corriente.
• Utilice un paño suave para limpiar la superficie de cristal y el panel de control. Si la zona de cocción está
demasiado sucia, utilice un paño húmedo y un poco de lavavajillas.
• Limpie la salida de aire con un cepillo o un bastoncillo.
• No sumerja el aparato en agua para limpiarlo.
• Asegúrese de que el enchufe esté siempre conectado antes de utilizar el aparato.
• No desconecte el enchufe de la toma de corriente durante la utilización del aparato. Apague el aparato en el
botón on/off y a continuación desconéctelo de la toma de corriente.
• Si el ventilador continúa funcionando tras el apagado, espere hasta que se haya detenido por completo
antes de desenchufar el aparato.
• Desconecte el enchufe cuando no utilice el aparato durante un periodo prolongado de tiempo.

18
Detección y resolución de problemas
Problema Posible causa Solución
Tras enchufar el aparato y
haber pulsado el botón On,
el aparato no se enciende.
Fallo en el suministro eléctrico. Asegúrese de que el suministro
proporciona la tensión adecuada.
El fusible está fundido. Si no puede solucionar el problema,
contacte con el servicio de atención
al cliente.
El enchufe no está conectado.
En un funcionamiento
normal, el calentamiento
se interrumpe y se produce
un pitido.
Batería de cocina incompatible o
zona de cocción funcionando sin
batería.
Utilice solamente batería de cocina
apta para placas de inducción.
La batería de cocina no se ha
colocado en el centro de la zona de
cocción.
Coloque la batería de cocina en el
centro de la zona de cocción.
La batería de cocina se encuentra
a temperatura elevada pero se ha
sacado varias veces de la zona de
cocción.
Coloque la batería de cocina en el
centro de la zona de cocción.
No pasa nada aunque el
aparato esté encendido.
La batería de cocina está vacía o la
temperatura es demasiado alta.
Utilice la configuración adecuada.
La válvula de salida/entrada de aire
está obstruida.
Limpie las válvulas. Deje que el
aparato se enfríe por completo y
reinícielo.
El aparato ha estado funcionando
desde hace 2 horas, pero no se ha
seleccionado ningún ajuste.
Ajuste un modo de cocción o el
temporizador.
Código de error
E0 Problema interno con el circuito
eléctrico
Si aparecen los códigos de error
E1, E2 y E7, compruebe si la batería
de cocina es apta para la placa de
inducción. Deje que el aparato se
enfríe por completo y reinícielo. Si
aparecen los códigos de error E0
o E3-E6, contacte con un servicio
técnico para que examine el aparato.
E1 Batería de cocina incompatible o
zona de cocción funcionando sin
batería.
E2 El aparato se ha sobrecalentado.
E3 La tensión es demasiado alta.
E4 La tensión es demasiado baja.
E5 Cortocircuito.
E6 Cortocircuito.
E7 Las placas están sobrecalentadas.

19
Indicaciones para la retirada del aparato
Si el aparato lleva adherida la ilustración de la izquierda (el contenedor de basura tachado)
entonces rige la normativa europea, directiva 2002/96/CE. Este producto no debe arro-
jarse a un contenedor de basura común. Infórmese sobre las leyes territoriales que regulan
la recogida separada de aparatos eléctricos y electrónicos. Respete las leyes territoriales
y no arroje aparatos viejos al cubo de la basura doméstica. Una retirada de aparatos con-
forme a las leyes contribuye a proteger el medio ambiente y a las personas a su alrededor
frente a posibles consecuencias perjudiciales para la salud. El reciclaje ayuda a reducir el
consumo de materias primas.
Declaración de conformidad
Fabricante: Chal-Tec GmbH, Wallstraße 16, 10179 Berlín (Alemania).
Este producto cumple con las siguientes directivas europeas:
2014/30/UE (EMC)
2014/35/UE (baja tensión)
2011/65/UE (refundición RoHS)

20
Chère cliente, cher client,
Toutes nos félicitations pour l’acquisition de ce nouvel appareil. Veuillez lire attentivement et respecter les
instructions de ce mode d’emploi afin d’éviter d’éventuels dommages. Nous ne saurions être tenus pour res-
ponsables des dommages dus au non-respect des consignes et à la mauvaise utilisation de l’appareil.
Sommaire
Fiche technique 20
Consignes de sécurité 20
Aperçu de l’appareil et panneau de commande 21
Mise en marche et utilisation 22
Nettoyage et entretien 23
Identification et résolution des problèmes 24
Information sur le recyclage 25
Déclaration de conformité 25
Fiche technique
Numéro d’article 10030684
Alimentation électrique 220-240 V ~ 50-60 Hz
Puissance (grande plaque de cuisson + petite plaque de cuisson) 3400 W (2000 W + 1400 W)
Consignes de sécurité
• Ne pas placer l’appareil à proximité de sources de chaleur ou d’appareils fonctionnant au gaz.
• Ne pas brancher l’appareil à des prises sur lesquels d’autres appareils électroniques sont branchés.
• Placer l’appareil sur une surface plane et laisser un espace de 10 cm autour de l’appareil par rapport aux
autres appareils ou aux murs.
• Ne pas plonger l’appareil, la fiche et le cordon d’alimentation dans l’eau ou tout autre liquide.
• Ne pas couvrir l’appareil pendant son utilisation.
• Pour éviter tout danger, enlever le couvercle pour réchauffer une conserve alimentaire.
• Si l’appareil ne fonctionne toujours pas après son auto-analyse, contacter le service client.
• Si le cordon ou la fiche d‘alimentation sont endommagés, ils doivent être remplacés par le fabricant, une
entreprise spécialisée habilitée ou une personne présentant une qualification analogue.
• Ne pas placer d’objet en métal sur la plaque de cuisson et veiller à ce qu’aucun objet métallique ne se trouve
dans un périmètre de 10 cm.
• Ne pas allumer la plaque de cuisson si aucune casserole ou poêle ne se trouve dessus.
• Nettoyer régulièrement l’appareil pour éviter que le ventilateur ne s’encrasse.
• Ne pas toucher la plaque de cuisson pendant son fonctionnement afin de ne pas se brûler.
• Il est interdit aux enfants d’utiliser l’appareil.
• Si l’utilisateur possède un pacemaker, il doit demander à son médecin la confirmation qu’il peut utiliser
l’appareil sans danger.
• Ne pas placer l’appareil sur un four à gaz ou une plaque en métal.
Table of contents
Languages:
Other Klarstein Cooktop manuals

Klarstein
Klarstein Illuminosa 10035464 User manual

Klarstein
Klarstein Cook n Roll Klarstein Pro User manual

Klarstein
Klarstein CAPTAIN COOK User manual

Klarstein
Klarstein 10028038 User manual

Klarstein
Klarstein 10032124 User manual

Klarstein
Klarstein 10031757 User manual

Klarstein
Klarstein 10031348 User manual

Klarstein
Klarstein 10031987 User manual

Klarstein
Klarstein VariCook 10012195 User manual

Klarstein
Klarstein 10033283 User manual