ROBINHOOD HEA604TFG User manual

Description: Robinhood Ceramic Touch Control Cooktop 60cm
Model Numbers: HEA604TFG
Issue 3

Warning and safety information
Installing the built in cooktop
This appliance is not intended for use by persons (including children) with reduced physical, sensory or
mental capabilities, or lack of experience and knowledge, unless they have been given supervision or
instruction concerning use of the appliance by a person responsible for their safety. Children should be
supervised to ensure that they do not play with the appliance.
Do not leave this cooktop unattended or unsupervised whilst children or infirmed are present.
Accessible parts will become hot when in use and directly after use, care should be taken to avoid touching
the burners. To avoid burns and scalds keep children away.
The installation of this cooktop is to be carried out by using a qualified electrician.
This cooktop is to be installed in accordance with the local, national building, electrical and plumbing codes.
If the power supply cable is damaged, it must be replaced by the manufacturer or its service agent or similarly
qualified person to avoid a hazard
If a stationary cooktop is not provided with a supply cord and a plug or by other means of disconnection from
the supply having an air gap contact the separation in all active (phase) conductors, the instructions shall state
that such means for disconnection shall be incorporated in the fixed wiring according to the wiring rules
The cooktop is not intended to be operated by means of an external timer or separate remote-control system.
If the surface is cracked, switch off the appliance to avoid the possibility of electric shock, for cooktop
surfaces of glass-ceramic or similar material which protect live parts
The appliance must be installed by an qualified person in accordance with local and national building regulations.
Panels and furniture lining of the kitchen cabinet receiving the cooktop must be treated with temperature resistant
adhesives 100°C (otherwise they may become discoloured or deformed due to inadequate temperature resistance).
The cooktop is intended for installation into a benchtop above a kitchen cabinet of min 600mm width or more.
After the installation of built-in cooktop make sure that there is free access to the two fixing elements in front.
The distance between the top of the cooktop and any cabinets or rangehoods above must be no less than 600mm such
as indicated in the instructions for installation of the rangehood.
The use of hard wood decorative borders around the worktop behind the appliance is allowed, in case the minimum
distance remains as indicated on the installation illustrations.
Minimum distance between the built-in cooktop and rear wall is indicated at the illustration for the installation of the built-
in cooktop.
The cooktop may be installed into benchtop between 25mm to 40mm thick.
Kitchen cabinet must not have a drawer directly below cooktop. It must be fitted with a horizontal board 20mm away
from the cooktop bottom surface. Space between the plate and the cooktop must be empty and no objects may be
stored or kept there.
Rear side of the kitchen element must also have a 50mm high opening along the entire width of the element, and the
front part must have an opening of no less than 5mm .
Incorporation of the oven under the ceramic cooktop is permissible for ovens equipped with a cooling fan.

Installation - continued
Built in ceramic cooktop cutout dimensions.
HEA604TFG
A (mm)
580
B (mm)
510
C (mm)
560
D (mm)
490
E (mm)
40
F (mm)
10
G (mm)
50
Installing the foam gasket
Before inserting the appliance into the opening in the kitchen benchtop, the supplied foam
gasket must be attached to the lower side of the glass ceramic (glass) cooktop between
the benchtop and cooktop.
Do not install the appliance without the foam gasket!
The gasket should be attached to the appliance in the following way:
•Remove the protective film from the gasket.
•Then, attach the gasket to the lower side of the glass, approximately 2-3mm from the edge.
•The gasket must be attached along the entire length of the glass edge and should not overlap at the corners.
•When installing the gasket, make sure that the glass does not come into contact the with any sharp objects.

Installation - continued
Installation procedure.
Worktop must be placed absolutely horizontal.
•Suitably protect the edges of the cut aperture.
•Connect the cooktop to the mains power supply (see instructions for the connection of the cooktop to the mains power
supply).
•Insert the cooktop into the cut aperture.
•Press the cooktop firmly towards the worktop from above.
Connection to the power supply.
Connections must be carried out by a qualified electrician only. The earth protection must comply with the national
regulations.
1. Connection terminals are revealed when the connection box cover is removed.
2. Prior to any attempted connection check that the voltage indicated on the rating plate is in line with your home power
supply.
•The rating plate is located underneath the appliance.
•The appliance is manufactured for use with the power supply voltage 220-240 V~.
3. The electric wiring should be equipped with a circuit breaker able to isolate the appliance from the mains in all points,
with the distance between terminals of at least 3 mm in open position. This may be done by means of fuses, safety
switches, etc.
4. The connection should be selected in accordance with the declared charge capacity of the mains and the fuse power.
5. Such appliances are allowed to be mounted on one side next to a high kitchen cabinet, the height of which may
exceed that of the appliance. On the opposite side however, only a kitchen cabinet of equal height as the appliance is
allowed.
6. Upon the completion of installation, live wires and isolated cables must be adequately protected against accidental
touching.
7. In accordance with the mains voltage, the appliance should be connected in line with the attached diagram.
8. The earth wire (PE) must be connected to the terminal marked with the earth symbol .
9. Connection may be carried out means of harmonized cables as H05V2V2-F (90°C), or with equal or better features.
10. The power cable must lead through the relief safety device, protecting it from accidental pull out.
11. Upon the completion of installation switch all the hotplates on for about 3 minutes to check the proper functioning
Attention
Only qualified electricians should attempt any repairs on the appliance, always disconnect the power supply beforehand.

Installation - continued
Technical information
Type HEA604TFG
Width 580mm
Rated voltage 220-240 V~ or 380-415 V 2N~, 50/60 Hz
Type of switch Electronic sensors
Cooking zones ( Ø, mm/W )
Forward left 140, 1,2
Rear left 180, 1.8
Rear right 180, 1.8
Forward right 140, 1,2
Total power (W) 6.0
Basic adjustment of the sensors to the environment
Upon each connection to the power supply the sensors of the appliance are automatically adjusted to the environment to
ensure their proper function, all displays turn on and are fully illuminated for a few seconds.
During the adjustment procedure the sensors must be free of any objects, otherwise the adjustment procedure will be
interrupted until such objects are removed from the sensor surface. During this period the regulation process of the
cooktop is impossible.
Before using the cooktop for the first time.
Clean the glass-ceramic surface with a damp cloth and some dishwashing detergent. Do not use aggressive detergents
such as abrasive cleaners, abrasive dishwashing sponges, or stain removers as these can scratch the surface.
•Do not turn on a cooking zone without a pan over it, and never use the cooking for room heating!
•Make sure the cooking zones and pan bottom are clean and dry, and that sufficient heat transmission is enabled
between them, in order to prevent any damage to the heating surface.
•Any fat or oil left on the cooking zones may ignite. Therefore, be careful when using fat and oil to prepare food (e.g.
French fries) and control the cooking process at all times.
•Do not place a damp pan or a steam-covered lid on the cooking zones, as moisture is detrimental to them.
•Do not leave a hot pan to cool down on the cooking zones, because moisture will be generated under it, causing
corrosion.
•The cooktop can not be activated by external timers or remote control systems.

Installation - continued
Important warnings regarding the glass ceramic cooktop
•Cooking zone reaches the selected power level or temperature very quickly; however, the area surrounding the
cooking zones remains relatively cool.
•The cooktop is resistant to temperature changes.
•The cooktop is also impact-resistant. The pans may be placed onto the cooktop roughly without damaging the
cooktop.
•Glass ceramic cooktops should not be used as a worktop. Sharp objects can cause scratches.
•Preparing food in thin aluminium of plastic containers on hot cooking zones is not allowed. Do not place any
plastic objects or aluminium foil on the glass ceramic cooktop.
•Never use a glass-ceramic cooktop that is cracked or broken.
•If an object falls on the cooktop with a sharp edge downwards, this could cause the cooktop / glass ceramic panel
to break. The consequences are visible immediately, or only after a while. If any visible crack should appear,
immediately disconnect the appliance from the power supply.
•If sugar is spilt on a hot glass ceramic cooktop, or a sugar-laden food, immediately wipe the cooktop.
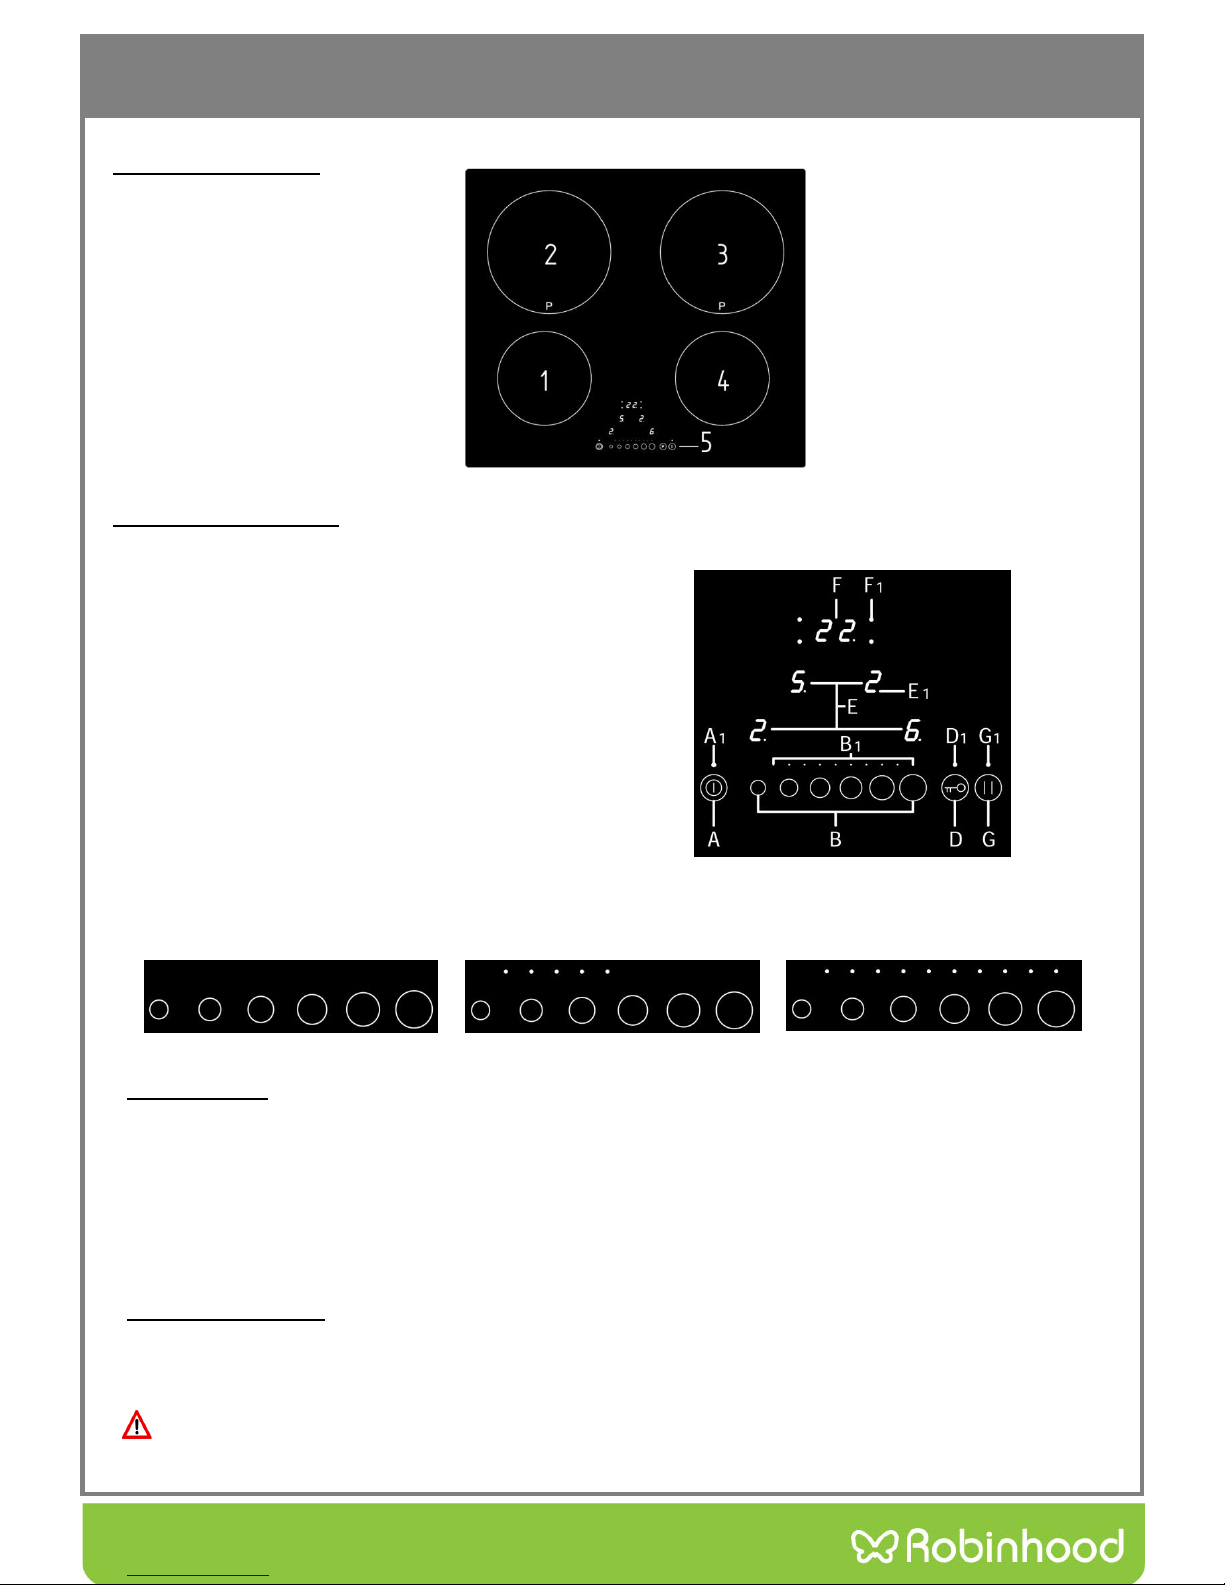
Hotplate functions
Ceramic glass cooktop is fitted with four hotplates. The cooktop surface is completely flat and smooth, without edges to
accumulate dirt.
Glass ceramic hotplate is not heated directly, but only by return heat transmitted by the dish. This heat figures as “residual
heat” after the hotplate is turned off.
IMPORTANT!
In case sugar or other heavily sweetened substance is spilled on the hotplate, wipe it up immediately and carefully remove the
sugar residues with a scraper while the cooking zone is still warm, otherwise the hotplate may be damaged.
Avoid cleaning the cooktop while the cooking zones are still hot, as you may damage the cooktop.
Tips on cookware
•Use high-quality cookware with a flat and stable bottom.
• When using a tempered glass (Pyrex) or porcelain cookware, please follow the cookware manufacturer’s instructions.
•When using a pressure cooker, do not leave it unattended until the desired pressure is reached. The cooking zone
should initially be set to the maximum power level; as the pressure rises, use the sensors to decrease the power level
according to the pressure cooker manufacturer’s instructions.
•Make sure there is always enough water, either in a pressure cooker or in any other piece of cookware, as using an
empty pan on the cooking hob will result in overheating which will damage both the pan and the cooking zone.
•Tempered glass (Pyrex) cookware with a specially brushed bottom is suitable for use on cooking hobs if it fits the
diameter of the cooking zone. Cookware with larger diameter may break due to thermal stress.
• When using any special or unconventional cookware, follow the cookware manufacturer’s instructions.
•When a highly reflective pan (bright metal surface) or a pan with a thick bottom is used for cooking on a glass-ceramic
hob, cooking time can be extended by several minutes (up to 10 minutes). If you wish to boil a larger quantity of food,
it is recommended to use a container with a flat dark bottom.
•Do not use clay cookware, because it may leave scratches on the glass-ceramic hob.
•Pan bottom diameters should match the diameter of the cooking zone. If the pan is too small, some heat is wasted;
furthermore, using a too small pan can damage the cooking zone.
•Whenever possible given the cooking process, use a lid.
•The pan should be appropriately sized given the quantity of food prepared. Preparing a small quantity of food in a
large pan will cause a waste of energy.

Installation - continued
.
Energy saving tips
When buying cookware be careful in selecting size: pot diameter
usually refers to the top edge of the dish, which is often larger
than the dish bottom.
Use such dish size to accommodate the quantity of food to be
prepared. If you use excessively large pot for small amount of
food, you will consume considerably more energy.
Always cover the cookware with lids of appropriate size.
Steam-pressure pots (economic pots), which use pressure in tightly sealed interior, are especially economic, and save both
time and energy. Shorter cooking time leaves more vitamins in food.
Always leave enough water in steam-pressure pots, otherwise it may result in overheating which may damage both the
pot and the hotplate.
Power regulation
Heating power of the hotplates may be set at nine different levels.
The following chart indicates illustrative use of each power setting.
Power
Setting
Purpose
0
Off, using remaining heat
1-2
Maintaining warm food, slow simmer of smaller quantities
3
Slow simmer (continuation of cooking after a powerful start-up)
4-5
Slow cooking (continuation) of larger quantities, roasting larger chunks
6
Roasting, browning
7-8
Roasting
9
Start of cooking, roasting
A
Automatic initial setting

Instructions for use and maintenance
Ceramic Glass Cooktop
1. Hi-light hotplate front left
2. Hi-light hotplate rear left
3. Hi-light hotplate rear right
4. Hi-light hotplate front right
5. Cooktop control panel
Cooktop control elements
A. ON/OFF sensor
A1. ON/OFF indicator LED
B. Slide control sensor
B1. Slide control indicator LED’s
D. Safety lock on/off and child lock sensor
D1. Safety lock on/off and child lock sensor indicator LED
E. Hotplate selection/power or remaining heat displays
E1. Decimal dot on the power displays:
On: hotplate power control is possible
Off: hotplate power control is not possible
F. Timer ON/OFF sensor
F1. LED indication cooking zone on which the timer is active:
Flashing: time setting is possible
Fixed: time setting is not possible
G. Pause setting ON/OFF sensor
G1. Pause indicator LED
Off Medium power Full power
Cooktop control
1. After turning the ceramic glass cooktop on, all displays come on for a moment. The cooktop is ready for
operation.
2. The cooktop is fitted with electronic sensors which are switched on if you touch the relevant circle for at least one
second.
3. Each sensor activation is followed by a sound signal.
4. Avoid placing any objects on sensor surface (possible error signalization).
5. Always keep the sensor surface clean.
Activating the cooktop
Touch the ON/OFF sensor (A) for at least one second. The cooktop is now active, and all hotplate power indicators (E)
indicate »0«, decimal dot (E1) is flashing and the timer display shows "CL" .
Now you need to select the next setting within 20 seconds, otherwise the cooktop switches off again.

Instructions for use and maintenance
Turning hotplates on
1. After turning the cooktop on using the ON/OFF sensor (A), within
the next 20 seconds start one of the hotplates.
2. Touching the desired hotplate sensor (E), its relevant power
indicator indicates »0« and decimal dot (E1) changes from
flashing fixed.
3. Set the power level 1-9 by touching the slider. At the first touch,
the level is set according to the part of the slider that you touch.
Upon the slider, the control LEDs light up, according to the level
set. By sliding along the slider, the power level setting is changed.
By sliding to the right, the level increasing, while sliding to the left
decreases the level. When you move your finger away from the slider,
the cooking field starts to operate at the level set. If the first touch of
the slider is on its far right side (level 9), followed by a new pressure
level 9, the automatic cooking is activated (see Automatic fast heating).
Changing hotplate power settings
•Select a particular hotplate by touching the sensor (E), the respective decimal point (E1) lights.
•By touching or sliding along the slide sensor you change power setting.
•When you remove the finger from the slide sensor, the hotplate starts to operate at selected power.
Switching hotplates off
•Selected hotplate must be activated.
•To select a particular hotplate, touch the sensor (E), the respective decimal point (E1) lights.
• By touching the slide sensor (B) at the start, bring the power setting to “0”. Short beep confirms the OFF position.
Switching the cooktop off
The cooktop is switched off by pressing the main ON/OFF sensor (A). The sound signal beeps and all indicators go off,
except for those hotplates which are still hot and display the warning “H” sign as an indication of the remaining heat.
If you switch the cooktop off prior end of cooking session, use the remaining heat and save electric energy.
Locking the control unit / child safety lock
By activating the child lock protection you can stop the operation of the appliance and the use of hotplates, protecting
the children from accidental start and eventual injury.
Activating the control unit lock
•Safety lock is activated by pressing the sensor (D) for approximately three seconds; after that, the control
LED (D1) lights.
•Safety lock can be activated only if the cooking hob is turned on.
•Safety lock prevents the activation of al sensors, except for he main switch (A) shut-off sensor and the lock
sensor (D).
•If the hob is switched off when the lock function is activated, it remains in memory until a new switches the hob.
•When set timers end their time, alarms can be switched by activating any key without need for unlocking the
control.
Deactivating the control unit lock
The lock can be disengaged by pressing the sensor (D) for three seconds; after that, the unlocking is confirmed by a
beep. The signal LED above the sensor is turned off.

Instructions for use and maintenance
Remaining heat indicator
When an active hotplate is switched off, or when the entire cooktop is switched off, the indicator (E) displays »H«, as a
signal that a particular »hotplate is still hot«.
Display time is calculated in relation to the used heating power and the period the hotplate was active prior switching off.
Even when warning signal “H” disappears, hotplate may still be hot in certain cases (power failure, leaving any
temperature sensitive objects on the hotplate).
Be careful, danger of burns!
Pause
The Pause mode is not possible within the first 6 seconds after switching on.
The execution of the function is only possible if at least one cooking zone is in operation.
Activating the Pause function
• Actuating the pause key (G) for ≥1 second, the LED (G1) is statically illuminated.
The pause conditions may also be activated with cooking zone-specific errors , here, the error display is hidden. Also
residual heat indication , special message such as A or “no pan” are hidden, the pause has priority.
If there is a general error during the pause, the control switches off and terminates the mode.
During the Pause function:
•Already programmed timers are stopped
•Automatic heat-up is also switched off
•The residual heat calculation and operating time limitation continue
• The LED’s of other functions (timer, multi-circuits,etc…) continue illuminated depending on the status
The Pause condition may last for max. 10 minutes. If the status is not terminated within this time, the control switches
off. The cooking zone may be switched at any time with the ON/OFF key (A), a possibly activated Pause mode is then
terminated.
Terminated the Pause mode
The Pause key (G) and any other key (not the same again) has to be actuated within 10 seconds.
This re-establishes the condition before the Pause mode
Recall
By using this function the settings may be recovered quickly, when the control was switched off with the main switch by
mistake. After switching off with the ON/OFF key (A), the operator has 6 seconds to switch on again the control and
another 6 seconds to actuate the pause key (G).
Automatic fast heating
When automatic cooking mode is activated the hotplate will operate at maximum power for a limited period of time and
then automatically switch to the reduced power level to resume cooking. It may be switched on in any of the hotplates
for all power settings except for setting “9” where power is set at maximum all the time.
Automatic cooking mode is activated on any idle hotplate.
• Select a particular hotplate, power indicator displays “0”.
•First touch of the slide sensor (B) must be to the extreme right, followed by a new pressure level 9. Display (E)
indicates “A”, automatic cooking mode is on.
•Until the decimal point (E1) flashes, it is possible setting the desired power level (8...1) further by touching the slide
sensor.
• Display alternate “A” and the level set cooking
Once the time from the chart below expires, the function is switched off and “A” disappears.
You can also switch the automatic cooking mode off anytime by bringing power setting to “0”.

Instructions for use and maintenance
Safety switch off
Maximum continuous operation of a particular hotplate is limited, and the duration is displayed in the above chart. When
the hotplate is switched off by the safety mechanism, the indicator displays symbols “0”, or “H” in case there is any
remaining heat left.
In such cases switch the hotplate off by touching the relevant power setting sensor (B).
Example:
Set the hotplate to power level 5 and leave it operate for some time. If you do not change the above setting, the safety
mechanism will switch the hotplate off after 4 hour and a half.
available.
Timer
Use of timer facilitates cooking by setting the time of hotplate operation.
Turning timer on
•Select the hotplate to be timer controlled, the respective decimal
point (E1) lights and timer display shows "CL".
•Turn the timer on by touching the timer ON/OFF sensor (F), at the
beside of timer’s display, the light of the cooking zone of which timer
is being set turns on.
•First the regulation of the second digital number has place and then the one of the first digital number (the active
number is displayed by the symbol “-“ when the regulation starts).
•By sliding along the entire slider, the exact tie can be set. By sliding to the right, the time increases, while sliding to
the left decreases the time setting by one minute steps.
•When you remove the finger, after a few seconds the timer starts the countdown. Indicator displays actual power
setting, and the dot beside of timer’s display indicates that timer is on.
Operation time can be set for each hotplate separately, Changing preset cooking time
Cooking time can be changed anytime during the operation.
•Select desired hotplate, the respective decimal point (E1) lights, residual time is displayed on timer’s display.
•Touch the timer ON/OFF sensor (F).
•By sliding along the entire slider area (B), the cooking time is changed by one minute steps.
•When you move your finger away from the slider, the cooking filed starts operating with the newly set cooking time.
•If time is not modified in 10 seconds since pressing the sensor (F), timer goes to zero and then turns off
Automatically.
Power setting
1
2
3
4
5
6
7
8
9
Maximum
power cooking
time (min.)
0,8
2,4
3,8
5,2
6,8
2,0
2,8
3,6
0,2
Power setting
1
2
3
4
5
6
7
8
9
Hours lapse prior safety
switch off
6
6
5
5
4
1.5
1.5
1.5
1.5

Instructions for use and maintenance
Checking remaining cooking time
•Last set timer is always displayed .
• Select cooking zone. The residual time of selected cooking zone will be displayed on timer’
Turning time off
When preset time elapses, a beep signals the end, and the hotplate is switched off. Switch off the alarm by pressing the
sensor of switch-off timer (F),or it switches off automatically after 2 minutes.
If you want to switch the timer prior to preset time
•Select desired hotplate, the respective decimal point (E1) lights. Cooking’s residual time is displayed on timer’s
display.
•Touch the timer ON/OFF sensor (F).
•Pressing on the far left side of the slider deactivates the timer and the time set. The time setting can also be reset
by sliding along the entire slider area by 1 minute decrements.
•The illuminated point on the left part of the display is turned off and the timer is deactivated.
Alarm timer function
Timer can be used as alarm only if it is not already employed in timer
control of one of the hotplates.
Timer setting
With the cooktop off:
•Touch the cooktop ON/OFF sensor (A) to activate the cooking cooktop.
•Touch the timer ON/OFF sensor (F) to activate the timer.
•Sliding a finger on slider area (B), set desired time.
• Values of zones’ Cooking levels can be set:
•Before the first decimal number stops flashing (2 seconds).
• After setting alarm functions (cooking zones’ displays turn off), it’s enough pressing sensor (A) again.
Switching the alarm off
When the preset time expires a beep is heard which you can either turn off by touching any sensor or leave it to turn off
automatically after 2 minutes.
If you want to switch the timer off prior expiry of preset time:
•Touch the timer ON/OFF sensor (F).
•Pressing on the far left side of the slider. Alarm function is off.
•During the time the alarm is activated, timer can not be preset for any hotplate. To enable timer setting function,
alarm must be switched off.

Safety functions and error display
ERROR CODE
ERROR DESCRIPTION
INSTRUCTION MANUAL
ER03
Permanent use of keys; Control unit cuts off
after 10 sec
contact the AUTHORIZED SERVICE CENTRE
FOR TECHNICAL ASSISTANCE - SPECIFYING
THE ERROR CODE
ER20
Flash-failure. Microcontroller faulty
contact the AUTHORIZED SERVICE CENTRE
FOR TECHNICAL ASSISTANCE - SPECIFYING
THE ERROR CODE
ER21
Control unit cuts off after controlling due to
overheating to avoid damage to electronics
contact the AUTHORIZED SERVICE CENTRE
FOR TECHNICAL ASSISTANCE - SPECIFYING
THE ERROR CODE
U400
Secondary voltage of the power unit to high
(primary>300V). Control unit cuts off aftre 1
sec releasing a permanent tone.
contact the AUTHORIZED SERVICE CENTRE
FOR TECHNICAL ASSISTANCE - SPECIFYING
THE ERROR CODE
ER22
Defective Key evaluation. Control unit cuts
off after 3.5 - 7.5 sec.
contact the AUTHORIZED SERVICE CENTRE
FOR TECHNICAL ASSISTANCE - SPECIFYING
THE ERROR CODE
ER36
NTC value is not within its specification
(value <200mV or >4.9V; control unit cuts
off.
contact the AUTHORIZED SERVICE CENTRE
FOR TECHNICAL ASSISTANCE - SPECIFYING
THE ERROR CODE
ER40
Secondary operational voltage is min.5 sec
too low according to identified
Unterspannung (1.8V<U<2.9V)
contact the AUTHORIZED SERVICE CENTRE
FOR TECHNICAL ASSISTANCE - SPECIFYING
THE ERROR CODE

Cleaning & maintenance
Cleaning and maintenance of ceramic glass cooktop
Ceramic glass cooktop should be cleaned only when completely cooled down, preferably after
each use, otherwise even the slightest stains remaining after cooking may burn into the cooktop
surface with each following use.
For regular maintenance of ceramic-glass cooktop use special cleansing agents, produced in
such way to create protective film upon the surface.
Before each use, wipe the dust and other particles from the cooktop, they may scratch the
surface (Fig. 1). Figure 1
Caution: use of steel wool, abrasive cleaning sponges, and abrasive detergents can scratch
the surface of the cooktop. The surface may also be damaged by the use of aggressive sprays
and inappropriate liquid chemicals (Fig.1 and 2).
Pattern marks can be erased by the use of aggressive cleansing agents or rough and
damaged cookware bottoms (Fig. 2).
Minor stains are removed with moist soft cloth; after that the surface should be wiped dry (Fig. 3).
Figure 2
Water stains are removed with gentle vinegar solution, but you must not wipe the frame
with it (certain models only), since it may lose its glow. Never use any aggressive sprays
or limestone removers (Fig. 3).
Major stains are removed with special ceramic-glass cleansers.
Follow strictly the manufacturer’s instructions.
Be careful to remove any remains of cleansing agent from the cooktop surface, otherwise
they will be heated during the next use and can damage the cooktop (Fig. 3).
Figure 3
Stubborn and burnt stains are removed with special ceramic-glass scraper. Be careful,
however, not to touch the hotplate surface with the scraper handle (Fig. 4).
Handle the scraper with utmost care to avoid injuries!
Sugar and sugar containing food may permanently damage the ceramic-glass cooktop
surface (Fig. 5), so the remains of sugar and sugar containing food must be scraped off
from the cooktop surface immediately, when the hotplates are still hot (Fig. 4).
Discolouring of ceramic-glass cooktop has no effect whatsoever on its operation and stability. Figure 4
In most cases, it appears as the consequence of burnt in food remains, or as a result of
dragging pots and pans (especially aluminium or copper bottom cookware) across the surface,
and such discolouring is rather hard to remove.
Figure 5
Note:
All described faults are mostly aesthetic and do not affect directly the operation of the appliance. Remedy of such faults is not covered
by warranty.

The appliance may be built-in and connected to the power supply only by a qualified technician.
Particular areas of the cooktop surface (adjacent to the hotplates) are hot during operation.
Hot oil ignites readily, so be sure have the preparation of such food (fries) under constant control.
Hotplates may not be left in operation empty, without any dishes on top.
Never use the appliance as a room heater.
Never use the ceramic-glass cooktop as a working surface. Sharp objects may damage the cooktop
surface.
Never place any metal objects upon the ceramic glass hotplate, such as knives, forks, spoons, pot lids, and
the like, as they may get very hot.
Preparation of food in aluminium or plastic cookware is not allowed. Never place any plastic objects or
aluminium foil upon the cooktop surface.
In case any other appliances are plugged in the electric mains close to the cooktop, prevent contact
of the plug cable with the hot cooking zones.
Never keep any flammable or temperature sensitive objects, like cleaning agents, sprays, detergents, etc.,
below or near the appliance.
Never use cracked or broken ceramic-glass cooktop. In case you notice any visible cracks on the surface,
cut the power supply immediately and contact Customer Service.
In case of any malfunction, disconnect the appliance from the power supply and call customer service.
Do not use high-pressure steam cleaner or hot steam to clean the appliance.
The appliance is manufactured in compliance with the relevant safety standards.
Important information

Warranty Certificate (Australia)
Terms and Conditions
If you are a consumer under the Australian Consumer Law, our goods come with guarantees that cannot be excluded under the Australian
Consumer Law. You are entitled to a replacement or refund for a major failure and for compensation for any other reasonably foreseeable loss or
damage. You are also entitled to have the goods repaired or replaced if the goods fail to be of acceptable quality and the failure does not amount
to a major failure
1. Parbury Pty Limited (“Parbury”) also warrants the following Robinhood products against manufacturing defects and faulty materials, under
normal use and subject to the exclusions in this certificate, for a period of:
Rangehood, Ovens, Cooktops - 24 months from date of original purchase for domestic use.
Uniduct –12 months from date of original purchase for domestic use.
Ironing centre –12 months from date of original purchase for domestic use.
Taps, including Pull-out and Mixer taps –5 years on parts only from date of original purchase domestic for use, 24 months parts and labour from
date of original purchase for domestic use
Sinks sets–5 years on stainless steel sink including draining bench from date of original purchase for domestic use, 6 months on all stainless steel
accessories, including wire rack, colander and tray from date of original purchase for domestic use.
Supertub - 5 years on stainless bowl, 24 months on Tap, Cabinet and other components from the date of original purchase for domestic use.
“Original purchase”, when used in this certificate, means purchase by the customer directly from Parbury or one of its approved suppliers.
2. This warranty is limited to the repair or replacement, at our option, within the warranty period of any component part which we at our
discretion determine to contain faulty materials or a manufacturing defect in breach of this warranty. This warranty is subject to terms and
conditions set out in this certificate.
3. The warranty only applies within Australia.
4. For warranty service outside of capital city metropolitan area or 30 km from nearest authorised service agent you will be liable for reasonable
travelling expenses and the cost of transport of the product or parts to and from the service agent
5. To make a claim under this warranty, you must produce the original invoice or other purchase documentation as proof of the original purchase
date. You must send your claim to Parbury Pty Limited, 76 Postle Street, Coopers Plains QLD 4108 within 7 days of any alleged defect or failure of
the product first becoming apparent, you are responsible for the expense of making a claim under this warranty.
This warranty is given by:
Parbury Pty Ltd
ABN 83 004 568 138
Telephone: 1800 648 556
Facsimile: 1800 628 577
www.robinhood.com.au
Attention Customer Services Manager
Warranty exclusions
1. The warranty does not apply where, in Parbury’s opinion:
The defect is caused by misuse, wear and tear, dirt, fire or accidental damage.
The product has been repaired or serviced by an unauthorised person.
The product was not installed in accordance with our instructions.
The product was purchased overseas or was not designed for use in Australia.
The product was not used, cleaned or cared for in accordance with our instructions.
The product was used outdoors.
2. All Robinhood rangehoods are suitable for indoor use only and not suitable over BBQs or charcoal cookers designed for outdoor use.
3. In addition, this warranty does not extend to damage or defects which in our opinion, directly or indirectly arise from or are due to: exposing
the product to acidic or corrosive materials or chemicals such as dyes, solvents, denture cleaner or acetone; using inappropriate household
cleaning products such as abrasive cream or powder cleansers, furniture polish, bleach, mentholated spirits, drain cleaners, sugar soap, metal
pads and strongly alkaline or acidic cleaners; heat damage, including from washing the product at high temperatures;
impact or mishandling the product, including the impact caused by objects scraped along, thrown or dropped on the product surface or excessive
weight being placed on the product; structural or support changes in or affecting the building or the application where the product has been
installed; failure to clean or maintain the product as recommended; or any other causes specified in the product information as being excluded
from this warranty.
4. Variations with the colour or gloss within the product or any ageing or fading of colour, shine or gloss level over time are not covered by this
warranty. The warranty does not cover visual imperfections or blemishes in the surface and edges of the product that were not brought to your
supplier’s attention at the time you inspected the product.
5. We will not be responsible under this warranty for, nor pay the costs of, removing the existing product, or reinstalling the new product, or any
associated costs or damages.
6. Charcoal filters and light bulbs are not covered by this warranty
The benefits given by this warranty are in addition to other rights and remedies of consumers under any law in relation to the goods which
cannot be excluded.
This warranty certificate is not intended to create a contract between Parbury Pty Limited and the purchaser.
New Zealand
Parbury Ltd
Telephone: 0800 760 667
Facsimile: 0800 276 246
www.robinhood.co.nz
Australia
Parbury Pty Ltd
ABN 83004568138
Telephone: 1800 648 556
Facsimile: 1800 628 577
www.robinhood.com.au

Warranty Certificate (New Zealand)
New Zealand
Parbury Ltd
Telephone: 0800 760 667
Facsimile: 0800 276 246
www.robinhood.co.nz
Australia
Parbury Pty Ltd
ABN 83004568138
Telephone: 1800 648 556
Facsimile: 1800 628 577
www.robinhood.com.au
Terms and Conditions
The following conditions apply in respect of the warranty given in this certificate:
1.
Parbury Pty Limited (“Parbury”) warrants the following Robinhood products against manufacturing defects and faulty
materials, under normal use and subject to the exclusions in this certificate, for a period of:
Rangehood, Oven, Cooktop - 24 months from date of original purchase for domestic use.
Uniduct –12 months from date of original purchase for domestic use.
Ironing centre –12 months from date of original purchase for domestic use.
Waste disposal –24 months from date of original purchase for domestic use.
“Original purchase”, when used in this certificate, means purchase by the customer directly from Parbury or one of its
approved suppliers.
2.
This warranty is limited to the repair or replacement, at our option, within the warranty period of any component part
which we at our discretion determines to contain faulty materials or a manufacturing defect in breach of this warranty.
This warranty is subject to terms and conditions set out in this certificate.
3.
The warranty only applies within New Zealand.
4.
The customer must produce the original invoice or other purchase documentation as proof of the original purchase date.
Warranty exclusions
1.
The warranty does not apply where, in Parbury’s opinion:
The defect is caused by misuse, wear and tear, dirt, fire or accidental damage.
The product has been repaired or serviced by an unauthorised person.
The product was not installed in accordance with our instructions.
The product was purchased overseas or was not designed for use in New Zealand.
The product was not used, cleaned or cared for in accordance with our instructions.
The product was used outdoors.
All Robinhood rangehoods are suitable for indoor use only, and not suitable over BBQs or charcoal cookers designed for
outdoor use.
2.
In addition, this warranty does not extend to damage or defects which in our opinion, directly or indirectly arise from or are due to:
Exposing the product to acidic or corrosive materials or chemicals such as dyes, solvents, denture cleaner or acetone;
Using inappropriate household cleaning products such as abrasive cream or powder cleansers, furniture polish, bleach,
mentholated spirits, drain cleaners, sugar soap, metal pads and strongly alkaline or acidic cleaners;
Heat damage, including from washing the product at high temperatures;
Impact or mishandling the product, including the impact caused by objects scraped along, thrown or dropped on the product
surface or excessive weight being placed on the product;
Structural or support changes in or affecting the building or the application where the product has been installed;
Failure to clean or maintain the product as recommended; or
Any other causes specified in the product information as being excluded from this warranty.
3.
Variations with the colour or gloss within the product or any ageing or fading of colour, shine or gloss level over time are not
not covered by this warranty. The warranty does not cover visual imperfections or blemishes in the surface and edges of the
product that were not brought to your supplier’s attention at the time you inspected the product.
4.
Costs incurred on installation or removal of a product, or any reinstallation of a product, or any associated costs, are not
covered by this warranty.
5.
Parbury will not be liable for consequential or indirect loss or damage whatsoever and however arising out of or in connection
with the supply, performance or removal of the product, including (but not limited to) loss of profit, loss of revenue, loss of
contract, loss of goodwill or increased cost of workings, even if due to the negligence of Parbury or any of its approved
suppliers, employees or agents.
6.
Charcoal filters and light bulbs are not covered by this warranty
7.
This warranty and the statements contained in this certificate or other documents given to you do not exclude, restrict or
modify the application of any term implied into this warranty by statute, provided that (to the extent any statutory provision
permits Parbury to limit its liability for a breach of an implied condition or warranty) Parbury’s liability for such breach is limited
to the payment of the cost of replacing the product, repairing the product or acquiring an equivalent product.
8.
Subject to clause 5, our obligations under this warranty are limited to those set out in this certificate, and this warranty is
expressly instead of all other warranties, express or implied, including any implied warranty of merchantability or fitness for a
particular purpose and notwithstanding any course of dealing between the parties or custom and usage in trade to the contrary.
Should warranty service be required, please contact us:
Free Phone: 0800 760 667
Free Fax: 0800 276 249
Website: www.robinhood.co.nz
Terms and conditions are subject to change without notice
Table of contents
Other ROBINHOOD Cooktop manuals

ROBINHOOD
ROBINHOOD HIA905TFG User manual

ROBINHOOD
ROBINHOOD HEA905TFG User manual

ROBINHOOD
ROBINHOOD HIC604TFG User manual

ROBINHOOD
ROBINHOOD HEE604TFG User manual

ROBINHOOD
ROBINHOOD HEF302TCOM User manual

ROBINHOOD
ROBINHOOD HEC604KWH User manual

ROBINHOOD
ROBINHOOD HGA604FKSS User manual

ROBINHOOD
ROBINHOOD HED604FKG User manual

ROBINHOOD
ROBINHOOD HEC Series User manual

ROBINHOOD
ROBINHOOD HGAA604FKSS User manual