7
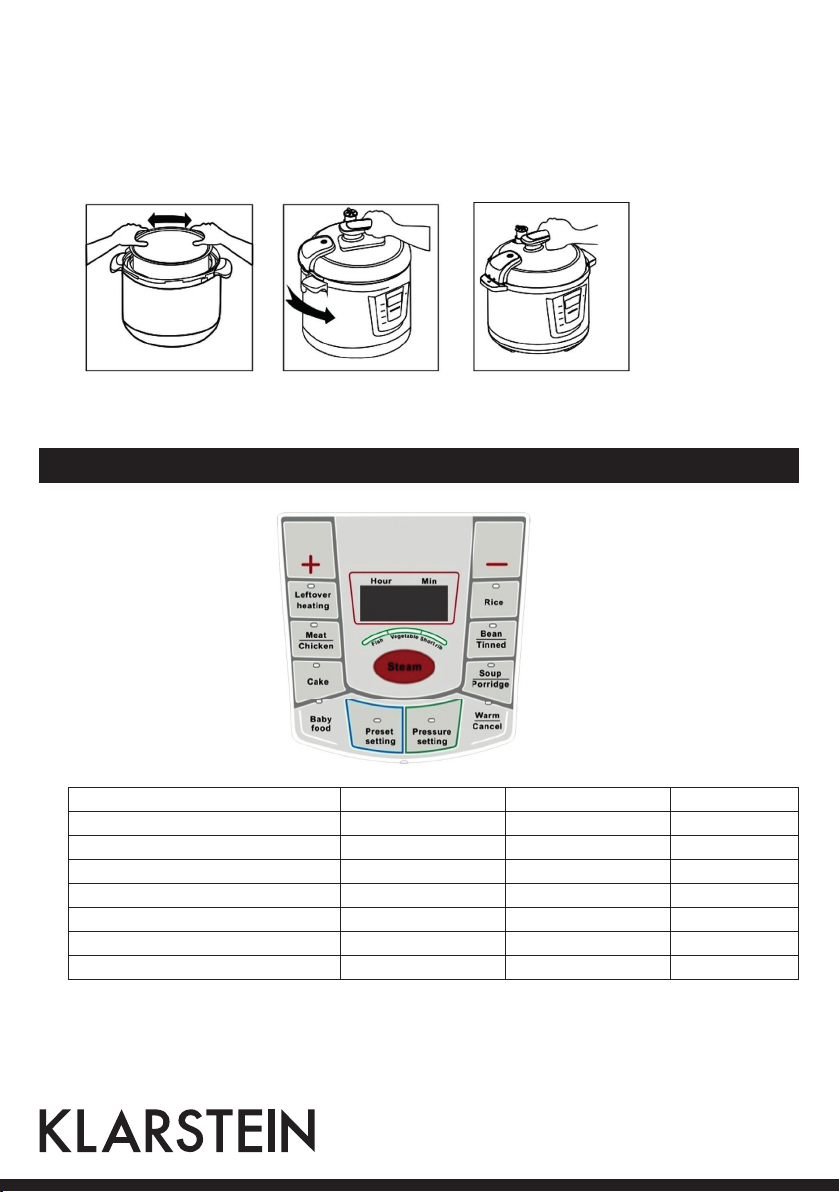
Programm Voreingestellte Zeit Einstellbare Zeit Temperatur
Steam
(Dünsten)
Fisch 8 Minuten 8-16 Minuten 100-105 °C
Gemüse 10 Minuten 8-16 Minuten 100-105 °C
Rippchen 15 Minuten 8-16 Minuten 100-105 °C
Warm/Cancel (Warmhalten/Stop) -- -- 65-75 °C
Pressure Keeping (Druck halten) -- 2-99 Minuten --
Preset Setting (Startverzögerung) -- 0.5-24 Stunden --
Hinweise zu den Programmen und Funktionen
Das Gerät verfügt über die folgenden Programme: Rice (Reis), Baby Food (Babybrei), Left heating (Reste erwär-
men), Bean/Tinned (Bohnen/Dosennahrung), Cake (Kuchen), Steam (Dünsten von Fisch, Gemüse, Rippchen),
Soup/Porridge (Suppe/Haferbrei), Pressure keeping (Druck halten) und Preset setting (Startverzögerung).
Nachdem Sie eine Funktion ausgewählt haben blinkt das Display 8 mal und das Gerät startet dann automa-
tisch.
• Die Funktion PRESET SETTING erlaubt es eine verzögerte Startzeit einzustellen. Jedes Mal wenn Sie die
Taste drücken, wird die zeit im Display angezeigt und die entsprechende Kontrollleuchte blinkt. Zu beginn
wird die zeit in 0.5-Stunden-Schritten erhöht. Nach 10 Stunden wird die zeit in 1-Stunden-Schritten erhöht.
Die maximal einstellbare Startverzögerung beträgt 24 Stunden.
• Die Funktion LEFTOVER HEATING dient dazu kalte Reste erneut zu erhitzen.
• Funktion WARM/CANCEL: Sobald ein Programm beendet ist wird das Essen automatisch bis zu 24 Stunden
warmgehalten. Drücken Sie auf die CANCEL-Taste, um das Warmhalten zu beenden.
• Das RICE Programm ist ein automatisiertes Programm, mit dem normaler oder Parboiled Reis gekocht wer-
den kann. Die Kochdauer wird automatisch anhand der eingegebenen Menge ermittelt. 2 Becher Reis zu ko-
chen dauert etwa 10 Minuten, 3-6 Becher Reis dauern etwa 12 Minuten, mehr reis dauert dementsprechend
länger. Die Kochzeit wird auf dem Display nicht angezeigt. Sobald der Arbeitsdruck erreicht ist wird aber die
Zeit angezeigt, in der der Druck gehalten wird. Hinweis: Wenn Sie mehr als 2 Becher reis kochen, passen Sie
die Wassermenge dementsprechend an.
• Das Programm SOUP/PORRIDGE eignet sich zur Herstellung von Suppen und Haferbrei. Benutzen Sie die
[+] und [-] Taste, um die Kochzeit einzustellen. Wählen Sie für Haferbrei 18 Minuten. Wenn das Programm
fertig ist, drehen Sie das Dampfauslassventil nicht auf, andernfalls spritzt der Haferbrei heraus.
• MEAT/CHICKEN-Programm: Benutzen Sie die [+] und [-] Taste, um eine Zeit einzustellen, in der das Fleisch
die gewünschte Textur hat. Für Fleisch das sich leicht von den Knochen lösen lässt, empfehlen wir eine
Garzeit von 98 Minuten.
• Die Funktion BEANS/CANNED ist dazu gedacht Lebensmitteln aus Dosen zu erwärmen. Falls Sie möchten,
dass die Bohnen gut durchgekocht sind, benutzen Sie die [+] Taste und wählen Sie 30 Minuten.
• Die Funktion BABY FOOD eignet sich speziell zum Erwärmen von Babybrei. Benutzen Sie die [+] oder [-]
Taste, um die gewünschte Zeit einzustellen.
• Mit der Funktion STEAM, können Sie Fisch, Gemüse oder Rippchen auf dem mitgelieferten Gitter und
Dämpfer dünsten. Wenn Sie Fisch oder Gemüse dünsten, beachten Sie dass die automatische Druckver-
minderung zu überhöhten Garzeiten führen kann. Lassen Sie den Druck daher manuell ab.