KLAUDIO KD-CLN-LP200 User manual

English v1.1
www.klaudio.com
Printed in Korea
TM
KD-CLN-LP200
Ultrasonic Vinyl Record Cleaner
User’s Manual
TM

i
User Manual
User Manuals are updated regularly. Please be sure to check our support page for a newer
version of this guide: www.klaudio.com
GENERAL PRECAUTION
Please read this manual carefully before using your Klaudio product.
!WARNING:Indicates apotentiallyhazardoussituation which,if notavoided,
could result in personal injury or be life-threatening.
!CAUTION:Indicates a potentially hazardous situation which, if not avoided,
may result in damage to equipment or property.
PROHIBITED:Indicates a prohibited action.
ABOUT SIGNS
Throughout this document, critical information is highlighted in gray-colored boxes. The
following symbols are intended to help prevent any situation which may cause personal
injury and/or damage to equipment:
TRADEMARKS
The Klaudio name and logo are trademarks or registered trademarks of Koolance, Inc.
Other company and product names used in this publication are for identification purposes
only and may be trademarks or registered trademarks of their respective companies.
COPYRIGHT
All rights reserved. Copyright (C) Klaudio.
CONTACT INFORMATION
Web: www.klaudio.com
Address: 2840 W Valley Hwy N, Auburn, WA 98001
Phone: +01 253-249-7813

ii iii
User Manual
- Rubber funnel
- PVC drain tubing
- User Manual
- AC Power Cable (U.S. plug)
Included Hardware
flat-head screw driver
Required Tools
During installation, you may need the following tools:
CAUTION: Keep this product level once water is added. If
the product is tilted, water may spill onto and damage the
electronics.
!
Do not tilt while filling! Do not tilt while operating!
Keep unit level whenever water is inside. Always drain water
from the reservoir completely before transporting.
CAUTION: Before powering-on the
system, the “AC POWER SELECT”
switch must be set for your local
voltage. The incorrect setting can
damage the product and is not
covered by the product warranty.
!

iv 1
User Manual
Chapter 1
Overview
Table of Contents
Overview 1
Product Diagram.............................................................................................2
Features..........................................................................................................3
Setup 4
Voltage Configuration......................................................................................5
Filling the Reservoir........................................................................................5
Connecting the Power Cable..........................................................................6
Adjusting Washing and Drying Settings..........................................................6
Understanding the LED Progress Bar.............................................................7
Operation 8
Loading a Record............................................................................................9
Draining and Maintenance..............................................................................9
Accessing the Reservoir............................................................................... 11
Troubleshooting ............................................................................................12
Limited Warranty...........................................................................................13

23
User Manual
Overview
Product Diagram
Power
Switch
Reservoir Window Display Panel
Drain
Valve
Fill Port
(Top)
Drain
Outlet
Reservoir
Cleaning Access
Auxillary
Power
Output
AC Plug and
Voltage Switch
Features
Enjoyyourvinylrecordsasif they were new again! Klaudio’sKD-CLN-LP200brings
an unrivaled 200 Watts of ultrasonic cleaning power to your LP collection. Using
patent-pending technology, the toughest grime and dust is easily removed without
the risk of physical scrubbers or need for detergent. Drying is also handled safely
with blowers. Simply fill with plain water and insert your phonograph record-- the
rest is automated.
Ultrasonic transducers are placed perpendicular to the disc for maximum cleaning
effect. Klaudio’s technology allows powerful waves to remove debris without dam-
aging the disc, and special dampening minimizes vibration and noise. The entire
washing and drying process can be adjusted from 3 to 9 minutes. Cleaning status
is conveniently displayed through an LED progress bar.
• 200W total ultrasonic cleaning power
• Compatible with 296-304mm (11.65-12in) diameter LP vinyl records
• Easy-to-use automated process which starts simply with record insertion
• Risk-free cleaning and drying without physical surface contact
• No scrubbing or drying rollers to replace
• Designed for use without detergent, fill with tap or distilled water
• Adjustable washing time: 1-5 minutes
• Adjustable drying time: 2-4 minutes
• Wash + dry and dry-only modes
• Premium welded stainless steel reservoir for high reliability
• Integrated drain valve and reservoir access for easy maintenance
• Auxiliary power output for future accessories
• 115V (60Hz) and 230V (50Hz) AC compatible
• 2-year warranty

45
User Manual
Chapter 2Setup
Setup
Before powering-on the system, the “AC Power Select” voltage switch must be set
for your local voltage.
Voltage Configuration
CAUTION: Before powering-on the
system, the “AC POWER SELECT”
switch must be set for your local
voltage. The incorrect setting can
damage the product and is not
covered by the product warranty.
!
On the rear of the unit, use a small flat-head screwdriver to adjust the AC voltage
switch (115V/60Hz or 230V/50Hz). The incorrect setting can permanently damage
the ultrasonic transducers. This condition is not covered by the product warranty.
Filling the Reservoir
Use only household tap water or distilled water
to fill the reservoir. Detergents or additives are
notrecommendedand may reactwithmaterials
used in the system.
Using a funnel (one is included), SLOWLY add
water through the top fill port. The reservoir
requires approximately 2.5 liters or 0.66 gal-
lons of water.
Stop filling once the water level reaches the “Max Fill
Level” marked on the reservoir. There will be a delay
between pouring and an increase in the reservoir fill
line. Go slowly to avoid overfilling.
Max Fill Level

67
User Manual
Understanding the LED Progress Bar
Adjusting Washing and Drying Settings
Setup
Connecting the Power Cable
Once the reservoir is filled with water,
connect the mainAC power cable to the
back of the unit. Plug the pronged end
into an AC outlet.
Turn on the main front power switch. It will illuminate
when switched on.
The LED display bar will show the current status and cleaning progress.
PRIMING The pump is filling the upper wash basin from the reservoir.
Washing Cycle
0% 25% 50% 75% 100% Indicates the current washing
progress based on the preset
time.
DRAINING The upper wash basin is emptying back into the reservoir.
Drying Cycle
0% 25% 50% 75% 100% Indicates the current drying
progress based on the preset
time.
Once finished, the “Completed” green LED will illuminate. The
system will also emit an audio chime every few minutes until the
disc has been removed. Remove the disc and insert another to
restart the cleaning cycle.
COMPLETED
“WASHING TIME” adjusts the ultrasonic washing time
from 1-5 minutes. Longer cleaning times are intended for
especially difficult-to-clean records. It is suggested to start
with a short time period and increase if needed.
“DRYING TIME” adjusts the air blower drying time from
2-4 minutes. This setting depends on room temperature
and humidity.
Configure the setting knobs as desired. This can be done at any time before or
during the cleaning operation:
This toggle switch selects between “DRY ONLY” and “WASH &
DRY”. If “WASH & DRY” is selected, the drying cycle will begin
immediately after the washing cycle has completed.

89
User Manual
Chapter 3
Operation
Loading a Record
Operation
After initial setup and configuration, there’s only one step to operation. Carefully
place an LP vinyl record with a diameter of between 296-304mm (11.65-12in) into
the top loading slot. When loading, the disc should be kept vertical (perpendicular
to the floor).
Thecleaning/dryingprocesswillautomatically start. Once finished, the “Completed”
green LED will illuminate. Insert a new disc to start again.
Draining and Maintenance
It’s recommended to refresh the system with
clean water periodically, about every 1-4
weeks, depending on usage.
The unit should also be drained before being
transported or sitting idle for long periods of
time.DISCONNECTTHEACPOWERCABLE
BEFORE DRAINING!
To avoid scratches, keep disc
perpendicular to the floor when inserting.

10 11
User Manual
Todrain,push theincludedPVCtubing onto
thebarbedfittingmarked “Drain” and screw
on the knurled compression ring. Position
theoppositeendofthistubing into a sink or
large container to capture the older water.
Draining is made easier by
placing the cleaning unit on a
table with the tubing lowered
into a bucket.
To release water from the reservoir, turn
the drain valve knob on the side of the
unit to “Open”.
Open
Operation
Accessing the Reservoir
If necessary, the reservoir can be accessed for cleaning or thorough drying. Before
opening the reservoir, be sure it’s completely empty.
See“Drainingand Maintenance” whichdescribesthis process. Whiledraining,gently
tilt the system towards the drain fitting to fully evacuate water from the reservoir.
Once the reservoir is completely empty, unscrew the rear access cap. If the unit
will be shipped or transported, paper towels can be placed inside the reservoir to
absorb residual water (along with replacing the access cap).

12 13
User Manual
1. The system does not power on, begin the cleaning cycle, or the LED progress
bar flashes when a disc is inserted.
Check that the power cord is connected between the unit and an AC wall
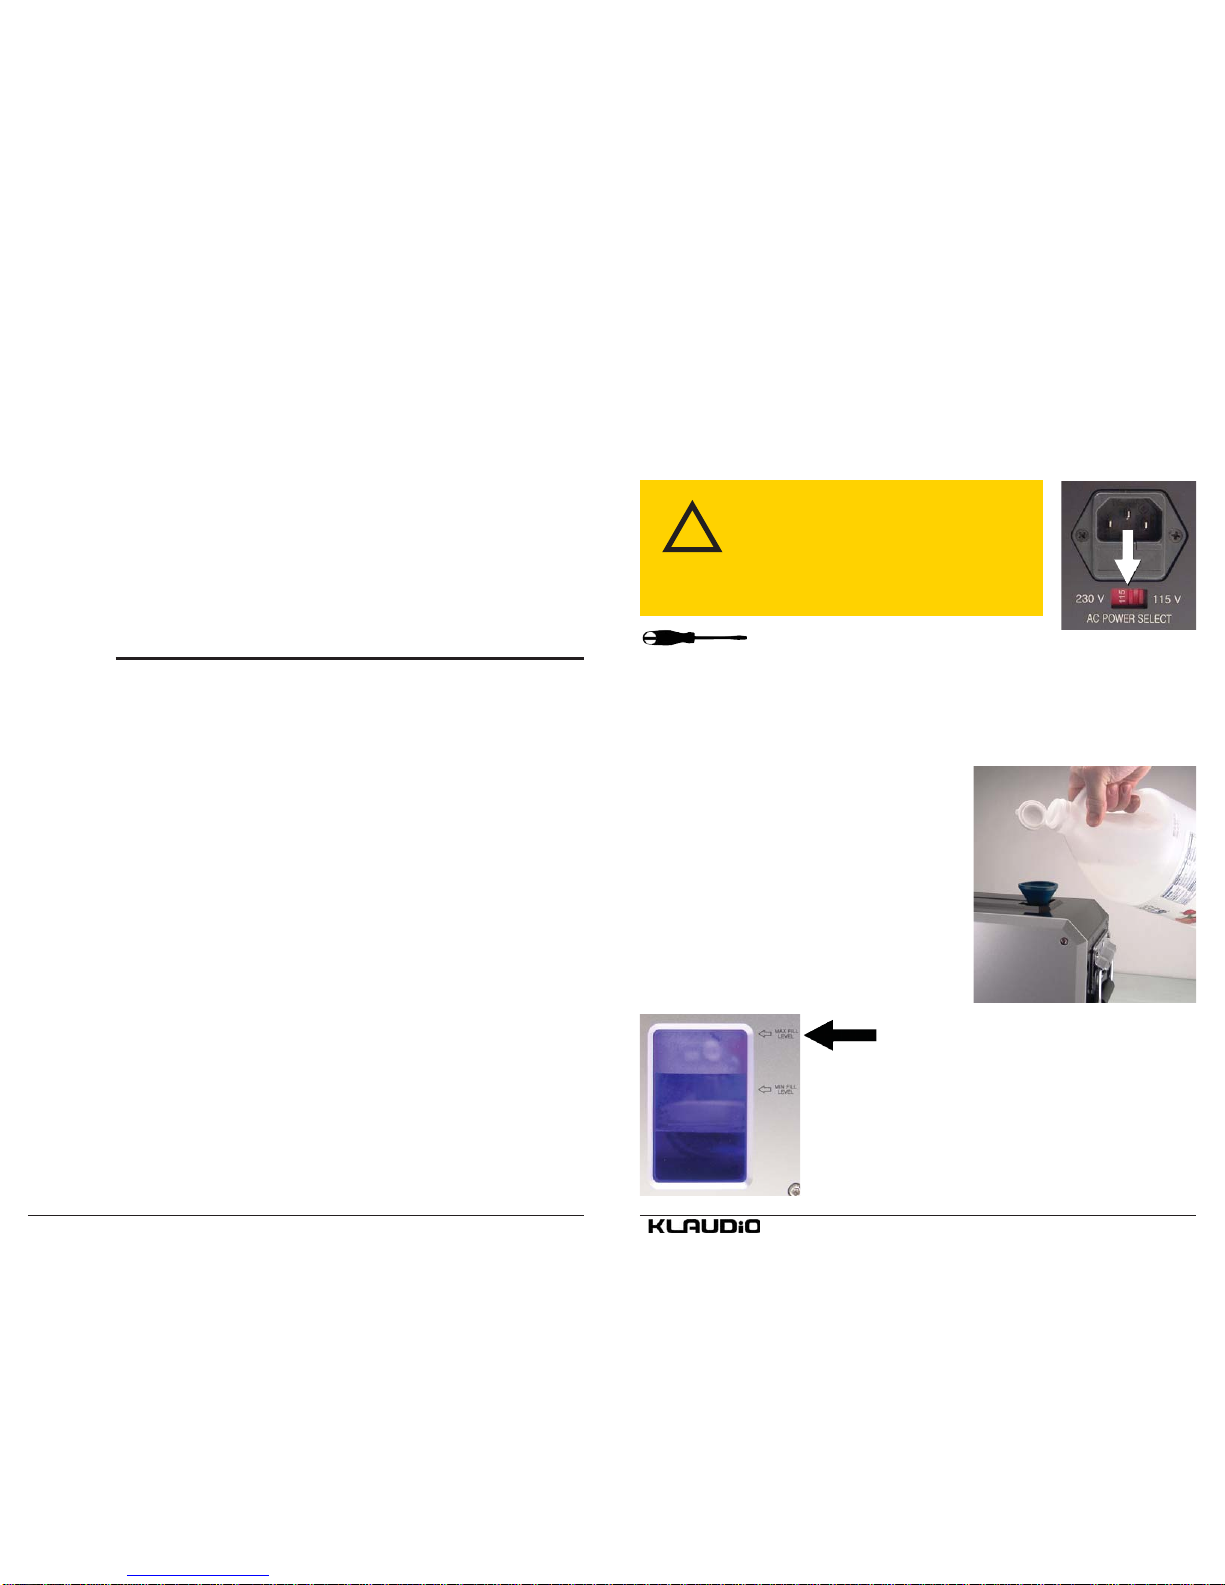
outlet. Confirm the voltage switch is properly set on the rear of the unit (See
“Voltage Configuration”). Be sure the diameter of the LP record is between
296-304 millimeters (11.65-12.00 inches); other sizes will not be detected.
Make sure the “Completed” green LED light is illuminated before inserting a
record. If not, try power cycling the unit (turning off/on using the front power
switch), then removing and reinserting the disc.
3. Water is dripping from the unit.
The cleaning system must remain level at all times when filled with water.
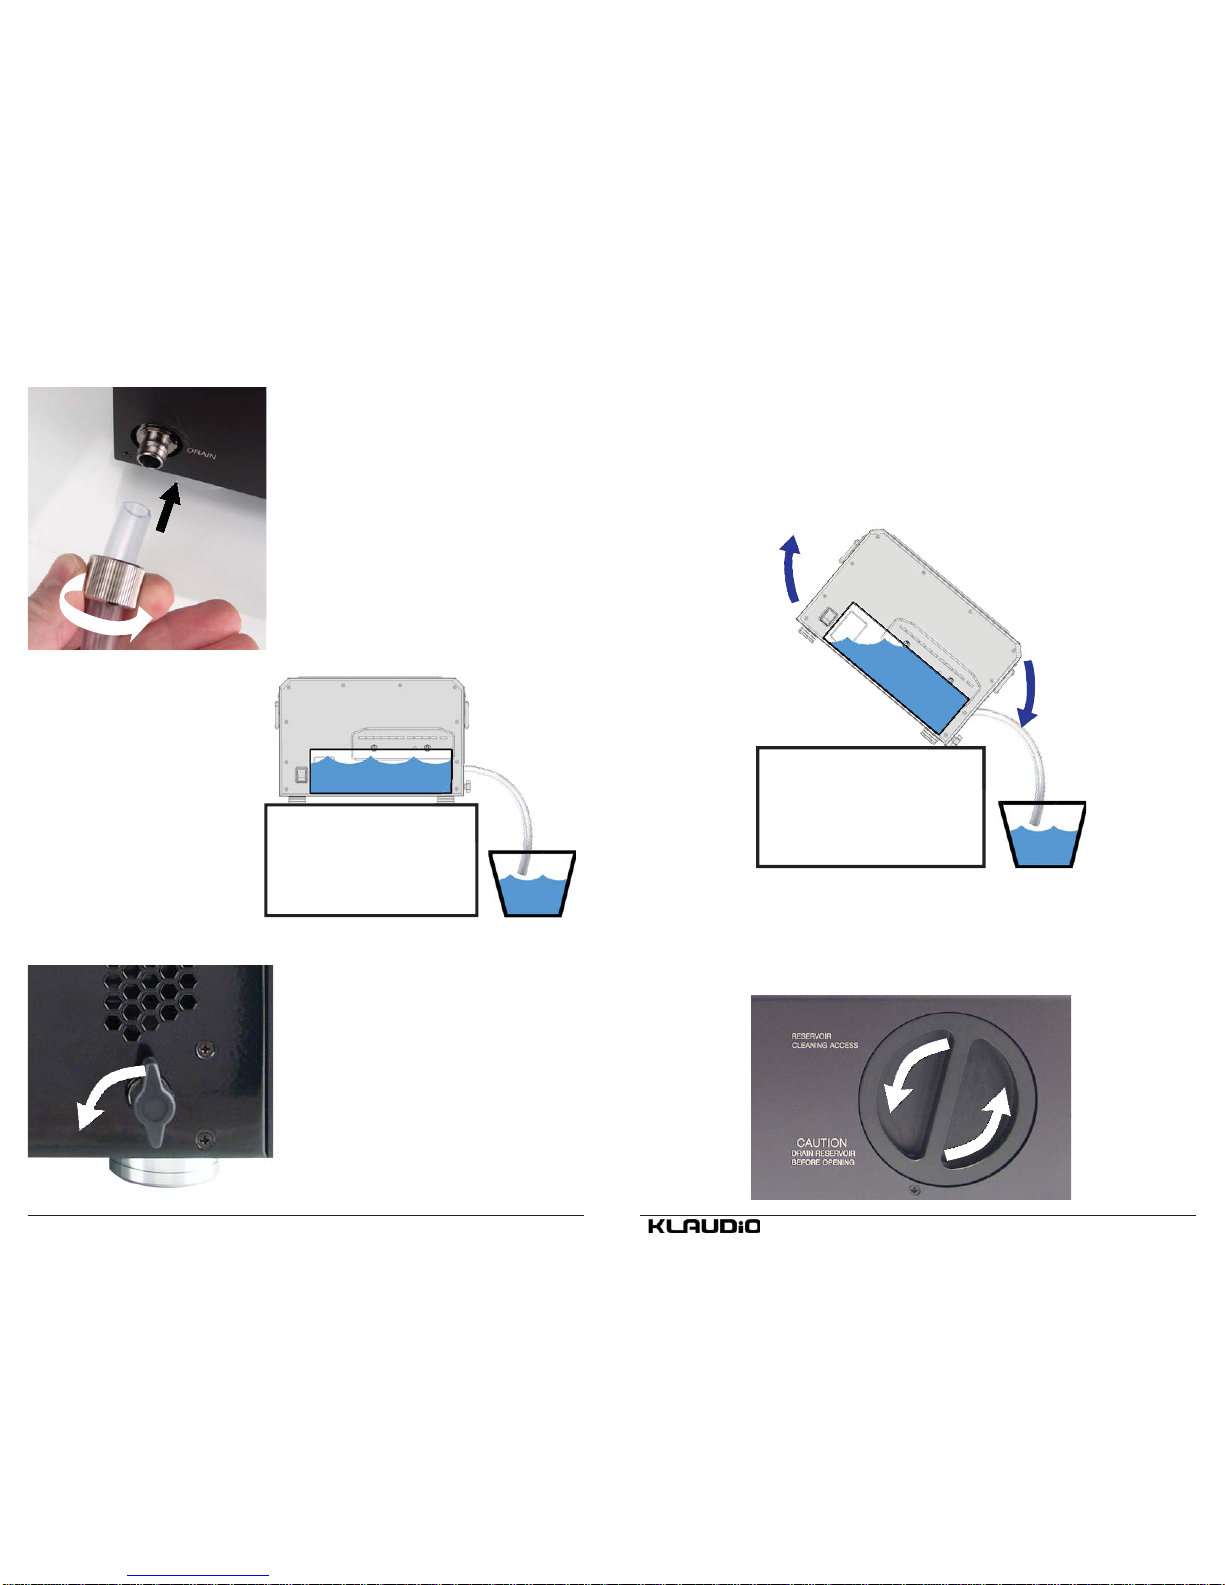
Checkthatthedrainvalve isclosed(See“DrainingandMaintenance”)andthat
the reservoir access cap is tightened shut (see “Accessing the Reservoir”).
4. The unit makes a loud noise during the auto priming or draining process.
Be sure there is sufficient water in the reservoir (See “Filling the Reservoir”).
If the reservoir is already full, unwanted debris may have entered the pump
throughthetop loading slot. Completelydrainanddry the unit(see“Draining&
Maintenance”). Check inside the reservoir via the rear access cap. Significant
debris or any hard particles should be removed before operation. Add new
water after cleaning out the reservoir (see “Filling the Reservoir”).
5. The unit makes odd noises during the washing cycle (0-100%).
The ultrasonic transducers will produce a moderate squeeling or grinding
noise when cleaning, which is normal. The record is also rotated with a belt
motor during this process. If a more significant noise is heard, try turning off
the unit and placing it onto a different surface. Although the transducers are
insulated, vibrations might be exaggerated by some table surfaces.
6. The record does not rotate properly during the cleaning or drying cycle.
This can occur if there are significant irregularities or “flat spots” in the outer
edge of the disc. It may help to lightly smooth the outer edge of the vinyl with
sandpaper. If sanding, rinse the disc to remove vinyl debris before inserting it
into the cleaning unit.
7. The power consumption of the unit is less than 200W.
Power consumption of the ultrasonic transducers depends upon the surface
of the record. If there are less grooves or debris, power usage will be lower.
Troubleshooting Limited Warranty
Disclaimer
Klaudio (“Klaudio”) warrants each new ultrasonic cleaning product against defects
in materials or workmanship for a period of two years from the date of purchase, and
agrees to repair or replace any defective Klaudio system without charge. Shipping
costs are non-refundable.
This warranty is non-transferable. All warranty claims must be accompanied by the original
proof of purchase.
THISWARRANTYDOESNOTCOVERDAMAGERESULTINGFROMACCIDENT,MISUSE
OR ABUSE, LACK OF REASONABLE CARE, SHIPPING DAMAGE, MODIFICATIONS,
THE AFFIXING OF ANY ATTACHMENT NOT PROVIDED WITH THE PRODUCT, OR
LOSS OF PARTS .
Use of chemical cleaning agents or liquids will void this warranty. Klaudio will not pay
for warranty service performed by a non-authorized repair or diagnostic service and will
not reimburse the consumer for damage resulting from warranty service performed by a
non-authorized repair service. No responsibility is assumed for any special incidental or
consequential damages due to a defective Klaudio product.
Inorder toobtain warrantyservice, contactour RMAdepartment forinformation.The product
must be shipped postage prepaid to an authorized Klaudio service location. It is suggested
that, for your protection, you return shipments of product by insured mail, insurance prepaid.
Damage occurring during shipment is not covered by this warranty. Shipping costs are non-
refundable. No other warranty, written or oral, is authorized by Klaudio.
IN NO EVENT SHALLKLAUDIO, PARENT COMPANY KOOLANCE, OR ITS EMPLOYEES,
AGENTS, SUPPLIERS, MANUFACTURERS, OR CONTRACTORS BE LIABLE FOR
ANY DAMAGES OF ANY KIND OR CHARACTER, INCLUDING WITHOUT LIMITATION
ANY COMPENSATORY, INCIDENTAL, DIRECT, INDIRECT, SPECIAL, PUNITIVE, OR
CONSEQUENTIAL DAMAGES, LOSS OF USE, LOSS OF DATA, LOSS OF INCOME OR
PROFIT, LOSS OF OR DAMAGE TO PERSONS OR PROPERTY, CLAIMS OF THIRD
PARTIES, OR OTHER LOSSES OF ANY KIND OR CHARACTER, AND WHETHER
OR NOT THE POSSIBILITY OF SUCH LOSS OR DAMAGE HAS BEEN NOTIFIED TO
KLAUDIO.

14
This page has been intentionally left blank.
Table of contents
Other KLAUDIO Turntable manuals