kleankin 834-599V00CR User manual

IN230300257V02_UK_FR_ES_PT_DE_IT
IMPORTANT, RETAIN FOR FUTURE REFERENCE: READ CAREFULLY
INSTRUCTION MANUAL
30MIN
EN
834-589V00CR

CHECK PRODUCT LIST AFTER
OPENING THE PACKAGE
TOOLS YOU MAY NEED
● LED Lighted Mirror
● Screws for wall
● Type A Plastic Anchor
● lnstallation Manual
● Gloves
x 1
x 2+1
x 2+1
x 1
x 2
WARNING AND SAFETY INSTRUCTIONS
Before assembly, carefully read this instruction manual. Refer back to this manual when
installing the product to ensure it is fitted safely and correctly. Keep these instructions for
future use.
WARNING Risk of fire and electric shock
● All fittings must be installed in accordance with current IEE wiring regulations. If in doubt,
consult a qualified electrician.
● Switch off the electrical supply at the main circuit board before installation and mainte-
nance.
● For indoor use only. This product should be positioned well away from curtains and fabrics.
Never cover the mirror.
● Regularly check the cord, the transformer and all other parts for damage. If damages are
found, do not use this product.
INSTALLATION SAFETY
● Before installation, ensure the product is not damaged or has missing parts. Handle the
product with care.
● Ensure there are no hidden pipes or cables in the wall before drilling.
● Wear suitable eye protection when drilling. Take care if drilling on tiled surfaces, just in case
the drill slips.
CAUTION
This product contains a light source of energy efficiency class <F>.
The light source of this product is non-replaceable light diodes (LED). Do not disassemble the
product, as the light diodes can damage the eyes.
NOTE: The important safeguards and instructions that appear in this manual are not meant
to cover all possible conditions and situations that may occur. It must be understood that
common sense, caution and care, are factors that can't be built into any product. These
factors must be supplied by the person(s) caring for and operating the product. Do not install
this product in hazardous locations.
-2-

INSTALIATION
2.Mark the hole position on the wall
3.Drill the holes and place the suitable
plastic anchors.
4.Arrange the screws on the wall, leav-
ing about 3/8 inch outside the wall, and
make sure the screws are stable
5.Connect the mirror with the main
supply.
ATTENTION:
PLEASE CUT OFF THE MAIN POW-
ERSUPPLY BEFORE WIRING!
6.Hang the mirror on the screw
+
+
+
+
+
+
+
+
1.Measure the distance of the hanging
hole
WALL
MIRROR
LIVE (usually BROWN)
GROUND (usually BLUE)
-3-

OPERATION INSTRUCTION
Anti-Fog Function
ON/OFF button
Defogger button
● Button turns blue when connected to main supply.
● Touch the button to turn on/off the mirror
● Hold the button to adjust the brightness.
● Confirm the setting by removing your finger when it
reaches the colour you need.
● Mirror begins to be warm and defog after pressing
the defogger button.Press again to quit the anti-fog
function.
● Note: The defogger will stop automatically after 60
minutes of continuous operation to prevent any
damage caused by prolonged high temperature.
AFTERCARE INSTRUCTIONS
Before cleaning, ensure the mirror is turned off.
Clean using a soft and dry cloth. Never use cleaning agents or abrasive
materials. Do not allow moisture to come into contact with the lamp.
-4-

IN230300257V02_UK_FR_ES_PT_DE_IT
30MIN
FR
MANUEL D’INSTRUCTIONS
IMPORTANT - CONSERVEZ CES INFORMATIONS
POUR VOTRE CONSULTATION ULTÉRIEURE: LISEZ ATTENTIVEMENT
834-589V00CR
-5-

VÉRIFIEZ LA LISTE DES PRO-
DUITS APRÈS L’OUVERTURE DE
L’EMBALLAGE
TOOLS YOU MAY NEED
● Miroir éclairé LED
● Vis pour mur
● Ancrage en plastique de type A
● Manuel d’installation
● Gants
x 1
x 2+1
x 2+1
x 1
x 2
AVERTISSEMENT ET CONSIGNES DE SÉCURITÉ
Avant l’assemblage, lisez attentivement ce manuel d’instructions. Reportez-vous à ce
manuel lors de l’installation du produit pour s’assurer qu’il est monté correctement et en toute
sécurité. Conservez ces instructions pour une utilisation ultérieure.
AVERTISSEMENT Risque d’incendie et de choc électrique
● Tous les raccords doivent être installés conformément à la réglementation en vigueur en
matière de câblage IEE. En cas de doute, consultez un électricien qualifié.
● Coupez l’alimentation électrique au niveau de la carte de circuit principal avant l’installation
et l’entretien.
● Utilisation à l’intérieur uniquement. Ce produit doit être placé bien loin des rideaux et des
tissus. Ne couvrez jamais le miroir.
● Vérifiez régulièrement que le cordon, le transformateur et toutes les autres pièces ne sont
pas endommagés. Si des dommages sont constatés, n’utilisez pas ce produit.
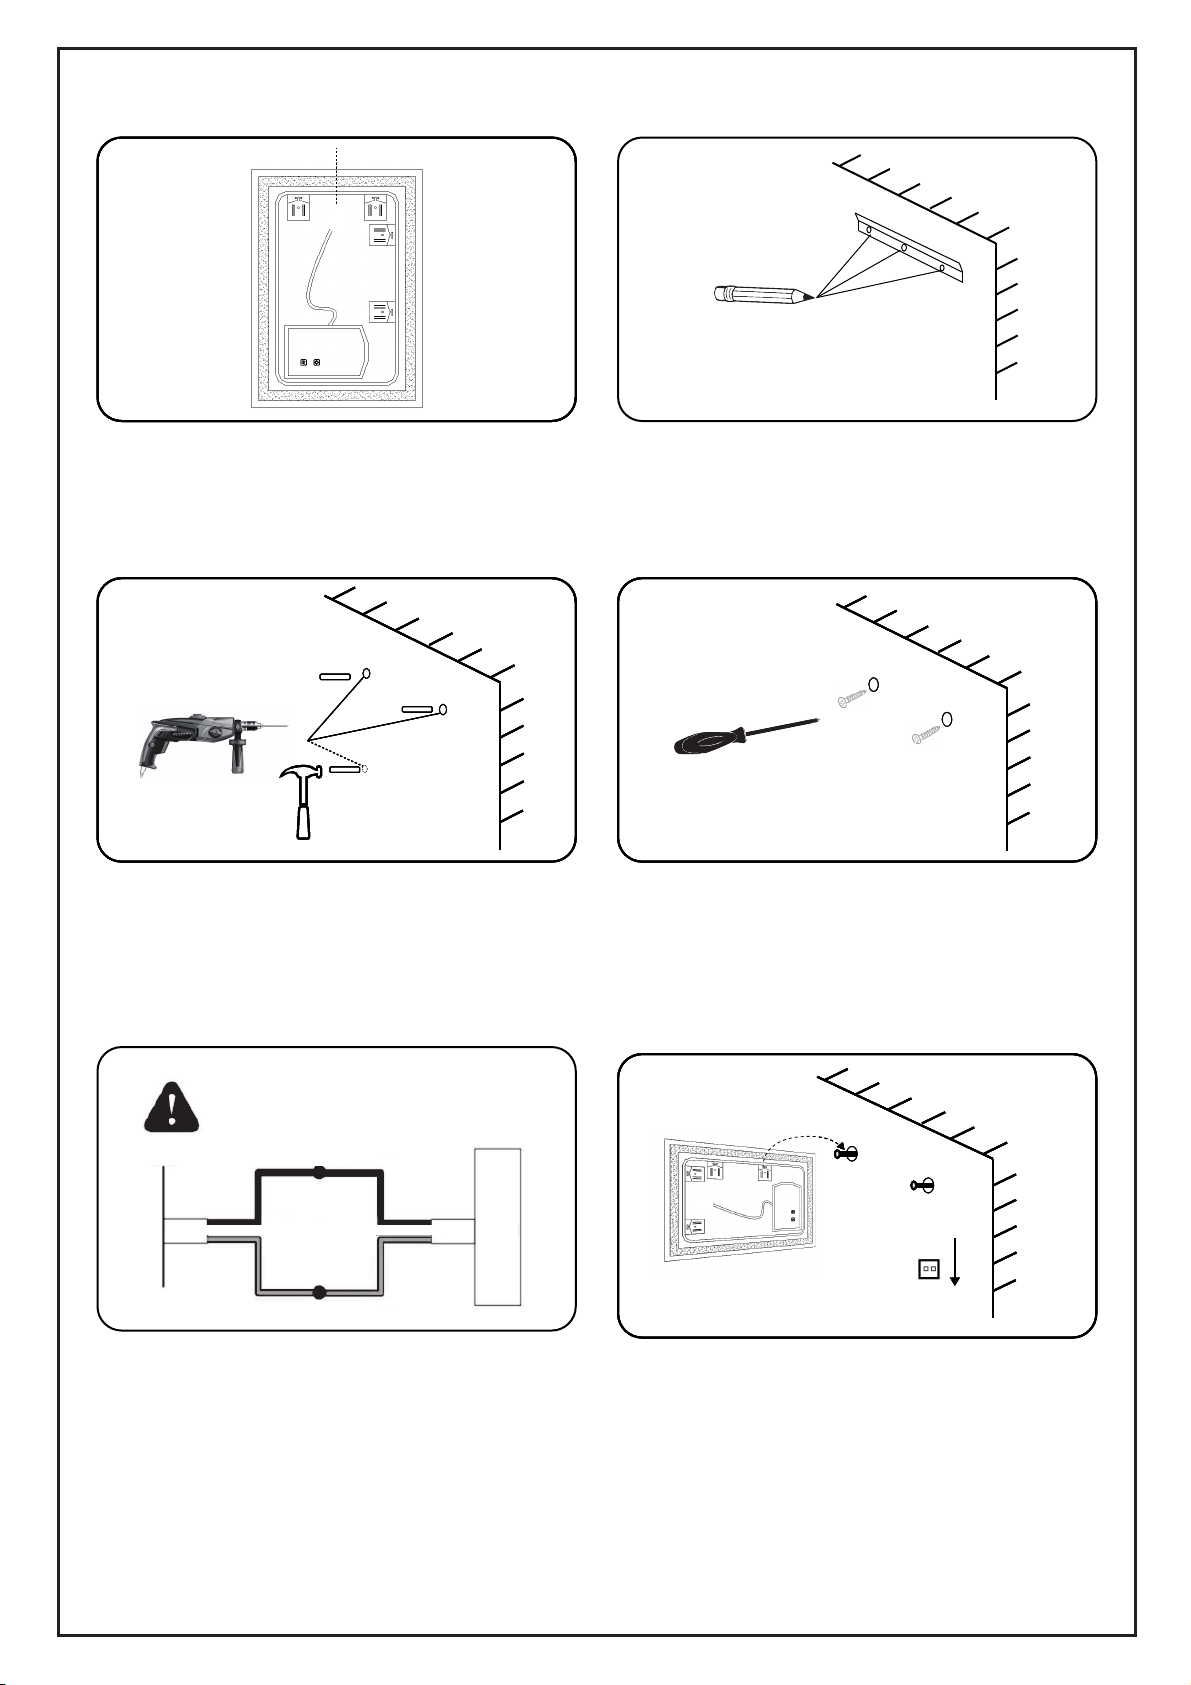
SÉCURITÉ D’INSTALLATION
● Avant l’installation, assurez-vous que le produit n’est pas endommagé ou qu’il ne manque
pas de pièces. Manipulez le produit avec précautions.
● Assurez-vous qu’il n’y a pas de tuyaux ou de câbles cachés dans le mur avant le perçage.
● Portez une protection oculaire appropriée lors du forage. Faites attention si vous percez sur
des surfaces carrelées, juste au cas où la perceuse glisse.
Prudence
Ce produit contient une source lumineuse de classe d'efficacité énergétique <F>.
La source lumineuse de ce produit est constituée de diodes lumineuses non remplaçables
(LED). Ne démontez pas le produit, car les diodes lumineuses peuvent endommager les
yeux.
NOTE : Les garanties et les instructions importantes qui apparaissent dans ce manuel ne
sont pas destinées à couvrir toutes les conditions et situations possibles qui peuvent se pro-
duire. Il convient de souligner le bon sens, la prudence et le soin sont des facteurs qui ne peu-
vent être intégrés dans aucun produit. Ces facteurs doivent être fournis par la ou les per-
sonnes la personne qui s’occupe du produit et l’utilise. N’installez pas ce produit dans des
endroits dangereux.
-6-

INSTALLATION
1.Mesurer la distance du trou de sus-
pension
2.Marquez la position du trou sur le
mur
3.Percez les trous et placez les
ancrages en plastique appropriés.
4.Disposez les vis sur le mur, en lais-
sant environ 3/8 de pouce à l'extérieur
du mur, et assurez-vous que les vis
sont stables
5.Connectez le miroir à l’alimentation
principale.
ATTENTION:
VEUILLEZ COUPER L’ALIMENTA-
TION PRINCIPALE AVANT LE
CÂBLAGE !
6.Accrochez le miroir à la vis
+
+
+
+
+
+
+
+
Mur
Mirror
Chargé (généralement Brun)
SOL (généralement Bleu)
-7-

INSTRUCTIONS D’UTILISATION
Bouton ON/OFF
Bouton Désembuage
● Le bouton devient bleu lorsqu’il est connecté à l’ali-
mentation principale.
● Appuyez sur le bouton pour allumer/éteindre le
miroir
● Maintenez le bouton pour régler la luminosité.
● Confirmez le réglage en retirant votre doigt lorsqu’il
atteint la couleur souhaitée
● Le miroir commence à être chaud et à se désem-
buer après avoir appuyé sur le bouton de désem-
buage. Appuyez à nouveau pour quitter la fonction
antibuée.
● Note : Le dégivreur s’arrêtera automatiquement
après 60 minutes de fonctionnement continu pour
éviter tout dommage causé par une température
élevée prolongée.
Fonction antibuée
INSTRUMENTS DE SUIVI
Avant le nettoyage, assurez-vous que le miroir est éteint.
Nettoyez à l’aide d’un chiffon doux et sec. N’utilisez jamais d’agents de nettoyage
ou de matériaux abrasifs. Ne laissez pas l’humidité entrer en contact avec la
lampe.
-8-

IN230300257V02_UK_FR_ES_PT_DE_IT
30MIN
ES
MANUAL DE INSTRUCCIONES
IMPORTANTE - CONSERVE ESTA INFORMACIÓN
PARA SU CONSULTA POSTERIOR: LEER DET ALLA DAMENTE
834-589V00CR
-9-

● Espejo con luz LED
● Tornillos de pared
● Tacos plásticos tipo R
● Manual
● Guantes
VERIFIQUE LAS PIEZAS AL
ABRIR EL PAQUETE
HERRAMIENTAS NECESARIAS
x 1
x 2+1
x 2+1
x 1
x 2
ADVERTENCIAS E INSTRUCCIONES DE SEGURIDAD
Antes del montaje, lea atentamente este manual de instrucciones. Vuelva a consultar este
manual al instalar el producto para asegurarse de que se instala de forma segura y correcta.
Guarde estas instrucciones para futuros usos.
RIESGO DE INCENDIO Y DESCARGA ELÉCTRICA
● Todos los accesorios deben instalarse de acuerdo con las normas de cableado actuales de
IEE. Si tiene dudas, consulte a un electricista calificado.
● Desconecte la alimentación eléctrica en la placa de circuito principal antes de la instalación
y el mantenimiento.
● Sólo para uso en interiores. Este producto debe colocarse lejos de cortinas y telas. Nunca
se debe cubrir el espejo.
● Controle periódicamente el cable, el transformador y todas las demás piezas en busca de
daños. Si se encuentran daños, no utilice este producto.
SEGURIDAD DE LAS INSTALACIONES
● Antes de la instalación, asegúrese de que el producto no está dañado ni le faltan piezas.
Manipule el producto con cuidado.
● Asegúrese de que no haya tuberías o cables ocultos en la pared antes de perforar.
● Utilice protección ocular adecuada al taladrar. Tenga cuidado al taladrar en superficies
alicatadas, por si el taladro resbala.
ATENCIÓN
Se incluye una fuente de luz de clase <F> de eficiencia energética.
La fuente de luz de este producto son diodos de luz (LED) no reemplazables. No desmonte
el producto, ya que los diodos de luz pueden dañar los ojos.
NOTA: Las medidas de seguridad e instrucciones importantes que aparecen en este manual
no pretenden cubrir todas las condiciones y situaciones posibles que pueden ocurrir. Debe
entenderse que el sentido común, la precaución y el cuidado son factores que no se pueden
incorporar a ningún producto. Estos factores deben ser suministrados por la(s) persona(s)
que cuida(n) y opera(n) el producto. No instale este producto en lugares peligrosos.
-10-

INSTALACIÓN
1.Mida la distancia del agujero para
colgar.
2.Marque la posición del agujero en la
pared.
3.Taladre los agujeros y coloque los
tacos de plástico adecuados.
4.Arrange the screws on the wall, leav-
ing about 3/8 inch outside the wall, and
make sure the screws are stable
5.Conecte el espejo con el suministro
principal.
ATENCIÓN:
¡CORTE LA FUENTE DE ALI-
MENTACIÓN PRINCIPAL ANTES DE
CABLEAR!
6.Cuelgue el espejo.
+
+
+
+
+
+
+
+
Muro Espejo
Cargado (generalmente marrón)
TIERRA (generalmente AZUL)
-11-

Función
antiempañamiento
● El botón se vuelve azul cuando está conectado a la
corriente.
● Toque el botón para encender o apagar el espejo.
● Mantenga pulsado el botón para ajustar el brillo.
● Confirme el ajuste retirando el dedo cuando alca-
nce el color que necesita.
● El espejo comienza a calentarse y a desem-
pañarse tras pulsar el botón antivaho. Pulse de
nuevo para salir de la función antivaho,
● Nota: El desempañador se detendrá automática-
mente después de 60 minutos de funcionamiento
continuo para evitar cualquier daño causado por la
alta temperatura prolongada.
INSTRUCCIONES DE MANTENIMIENTO
Antes de limpiar, asegúrese de que el espejo esté apagado.
Limpiar con un paño suave y seco. Nunca use agentes de limpieza o materiales
abrasivos. No permita que la humedad entre en contacto con la lámpara.
INSTRUCCIONES DE USO
botón ON/OFF
Botón antivaho
-12-

IN230300257V02_UK_FR_ES_PT_DE_IT
30MIN
PT
MANUAL DE INSTRUÇÕES
IMPORTANTE, GUARDE PARA FUTURAS REFERÊNCIAS: LEIA ATENTAMENTE
834-589V00CR
-13-

● Espelho iluminado por LED
● Parafusos para parede
● Tipo R âncora plástica
● Manual de instruções
● Luvas
x 1
x 2+1
x 2+1
x 1
x 2
VERIFICAR A LISTA DE PRODU-
TOS DEPOIS DE ABRIR A EM-
BALAGEM
FERRAMENTAS DE QUE
PODERÁ NECESSITAR
AVISO E INSTRUÇÕES DE SEGURANÇA
Antes da montagem, leia atentamente este manual de instruções. Consulte novamente este
manual ao instalar o produto para garantir a sua montagem segura e correta. Guarde estas
instruções para utilização futura.
ATENÇÃORisco de incêndio e choque elétrico
● Todos os acessórios devem ser instalados de acordo com os regulamentos atuais da cab-
lagem do IEE. Em caso de dúvida, consultar um eletricista qualificado.
● Desligar a alimentação elétrica na placa de circuitos principais antes da instalação e ma-
nutenção.
● Apenas para utilização em interiores. Este produto deve ser posicionado bem longe de cor-
tinas e tecidos. Nunca cobrir o espelho.
● Verificar regularmente se o cabo, o transformador e todas as outras peças estão danifica-
das. Se forem encontrados danos, não utilizar este produto.
INSTALAÇÃO DE SEGURANÇA
● Antes da instalação, certifique-se de que o produto não está danificado ou tem peças em
falta. Manusear o produto com cuidado.
● Certificar-se de que não há tubos ou cabos escondidos na parede antes da perfuração.
● Usar proteção adequada dos olhos ao perfurar. Ter cuidado ao perfurar em superfícies
azulejadas, para o caso da broca deslizar.
ATENÇÃO
Este produto contém uma fonte de luz de classe de eficiência energética <F>.
A fonte de luz deste produto são díodos de luz não substituíveis (LED). Não desmontar o pro-
duto, pois os díodos luminosos podem danificar os olhos.
NOTA: As importantes precauções e instruções que aparecem neste manual não se des-
tinam a cobrir todas as condições e situações possíveis que possam ocorrer. Deve entend-
er-se que o bom senso, precaução e cuidado, são fatores que não podem ser incorporados
em nenhum produto. Estes fatores devem ser fornecidos pela(s) pessoa(s) que cuida(m) e
operacionaliza(m) o produto. Não instalar este produto em locais perigosos.
-14-

INSTALAÇÃO
1.Meça a distância do orifício de sus-
pensão
2.Marque a posição do furo na parede
3.Faça os orifícios e coloque as ânco-
ras de plástico adequadas.
4.Disponha os parafusos na parede,
deixando cerca de 3/8 de polegada
fora da parede e certifique-se de que
os parafusos estejam estáveis
5.Ligar o espelho com o fornecimento
principal.
ATENÇÃO:
POR FAVOR CORTAR A ENERGIA
PRINCIPAL FORNECIMENTO ANTES
DA CABLAGEM!
6.Pendurar o espelho no parafuso.
+
+
+
+
+
+
+
+
PAREDE
Espelho
PARTE SUPERIOR (geralmente Marrom)
CHÃO (geralmente Azul)
-15-

Função
Desembaciador
● O botão fica azul quando ligado ao fornecimento
principal.
● Tocar no botão para ligar/desligar o espelho.
● Segurar o botão para ajustar a luminosidade.
● Confirme a definição retirando o seu dedo quando
● atinge a cor de que necessita
● O espelho começa a aquecer e a embaciar.
Quando acontece premir o botão do desembaciador.
Premir novamente para abandonar a função anti-de-
sembaciador.
● Nota: O desembaciador pára automaticamente
após 60 minutos de funcionamento contínuo para
evitar qualquer dano causado por temperaturas
elevadas prolongadas.
INSTRUÇÕES DE CUIDADOS
Antes de limpar, certifique-se de que o espelho está desligado.
Limpar com um pano macio e seco. Nunca utilizar produtos de limpeza ou materi-
ais abrasivos. Não permitir que a humidade entre em contacto com a lâmpada.
INSTRUÇÕES DE FUNCIONAMENTO
Botão ON/OFF
Botão desembaciador
-16-

IN230300257V02_UK_FR_ES_PT_DE_IT
30MIN
DE
GEBRAUCHSANWEISUNG
WICHTIG - BITTE HEBEN SIE DIESE ANLEITUNG FÜR
EINE SPÄTERE BEZUGNAHME AUF: SORGFÄLTIG DURCHLESEN
834-589V00CR
-17-

● LED-beleuchteter Spiegel
● Schrauben für die Wand
● Kunststoffdübel Typ A
● INSTALLATIONSHANDBUCH
● Handschuhe
x 1
x 2+1
x 2+1
x 1
x 2
NACH DEM ÖFFNEN DER VER-
PACKUNG PRODUKTLISTE
PRÜFEN
BENÖTIGTE WERKZEUGE
WARNUNG- UND SICHERHEITSHINWEISE
Lesen Sie diese Anleitung vor der Montage sorgfältig durch. Ziehen Sie diese Anleitung bei
der Montage zu Rate, um sicherzustellen, dass das Produkt sicher und korrekt montiert wird.
Bewahren Sie diese Anleitung für den späteren Gebrauch auf.
WARNUNG Brand- und Stromschlaggefahr
● Alle entsprechenden Installationen müssen in Übereinstimmung mit den aktuellen IEE-Ver-
drahtungsvorschriften durchgeführt werden. Wenden Sie sich im Zweifelsfall an einen qualifi-
zierten Elektriker.
● Schalten Sie vor Installations- und Wartungsarbeiten die Hauptstromversorgung aus.
● Nur für den Gebrauch in Innenräumen. Dieses Produkt sollte nicht in der Nähe von Vorhän-
gen oder Stoffen installiert werden. Den Spiegel niemals abdecken.
● Überprüfen Sie das Netzkabel, den Transformator und alle anderen Teile regelmäßig auf
Beschädigungen. Wenn Sie Schäden feststellen, verwenden Sie dieses Produkt nicht.
SICHERHEIT BEI DER INSTALLATION
● Vergewissern Sie sich vor der Installation, dass das Produkt nicht beschädigt ist oder Teile
fehlen. Behandeln Sie das Produkt mit Sorgfalt.
● Vergewissern Sie sich vor dem Bohren, dass sich keine Rohre oder Kabel in der Wand
befinden.
● Tragen Sie beim Bohren eine geeignete Schutzbrille. Achten Sie beim Bohren auf Fliesen
darauf, dass der Bohrer nicht abrutscht.
Vorsicht
Dieses Produkt enthält eine Lichtquelle der Energieeffizienzklasse <F>.
Die Beleuchtung dieses Produkts besteht aus nicht austauschbaren Leuchtdioden (LED).
Das Produkt nicht zerlegen, da die Leuchtdioden die Augen schädigen können.
HINWEIS: Die wichtigen Sicherheitshinweise und Anweisungen in diesem Handbuch bedeu-
ten nicht, dass alle möglichen Bedingungen und Situationen, die auftreten können, abge-
deckt sind. Es muss klar sein, dass gesunder Menschenverstand, Vorsicht und Sorgfalt Fak-
toren sind, die nicht in ein Produkt eingebaut werden können. Diese Faktoren müssen von
der/den Person(en) bereitgestellt werden, die für das Produkt verantwortlich ist/sind und es
bedient/bedienen. Installieren Sie dieses Produkt nicht an gefährlichen Orten.
-18-

INSTALLATION
1.Messen Sie den Abstand des Auf-
hängelochs
2.Markieren Sie die Lochposition an
der Wand
3.Löcher bohren und passende Kunst-
stoffdübel einsetzen.
4.Ordnen Sie die Schrauben an der
Wand an, lassen Sie etwa 3/8 Zoll
außerhalb der Wand und stellen Sie
sicher, dass die Schrauben stabil sind
5.Den Spiegel an die Hauptstromver-
sorgung anschließen.
ACHTUNG:
BITTE VOR DER VERKABELUNG
DIE STROMVERSORGUNG UNTER-
BRECHEN!
6.Spiegel an der Schraube aufhängen
+
+
+
+
+
+
+
+
Wand
Spiegel
UNTER SPANNUNG
(normalerweise Braun)
ERDE (normalerweise Blau)
-19-

Beschlagschutzfunktion
● Die Taste leuchtet blau, wenn sie mit dem Strom-
netz verbunden ist.
● Berühren Sie die Taste, um den Spiegel ein- bzw.
auszuschalten
● Zum Einstellen der Helligkeit die Taste gedrückt
halten.
● Bestätigen Sie die Einstellung, indem Sie den
Finger entfernen, wenn Sie die gewünschte Farbe
erreicht haben.
● Der Spiegel heizt sich auf und entfernt den Bes-
chlag, wenn Sie die Taste für den Beschlagschutz
drücken. Drücken Sie die Taste erneut, um den Bes-
chlagschutz zu beenden.
● Hinweis: Die Beschlagschutzfunktion schaltet sich
nach 60 Minuten Dauerbetrieb automatisch ab, um
Schäden durch anhaltend hohe Temperaturen zu
vermeiden.
PFLEGEHINWEISE
Vor dem Reinigen den Spiegel ausschalten.
Zur Reinigung ein weiches und trockenes Tuch verwenden. Niemals Reinigung-
smittel oder Scheuermittel verwenden. Lassen Sie keine Feuchtigkeit mit der
Lampe in Kontakt kommen.
BETRIEBSANLEITUNG
EIN/AUS-Taste
Beschlagschutz-Taste
-20-
This manual suits for next models
14
Table of contents
Languages:
Other kleankin Personal Care Product manuals
Popular Personal Care Product manuals by other brands

Solaire
Solaire GODDESS Royal Collection T6000 S instruction manual

Lifemax
Lifemax 1359 manual

B. Braun
B. Braun Aesculap Instructions for use/Technical description

Silvercrest
Silvercrest SNS 45 A3 operating instructions

Lifemax
Lifemax 1206.1 quick start guide

Home Skinovations
Home Skinovations Silk'n Reju Instructions for use

Riobeauty
Riobeauty SONICLEANSE GLO user manual

Silvercrest
Silvercrest SHK 100 B2 Operation and safety notes

Silvercrest
Silvercrest SWWS 240 C1 operating instructions

Hague
Hague POSIGO P01XL user manual

Frog
Frog @ease operating instructions

Speakman
Speakman SEF-1800 EYESAVER Installation, Maintenance & Operation Instructions