manuals.online logo
Brands
  1. Home
  2. •
  3. Brands
  4. •
  5. KleenGel
  6. •
  7. Dispenser
  8. •
  9. KleenGel 1001 User manual

KleenGel 1001 User manual

Replace with four (4) new A
KleenGel ™
Hands-Free Gel Dispenser
Non-Sterile
Symbol Descriptions
In this document, indicates conditions or practices that could damage the equipment
or other property (“CAUTION”)
INDICATIONS FOR USE
The KleenGel hands-free dispenser is used to dispense lubricating gel by healthcare
providers when performing pelvic and rectal exams and other procedures requiring
lubricating gel. The dispenser is for use only with KleenGel disposable gel
cartridges.
CAUTIONS
CAUTION: Federal law restricts this device to sale by or on the order of a physician
CAUTION: Do not immerse dispenser in water or other liquids.
CAUTION: Do not sterilize dispenser.
CAUTION: Use only KleenGel disposable gel cartridges.
CONTRAINDICATIONS: KleenGel Lubricating jelly issterile until the cartridge is
opened. The dispenser isnotintended for usewith sterile procedures.
1. Power On/Off Switch 5. Volume Up and Down Switch (+/-)
2. Dispense Spout 6.Infra-Red Sensor
3. LED Indicator Lights 7. 12 oz Gel Cartridge
4. Digital Display 8.AC DC Power Cord Jack
ATTACHING POWER CORD
Plug the DC cord into the port at the base of dispenser. Lift dispenser to access
port. Plug the other end of the AC power cord into a wall electrical outlet.
\INSERTING THE GEL CARTRIDGE
1. Remove cap then remove foil tab completely from gel cartridge before
inserting into dispenser.
2. Lift dispenser to locate cartridge chamber on base of device.
3. Insert gel cartridge into chamber and turn clockwise until fully seated, being
careful not to overtighten.
USING THE DISPENSER
1. Remove empty bottle shipped with dispenser and insert new gel cartridge.
2. Turn POWER ON/OFF SWITCH to the ON position.
3. Using the volume up or down switch, select the gel volume required (from 1 to
9ml). Dispenser is shipped with a default setting of 5. For pelvic exams we
recommend a setting of 3.
4. Place dispenser on a flat surface. Place hand or instrument under the dispense
spout, positioning fingers or instrument where you would like to receive gel.
The INFRA-RED SENSOR will automatically sense your hand or instrument and
dispense the volume of gel selected.
5. Priming the dispenser. When a new cartridge is inserted it is important to prime
the dispenser prior to use. Prime by swiping your gloved hand or a paper towel
under the sensor several times until gel begins to flow evenly. This may take up
to 5 swipes.
1
2
3 6
27
8
4 5
INSTRUCTIONS FOR USE
(ENGLISH)
LOCATION OF PARTS AND CONTROLS
12
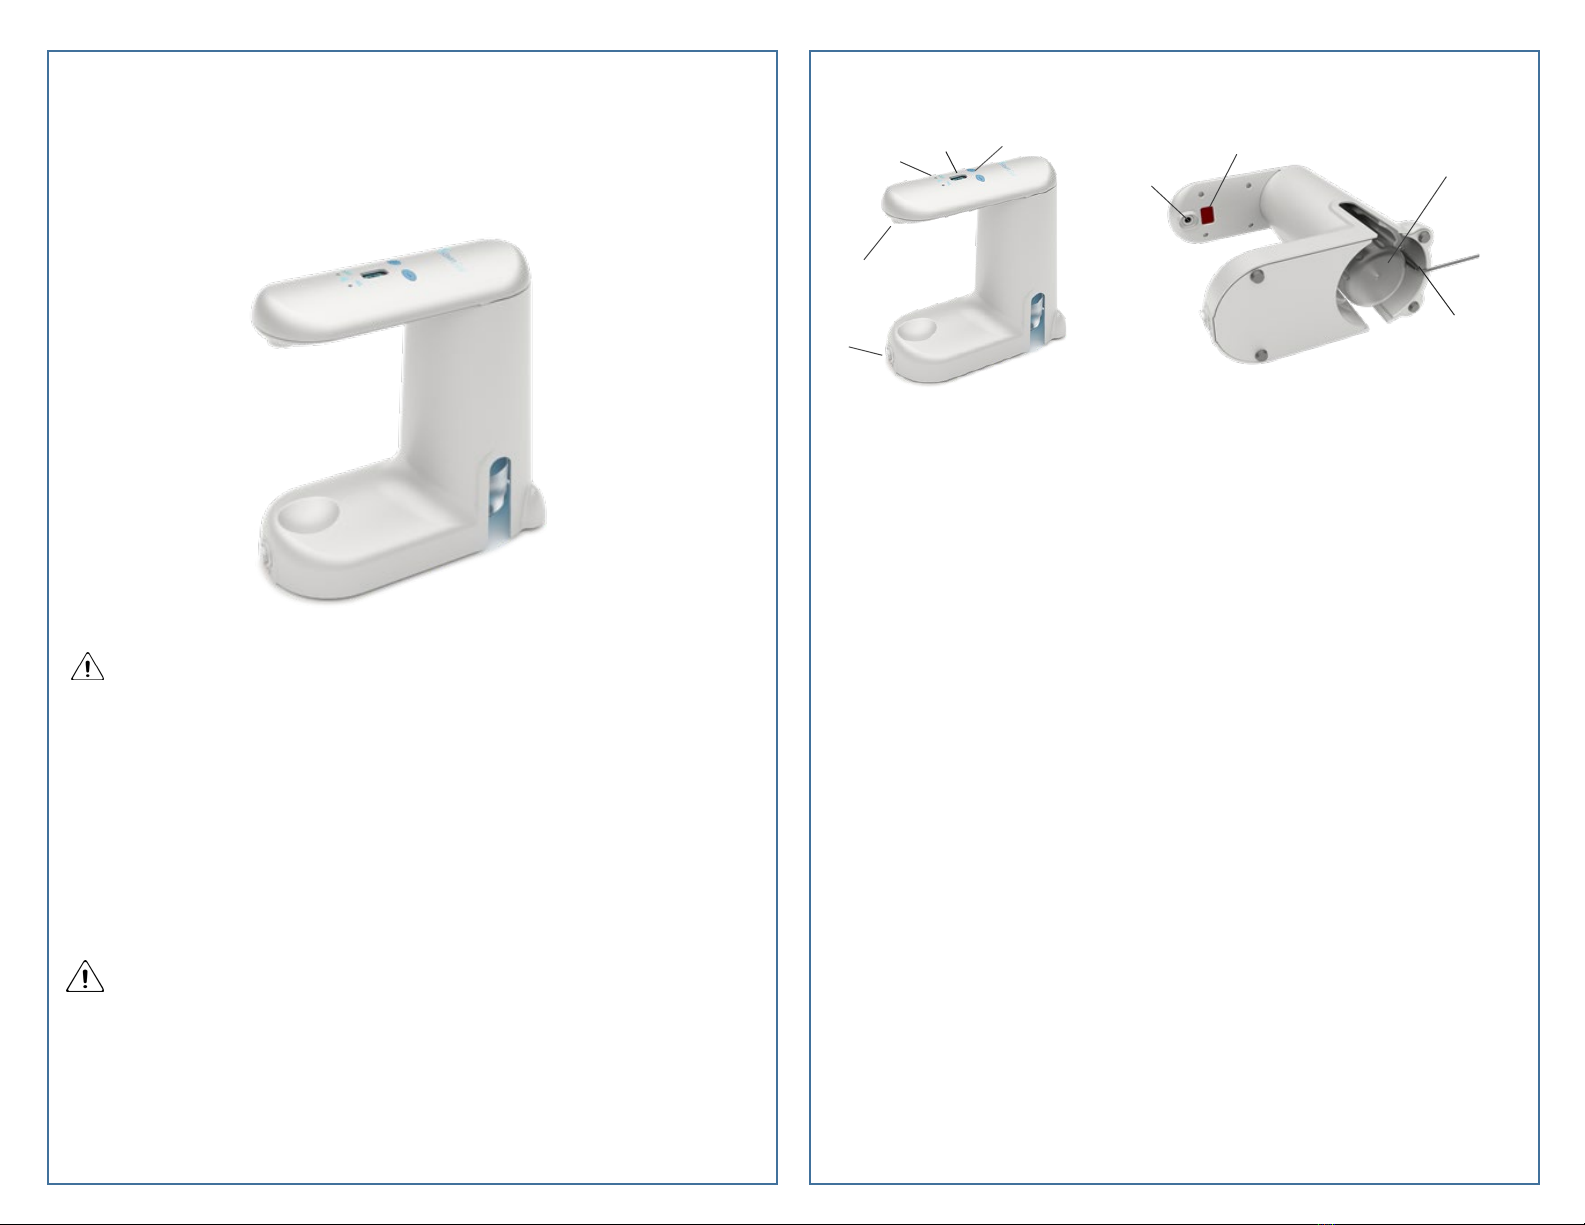
6. The view chamber will glow with a blue light when dispensing and for 10
seconds after to aid in viewing gel level.
7. The LED INDICATOR LIGHT on the top provides an ON status and warnings for
low gel:
a. Green LED light indicates Power ON and ready
b. Red LED light indicates gel is low
8. The DIGITAL DISPLAY indicates the pre-selected gel volume and other warnings:
a. C – Calibrating (displayed briefly when unit is turned on)
b. E – Error (check for dust or other particles on the Infra-red sensor)
c. e – Error (If hand is held continuously under sensor after dispensing
unit will display “e”).
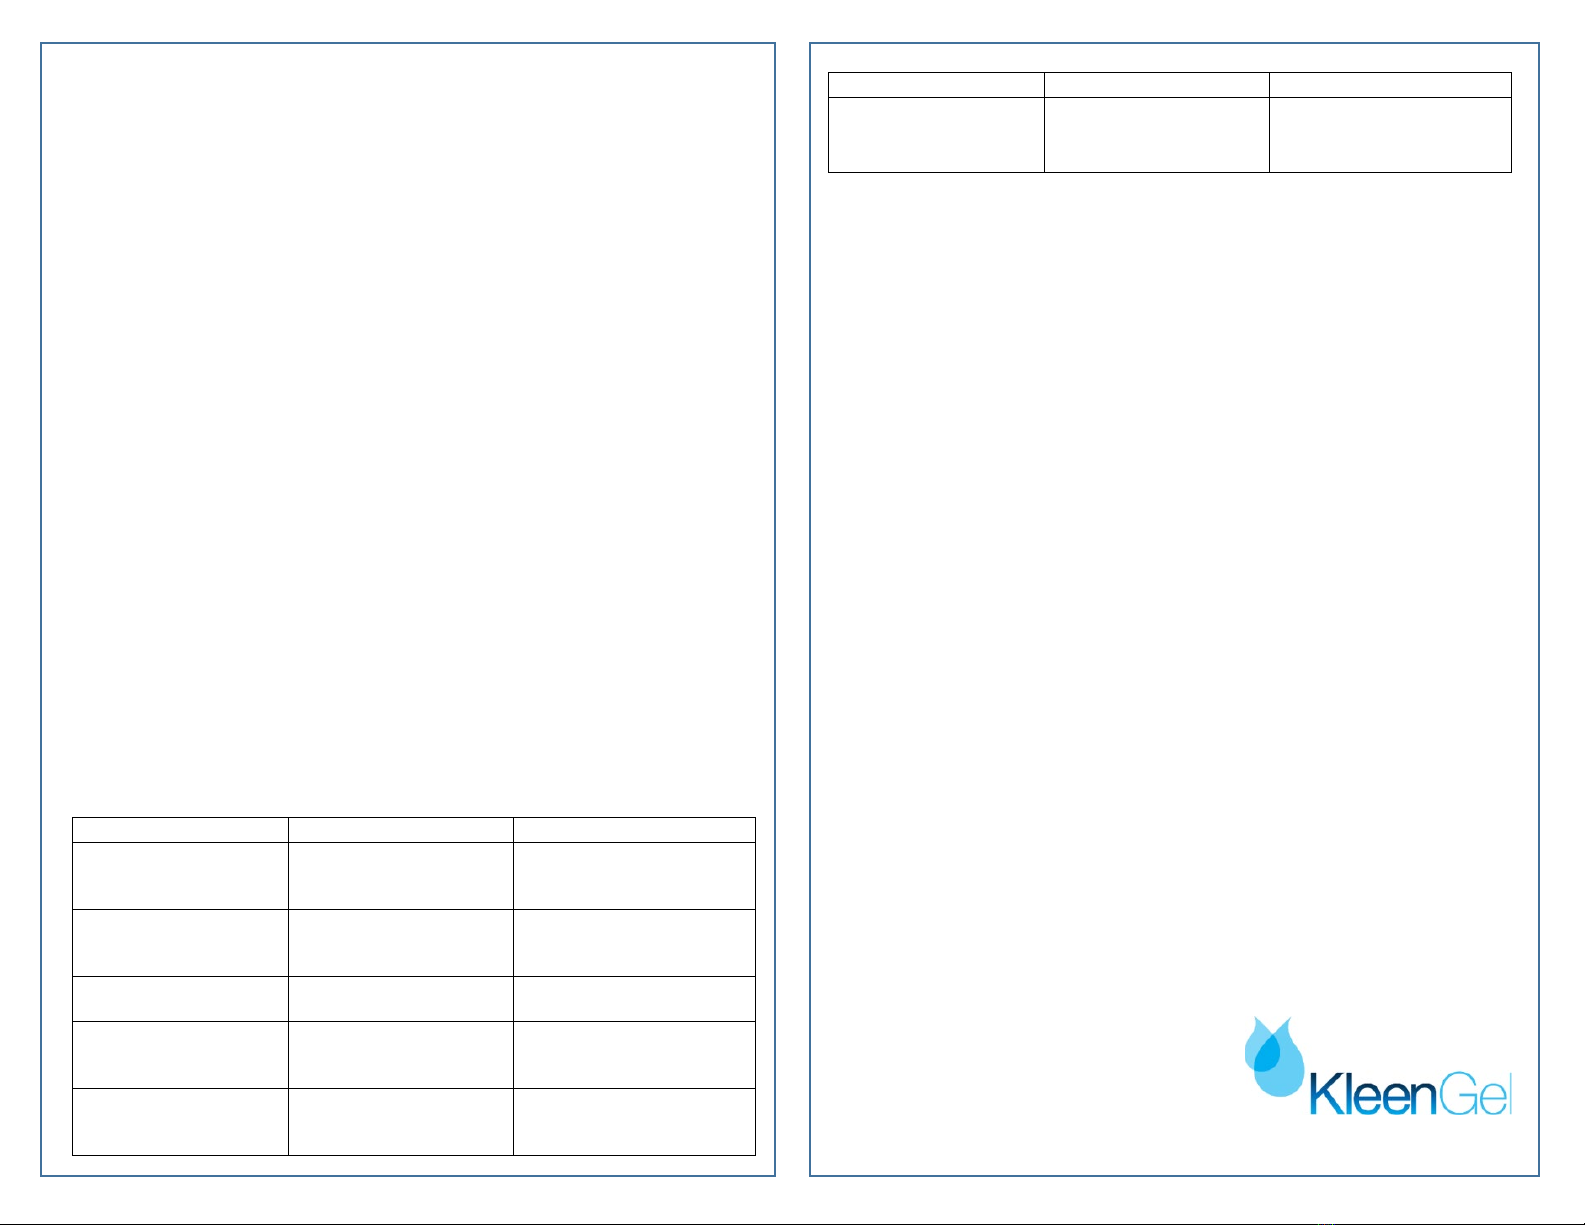
REMOVING THE GEL CARTRIDGE
1. Lift dispenser to remove cartridge.
2. Grasp base of gel cartridge and turn counterclockwise until cartridge is
released.
3. Discard cartridge and replace with a new KleenGel cartridge
CLEANING THE DISPENSER
Turn off dispenser before cleaning. Wipe the surface of the dispenser periodically
with a damp soft cloth using water.When cleaning around the sensor be careful
not to scratch the surface of the sensor. It is recommended to clean the dispenser
spout daily with 70% isopropyl alcohol using a Q-tip or an alcohol wipe. Due to the
drying effects of the gel, if the dispenser is left unused for several days you may
need to clean and wipe the dispense valve and activate with one to two swipes to
get gel flowing again.
TROUBLESHOOTING
ISSUE POSSIBLE CAUSE SOLUTION
LED indicator not
illuminated
Unit is in OFF position or
does not have power
supply
Connect to power outlet.
Turn POWER ON/OFF SWITCH
to the ON position.
Gel does not dispense
when hand or instrument
is placed under sensor
Is the device switched on? Turn POWER ON/OFF SWITCH
to the ON position.
Is the Red LED light on? Indicates low gel level. Insert
or replace cartridge.
Is there an Error Message
(E) on the digital display?
Wipe the sensor with a clean
cloth dampened with water
or isopropyl alcohol.
Is hand too far away from
sensor?
Place hand maximum of 8cm
below the sensor to activate
dispensing
ISSUE
POSSIBLE CAUSE
SOLUTION
Red LED light is on
Lubricating gel is low.
May also blink during
priming.
Replace gel cartridge with
new KleenGel cartridge.
To ensure optimal performance, each KleenGel dispenser is tested prior to
shipment using a small amount of sterile lubricating gel. The gel used in testing
will be cleared from the device during the priming process.
LIMITED WARRANTY
Dispensers purchased new from ClearSpec LLC are warranted to be free from
original defects in material and workmanship under normal use and service for
a period of one year from the date of first shipment from ClearSpec. This
warranty shall be fulfilled by ClearSpec or its authorized representative
repairing or replacing at ClearSpec’s discretion, any such defect, free of charge
for parts and labor. ClearSpec must be notified via telephone of any defective
product and the item must be immediately returned, with an RMA number
provided by ClearSpec, securely packaged and postage prepaid to ClearSpec.
Loss or damage in shipment shall be at the purchaser’s risk. ClearSpec will not
be responsible for loss associated with the use of any ClearSpec product that
(1) has been repaired by anyone other than an authorized ClearSpec
Representative, (2) has been altered, (3) has been used in a manner other than
in accordance with the instructions, or (4) has been abused or exposed to
extreme environmental conditions
SPECIFICATIONS
Model No…………………………………..1001
Gel Cartridge Capacity ………..…….12 OZ
Power Source ………………………….. AC DC Power Cord
Product Dimensions ………………… 24cm (H) x 24.4cm (D) x 11.5cm (W)
Product Weight ……………………….. 1.45lb
Manufacturer
ClearSpec LLC
138 NW 16th Street
Boca Raton, FL 33432
(561) 395-7767
Drawing #: 409-0089 Revision: A03
34

Popular Dispenser manuals by other brands

Piusi MC BOXdc B.SMART Installation, use & maintenance manual

Piusi

Piusi MC BOXdc B.SMART Installation, use & maintenance manual

DEMA Nitro manual

DEMA

DEMA Nitro manual

Cornelius VANTAGE installation manual

Cornelius

Cornelius VANTAGE installation manual

Fluid Management Blendorama 22PC Operating and maintenance manual

Fluid Management

Fluid Management Blendorama 22PC Operating and maintenance manual

Murdock A152.8FG-BF3 Series Installation & maintenance instructions

Murdock

Murdock A152.8FG-BF3 Series Installation & maintenance instructions

Delta Clean DZ6542 manual

Delta Clean

Delta Clean DZ6542 manual

Hewi 950 Assembly, installation and operation instructions

Hewi

Hewi 950 Assembly, installation and operation instructions

Bennett Horizon 2 Series installation manual

Bennett

Bennett Horizon 2 Series installation manual

rosseto EZ-SERV EZ563 quick start guide

rosseto

rosseto EZ-SERV EZ563 quick start guide

Gasboy atlas owner's manual

Gasboy

Gasboy atlas owner's manual

Jean Bouteille M8MI manual

Jean Bouteille

Jean Bouteille M8MI manual

STODDART Standard Security SPPL.HSD.STS.001 installation manual

STODDART

STODDART Standard Security SPPL.HSD.STS.001 installation manual

Final Touch FTA1804 Operation manual

Final Touch

Final Touch FTA1804 Operation manual

Tork Matic manual

Tork

Tork Matic manual

Cornelius ABS 2.0 Service manual

Cornelius

Cornelius ABS 2.0 Service manual

Delfield CMB-2 Specifications

Delfield

Delfield CMB-2 Specifications

Hydro Chem 918 quick start guide

Hydro

Hydro Chem 918 quick start guide

Royal Catering RCSD-3A1 user manual

Royal Catering

Royal Catering RCSD-3A1 user manual

manuals.online logo
manuals.online logoBrands
  • About & Mission
  • Contact us
  • Privacy Policy
  • Terms and Conditions

Copyright 2025 Manuals.Online. All Rights Reserved.