KLOPPENBERG DISP-500 User manual

2627 West Oxford Avenue, Englewood, Colorado 80110 ● (303) 761-1615 ● www.kloppenberg.com
DISP-500
Manual

2627 West Oxford Avenue, Englewood, Colorado 80110 ● (303) 761-1615 ● www.kloppenberg.com
PARTS

2627 West Oxford Avenue, Englewood, Colorado 80110 ● (303) 761-1615 ● www.kloppenberg.com
DISP-500
(Front)
Parts
Toll Free Phone: 1-800-346-3246
www.kloppenberg.com
Number Part Number Part Descripon
14030010 Shovel Door Assembly
24030045 Extrusion Kit - Shovel Door - Poly Liner
34030006 Shovel Door Latch Assembly
44030002 Shovel Door Hood Bae Assembly
54080025 Bagger / Drip Tray Assembly
63080027 Bag Catch False Boom
74080016 Foot Pedal
82300041 Flanged Feet
94080013 Door / Chain Cover Safety Switch
10 3080001 Angled Front Auger Bracket
11 4080008 S/S Ice Chute Assembly
12 3080025 Chain Cover
13 2750004 GASKET - SHOVEL DOOR, 4 SIDED
14 4030009 GASKET (BIN) 1.5

2627 West Oxford Avenue, Englewood, Colorado 80110 ● (303) 761-1615 ● www.kloppenberg.com
DISP-500
(Rear)
Parts
Toll Free Phone: 1-800-346-3246
www.kloppenberg.com
Number Part Number Part Descripon
15 2400080 Large Sprocket
16 2400079 Small Sprocket
17 4080015 Large Chain - 49"
18 4080015 Small Chain - 33"
19 2400078 Chain Tensioner
20 2400083 Flange Bearing
21 2400088 Gear Reducer
22 2400066 1/2 HP Motor
23 4080005 Agitator Assembly
24 4080006 Auger Assembly
25 1800025 Enclosure (electrical box)
26 2005113 Copper Drain Pipe

2627 West Oxford Avenue, Englewood, Colorado 80110 ● (303) 761-1615 ● www.kloppenberg.com
DISP-500
(Electrical)
Parts
Toll Free Phone: 1-800-346-3246
www.kloppenberg.com
Number Part Number Part Descripon
14080011 Power Relay
22400076 Fuse - 2Amp, 250V, AGC Series
34080013 Door / Chain Cover Safety Switch
41800030 Transformer 120v Input 24v Output
51800009 Power Supply Cord 8’

2627 West Oxford Avenue, Englewood, Colorado 80110 ● (303) 761-1615 ● www.kloppenberg.com
INSTALLATION

2627 West Oxford Avenue, Englewood, Colorado 80110 ● (303) 761-1615 ● www.kloppenberg.com
Remove Bin, Drain Pan and Contents from the
transport packaging
Peel PVC lm from the front panel, shovel door
& drain pan (Shown in red).
Save all packaging unl machine is installed
and running properly.
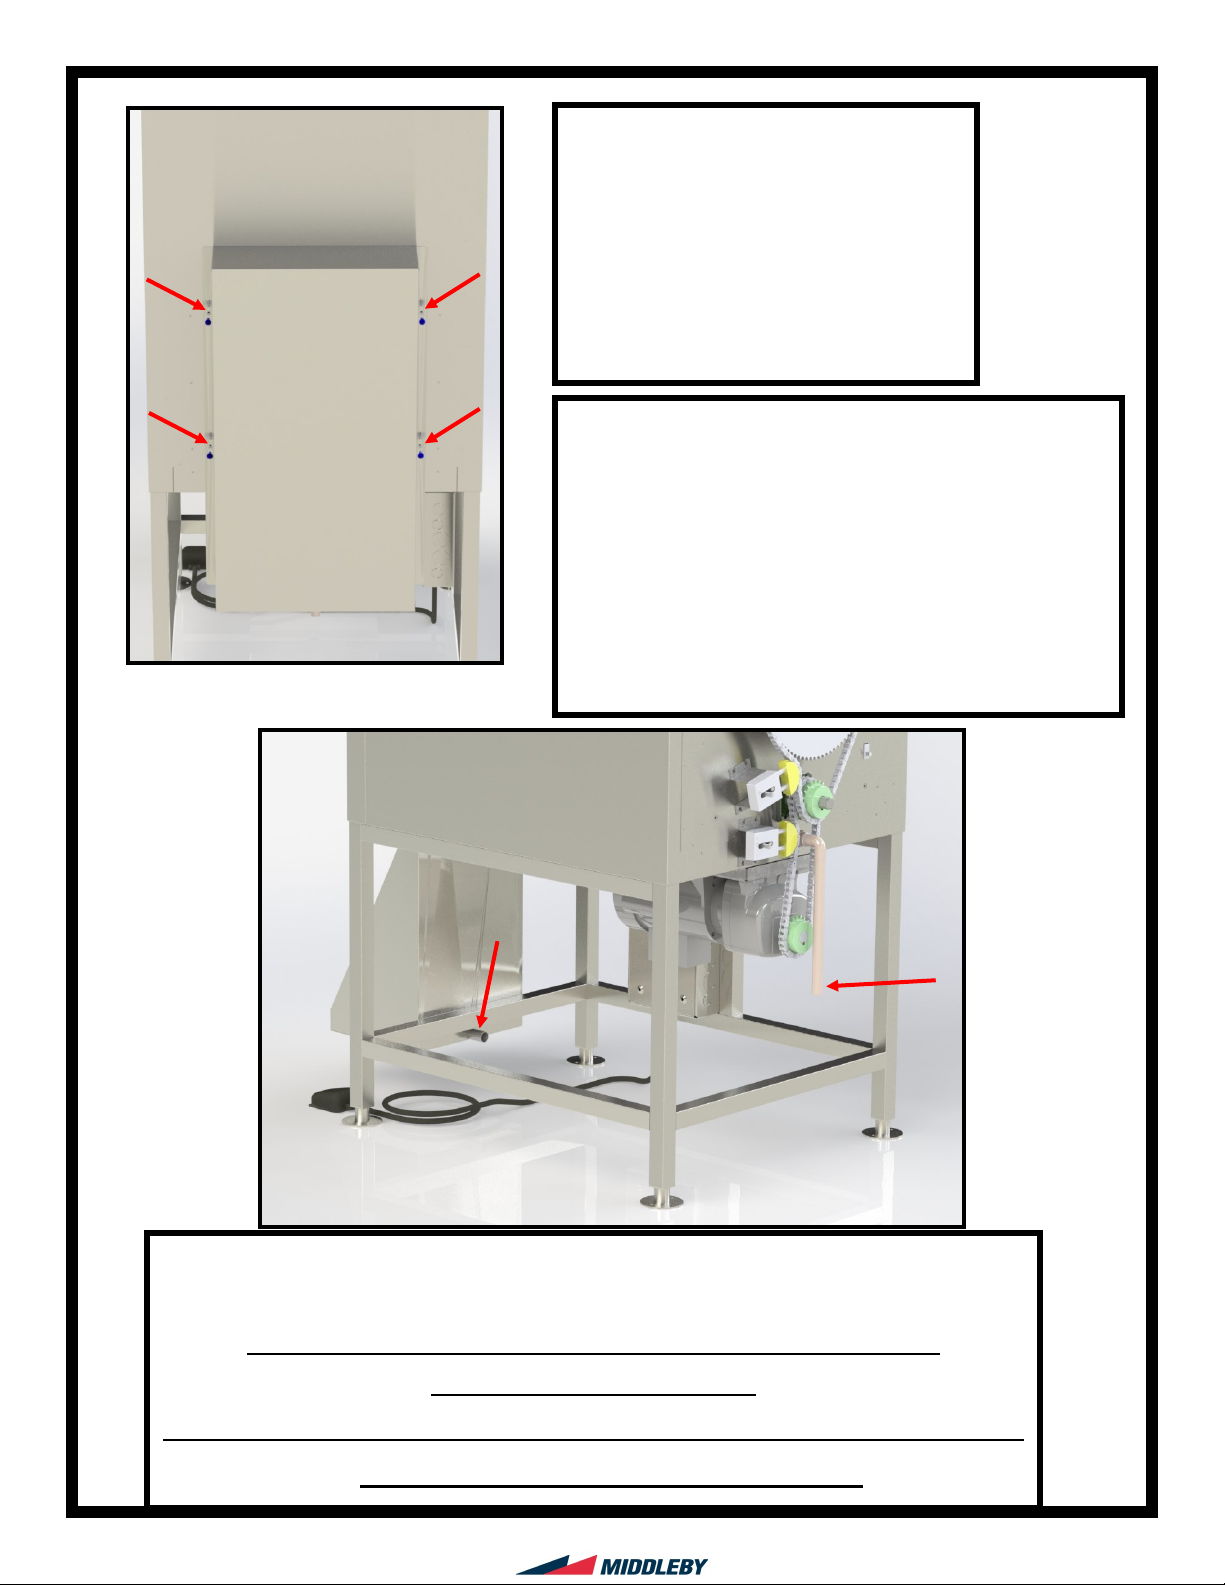
Aach the drain pan using a
Phillips head screwdriver to
the 2 aachment locaons
shown and hand ghten.
Posion dispenser into desired locaon care-
fully to not damage legs or any funconing
parts on the front, back, side or under the
bin. Make sure to leave a minimum 24’’ of
space from the side and back of the bin
(16’’ from chain cover) to the back of the
wall. Maintenance will need to be per-
formed from the back, make sure there is
room for a technician to get behind the bin
and access to the electrical box.

2627 West Oxford Avenue, Englewood, Colorado 80110 ● (303) 761-1615 ● www.kloppenberg.com
Remove the chain guard using
a Phillips head screw driver.
The guard is aached in 4 loca-
ons shown the gure .
Connect 1” tubing to the copper drain
pipe shown above. Connect 1” tubing to
the drain nipple on the back of the drain
pan. These drains can be connected to-
gether with a “T” and aached to the
main line.
Level bin and aach desired drain ngs to the copper drain pipe on the
back of the bin and the drip tray.
**DO NOT remove the factory installed copper drain pipe**
Removal may void warranty
*Ice machine must drain on an independent line. Do not hook up
to bin drain lines to prevent backow.

2627 West Oxford Avenue, Englewood, Colorado 80110 ● (303) 761-1615 ● www.kloppenberg.com
Make sure all chains, tensioners, sprockets, drive shas, agitators and auger
are properly aached. Aach chain cover.
Plug dispensers in to a 115v plug running on a dedicated 20-amp circuit.
An ice machine and dispenser plugged in on the same circuit will trip the
breaker.
Test funconality of the bin. For standard bins Press the foot pedal and make
sure all motors are running. For IBU bins, push buons to check motors are
running. Ensure all med dispense and agitaon sengs are at desired
sengs.
Open the door and make sure the interlock switch is funconing. The machine
should not run with the door open.
Unplug power and secure plug to the dispenser and properly clean the inside
using a food grade sanizer.
The ice machine can now be mounted on top of the dispenser.
It is the owners responsibility to manage ice ow in the bin.
*Ice machine must drain on an independent line. Do not hook up to bin drain lines to pre-
vent backflow.

2627 West Oxford Avenue, Englewood, Colorado 80110 ● (303) 761-1615 ● www.kloppenberg.com
SERVICE

2627 West Oxford Avenue, Englewood, Colorado 80110 ● (303) 761-1615 ● www.kloppenberg.com
CLEANING AND SANITATION INSTRUCTIONS
**NOTE**
CHLORINE BASED CLEANERS MAY CAUSE CORROSION OF THE STAINLESS STEEL
BEFORE USING ICE BIN
• Clean and sanize all surfaces using a quaternary cleaner/sanizer
STAINLESS STEEL & POLY LINER CLEANING PROTOCOL
• Bi-Monthly Cleaning
• With a clean dry cloth, wipe down internal ice bin ceiling, doors, snouts, baes
and windows
• Quarterly Cleaning (for heavy use bins conduct this cleaning monthly)
1. Empty bin completely
2. Wash with mild soap and water, including augers, agitators, snouts and baes,
and rinse thoroughly.
3. Then use quaternary cleaner/sanizer* on all surfaces including augers, agitators,
snouts and baes, and let dry per cleaning soluon instrucons.
*Recommend EcoLab No Rinse Food Contact Cleaner Sanizer.
TROUBLE SHOOTING
• Heavy deposit -
1. Empty bin completely
2. Wash with mild soap and water, including augers, agitators, snouts and baes.
Use vigorous agitaon on deposit areas. Rinse thoroughly.
3. Then prepare a diluted nitric acid soluon (5-10% HN03).
Apply a light layer of the soluon to the liner and allow to stand for 30 minutes.
Rinse the liner with clean water.
***WARNING: HANDLE AND USE NITRIC ACID WITH CARE.
FOLLOW ALL MANUFACTURER/SUPPLIER INSTRUCTIONS***
**RECOMMENDATION**
To minimize bin contaminaon, use a water soening system that reduces
ferrous minerals and parculates

2627 West Oxford Avenue, Englewood, Colorado 80110 ● (303) 761-1615 ● www.kloppenberg.com
TROUBLESHOOTING
COMMON ISSUES ACTION(S) TECHNICAL/DESCRIPTION FUTURE PREVENTION
ICE BRIDGING (NO ICE
DISPENSING)
(1)USE PADDLE TO BREAK ICE
USING SHOVEL DOOR FOR
ACCESS
AFTER BREAKING ICE PRESS FOOT
PEDAL ICE SHOULD NOW DISPENSE
Maintain ice levels, do not
leave unused for long
periods of me, break ice
(2) CHECK TO SEE IF
AGITATOR(S) ARE TURNING
SHEAR PIN ON DRIVE SHAFT MAY
BE MISSING OR BROKEN ON AGI-
TATOR WILL NEED TO REMOVE
AGITATOR ARM TO ACCESS DRIVE
SHAFT.
Maintain ice levels, do not
leave unused for long
periods of me, break ice
NOTE: UNITS WITH SERIAL # PREFIX
16-18 SHEAR PIN WILL HAVE A
NOTCH AND SET SCREW
(3)IF MOTOR IS RUNNING
REMOVE CHAIN COVER TO
VERIFY SS KEY STOCK IN PLACE
ON MOTOR SPROCKET
IF ALUMINUM KEY STOCK IS NOT
IN PLACE OR MISSING SPROCKET
WILL NOT TURN
(4) VERIFY CHAIN ON
SPROCKETS (SEE BACK VIEW) REMOVE CHAIN COVER TO ACCESS
SPROCKETS. MOST LIKELY MISSING
THE CONNECTING LINK(S)
(5) VERIFY CHAIN IS STAYING
ON SPROCKETS CHAIN SHOULD BE ON SPROCKETS
PARALLEL TO BACK OF BIN. IF
THROWING OFF FLANGE BEARING
IS MOST LIKELY THE CAUSE
USE SYNTHECTIC GREASE
IN FLANGE BEARING
ANUALLY OR AS NEEDED.
(6)TEST MOTOR
MOTOR SHOULD READ BETWEEN 7-
10 AMPS. WHEN RUNNING DRY
MOTOR MAY SPIKE DUE TO STRESS
OF PRESSING PEDAL WITH NO ICE
DO NOT KEEP PRESSING
PEDAL IF NO ICE IS DIS-
PENSING. BREAK ICE
WITH PADDLE

2627 West Oxford Avenue, Englewood, Colorado 80110 ● (303) 761-1615 ● www.kloppenberg.com
TROUBLESHOOTING
MOTOR CONTANTLY
RUNNING
CHECK FOOT PEDAL AND
CORD FOR DAMAGE
IF PEDAL OR CORD IS DAMAGED
CAN ACTIVATE SWITCH AND
KEEP RUNNING
KEEP PEDAL & CORD OUT
OF WALKWAY OR WHERE
DAMAGE CAN OCCUR
DEPENDING ON AGE AND
USAGE MOTOR CONTACT
COULD BE WORN
IN ELEC BOX REMOVE AND
REPLACE
NOTE: OLDER UNITS HAVE A
PUSH SWITCH RELAY. CURRENT
RELAY WILL REPLACE
NOTHING HAPPENS
WHEN PLUGGED IN
(1) CHECK SHOVEL DOOR IS
CLOSED AND CHAIN COVER
IS ATTACHED
FACTORY DESIGNED SAFTEY
SHUT OFF. UNIT SHOULD NOT
OPERATE WITH DOOR OPEN OR
CHAIN COVER OFF
ALWAYS KEEP DOOR
CLOSED AND CHAIN
COVER ATTACHED
TO
OPERATE.
(2)CHECK OR REPLACE 2
AMP FUSE, DOOR & CHAIN
COVER SWITCH
BAD FUSE OR BAD SWITCH WILL
NOT ALLOW SYSTEM TO OPER-
ATE
TEST WITH VOLTAGE
METER
(3) REMOVE CHAIN COVER
AND PRESS RESET ON
MOTOR
THIS WILL RESET MOTOR

2627 West Oxford Avenue, Englewood, Colorado 80110 ● (303) 761-1615 ● www.kloppenberg.com
Shovel Door Hood Replacement Instrucons
Removal Instrucons
1. Disconnect power supply **For DISP Models ONLY**
2. Open shovel door
3. Locate thumb screws on the interior side of the shovel door (both
le and right side about 2” up from the boom of the door)
4. Loosen one screw (about ½” ); do not remove the screw. Support
the hood with one hand and loosen and remove the second
thumb screw.
5. Slide the hood o the rst screw. Lower the hood and turn to
remove it out the shovel door opening.
*NOTE*
Ice level should be below boom of shovel door before removing the hood
Installaon Instrucons
1. Remove protecve plasc coang from the plexiglass window
2. Turn the hood sideways the slide through shovel door opening.
3. Slide the hood under the lip on the interior upper side of the door.
The slide onto the thumb screw that was le in place on the
interior side of the door.
4. Supporng the hood with one hand put in the second thumb screw
and ghten well. Now ghten the rst screw.
5. Check to ensure plexiglass window moves freely up and down.

2627 West Oxford Avenue, Englewood, Colorado 80110 ● (303) 761-1615 ● www.kloppenberg.com
Shovel Door
Replacement Instrucons
Figure 1
Figure 2
Figure 3

2627 West Oxford Avenue, Englewood, Colorado 80110 ● (303) 761-1615 ● www.kloppenberg.com
Shovel Door
Replacement Instrucons
Toll Free Phone: 1-800-346-3246 Local Phone: 303-761-1615 Fax: 303-789-1741
Email: sales@kloppenberg.com
Please send all PO’s to purchaseorders@kloppenberg.com
Figure 4
Figure 5
Figure 6

2627 West Oxford Avenue, Englewood, Colorado 80110 ● (303) 761-1615 ● www.kloppenberg.com
Manufacturer’s Warranty
Obligaons of Kloppenberg Products, LLC (“Kloppenberg”) are exclusively
limited to the original purchaser / registered owner.
Products must be registered with Kloppenberg within 30 days of installaon.
Kloppenberg warrants that it will repair or replace at its own expense any commercial ice bin of
its manufacture bearing the name Kloppenberg due to a factory defect in material and/or
workmanship occurring within the rst twelve (12) months from the date of installaon or
eighteen (18) months from date of shipment providing, the ice bin has been installed, and
maintained in accordance with the procedures set forth in the product manual provided with
each ice bin.
This warranty does not include parts or labor coverage for a factory component failure, or
other damage resulng from:
•Failure to clean and maintain as set forth in the product manual
•Adverse operang condions
•Drain line malfuncons
•Water content irregularies for any reason
All decisions regarding defects in material or workmanship or accident, alteraon or misuse or
improper maintenance or installaon shall be made by Kloppenberg and shall be
nal and binding upon the pares. All claims must include the ice bin model number, serial
number, original date of installaon and customer idencaon.
This warranty is applicable only in the United States and Canada.
Kloppenberg assumes no liability for incidental or consequenal damages of any
kind or for any damages resulng in whole or in part from misuse or inadequate maintenance or
the product or any part thereof.
THE WARRANTY DESCRIBED SHALL BE IN LIEU OF ANY OTHER WARRANTY
EXPRESS OR IMPLIED, INCLUDING BUT NOT LIMITED TO, ANY IMPLIED WARRANTY OF
MERCHANTABILITY OR FITNESS FOR A PARTICULAR PURPOSE.
ALL SUBJECT WARRANTY CLAIMS MUST BE PREAUTHORIZED

2627 West Oxford Avenue, Englewood, Colorado 80110 ● (303) 761-1615 ● www.kloppenberg.com
Kloppenberg Products, LLC (“Kloppenberg”) warrants to the original purchaser that it will repair or
replace at its own expense and discreon the following lifeme product models.
Warranty applies to factory defect in material and/or workmanship exclusive to the
polyethylene liner and stainless steel bin cabinet:
UPRIGHT MODELS
705 905 1045 1315 1325 1665
ICE SHUTTLE SYSTEM
SPS-1 SPS-1G SPS-2
ICE STORAGE DISPENSER
DISP-500 DISP-1000
Obligaons of Kloppenberg are exclusively limited to the original purchaser / registered owner.
Lifeme warranty products must be registered with Kloppenberg within 30 days of installaon.
To qualify for subject warranty, Kloppenberg Lifeme products must be installed and maintained
in accordance with the procedures set forth in the product manual provided with each unit .
All decisions regarding defects in material, workmanship, accident, alteraon, misuse, improper maintenance
or installaon shall be made by Kloppenberg and shall be nal and binding upon both pares.
All claims must submied directly to Kloppenberg.
Claims for shipments that are damaged are not covered by warranty and must be handled through the carrier.
Kloppenberg assumes no liability for warranted poly liner or cabinet condions that do not result in an
inoperable and unusable state.
The foregoing warranty shall not apply to cosmec damage, punctures or any outside or internal
damage from resulng from foreign objects.
Kloppenberg does not warrant incidental or consequenal damages of any kind resulng in whole or
in part from misuse or inadequate maintenance of the product or any part thereof.
Kloppenberg assumes no liability for damage of any kind that is a result of alteraon or used parts that
are not manufactured or approved in wring by Kloppenberg.
This warranty is applicable only in the United States and Canada.
Kloppenberg strongly advises that a pre-determinaon for any warranty be made by direct contact with
Kloppenberg before any service has been called or completed.
Table of contents