manuals.online logo
Brands
  1. Home
  2. •
  3. Brands
  4. •
  5. KMART
  6. •
  7. Accessories
  8. •
  9. KMART Bell 15S User manual

KMART Bell 15S User manual

This manual suits for next models

1

Other KMART Accessories manuals

KMART A-1986-3 User manual

KMART

KMART A-1986-3 User manual

KMART 43156054 User manual

KMART

KMART 43156054 User manual

KMART 42953234 User manual

KMART

KMART 42953234 User manual

Popular Accessories manuals by other brands

Hillco 2810 Operator's manual

Hillco

Hillco 2810 Operator's manual

Siemens QSA2700D Basic documentation

Siemens

Siemens QSA2700D Basic documentation

Contours ZY024 manual

Contours

Contours ZY024 manual

Saivod VS621 manual

Saivod

Saivod VS621 manual

SCE ENVIRO-THERM SCE-TE170B24VSS user manual

SCE

SCE ENVIRO-THERM SCE-TE170B24VSS user manual

Z-Wave HSD-200Z user manual

Z-Wave

Z-Wave HSD-200Z user manual

turck FMX-IM-2UPLI63FX quick start guide

turck

turck FMX-IM-2UPLI63FX quick start guide

Decagon Devices 10HS manual

Decagon Devices

Decagon Devices 10HS manual

UPPAbaby Cup Holder user manual

UPPAbaby

UPPAbaby Cup Holder user manual

Elko SmartSensor Leakage Wireless manual

Elko

Elko SmartSensor Leakage Wireless manual

Grizzly H8371 instructions

Grizzly

Grizzly H8371 instructions

Panasonic HG-T Series user manual

Panasonic

Panasonic HG-T Series user manual

IFM Electronic Efector 250 Series Brief instructions

IFM Electronic

IFM Electronic Efector 250 Series Brief instructions

Virtuox VirtuCLEAN 2.0 user manual

Virtuox

Virtuox VirtuCLEAN 2.0 user manual

DigiDesign 888/24 I/O installation guide

DigiDesign

DigiDesign 888/24 I/O installation guide

PROZIS QUAY user manual

PROZIS

PROZIS QUAY user manual

patagonia PSI Vest user manual

patagonia

patagonia PSI Vest user manual

SFC Energy EFOY GO! manual

SFC Energy

SFC Energy EFOY GO! manual

manuals.online logo
manuals.online logoBrands
  • About & Mission
  • Contact us
  • Privacy Policy
  • Terms and Conditions

Copyright 2025 Manuals.Online. All Rights Reserved.

1 | P a g e
Quick Start Guide
FULL HD Doorbell Camera
Model: 43061068
Bell 15S
v1.0 30/03/2021
2 | P a g e
Welcome, Thank you for choosing our smart camera, getting started is easy
What’s included
Bell 15S
USB charging cable
USB chime
Wall mount
screw sets
Product Details
3 | P a g e
Connection Preparation
It is important that your phone is connected to the 2.4Ghz Wi-Fi and not to the 5GHz
network.
To verify your mobile device is set to a 2.4Ghz Wi-Fi network, navigate to the Settings
menu and click on Wi-Fi. In this menu you will see all the detectable networks in your
area. Locate the SSID (the name of your network) and ensure that the Wi-Fi SSID does
not end with a 5G / 5GHz.
Check that you have a strong Wi-Fi signal (at least two bars) in the location where the
smart camera is to be installed.
If you don’t have at least two bars signal on your phone, then you may need to
reconsider relocating the camera to a different location or obtain a Wi-Fi extender to
boost the Wi-Fi signal strength.
4 | P a g e
1. Install the APP and register Account
Download the "Mirabella Genio" APP to your smartphone from the App Store
or Google Play.
Insert the Micro SD card (not included) (Please note that the camera will work
without an SD card, but it will not be able to record any footage.)
Remove the rubber cap to expose the SD card slot, insert the Micro SD card gently into
the SD card slot. Please pay attention to the direction of the Micro SD card. Do not
force it inside, once inserted, refit the rubber cap.
Micro SD card size needs >8GB, Support up to Max of 128Gb, FAT32 format only, The
camera doesn’t support NTFS file system.
We recommend use Scandisk, Verbatim, Kingston , Samsung Class 10 high speed micro
SD for best performance.
Recharging the battery, remove the plastic cover on the side, to expose the charging
port, insert the supplied USB cable and standard phone charger 5V 1A (not included)
to charge the battery
5 | P a g e
2. Doorbell Camera Installation
6 | P a g e
3. Pairing the camera using Mirabella Genio App
1. Remove the plastic cover on back to expose the ON/OFF switch, slide
the switch to ON.
2. Press the doorbell button, wait for 6-30 seconds, the outer ring on the
doorbell button will start to blink red slowly, (1 blink every two
seconds)
if it is blinking fast (2 blinks per second) rather than slowly, you will
need press and hold the reset button until you hear a sound, then the
LED will now start to blink RED slowly. (1 blink every two seconds).
3. Please ensure your mobile phone is connected to your 2.4Ghz Wi-Fi
network (DO NOT use Wi-Fi name ending with -5G)
4. Open the Mirabella Genio APP, tap on +, then choose Security &
Sensor
Select your doorbell camera from the list of smart camera icon
7 | P a g e
5. Double check and ensure that the LED indicator light is still red and
blinking slowly, tap confirm blinking slowly and enter your 2.4GHz Wi-
Fi name and password (not your genio password)
6. Tap continue and the QR code will appear, place this QR code in front
of the camera at approximate 15-20cm, until your hear a sound, the
indicator light will now change from blinking red to blinking blue
example of how to scan QR code
QR code is the code on your phone screen,
not the barcode on the camera box
8 | P a g e
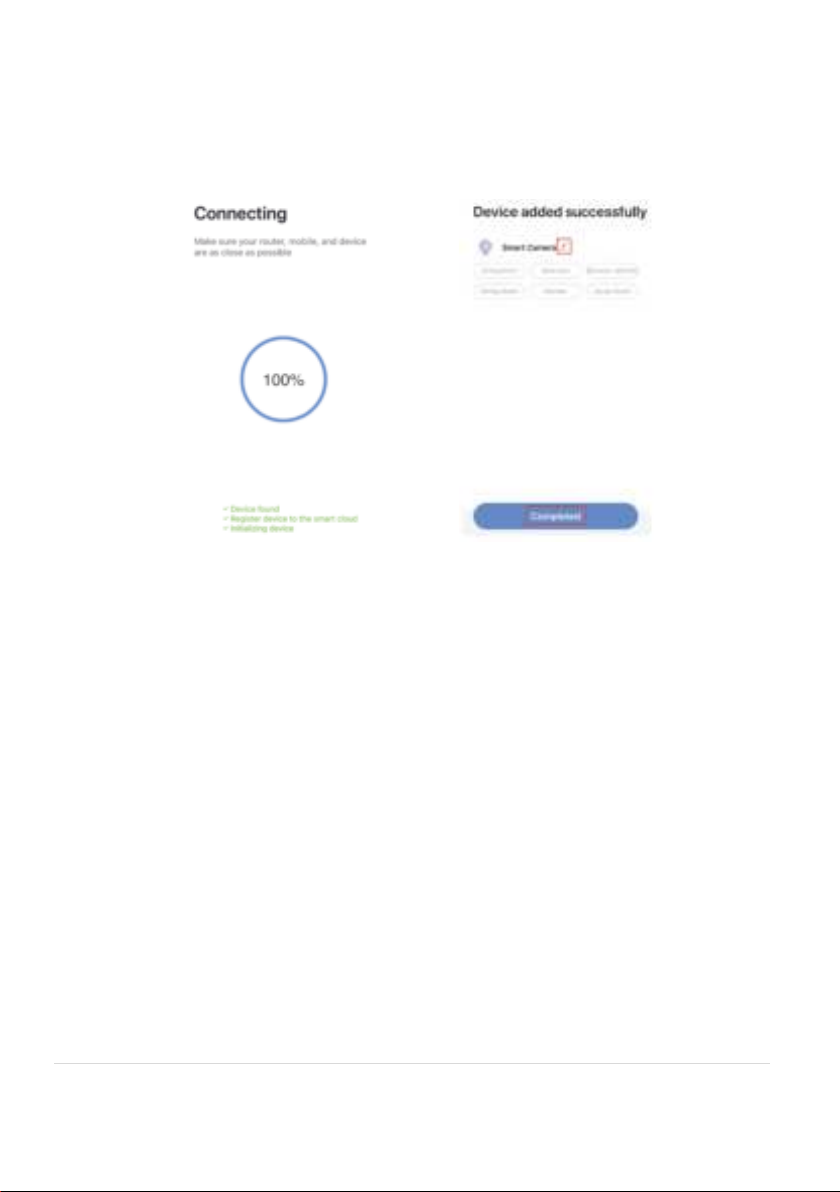
7. Please wait for indicator light to switch to solid blue, then tap the
beeped/indicator switch button
8. Camera is now successfully added into your APP. Please refer to the
FAQ section for troubleshooting if this method does not connect.
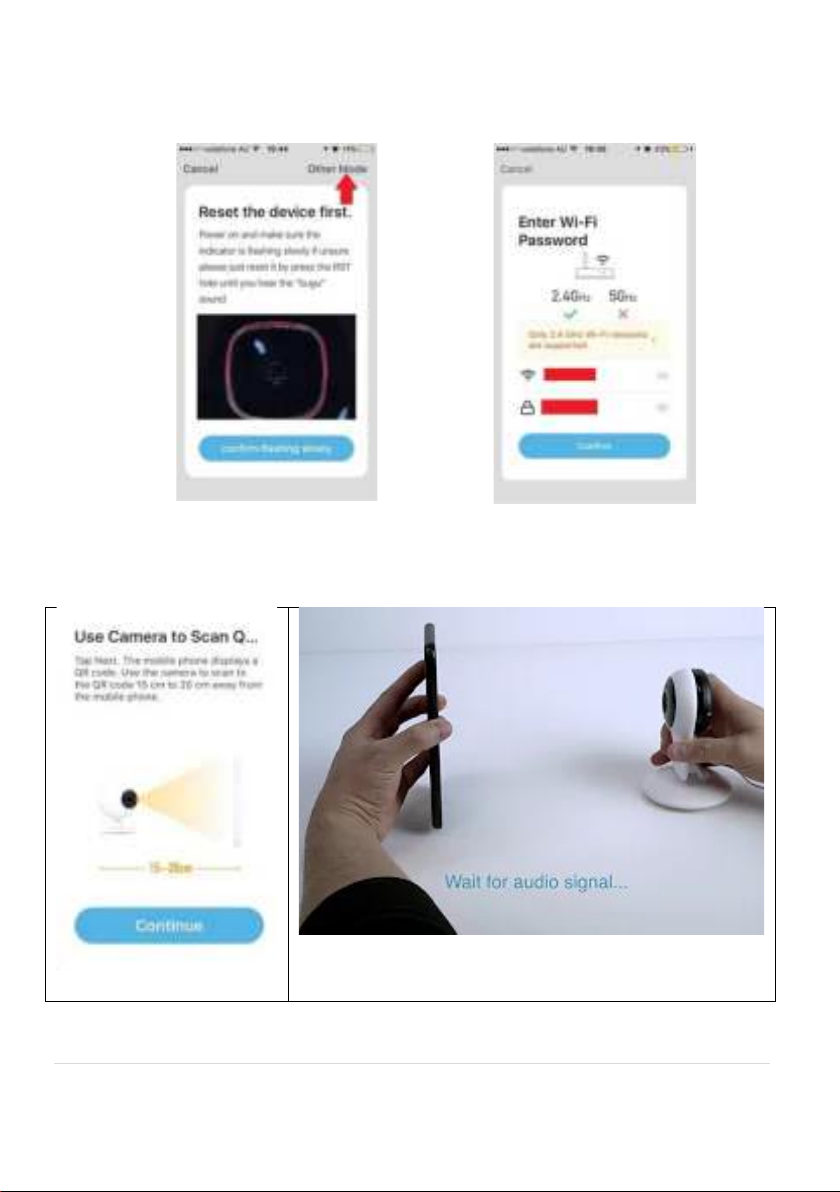
Q. LED indicator is not blinking slowly as per APP screen
A. Power off the camera, wait for 20 seconds, then power on. Use the depress the reset button
until you hear a sound, then indicator light starts to blink red slowly (1 blink every two seconds).
Q. Camera doesn’t scan the QR code
A. Please ensure camera is in the pairing mode, indicator light is blinking red slowly as per APP
screen, if you are unsure, please reset it
Q. After scanning the QR code, indicator light doesn’t turn into solid blue
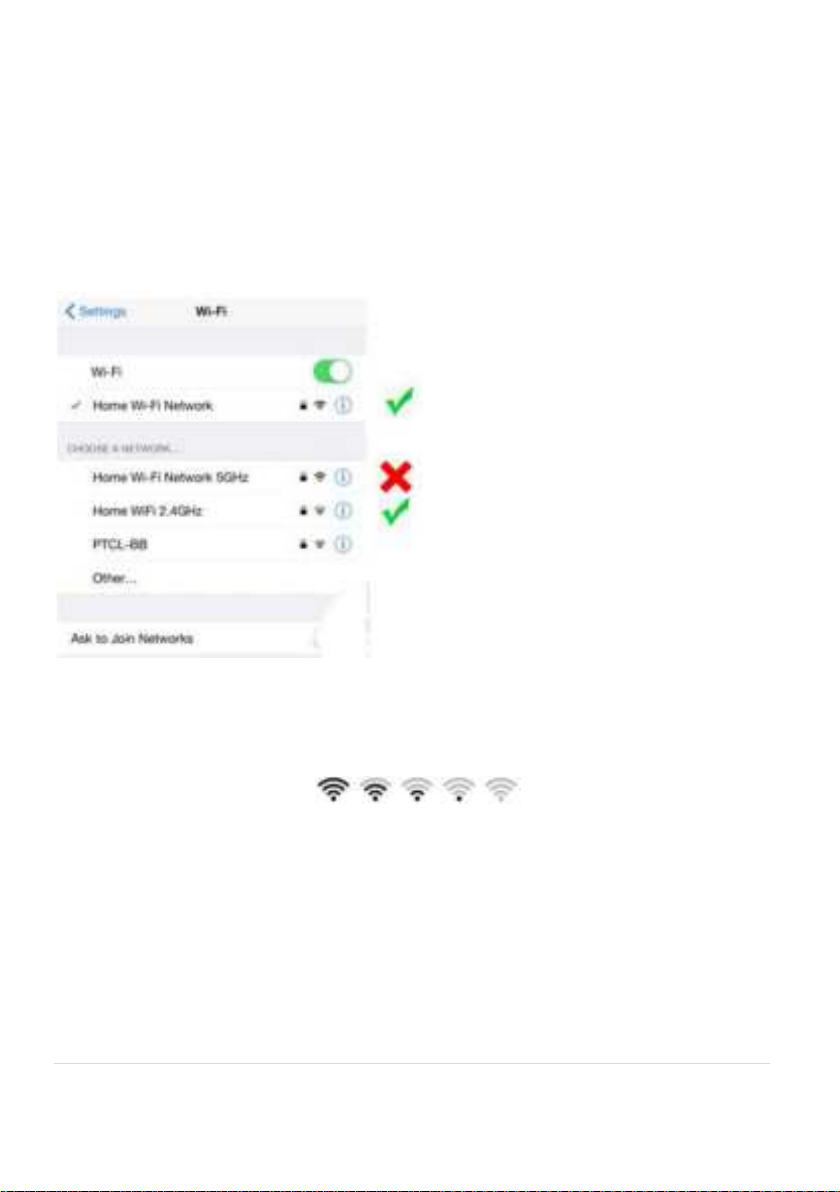
A. This is an indication of communication error with router, please ensure you are using the
correct 2.4Ghz Wi-Fi name and password, and please manually disabled the 5GHz Wi-Fi signal on
the router setting
Q. I am using Telstra NBN, I disabled the 5Ghz and I still cannot get it to pair?
A. Please try follow the Guest Network paring instructions at https://mirabellagenio.net.au/faqs
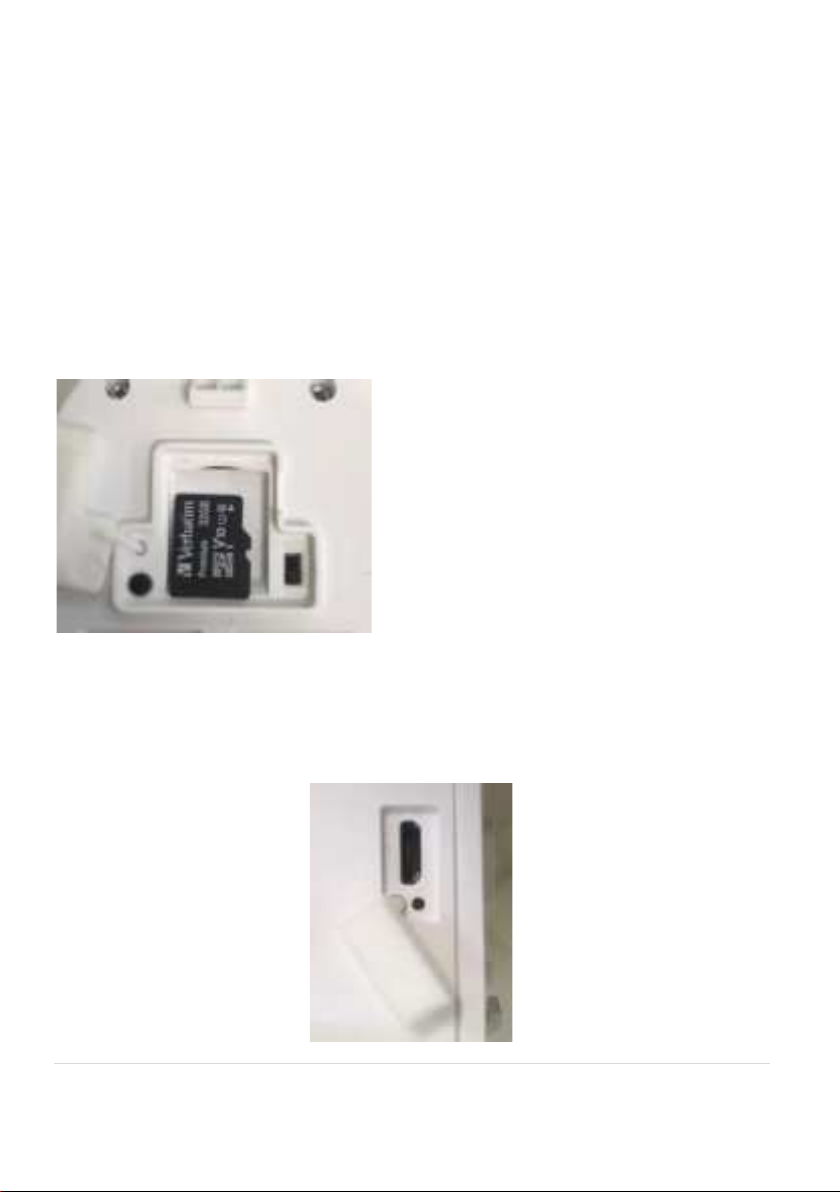
Note: rechargeable battery can be recharged with supplied USB cable and standard 5V 1A
mobile phone USB adaptor (not included)
9 | P a g e
4. Pairing the Wireless Chime
1. Insert the chime into any standard USB outlet or adaptor (not included), the
chime needs to be in 5 metres range of the doorbell
2. Open the Mirabella genio APP, tap on doorbell ->setting-> bell setting
>choose Wireless Chime or Chime Type , select Wireless Chime
3. Press and hold the reset button on the back of the chime and ensure the
blue indicator light is continuously blinking for more than 10 seconds before
adding the chime. If it is not continuously blinking you will need to press and
release the reset button again before proceeding to step 4
4. Return to setting -> ring setting-> tap on add, If you don’t have ring setting,
then go to Bell Setting,-> Bind
5. The indicator light on the chime will stop blinking as soon as you hit the add
or Bind, the chime is paired successfully, and you can test it by press the
doorbell button.
6. If the chime did not stop blinking, or no ring tone, please unbind the chime,
then repeat step 2 to step 5.
10 | P a g e
Camera interface is subject to slight alterations based on firmware updates
Tap on the pencil icon or … icon you can access the camera’s Settings page
To take snapshot of the screen and save it
to phone’s camera roll
Tap to speak to the camera
Record live footage into your phone’s
internal storage
Access to the footage recorded on the
Micro SD card
To turn sound on/ off
To change video quality, high definition or Standard definition
To access to camera’s settings page
To switch to full screen view mode
: Wi-Fi signal, if signal is less than 60% you should consider changing
the location or boost the Wi-Fi Signal using Wi-Fi extender