manuals.online logo
Brands
  1. Home
  2. •
  3. Brands
  4. •
  5. Knightsbridge
  6. •
  7. Accessories
  8. •
  9. Knightsbridge OS001 Instruction Manual

Knightsbridge OS001 Instruction Manual

ML Accessories Limited
LU5 5TA
www.mlaccessories.co.uk 10-13 V– PS
Blanking Inserts
Blanking inserts are supplied that can be cut
and attached to the lens to blank out areas of
interference as required i.e. automatic heat
sources, public pathways.
Auto Mode
When in auto mode the unit will operate according to the settings of the Lux and Time controls.
Manual Override
From Auto mode the unit can be manually overridden by switching the power off and on twice
within 3 seconds, this will turn the light permanently on. After 6 hours the unit will then revert
back to auto mode or the unit can be put back into auto mode at any time by switching the
power off and on once.
CLEANING
Clean with a soft dry cloth only, do not use other materials or solutions which may damage the fitting.
INSTALLATION & MAINTENANCE MANUAL
230V
50Hz
IP
55
85
OUTDOOR MOTION SENSOR
OS001_instructions_Layout 1 17/12/2013 11:09 Page 1
OS001 / OS001B
GENERAL INSTRUCTIONS:
These instructions should be read carefully and retained after installation for further reference
and maintenance.
SAFETY
• Before installation/maintenance, ensure that the mains supply to the luminaire and sensor is
switched off and the circuit fuses are removed or circuit breakers switched off
• Installation of this sensor should only be carried out by a qualified electrician to the current
IEE Wiring and Building Regulations
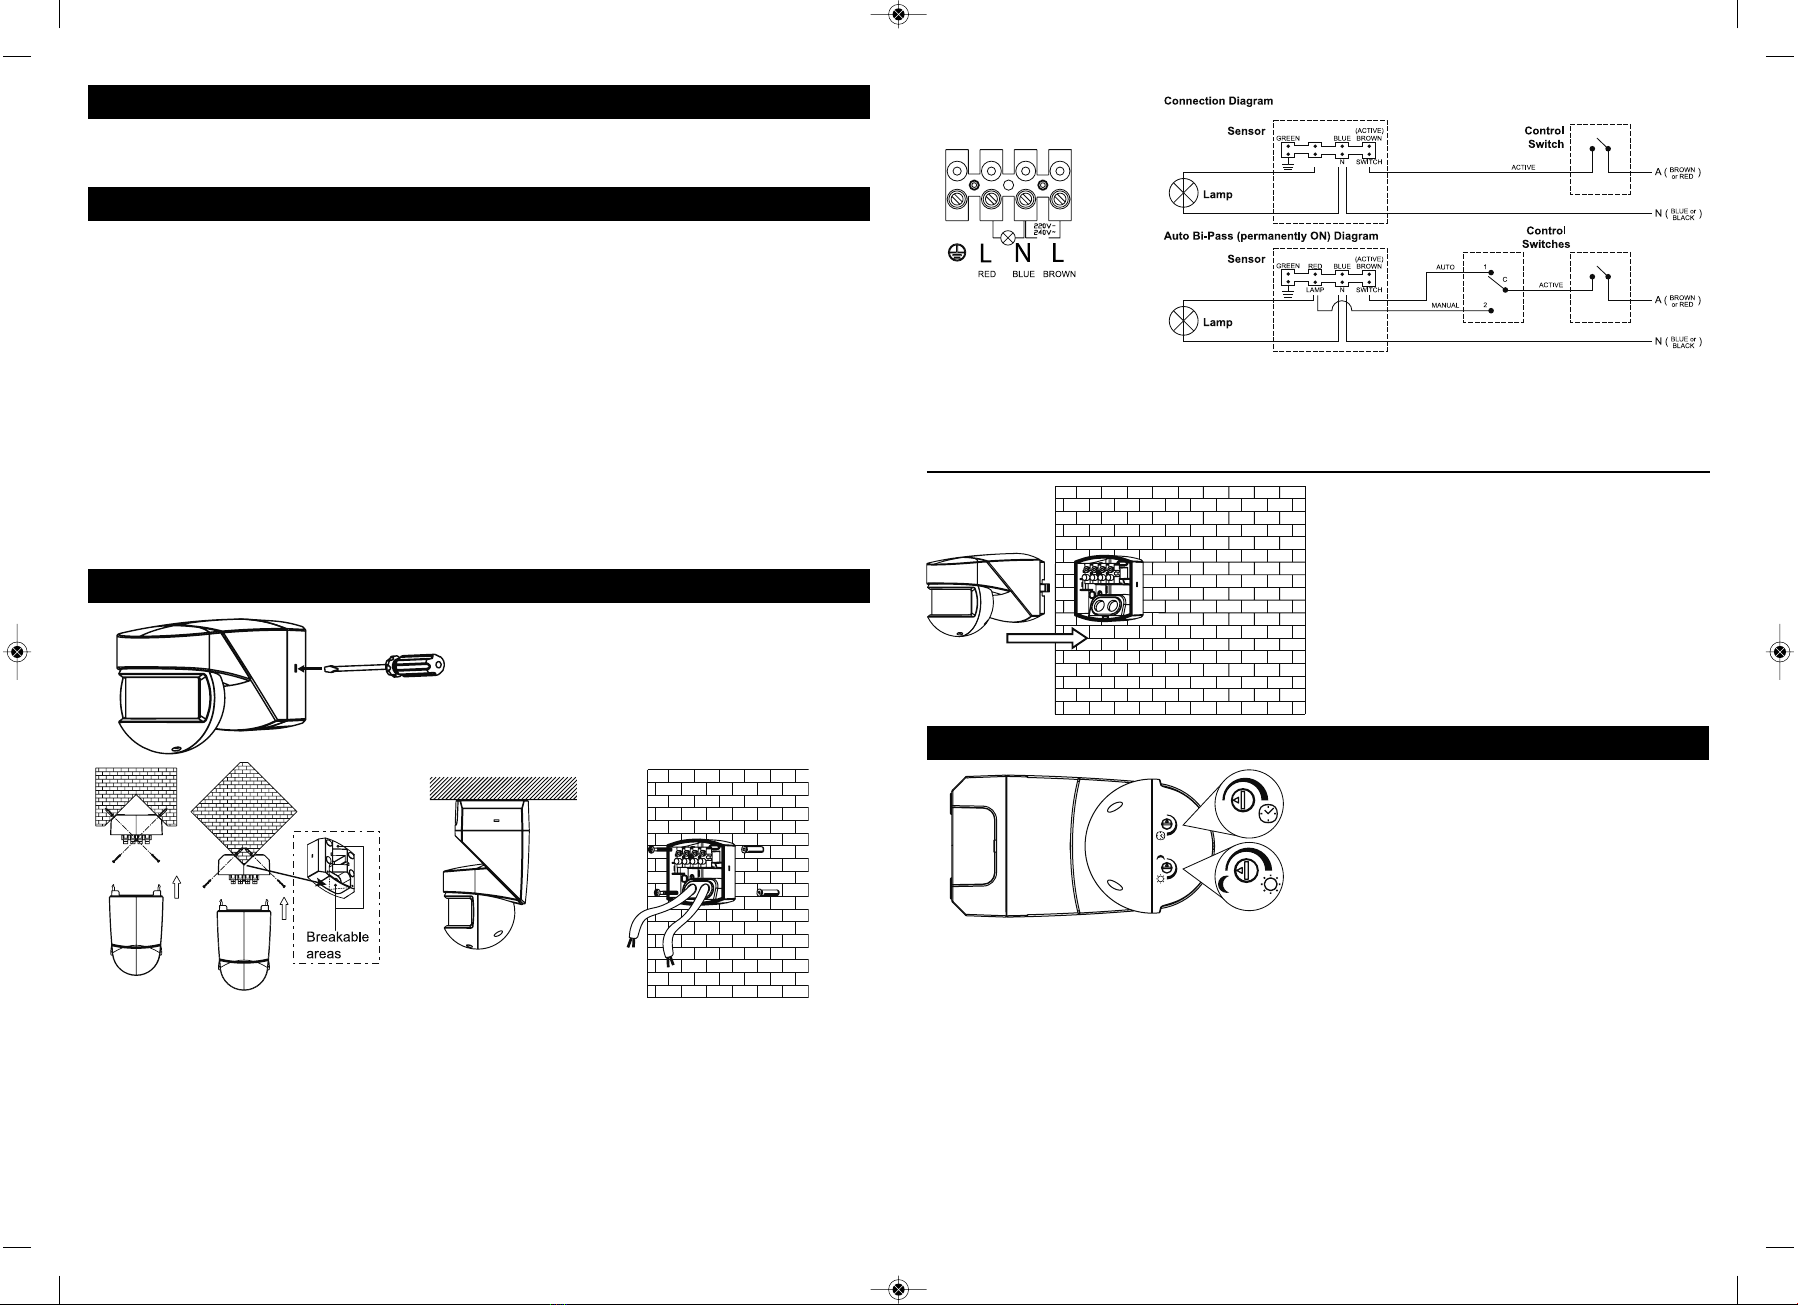
Remove the base:
Insert a slotted screwdriver into the slots at
either side of the base and push on the locking
tabs, then pull the sensor forward to release
from the base.
Connect the sensor head:
Align the sensor head with the base and push
the sensor head back into the base until it
locks into position.
Time Control: 3 sec – 30 min. Turning the
knob clockwise increases the length of time
the light stays on after activation.
Lux Control: controls the PIR from 5 lux to full
daylight. Dusk is approximately at the 12
o’clock position. If the unit is to operate under
brighter conditions turn the knob clockwise.
Electrical Connections:
Ensuring correct polarity is observed, the unit can be connected using a standard 10A 1 way
switch (automatic override) (Diagram A) or manual override using a standard 10A 2 way switch
(Diagram B).
Choose a suitable fixing location:
The unit maybe mounted onto a flat surface,
ceiling or corner-mounted by removing part of
the base as shown (breakable areas)
Screw the base onto a suitable surface and insert
the installation cables through the entry
holes/grommets in the back of the baseensuring
the IP rating of the unit is maintained (silicone
sealant may need to be applied).
Avoid Mounting:
• on non-stable surface
• pointing directly at sunlight or bright surfaces
• above the lamp or near air vents
SETUP and OPERATION
Walk Test
•
For initial setup turn the time control fully anti-clockwise to minimum and the lux control fully
clockwise
• After the power is switched on to the unit it will take approximately 30 seconds to enter into
automatic mode
• Once in automatic mode walk test the unit by moving in front of the sensor at various positions of
the required field of view checking that the light is activated at each point. The sensor head can be
adjusted from side to side and up and down. Adjusting the head up will increase the range
• It should be noted that the unit will be more sensitive when walking across the field and slower to
react when walking directly towards it
• After the initial setup and walk test has been completed adjust the time and lux settings to the
desired levels
OS001_instructions_Layout 1 17/12/2013 11:09 Page 3
• This product is IP55 rated and suitable for external applications
• This product is CLASSLRATEDANDMUSTBEEARTHED
• 220-240V 50Hz
• Load: 7INCANDESCENT7FLUORESCENTINDUCTIVEAND2257,%$
• Range: 12m to front 8m to side. Angle of detection 200
• Time 3 sec to 30 min
• Lux control adjustable 5 Lux min
• Automatic or manual override
• Please recycle this unit
INSTALLATION

This manual suits for next models

1

Other Knightsbridge Accessories manuals

Knightsbridge DC007 Instruction Manual

Knightsbridge

Knightsbridge DC007 Instruction Manual

Knightsbridge RCD9000 Instruction Manual

Knightsbridge

Knightsbridge RCD9000 Instruction Manual

Knightsbridge TPB14SLED Instruction Manual

Knightsbridge

Knightsbridge TPB14SLED Instruction Manual

Knightsbridge MSENSOR Instruction Manual

Knightsbridge

Knightsbridge MSENSOR Instruction Manual

Knightsbridge OS001 Series Instruction Manual

Knightsbridge

Knightsbridge OS001 Series Instruction Manual

Knightsbridge OSHFREC Instruction Manual

Knightsbridge

Knightsbridge OSHFREC Instruction Manual

Knightsbridge DC002 Instruction Manual

Knightsbridge

Knightsbridge DC002 Instruction Manual

Knightsbridge DC001 Instruction Manual

Knightsbridge

Knightsbridge DC001 Instruction Manual

Knightsbridge IP9000R Instruction Manual

Knightsbridge

Knightsbridge IP9000R Instruction Manual

Knightsbridge OS0016 Instruction Manual

Knightsbridge

Knightsbridge OS0016 Instruction Manual

Knightsbridge HBLS Instruction Manual

Knightsbridge

Knightsbridge HBLS Instruction Manual

Knightsbridge OS0010 Instruction Manual

Knightsbridge

Knightsbridge OS0010 Instruction Manual

Popular Accessories manuals by other brands

TP-Link HS105 manual

TP-Link

TP-Link HS105 manual

Schulte Elektrotechnik ePlace EVOline FlipTop Push manual

Schulte Elektrotechnik

Schulte Elektrotechnik ePlace EVOline FlipTop Push manual

StarTech.com ST122HDMILE installation guide

StarTech.com

StarTech.com ST122HDMILE installation guide

tau SS340 Series user manual

tau

tau SS340 Series user manual

Somogyi Elektronic home DB 118 instruction manual

Somogyi Elektronic

Somogyi Elektronic home DB 118 instruction manual

Philips SCF302/13 manual

Philips

Philips SCF302/13 manual

ASTECH LDS10A user manual

ASTECH

ASTECH LDS10A user manual

Stahl 7571/11 Series operating instructions

Stahl

Stahl 7571/11 Series operating instructions

Windmere EK-1 Use and care book

Windmere

Windmere EK-1 Use and care book

Aritech 2000 Series Installation & service instructions

Aritech

Aritech 2000 Series Installation & service instructions

Lightolier Lytecaster 1085 specification

Lightolier

Lightolier Lytecaster 1085 specification

Crown Studio Reference II Reference manual

Crown

Crown Studio Reference II Reference manual

Smoko PEARL BOBA TEA user manual

Smoko

Smoko PEARL BOBA TEA user manual

Seifert SlimLine Pro KG 8525 instruction manual

Seifert

Seifert SlimLine Pro KG 8525 instruction manual

IFM UGT204 operating instructions

IFM

IFM UGT204 operating instructions

SOL paragliders VIRTUE 2 Pilot's manual

SOL paragliders

SOL paragliders VIRTUE 2 Pilot's manual

Koolatron SmartKool SK30 user manual

Koolatron

Koolatron SmartKool SK30 user manual

WebEye RoadPass OBU user manual

WebEye

WebEye RoadPass OBU user manual

manuals.online logo
manuals.online logoBrands
  • About & Mission
  • Contact us
  • Privacy Policy
  • Terms and Conditions

Copyright 2025 Manuals.Online. All Rights Reserved.