manuals.online logo
Brands
  1. Home
  2. •
  3. Brands
  4. •
  5. Kogan
  6. •
  7. LED TV
  8. •
  9. Kogan KALED55XXXWC User manual

Kogan KALED55XXXWC User manual

Table of Contents
Safety Instructions.............................................................................................................................2
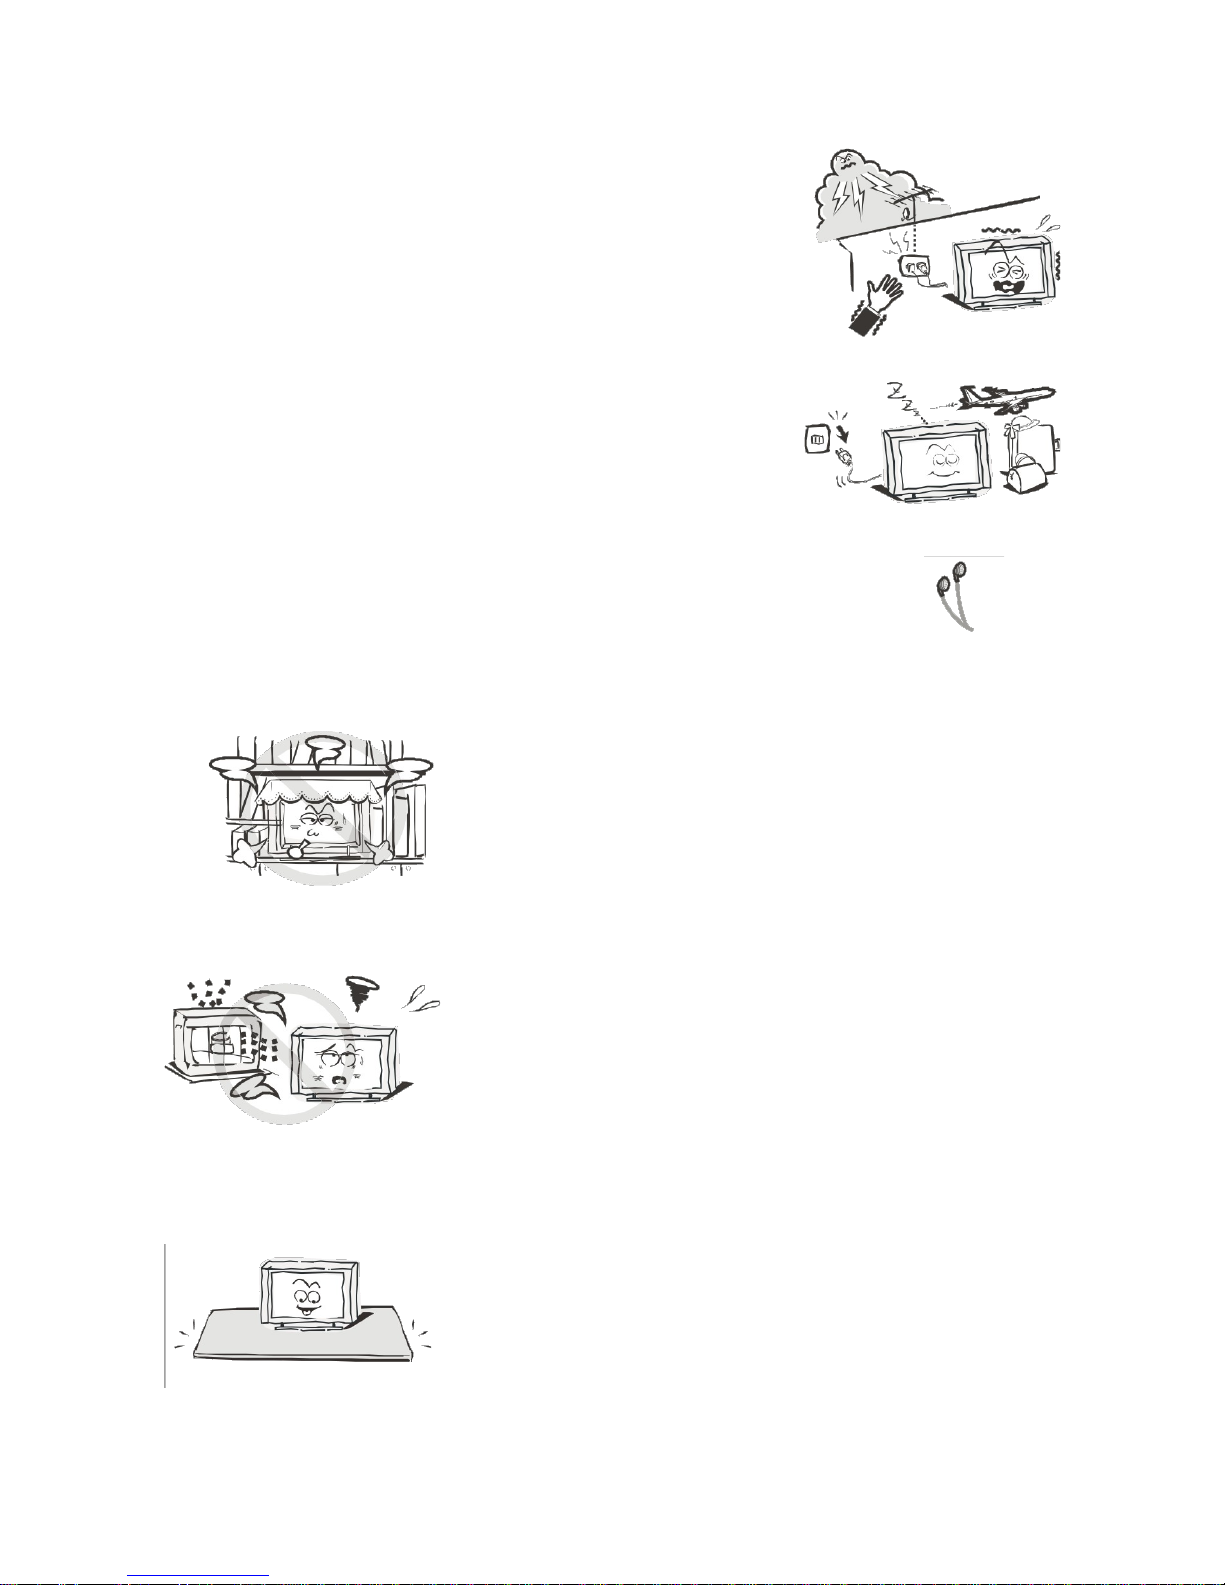
General Safety Instructions.......................................................................................................2
Installation........................................................................................................................................3
Cleaning............................................................................................................................................4
General Description..........................................................................................................................5
Specifications & Accessories.........................................................................................................5
Specifications..................................................................................................................................5
Accessories......................................................................................................................................5
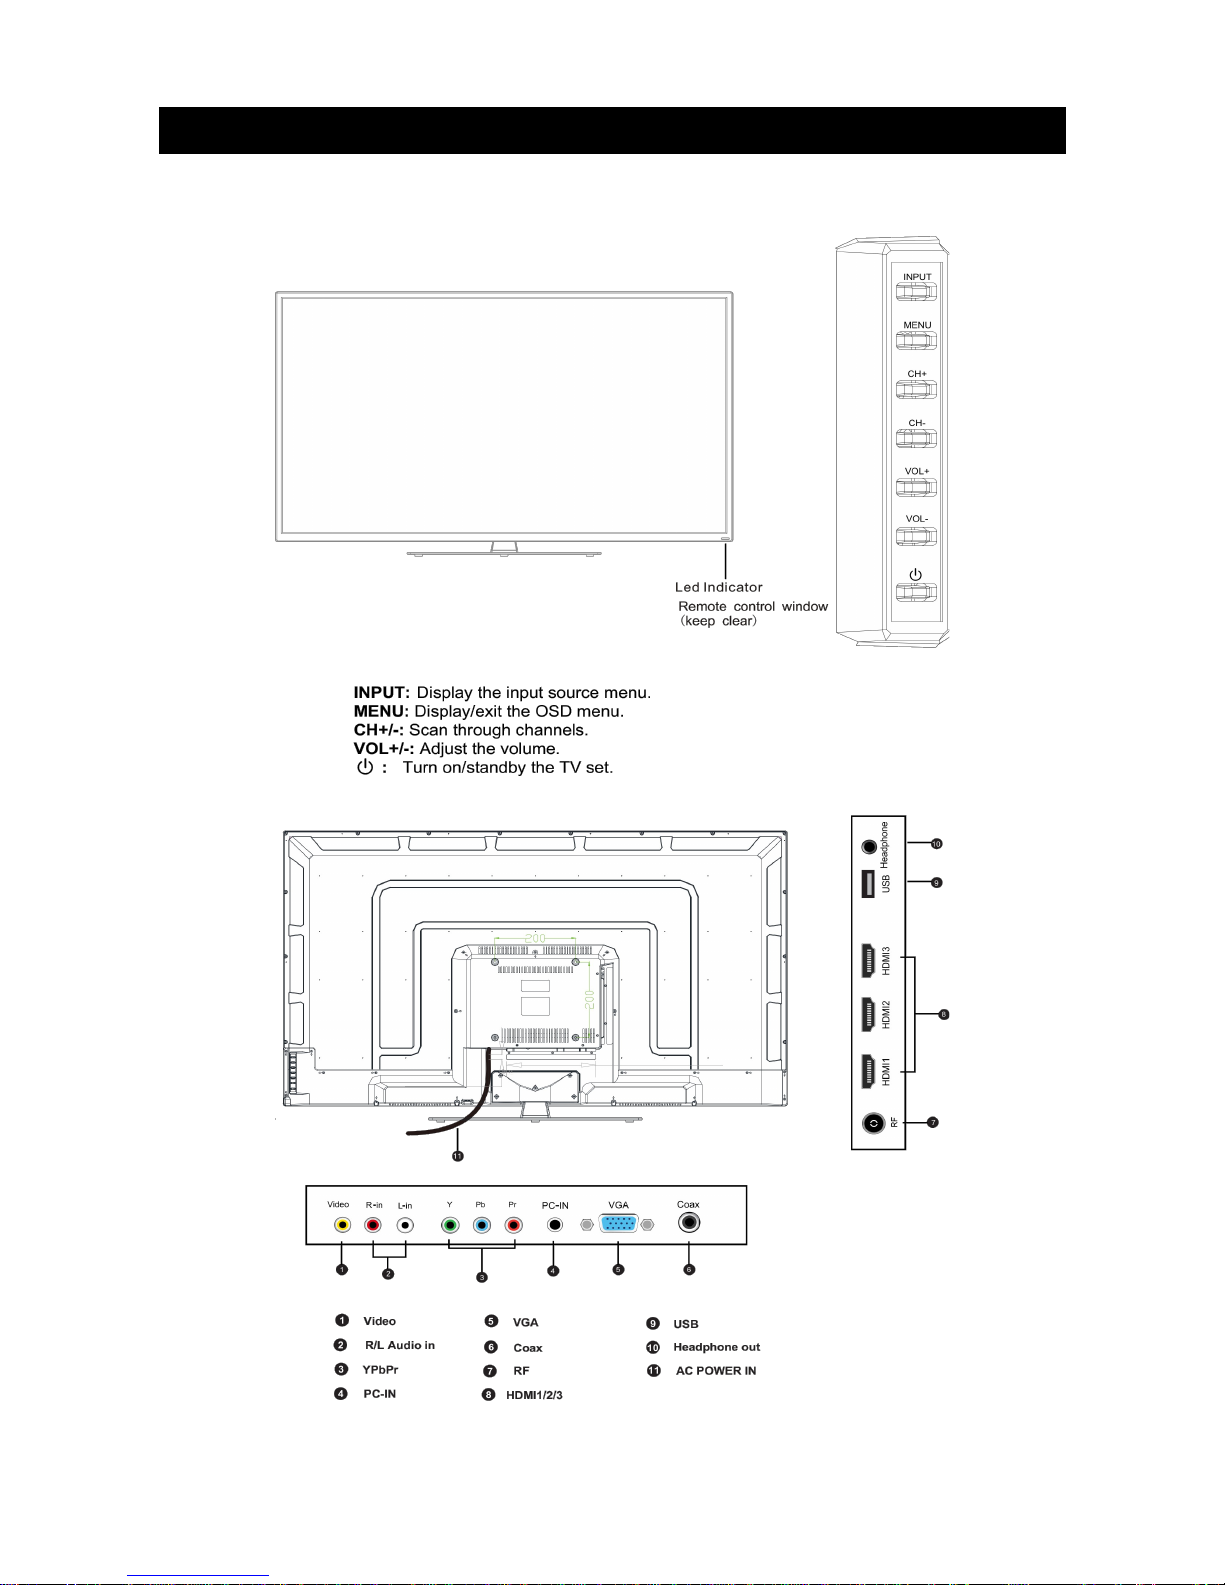
Overview...............................................................................................................................................
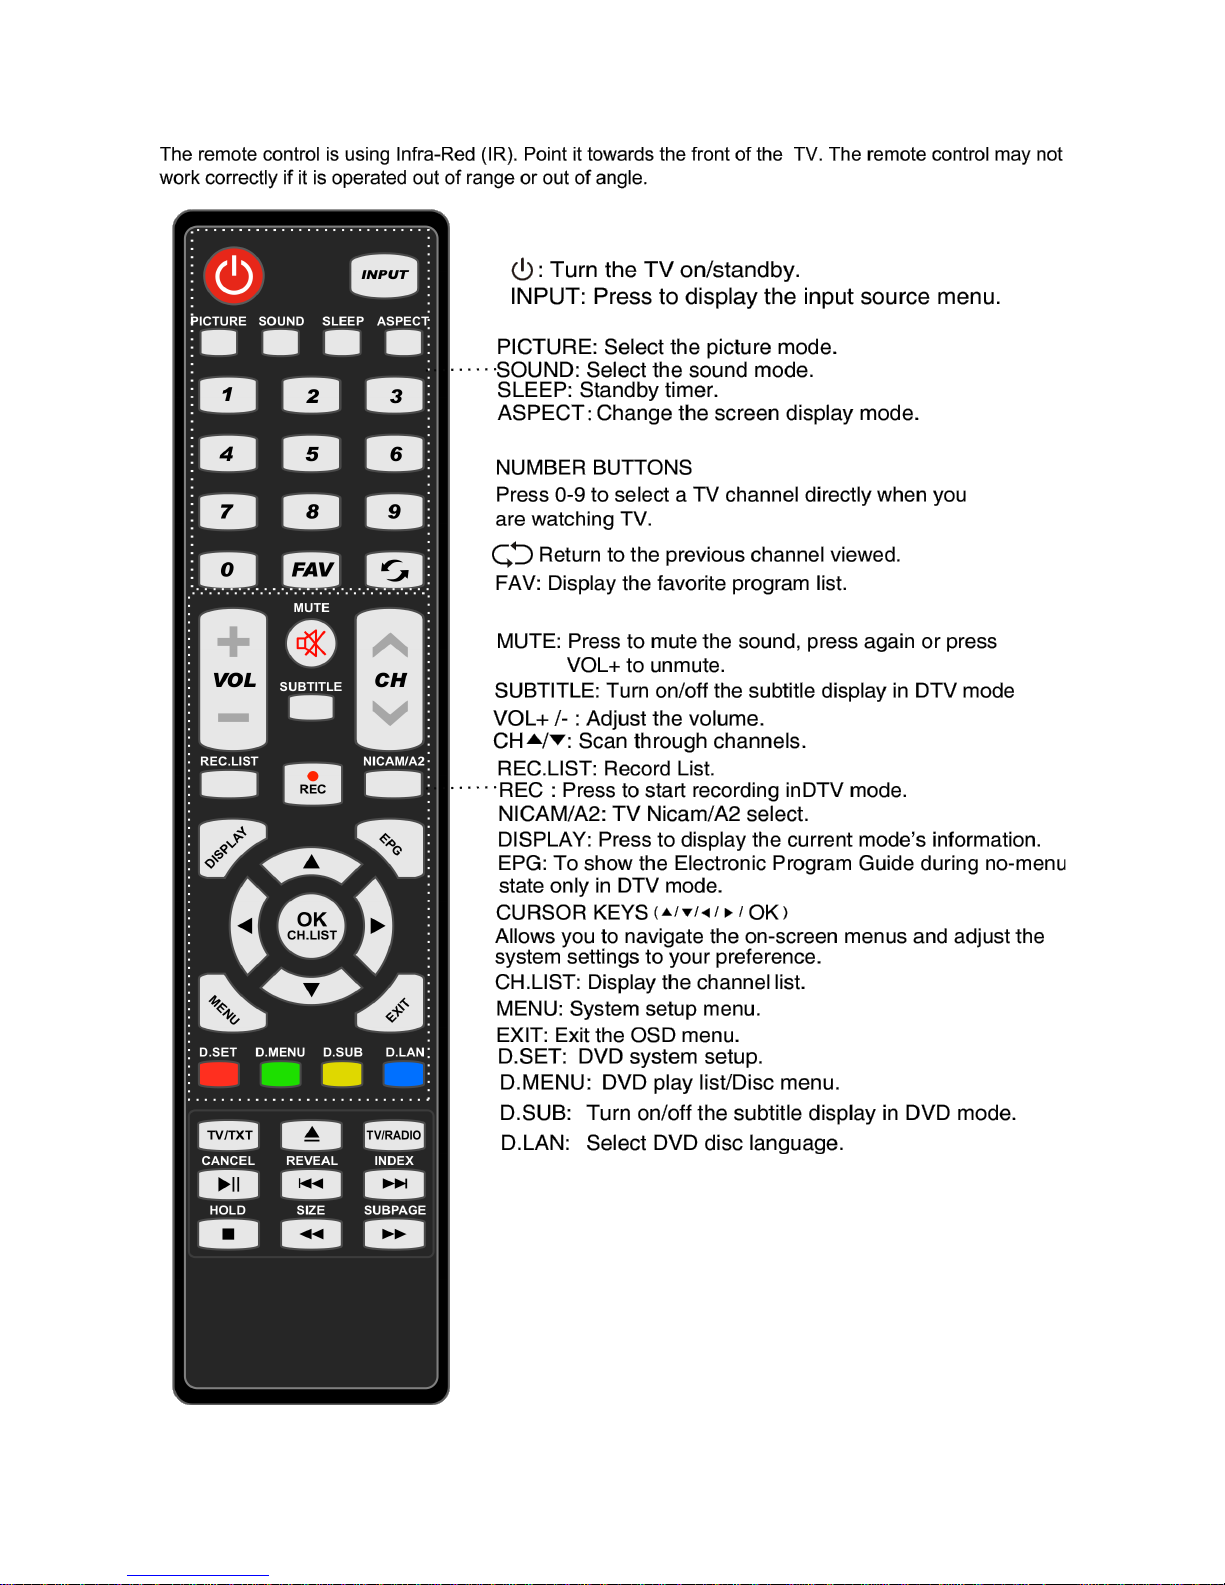
Remote Control..............................................................................................................................7
Basic Operation..................................................................................................................................9
Power On/Off.................................................................................................................................9
Changing the Input Source.......................................................................................................9
Navigating the Menu...................................................................................................................9
Menu Operation................................................................................................................................10
Picture Menu.................................................................................................................................10
Sound Menu...................................................................................................................................10
Channel Menu...............................................................................................................................10
Lock Menu........................................................................................................................................11
Setup Menu.....................................................................................................................................11
Multimedia Operations...................................................................................................................12
Basic Controls...............................................................................................................................12
Photo................................................................................................................................................13
Music.................................................................................................................................................13
Movie.................................................................................................................................................13
PVR.........................................................................................................................................................13
PVR Settings..................................................................................................................................13
Stand Assembly................................................................................................................................14
Parts Required..............................................................................................................................14
Installing the Stand.....................................................................................................................14
Troubleshooting................................................................................................................................15
1
Safety Instructions
General Safety Instructions
Risk of electric shock. DO NOT OPEN!
Do not attempt to service the television yourself, as
opening or removing the covers may expose you to
dangerous voltage or other hazards. Refer all servicing to
the Kogan customer support team.
To reduce the risk of fire or electric shock, do not expose this
product to rain or moisture. The television should not be
exposed to dripping or or splashing, and no liquid filled objects
such as vases should be placed on the case.
In the event of smoke, strange noises or a strange smell from
the unit, you should follow these steps:
•Turn off the unit immediately.
•Disconnect the power plug from the power outlet.
•Contact the Kogan customer support team. Never
attempt to make repairs yourself.
Never push objects of any kind into the set through the
cabinet slots as they may touch dangerous voltage
points or short-circuit parts that could result in a fire or
electric shock. Never spill any liquids onto the set. Use
special caution in households where children are
present. The television is not suitable for children under
4 years old to operate.
Power supply cords should be routed safely to prevent
dangers due to damaged cords.
The mains plug is the main disconnect method, so it should
be easily accessible and not be obstructed during use.
To avoid fires, no naked flame sources such as lit candles or
burning incense should be placed onto the casing of the
television.
Do not pull the plug out of a power outlet by pulling on the
power cable. Always grasp the plug and pull.
Never touch the plug with wet hands.
2
An outside antenna system should not be located in the
vicinity of overhead power lines or other electric light or
power circuits.
When installing an outside antenna system, extreme
care should be taken to keep from touching such power
lines or circuits, as contact with them may be fatal.
Always turn the set off when it is not being used.
Unplug the television from the power outlet when it will
not be used for a long time or when there is an
electrical storm.
Never touch the antenna cable during a lightning storm.
Excessive volume from earphones and headphones can
cause permanent hearing loss. Always monitor the volume of
noise from these devices, especially when children are using
them.
Installation
Ventilation should not be impeded or limited by
covering the ventilation slots with items such as
newspapers, tablecloths, curtains etc..
At least 10cm of space should be left around the
apparatus for sufficient ventilation.
The television should be situated away from heat
sources such as radiators, heaters, stoves or other
products that product heat.
Place the television in a position where the screen is
not exposed to direct sunlight. It is best to have soft
indirect lighting while watching, and you should avoid
a completely dark viewing environment and
reflections to avoid eye fatigue.
Keep the product away from high magnetic fields
(such as near an amplifier speaker) to avoid affecting
the tint.
Do not place the television on an unstable table, stand
or shelf. The set may fall, causing serious injury as well
as damage to the television itself.
If moving the television on a cart, move the unit with
care as sudden stops and starts may cause the
television to overturn.
3
Do not place this television near water, for example
near a bathtub, wash bowl, kitchen sink, laundry tub,
swimming pool or in a damp basement etc..
When moving the television to a warm location from
a cold location, allow some time for any dew or
condensation inside the television to evaporate fully
before you turn the unit on.
To prevent injury, the television must be securely
attached to the floor/wall in accordance to the
supplied installation instructions.
Cleaning
Unplug the television from the power supply before
cleaning. Do not use any liquid cleaners or harsh
chemicals. Use a soft, damp cloth.
4
General Description
•Zero X radiation complies to green environment protection requirements.
•Auto tuning and fine tuning.
•One PC VGA input socket.
•One YpbPr input socket.
•Three HDMI input sockets (HDMI 1.4)
•One composite input socket.
•One audio input socket.
•USB support.
•Headphone support
Specifications & Accessories
Specifications
Model KALED55XXXWC
Display Screen Size 55” Diagonal
Maximum Resolution 1920 x 1080
Power Supply AC 110-240V ~ 50/ 0Hz
Antenna Input Impedance 75ohm
Power Consumption 135W
Accessories
Remote Control
5
Overview
The buttons on the lower-right panel control your TVs basic features, including the on-screen
menu. To use the televisions more advanced features, you must use the remote control.
Remote Control
7
8
Note:
Before turning off the main power, or turning off the power supply,
you must switch the television into standby mode by pressing the
POWER button on the remote control or on the television set itself.
Once the television is in standby mode, you may turn off the mains
power supply.
asic Operation
Power On/Off
1. Connect the TV to the power supply.
2. To turn the TV on, press the button on the TV or remote control.
3. To turn the TV off, press the button on the TV or remote control.
Changing the Input Source
Press INPUT on the remote or TV set to display the input source menu.
Use the CH+/- buttons on the TV set or the buttons on the remote▲ ▼
to select the input source, then press the OK button on the remote
control to select it.
Note: Before selecting the input source, make sure the connections are
prepared and the input source is powered up.
Navigating the Menu
Press the MENU button to display the OSD menu as shown below:
Use the / buttons to select the main menu, then press /▲ ▼ ▶ OK to enter the
submenu. In the submenu, use the / buttons to select the function item, then ▲ ▼
press /▶OK to enter the setup menu.
Press / the buttons to adjust, or press / to select and press / /◀ ▶ ▲ ▼ ◀ ▶ OK to
confirm.
•Press /◀MENU to return to the previous menu.
•Press EXIT to exit the display menu.
Notes:
•The relevant input sources can only be accessed when the suitable input
signal is active.
•For hints on the operation of the OSD menu, refer to the hints displayed at
the bottom of the screen.
9
Menu Operation
Picture Menu
Picture Mode: Select your desired picture mode from Dynamic, Standard,
Mild and Personal.
rightness: Adjust image black level.
Contrast: Adjust image contrast.
Sharpness: Adjust the sharpness (unavailable in VGA/PC mode)
Saturation: Adjust image colour from black and white.
Hue: Control the image tint (available in NTSC mode only)
Colour Temp: Select an optimum colour temperature mode to suit your eyes for viewing from
Warm, Cool or Standard.
Aspect Ratio: Change the aspect for the screen from 4:3, Full, Zoom1 or Zoom2.
Noise Reduction: If the broadcast signal is weak, you can select this to reduce the video noise
level. (Not available in DTV mode).
Sound Menu
Sound Mode: Select your desired audio mode as following: Standard, Music,
Personal, Movie. (You may select the sound mode directly by pressing the
SOUND button on the remote control.)
Treble: Adjust the treble effect. Increases or decreases high-pitched sounds.
ass: Adjust the bass effect. Increases or decreases lower-pitched sounds.
alance: Adjust the balance between the left and right speakers to adapt to your listening
position.
Surround Sound: Turn on/off the surround sound function.
EQ Settings: Adjust Equalizer settings.
AVL: Activate or deactivate the Auto Volume Limited function.
SPDIF: Select the spdif mode for the TV from off, PCM and Auto.
Channel Menu
Make changes to the channels to suit your viewing requirements.
You can edit Auto Scan, Manual Tuning, Channel Edit and Signal Information.
Auto Search: Enters the Auto scan menu to start the auto scan. It will scan
the analog signal channel first, then search for digital signals. Before
executing the auto channel search, please confirm whether your antenna
type is Air or Cable.
Digital Manual Search: Press the OK button to enter the digital manual scan menu.
Analog Manual Search: Analog signals are no longer transmitted in Australia.
Channel Edit: Press the OK button to enter the Channel Edit menu as shown
in the picture to the right.
•Delete: Press RED to select the channels you wish to delete.
•Skip: Press GREEN to skip the channel or cancel the setting. The
channel will then not be shown when using the CH+/- buttons.
•Move: Press LUE to select the channel, then press / to move the▲ ▼
channels and OK to confirm.
Signal Information: Displays signal information in DTV mode.
10
Lock Menu
This option allows parents to block channels and programs using a password.
The default password is 0000, and if you do forget your current password,
the master password is 8899. Please take note of this.
Enable: Turn the Lock Channel function on/off.
Channel Locks: When a channel is locked, you must enter your password to
view the channel. Use the / buttons to select the channel, then press the ▲ ▼ OK/▶ button on the
remote control to lock the channel. Press the button a second time to unlock the channel.
Parent Rating: Press / buttons to select Parent Rating, then press ▲ ▼ / ◀ ▶ buttons to select.
Lock Keypad: Set to prevent the remote being used by young children or from other
unexpected usage.
Hotel Mode: Enter the Hotel Setting Mode.
•Max Volume: Set the Max volume for the TV.
•Default Volume: Set the default volume when the program is on.
•Source Lock: Disable any input sources you desire to block.
•Default Source: if “Hotel Mode” is set to on, select the default source
when the TV is turned on.
•Default Prog: if “Hotel Mode” is set to on, selects the default channel
when the TV is turned on.
Setup Menu
OSD Language: Allows you to select the menu language.
Audio Language: Allows you to select the audio language.
Subtitle: Allows you to select the subtitle language.
Teletext: Adjust teletext settings. Teletext is not available in Australia.
Timer Settings:
•OSD Time: 10 seconds, 20 seconds, 30 seconds, 0 seconds, off.
•Sleep Time: 5 mins, 15 mins, 30 mins, 0 mins, 90 mins, 120 mins, 240 mins, off.
•Auto Sleep: 3 hours, 4 hours, 5 hours, off.
•Time Zone: Allows you to select the time zone.
HDMI CEC Control: Turn HDMI CEC Control on/off.
PVR System: Setup the PVR file system.
First Time Setup: Display the First Time Installation menu.
Reset: Press OK button to restore to factory defaults.
11
Multimedia Operations
asic Controls
Press the INPUT button on the remote control to display the input source menu. Select the
media source using the / ◀ ▶ buttons, then press OK to enter the multimedia menu as shown
below.
Insert your USB device, and select the media mode from Photo, Music, Movie or eBook. You will
then find the name of the device displayed on screen as shown below.
Press the / buttons to select the USB device and press ▲ ▼ OK. You will then see the file list as
shown below.
•Press / buttons to move (press ▲ ▼ OK to select the highlighted file or enter the folder);
•Press RED to delete the file; Press the GREEN button to flag the file to add to playlist;
•Press OK to flag or cancel the selected file to the playlist.
•Press to return to the previous menu. Press EXIT to select the file view type from list (◀)
or thumbnail (▶).
•Press EXIT again to return to the root menu.
•Then press ▶to program the flagged files.
•Press STOP to stop and exit the full screen displayed program.
12
Return to
previous menu
Preview
Information
Photo
Press / ◀ ▶ to select the photo option from the media type select, then press
OK to change. You can then press OK again to display the media type table
when it disappears.
•Previous/Next: View the next/previous photo.
•ASPECT Zoom: Adjust picture size.
•Rotate: Rotates the photo clockwise/anti-clockwise.
Music
Press / ◀ ▶ to select the music option from the media type select, then press
OK to change. You can then press OK again to display the media type table
when it disappears.
•Pause: Play/pause the menu.
•FB/FF: Fast backward/fast forward.
•Previous/Next: Play the next/previous track.
•Stop: Stop the music.
Movie
Press / ◀ ▶ to select the movie option from the media type select, then press
OK to change. You can then press OK again to display the media type table
when it disappears.
•Pause: Play/pause the menu.
•FB/FF: Fast backward/fast forward.
•Previous/Next: Play the next/previous track.
•Stop: Stop the music.
PVR
PVR Settings
Press the MENU button and select the PVR/Timeshift menu. Press OK to enter the menu as
shown below.
•File Manager
Select Record File Format from TS and PS for storing on the USB device.
•Device List
Note: Not all USB devices, such as phones, MP3 players, cameras and the like, are
compatible with recording files. Please use USB flash drives or external HDDs with a
separate power supply. The USB drive has to be formatted before any recording can be
done to ensure that it is in the correct file system format and that there is enough data
space for recording.
•Schedule List
Red button: Delete one scheduled program.
Green button: Delete all scheduled programs.
13
Stand Assembly
Parts Required
Before installing the stand, please check that you have all of the parts listed and that there is no
visible damage. If a part is missing or appears damaged, please contact the Kogan.com
customer support team.
Installing the Stand
Place the TV face down on a soft, flat surface (blanket, foam, cloth etc.) to prevent any damage.
Put the neck onto the back of the TV set as shown below, then attach the neck with the supplied
screws (5pcs x MB4 x 10).
Put the stand onto the neck as shown below, then attach with the supplied screws ( pcs x ST4 x 24F).
14
Television Neck Stand Screws
NOTE: TV cannot be tilted forwards
or backwards as shown.
Doing so will damage the stand. NOTE: TV cannot be swivelled left or right as shown.
Doing so will damage the stand.
Troubleshooting
If you have any problems with your television, please check the suggested
solutions below, as these issues may be caused by improper adjustment/setup
rather than a malfunction with the unit. If the problem persists, please contact
the Kogan customer support team.
Problem Possible Solution
Poor picture and sound quality •Try a different channel
•Adjust the antenna
•Check all connections
No picture or sound in TV status •Try another channel
•Press the TV/AV button
•Make sure TV is plugged in
•Check the antenna connection
No sound, or sound is too low at maximum
volume
•Check the volume settings on any
external speakers connected to your
television
•Adjust the TV volume accordingly
•Check that MUTE hasn't been turned on
No colour, wrong colour or tints •Make sure the program itself is
broadcast in colour
•Select the picture menu, then adjust the
colour and tint submenus
Picture rolls vertically •Check all connections
Blurred or snowy picture, distorted sound •Check direction, location and
connections to your antenna
•Issues may be caused by use of an
indoor antenna
Remote control malfunctions •Replace remote control batteries
•Check battery terminals
•Remote is out of range, move closer to
TV
•Confirm there is no obstructions
between remote and TV
•Make sure power cord is plugged in
Image is not centered on the screen •Adjust the horizontal and vertical
position
15

Other Kogan LED TV manuals

Kogan 9 RT9230 Series User manual

Kogan

Kogan 9 RT9230 Series User manual

Kogan KALED24XXXZA User manual

Kogan

Kogan KALED24XXXZA User manual

Kogan 8 Series User manual

Kogan

Kogan 8 Series User manual

Kogan KALED16XXXVA User manual

Kogan

Kogan KALED16XXXVA User manual

Kogan KALED40GF7300ZA User manual

Kogan

Kogan KALED40GF7300ZA User manual

Kogan 7 Series User manual

Kogan

Kogan 7 Series User manual

Kogan KALED55CUHDUA User manual

Kogan

Kogan KALED55CUHDUA User manual

Kogan 8 JU8300 Series User manual

Kogan

Kogan 8 JU8300 Series User manual

Kogan 7 Series User manual

Kogan

Kogan 7 Series User manual

Kogan KALED24XXXZA User manual

Kogan

Kogan KALED24XXXZA User manual

Kogan 8 Series UN8910 User manual

Kogan

Kogan 8 Series UN8910 User manual

Kogan KALED32SMTZB User manual

Kogan

Kogan KALED32SMTZB User manual

Kogan KALED16DVDVA User manual

Kogan

Kogan KALED16DVDVA User manual

Kogan KALED24***YC User manual

Kogan

Kogan KALED24***YC User manual

Kogan KALED55KU8000SZB User manual

Kogan

Kogan KALED55KU8000SZB User manual

Kogan KALED32EH6200DZA User manual

Kogan

Kogan KALED32EH6200DZA User manual

Kogan KALED42XXXVA User manual

Kogan

Kogan KALED42XXXVA User manual

Kogan KALED43UHDZA User manual

Kogan

Kogan KALED43UHDZA User manual

Kogan KALED32DH5000VA User manual

Kogan

Kogan KALED32DH5000VA User manual

Kogan KAQLED65RQ9510SVA User manual

Kogan

Kogan KAQLED65RQ9510SVA User manual

Kogan Android TV 9 Series User manual

Kogan

Kogan Android TV 9 Series User manual

Kogan KALED32DVDWC User manual

Kogan

Kogan KALED32DVDWC User manual

Kogan KALED32XXXZB User manual

Kogan

Kogan KALED32XXXZB User manual

Kogan KULED32XXXYA User manual

Kogan

Kogan KULED32XXXYA User manual

Popular LED TV manuals by other brands

VESTEL SATELLITE 22PF5045 operating instructions

VESTEL

VESTEL SATELLITE 22PF5045 operating instructions

LG 43UF680T-TA owner's manual

LG

LG 43UF680T-TA owner's manual

LG LW300C-U Series installation manual

LG

LG LW300C-U Series installation manual

Andersson LED5062UHD PVR user manual

Andersson

Andersson LED5062UHD PVR user manual

Panasonic CT27G13 - 27" COLOR TV operating instructions

Panasonic

Panasonic CT27G13 - 27" COLOR TV operating instructions

LG 49LJ5400 Easy setup guide

LG

LG 49LJ5400 Easy setup guide

Shivaki STV-16LED1 Service manual

Shivaki

Shivaki STV-16LED1 Service manual

Panasonic TC-55GX800C owner's manual

Panasonic

Panasonic TC-55GX800C owner's manual

Telefunken TF-LED32S17T2 instruction manual

Telefunken

Telefunken TF-LED32S17T2 instruction manual

Element ELEFW401A instruction manual

Element

Element ELEFW401A instruction manual

Gogen TVH32P320T manual

Gogen

Gogen TVH32P320T manual

Panasonic TH-75LX900Z operating instructions

Panasonic

Panasonic TH-75LX900Z operating instructions

Horizon Fitness 40HL739F operating instructions

Horizon Fitness

Horizon Fitness 40HL739F operating instructions

LG 47LS5600 user guide

LG

LG 47LS5600 user guide

Samsung 7 Series user manual

Samsung

Samsung 7 Series user manual

Krüger & Matz KM0242 Quick installation guide

Krüger & Matz

Krüger & Matz KM0242 Quick installation guide

Panasonic TX-24FS500B operating instructions

Panasonic

Panasonic TX-24FS500B operating instructions

Panasonic TX-24J330B operating instructions

Panasonic

Panasonic TX-24J330B operating instructions

manuals.online logo
manuals.online logoBrands
  • About & Mission
  • Contact us
  • Privacy Policy
  • Terms and Conditions

Copyright 2025 Manuals.Online. All Rights Reserved.