Kogan KA15WMETGRA User manual

1500W MEAT GRINDER
KA15WMETGRA


The product is intended for household use only. Do not use for industrial purposes.
Unplug the product from outlet when assembling and disassembling the unit.
Children should be closely supervised to ensure that they do not play with the
appliance.
When carrying the unit be sure to hold the motor housing with both hands. Do not
carry the unit by holding only the hopper plate or head.
Do not attach the cutting blade or cutting plate when using the kubbe
attachment.
Never feed food by hand. Always use a food pusher.
Do not grind hard food such as bones, nuts, etc.
Do not grind ginger and other materials with hard fibres.
The meat grinder should never be continuously run for more than 5 minutes at a
time.
Never switch to the reverse function while the appliance is operating (switching the
power knob from “⏻⏻” to “R”, or vice versa). Always wait at least one minute until
the grinder has come to a complete stop, or damage to the appliance may be
caused.
After use, it is normal for a small amount of food to be left in the grinder head. If
any black metal powder is adhering to food ground in the end, pick these pieces
out and throw them away; do not eat them.
To avoid jamming, do not force the unit to operate with excessive pressure.
When the circuit breaker activates, do not switch on.
Never attempt to disassemble, modify, or repair the motor unit.
If the supply cord is damaged, it must be replaced by Kogan.com to avoid a
hazard.
SAFETY & WARNINGS

1 Food pusher 11 Fixing ring
2 Sausage base 12 Cutting plate (medium)
3 12mm sausage 13 Cutting plate (coarse)
4 16mm sausage 14 Kubbe attachment 1
5 20mm sausage 15 18mm sausage
6 Hopper plate 16 Kubbe attachment 2
7 Head 17 Triangle cutting plate
8 Feed screw 18 Locking knob
9 Cutting blade 19 Motor housing
10 Cutting plate (fine) 20 Power/REV
OVERVIEW

Check that voltage indicated on the rating label corresponds to the mains voltage
in the household.
Wash all parts except the body in warm, soapy water.
Before plugging in, ensure the Power/REV dial is turned to the “⏻⏻” position.
INSTRUCTIONS
ASSEMBLY

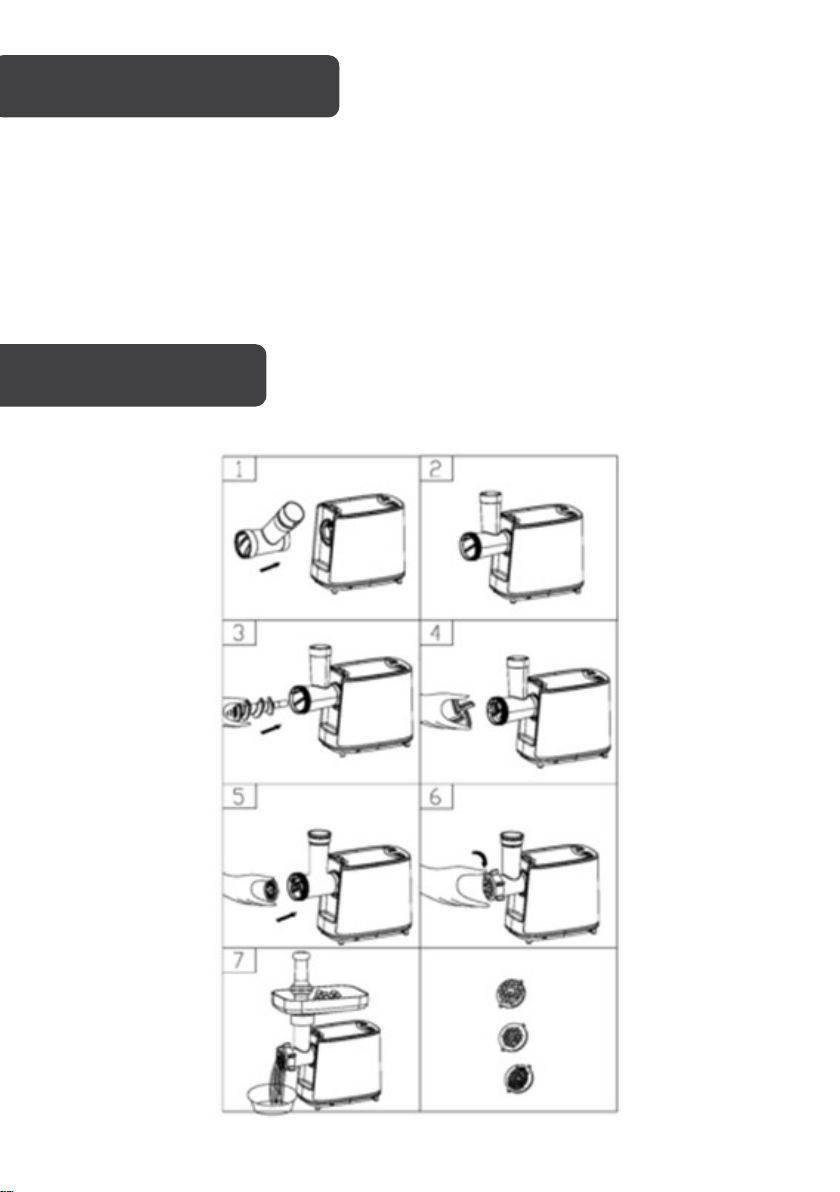
Insert the head into the inlet (fig.1) and turn it to the left to lock into place (fig.2).
Place the feed screw into the head, long end first, and turn the feed screw slightly
until it is set into the motor housing (fig.3).
Place the cutting blade onto the feed screw shaft with the blade facing the front
as illustrated (fig.4). If it is not fitted properly, the meat will not be ground.
Place the desired cutting plate next to the cutting blade, fitting the protrusions into
the appropriate slots (fig.5).
Support or press the centre of the cutting plate with one finger then screw the
fixing ring until tight with another hand (fig.6). Do not over tighten.
Place the hopper plate on the head and fix into position.
Locate the unit on a flat, stable surface.
The air passage at the bottom and the side of the motor housing should always be
kept clear and unobstructed.
Mincing Meat
Prepare and cut all foods into pieces (meat with sinews, bone and fat removed, in
pieces ~20 mm x 20 mm x 60 mm in size) so that they fit easily into the hopper
opening.
Plug-in and turn the “⏻⏻/R” switch to the “⏻⏻” position.
Feed foods into the hopper plate using only the food pusher (fig.7).
After use, switch the unit off and unplug it from the power supply.
Reverse Function
In case of jamming switch the appliance off. Wait at least one minute until grinder has
come to a complete stop, then, turn the “⏻⏻/R” switch to “R” position.
The feed screw will rotate in the opposite direction and empty food from the head.
If reversing the feed screw fails to remove the jam, switch the unit off and clean it.

Making Kubbe
Stuffing:
Mutton: 100g
Olive oil: 1 ½ tablespoons
Onion (cut finely): 1 ½ tablespoons
Spices: to taste
Salt: to taste
Flour: 1 tablespoon
Mince mutton once or twice.
Fry onion until brown and add minced
mutton, spice, salt, and flour.
Casing:
Lean meat: 450g
Flour: 150-200g
Spices: to taste
Nutmeg (cut finely): 1
Powdered red pepper: to taste
Pepper: to taste
Mince the meat three times and mix all ingredients
in a bowl. More meat and less flour for outlet cover
create better consistency and taste.
Grind the mixture three times.
Disassemble by reversing assembly steps from 5-3
to remove the cutting plate and cutting blade.
Place kubbe attachments A and B onto the feed
screw shaft together, fitting protrusions in the slots
(fig.8).
Screw fixing ring into place until tight. Do not over
tighten (fig.9).
Assemble the cylindrical outlet cover (fig.10).
OPERATION

Form kubbe as illustrated below and deep fry.
Making Sausage
Before starting, assemble the sausage attachment as shown below (fig.11).

Disassembling
Make sure that the motor has stopped completely.
Disconnect the plug from the power outlet.
Disassemble by reversing the assembly steps from
fig.6 to fig.1.
If the fixing ring is not easily removed by hand, use
an appropriately sized wrench to loosen (fig.12).
To remove the cutting plate easily, place a
screwdriver between the cutting plate and the
head as illustrated and lift it (fig.13).
Cleaning
Remove any food scraps and wash each part in warm soapy water.
Do not use bleaching solutions containing chlorine, as they will discolour
aluminium surfaces.
Wipe the motor body with a damp cloth. Do not immerse the motor housing in
water.
Chemicals such as thinners and petrol will crack or change the colour of the unit.
Wipe the cutting parts with a cloth wet with vegetable oil to prevent rusting.
Disposal
This marking indicates that this appliance should not be disposed with other
household wastes. To prevent possible harm to the environment or human
health from uncontrolled waste disposal, recycle it responsibly to promote the
sustainable reuse of material resources.
TROUBLESHOOTING

NOTES


Need more information?
We hope that this user guide has given you
the assistance needed for a simple set-up.
For the most up-to-date guide for your product,
as well as any additional assistance you may require,
head online to help.kogan.com
Table of contents
Other Kogan Meat Grinder manuals