Kogan WiFi Digital Radio User manual

WI-FI DIGITAL RADIO WITH
IPOD DOCKING STATION

WIFI RADIO DAB/DAB+ WITH IPOD DOCK INSTRUCTION MANUAL - ENGLISH
Page 1
Table of Contents
1Welcome….…………………………………………………………………………………………3
1.1 System requirements………………………………………………………………………………3
2Key functions……….………………………………………………………………………………...4
2.1 Front panel controls………………………………………………………………………………..4
2.2 Top panel connectors………………………………………………………………………………5
2.3 Rear panel connections……………………………………………………………………………..6
3 Turning on the radio……..………………………………………………………………………6
4 System Settings……………………………………………………………………………………...7
4.1 Setting the time and date……………………………………………………………………………7
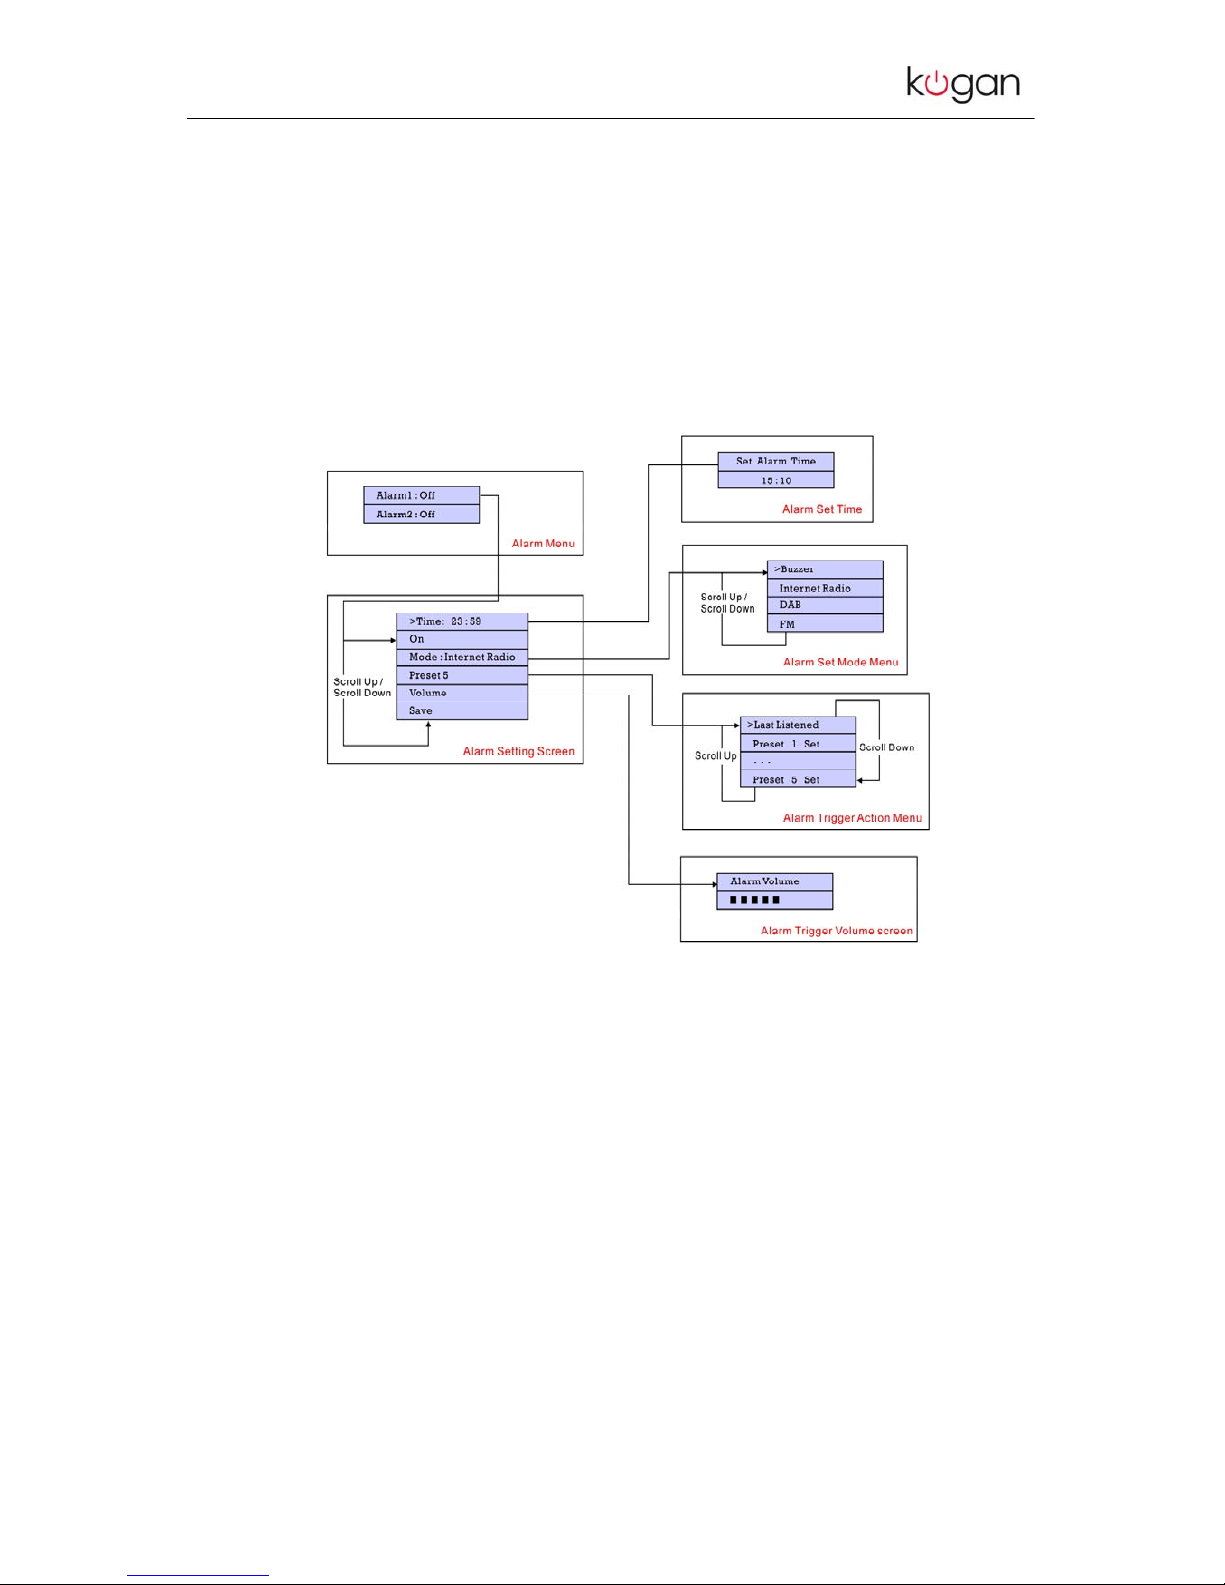
4.2 Setting the alarm…………………………………………………………………………………..8
4.3 Setting up an Internet connection…………………………………………………………..……10
4.4 Updating Software through the Internet…………………………………………………………11
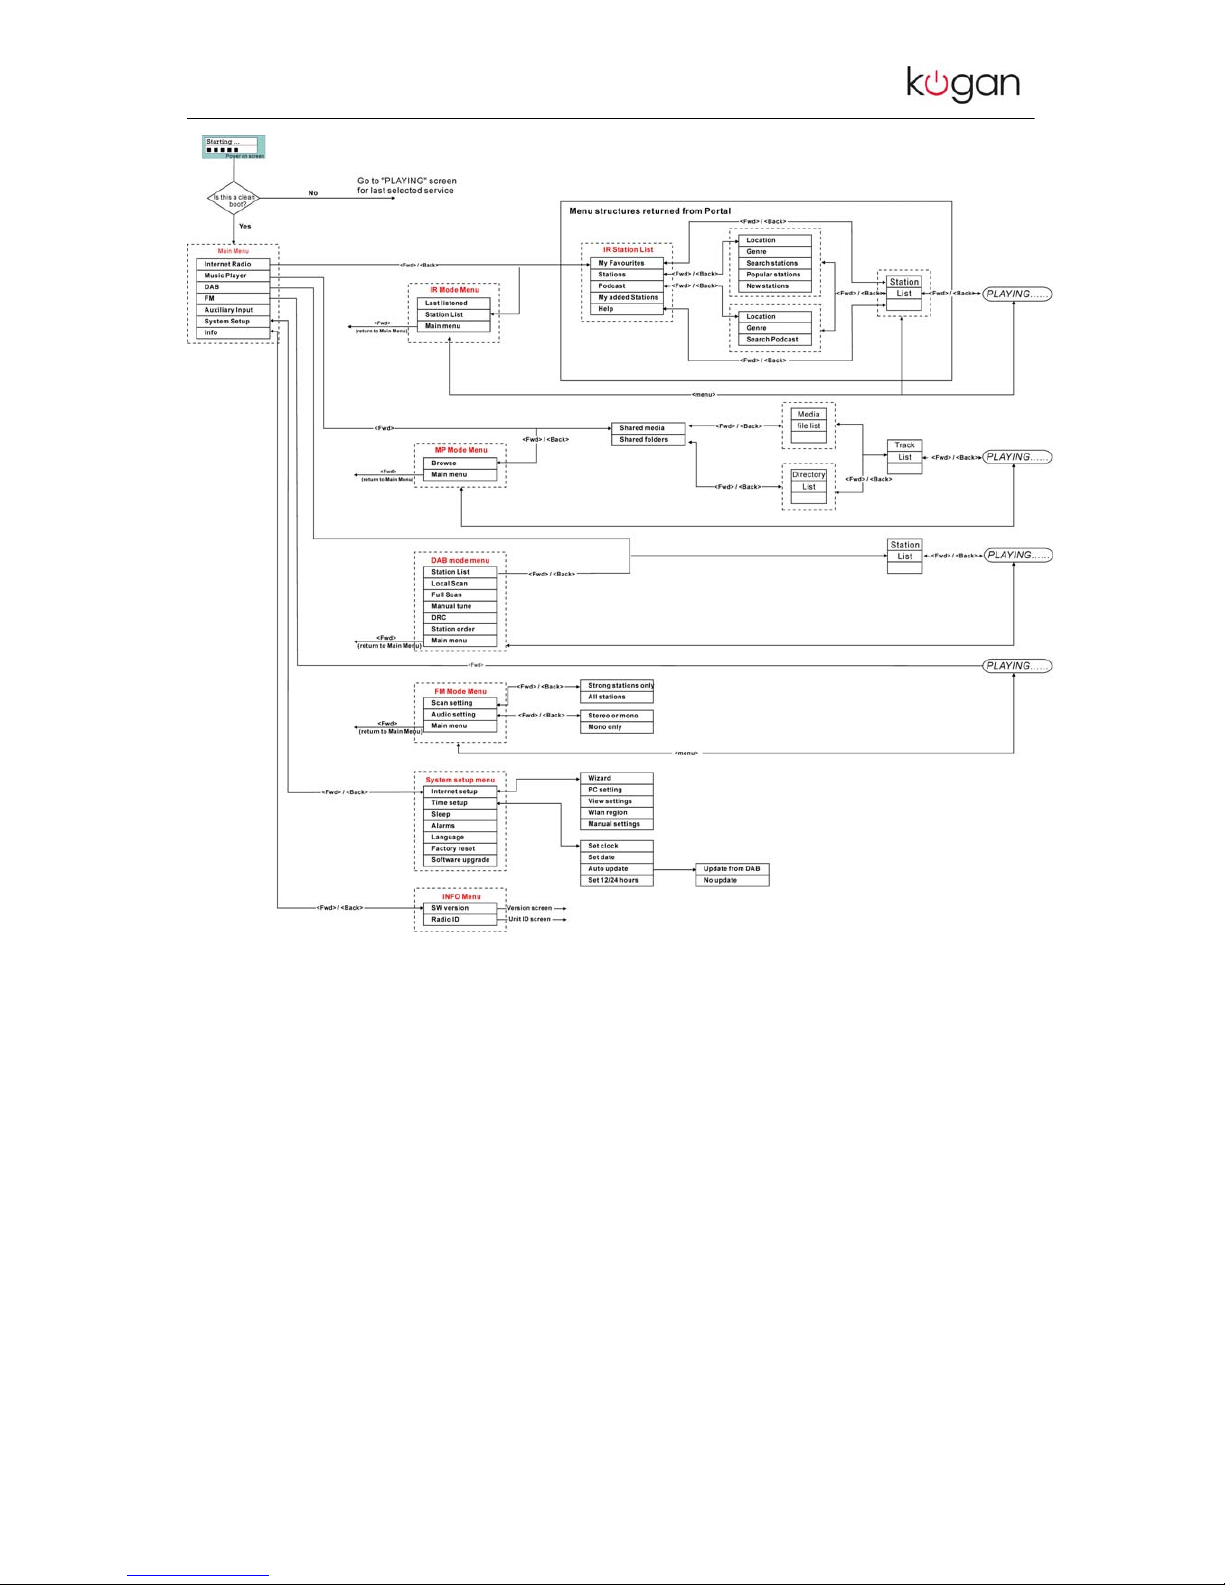
4.5 Changing Modes……………………………………………………………………………………12
5 “Aux” Mode………………………………………………………………………………………..12
6The Music Player Mode………………………………………………………………………. 12
6.1 Shared folder (CIFS) ……………………………………………………………………………….13
6.1.1 PC: Domain/Workgroup configuration………………………………………………………13
6.1.2 PC: Setting up a new user account (Window XP) ……………………………….………..13
6.1.3 PC: Configuring a shared drive………………………………………………………………13
6.1.4 Wi-Fi Radio: Storing the username and password…………………………………………13
6.2 Shared media (UPnP) …………………………………………………….…………..…..……14
6.3 “Music Player” operation……………………………………………………………....……..…15
6.3.1 “Shared Folder” option……………………………………………………………….…………16
6.3.2 “Shared Media” option………………………………………………………………….……… 17
7Operating the Internet Radio …………………………………………………………….….………18
7.1 The “Station List” option……..……………....……………………..…………………….……...…… 19
8“DAB” Mode…………………………………………………………………………………….…..…..20
9“FM” Mode………………………………………………………………………………………………22
10 “iPod” Mode…..……………………………………………………………………………….………..23
11 USB……………………………………………………………………………………………..……...21
12 Pre-sets…………………………………………………………………………………….…..…….22
13 Internet portal on the PC……………………………………………………………………..………24
14 Info and Error Messages / Troubleshooting………………………………………………………..25
15 Safety Information……………………………………………………………………………..……...25

WIFI RADIO DAB/DAB+ WITH IPOD DOCK INSTRUCTION MANUAL - ENGLISH
Page 2
Table of Figures
Figure 1 : System requirements..............................................................................................................3
Figure 2 : Front panel controls................................................................................................................4
Figure 3 : Menu structure of the Radio ...................................................................................................5
Figure 4 : Top panel connections............................................................................................................6
Figure 5 : Rear panel connections..........................................................................................................6
Figure 6 : Alarm setting programme .......................................................................................................9
Figure 7 : Navigating to the Software update menu .............................................................................11
Figure 8 : Internet software upgrade process.......................................................................................11
Figure 9 : Navigating to PC Settings menu...........................................................................................13
Figure 10 : ‘’Music Player’’ mode..........................................................................................................16
Figure 11 : ‘’Shared Folders’’ flowchart.................................................................................................16
Figure 12 : ‘’Shared Media’’ flowchart...................................................................................................17
Figure 13 : Internet Radio menu...........................................................................................................18
Figure 14 : Information types available for Internet Radio and Podcasts.............................................19
Figure 15 : Navigating to the DAB menu ..............................................................................................20
Figure 16 : DAB Mode menu flowchart.................................................................................................21
Figure 17 : FM Mode menu Structure...................................................................................................22
Figure 18 : Frontier Silicon Internet Portal............................................................................................24

WIFI RADIO DAB/DAB+ WITH IPOD DOCK INSTRUCTION MANUAL - ENGLISH
Page 3
Welcome
Thank you for purchasing the Kogan Wi-Fi Radio with IPod Dock.
The Kogan WIFI Radio with IPod Dock combines the features and technology that our customers love
in an all-in-one device. This user guide includes setup and basic instructions for using your Wi-Fi
Radio.
1.1 System Requirements
Operating system:
Windows Vista, Windows XP, or Windows 2000 (SP4 or later required) ; Mac OS X, version 10.3 or
higher.
Internet:
You’ll need a broadband internet connection for internet radio and access to music services. Some
advanced internet radio features can only be accessed by visiting the Frontier Internet Radio Portal.
(http://www.wifiradio-frontier.com).
Network :
802.11b/g compatible wireless network.
Computer:
Figure 1 : System Requirements

WIFI RADIO DAB/DAB+ WITH IPOD DOCK INSTRUCTION MANUAL - ENGLISH
Page 4
2. Key functions
2.1 Front panel controls
Figure 2 : Front panel controls
(1) ‘’ALARM’’
Press the ‘’ALARM’’ key to set the alarm.
(2) ‘’INFO’’
Press the ‘’INFO’’ key to see information about the service currently playing.
(3) ‘’POWER’’
Press the ‘’POWER’’ key to switch on / off the radio.
(4) ‘’MODE’’
Press the ‘’MODE’’ key to select a different mode immediately in the broadcast.
(5) ‘’PRESET’’
(P1 – P5)
Press a ‘’PRESET’’ key (from P1 to P5) to recall a preset station. To save a station, press
and hold a ‘’PRESET’’ key for 2 seconds.
Press ‘’P4’’ ( >II ) to play or pause.
Press ‘’P3’’ ( I<< ) and ‘’P5’’ ( >>I ) to move through playlist tracks. Press quickly to
select previous or next track.
(6) ‘’MENU’’ The ’’MAIN MENU’’ allows you to enter different operating modes (‘’Internet Radio’’ mode ;
‘’Music Player’’ mode ; ‘’DAB’’ mode ; ‘’FM’’ mode ; ‘’AUX’’ mode ; ‘’iPod’’ mode; ‘’System
Settings’’ mode ; ‘’Info’’ mode)
The ‘’MODE MENU’’ show the functions available within the context of each of the
operating modes.
Press the ‘’MENU’’ key at anytime will take you to the mode menu of the operating mode
your radio is currently in. Each mode menu includes an option ‘’Main menu’’ – selecting this
option will return you to the main menu.
Press the ‘’MENU’’ key again to return to the playing screen.
(See figure 3)
(7) ‘’BACK’’
Press the ‘’BACK’’ key to return to the previously selected menu entry.
(8) ‘’TUNING’’
Rotate the ‘’TUNING’’ key to scroll up/down through menu options. Press the ‘’TUNING’’ key
to confirm your selection of a menu option.
(9) ‘’VOLUME’’
Rotate the ‘’VOLUME’’ key to the right to increase the volume or to the left to decrease the
volume.

WIFI RADIO DAB/DAB+ WITH IPOD DOCK INSTRUCTION MANUAL - ENGLISH
Page 5
Figure 3 : Menu structure of the Wi-Fi Radio

WIFI RADIO DAB/DAB+ WITH IPOD DOCK INSTRUCTION MANUAL - ENGLISH
Page 6
2.2 Top panel Connections
Figure 4 : Back panel connectors
(1) USB Port To insert a USB memory stick.
(2) iPod Port To connect to an iPod.
2.3 Rear panel Connections
Figure 5 : Rear panel connections
(1) ‘’ANTENNA’’ Set the antenna to a vertical position to ensure best reception of wireless signal.
(2) ‘’AUX IN’’
(MUSIC PORT) For connecting an MP3 player, portable CD player, or other audio device with a
3.5mm line level output
(3) ‘’HEADPHONE’’ Connect headphones to the WiFi Radio.
(4) DC POWER
JACK (DC 12V) Connect the supplied power cord to this jack. Be sure to use only the power
supply provided with the radio.

WIFI RADIO DAB/DAB+ WITH IPOD DOCK INSTRUCTION MANUAL - ENGLISH
Page 7
3. Turning on the Radio
To turn on your Kogan Wi-Fi Radio for the first time:
1. Plug the supplied power adapter in a power outlet.
2. Connect the power adapter to the DC power jack on the rear panel.
3. Press the ‘’POWER’’ switch on the front panel to turn on the radio. The display lights up and
then the main menu’s list appears.
4. System Settings
To fully operate all the functions available in the radio, please setup the radio by selecting the
“System Settings” from the main menu.
Rotate the ‘’TUNING’’ to scroll to ‘’System Settings’’ and then select ‘’TUNING.’’
Below are the options in the ‘’System Settings’’:
Options
‘’Internet setup’’ Setting up the Internet connection (See section 4.3)
‘’Time setup’’ Setting the date and time (See section 4.1)
‘’Languages’’ Select the user interface language. The radio supports multiple
languages for the Wi-Fi radio.
‘’Factory Reset’’ It is possible to perform a full software reset. This operation will
completely reset the radio’s memory, clearing all codes and user
settings. This will return the radio to its default factory settings.
‘’Auto update’’ Setting the Auto update for the time (ON / OFF)
‘’Software update It is possible to update the radio’s software via your Wi-Fi internet
connection, to ensure that you have all the latest features, or to fix
known bugs in the software. (See section 4.4)
4.1 Setting the time and date
The time and date can be set in two ways, either manually by selecting ‘’Clock’’ / ‘’Date’’ from the
‘’Time Setup’’ menu, or automatically by selecting ‘’Auto update’’ from the ‘’Time Setup’’ menu.
Setting the Clock/Date- Manually:
1. From the main menu, rotate the ‘’TUNING’’ key to scroll to ‘’System Settings’’ and press the
‘’TUNING’’ for the selection
2. Rotate the ‘’TUNING’’ key to scroll to ‘’Time setup’’ and press the ‘’TUNING’’ for the selection
3. Select ‘’Clock’’ / ‘’Date’’ to set the clock / date manually

WIFI RADIO DAB/DAB+ WITH IPOD DOCK INSTRUCTION MANUAL - ENGLISH
Page 8
Setting the Clock/Date- Automatically.
‘’Update from NET’’
If you have selected “Update from NET”, the radio will automatically set the date and time the next
time you listen to an internet radio station. The time will be set to GMT. Depending on your
location, you may need to adjust the time zone.
‘’No Update’’
If you have selected ‘’No Update’’, the radio will not set the date and time automatically the next
time you listen to an internet radio station.
12/24 hour
You can switch between 12 or 24 hours clock formats.
Sleep
It is possible to programme the radio to turn off after a predefined period of time.
4.2 Setting up an Alarm
The radio must have its clock and date set to use the alarm functionality.
The ‘’Alarms’’ can be accessed in two ways:
From the ‘’Time setup’’ menu
1. From the main menu, rotate the ‘’TUNING’’ key to scroll to ‘’System Settings’’ and press the
‘’TUNING’’ for the selection
2. Rotate the ‘’TUNING’’ key to scroll to ‘’Time setup’’ and press the ‘’TUNING’’ for the selection
3. Select ‘’Alarms’’
From the front panel controls
Press the ‘’ALARM’’ key
The radio allows you to store two alarm programmes in memory.
1. To set an alarm, press the ‘’ALARM’’ key
2. Rotate the ‘’TUNING’’ key to choose ‘’Alarm1’’ or ‘’Alarm2’’ and press the ‘’TUNING’’ for the
selection.
3. Press the ‘’TUNING’’ key to select ‘’Set alarm time’’ option. Rotate the ‘’TUNING’’ to set the
alarm time and press the ‘’TUNING’’ for the selection.

WIFI RADIO DAB/DAB+ WITH IPOD DOCK INSTRUCTION MANUAL - ENGLISH
Page 9
4. You can switch the alarm on or off
5. You can now decide whether you would like to be woken up by Internet Radio, DAB, FM or
Buzzer.
6. Then you can decide whether you would like to be woken up by the last played station, or by
a specific preset.
7. Finally, you should select ‘’Save’’ from the menu to complete your alarm programme. If you
leave the programme without saving, ‘’Alarm Not saved’’ will display on the screen.
Figure 6 : Alarm setting Programme

WIFI RADIO DAB/DAB+ WITH IPOD DOCK INSTRUCTION MANUAL - ENGLISH
Page 10
4.3 Setting up an Internet connection
In order to access to the internet radio features, you must connect to your WIFI broadband connection.
Please follow the steps below to setup the Internet connection by using the ‘’Scan for networks’’
function.
1. From the main menu, rotate the ‘’TUNING’’ key to scroll to ‘’System Settings’’ and press the
‘’TUNING’’ for the selection.
2. Rotate the ‘’TUNING’’ key to scroll to ‘’Internet setup’’ and press down the ‘’TUNING” key to
select.
3. The radio will ask you to choose the network you would like to use. If there is more than one
available, all will be listed. Rotate the ‘’TUNING’’ key to scroll through the options and press
the ‘’TUNING’’ for the selection. There are two special options :
[Rescan] - Rescan for all possible networks
[Manual Config]- Set up the wireless configuration manually
4. If the network you have chosen doesn’t require a password, the radio will automatically
connect. ‘’Connected’’ will be shown on the screen after the radio is successfully connected to
the internet.
5. If your chosen network has security enabled, you will be asked to input the relevant key or
password. Remember the password will be case-sensitive. Rotate the ‘’TUNING’’ key to move
the flashing cursor along the row of characters, and press the ‘’TUNING’’ to select the flashing
character.
the ‘<’ symbol = back space
the ‘↵’ symbol = enter
the ‘C’ symbol = cancel
When the password has been entered, move the cursor to the ‘↵’ symbol and press the
‘’TUNING’’. The radio will connect to the network.
The radio will remember the security key or password; you will not be required to enter it
again, even after the radio has been disconnected from main power.
NOTE :
1. Users can edit their WIFI settings by accessing the ‘’System settings’’
Æ
‘’Internet setup’’
Æ
‘’Manual settings’’.
2. Selecting ‘’View settings’’ allows you to access other Wi-Fi connected settings. These are :
•‘’Active adapter’’, which displays the current connection being used to connect to the
Internet.
•‘’MAC address’’
•‘’DHCP status’’
•‘’PC settings’’
•‘’SSID’’
•‘’IP settings’’, which displays the IP address, the subnet mask and the gateway address.

WIFI RADIO DAB/DAB+ WITH IPOD DOCK INSTRUCTION MANUAL - ENGLISH
Page 11
4.4 Updating Software via the Internet
It is possible to update your radio’s software. For this, you must connect to your internet network (see
section 4.3).
Figure 7 : Navigating to the Software update menu
See figure 8
The ‘’Software update’’ option is accessed via the ‘’System settings’’ menu. When you select
‘’Software update’’, the radio will check if an update is available. If an update is available for your
radio, the radio will ask you to press the ‘’INFO’’ key in order to start the update process. A software
update may take several minutes.
Press the ‘’BACK’’ key if you do not wish to carry out the update.
IMPORTANT
Do not switch off the power of the radio or cut off the internet connection until the update operation is
complete, otherwise some settings or information in your radio may be lost.
You may find that you will need to reconfigure your network connection following an update. You may
also need to re-enter all radio station presets, alarm settings, and configuration options.
Figure 8 : Internet software upgrade process

WIFI RADIO DAB/DAB+ WITH IPOD DOCK INSTRUCTION MANUAL - ENGLISH
Page 12
4.5 Changing modes
When you turn on the radio again, the radio will automatically run the last listened programme. To
select another mode:
1. Press the ‘’MENU’’ key to display the mode menu of the mode you are in.
2. Rotate the ‘’TUNING’’ key to scroll to ‘’Main menu’’ and press the ‘’TUNING’’ to go back to the
main menu.
3. In the main menu, select the different mode you wish.
Alternatively, press the ‘’MODE’’ key on the radio to select the different modes.
5. ‘’AUX’’ Mode
The radio’s rear panel contains a 3.5mm stereo input jack (‘’AUX IN’’) for connecting MP3 players, CD
players, or just about any device with line level or headphone output.
From the main menu, rotate the ‘’TUNING’’ key to scroll to ‘’Aux’’ and press the ‘’TUNING’’ for the
selection. Or press the ‘’MODE’’ key until ‘’Aux mode’’ is displayed on the radio’s display.
Connect your radio (‘’Aux-in’’) with your audio device (‘’Audio out’’), and using the included 3.5mm
stereo cable, hit ‘’Play’’ on your audio device and adjust the volume accordingly.
6. ‘’Music Player’’ Mode
There are two Music Player modes available. Each of them requires different settings, and either one
can be used to playback music from a media server.
6.1 Shared folders (CIFS)
In order to set up the device to playback music stored on shared network drives, user name,
password and domain settings must be configured to work with the PC share settings. This is only
required if the user has set a password on his/her shared folders.
6.1.1 PC : Domain/Workgroup configuration
The Domain configuration item can be found on a Windows XP machine as follows:
1. From the ‘’Start’’ menu, select ‘’Control Panel’’ > ‘’System’’ then select the “Computer Name
Tab”.
2. The Domain or Workgroup that this Computer is a member of is displayed in this tab.
3. If the PC is not a member of any Domain or Workgroup, then one must be joined. To do this
click on the ‘’Change’’ button on the computer name tab and enter the name of the domain
(default on Windows XP is ‘’MSHOME’’).
4. A reboot of the PC may be prompted if the Domain or Workgroup has been changed.

WIFI RADIO DAB/DAB+ WITH IPOD DOCK INSTRUCTION MANUAL - ENGLISH
Page 13
6.1.2 PC : Setting up a new user account (Windows XP)
The radio may require you to setup a user account on each PC that you wish to browse. By default
most PCs have at least one user account associated with it. The user name and password (optional)
needs to be the same on each PC as the Internet radio only stores one user name and one password.
For windows XP this can be set up as follows:
1. From the ‘’Start’’ menu, select ‘’Control Panel’’ -> ‘’User accounts’’
2. From this screen left click ‘‘Add …’’, and enter the new user name and the
Domain/Workgroup setting noted above. Select the type of user (restricted) and then select
‘’Finish’’.
3. Select the user just created, and select ‘‘Reset Password …’’ and enter a password for this
user.
4. Note the User Name and Password.
Note for Windows VISTA : Users have to turn on the ‘’Guest account’’ via ‘’Manage user accounts’’
in the ‘’Control Panel’’ in VISTA, then add access to either ‘’Everyone’’ or ‘‘Guest’’ on the shared drive.
They could create a new account for the internet radio, with a password, if they are concerned about
security. The Guest account has no password by default, so the WiFi radio will connect to it from its
factory default settings.
6.1.3 PC: Configuring a shared drive
From the ‘’Start’’ menu select ‘’My Computer’’ and navigate to the directory you wish to share. Right
click on the directory and select ‘’Sharing and Security’’. Configure the shared drive as read only, and
ensure that the User Name created above has read access to the share.
6.1.4 WiFi Radio : Storing the username and password
Before the radio can stream music from a PC, you need to ensure you have shared folder available
on the PC, and set up the radio so that it knows the username and password (if one has been set) for
the shared folder on the PC. This can be set up using the ‘’PC Settings’’ menu (‘’System Settings’’ >
‘’Internet setup’’ >‘’PC settings’’). (Figure 9)
Figure 9 : Navigating to the PC Settings menu

WIFI RADIO DAB/DAB+ WITH IPOD DOCK INSTRUCTION MANUAL - ENGLISH
Page 14
6.2 Shared media (UPnP)
Media sharing uses Windows Media Player (WMP) 11 and above as the media server. This mode
does not require any settings changes on the radio, but the PC needs to be configured to allow the
radio access to the media. You will only have to do this once, following the below steps.
(WMP 11 : http://www.microsoft.com/windows/windowsmedia/player/download/download.aspx )
1. The PC must be connected to wireless network that will be used to share media with the
radio.
2. Ensure that the radio is powered on and connected to the same network as the PC.
3. In WMP, add to the media library the audio files and folders you want to share with your
internet radio (in ‘’Library’’ -> ‘’Add to Library’’).
4. In the WMP main window, click on ‘’Library’’, then ‘’Media Sharing’’.
5. Tick the ‘’Share my media to’’ box, then click ‘’Settings’’.

WIFI RADIO DAB/DAB+ WITH IPOD DOCK INSTRUCTION MANUAL - ENGLISH
Page 15
6. Choose what you wish to share, then click ‘’OK’’.
7. The Internet radio is presented as an ‘’Unknown Device’’. Make sure that the device has
access to the shared media by selecting it and clicking ‘’Allow’’. Then click ‘’OK’’.
8. The PC is now ready to stream music to the Wi-Fi Radio.

WIFI RADIO DAB/DAB+ WITH IPOD DOCK INSTRUCTION MANUAL - ENGLISH
Page 16
6.3 Operating the Music Player
From the main menu, rotate the ‘’TUNING’’ key to scroll to ‘’Music Player’’ and press the ‘’TUNING’’
for the selection. Or press the ‘’MODE’’ key until ‘’Music Player Mode’’ is displayed on the radio’s
display. Choose the option ‘’Shared Media’’ or ‘’Shared Folders’’ depending on your configuration
(Figure 9).
Figure 10 : ‘’Music Player’’ Mode
6.3.1 ‘’Shared Folders’’ option
Below is a flowchart of the ‘’Shared Folders’’ option:
Figure 11 : ‘’Shared Folders’’ Flowchart

WIFI RADIO DAB/DAB+ WITH IPOD DOCK INSTRUCTION MANUAL - ENGLISH
Page 17
1. Ensure that the username and password have been configured as described in section 6.1.
2. Enter the ‘’Music Player’’ mode and select the ‘’Shared Folders’’ option.
3. Once you select the “MSHOME” domain, a list of PCs on the domain is displayed:
4. Once the Domain and PC have been chosen, a list of all of the shared folders in the system is
displayed.
5. Select a folder and a file to play within the folder.
6. Press ‘’Menu’’ to open the Music player mode menu; then select ‘’Browse’’ to enter to the last
selected shared folder.
6.3.2 ‘’Shared Media’’ option
Below is a flowchart of the ‘’Shared media’’ option. Ensure that the UPnP network has been setup on
the PC, for example Windows Media Player 11. (See section 6.2)
Figure 12 : ‘’Shared Media’’ Flowchart

WIFI RADIO DAB/DAB+ WITH IPOD DOCK INSTRUCTION MANUAL - ENGLISH
Page 18
7. Operating the Internet Radio
7.1 The ‘’Station list’’ option
The internet radio mode allows you to choose from a number of services, including listening to live
radio or Podcasts.
Enter to the ‘’Internet Radio’’ mode from the main menu or by pressing the ‘’MODE’’ key until ‘’Internet
Radio Mode’’ is displayed on the radio’s display.
When you connect to the Internet Radio, a ‘’Station list’’ menu is provided. This is built up after the
initial logon from the internet radio portal server. (Figure 12)
Figure 13 : Internet Radio menu
Below the options on the internet radio ‘’Station List’’ menu :
Options
‘’My Favourites’’ Used to navigate to your favourite stations. This list is compiled using your PC via
the internet radio portal. It is possible to compile a list (or lists) of your favourite
stations, allowing quick and easy access to a number of stations. To do this you
must first register your radio and then choose your favourites by visiting the
‘’Frontier Internet Radio Portal’’ (http://www.wifiradio-frontier.com).
‘’Stations’’ Find stations by location, genre, most popular, new station or by alphabetical
order.
‘’Podcast’’ Find Podcasts or listen-again services by location, genre or by alphabetical order.
‘’My added
stations’’ Shows stations which you have personally added through the vTuner internet radio
portal.
‘’Help’’ The ‘’Help’’ option is where you can find the ACCESS CODE that you require to
register your radio on the Frontier Portal.
The ‘’Internet Radio Playing’’ screen displays information on the currently-selected service, and is the
default setting when a service is selected and playing.
The top line always displays the station name, whilst the information displayed in the bottom line can
be scrolled through by pressing the ‘’INFO’’ key. The different information types displayed are shown
in figure 13 above. .

WIFI RADIO DAB/DAB+ WITH IPOD DOCK INSTRUCTION MANUAL - ENGLISH
Page 19
Internet Radio Playing screen
Signal strength
Format
Status
Format: 128 kbps / MP3
Playing
■■■■■
Reliability Reliability: Excellent
Info
Pressing the Info
Button changes the
Display state Example screen
Description
Genre
Location
Description: <a description string>
Genre: Dance
Location: Internet Only
Radio services
Podcast services
Signal strength
Location
Status
Location: London United Kingdom
Playing
■■■■■
Episode Description Episode Description: <description string>
Info
URL
Show Description
Show Format
URL: <url string>
Show Language
Show City
Show Format
Show State
Show Country
Show Description: <description string>
Show Format: <format string>
Show Language: <language string>
Show City: <city string>
Show Format: <format string>
Show State: <state string>
Show Country: <country string>
Time / date 11:46am 23-03-07
Show Title Show title: <description string>
Figure14 : Information types available for Internet radio and Podcasts.
Other manuals for WiFi Digital Radio
1
Table of contents
Other Kogan Radio manuals
Popular Radio manuals by other brands

Cobra
Cobra 29 LTD Classic user manual

Sony
Sony SRF-HM03V - S2 Sports Stereo Headphone Walkman Headband... operating instructions

Vertex Standard
Vertex Standard EVX-261 operating manual

Casio
Casio EV-600B Service manual & parts manual

Hypercable
Hypercable HYC-4009-30 user manual

MUSIC HALL
MUSIC HALL RDR-1 operating instructions