Kogan KADABXXTBLA User manual

KADABXXTBLA
USER MANUAL

KADABXXTBLA
DAB+ and FM Radio
Instruction Manual

Safety Precautions
To achieve the utmost in enjoyment and performance, and in order to become familiar with its
features, please read this manual carefully before attempting to operate the unit.
This will assure you years of faithful, trouble free performance and listening pleasure.
Important otes
•This instruction manual should be retained for future reference.
•The radio should not be exposed to liquids. Please ensure no objects filled with
liquids, such as vases are placed on radio.
•Avoid installing the unit in locations described below:
oPlaces exposed to direct sunlight or close to heat radiating appliances such
as electric heaters.
on top of other stereo equipment that radiate heat.
oPlaces blocking ventilation or dusty places.
oPlaces subject to constant vibration.
oHumid or moist places.
•No naked flame sources such as lighted candles should be placed on or near unit.
•Do not expose the radio to extreme heat or cold.
•perate turning controls and switches as instructed in the manual.
•Before turning on the power for the first time, make sure the power cord is properly
installed.
For safety reasons, do not remove any covers or attempt to gain access to the inside of the
product. Refer any servicing to qualified personnel.
Do not attempt to remove any screws, or open the casing of the unit; there are no user
serviceable parts inside, refer all servicing to qualified service personnel.
CAUTIO : T REDUCE THE RISK F ELECTRIC SH CK D N T REM VE C VER
( R BACK), N USER SERVICEABLE PARTS INSIDE, REFER SERVICING T
QUALIFIED SERVICE PERS NNEL.
DA GEROUS VOLTAGE
Dangerous Voltages, that may be of sufficient magnitude to constitute a risk of
electric shock to persons is present within this product’s enclosure.
ATTE TIO
The owner’s manual contains important operating and maintenance
instructions, for your safety, it is necessary to refer to the manual.
WAR I G: T PREVENT FIRE R SH CK HAZARD, D N T EXP SE THIS
APPLIANCE T DRIPPING R SPLASHING.
ote: This unit will become warm when used for a long period of time. This is normal and
does not indicate a problem with the unit.
2

Safety Information
Some Do’s and Don’ts on the safe use of equipment
This equipment has been designed and manufactured to meet international safety standards
but like any electrical equipment, care must be taken if you are to obtain the best results and
safety is to be assured.
DO read the operating instructions before you attempt to use the equipment.
DO ensure that all electrical connections (including the mains plug, extension leads and inter-
connections between the pieces of equipment) are properly made and in accordance with the
manufacturer’s instructions. Switch off and unplug the mains plug before making or changing
connections.
DO consult your dealer if you are ever in doubt about the installation, operation or safety of
your equipment.
DO ’T remove any fixed cover as this may expose dangerous voltages.
verheating will cause damage and shorten the life of the equipment.
DO ’T allow electrical equipment to be exposed to dripping or splashing, or objects filled with
liquids, such as vases, to be placed on the equipment.
DO ’T place hot objects or naked flame sources such as lighted candles or nightlights on, or
close to equipment. High temperatures can melt plastic and lead to fires.
DO ’T use equipment such as personal stereos or radios so that you are distracted from the
requirements of traffic safety.
DO ’T listen to headphones at high volume, as such use can permanently damage your
hearing.
DO ’T leave equipment switched on when it is unattended unless it is specifically stated that
it is designed for unattended operation. Switch off using the switch on the equipment and
make sure that your family knows how to do this. Special arrangements may need to be
made for infirm or handicapped people.
DO ’T continue to operate the equipment if you are in any doubt about if it’s working
normally or if it’s damaged in any way. Switch it off and withdraw the mains plug and consult
your dealer.
ESD Remark: In case of malfunction due to electrostatic discharge just reset the product
(reconnection of power source may be required) to resume normal operation.
OTE: In the unlikely event of a problem with your product please return to the store where
your purchase was made.
3

Table of Contents
Safety Precautions..........................................................................................................2
Table of Contents...........................................................................................................4
Package Content.............................................................................................................5
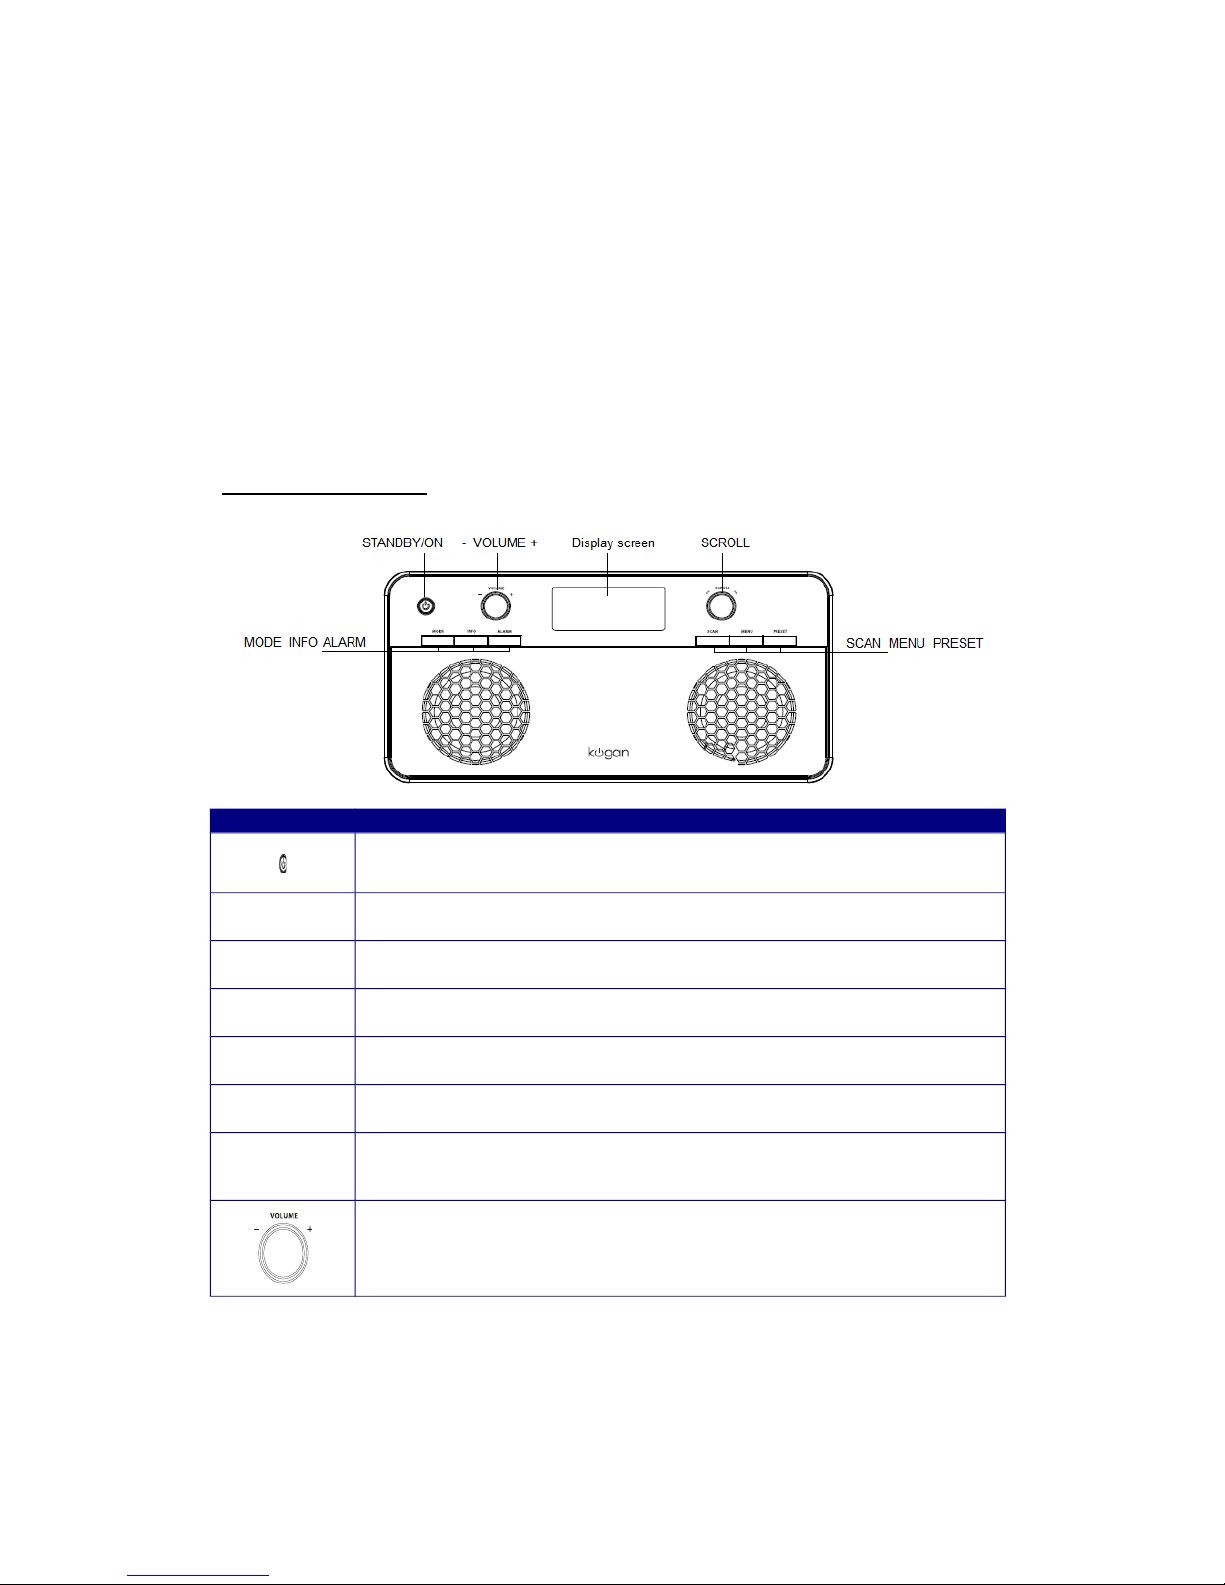
Front Overview.....................................................................................................................5
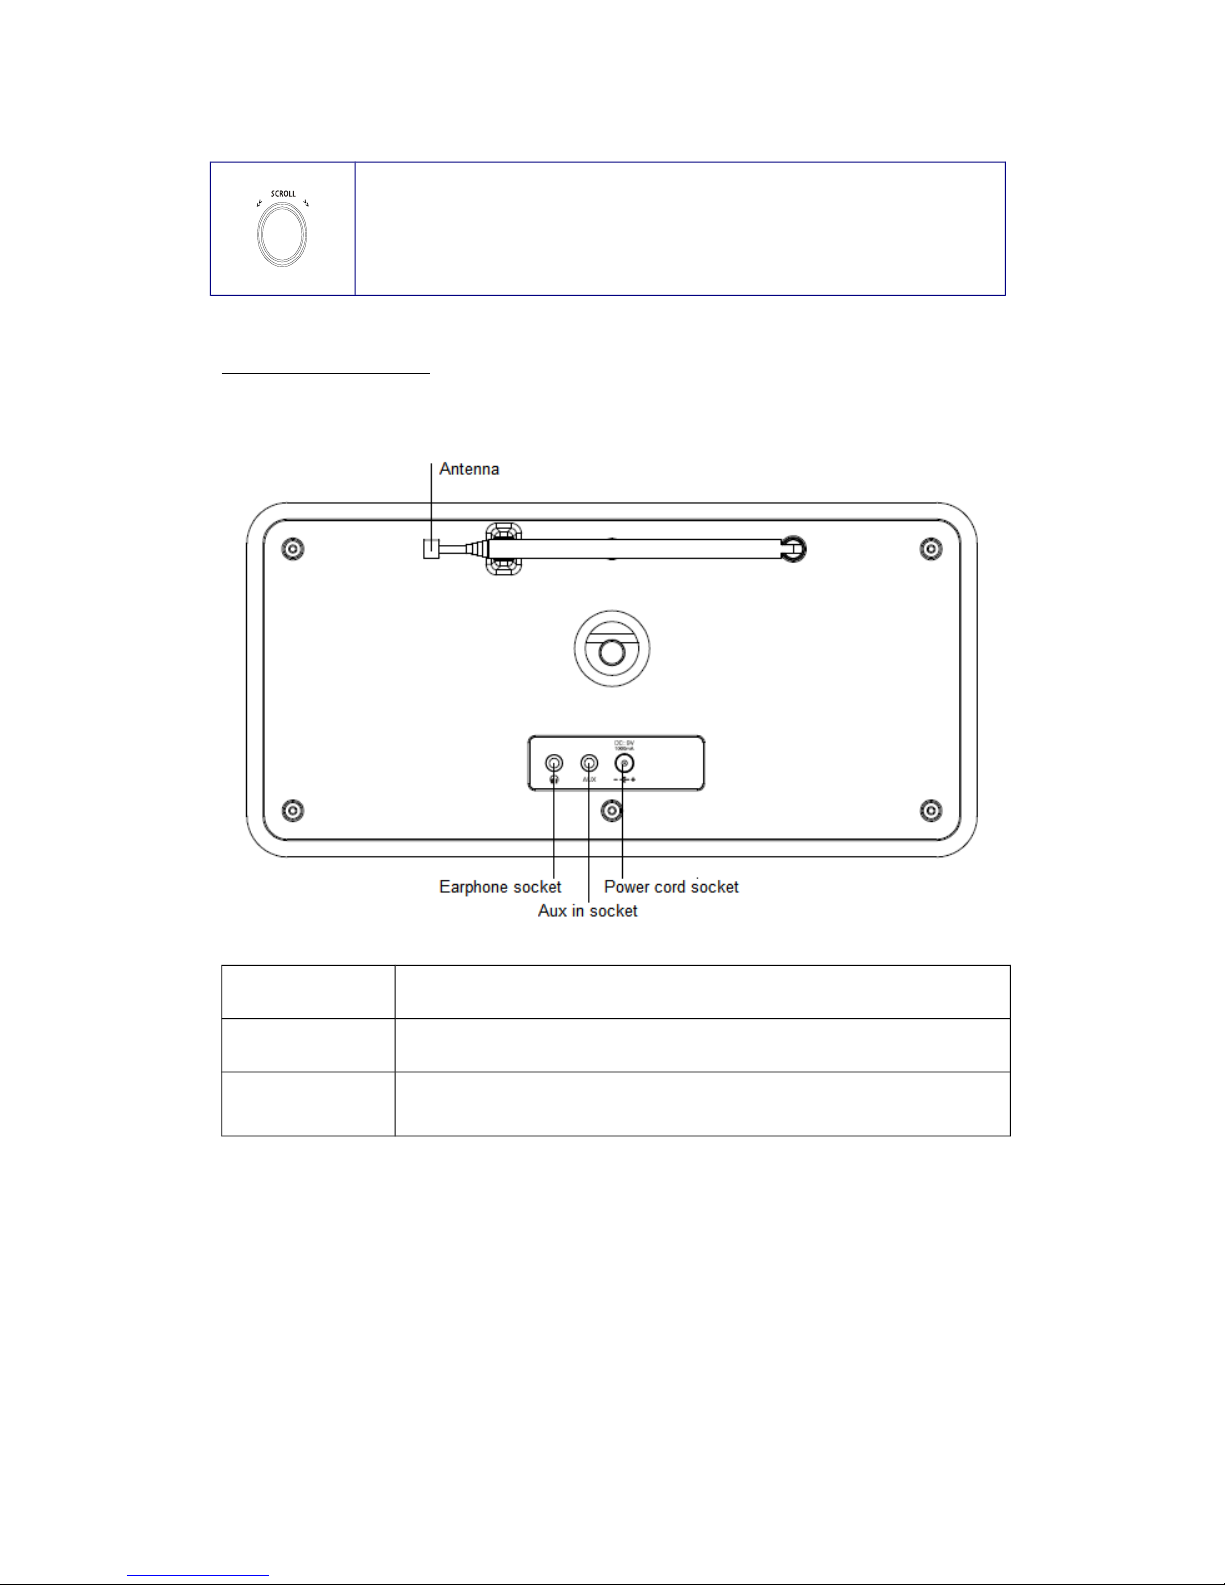
Back Overview ....................................................................................................................6
AB MO E...................................................................................................................7
Turn on.................................................................................................................................7
Shift to another AB+ Station..............................................................................................7
Update Stations List.............................................................................................................7
To Show the Signal Strength................................................................................................7
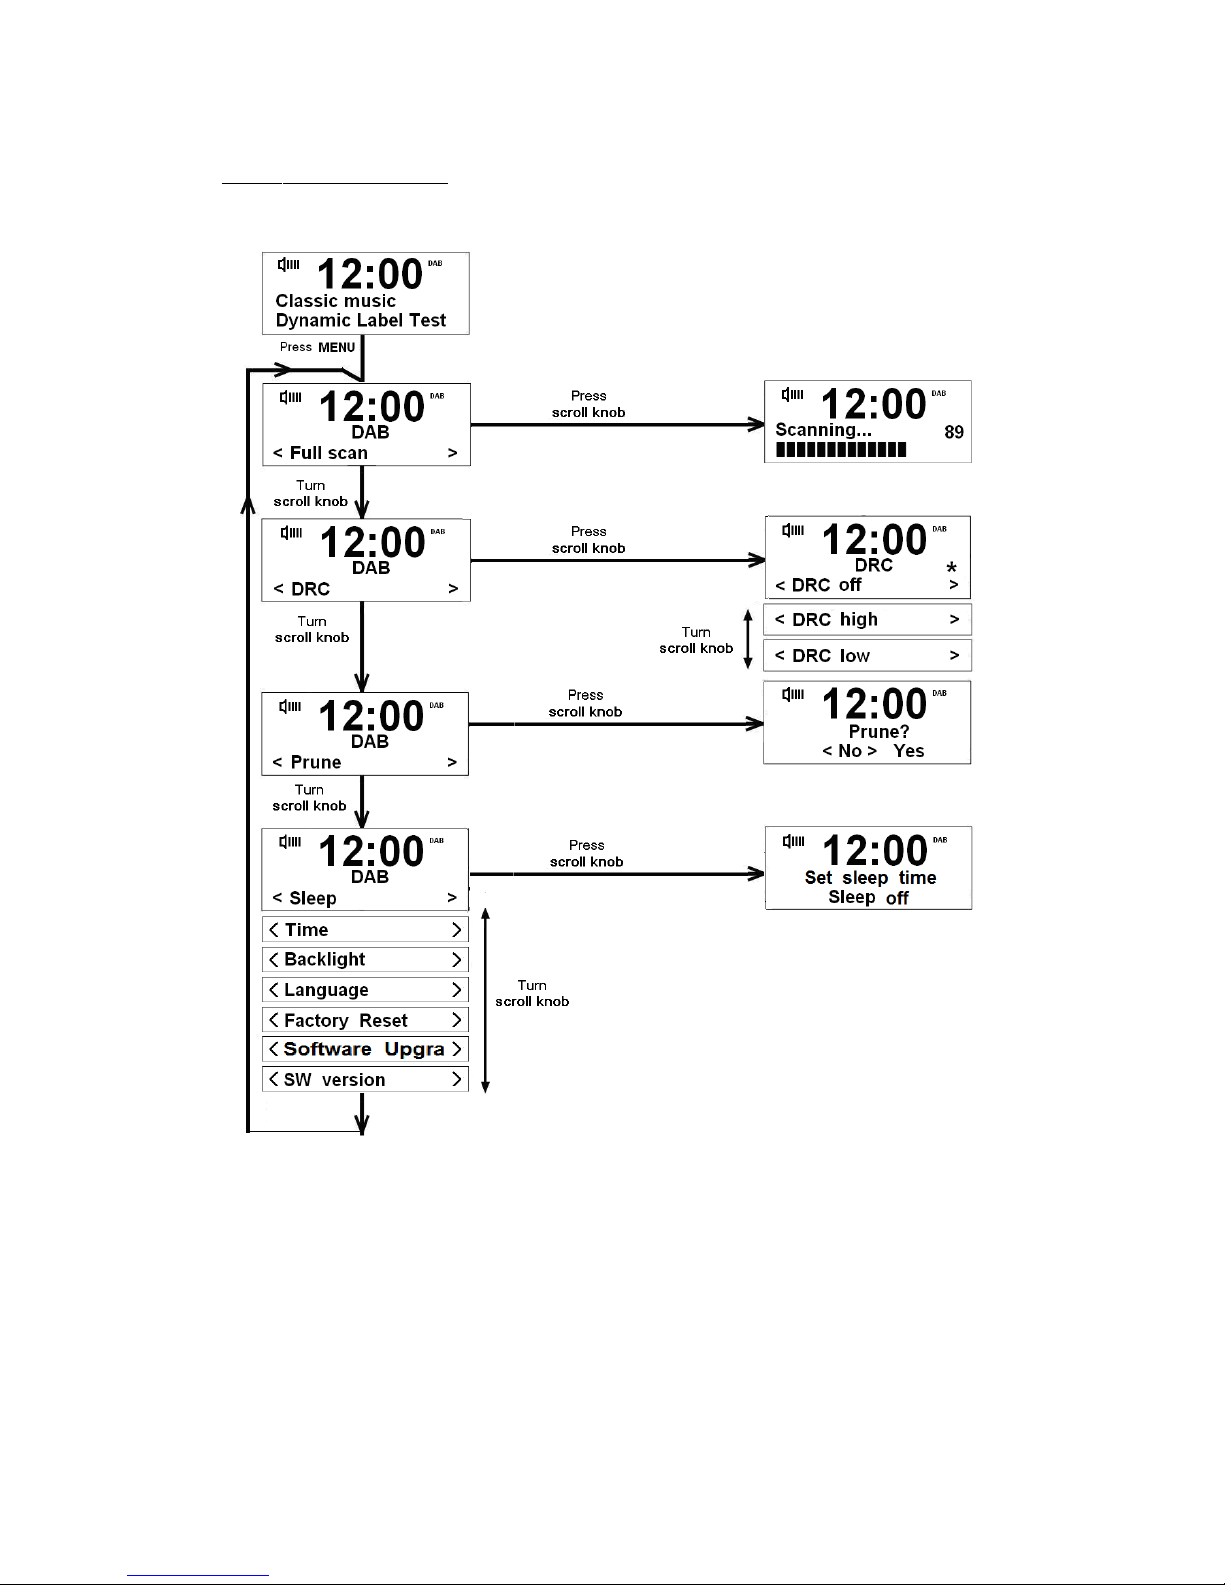
AB+ Menu Tree.................................................................................................................8
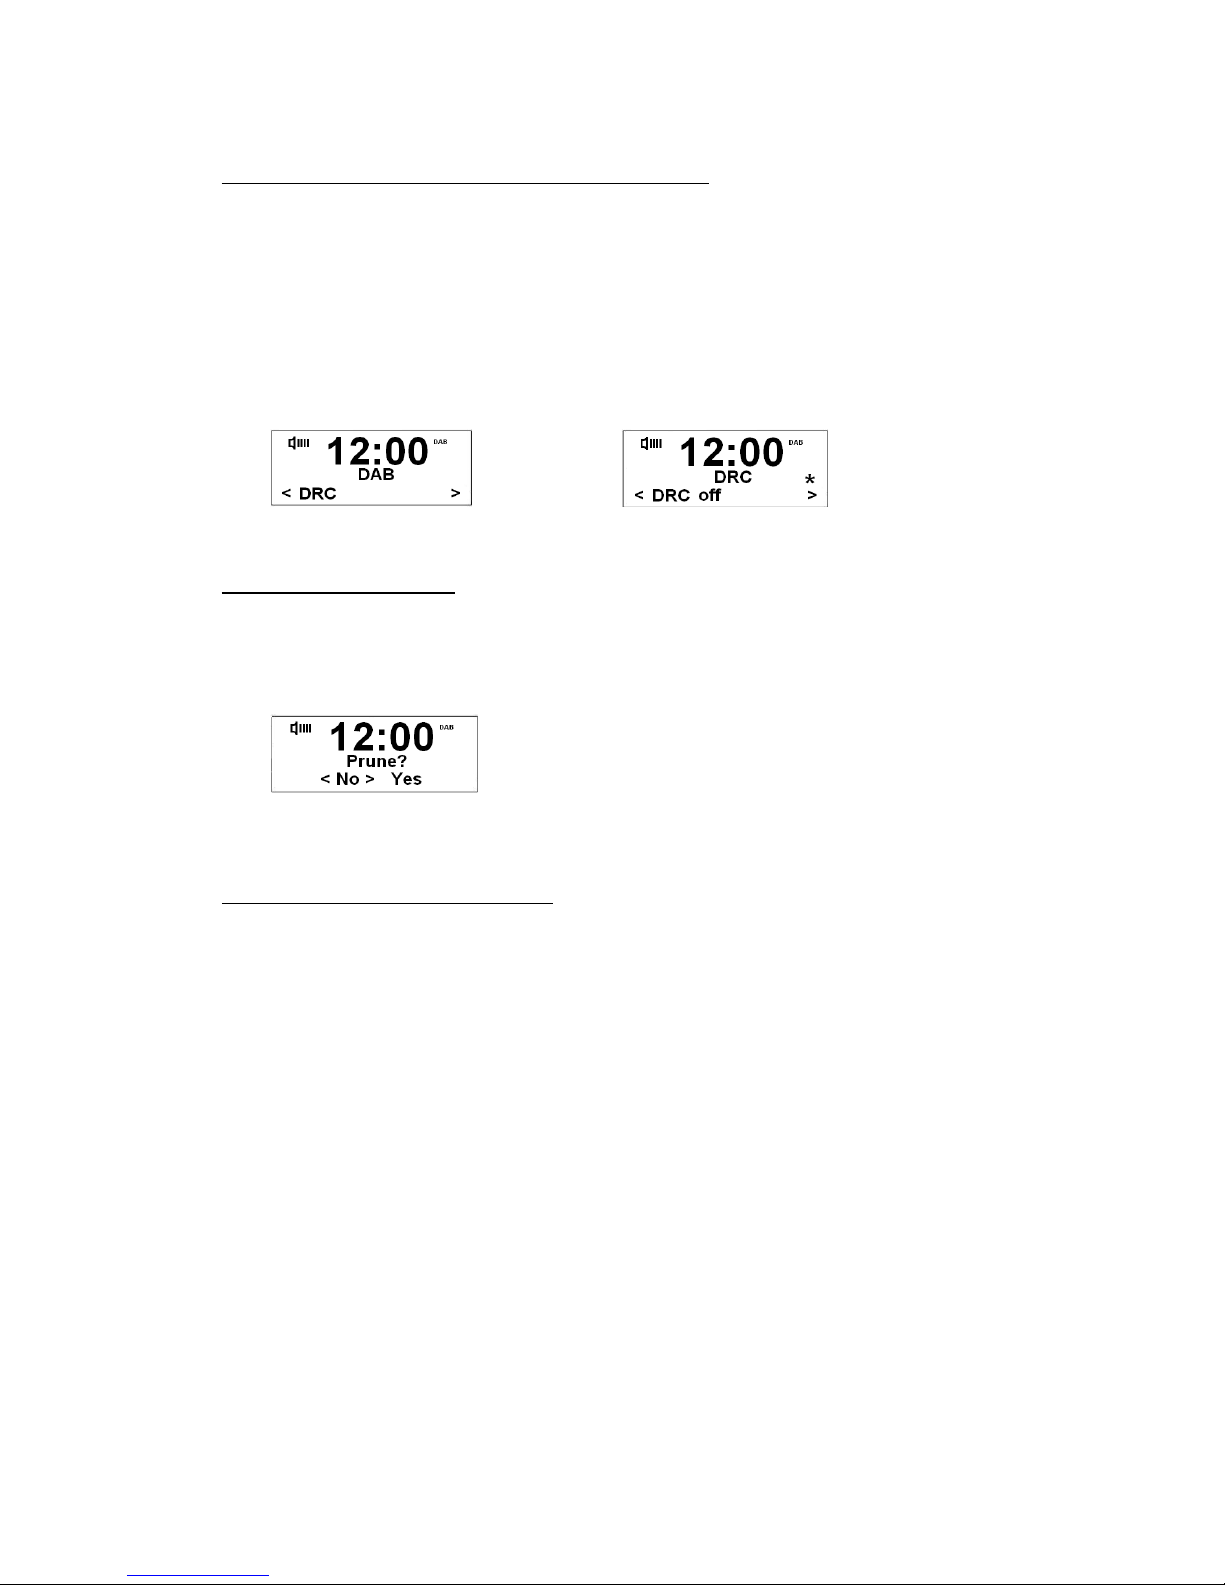
RC ( ynamic Range Control) value..................................................................................9
The way to Prune..................................................................................................................9
View Station Information.....................................................................................................9
FM MO E...................................................................................................................10
Tune in FM Mode...............................................................................................................10
Scan setting.........................................................................................................................10
Audio Settings....................................................................................................................10
FM Menu Tree....................................................................................................................11
Station Presets (for AB+ and FM mode)..........................................................................12
Preset Recall (for AB+ and FM mode)............................................................................12
AUX IN MO E...........................................................................................................12
General Settings...........................................................................................................13
Set Sleep.............................................................................................................................13
Set Time.............................................................................................................................13
Set Alarm............................................................................................................................14
Set Backlight
............................................................................................................................................15
Set Language......................................................................................................................15
Factory Reset......................................................................................................................15
Software Upgrade...............................................................................................................15
SW Version........................................................................................................................15
Specification.................................................................................................................16

Package Content
What you can find inside of your package:
Main unit
AC-DC Power Adapter
Front Overview
Control All mode
Press to turn on/off radio
When alarm sounds, press to turn alarm off
MODE Press to change to another mode
I FO DAB and FM mode: Press to browse station information.
ALARM Press to set alarm
SCA DAB and FM mode: Press to scan stations
ME U Press to access main menu
PRESET
DAB and FM mode:
Press and hold to activate preset stations function; and short press to load preset
stations.
Press to adjust volume level

a. Turn the browse options, press to confirm.
b. FM mode: Turn to manually adjust frequency 0.05MHz per step.
c. When alarm is sounding, press to postpone the alarm
Back Overview
Earphone
socket: For inserting 3.5mm earphone.
AUX I
socket: Connecting coaxial audio cable.
Power cord
Socket:
Connect to DC adaptor.
Please use the power adaptor provided by manufacturer only.

DAB MODE
Turn on
1. Extend the antenna found on the back of radio, press STA DBY/O to switch on radio.
2. n initial use, it will make a full scan and store stations list in memory.
3. nce the scanning is completed, the DAB+ stations will be displayed in alphanumeric
order. The first station in the list will be selected.
Note: if no DAB+ signal is found in your area, it may be necessary to relocate your radio
to a stronger signal area.
Shift to a nother DAB + Station
While a program is playing, turn SCROLL to cycle through available stations, press
SCROLL to confirm and then your radio will connect to the selected station.
Update Stations List
Simply press SCA , or, press ME U, while it shows ‘Full scan’, press SCROLL to
confirm.
To Show the Signal Strength
During playing a DAB+ program, repeatedly press I FO until the LCD screen display shows a
signal bar with the strength of the current station.
The indicator on the signal bar shows the
minimum acceptable signal level.
Note: tations with signal strength below the
minimum signal level may not provide a
steady stream of audio.
7

DAB + Menu Tree
8

DRC (Dynamic Range Control) value
You can set the compression level of stations to eliminate the differences in dynamic range or
sound level between radio stations.
Note: et DRC to off indicates no compression;
et DRC to low indicates little compression;
et DRC to high shows maximum compression.
1. Press ME U turn SCROLL to <DRC>, and press SCROLL to confirm.
2. Turn SCROLL to your preferred option, press to confirm.
The way to Prune
Note: Want to remove all currently inactive stations? It’s easy!
1. Press ME U turn SCROLL to < Prune >, press SCROLL to confirm. ‘’,
2. Turn SCROLL to ‘Yes’, and then press SCROLL to confirm.
View Station Information
It is possible to view the information that is displayed on the second line of the display when
listening to a DAB+ or FM program by pressing I FO repeatedly.
9

FM MODE
T une in FM Mode
1. Press MODE to convert radio from DAB mode into FM mode.
2. For initial use, it will start at the beginning of the FM frequency range (87.50MHz).
therwise, the last listened FM station will be selected.
3. To manually change FM frequency, while frequency is showing up, turn SCROLL to
adjust it 0.05MHz per step.
4. To auto-searching, simply press SCA , the display will show the frequency changing until
it reaches the next active station.
Scan setting
By default, FM scans stop at any available station. This may result in a poor signal-to-
noise ratio (hiss) from weak stations.
To change the scan settings to stop only at stations with good signal strength:
1. Press ME U, it will show: ‘Scan Setting’, press SCROLL to confirm.
2. Turn SCROLL to ‘Strong stations only’, and press SCROLL to confirm.
Audio Settings
By default, all stereo stations are reproduced in stereo. For weak stations, this may result
in a poor signal-to-noise ratio (hiss).
To play weak stations in mono:
1. Press ME U turn SCROLL to ‘Audio setting’, press SCROLL to confirm.
2. Turn SCROLL to ‘Forced mono’, press SCROLL to confirm.
10

FM Menu Tree
11

Station Presets (for DAB+ and FM mode)
Note: Your radio can store 10 DAB+ and 10 FM stations in its preset list.
This order is limited to DAB and FM mode.
1. While playing your favourite station, press and hold PRESET turn SCROLL to your
target preset number. (1-10)
2. Press SCROLL to confirm.
Preset Recall (for DAB+ and FM mode)
To select a stored station:
1. Press MODE to go to relative mode, press PRESET to enter ‘Preset Recall’ setting.
2. Turn SCROLL to your preferred station, then press SCROLL to confirm.
AUX I MODE
Note: AUX IN allows quick and easy connection of an MP3 player or other external sound source.
1. Press MODE shift to < Auxiliary Input Mode > from FM mode.
2. Using a 3.5mm cable lead (not provided), your radio can be transformed into a high
quality digital audio speaker system.
3. Connect one end of the cable lead to the headphone (or auxiliary out) socket of your
source device, the other end connect to AUX socket at the rear of your radio.
4. To gain optimal volume levels, adjusting the output volume level on both the Kogan radio
and source device are recommended.

General Settings
Set Sleep
1. Press ME U turn SCROLL to < Sleep >, press SCROLL to confirm.
2. Turn SCROLL to define the sleep period: off/15/30/45/60/90 minutes.
3. When your desired sleep period appears, stop turning.
Note: At this step, sleep icon shows up, as well as shows how long until it expires.
4. Select < Sleep > option again and then press SCROLL to check how long until the
sleep time is reached.
5. Radio will automatically go into standby mode once the set time has elapsed.
6. To continue enjoying your program, press STA DBY/O .
Set Time
It can be activated by pressing ME U < Time >, press SCROLL to enter a range of time
settings:
Set 12/24 hour: ‘Set 24 hour’ and ‘Set 12 hour’
Set Time/Date: Manually set-up both Time and Date
Auto update: ‘Update from DAB’ and ‘No update’
Set date format: ‘DD-MM-YYYY’ and ‘MM-DD-YYYY’
13

S et Alarm
Note: Before setting Alarm, make sure you set the time first.
1. Press ALARM, it will show “Alarm 1 Setup”, press ALARM again access to “Alarm 2
Setup”. The relevant alarm icon will highlight.
2. Taking set alarm 1 as example, while “Alarm 1 Setup” is displayed, press SCROLL to
confirm.
3. Now, follow your radio instruction, configure the following parameters:
Alarm states: n or ff
On Time: 00:00 (alarm sound time )
Duration Time: 15/30/45/60/90 minutes
Note: The alarm will sound until the duration time passes if nobody stops it.
Source: DAB, FM and Buzzer
Set Days: Daily, nce, Weekends or Weekdays
Volume level: remember don’t have your radio volume level to zero (Mute),
otherwise, when alarm triggers, it won’t be heard.
•Postpone Alarm :
When alarm is sounding, press SCROLL to postpone it for 5 minutes, repeated presses
will prolong snooze to other user-defined snooze time.
While in SN ZE function, your radio goes into standby mode and shows how long
snooze will be elapsed, during this moment, you can also press STA DBY/O to put the
alarm off and press STA DBY/O again to have your radio play.
After the SN ZE time elapses, alarm will sound again.
•Turn off Alarm:
When alarm is sounding, press STA DBY/O to turn it off.
•To cancel the Alarm:
Refer to above steps1-3, set ‘Alarm states’ to ‘Off ’, and then follow your radio’s
instructions, until it shows ‘Alarm saved’.
14

Set Backlight
Under Power on Condition
1. Press ME U < Backlight >. Press SCROLL to confirm.
2. While it shows < Power On >, press SCROLL to confirm.
3. Turn SCROLL to browse: ‘High’, ‘Medium’ and ‘Low’. Generally, setting to high level is
recommended.
4. Press SCROLL to confirm.
Under Standby Condition
Its access path is similar to ‘power on condition’, however, set to ‘Low or Medium’ is
recommended.
Set Language
1. It can be activated by pressing ME U < Language >. Press SCROLL to confirm.
2. Turn SCROLL to your preferred language, then press SCROLL to confirm.
Factory Reset
Note: A factory reset resets all user settings to default values, so time/date, alarm
settings and presets are lost
1. It can be activated by pressing ME U < Factory Reset >. Press SCROLL to confirm.
2. Turn SCROLL to ‘Yes’, and then press SCROLL to confirm.
S oftware Upgrade
Note: For service technician use only.
SW Version
Note: The helpdesk may ask you about the software version of your product.
It can be activated by pressing ME U < SW version >. Press SCROLL to confirm.
15

Specification
ITEMS SPECIFICATIO S
Description: DAB+, FM Digital radio
Audio Output: 3Wrms x 2
Frequency Ranges:
FM: 87.5-108MHz
DAB+: 174 – 240MHz
LCD Display: High resolution display
Power Supply: AC Power Input: 100-240VAC, 50-60Hz
(please use our provided adapter)
Dimension: 268mm x 82mm x 136mm
This symbol on the product or in the instructions means that your electrical and electronic equipment
should be disposed at the end of its life separately from your household waste. There are separate
collection systems for recycling in the EU.
For more information, please contact the local authority or your retailer where you purchased the
product.
16
Table of contents
Other Kogan Radio manuals