Kogan KAPWDBIDETA User manual

1
Premium Smart Wash & Dry Remote Control
Electric Toilet Seat
KAPWDBIDETA
Quick Start Guide
Table of Contents
Safety & Warnings....................................................................................................................................................2
Overview ......................................................................................................................................................................5
Installation ...................................................................................................................................................................6
Operation.....................................................................................................................................................................9
Cleaning & Care........................................................................................................................................................17
Specifications........................................................................................................................................................... 19
In the Box..................................................................................................................................................................20

2
Safety & Warnings
1. This appliance is not intended for use by persons (including children) with reduced
physical, sensory or mental capabilities or lack of experience and knowledge, unless
they have been given supervision or instruction concerning use of the appliance by a
person responsible for their safety.
2. Children should be supervised to ensure that they do not play with the appliance.
3. If the supply cord is damaged, it must be replaced by the manufacturer, its service
agent or similarly qualified persons in order to avoid a hazard.
Safety Precautions
All the safety precautions listed can prevent the users from physical injuries or property
losses. Please read all the safety items and warnings for using the product correctly.
Warning
Ignoring the sign may lead to serious injury or death.
Don’t disassemble, repair or alter the product.
•Doing so may lead to fire or electric shock.
•The product needs to be repaired by professionals.
Don't immerse the product into the water. If the operating environment has a quite high
humidity, please install scavenging port and seal the attaching plug with rubber.

3
Don't touch the plug with a wet hand.
•It may cause an electric shock.
Connect the grounding wire with the product to prevent electric discharge or electric
shock.
•If the grounding wire is not connected with the product, it may lead to electric
discharge or shock.
•The grounding wire needs to be installed by a professional.
Don’t power on before pouring water. The power supply should not be higher than 220-
240V.
•Failure to follow this may cause fire.
Don't use a loosened plug. The electric wire should not be scratched, damaged,
processed, bent, stretched, bundled, used to hang heavy things or clamped.
•It may cause electric shock or fire.

4
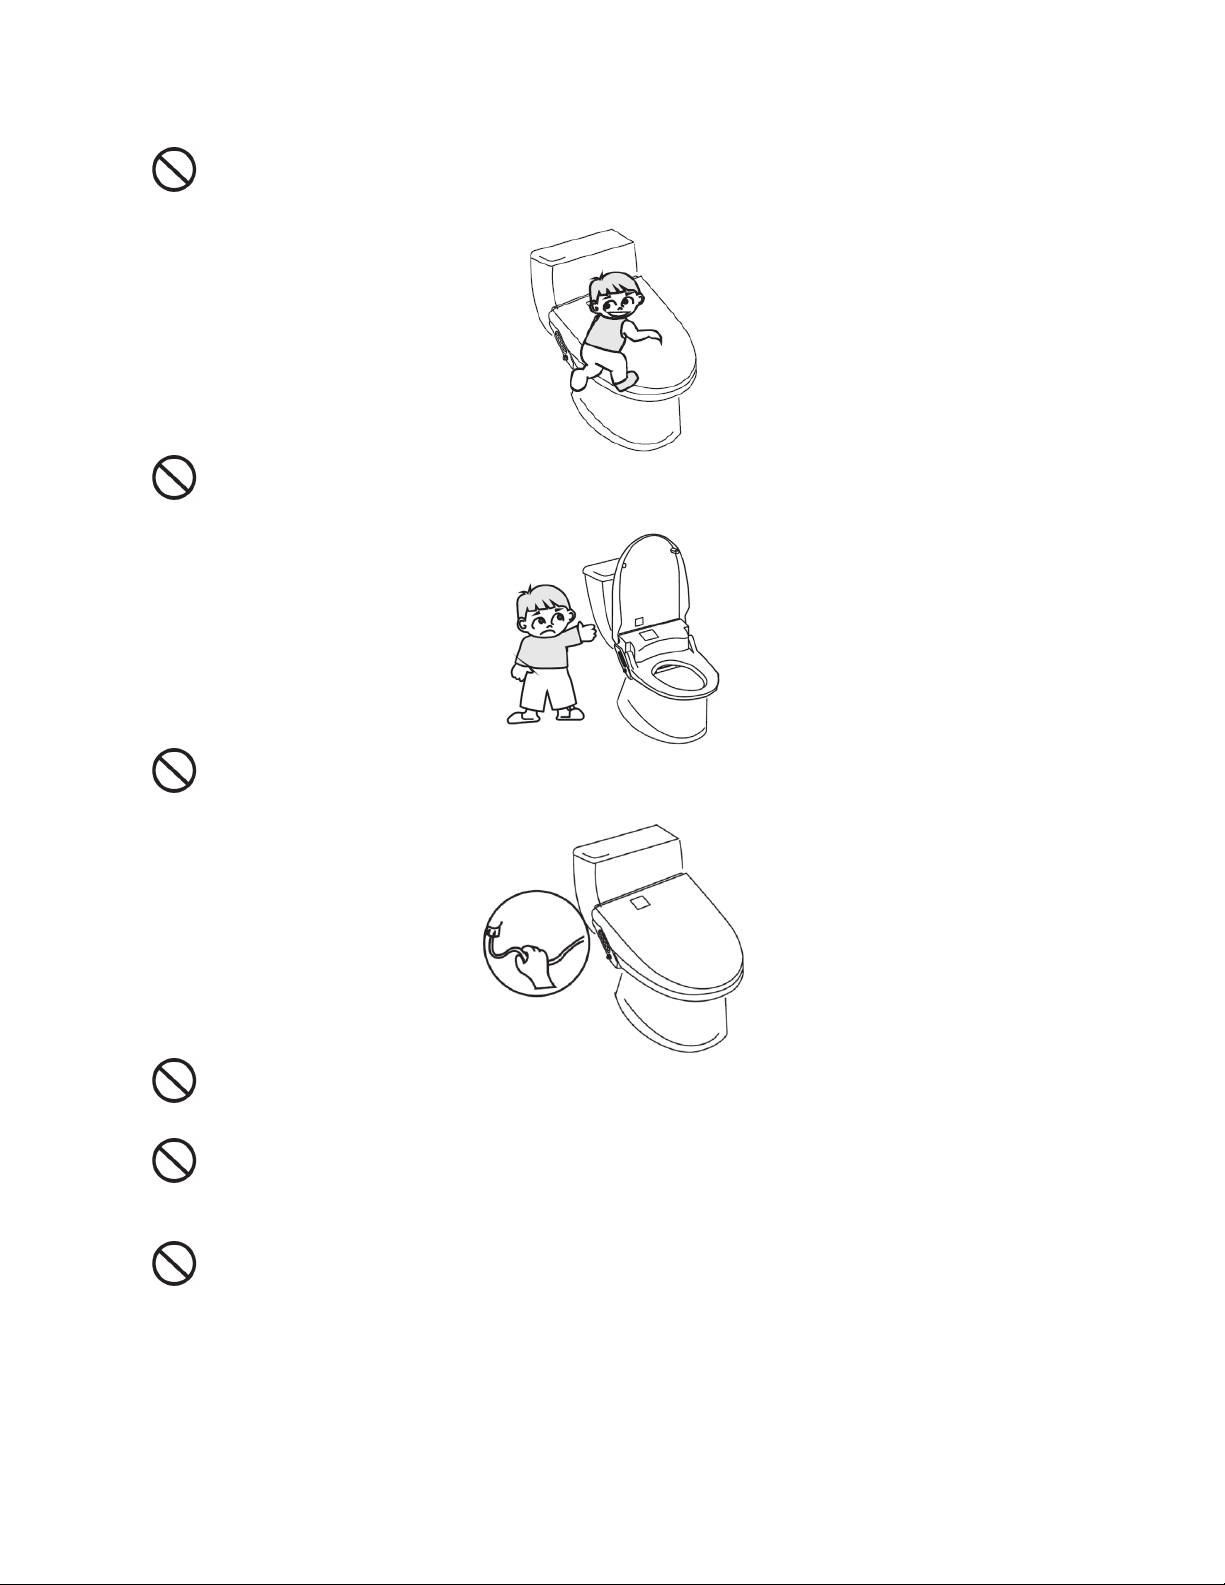
Don’t stand on the toilet seat cover or any other accessories.
•It may break down the product.
Don’t open and close the toilet seat or toilet cover roughly.
•It may crack the toilet seat circle or toilet cover and lead to electric discharge.
Don’t drag or bend the water pipe.
•It may lead to water leakage or block water supply.
Don’t install or leave the remote control near the water.
•It may affect the remote control.
Prevent damage from freezing.
•The inlet tube and the inner of the product may be damaged by freezing, leading
to water leakage.
Attention to the low temperature scalding.
•After using it for a long period, please turn off the heat preservation button near
the seat circle.
•Please turn off the button for these groups: children, elders, patients, people who
are unable to adjust the temperature, people with weak skin, people taking
sleeping pills, alcoholics and the tired as they may be more sensitive to heat.

5
Don’t put hot instruments beside the product.
•It may change the colour of the product or even break down the product. Please
avoid direct sunlight.
•Don’t cover the warm air outlet.
•It may cause a fire or burn.
The product cover, seat circle and seat cover are all plastic products. Don't bring a fire
source like cigarette butt or ashtray near these assemblies.
•It may lead to fire and damage of the item.
Overview
Water pipeline connecting
accessories
Fixed machine parts Accessories

6
Installation
Installation Environment
1. Before installation of the toilet seat, the toilet wall, floor tiles and ceramic toilet should
be completely installed, the bathroom should supply water and there should be a 220-
240V power socket nearby.
2. Water pressure should be between 0.06MPa (flow)-0.75MPa (Static), water
temperature 4°C-35°C.
3. In case it has frozen, please put the product in a warm place and wait to thaw and
then install it.
4. Connect with a daily-use water pipe only.
5. Do not connect to recycled water or industrial water supplies. Due to possible
contamination, this could cause jamming or internal damage.
6. Please be sure to use incidental T valve and filter.
7. Don’t put the power plug into the socket before finishing installation.
Install T Valve
1. Lock inlet valve to remove water pipe. See Picture 1.
2. Connect T valve, filter and inlet valve. See Picture 2.
3. Install flush tank and inlet pipe. See Picture 3.
Install Bidet
1. Remove original toilet seat:
Lose the nut.
Take out the toilet seat.

7
2. Install fix brackets:
1) Put the rubber sleeves into the toilet installation hole.
2) Put the fix bracket on the toilet.
3) Use the mounting bolts screw the metal brackets onto the toilet.
The fix bracket can adjust the range between 130-170mm.
3. Install bidet:
Push the product into the fix bracket and lift bidet to position it into place.
Notice: Please don't leave the power cable between the toilet and bidet.
Make sure that the bidet is screwed into place and then lift bidet to fit it on correct
position.

8
Connect Inlet Pipe
1. Connect T valve:
Take out the clip from connector of T valve.
Hold PE Inter to push it towards the connector of T valve.
Reinstall the clip to its original position.
2. Connect bidet:
Take out the clip from connector at the side of bidet.
Hold PE Inter to push it towards the connector of bidet.
Reinstall the clip to its original position.
Turn on the inlet valve after connecting, please check the connector part for any leakage.
Install the Remote Control Holder
Paste the tape on the backside of the remote control holder and fasten the remote control
holder to the wall.
Notice: Clean the installation position before pasting and press the tape evenly when
positioning. After pasting, do not touch the holder for next 15 minutes.
Please see the picture below.

9
Operation
Preparation for Water Supply and Test for Operation
1. Insert the power plug into the socket.
2. When the indicator light is on, water starts to flow into the inner water tank. The
process will take approximately 11 seconds. Water then sprays out from the nozzle. All
indicator lights will then turn off with a sound.
3. Press the power button on the toilet or on remote control, then the power indicator
light or power icon on the LED display will turn on.
4. Adjust the temperature of water and toilet seat to appropriate level.
5. Follow the instructions to operate, press buttons as instructed and test every action.
Preparations Before Use
1. Ensure the plug is inserted into the socket and the indicator light is on.
2. Open the water-inlet valve.

10
3. Confirm that the power icon in the LED display is on.
4. Press the Power Button on the panel or turn on the power by using remote control.
Confirm that the power LED on the toilet is on, otherwise it cannot be operated.
Use of the Remote Control
This product is controlled mainly by remote control, with use of the control panel as a
secondary measure.
Sitting on the toilet seat:
If air purification is activated, deodorising function operates automatically.

11
1. Rear wash/Oscillating:
Press this button and the rear wash nozzle will extend for operation. Press again to change to
rear oscillating cleansing. The indicator #1 will blink on the remote control, while the nozzle
repeatedly swings back and forth. Press again to stop oscillating cleansing and switch back to
rear wash.
2. Stop:
Stop the current cleaning operation. After rear wash/front wash for 2 minutes, it will stop
automatically if you do not press the stop button. Press this button for 3 seconds to shut
down smart toilet seat.
3. Front wash/Oscillating:
Press this button and front wash nozzle will extend for operation. Press again to change to
front oscillating cleansing. The indicator #1 will blink on the remote control, while the nozzle
repeatedly swings back and forth. Press again to stop oscillating cleansing and switch back to
front wash.
4. Nozzle position adjustment:
To set to a satisfied cleaning position, press .
Attention: While oscillating, the position of nozzle cannot be adjusted.
5. Water pressure adjustment:
To adjust for comfortable water pressure, press .

12
6. Dryer:
Press this button to start the warm air drying operation.
After drying for 4 minutes it will stop automatically if you do not press the stop button.
7. Warm air temp adjustment:
To adjust warm air temperature, press during drying.
8. Nozzle self-cleaning:
Press on remote control when in standby mode and water will start to flow out to clean
the nozzle. Press this button repeatedly and the nozzle switches between rear and front
cleansing and then you can clean and replace the nozzle.
1. Self-cleaning button is available when no one sits on the toilet.
2. It will clean the nozzle automatically before rear cleansing and front cleansing.

13
8. Water temp adjustment:
Press this button to adjust water temperature.
If not heating under normal temperature level, switch to another with each press.
High (39°C) > Mid (36°C) > Low (33°C) > Off
Three indicators of the remote control #1, #2, #3 corresponds to the status display.
9. Night light:
Press this button to turn on the light; the indicator #4 will blink on remote control in standby.
Press again to turn off. It can be switched between on and off.
10. Seat temp adjustment:
Press this button to adjust seat temperature.
If not heating under normal temperature level, switch to another with each press.
High (39°C) > Mid (36°C) > Low (33°C) > Off
Three indicators of the remote control #4, #5, #6 corresponds to the status display.
Attention: To prevent the low temperature burn, the 36°C toilet seat will automatically
reduce temperature after sitting on the seat for 10 minutes.
Tip: Standby mode means that the toilet seat is in an operational state. The toilet seat is not
in the state of washing, drying, nozzle self-cleaning, etc.

14
11. Power saving:
Press to enter into power save mode, the indicator #3 on remote control will blink
when in standby. Press again to cancel; it can be switched on and off.
12. Deodoriser:
Power on automatic deodorisation. Press to turn off when in standby. Press again to
start and the indicator #2 blinks on the remote control. It can be switched on and off.
Reminder:
Deodoriser will turn off when blow-drying functions. Deodoriser will keep on working for 1.5
minutes when people leave the toilet seat.
13. Lady care:
Press , front wash nozzle extends to operate, and water temperature is set to the
highest level (39°C), cleaning position is default. Water temperature/water pressure is not
adjustable and cleaning position adjusts when in standby. After cleaning for 2 minutes it shuts
off automatically. Press to end Lady care mode.
Tip: Standby mode means that the toilet seat is in an operational state. That is, the toilet seat
is not in the state of washing, drying, nozzle self-cleaning, etc.

15
14. Child wash:
Press , front wash nozzle reaches out to work and nozzle position is at the front, mini
water pressure, water temperature is mid (36°C), after washing for 30 seconds it ends
automatically. Press to end child wash mode.
Attention: Cleaning position/water pressure/water temperature and other parameters are
not adjustable when you start child wash mode.
15. One solution:
Press to start, the order is: rear wash for 40 seconds oscillate wash 20 seconds
warm air dryer 2 minutes and stops. In this process, press to end one solution
mode.
16. Strong wash:
Press , rear wash nozzle reaches out to work and the water pressure is in highest
mode. After washing for 2 minutes it ends automatically. Press to end strong wash.

16
Buzzer
Buzz once: Normal operation - receives instructions from the buttons on the remote control
Buzz twice: Auto operates when users leave.
Buzz three times or above: Indicates malfunction or disorders. Buzzing intervals depends.
Indicator Light
Power indicator
When the power is on, the indicator light turns on. If there is
something wrong with flushing components, the indicator light
will blink.
Seat temperature indicator When the toilet seat is heating, the indicator light is on. If it is
over heated, the indicator light will blink.
Water temperature
indicator
When the water is heating, the indicator light is on. If it is over
heated, the indicator light will blink.
Seat indicator
When seated, the indicator light is on. If water level is low, the
indicator light will blink.
Energy saving indicator When it enters energy saving mode, the indicator light is on.
LED Display
Power
Keeps glowing, meaning the power is on.
Seat temperature
When seat is heated, the temperature will be displayed in figures. When
error occurs, temperature figure will show letter. When displays F, it
means the seat temperature is high. When shows E, it means there is a
seat temperature sensor problem.
Water
temperature
When water is heated, the temperature will be shown in figures. When
error occurs, the temperature figure will show letters. When shows D, it
means heater problem. When shows E, it means there is a water
temperature sensor problem. When shows F, it means current water
temperature is high.
Seated sensor
After sitting on the toilet seat, keeps shinning.
Power saving
When under power saving mode, will show in LED display
Night light
When night light is pressed, will show in LED display.
Deodorant When you set deodorant and sit on the seat, will show in LED
display.

17
Cleaning & Care
Cleaning the Toilet Seat
•Do not use corrosive solvents to clean the toilet seat, such as banana oil, benzene,
decolouriser, cleaner and diluter. Do not use water to rinse the equipment as this
may cause short circuits resulting in a fire.
•Pull out the plug before cleaning; plug or the outlet may get wet by water.
•Scrub the toilet seat gently with a soft cloth. If it is very dirty, wet the cloth and
clean the unit with neutral agents.
Cleaning and Maintaining the Nozzle
•Press the Nozzle Cleaning button and water will spray out. Press the button a
second time then the rear nozzle extends. Press again and the feminine nozzle
extends too.
•Clean the nozzles with a brush.
Replacing the Nozzle (except stainless steel nozzle)
•Hold the front end of the nozzle tip and turn it anticlockwise when nozzle extends.
Then pull it out. Replace the tip, insert into the nozzle and turn it clockwise.
•Do not force the nozzle tip out or bend it.
Cleaning the Filter
When the water pressure is too low or insufficient, please clean the filter.
1. Close the shutoff valve and stop water supply:
Notice: Do not remove the filter without closing the shutoff valve. Otherwise water will spray
out.

18
2. Disassemble filter:
Please use spanner to remove the one touch fitter, take out filter from the T valve; turn the
cover of filter to take out filter, please see picture.
3. Clean:
Take out the filter to clean the scale by using a brush. Please wash it in clear water or brush it.
Notice: Please don’t use detergent to clean it. Please softly wash the filter net to avoid net
deformation.
4. Reinstall the net and others in turn:
Notice: Tighten the filter with the special spanner, turn on the inlet valve to check whether it
leaks or not.
Long Times without Use
Please turn off the inlet valve and power supplier when out of house or don’t use it for long
time. Please don’t turn off the inlet valve and power when room temperature lower than 0°C,
your bidet will enter the anti-freeze program automatically.
Daily Wash
Disassemble and install:
1. Take out the plug from socket.
2. Turn off inlet valve.
3. Grip the bidet to pull out, separate it from ceramic toilet.
4. Clean the surface of the bidet and toilet.
5. Reinstall it after cleaning the bidet and toilet. Grip the bidet to slide it into the bracket
to hear a sound, meaning it is fixed in the correct position.
6. Make sure the bidet fit tight with the toilet.
7. Turn off inlet valve and put plug into socket.

19
Replace the Remote Control Battery
•When the battery is running out, the remote control can sometimes become
unresponsive and out of control. You should replace the battery at this point.
Attention:
1. The positive and negative poles of the battery must be placed correctly. The
compression spring protrudes from the negative pole.
2. New and old batteries cannot be mixed.
3. Please use alkaline batteries.
Specifications
Rated voltage
AC 220-240V, 50Hz
Rated power consumption
1520W (When the inflow water is 15 degrees, set the outflow
temperature and strength to the maximum.)
Power cord length
1.5m
Cleansing and flushing
Water pressure range
0.06MPa (dynamic)-0.75MPa (Static)
Water pressure adjustment
Adjustable in 4 levels
Water temperature
adjustment
Adjustable in 4 levels: 33°C, 36°C, 39°C (Room Temperature)
Safety device
Temperature control system; Over-heated protection
mechanism; Over-dried protection mechanism; water and
electricity isolation system.
General cleansing flow rates
0.5-0.9L/min (Minimum required water pressures 15MPa)
Feminine cleansing flow
rates
0.5-0.9L/min (Minimum required water pressures 15MPa)
Seat heating
Surface temperature
Adjustable in 4 levels: 33°C, 36°C, 39°C (Room Temperature)
Safety device
Temperature control system; Over-heated protection
mechanism

20
Warm air dryer
Warm air temperature
Adjustable in 4 levels from 32°C to 52°C
Safety service
Temperature reset switch/Temperature fuse
Deodoriser
Method
Chemical absorption by deodoriser cartridge
In the Box
Product packaging box contains the following items:
•1x toilet seat
•1x manual
•1x spanner
•1x filter
•1x rubber gasket
•1x front wash nozzle (back up)
•1x rear wash nozzle (back up)
•1x PE Inlet tube
•1x fix bracket
•2x metal gasket
•2x mounting bolts
•2x rubber sleeves
•2x No.7 Alkaline batteries
User manual is subject to change without notice. For the latest version of your user manual, please visit
https://www.kogan.com/usermanuals/
Other manuals for KAPWDBIDETA
3
Table of contents
Other Kogan Toilet manuals
Popular Toilet manuals by other brands

Dometic
Dometic 4000 Series installation manual

Kohler
Kohler K-3900X-2 installation guide

ProFlo
ProFlo PF9312PWH installation instructions

Fiamma
Fiamma Bi-Pot Series Installation and usage instructions

Thetford
Thetford TECMA FLEXI LINE Operation / installation / service manual

MullToa
MullToa Separera Mini user manual