Kogan KAWWASHT10A User manual

10KG TOP LOAD WASHING
MACHINE
KAWWASHT10A & KAWWASHT10B


Read Carefully and Keep for Future Reference
Read this user guide thoroughly before first use, even if you are familiar with this type of
product. The safety precautions enclosed reduce the risk of fire, electric shock and injury
when correctly adhered to.
Keep the user guide in a safe place for future reference, along with the completed warranty
card and purchase receipt. If applicable, pass these instructions on to the next owner of the
appliance.
Always follow basic safety precautions and accident prevention measures when using
an electrical appliance, including the following:
Warning
This heading indicates that there is a serious risk of injury if you do
not adhere to the warning(s).
Caution
This heading indicates that care should be taken to avoid injury to
persons or damage to property.
A tick in a circle accompanies a measure or action that you should
do or follow.
A cross in a circle accompanies a measure or action that you
should NOT do.
SAFETY & WARNINGS

•The appliance is rated 230-240V ~ 50Hz. Ensure the voltage supply at your home
corresponds to this.
•Only connect the washing machine to a grounded (earthed) electrical outlet.
•Do not insert any objects into the appliance.
•Do not kink or damage the power cord. Position it correctly to avoid any damage.
•Do not overload the wall outlet. Overloading can result in fire or electric shock.
•If the supply cord is damaged, contact Kogan.com
•Never use this washing machine with a power adaptor or an extension cord.
•Unplug the washing machine from the power supply before cleaning, servicing,
maintenance or moving the appliance. Do not pull the appliance by cord.
•After use, always unplug the appliance and turn off the water supply.
•Warning: All electrical work must be done in accordance with local and national
electrical codes as applicable and should be undertaken by licenced and qualified
persons only.
•Install the washing machine on a flat surface to avoid overturning during use. If the
machine must be placed on a carpet, make sure any ventilation openings in the
base are not obstructed.
•This appliance is intended to be used in household and similar applications such
as:
oStaff kitchen areas in shops, offices and other working environments;
oFarm houses;
oBy clients in hotels, motels and other residential type environments;
oBed and breakfast type environments.
oAreas for communal use in apartments.
•When you install the appliance, ensure there is a distance of at least 200mm
between the appliance enclosure and any external heat sources.
•Connect the washing machine to the water mains using new hose sets. Do not
reuse old hose sets. The required water pressure is 0.03MPa (minimum) to 0.8MPa
(maximum).
•Make sure that all water and electrical connections are made by qualified
personnel only. Observe local safety regulations and follow the installation
instructions in this user guide.
•Improper installation may result in the risk of fire, electric shock and/or injury.
Kogan.com assume no liability for any eventual damages caused by improper
installation.
•The appliance is designed for domestic use only. It is not suitable for commercial or
trade use. The appliance has a capacity (maximum weight of dry wash load) of
10kg.
•Do not operate this appliance outdoors.
•This appliance is not intended for use by persons (including children) with reduced
physical, sensory or mental capabilities or lack of experience and knowledge,
unless they have been given supervision or instruction concerning use of the
appliance by a person responsible for their safety.

•Children should be supervised to ensure they do not play with the appliance.
•Before loading the machine, always ensure no pet or young child has climbed into
it.
•Empty the pockets before washing the clothes. Hard, sharp objects such as coins,
safety pins, bra wires, nails, screws, or stones can cause extensive damage to the
appliance and block the pump.
•Any damage or malfunction resulting from foreign objects is not covered by your
warranty and may lead to expensive repairs. Kogan.com assume no liability for any
eventual damages caused by improper or faulty use.
•Before cleaning or carrying out maintenance, always unplug the appliance from
the power supply.
•Except for the filters that require regular cleaning, the appliance has no user-
serviceable parts contained within. Do not attempt to repair, disassemble, or
modify it. Repairs made by inexperienced or unqualified persons may cause injury
and/or make more serious repairs to the appliance.
•Caution:After each wash, check and clean the lint filter inside the drum. Also
check and clean the lint filter at the back of the machine next to the drain hose
outlet on a regular basis.
•This appliance should only be serviced by an authorised service centre and only
genuine spare parts should be used. Contact Kogan.com for advice.
•Do not let children climb into the washing machine or peer into the rotating spin
barrel.
•Do not wash clothes that have residue of flammable materials.
•Do not use the appliance if the power cord or plug is damaged to avoid an electric
shock, short circuit, or fire.
•Regularly clean the power plug to remove dust and dirt and avoid contact failure.
•Turn the machine off before pulling out the plug from the socket if the machine is
not in use.
•Do not place any lit candles or cigarettes on top of the washing machine.
•Insert the power plug securely.
•Use a 230-240V AC power source.
•To avoid electric shock, fire, and malfunction, do not install this machine in a damp
place.
•Do not pull out or insert the plug with wet hands to avoid electric shock.
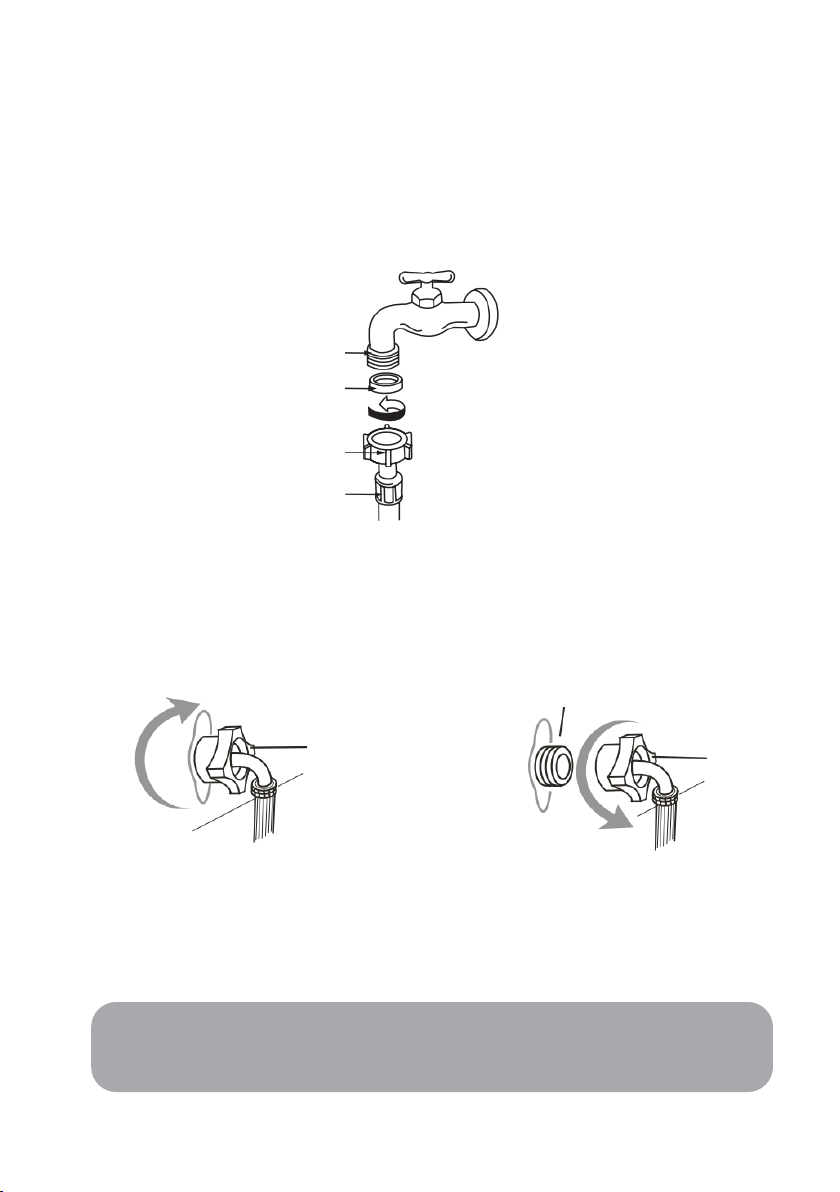
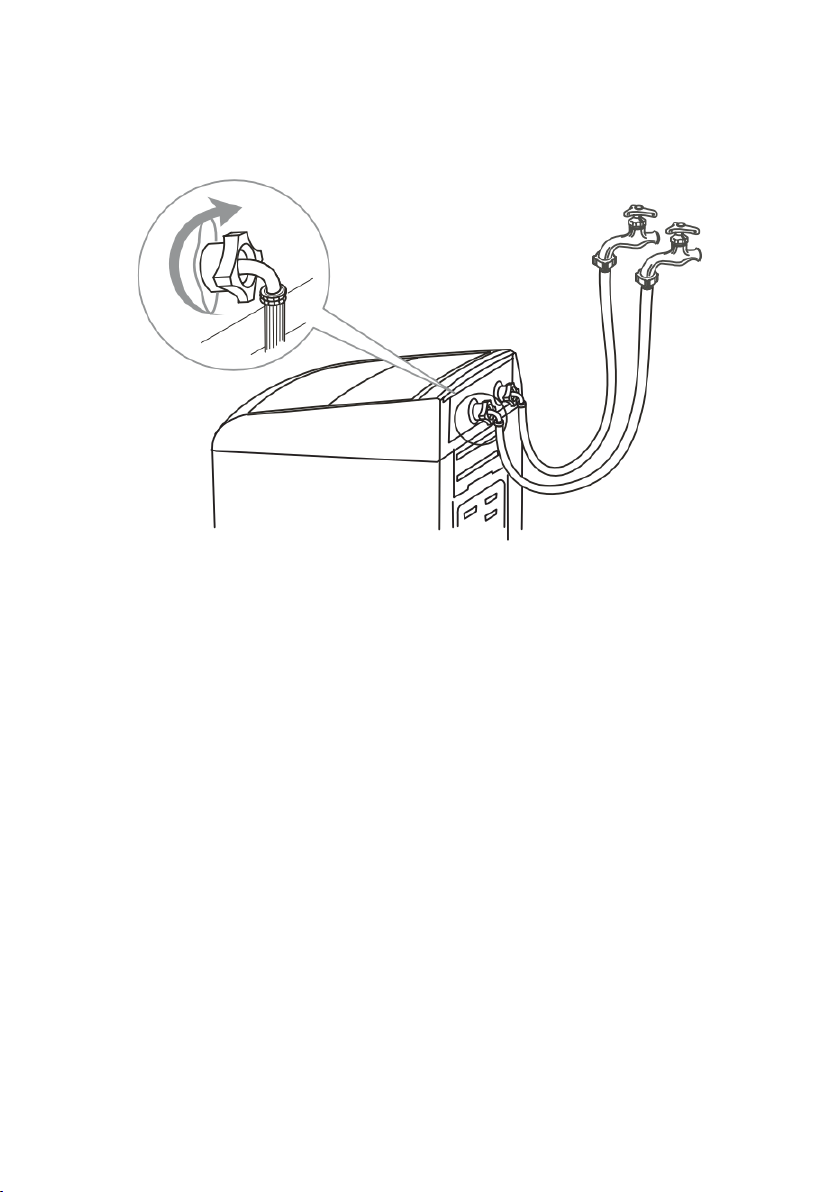
•Ensure the water inlet hoses are connected and the taps are turned on before
washing a load.
•Do not allow children to lay or sit on top of the washing machine.
•Do not change the power cord. If it needs changing, contact a qualified electrician
or contact Kogan.com
•Do not wash jackets, raincoats, fishing coats and similar clothes in the washing
machine.
•Do not pull the power cord when removing the plug.
•Do not exceed 60°C temperature when washing with warm water.

1
Lid
8
Handle (One on each side)
2
Level Indicator
9
Wash/Spin Tub
3
Softener Dispenser
10
Detergent Box
4
Control Panel
11
Cold and Hot Water Buttons
5
Housing
12
Hot Water Supply Hose
6
Adjustable Leg
13
Cold Water Supply Hose
7
Rollers (One on each back corner)
14
Drain Hose
Not Shown: Base Cover, Screws, User Guide and Warranty Card.
OVERVIEW
Accessories
Back View

Unpacking Tips
•This product has been packaged to protect it against transportation damage.
Keep the original packaging carton in a safe place. It will help prevent any damage
if the product needs to be transported in the future. If it is to be disposed of, recycle
it and all other packaging materials as per the regulations.
•Plastic wrapping can be a suffocation hazard for babies and young children, so
ensure all packaging materials are out of their reach and disposed of safely.
•Unwind the power cord to its full length and inspect it for damage. Do not use the
appliance if the appliance or its cord has been damaged or is not working properly.
In case of damage, contact our after-sales support centre for advice on
examination, repair or return of the damaged product.
Installing the Base Cover
1. Make sure the power cord is unplugged from the mains supply.
2. Place some padding such as a soft mat, blanket or thick towel on the floor and
gently lay the screws on the padding, back side down. Ensure not to dent the
housing.
3. Insert the base cover into the hooks of the leg, pushing it straight until it reaches
into the front hooks.
4. Fasten the base cover with the supplied screws.
5. Carefully set the washer upright.
INSTALLATION
Back
Front
Leg
Base cover
Screw(s)

Levelling the Washer
1. Install the washer on a stable and level surface, in a dry location, out of sunlight.
2. The inbuilt levelling indicator will help you determine whether levelling is necessary.
If so, adjust the adjustable leg (at the front right side of the machine), as illustrated
in the below image. The maximum permissible inclination of the supporting
surface is 2 degree.
Caution:Installing the washer on a carpeted floor may cause vibration issues. If you
must install it on carpet, make sure not to block any ventilation openings on the bottom
of the washer.
Base of the washer
Lock nut
Adjustable leg
Up
Down
Tighten
Loosen

Connecting the Water Inlet Hoses
1. Install the water inlet hoses to your hot and cold-water taps.
2. Check and ensure that the sealing washers are firmly in place.
3. Attach the straight end of the hose to your water taps. Make sure to attach the hot
water supply hose (with Red markings) to the hot water tap and the cold-water
supply hose (with Blue markings) to the cold-water tap.
4. Tighten the coupling nuts securely by hand, as illustrated in the below image. The
sealing washer is part of and located inside the tap end.
5. Attach the curved end of the hose to the corresponding inlet valve of the washer.
6. Tighten the coupling nuts securely by hand.
7. Tighten the nut by turning it clockwise while holding the hose.
8. Turn on the taps and check for leaks. Tighten the coupling nuts firmly if there is
any leakage. If your water pressure is strong, close the water tap completely, then
open it slightly.
9. To detach the water supply hose, turn off the tap, turn the nut anticlockwise.
Twist
Tap
Sealing washer
Tap end
Inlet hose
Nut
Nut
Water inlet valve
Notes:
•Both the hot water and cold-water hoses must be connected to taps.
•Make sure hot water temperature from the tap is no more than 60°C.

Caution:
•When tightening the clamping nut, ensure not to damage the water inlet valve
joint. Apply force evenly and do not twist the water inlet valve.
•Ensure to use only the new (supplied) hoses with your new appliance. Do not use a
hose from an existing machine or one that has been used previously.
•If the hoses are too short for your set-up, contact Kogan.com to purchase a longer
hose.

Installing the Drain Hose
1. The drain hose and drain pump filter are located at the back of the machine as
shown in the image.
2. Pinching the two bands of the clamp on the drain hose, connect it to the drain
hose connection at the back of the washer.
3. When the washer is in use, put the drain hose into a drain spout (or into a sink/tub).
Caution:
•While the washer is in use, make sure the height of the drain hose is at least 80cm.
Otherwise the washer will not work properly, or the water may flow out while
washing. Also ensure the drain hose is not higher than 120cm above ground,
otherwise the washer will not drain water well.
•Never lay down the drain hose, as water will be discharged.
•Ensure the drain hose is properly routed so it will not kink or lift off the sink.
Drain pump
with lint filter
Drain hose
connection

Using the Rollers
The washing machine is equipped with two rollers at the back that you can use to move the
machine more easily. Tilt the washing machine by about 30 degrees and push forward or
pull backward, while holding the machine securely on both sides with your hands, as
illustrated in the image.
Do not move the machine on the rollers on uneven ground, which can damage the rollers.
Caution: Take care of your back. Do not tilt the washing machine too much, which could
cause injury.

Control Panel
1. Detergent Indicator
These indicators show the quantity of the powder detergent to use. See the
Detergent and Load Recommendations section for details.
2. Display
Status Display Result
During washing, it shows the time
remaining Remaining time is 20 minutes
When setting soak and wash
processes, this indicator shows the
time you set Washing time is 10 minutes
When setting the preset timer, it shows
when the washing will be finished
Finish washing 2 hours later
When an abnormal condition occurs, it
shows the warning code Water does not flow
OPERATION

3. Rinse Indicator
This indicator shows the number of rinses.
4. Spin Indicator
This indicator shows the spin time in minutes. Maximum of 9 minutes.
5. Start/Pause Button
•Press this button to start the washer operation.
•During operation, press this button to stop the washer temporarily. Press it
again to restart the washer operation.
6. Power Button
•Press this button to switch the power on; press it again to switch the power
off.
•At the end of a washing program, the power will be switched off automatically
after 5 seconds.
•If you leave the washer switched on without starting the operation, the power
will be switched off automatically after 10 minutes of inactivity.
7. Temperature Button
•Press this button if you want to choose the water temperature.
•See the Hot / Cold / Warm Water Wash section for details.
8. Process Buttons
•Press these buttons to set various wash processes. See Setting the Water
Level and Other Process section for details.
•Press the Soak / Variable Wash button before the start to set a soak time of
up to 40 minutes (not applicable for the Delicate and Blanket programs).
Display Result
Rinsing 2 times
Display Result
Spinning time is 9 minutes
Note: This is not a Cancel button.

9. Program/Child Lock Button
•Press this button to choose the washing program. The relevant indicator light
will start flashing.
•This button is also used to set the child lock function. See the Child Lock
section for details.
•The machine automatically sets it for certain washing processes such as
Normal, Heavy Duty, Custom and Wool wash programs.
10. Preset / Ultrasonic Button
•Press this button to preset the finish time of the washing (not applicable for
the Delicate program).
•To select or cancel the Ultrasonic function, press and hold the button until the
Ultrasonic light is on or off.
11. Water Level Button
•You can choose the appropriate water level that matches the load size.
•Different water levels for washing or rinsing are optional.
•See the Setting the Water Level and Other Process section for details.
Before You Start Washing
•Make sure the washer is stable and level. The inbuilt levelling indicator will help you
determine whether levelling is necessary. If so, adjust the adjustable leg (front right)
to stabilise the washer.
•Make sure the water inlet hoses are properly installed.
•Plug the machine into a nearby power point.
•Open the water taps.
•Make sure the drain hose is properly installed. Hang the upper end of the hose over
the laundry sink or into a drain spout.
•Before using the washing machine for the first time, run a complete cycle without
laundry items. Select the Normal program and run the machine until the end of the
program.

Normal Usage
1. Before washing, remove any coins, keys, and other hard items from pockets. Close
any zippers to prevent damaging your clothes and the wash tub. Brush dirt and
sand off clothes and turn pockets inside out.
2. Sort your washing into appropriate loads: whites, coloureds, cottons, delicates,
heavily soiled, etc. Place delicate items into a wash bag for protection.
3. Load your washing items uniformly in the tub.
4. Add washing detergent. See the Detergent and Load Recommendation section for
details.
5. Press the Power button.
6. Refer to the Program Selection Guide and select a suitable wash program.
oFor the Normal and Heavy-Duty programs, the machine will
automatically choose the correct waterpower and level, wash and spin
time and rinse type.
oFor the Custom and Wool programs, the machine will automatically
select the correct water level. Other parameters can be set individually.
7. Close the lid and press the Start/Pause button. If the washer lid is not closed
properly, the washer will sound an alarm and stop working before spinning.
8. At the end of the wash, remove your washed clothes, unplug the power plug from
the wall outlet and close the water taps. Leave the lid open until the interior has
dried.

Program Selection Guide
Program
Suitable Items
Default Settings for Individual Wash
Processes
Washing
Time
(minutes)
Rinse Type Spin Time
(minutes)
Normal Normally soiled clothing
and other items 5-40
2x Water saver
rinse
4x Shower rinse
5-26
Custom
Dependent on the custom
settings
10
2x Water saver
rinse
5
Delicate Delicate fabrics, lingerie 6
2x Water saver
rinse
2
Heavy
Duty
Heavily soiled cottons,
workwear
7-14
2x Water saver
rinse
7-8
Blanket Blanket or bulky items 12
2x Water saver
rinse
8
Wool Delicate, knitwear 10
2x Water saver
rinse
2
Notes:
•Washing time: Total program times differ and depend on the weight of the
wash load and water level.
•Normal Program: When the water level of the Normal program is set to 8, the
program has a default setting of 90L of warm water; all other programs have
cold water as a default. The water temperature is adjustable.

Detergent and Load Recommendations
•We suggest you use detergent in the amounts recommended below. Too little will
give poor washing results, but too much will affect rinse performance and may
cause overflow of suds, which could interfere with machine operation.
Caution: Do not overfill detergent.
•Add detergent into the detergent box or put it directly into the tub.
•Dilute fabric softener with a little water and carefully add it to the softener
dispenser on the balance ring for dispersion through the final rinse.
Water Level
Indicator
Water Level 1 2 3 4 5 6 7 8
Water Volume
28L
35L
44L
53L
65L
71L
81L
90L
Wash Capacity
(kg)
Below 1 1-2.5 2.5-3.5 3.5-5 5-6 6-7.5 7.5-8.5 8.5-9
Detergent
Indicator
Amount of Powder
Detergent (g)
25-35 35-53 53-71 71-90
Liquid Detergent
Follow the recommendations on the detergent packaging.

Customising a Program
This washing machine is equipped with a fuzzy logic function that automatically chooses
certain wash cycle processes for the Normal, Heavy Duty, Custom and Wool programs. You
do not have to adjust them yourself, however, if you want to adjust these values, follow the
below instructions:
1. Prepare your washing according to steps 1 to 4 of the Normal Usage section.
2. Press the Power button, then press the Program button to select the washing
program, e.g. Normal, Heavy Duty.
3. Press the appropriate process button to select the process and time you want to
set. The relevant indicator light will illuminate when the option is selected.
4. Press the Water Level button and choose an appropriate water level.
5. Close the lid and press the Start/Pause button for the washing program to start.
6. At the end of the washing program, a buzzer will sound to alert you that the
program has finished. Then the power is shut off automatically.
7. Close the water taps and unplug the power plug from the wall outlet.
8. If you want to use a customised program on a regular basis, you can program it to
the machine’s memory for easy access. See the Memory Function section for
instructions.
•SOAK time options
•WASH time options
•RINSE options
•SPIN time options
Minutes (Delicate)
•PRESET time options
Minutes (Soak time cannot be adjusted for the
Delicate and Blanket programs.)
Minutes
(The number is the number of rinses.)
Minutes (For the Delicate program, spin time can
only be adjusted up to 3 minutes, as illustrated.)

Blanket Program
Use this program for washing blankets or other bulky items. It will automatically select the
highest water level (90L), but you can adjust this manually down to 62L according to the
size of your items.
1. Press the Power button and open the washer lid.
2. Press the Program button repeatedly until the indicator for the Blanket program
flashes.
3. Dissolve an appropriate amount of washing detergent with a little lukewarm water,
then pour the detergent solution directly into the tub of the washing machine.
4. Fold up the blanket and put it into the washing tub, as illustrated below.
5. Close the washer lid.
6. Press the Start / Pause button for the washing program to start.
7. At the end of the washing program, a buzzer will sound to alert you that the
program has finished. Then the power is shut off automatically.
8. Close the water taps and unplug the power plug from the wall outlet.
9. We recommend cleaning the lint filter after washing a blanket.
Selecting a Single Wash Cycle Process
You may want to select a single wash cycle process (or two processes) instead of a
complete program. For example, you may want to spin clothes that got wet from rain while
hanging on the line or rinse and spin clothes washed by hand.
•To set a spin cycle only: Set the WASH time and RINSE options to “0” and then
select a SPIN time (from 0-9 minutes). Then follow the instruction in the
Customising a Program section.
•To set a rinse and spin cycle: Set the WASH time to “0”, then select a RINSE
option (from 1 to 4) and then the SPIN time (from 0-9 minutes). Then follow the
instruction in the Customising a Program section.
Fold in 2 by
the long side
Fold 4 times in
the same
direction
Roll up the blanket.
Put into the wash tub
with the edge
downwards
Note: If you notice that the blanket floats up during the wash, press the
Start/Pause button, the washer will stop working temporarily. Push the blanket
down and press the Start/Pause button again to continue washing.
This manual suits for next models
1
Table of contents
Other Kogan Washer manuals

Kogan
Kogan KATTLWASH9A User manual

Kogan
Kogan KAGFLWASH9A User manual

Kogan
Kogan 7 Series User manual

Kogan
Kogan KAWWASHT85A User manual

Kogan
Kogan KAWFLWASM9B User manual

Kogan
Kogan androidtv 9 Series User manual

Kogan
Kogan 8KG Series User manual

Kogan
Kogan KAGFLWASH8A User manual

Kogan
Kogan KAGFLWAS10A User manual

Kogan
Kogan KATFWASH75A User manual