manuals.online logo
Brands
  1. Home
  2. •
  3. Brands
  4. •
  5. Kohler
  6. •
  7. Plumbing Product
  8. •
  9. Kohler TAUT 24572X-4A User manual

Kohler TAUT 24572X-4A User manual

ROUGH-IN DIMENSIONS



 
:
1. 
2.  
3. 
4. 
5.  
6.  
7.  G1/2"
24572X-4A 


BEFORE YOU BEGIN
All information is based on the latestproduct information
available at the time of publication. Kohler Co. reserves
the right to make changes in product characteristics,
packaging, or availability at any time without notice.
Please leave these instructions for the consumer. They
contain important information.
NOTES:
1. The dimension from the finished wall to the
centerline of the valve decided by the trim
selection.
2. Flush the water supply pipes thoroughly to remove
debris.
3. Observe all local plumbing and building codes.
4. Shut offthe main water supply.
5. Do not remove the plaster guard from the valve body
until instructed to do so.
6. Check for leaks before covering the pipes, repairs as
needed.
7. Inlet & outlet threads of valve are G1/2".
*
*: .
*Dimensions are approximate.
*Unit: mm
 LIMITED WARRANTY
Kohler (Thailand) Public Company Limited warrants to the original
products, which are purchased from authorized distributors and dealers
within Kingdom of Thailand only, to be free of defects in material and
workmanship.
Within the below mentioned periods from the date of purchase,
Kohler(Thailand) Public Company Limited will at its election, repair,
replace or make appropriate adjustment where company’s inspection
disclose any such defect occurring in normal usage and maintenance but
is not responsible for labor charges, removal charges, installation, or
other incidental or consequential costs. In no event shall the liability of
Kohler(Thailand) Public Company Limited exceed the purchase price
of the product. This warranty applies only to Kohler Faucets installed in
Thailand.
• Ceramic Valve(leak/drip)
- Lifttime Limited Warranty* for residential use
- and Five (5) Years for commercial use
• Finish One(1) Year
• Fitting Three(3) Years
• Automatic faucet One(1) Year
• Hygiene spray(leak/drip Five(5) Years for selected models
from hygiene spray body) only
• Shower One(1) Year
• Bathroom accessories One(1) Year
This limited warranty DOES NOT COVER the defect or damage caused by
accident, natural disasters such as fire, flood, or earthquake, misuse or
abuse of products. Improper care and cleaning will avoid the warranty.
Consumers are responsible for the cost of service parts and service fee
for such cases.
To ensure continuous product quality and performance, as well as
product durability and lifetime, without any damage to the product,
consumers should purchase and use only genuine service parts and
after-sales services from Kohler (Thailand) Public Company Limited or
company’s authorized service centers, distributors, or dealers only.
*KOHLER® Faucet Lifetime Limited Warranty
Kohler (Thailand) warrants its faucets manufactured after January 1,
1997, to be leak and drip free during normal residential use for as long as the
original consumer purchaser owns his or her home. If the faucet should
leak or drip during normal use, Kohler (Thailand) will, free of charge;
replace
the new cartridge necessary to put the faucet in good working
condition.
Kohler (Thailand) also warrants all other aspects of the faucet or
accessories (“Faucet”)**to be free of defects in material and workmanship
during normal residential use for as long as the original consumer
purchaser owns his or her home. If a defect is found in normal residential
use, Kohler (Thailand) will, at its election, repair, provide a replacement
part or product, or make appropriate adjustment. Damage to a product
caused by accident, misuse, or abuse is not covered by this warranty.
Improper care and cleaning will also void the warranty.
Proof of purchase (original sales receipt) must be provided to
Kohler(Thailand) with all warranty claims. Kohler (Thailand) is not
responsible for labor charges, installation, or other incidental or consequen-
tial costs. In no event shall the liability of Kohler (Thailand) exceed the
purchase price of the Faucet.
Important: Never use cleaners containing abrasive cleansers, ammonia,
bleach, acids, waxes, alcohol, solvents or other products not
recommended for chrome. This will void the warranty.
To obtain warranty service, please contact your dealers or contact the
KOHLER (Thailand) Call Center, together with proof of purchase at;
Call Center
KOHLER (Thailand) Public Company Limited
16th Floor, Jasmine City Building
2 Soi Sukhumvit 23, Sukhumvit Road,
Wattana, Bangkok 10110
Tel: 02700-9299
Email: [email protected]
COPYRIGHT ©2020 BY KOHLER (THAILAND) PUBLIC COMPANY
LIMITED
ขอแนะนำการติดตั้ง
INSTALLATION INSTRUCTIONS
ชุดฝาครอบและวาลวผสมฝงกําแพง
ลงอางอาบนํ้าและยืนอาบ รุน ทอธ
TAUT
Recessed Bath and Shower Valve Mixer
1429413-X2-A 1
1429413-X2-A 4
Finished floor / 
Recommended
1220 to the ground
(For shower faucet)
370 to up side of bath fringe
(For bath & shower faucet)
87
60
G1/2"
G1/2"
29-57
G1/2"HOT /  G1/2"COLD / 
110
146
185
42
Finished wall / 

1220 ()
370 
()

INSTALLATION

INSTALLATION
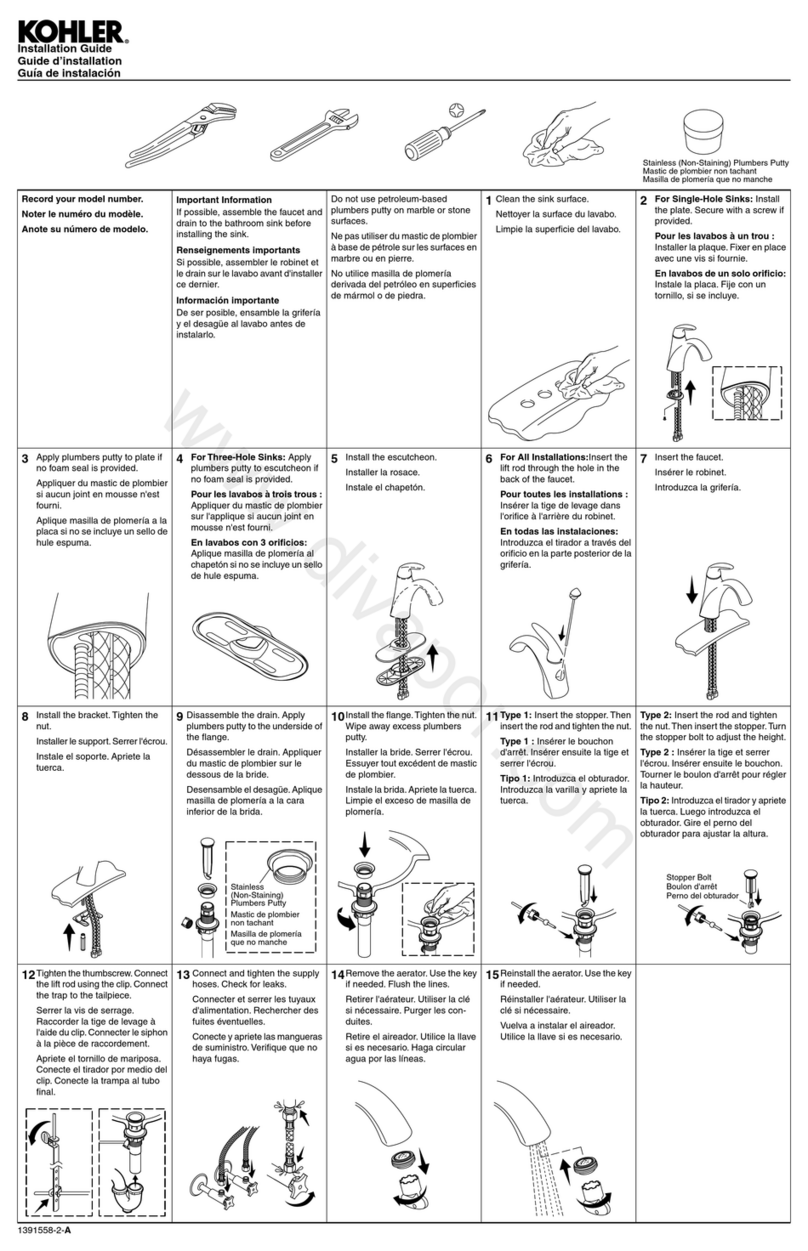
Determine where the valve body (1) will
be located on the wall. Be sure the
arrow mark on the valve body is facing
upward, the mark "hot water connection"
is on the left.
NOTE: The out surface of the finished
wall should be between the MAX and
MIN marks on the protectors (2) as
shown.
Ensure the centerline of valve is
perpendicular to the wall, the up plane
of guard is level.
Connect G1/2″hot and cold supplies,
showerhead and bath pipings to valve
body as shown. Connect hot supply to
the end on the left. Supply enough tape
or sealant.
Install temporary nipples for showerhead
and bath spout. During installation, keep
valve guard on valve body.
Loosen the screws (3), and remove the
plastic guard (2) after completed the
finished wall.
Apply a ring of plumbers putty around
the back surface of the faceplate (4).
Slide the faceplate onto the valve (1)
with slots (5) downwards (NOTE: Don’t
squeeze out the o-rings 6, 7). Push it
against the wall. Remove any excess
putty. Screw the bonnet (8) on the valve.
Install the handle (9) on the valve stem.
Tighten the screw (10) with the hex
wrench (12). Press plug button (11) to
the hole.
 (1) 
  
 
"hot water connection" 
 

(2)


G1/2" 



 
 

 (3)  (2)

  (4)
(1) (5) 
(  6, 7 )

  (8) 
  (9) 
(10)  (12) 
(11) 
The illustration shown is the correct
position of the handle in the closed
position.
 
For bestresults, keep the following in mind when caring
for your product:
Always testyour cleaning solution on an inconspicuous
area before applying to the entire surface.
Wipe surfaces clean and rinse completely with water
immediately after applying cleaner. Rinse and dry
any overspray that lands on nearby surfaces.
Do not allow cleaners to soak on surfaces.
Use a soft, dampened sponge or cloth. Never use an
abrasive material such as a brush or scouring pad to
clean surfaces.
The ideal cleaning technique is to rinse thoroughly and
blot dry any water from the surface after each use.

 


 
 

 
  
 

1429413-X2-A 3
1429413-X2-A 2
Hot/
Cold/

2
1
3
2
Spout/
Shower/
4
8
9
5
7
6
1
10
11
12
24572X-4A 
SP1267638**
SP1237724**
SP1196248
SP1209777
SP1209778**
SP1246085**
SP1215216
SP1245813
SP833438
SP1413561-U-**
SP3008523
1429413-X2-A 5
Call Center: +(66) 2700 9299
e-mail: [email protected]
อุปกรณประกอบและอะไหล
SERVICE PARTS
SERVICE PARTS
**Color code must be specified when ordering.
NOTE: For all Asia pacific regions (excluding China) add SP (SPxxxxxxx**) in front of the part number when ordering.
**/
:ระบุ SP เพิ่มในรหัส SPxxxxxxx** เมื่อสั่งซื้อผลิตภัณฑ์ในประเทศกลุ่มเอเชียแปซิฟิค (ยกเว้นประเทศจีน)
ชุดฝาครอบและวาลวผสมฝงกําแพง
ลงอางอาบนํ้าและยืนอาบ รุน ทอธ
TAUT
Recessed Bath and Shower Valve Mixer

Other Kohler Plumbing Product manuals

Kohler rada Exact-3 B User manual

Kohler

Kohler rada Exact-3 B User manual

Kohler K-3396 Assembly instructions

Kohler

Kohler K-3396 Assembly instructions

Kohler 72282T-4 Service manual

Kohler

Kohler 72282T-4 Service manual

Kohler Margaux 16238-4-CP Assembly instructions

Kohler

Kohler Margaux 16238-4-CP Assembly instructions

Kohler K-444 Assembly instructions

Kohler

Kohler K-444 Assembly instructions

Kohler 18464 User manual

Kohler

Kohler 18464 User manual

Kohler Mira Move 8.5 User manual

Kohler

Kohler Mira Move 8.5 User manual

Kohler 8002A User manual

Kohler

Kohler 8002A User manual

Kohler K-6487 User manual

Kohler

Kohler K-6487 User manual

Kohler K-1002-H2 User manual

Kohler

Kohler K-1002-H2 User manual

Kohler K-2268 Assembly instructions

Kohler

Kohler K-2268 Assembly instructions

Kohler K-18865 User manual

Kohler

Kohler K-18865 User manual

Kohler K-8998 Assembly instructions

Kohler

Kohler K-8998 Assembly instructions

Kohler K-5664 Assembly instructions

Kohler

Kohler K-5664 Assembly instructions

Kohler K-18829 User manual

Kohler

Kohler K-18829 User manual

Kohler K-T15231 User manual

Kohler

Kohler K-T15231 User manual

Kohler FAIRFAX 12177T-B User manual

Kohler

Kohler FAIRFAX 12177T-B User manual

Kohler K-8211 Assembly instructions

Kohler

Kohler K-8211 Assembly instructions

Kohler K-4108 User manual

Kohler

Kohler K-4108 User manual

Kohler 5024-T-0 User manual

Kohler

Kohler 5024-T-0 User manual

Kohler K-2749 Series Assembly instructions

Kohler

Kohler K-2749 Series Assembly instructions

Kohler K-6490 User manual

Kohler

Kohler K-6490 User manual

Kohler K-T343 User manual

Kohler

Kohler K-T343 User manual

Kohler MAXISPACE 2.0 K-24369X User manual

Kohler

Kohler MAXISPACE 2.0 K-24369X User manual

Popular Plumbing Product manuals by other brands

Moen SANI-STREAM 8797 manual

Moen

Moen SANI-STREAM 8797 manual

Grohe Allure Brilliant 19 784 manual

Grohe

Grohe Allure Brilliant 19 784 manual

Cistermiser Easyflush EVO 1.5 manual

Cistermiser

Cistermiser Easyflush EVO 1.5 manual

BEMIS FNOTAB100 Installation instruction

BEMIS

BEMIS FNOTAB100 Installation instruction

Hans Grohe ShowerTablet Select 700 13184000 Instructions for use/assembly instructions

Hans Grohe

Hans Grohe ShowerTablet Select 700 13184000 Instructions for use/assembly instructions

Akw Stone Wash Basin Installation instructions manual

Akw

Akw Stone Wash Basin Installation instructions manual

Enlighten Sauna Rustic-4 user manual

Enlighten Sauna

Enlighten Sauna Rustic-4 user manual

Moen ShowHouse S244 Series quick start guide

Moen

Moen ShowHouse S244 Series quick start guide

Sanela SLWN 08 Mounting instructions

Sanela

Sanela SLWN 08 Mounting instructions

Franke 7612982239618 operating instructions

Franke

Franke 7612982239618 operating instructions

Heritage Bathrooms Granley Deco PGDW02 Fitting Instructions & Contents List

Heritage Bathrooms

Heritage Bathrooms Granley Deco PGDW02 Fitting Instructions & Contents List

Tres TOUCH-TRES 1.61.445 instructions

Tres

Tres TOUCH-TRES 1.61.445 instructions

STIEBEL ELTRON WS-1 Operation and installation

STIEBEL ELTRON

STIEBEL ELTRON WS-1 Operation and installation

Miomare HG00383A manual

Miomare

Miomare HG00383A manual

BELLOSTA revivre 6521/CR1 quick start guide

BELLOSTA

BELLOSTA revivre 6521/CR1 quick start guide

American Standard Heritage Amarilis 7298.229 parts list

American Standard

American Standard Heritage Amarilis 7298.229 parts list

BorMann Elite BTW5024 quick start guide

BorMann

BorMann Elite BTW5024 quick start guide

Moen 1225 quick start guide

Moen

Moen 1225 quick start guide

manuals.online logo
manuals.online logoBrands
  • About & Mission
  • Contact us
  • Privacy Policy
  • Terms and Conditions

Copyright 2025 Manuals.Online. All Rights Reserved.