Kolin KEA-60BDRDCA User manual

USER’S MANUAL
Model
KEA-60BDRDCA
AC/DC EVAPORATIVE AIR COOLER
Please read this owner’s manual before operation and retain it for future reference.

I. Product Introduction --------------------------------------------------------------- 1
Principle Diagram ----------------------------------------------------------------- 1
II. Safety Instructions ---------------------------------------------------------------- 2
III. Main Specifications -------------------------------------------------------------- 3
IV. Range of Application ------------------------------------------------------------- 3
V. Using Environment ---------------------------------------------------------------- 3
VI. Components/ Structure Diagram --------------------------------------------- 4
VII. Circuit Wiring Diagram --------------------------------------------------------- 5
VIII. Installation Instruction --------------------------------------------------------- 5
IX. Introduction to AC/DC Evaporative Air Cooler----------------------------- 7
Power Supply Options ----------------------------------------------------------- 7
X. 3 Ways to Connect your AC/DC Air cooler --------------------------------- 8
Way 1: Works with battery ---------------------------------------------------- 8
Connecting the battery ------------------------------------------------ 8
Way 2: Works with AC ---------------------------------------------------------- 9
Battery will automatically charge------------------------------------ 9
Switch on/off for DC cord---------------------------------------------- 9
Charging the battery---------------------------------------------------- 9
Way 3: Works with Solar Panel ------------------------------------------------- 11
XI. Operating Instruction ------------------------------------------------------------- 11
LED control panel--------------------------------------------------------- 11
Remote Controller --------------------------------------------------------- 12
XII. Maintenance Instruction ------------------------------------------------------ 13
A. Cleaning the water tank ----------------------------------------------------- 13
B. Cleaning the cooling pad --------------------------------------------------- 14
C. Replacing the cooling pad ------------------------------------------------- 15
D. Cleaning outside of the air cooler --------------------------------------- 15
E. Check the mechanical parts ---------------------------------------------- 16
XIII. Troubleshooting ------------------------------------------------------------------ 17

Page 1
Principle Diagram
Hot air
Water pump
Filter
Air-blower
Cool air
Water tank
I. Introduction: Overview of the Product and its Benefits
Thank you for choosing our evaporative air cooler. This user manual is designed to provide you
with all the information you need to use and maintain your air cooler properly. Before operating your
air cooler, please read this manual carefully to ensure that you get the most out of your new
appliance. Our air cooler is an innovative solution for indoor and outdoor cooling needs. It uses
the natural process of evaporation to cool the surrounding air, making it an energy-efficient and
eco-friendly alternative to traditional air conditioning. Our air cooler is perfect for use in homes,
offices, workshops, warehouses, and outdoor areas such as patios, decks, and garages.
We are confident that our evaporative air cooler will provide you with reliable and effective cooling
performance for many years to come. If you have any questions or concerns about your air cooler,
please refer to this manual or contact our Kolin customer support team hotline for assistance.
Some of the key benefits of using our evaporative air cooler include:
1Our air cooler is designed to provide effective cooling without consuming
excessive energy, resulting in cost savings on your electricity bill.
Our air cooler does not use any harmful refrigerants or chemicals, making
it a more environmentally friendly option for cooling your space.
Our air cooler is easy to move around, making it a versatile and
convenient cooling solution for any space, thanks to its caster wheels.
2
3
Our air cooler comes with intuitive controls and settings that make it easy
to operate and adjust to your desired comfort level.
4
Our air cooler helps improve indoor air quality by humidifying and purifying
the air, reducing the risk of allergies, asthma, and other respiratory problems.
5
Please carefully read and retain the Manual for reference before using the product.
The manual has undergone thorough verification, but in the event of any misprints
or misleading information, we reserve the right to provide the correct interpretation.
Additionally, please note that our products are subject to continuous updates, which
may include changes in technology, appearance, color, etc., without prior notice.
The actual product and its nameplate will always take precedence. Any changes will be
reflected in the updated version of the Manual.

II. Safety Instruction
Page 2
Its working principle is a "direct evaporative" humidification and cooling technology. Not only have
cooling functional but also can achieve cooling effect of air humidification. Continuously circulating
pump draws water from the water tank, and then the water distributed to the wet curtain. When the
hot air enters into the wet curtain which is a cell-type filter layer made of special material, and then
it exchanges energy with water, a satisfactory effect of cooling can be obtained. Pure cool and
clean air then blows indoors under a pressure rendered by air blower while the hot air goes out of
the room through open vents or windows. Such cycle achieves the goal of lowering the temperature
in the room.
Your personal and property safety is of utmost importance. To minimize the risk property
damage and personal injury, it is crucial to follow the safety guidelines provided in the
Manual. Make sure to read and understand the Manual before operating the product.
Neglecting these instructions can lead to complications and undesirable consequences.
Prioritize a thorough understanding of the Manual for a smooth and safe user experience.
WARNING
Before plugging in the air cooler, carefully check the power cord for any damage. If the cord
is damaged, do not use the air cooler. Instead, contact our Kolin hotline or authorized service
center for immediate assistance..
Always operate the air cooler from a power source that matches the specified voltage,
frequency, and rating indicated on the product identification marking.
Keep the air cooler away from children and pets. Ensure children are supervised around the
unit at all times.
Keep the air cooler away from water and other liquids to prevent electrical shock.
Avoid operating the air cooler with wet hands to prevent electric shock.
If the air cooler with water is overturned, immediately unplug it from the power source.
Restart the air cooler only after it has thoroughly dried, as malfunction may occur otherwise.
Always unplug the air cooler before cleaning or performing maintenance.
Avoid using the air cooler if it has been dropped, damaged, or exposed to extreme
temperatures.
CAUTION
These precautions pertain to installation, use, and maintenance.
Do not: This symbol indicates actions that must never be performed.
CAUTION
WARNING
Do not attempt to repair or disassemble the air cooler yourself, as this can be dangerous and
will void the warranty.
To ensure safe and proper use of your air cooler, kindly see the meaning of the symbols below:
After adding water, do not tilt, collide, lay, or move the air cooler to any position that may
cause water to overflow. Do not overturn the air cooler.
In high humidity conditions, it is advisable to use the wind mode instead of the cool mode, as
the latter has a humidifying effect.
Always disconnect the air cooler's power supply before moving it from one location to another.
Remember to unplug the air cooler when not in use.

III. Product Description
Page 3
A. Specifications
IV. Range of Application
V. Using Environment
Voltage/Frequency
Working Current
Water Consumption
Outlet Size (mm)
Noise
Max. Air Volume
100W
60L
720×430×1220
20.5kg
Axial Fan
Power
Water Storage
Size (mm)
Weight
Fan Type
AC230V~ / 60Hz / DC12V
8.5A
2~3 L/h
480×500
60dB
6000m3/h
The AC/DC air cooler is suitable for use in small to large-sized rooms or outdoor spaces, such as
living rooms, patios, and garages. They are often used in areas with low humidity levels to provide
a comfortable and cool environment.
Air coolers are not recommended for use in areas with high humidity levels as they can increase
the humidity and make the environment feel damp and uncomfortable. They are also less effective
in cooling large rooms or spaces with poor ventilation.
It's important to note that air coolers work by evaporating water, so they work best in dry and arid
climates. In areas with high humidity levels, they may not be as effective in reducing the tempera-
ture or may even increase the humidity levels.
When using an air cooler, it's important to keep the doors and windows open to allow proper
ventilation and air circulation. It's also recommended to place the air cooler near a window or door
to allow the hot air to escape and the cool air to circulate effectively.
1. Environment Relative Humidity: ≤ 60%
2. Atmospheric pressure: 86kpa~106kpa
3. 0°<Water supply temperature <45° , water supply pressure: 0.15~0.6mpa
4. Voltage range: DC12V(8~12V), Voltage
5. No harmful or damaging gases
Avoid placing the air cooler too close to walls or window curtains, as this may block the airflow.
Refrain from inserting any objects or body parts into the air cooler while it is operating.
Clean the air cooler with a damp cloth, but do not flush it with water directly.
Avoid placing the air cooler near heat sources or open flames.
Only qualified professionals should perform repairs on the air cooler.
Do not cover the guard or operate the air cooler too close to curtains, furniture, or other
objects.
Do not place any objects on top of the air cooler.
Do not obstruct the air outlet and provide at least 1 meter of space in front and behind the air
cooler.
Do not use the air cooler in environments with high humidity or excessive moisture.
By diligently following these safety instructions, you can help prevent accidents or
hazards while using your AC/DC air cooler.

VI. Components / Structure Diagram
Page 4
• Water tank: The AC/DC air cooler features a water tank that holds up to 60 liters of water.
• Cooling pads: The air cooler has cooling pads that absorb water from the tank and use the
natural process of evaporation to cool the surrounding air.
• Dust proof filter: The air cooler also features a dust proof filter that helps to trap dust and
other particles, keeping the air clean and fresh.
• Blower fan: The air cooler has a powerful blower fan that distributes the cooled air evenly
across the room.
• Control panel: The air cooler features a control panel that allows you to adjust the fan speed,
cooling level, and timer settings.
• Ice packs: The air cooler comes with 2 ice packs that are already placed on top of the unit to
provide an extra boost of cooling. (Please do not open the ice packs; its inedible)
• Caster wheels: The air cooler is equipped with caster wheels that make it easy to move
around.
Water Supply
Inlet
Water Tank
Cooling Pads
(after dust filter/
honeycomb)
Caster
Wheels
Control Panel
Ice Packs
Blower Fan/
Air Outlet
Water Drainage
Dust Filters
Side Dust Filter
Side Dust Filter
Water Level
Indicator
FRONT BACK

Water level
sensor
DC12V
Submersible
pump
Fan motor
Draining pump
Swing motor
Control panel
VII. Circuit Wiring Diagram
VIII. Installation Instruction
Page 5
1. Unpacking: Open the package and remove all packing materials. Take out the air cooler.
2. Installation of Caster Wheels.
Step 1: Place the machine on a flat surface.
Step 2: Gently tilt the machine and attach two caster wheels with stoppers at the front using a
wrench.
Step 3: Repeat step 2 to attach the other two caster wheels on the opposite side.
Read Safety Precautions Before Installation
Incorrect installation due to ignoring instruction can cause serious damage or injury.

Page 6
Note:
When using the air cooler for the first few hours, you may notice a slight odor. This is normal
and should dissipate after a few hours of use. This is due to the materials used during
manufacturing and is not harmful to your health. To reduce the odor, it is recommended to run
the air cooler on the highest speed with a full tank of water for a few hours in a well-ventilated
area. After this initial period, the odor should dissipate. If the smell persists, please contact our
Kolin customer support for assistance.
Remember to always follow the safety instructions provided in this manual, such as avoiding
splashing water onto the motor and ensuring that the air cooler is placed on a flat surface before
use.
21mm (G1/2”)
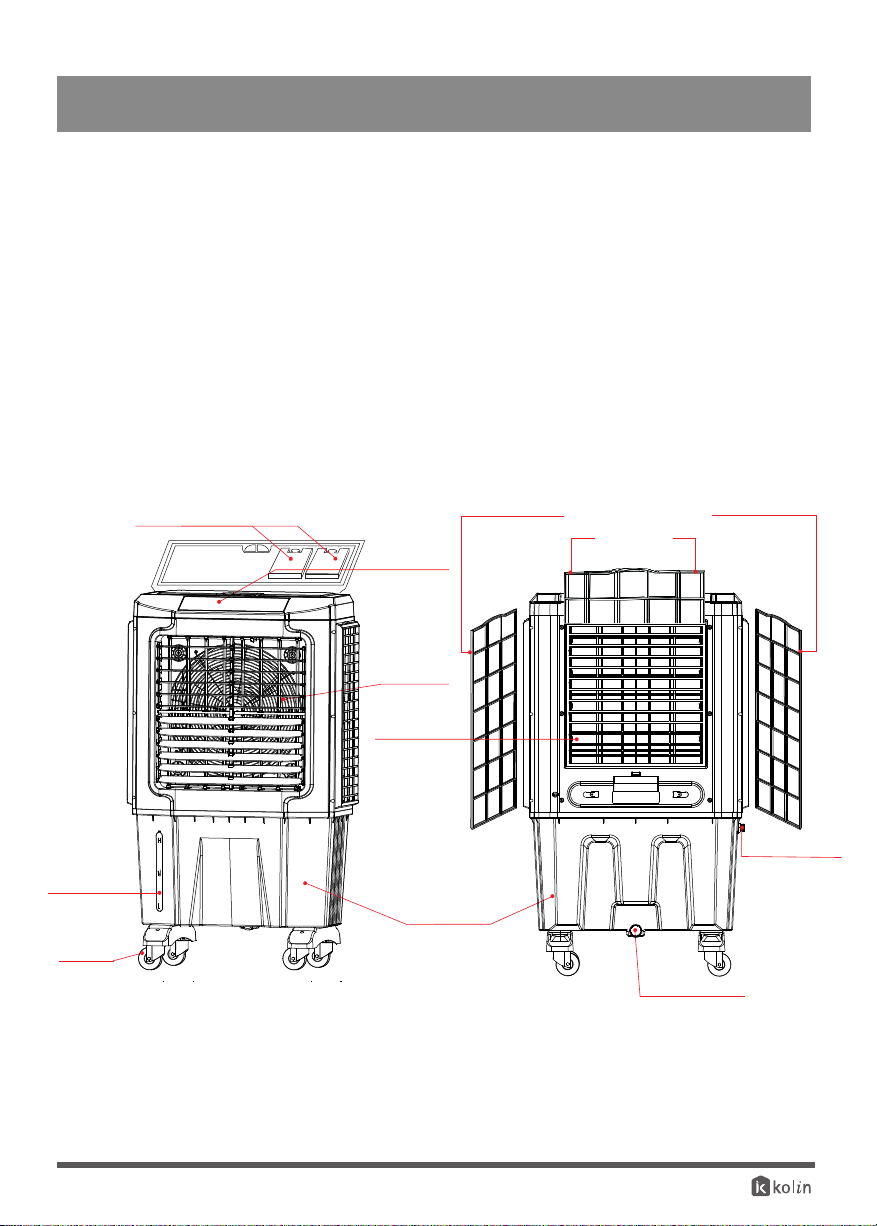
3. Adding Water: There are 3 ways to fill in the water tank:
Way 1: Open the water inlet on the top cover and pour water into it.
Way 2: Open the water inlet at the back of the unit and pour water into it.
Way 3: Use the inlet for a hose, which you can find on the side of the water
tank for continuous water supply. The floating ball will automatically shut down
the water source once the tank is filled.
.
The diameter of the inlet for the hose is 21mm (G 1/2”)
5. Turn on the air cooler by pressing the ON/OFF button on the Panel control or remote controller.
During the initial use, the default setting is “COOL MODE”. In this setting the pump is turned on.
6. Select your desired fan speed by pressing the speed button on the LED control or remote
controller.You can choose from six different speed levels, with level 6 being the highest.
7. If you want the air cooler to oscillate and distribute air throughout the vicinity, press the swing
button on the Panel control or remote controller. This will move the vertical louvers automatically
from left to right, while the horizontal louvers can be adjusted manually
to direct the air away from you if desired.
8. If you want to use the ice packs for extra cooling, make sure that they are ice before use, as
they are already placed on top of the unit. Do not open the ice packs, as it is inedible.
You can also add ice tubes if you want, but be careful not to overflow on the top of the cover.
Make sure that the top cover can still close and avoid placing the ice on the side where the
holes are.
9. When you're done using the air cooler, turn it off by pressing the ON/OFF button on the Panel
control or remote controller.
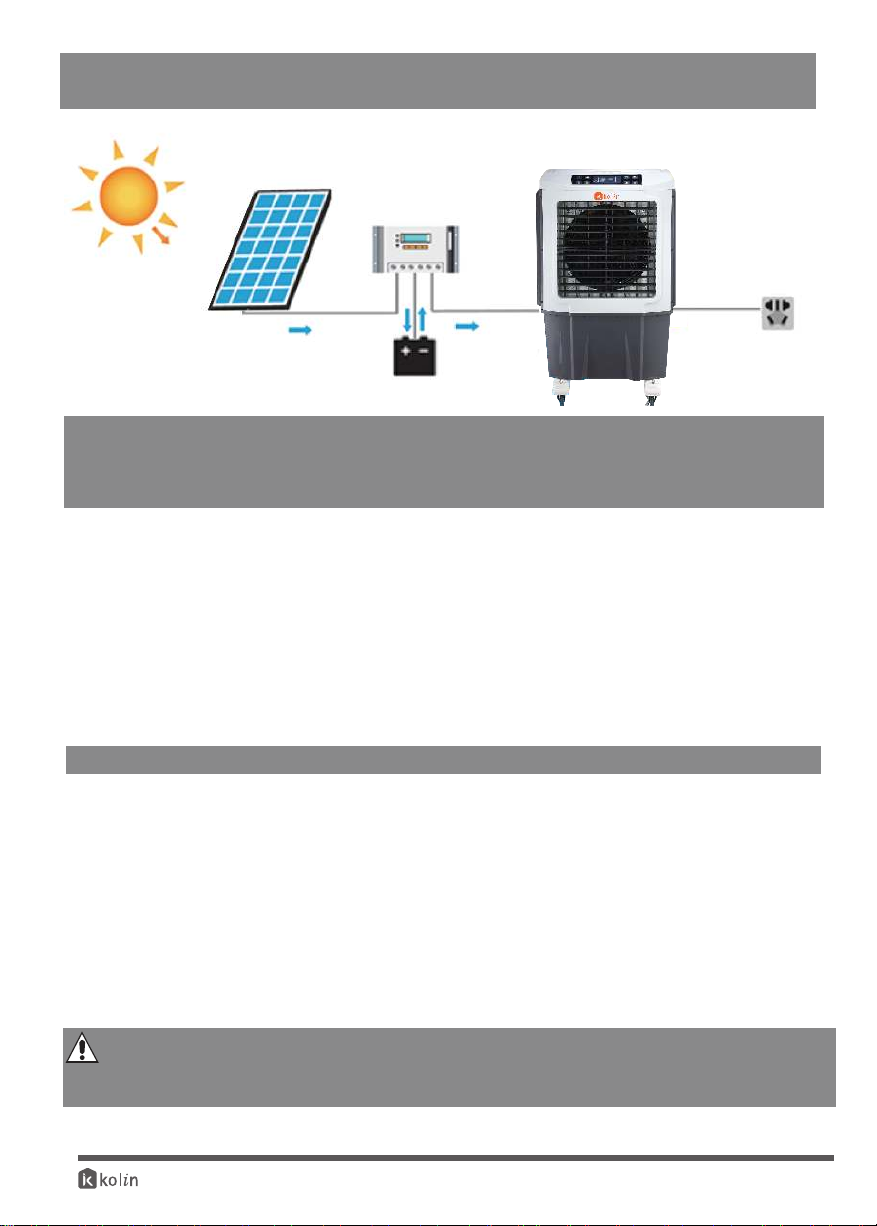
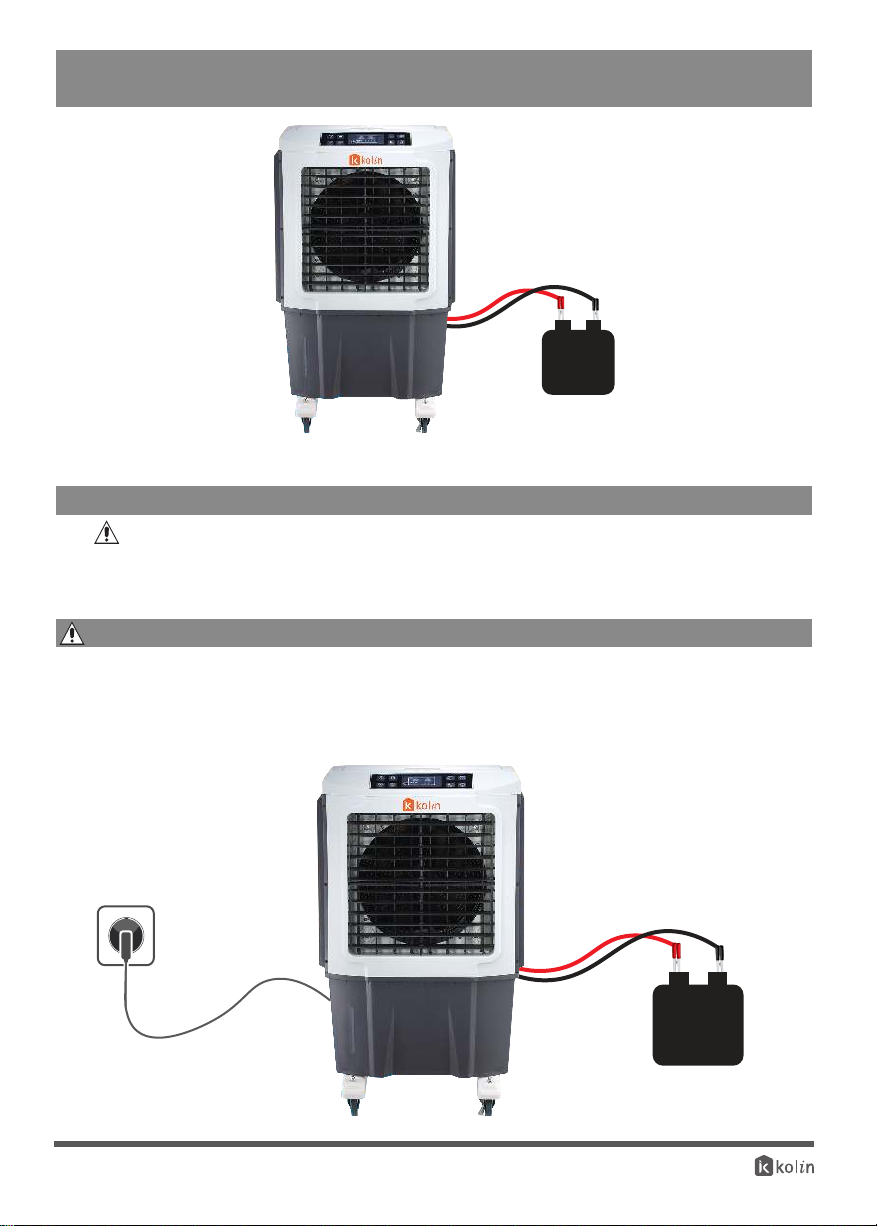
4. Place the air cooler on a flat surface and make sure it is plugged in (AC)
Note: When using a hose, the diameter of the inlet for the hose is 21mm(G1/2")
Note: When using the first two ways of filling the water, observe the water level indicated by
the floating ball and pay attention to the following:
• Avoid splashing water onto the motor to prevent damage to the electrical components.
• Ensure that the water level is below the maximum level (H). Please refer to the water
indicator at the front of the tank to prevent overflowing.
• Only use clean water to fill up the air cooler.

Page 7
Solar Panel
12V Battery
12V DC
Solar Charge Controller
230V~
60Hz
AC Power
IX.Introduction to AC/DC Evaporative Air Cooler
Disclaimer: Please be advised that the battery and solar panel are not included in the
AC/DC Air Cooler package. If you wish to operate the unit using a battery and solar panel,
we recommend seeking assistance from a qualified solar panel expert to ensure proper
installation and compatibility.
Power Supply Options
Note that it is important to use an appropriate power supply that matches the air cooler's rated
power consumption. Using an inadequate power supply can cause damage to the unit and
void the warranty.
This AC/DC air cooler is designed to provide versatility in powering options, catering to
different preferences and needs. Here are the various ways you can power the unit:
• AC Plug: The air cooler can be plugged into a standard 230V~ AC outlet
• DC Plug: The unit comes with a 12V DC power cord that enables you to power it using a
car battery or a similar power source.
• Solar Panel: The air cooler is designed to be used with a solar panel. We recommend
consulting a solar panel expert to determine the suitable panel size and power output
required for optimal performance.
• Full Solar System: For optimum performance and environmental friendliness, this
air cooler can be powered by a complete solar system. Please ensure that the solar panel,
charge controller, and battery are all compatible with each other and we recommend
consulting a solar panel expert.
AC/DC Air Cooler is a unique type of evaporative air cooler that can run on solar energy. Unlike
conventional air coolers, it converts solar energy from the sun into chemical energy and stores it in a
battery. This battery serves as the power source for the air cooler, making it a cost-effective and
eco-friendly choice for cooling your space.
AC/DC Air Cooler is designed with a simple and easy-to-use mechanism, making it suitable for a
wide range of users. Its economical operation and low environmental impact make it an excellent
choice for those living in rural areas where access to electricity may be limited.
To ensure optimal performance, it is important to keep the battery charged and to position the solar
panel in an area that receives sufficient sunlight. Please refer to this user manual for further
instructions on how to operate and maintain your AC/DC Air Cooler.

X. 3 Ways to Connect your AC/DC Air Cooler
12V Battery
+
-
Page 8
12V Battery
+
-
DC Power
AC OUTLET
AC Power
DC Power
Way 1: Works with battery
Safety Reminders:
Connecting the Battery:
Make sure to connect the positive and negative terminals correctly to avoid potential short
circuits. For optimal performance, ensure that the battery is fully charged.
When connecting the alligator clips, be careful not to let the metal rods touch or collide with
each other, as this may cause a short circuit and produce up to 15 volts of electricity.
Keep the clips separated and secure when using the air cooler’s AC/DC function to avoid
any electrical mishaps.

Page 9
Way 2: Works with AC power source
To operate the air cooler using an AC power source, plug the AC plug into an electrical
outlet 230V~.
The air cooler is equipped with a switch at the back that can be used to cut off the current
from the DC cord. Turn OFF (o) this switch when not using the battery or solar panel or when the
battery is fully charged. Only turn ON (I) the switch when using the DC cord to prevent potential
electrical hazards.
Switch On/Off for DC cord:
Please note that when the air cooler is plugged into an AC outlet and the DC plug is
connected to a 12v battery, the battery will autommatically begin to charge. Take note
that there is no indicator to show if the battery is already fully charged.
Battery will automatically charge:
Charging the Battery:
The charging time for a battery can vary depending on the capacity of the battery and the
charging rate of the charger.
Monitor the battery while it is charging and check the charger periodically to make sure
it is not overheating or showing signs of damage.
As a general rule, a fully discharged battery can take anywhere from 4-12 hours to fully
charge, depending on the charging rate and battery capacity.
It is important to monitor the battery while it is charging and not leave it on the charger for an
extended period of time once it is fully charged.
Remember to always follow the manufacturer's instructions when charging your battery,
and if you have any doubts or questions, consult a professional.

Page 10
Do not leave the battery on the charger for an extended period of time once it is fully
charged.
Overcharging a battery can cause damage to the battery and potentially start a fire.
Calculate the Charging Time and Charging Current for Battery Charging:
Overcharging:
If the charger does not have an automatic shut-off feature, make sure to monitor the battery
closely to avoid overcharging.
If you suspect that the battery has been overcharged, stop using it immediately and dispose
of it properly.
Ampere per hour
(Ah)
Hour(s)
13 4.5
Ampere(A)
Air cooler(Off) Air cooler(On)
Time to fully charge battery
190
170
150
130
110
90
70
50
30
200
180
160
140
120
100
80
60
40
14.62
13.08
11.54
10.00
8.46
6.92
5.38
3.85
2.31
15.38
13.85
12.31
10.77
9.23
7.69
6.15
4.62
3.08
42.22
37.78
33.33
28.89
24.44
20.00
15.56
11.11
6.67
44.44
40.00
35.56
31.11
26.67
22.22
17.78
13.33
8.89
Battery Capacity
-
-
-
-
-
-
-
-
-
-
-
-
-
-
-
-
-
-
-
-
-
-
-
-
-
-
-
Calculate the Charging Time and Charging Current for Battery Charging:
The time it takes to charge the battery depends on the battery capacity. When using the AC/DC
air cooler, it can automatically recharge when connected to AC230V~ and the battery at the
same time.
When,
Ah = Ampere per hour rating of Battery.
A = Current in Amperes.
T = Time in hours.
The air cooler's working current is 8.5A when the water pump is on and 8.33A when the water
pump is off. The power board PCB provides 13A current.
For example,
- If your battery capacity is 50Ah and the air cooler is off, it will take approximately 3.85
hours to fully charge the battery (T = 50Ah divided by 13A).
- If the air cooler is on at its highest fan speed, it will take about 11.1 hours to fully charge the
battery (50Ah divided by 4.5A, which is the difference between the total current 13A and the
working current of 8.5A).

Can be connected to full solar system: If you would like to connect your air cooler to a full
solar system, please consult with a solar panel expert for proper installation and guidance. It
is important to ensure that the solar panel system can provide the necessary power for the air
cooler's DC input, and that the system is installed correctly to prevent any potential damage to
the air cooler or the solar system.
Way 3: Works with Solar Panel
LED panel control
XI. Operating Instruction
Page 11
LED control panel
After plugging into a DC12V or AC230V~/60Hz power outlet, it will enter standby mode.
1. ON/OFF
Connect the power and press ON/OFF to turn the device on in COOL state.
Press the button again to turn off the device, including the fan motor, water pump,
and LED screen.
2. COOL
Press the COOL button to enter COOL mode, and the COOL display will light up.
After 30 seconds, the fan motor will start working to blow cool air. Press the COOL
button again to enter WIND mode, where the water pump is turned off, and the fan blows
normal air.
Solar Panel
12V DC
Solar Charge Controller
AC Power
12V Battery
+
-
Safety Hazards:
Do not touch the battery terminals with bare hands or metal objects, as it can cause a
short circuit.
Make sure to charge the battery in a well-ventilated area to prevent the buildup of explosive
gases.
Always wear eye protection and gloves when handling batteries and battery chargers.
Keep the battery and charger away from open flames or sparks, as they can cause a fire or
explosion.
If the battery shows any signs of damage or leakage, do not attempt to charge it and
dispose of it properly.

Page 12
Remote controller (Picture 1)
3. WIND
Press the WIND button, the device will enter WIND mode, where the water pump will be
turned off, and the fan motor will continue to run at the selected speed. In this mode, the
device will only provide air circulation and does not cool the air with water.
4. SPEED
Use the SPEED buttons to switch between the six wind speed levels, from low to high.
5. SWING
Press the SWING button to move the vertical louvers automatically from left to right, to
adjust the direction of the air flow.
NOTE: HORIZONTAL LOUVERS
Manually adjust the horizontal louvers to change the direction of airflow (Up/Down)
6. SLEEP
Press SLEEP button, the speed of the fan motor will be lowered from high to low, and
then from low to high again. To exit sleep mode, simply press the SLEEP button again.
7. TIMER
- When the device is off, press the TIMER button to set a shutdown time between 1
and 12 hours.The LED screen will display the current timer setting. When the time is up,
the device will automatically turn on in COOL mode.
- When the device is on, press the TIMER button to set a shutdown time between 1
and 12 hours. The LED screen will display the current timer setting. When the time is up,
the device will automatically turn off.
Note: The timer function will not work if the device is unplugged or there is a power
outage.
1. POWER
Connect to a power source and press ON/OFF button to turn the device on in COOL
mode. Press the button again to turn off the device, including the fan motor, water
pump, and LED screen.
2. COOL
Press the COOL button to enter COOL mode, and the COOL display will light up. After
30 seconds, the fan motor will start working to blow cool air. Press the COOL button
again to enter WIND mode, where the water pump is turned off, and the fan blows
normal air.
3. WIND
Press the WIND button, the device will enter WIND mode, where the water pump will be
turned off, and the fan motor will continue to run at the selected speed. In this mode, the
device will only provide air circulation and does not cool the air with water.
4. SPEED
Use the SPEED button to switch between the six wind speed levels, from low to high.
5. SWING
Press the SWING button to move the vertical louvers automatically from left to right, to
adjust the direction of the air flow.

XII. Maintenance Instruction
A. Cleaning the Water Tank
Page 13
To ensure that your air cooler is always in good working condition, it is important to
perform regular maintenance and cleaning. Please follow the steps below to keep
your air cooler clean and hygienic.
NOTE: HORIZONTAL LOUVERS
Here are some tips:
Manually adjust the horizontal louvers to change the direction of airflow (Up/Down)
6. SLEEP
Press SLEEP button, the speed of the fan motor will be lowered from high to low, and then
from low to high again. This creates a gentler airflow that is less likely
to disturb your sleep. To exit sleep mode, simply press the SLEEP button again.
7. TIMER
When the device is off, press the TIMER button to set a starting time between 1 and
12 hours. The LED screen will display the current timer setting. When the time is up,
the device will automatically turn on in COOL mode.
- When the device is on, press the TIMER button to set a shutdown time between 1 and
12 hour.The LED screen will display the current timer setting. When the time is up, the
device will automatically turn off. Note: The timer function will not work if the device is
unplugged or there is a power outage.
Note:
When the button is pressed, a buzzer will ring every time. The remote controller operates the
same as the control panel.
In cool mode, if the water level remains below the warning level for 15 minutes, the pump will
automatically turn off. When the water level falls below the warning level, the audible buzzer
will sound and the cool mode indicator light will blink continuously, indicating the need for
water refilling. Kindly turn off and unplug the unit before refilling to ensure proper operation.
Turn off the power before performing maintenance or repairs on the machine to prevent
accidents. To ensure that your air cooler is always in good working condition, it is important to
perform regular maintenance and cleaning, wipe the machine body with a clean cloth every
day or every week. The interior of the machine should also be cleaned regularly, with the
recommended cleaning interval being once a month.However, the actual cleaning frequency
will vary depending on the exterior environment.
Step 1:
Turn off the power
Step 2:
Remove panels and cooling pads
Step 3:
Drain water out of the air cooler
Before performing any maintenance
or repairs, turn off the power to
prevent accidents.
Unplug the cooler, turn off the water,
and then remove the panels and air
cooler cooling pads.
Open the drain plug to drain the
water out of the air cooler

Page 14
Please note that during cleaning, it is important to avoid using high water pressure as it can
damage the honeycomb structure. Additionally, do not use acidic or alkaline detergents as
they can cause corrosion and deterioration over time. Instead, use a mild soap solution or a
mixture of water and lemon juice or vinegar as mentioned earlier in this manual. Always
follow the manufacturer's instructions and guidelines for cleaning and maintenance to
ensure the longevity and proper functioning of your air cooler.
Attention
By following these steps, you can maintain and clean your air cooler to keep it in good
working condition. Please note that the actual cleaning frequency will vary depending
on the exterior environment.
B. Cleaning the Cooling Pad
The cooling pads, also known as heat exchangers, are essential components for
the proper operation of the portable evaporative cooler. It is recommended to clean
the cooling pads once a month to ensure that the unit is working effectively.
After the cooling pads have been thoroughly
soaked, rinse them off and set them aside to
air dry completely before reinstalling them in
the unit. Alternatively, you can use the WIND
mode to let the pads air dry, with the water
pump turned off.
Submerge the cooling pads in a mixture
of water and lemon juice for 30-60 seconds.
Alternatively, you can use a 50-50 solution of
water and vinegar to clean the pads. Avoid using
strong detergents as they may damage the pads.
Step 1:
Soak the Pads
Step 2:
Air Dry the Pads
Step 4:
Brush out the inside of the cooler
Step 6:
Sanitize the water tank
Soft Cloth Sponge
Step 5:
Clean with water and mild soap
INSIDE
INSIDE
Use a soft cloth or sponge to sweep
the inside of the air cooler. Some
debris can get inside it, causing
blockages that stop up the cooler
and may lead to unclean water
cycling through it.
Clean the water tank with a mild
soap solution. Rinse it thoroughly
with clean water and wipe it dry
with a clean cloth.
Periodically empty the water tank
and sanitize it every three days.
Hot and humid climates are ideal
conditions for bacteria to grow,
so you must ensure that the water
tank is always clean to prevent
bacteria from reproducing.
Note: Be careful not to touch the water pump and water level sensor inside the water tank. Also, pay
attention not to change the position of the float ball and valve at the side of the water tank.

Page 15
C. Replacing the Cooling Pads
If you experience reduced air flow from your evaporative air cooler, it may be time
to replace the cooling pads. Honeycomb pads typically last longer and require
replacement every 3 to 5 years, depending on mineral buildup. Generally, cooling
pads don't need to be replaced annually. Replace the pads if they've lost thickness
or show fraying material.
D. Cleaning Outside of the Air Cooler
• Air Cooler Body: Before cleaning, ensure that the unit is turned off and unplugged from the
power source. Wipe down the outside with a damp cloth, using only water. Avoid using
harsh chemicals that may cause damage to the unit.
• Filter: The air cooler's filter can get clogged with dust and debris over time. The filter is
located in the back and sides of the fan and should be cleaned regularly. To clean it,
remove the filter and wash it with a mild soap solution. Rinse it thoroughly with clean water
and let it dry completely before replacing it. It is recommended to clean the filter once a
month.
• Eliminate Air Cooler Odors: Evaporative coolers may develop musty odors over time.
To freshen up the portable cooler, add essential oils to the water. Mix 15 drops of scented
essential oil with vinegar and place it in a spray bottle. After cleaning the air cooler, spray
the essential oil mixture into the unit. This will help eliminate any unpleasant odors and
leave a pleasant scent.

Page 16
E. Check the Mechanical Parts
Check the mechanical parts. While you have the air cooler apart, use a few
drops of lubricating oil on the motor and fan. Use a few drops to lubricate the
parts.
After a long time of use, the fan can be stuck, so it is important to pay attention
to hygiene. When cleaning the fan, use a damp towel to wipe it clean, avoiding
washing directly with water because it may contain the panel and the LED
display. The fan should be cleaned once a month.
Fan Blades
Motor
Other Tips to MaintainYour Air Cooler
Check the water level: Always make sure that there is enough water in the tank before
turning on the air cooler. If the water level is low, refill the tank immediately.
Store the air cooler properly: When not in use, store the air cooler in a cool and
dry place. Make sure that it is properly covered to prevent dust and debris from
xxxaccumulating.
Do not use strong detergents that may cause damage to the air cooler.
Pay attention to hygiene so as not to leak the electricity into the engine, which can cause a fire.
After cleaning, dry the components before re-fitting and using.
By following these maintenance and cleaning tips, you can ensure that your air cooler remains
in good working condition and provides you with cool and refreshing air for a long time.

XIII. Troubleshooting
Page 17
Troubles Common causes Solutions
Power failure Check power supply
Unable to start the
fan Switch burned Inspect and call our Kolin Service Hotline
Motor starter’s capacitor
damaged Inspect and call our Kolin Service Hotline
Motor damaged Inspect and call our Kolin Service Hotline
No air flow
There is jam at honeycomb or
air filter Clean out the wet
Be short of water in water
tank Add water
Water pump damaged Inspect and call our Kolin Service Hotline
Airflow not cool
honeycomb is dirty Clean the honeycomb
Unpleasant odor Water or honeycomb is dirty Change the water and clean honeycomb
Air cooler is not
cooling effectively
Low water level, dirty or
clogged cooling pads
Refill tank, clean or replace the cooling
pads as needed
Air cooler is
leaking water
Improperly seated water tank,
loose or damaged drain plug,
dirty or damaged cooling
pads
Check the water tank and drain plug,
clean or replace the cooling pads as
needed
Air cooler is
making unusual
noises
Debris or obstruction in fan
blades
Turn off and unplug the air cooler,
remove any obstructions, and contact
customer service if problem persists

Page 18
Note: When using the air cooler for the first few hours, you may notice a slight odor. This
is normal and should dissipate after a few hours of use. This is due to the materials used
during manufacturing and is not harmful to your health. To reduce the odor, it is recom-
mended to run the air cooler on the highest speed with a full tank of water for a few hours
in a well-ventilated area. After this initial period, the odor should dissipate.
If the problem persists after attempting these solutions, please contact Kolin customer
service for further assistance.
Table of contents
Other Kolin Air Conditioner manuals

Kolin
Kolin Quad Series User manual

Kolin
Kolin KLM-SC40-4F1M User manual

Kolin
Kolin KLG-SF70-4D3M User manual

Kolin
Kolin E Series User manual

Kolin
Kolin Primus Gold KSG-IWF-10WFY-8K1M32 User manual

Kolin
Kolin KAM-75BMC User manual

Kolin
Kolin KAM-55CMC32 User manual

Kolin
Kolin KAG-110RSINV User manual

Kolin
Kolin KLG-SF40-5G1M User manual

Kolin
Kolin e Series User manual