Kometec DOSTMANN ScanTemp RH 860 User manual

Please read this manual before switching the unit on.
Important safety information inside.
IR Video Thermometer
User Manual
IR Video Thermometer
User Manual
KOMETEC Karl Oelkers e.K.
Mess- und Prüfgeräte · Shop
Mozartstr. 10 · D-88097 Eriskirch
T: 07541 / 955-1313 · F: 07541 / 955-1131

Contents
1. Introduction.........................................................................
2. Features...............................................................................
3. Specifications.......................................................................
4. Front Panel And Button Description.....................................
5. Menu Overview....................................................................
6. Function...............................................................................
7. Notes...................................................................................
8. Emissivity Values..................................................................
9. Maintenance........................................................................
Page
3
3
4
6
7
15
19
20
20

1. Introduction
Thank you for purchasing the IR VIDEO Thermometer which is capable
of non-contact (infrared) temperature measurements with visual
camera at the touch of a button. The built-in laser pointer increases
target accuracy while the backlight LCD and handy push-buttons
combine for convenient, ergonomic operation.
The IR VIDEO Thermometer can be used to measure the surface
temperature of the objects that is improper to be measured by
traditional (contact) thermometer (such as moving object, the surface
with electricity current or the objects which are uneasy to be touched.)
Proper use and care of this meter will provide years of reliable service.
2. Features
•2.2" TFT LCD display
•640*480 pixels(30 million pixels)
•Micro SD memory card
•Image (JPEG) and video (AVI)
•Humidity and Air Temperature
•Dual laser targeting
•Type-K thermocouple probe
•Adjustable emissivity
•High accuracy
•Fast response time
•Dewpoint temperature and Wet bulb temperature
EN 3

Distance & Spot Size
As the distance (D) from the object increases, the spot size (S) of the
area measured by the unit becomes larger. The relationship between
distance and spot size for each unit is listed below. The focal point
for each unit is 914mm (36"). The spot sizes indicate 90% encircled
energy.
3. Specifications
IR temperature measurement
Temperature Range
D:S
Accuracy
Display resolution
Repeatability
Response Time
Spectral Response
Emissivity
-50 to 1000°C(-58 to 1832°F)
50:1
±1%±1.0°C(1.8°F) 20 to 500°C(68 to 932°F)
±1.5% 500 to 1000°C(932 to 1832°F)
±3.5°C(6.3°F) -50 to 20°C(-58 to 68°F)
0.1°C(0.1°F) <1000
1°C(1°F) >1000
±1.5°C(2.7°F) -50 to 20°C(-58 to 68°F)
±0.5% or ±0.5°C(0.9°F) 20 to 1000°C(68 to 1832°F)
150mS
8~14um
Digitally adjustable form 0.10 to 1.00
EN 4

Type-k temperature measurement
Temperature Range
Accuracy
Display resolution
Air Temperature And Relative Humidity Measurement
Air Temperature Range
Dewpoint Temperature Range
Relative Humidity Range
Air temperature Accuracy
Dewpoint temperature Accuracy
Relative Humidity Accuracy
Operating Temperature
Storage Temperature
Relative Humidity
Display
Power
Battery
Battery Life
Battery Charge Time
Size(H*W*L)
Weight
0 to 50°C(32to 122°F)
0 to 100% RH
±0.5°C(0.9°F) 10 to 40°C
±1.0°C(1.8°F) others
±0.5°C(0.9°F) 10 to 40°C
±1.0°C(1.8°F) others
±3%RH 40% to 60%
±3.5%RH 0% to 40% and 60% to 80%
±5%RH 0% to 20% and 80% to 100%
0 to 50°C(32 to 122°F)
-10 to 60°C(14 to 140°F)
10 to 90%RH non-condensing
2.2" 320*240 color LCD with backlight
Rechargeable battery
About 4 hours continuous use
About 2 hours with AC adapter or
USB connection
205mm*62mm*155mm
410g
-50 to 1370°C(-58 to 2498°F)
±0.5%±1.5°C(2.7°F) 0 to 1370°C(32 to 2498°F)
±2.5°C(4.5°F) -50 to 0°C(-58 to 32°F)
0.1°C(0.1°F) <1000
1°C(1°F) >1000
EN 5

4. Front Panel And Button Description
Item-Description
1-LCD Display
2-BUTTONS
3-Battery Cover
4-Measurement Trigger
5-Retractable Lens Cover
6-Visual camera
7-Laser
8-IR sensor
9-Type-k thermocouple socket
10-USB computer interface socket
11-Micro SD memory card
12-Battery
5
1
2
4
3
6
7
8
9
10
11
12
EN 6

Item-Description
1-UP or Picture button
2-ESC button
3-Down or VIDEO button
4-Mode button
5. Menu Overview
Power on or power off
•On the power off mode, press and hold
ESC button, until the LCD is on, then
the unit will power on.
•On the power on mode, Press and hold
the ESC button, until the LCD is off, then
the unit will power off.
5.1 Measurement Mode
The IR VIDEO thermometer has six modes. On the power on mode,
press the ESC button, the unit will display the six modes. You can
use UP or DOWN button to select any mode you need.
1
2
3
4
Items
CAM mode
IR mode
DEWPOINT
DATALOG
GALLERY
SETTINGS
Description
measure the IR temp,
air temp. & air humi.
With camera
measure the IR temp.
Very fast
measure the IR temp.
And dewpoint temp
Datalog mode
display the picture/
datalog and video
setting parameter
EN 7

Symbols
5.2 CAM Mode
•Use to measure IR temp, air temp, air humi,
dewpoint temperature and wet bulb temperature
with camera. It is can display the IR MAX
temp., MIN temp, DIF temp, AVG temp.
•Press and hold trigger to measure the temperature.
This mode can take picture and take video.
5.2.1 take picture function
On the CAM mode, press the button to enter
picture taking, then press SAVE with button to save pictures, or
press CENCEL with button to cancel.
5.2.2 take video function.
On the CAM mode, press the button to enter video taking mode,
then press START with button to take videos, or press ESC button
to esc.
press STOP with button to stop the video.
•
•
•
•
Symbols Description
CAM mode
IR mode
DEWPOINT mode
Laser
Scan
Symbols Description
High alarm
High alarm working
Low alarm
Low alarm working
Hold
EN 8

5.3 IR Mode
Use to measure IR temp, air temp, air humi,
dewpoint temperature and wet bulb
temperature without camera. It is can display
the IR MAX temp, MIN temp, DIF temp, AVG
temp.
Press and hold trigger to measure the temperature.
5.4 DEWPOINT Mode
measure the IR temp. and dewpoint temp.
Press and hold trigger to measure the temperature.
This is that the IR temperature and dewpoint temperature close to
the percentage of.
5.5 Data log
In the DATALOG mode, first set the parameter,
like high alarm value, low alarm value, interval
time, and the line color, then press the trigger
to start logging. The unit will automatically
record data, press the ESC buttom to esc the
DATALOG mode, then the data will automatically
save.
EN 9

Items
Picture
Video
Logs
Descriptions
Display the saved pictures
Play the saved videos
Display the data log and view
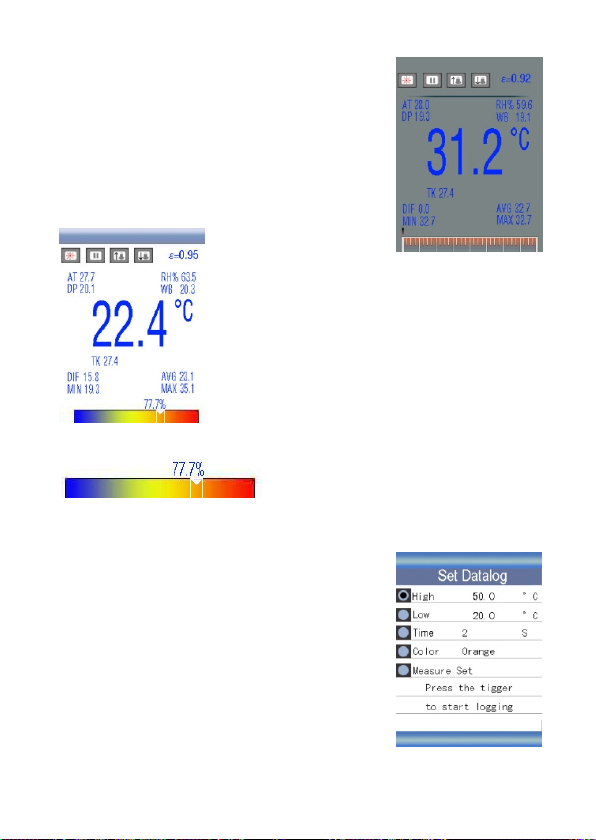
Set the datalog parameter
Set high alarm value
Press the ENTER button, use the and button to adjust the value,
then press the ENTER button to confirm.
Set low alarm value
Press the ENTER button, use the and button to adjust the value,
then press the ENTER button to confirm.
Set interval time
Press the ENTER button, use the and button to adjust the value,
then press the ENTER button to confirm.
Select the color
Press the ENTER button, use the and button to select the color,
then press the ENTER button to confirm.
5.6 Gallery
•Press the and button to select the picture,
video or Logs. Then press the ENTER button
to enter.
•In the picture. Video or logs, press the ENTER
button to view picture, play video or view log. Then press the ENTER
button to delete the picture, video or log. Press the button to
confirm to delete, press button to cancel.
•
•
•
•
•
EN 10

Items
Date/Time
Units(C/F)
Language
Font Color
Cursor
Backlight
Auto Power off
Screen Timeout
Keypress Alert
Memory Status
Factory Setting
Descriptions
Set date and time
Select the temperature unit
Select language
Select the font color
Select cursor or off
Backlight brightness adjustment
Select auto power off time
Select screen auto off time
Able or disable of Keypress Alert
Display the memory and SD card capacity
Restore factory settings
5.7 SETTINGS
Press the and button to select the Items, Then press the ENTER
button to enter.
5.7.1 Date/Time
Press the and button to select the value, press the ENTER button
to set the next value, press ESC button to esc and save the date and
time.
EN 11

5.7.2 Units(C/F)
Press the and button to select the unit, press the ESC button to
esc and save.
5.7.3 Language
Press the and button to select the language, press the ESC button
to esc and save.
5.7.4 Font Color
Press the and button to select the color, press the ESC button to
esc and save.
5.7.5 Cursor
Press the and button to select the cursor (off, cross or circle),
press the ESC button to esc and save.
EN 12

5.7.6 Backlight
Press the and button to select the backlight brightness, press
the ESC button to esc and save.
5.7.7 Auto Power off
Press the and button to select the auto power off time or never
auto power off, press the ESC button to esc and save.
5.7.8 Screen Timeout
Press the and button to select the screen auto off time or never
screen auto off, press the ESC button to esc and save.
EN 13

5.7.9 Keypress Alert
Press the and button to enable or disable the keypress alert,
press the ESC button to esc and save.
5.7.10 Memory Status
Press the and button to select the memory (flash or SD). Press
the ESC button to esc and save.
NOTE: If SD card inserted, SD card will be selected by default.
Press the ENTER button to format the flash or SD card, press button
to cancel format, press button to confirm format.
5.7.10 Factory Setting
Press the and button to select yes or no restore factory settings.
Press the ESC button to esc and save.
EN 14

Items
Emissivity set
Alarm High
Alarm Low
Laser
Auto Mode
Max/Min
Average/Dif
Ambient TEMP/% RH
Dewpoint/wet bulb
Type k
Descriptions
Set the emissivity
On or off the high alarm and set the value
On or off the low alarm and set the value
Able or disable of laser
Lock to continue measure
Display the max. or min. IR temperature
Display the average or difference of IR temp.
Display the air temperature and humidity
Display the dewpoint and wet bulb temperature
Enable or disable the type-k input
6. Function
On any mode, press the ENTER button into the menu.Measure set
EN 15

6.1 Emissivity set
ON the first line (ε=0.94), press the ENTER button to adjust emissivity,
Press the and button to adjust the value, then press the ENTER
button conform. Press the and button to select the emissivities
of the materials, press the ESC button to esc and save.
6.2 Alarm High
Press the and button to on or off the high alarm. If the high
alarm is on, press the ENTER button to adjust, press the and
button to adjust value. Press the ENTER button to conform, press
the ESC button to esc and save.
EN 16

6.3 Alarm Low
Press the and button to on or off the low alarm. If the low alarm
is on, press the ENTER button to adjust, press the and button to
adjust value. Press the ENTER button to conform, press the ESC
button to esc and save.
6.4 Laser
Press the and button to enable or disable laser, press the ESC
button to esc and save.
6.5 Auto Mode
Press the and button to enable or disable auto mode, press the
ESC button to esc and save.
If enable the auto mode, the unit will automatic continue measure,
on the status, press the ENTER button, and then press UP button to
exit the lock status, press the DOWN button to on or off the laser.
EN 17

6.6 Max/Min
Press the and button to on or off display the max. or min. IR
temperature, press the ESC button to esc and save.
6.7 Average/Dif
Press the and button to on or off display the average or difference
of IR temp, press the ESC button to esc and save.
6.8 Ambient TEMP/% RH
Press the and button to on or off display the air temperature
and humidity, press the ESC button to esc and save.
6.9 Dewpoint/wet bulb
Press the and button to on or off display the dewpoint and wet
bulb temperature, press the ESC button to esc and save.
EN 18

6.10 Type k
Press the and button to enable or disable Type k input, and then
press the ESC button to esc and save.
NOTE: If insert Type-k probe, Enable will be selected by default. Users
can select the Disable, prohibiting LCD display Type-k temperature.
7. Notes
•How it Works
Infrared thermometers measure the surface temperature of an object.
The unit's optics sense emitted, reflected, and transmitted energy,
which is collected and focused onto a detector. The unit's electronics
translate the information into a temperature reading, which is display
on the unit. In units with a laser, the laser is used for aiming purposes
only.
•Field of View
Make sure that the target is larger than the unit's spot size. The smaller
the target is, the closer you should be to it. When accuracy is critical,
make sure the target is at least twice as large as the spot size.
•Distance & Spot Size
As the distance (D) from the object increases, the spot size (S) of the
area measured by the unit becomes larger. See: Fig: 1.
•Locating a hot Spot
To find a hot spot aim the thermometer outside the area of interest,
then scan across with an up and down motion until you locate hot
spot.
•Reminders
A:Do not use the unit to measure shiny or polished metal surfaces
(stainless steel, aluminum, etc.).See Emissivity.
B:The unit cannot be measured through transparent surfaces such
as glass. It will measure the surface temperature of the glass instead.
C:Steam, dust, smoke, etc, Can prevent accurate measurement by
obstructing the unit's optics.
EN 19

•Emissivity
Emissivity is a term used to describe the energy-emitting characteristics
of materials.
Most (90% of typical applications) organic materials and painted or
oxidized surfaces have an emissivity of 0.95 (pre-set in the unit).
Inaccurate readings will result from measuring shiny or polished
metal surfaces. To compensate, cover the surface to be measured
with masking tape or flat black paint. Allow time for the tape to
reach the same temperature as the material underneath it. Measure
the temperature of the tape or painted surface.
8. Emissivity Values
9. Maintenance
•Repairs or service are not covered in this manual and should only
be carried out by qualified trained technician.
•Periodically, wipe the body with a dry cloth. Do not use abrasives
or solvents on this instrument.
•For service, use only manufacturer's specified parts.
•
•
Substance
Asphalt
Concrete
Cement
Sand
Earth
Water
Ice
Snow
Glass
Ceramic
Marble
Plaster
Mortar
Brick
Thermal emissivity
0.90 to 0.98
0.94
0.96
0.90
0.92 to 0.96
0.92 to 0.96
0.96 to 0.98
0.83
0.90 to 0.95
0.90 to 0.94
0.94
0.80 to 0.90
0.89 to 0.91
0.93 to 0.96
Substance
Cloth (black)
Human skin
Lather
Charcoal (powder)
Lacquer
Lacquer (matt)
Rubber (black)
Plastic
Timber
Paper
Chromium oxides
Copper oxides
Iron oxides
Textiles
Thermal emissivity
0.98
0.98
0.75 to 0.80
0.96
0.80 to 0.95
0.97
0.94
0.85 to 0.95
0.90
0.70 to 0.94
0.81
0.78
0.78 to 0.82
0.90
EN 20
Table of contents
Languages: