Safety Instructions
Poison Hazard!
Keep the batteries out of the reach of children.
Explosion Hazard!
Never throw batteries into the fire.
Important!
Failure to follow these safety instructions could damage the
watering computer and void your warranty.
• Do not let water enter into the housing.
• Check the battery charge status and replace new
batteries if you are not using the irrigation computer over
a longer period of time.
• Always replace both batteries and make certain the
polarity is correct.
• Replace empty batteries in a timely fashion. Leaking
batteries could damage the watering computer.
• Never charge alkaline batteries.
• Inspect the watering computer and its supply lines at
regular intervals for proper seal and function.
• Never press the buttons with your finger nails or with
sharp objects.
• Reprogram the watering computer when you have
removed the battery compartment from the housing.
Before inserting the battery compartment, wait at least
30 seconds so that the program memory is completely
deleted.
Proper Use
The watering computer KH 4038 is intended exclusively for
permitting or preventing water flow at a specific time. It is
intended only for use in private households and gardens.
Any other use is considered improper, in particular use in
drinking water systems and for growing food.
Delivery Contents
• Watering computer KH 4038
• Operating manual (no figure)
Description
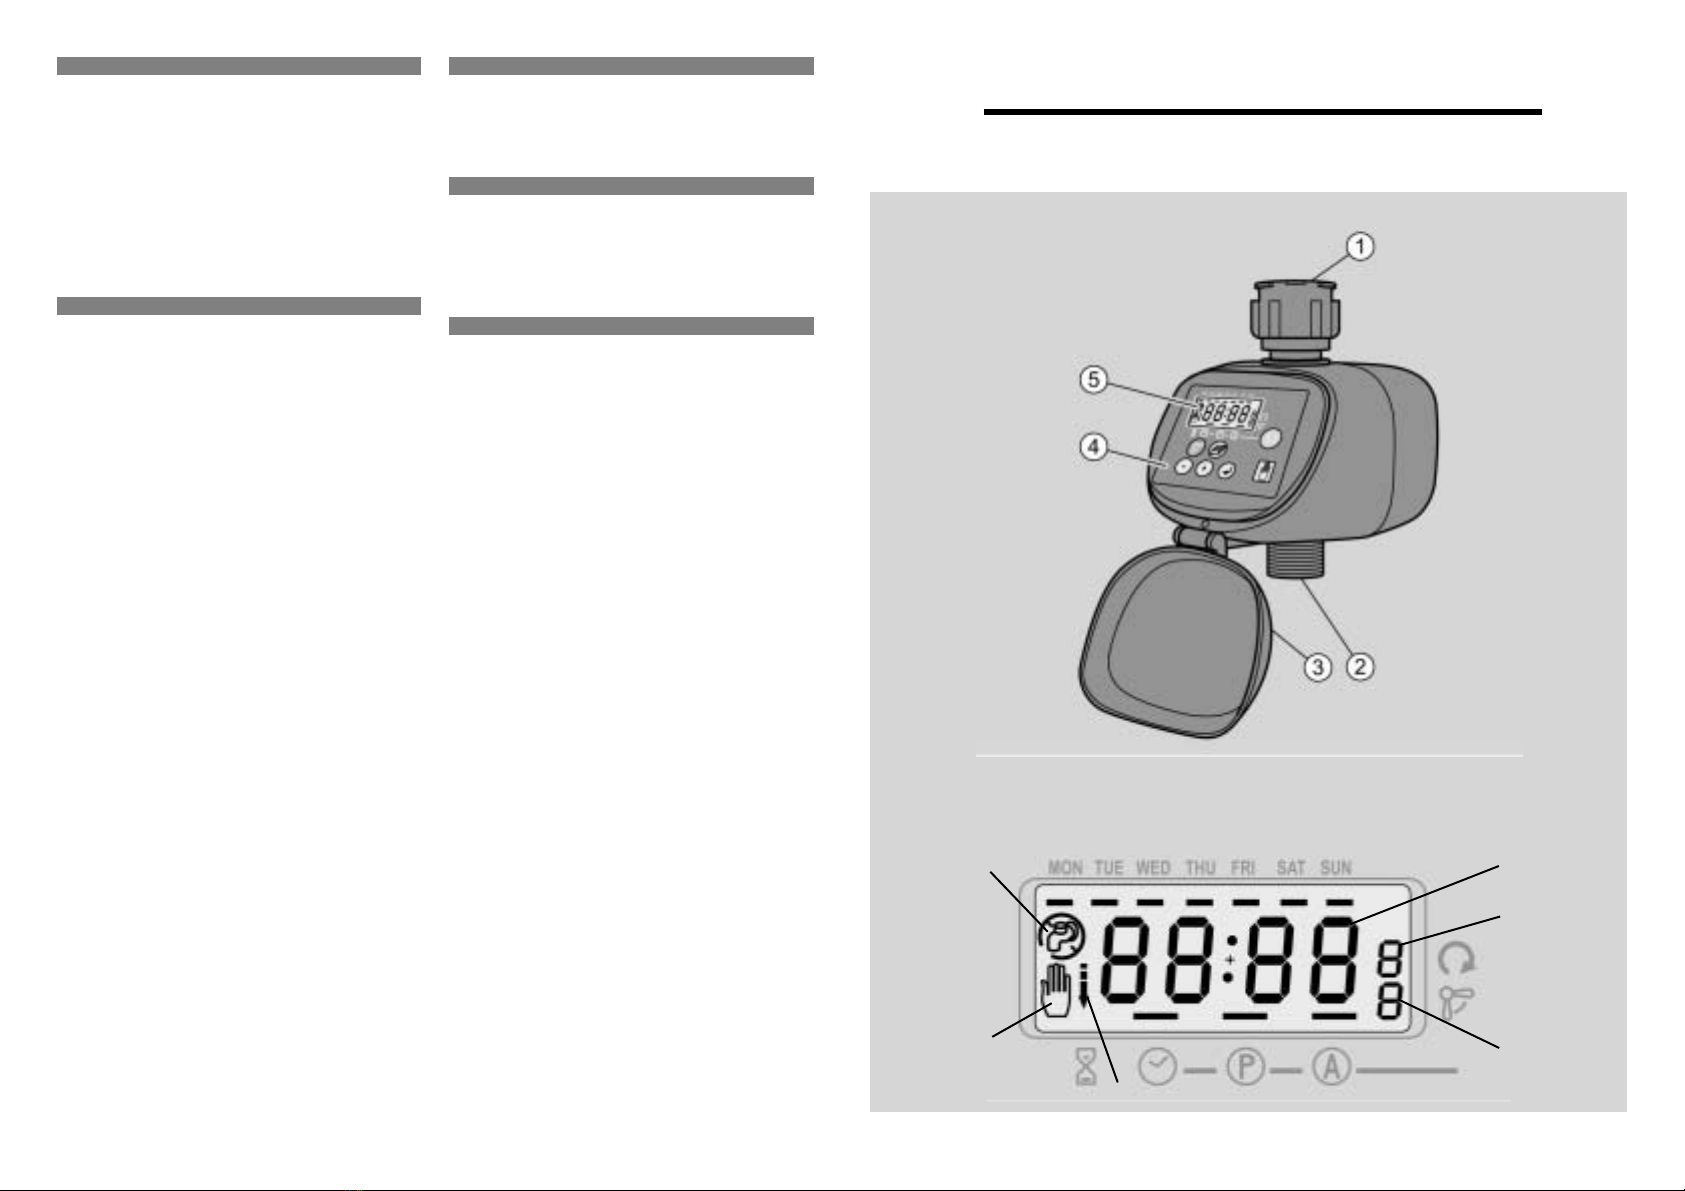
Figure A
Water spigot connection (3/4“)
Hose connection (3/4“)
Cover
Operating panel
Display
Display
Figure B
Time display
Watering frequency display
Program number display
Countdown symbol
Hand symbol
Watering on/off
Operation
Every selection in the watering computer must be confirmed
with the button.
Inserting the Batteries
The battery compartment is located on the bottom of the
watering computer.
Replace the batteries regularly. If the display indicates -LO-,
the batteries are empty.
➩Flip the locking lever of the battery compartment forward.
➩Pull the battery compartment out of the housing.
➩Insert two AA batteries into the battery compartment,
making certain that the polarity is correct.
➩Insert the battery compartment back into the housing
and secure it with the clip.
The watering computer retains its programming as long
as -PO- blinks in the display.When the display goes
blank, the programming has also been deleted.
Connecting to the Water Network
➩Turn the inflow connection to a suitable tap
(1“ outer thread).
➩Turn the outlet connection to a hose.
Make sure that the outlet connection is always turned
downwards.
Setting the Clock
➩Open the cover .
➩Press the "M" button repeatedly until a bar appears in
the display above the symbol and a bar blinks
under MON.
The watering computer is now in the clock setting mode.
➩Press the "+" or "–" button to set the current day of the
week.
The hour value blinks in the display.
➩Press the "+" button or the "–" button to set the current
hour.
The minute value blinks in the display.
➩Press the "+" button or the "–" button to set the current
minute.
The clock is now set.
Programming
You can program up to 6 on actions and 6 off actions.
➩Press the "M" button until a bar appears above the P in
the display .
The watering computer is now in the programming mode.A
U or the number 7 is shown in the display to the right of
FREQ.
Setting the Watering Frequency
➩Select the setting for the watering frequency with the
"+" button or the "–" button.
Program:
U: User-defined watering (e.g. Mon.,Wed.and Fri.)
1: daily
2: every second day
3: every third day, etc.
The frequency of the watering is shown in the display
next to PROG. is shown in the display on the left.
Setting the Watering Time
➩Select a program number with the "+" or "–" button.
The program number is shown in the display next to
PROG.
➩Press the "+" button or the "–" button to set the starting
time (hour).
➩Press the "+" button or the "–" button to set the starting
time (minute).
is shown in the display on the left.
➩Follow the same steps to set the stopping time.
➩Press the "M" button until a bar appears above the A in
the display.
The watering computer is now in automatic mode and will
execute the configured programs.
Setting Watering on Specific Days of the Week
➩Press the "M" button until a bar appears above the P in
the display.
➩Press the "+" button until the watering frequency is set
to U.
A U appears next the FREQ on the right side of the display
and a bar blinks beneath all the days of the week.
➩Press the button to select the day of the week.
is shown in the display on the left and the bar under
MON blinks.
➩Select a day of the week with the "+" and "–" buttons.
➩Confirm your selection by pressing the button to
select a program number.
➩Select a program number with the "+" or "–" button.
The program number is shown in the display next to PROG.
➩Press the button.
➩Set the watering time as described under "Setting the
Watering Time".
➩Press the "M" button until a bar appears above the A in
the display.
The watering computer is now in automatic mode and will
execute the configured programs.
Deleting a Program
➩Press the "M" button until a bar appears above the P in
the display.
➩Press the button until the desired program appears
in the display.
➩Press the button.
The program is deleted and the programmed time is no
longer shown in the display.
➩Press the "M" button repeatedly until a bar appears
above the A in the display.
The watering computer is once again operating in automatic
mode.
Skipping a Program
If you would like to switch the watering computer on or off
despite a program, you can skip the current step.
➩Press the button.
The skip symbol appears in the lower right of the display.
When the next programmed on/off action is reached, the
watering computer automatically switches back to automatic
mode.
Setting the Manual Mode or Countdown
➩Press the button .
blinks in the display and OFF is shown.
➩Press the button to move ahead one sequence.
The following sequences are available:
Off, on, 8:00, 7:00, 6:00, 5:00, 4:00, 3:00, 2:00, 1:00, 0:45,
0:30, 0:15, 0:10, 0:05.
OFF, ON or the sequence appears in the display.
Once you have selected a countdown sequence, the
symbol disappears and the countdown symbol appears in
the display.
Closing the Cover
➩Close the cover after programming.