Konica Minolta MAXXUM FLASH 5600HS (D) User manual

PROGRAM FLASH
MAXXUM FLASH
5600HS (D)
EINSTRUCTION MANUAL

2
FOR PROPER AND SAFE USE
Read and understand all warnings and cautions before using this
product.
WARNING
Batteries may become hot or explode due to improper use.
• Use only the batteries specified in this instruction manual.
• Do not install the batteries with the polarity (+/–) reversed.
• Do not subject batteries to fire or high temperatures.
• Do not attempt to recharge (except for rechargeable batteries),
short, or disassemble.
• Do not mix batteries of different types, brands, or ages.
• Tape over lithium battery contacts to avoid short-circuit when dis-
posing of batteries, and follow local regulations for battery dispos-
al.
Keep batteries or things that could be swallowed away from young
children. Contact a doctor immediately if an object is swallowed.
Immediately remove the batteries and discontinue use if...
• the product is dropped or subjected to an impact in which the inte-
rior is exposed.
• the product emits a strange smell, heat, or smoke.
Do not disassemble. Electric shock may occur if a high voltage cir-
cuit inside the product is touched. Take your flash to a Konica
Minolta Service Facility when repairs are required.
CAUTION
Do not touch the flashtube during operation, it may become hot
when the flash fires.

3
This device complies with Part 15 of the FCC Rules. Operation is sub-
ject to the following two conditions: (1) This device may not cause
harmful interference, and (2) this device must accept any interference
received, including interference that may cause undesired operation.
Changes or modifications not approved by the party responsible for
compliance could void the user's authority to operate the equipment.
This equipment has been tested and found to comply with the limits for
a Class B digital device, pursuant to Part 15 of the FCC Rules. These
limits are designed to provide reasonable protection against harmful
interference in a residential installation. This equipment generates, uses
and can radiate radio frequency energy and, if not installed and used in
accordance with the instructions, may cause harmful interference to
radio communications.
However, there is no guarantee that interference will not occur in a
particular installation. If this equipment does cause harmful interference
to radio or television reception, which can be determined by turning the
equipment off and on, the user is encouraged to try to correct the inter-
ference by one or more of the following measures:
• Reorient or relocate the receiving antenna.
• Increase the separation between the equipment and the receiver.
• Connect the equipment to an outlet on a circuit different from that to
which the receiver is connected.
• Consult the dealer or an experienced radio/TV technician for help.
This Class B digital apparatus complies with Canadian ICES-003.

4
CONTENTS
CAMERAS AND FLASH UNITS..............................................................6
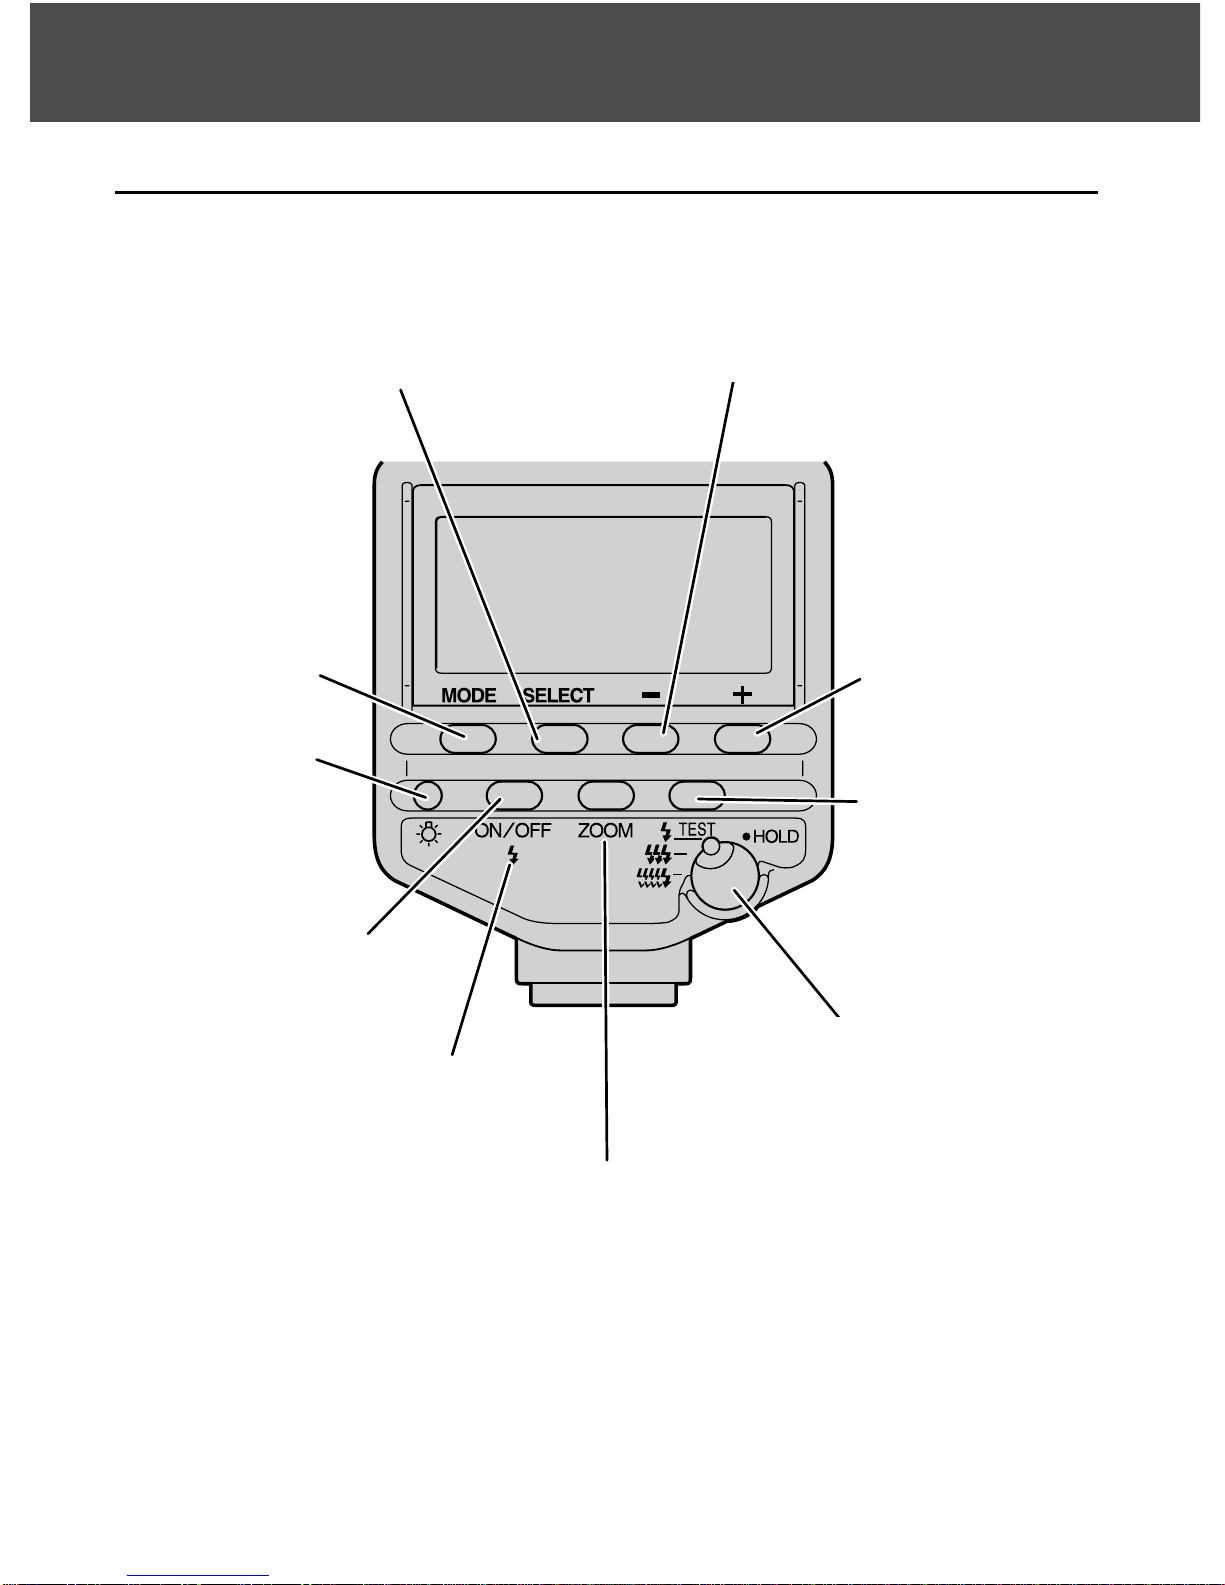
NAMES OF PARTS.................................................................................8
BASIC OPERATION
INSTALLING BATTERIES.....................................................................12
Checking Batteries ......................................................................13
ATTACHING AND REMOVAL................................................................14
AUTO POWER ON/OFF AND FILM......................................................15
P MODE FLASH: THE BASICS ............................................................16
Flash Range ................................................................................18
EXPOSURE MODES ............................................................................19
A Mode Flash ..............................................................................19
S Mode Flash ..............................................................................19
M Mode Flash .............................................................................20
Flash Sync Speed........................................................................21
APPLICATIONS
ZOOM FLASH COVERAGE..................................................................23
TEST-FLASH/MODELING FLASH........................................................26
BOUNCE FLASH...................................................................................28
CLOSE-UP PHOTOGRAPHY (DOWNWARD BOUNCE).....................31
DATA PANEL ILLUMINATOR ................................................................32
AF ILLUMINATOR.................................................................................33
MODE AND SELECT BUTTONS..........................................................34
MANUAL FLASH (M).............................................................................36
HIGH-SPEED SYNC (HSS) ..................................................................38
WIRELESS/REMOTE FLASH MODE...................................................40
Types Of Wireless/Remote Flash ...............................................41
Wireless Flash Range .................................................................42
Notes On Wireless Flash ............................................................44
[1] Using The Built-In Flash ........................................................46
[2] Using Two Flash Units ...........................................................48
[3] Using Wireless Remote Flash Controller ...............................52
CONNECTING CAMERAAND FLASH BY CABLE ..............................55

5
Thank you for purchasing the MAXXUM/PROGRAM FLASH
5600HS (D).
The MAXXUM/PROGRAM FLASH 5600HS (D) provides the maxi-
mum guide number 56, a high-intensity light source, and a wide
range of functions in a compact body, and is designed for use with
Konica Minolta auto-focus single lens reflex cameras.
Please read this manual thoroughly before using this flash. We
hope that you will continue to be satisfied by our products.
SETTING POWER LEVEL (LEVEL)......................................................58
MULTIPLE FLASH (MULTI)...................................................................60
RESET TO THE DEFAULT SETTINGS.................................................64
CUSTOM FUNCTION............................................................................65
Wireless channel setting
Flash range units (m/ft)
Time to auto power off
Time to auto power off when using wireless
Exposure modes in which manual flash and multiple flash may be set
APPENDIX
USE IN COMBINATION WITH OTHER PRODUCTS...........................69
ACCESSORIES.....................................................................................72
CAUTIONS WHILE HANDLING............................................................74
PERFORMANCE...................................................................................76

6
CAMERAS AND FLASH UNITS
Cameras
This manual covers the PROGRAM/MAXXUM FLASH 5600HS (D)
as attached to one of the following cameras.
MAXXUM
9, 7, 5, 4, 3, 70, 50, 800si, 700si, 600si, 400si, 300si, XTsi, HTsi,
STsi, QTsi
DYNAX
9, 7, 5, 4, 3, 3L, 60, 40, 30, 800si, 700si, 600si, 505siSuper, 505si,
500siSuper, 500si, 404si, 303si, 300si
DiMAGE
A2, A1, Z2, Z1, 7Hi, 7i, 7, 5
When attaching to another Maxxum series camera, a Dynax series
camera, a Vectis series camera, or a Dimâge series digital camera,
read the main section of this manual while referring to ‘Use in
Combination with Other Products’ on page 69.
Flash Units
For convenience, classify the following as D flash units when using
multiple flash units for wireless flash photography, etc.
MAXXUM/PROGRAM FLASH 5600HS (D)
MAXXUM/PROGRAM FLASH 3600HS (D)

7
This flash unit is designed and manufactured solely for use with
the Konica Minolta Maxxum/Dynax/Dimage series cameras. It
cannot be attached to other Konica Minolta cameras.
Performance when used with cameras from other manufacturers
cannot be guaranteed. Konica Minolta takes no responsibility for
accidents or malfunctions due to use with such cameras.
This manual contains information on products and accessories
available at the time of printing. To obtain compatibility information
on products not contained in this manual, contact a Konica
Minolta service facility.
This mark below the flashtube certifies that this product
meets the requirements of the EU (European Union) con-
cerning interference causing equipment regulations. CE
stands for conformité Européenne (European conformity).

8
NAMES OF PARTS
Built-in wide angle
adapter (25)
Flashtube
AF illuminator (33)
Wireless/Remote
control-signal
receiver (42)
Terminal cap
Inside terminal
Accessory terminal (55)
External-power terminal (72)
Mounting-foot-release
button (14)
Mounting foot
Bounce indica-
tor (28)
Data panel (10)
Control panel (9)
Bounce lock-release
button (28)
Battery-chamber door
(12)
Figures in brackets after each item indicate the relevant page.
Flash Unit Diagram
Remove protective plastic from front of AF illuminator before using.

Control Panel
9
Select button
Mode button
Data-panel
illuminator (32)
Flash on/off button (15)
Flash-ready lamp (17)
Zoom (flash-coverage)
selection button (24)
+ button
– button
Test-flash button
(26) / Modeling-
flash button (26)
Test-flash mode selection
(26)/Hold switch (26)

10
NAMES OF PARTS
High-speed-sync
indicator (38)
Flash-range-warning indicators (18)
Wireless/Remote controller
indicator (48)
Flash-ok indicator (17)
Wireless/Remote flash
indicator (46-54)
TTL indicator (36)
Manual-flash-control
indicator (36)
Ratio-flash indicator
(50, 53, 56)
Multiple-flash
indicator (60)
Custom indicator
(65)
Power-level indicator (58)
Flash on/off indicators
(16)
Low-battery
indicator (13)
ft/m indicator
(66)
Hz indicator (60)
Bounce indica-
tor (28)
TIMES indicator
(61)
mm indicator (23)
Zoom/Multiple-flash-
repetition display (61)
Manual-zoom indicator (24)
Flash-range (18)/Multiple-flash-
frequency display (60)
Data Panel

11
BASIC OPERATION
The section explains preparations for use of the flash,
and the basic
details of taking photos.
• Automatic flash generates a flash only as necessary. Fill
flash generates a flash with each photo.

12
INSTALLING BATTERIES
The 5600HS (D) may be powered by :
• Four AA-size alkaline batteries
• Four AA-size lithium batteries
• Four AA-size rechargeable nickel-metal hydride (Ni-MH) batteries
Always ensure that rechargeable nickel-metal hydride batteries are
charged in the specified charger unit.
1. Open the battery-chamber
door as shown.
2. Insert the batteries according
to the diagram in the battery
chamber.
3. Close the battery-chamber
door.
• The indicators appear on the data
panel. Press the flash on/off button if
it doesn’t appear.

13
Checking Batteries
The indicator on the data panel blinks when the batteries are
low.
Power is low. The batteries will need
to be replaced soon.
Insert new batteries. Flash cannot be
used.
• Check the orientation of the batteries if nothing appears when the
flash on/off button is pressed.
BATTERIES

14
ATTACHING AND REMOVAL
Attaching To The Camera
Push the mounting foot firmly
onto the camera until it stops.
• The flash is locked in place automati-
cally.
• If the built-in flash in the camera is
protruding, lower it before fitting the
flash unit.
Removing From The Camera
While pressing the mounting-foot
release button , remove the
flash .

Power is supplied to this flash automatically (auto power on) in the
following situations.
• When the camera is used with the flash
attached.
• When the flash on/off button is pressed.
Power is switched off and data panel indicators disappear automati-
cally to save the batteries when the camera or flash is not used for
four minutes (auto power off).
• When the flash is switched off (right diagram),
the data panel indicator will disappear after
eight seconds, or after 60 minutes in the case
of wireless flash (p. 40).
• Custom settings may be used to change the
time of auto power off, or to disable auto power off (p. 65).
15
AUTO POWER ON/OFF AND FILM
Auto Power On
Auto Power Off
Film
Do not use high-speed film (rating in excess of ISO 1000) with TTL
direct metering ( displayed on the data panel, p. 36). Use of
such film increases the exposure error.
• The low-speed film limit is the same as that for the films specified for
the camera. See the camera manual for details.
Flash on/off button
PREPARATION

16
P MODE FLASH: THE BASICS
1. Select the P mode on the cam-
era.
2. Press the flash ON/OFF button
to display or .
3. Press the shutter-release but-
ton partway down.
• and appear with auto-
matic flash. Only appears with
fill flash.
• With the Maxxum/Dynax 7, automatic flash is used with full-auto,
and fill flash when the P mode is selected.
• With the Maxxum/Dynax 9/800si or a DiMAGE digital camera, fill flash
is used when P mode is selected (automatic flash may also be select-
ed as a custom setting with the 800si).
• With other cameras, automatic flash is used when the P mode is
selected. Fill flash may be selected in the same way as the built-in
flash in the camera.

17
4. Press the shutter-release but-
ton partway down and check
that the subject is within the
flash range.
• See page 18 for details of the flash
range.
5. When the flash is charged,
press the shutter-release but-
ton to take the photo.
• The flash is charged when indica-
tors on the rear of the unit and in the
camera viewfinder are both lit.
When the correct exposure has been
obtained for the photo just taken:
• is displayed in the data panel for
approximately four seconds.
• The indicator blinks in the camera
viewfinder.
• The photo will be under-exposed if taken before charging is complete.
• When a photo is taken immediately after charging is complete while
using slide film, it may be under-exposed near the farther limit of the
flash range (p. 18).
• Press the shutter-release button after checking that charging is com-
plete when using the flash with the self-timer.
Continued on next page
P MODE FLASH

18
Flash Range
Press the shutter-release button part-
way down to display the flash range
for the proper exposure on the data
panel. Check that the subject is within
this range and then take the photo.
P MODE FLASH: THE BASICS
A distance range of 1.5~28m may be displayed on the data panel
(0.7~28m for downward bounce, see p. 31). When the distance is
outside this range, or is lit at both sides of the viewfinder.
Proper exposure is obtained at less than 1.5m.
Proper exposure is obtained from 8m to 28m or more.
• The flash range is not shown when using flash bounce above and to
left or right, with wireless flash, or when off-camera cables are used.
• When photographing beyond lower limit of the flash range, the photo
may be over-exposed despite being displayed, or the bottom of
the picture may become darker. Always photograph within the indicat-
ed flash range.

19
EXPOSURE MODES
This photography is only possible with cameras having the A, S,
and M modes.
A Mode Flash
1. Select the A mode on the camera.
S Mode Flash
1. Select the S mode on the camera.
2. Press the flash on/off button to display .
• Fill flash is selected.
3. Set the shutter speed, and focus the subject.
• A shutter speed faster than the sync speed cannot be selected with
the camera without high-speed sync.
• The shutter speed is set automatically with the Dynax 500si,
500siSuper, and Maxxum 400si.
4. Press the shutter-release button when charging is com-
plete.
2. Press the flash on/off button to
display .
• Fill flash is selected.
3. Set the aperture and focus the subject.
• Reduce the aperture (ie increase the f-stop) to reduce the flash
range, or open the aperture (ie reduce the f-stop) to increase the
flash range.
• The shutter speed is automatically set.
4. Press the shutter-release button when charging is com-
plete.
EXPOSURE MODES

20
M Mode Flash
1. Select the M mode on the camera.
2. Press the flash on/off button to display .
• Fill flash is selected.
3. Set the aperture and shutter speed, and focus the sub-
ject.
• Reduce the aperture (ie increase the f-stop) to reduce the flash
range, or open the aperture (ie reduce the f-stop) to increase the
flash range.
• A shutter speed faster than the sync speed cannot be selected with
the camera without high-speed sync.
4. Press the shutter-release button when charging is com-
plete.
EXPOSURE MODES
Table of contents
Other Konica Minolta Camera Accessories manuals