Konig EL-WDB301 User manual

13-04-2012
EL-WDB301/401
MANUAL (p. 2)
Wireless doorbell
ANLEITUNG (S. 5)
Drahtlose Türklingel
MODE D’EMPLOI (p. 8)
Carillon de porte à connexion sans fil
GEBRUIKSAANWIJZING (p. 11)
Draadloze deurbel
MANUALE (p. 14)
Campanello wireless
MANUAL DE USO (p. 17)
Timbre de puerta inalámbrico
HASZNÁLATI ÚTMUTATÓ (o. 20.)
Vezeték nélküli ajtócsengő
KÄYTTÖOHJE (s. 23)
Langaton ovikello
BRUKSANVISNING (s. 26)
Trådlös dörrklocka
NÁVOD K POUŽITÍ (s. 29)
Bezdrátový domovní zvonek
MANUAL DE UTILIZARE (p. 32)
Sonerie fărăfir
ΕΓΧΕΙΡΙΔΙΟ XPHΣHΣ(σελ. 35)
Ασύρματο κουδούνι πόρτας
BRUGERVEJLEDNING (s. 38)
Trådløs dørklokke
VEILEDNING (s. 41)
Trådløs ringeklokke

2
ENGLISH
Wireless doorbell
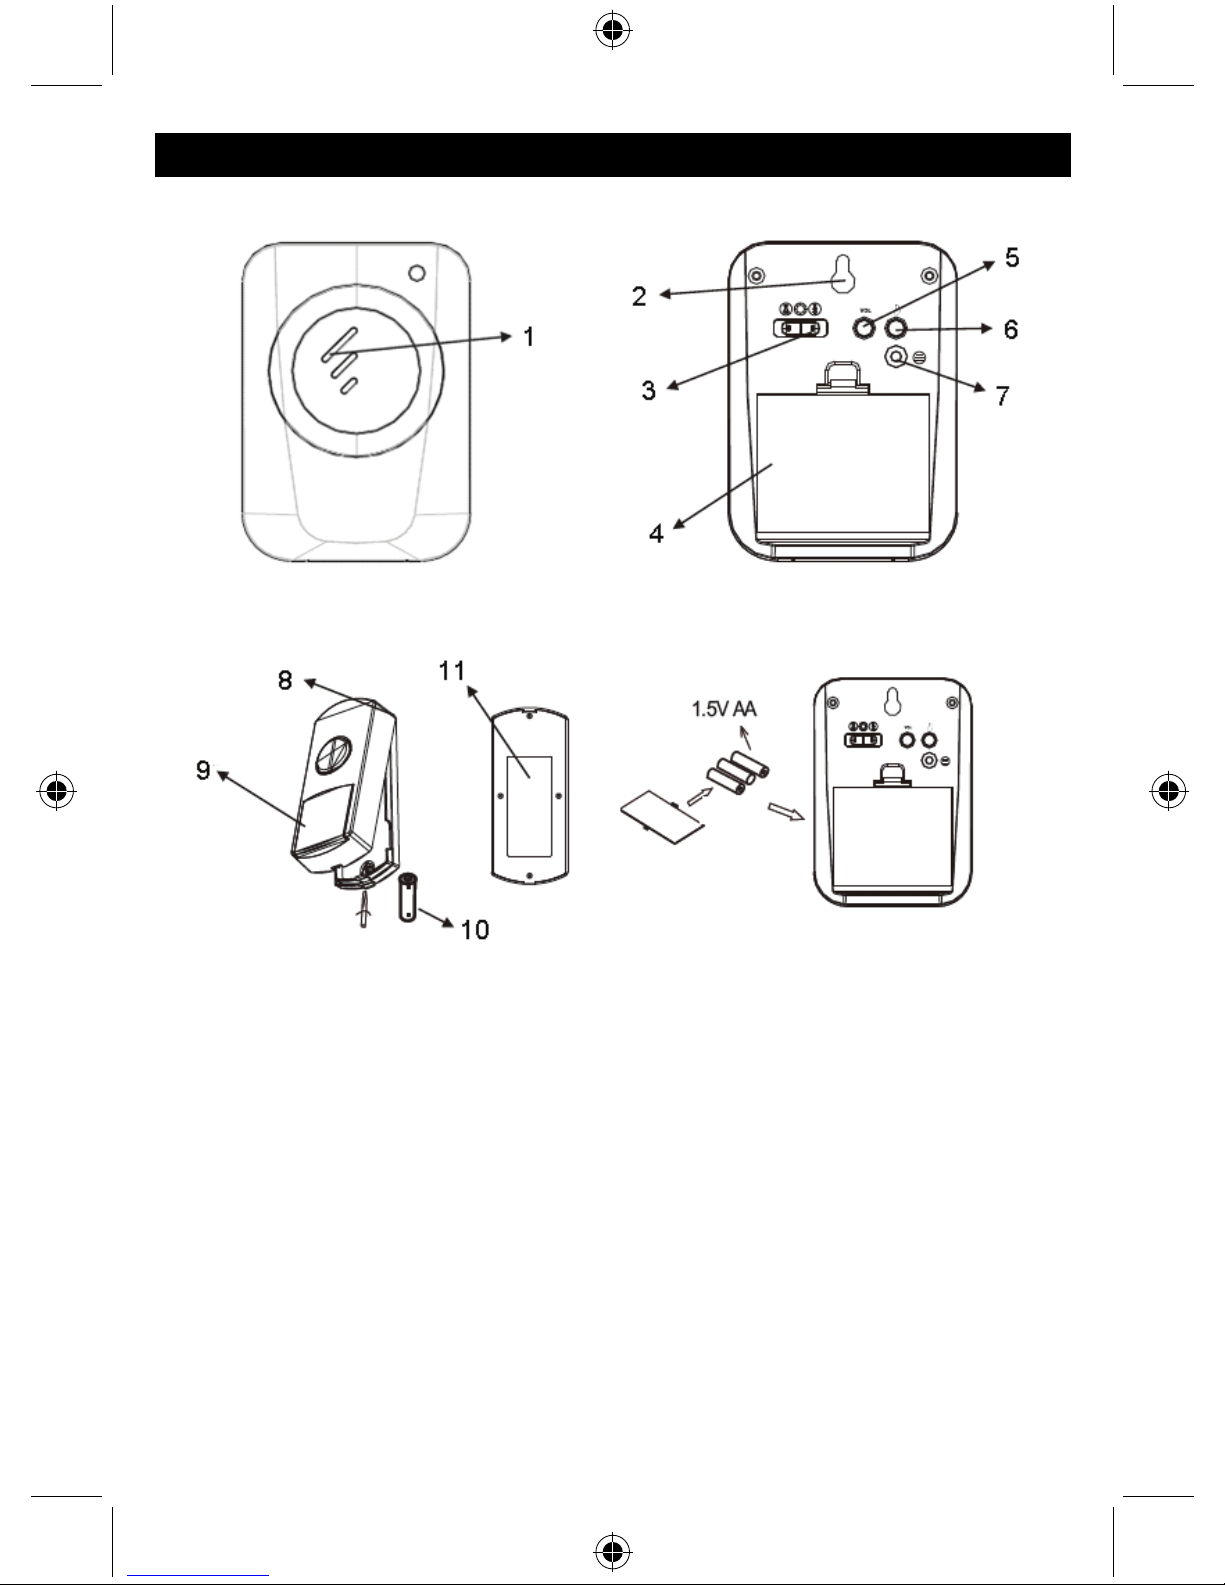
1. High quality loudspeaker.
2. Mounting hole.
3. Ring option switch: ring only, or LED flash only, or combination of ring and flash.
4. Battery compartment.
5. Volume switch.
6. Tune selection switch.
7. Hold the code-matching button on the receiver and push the button on the receiver at the same
time. Release the code-matching button as soon as the bell rings. Then release the button of the
transmitter accordingly. With this, the code-matching of the doorbell set is finished.
8. Insert the fastening tab of the top cover into the slot of the base.
9. Press here by hand to fix the top cover onto the base.
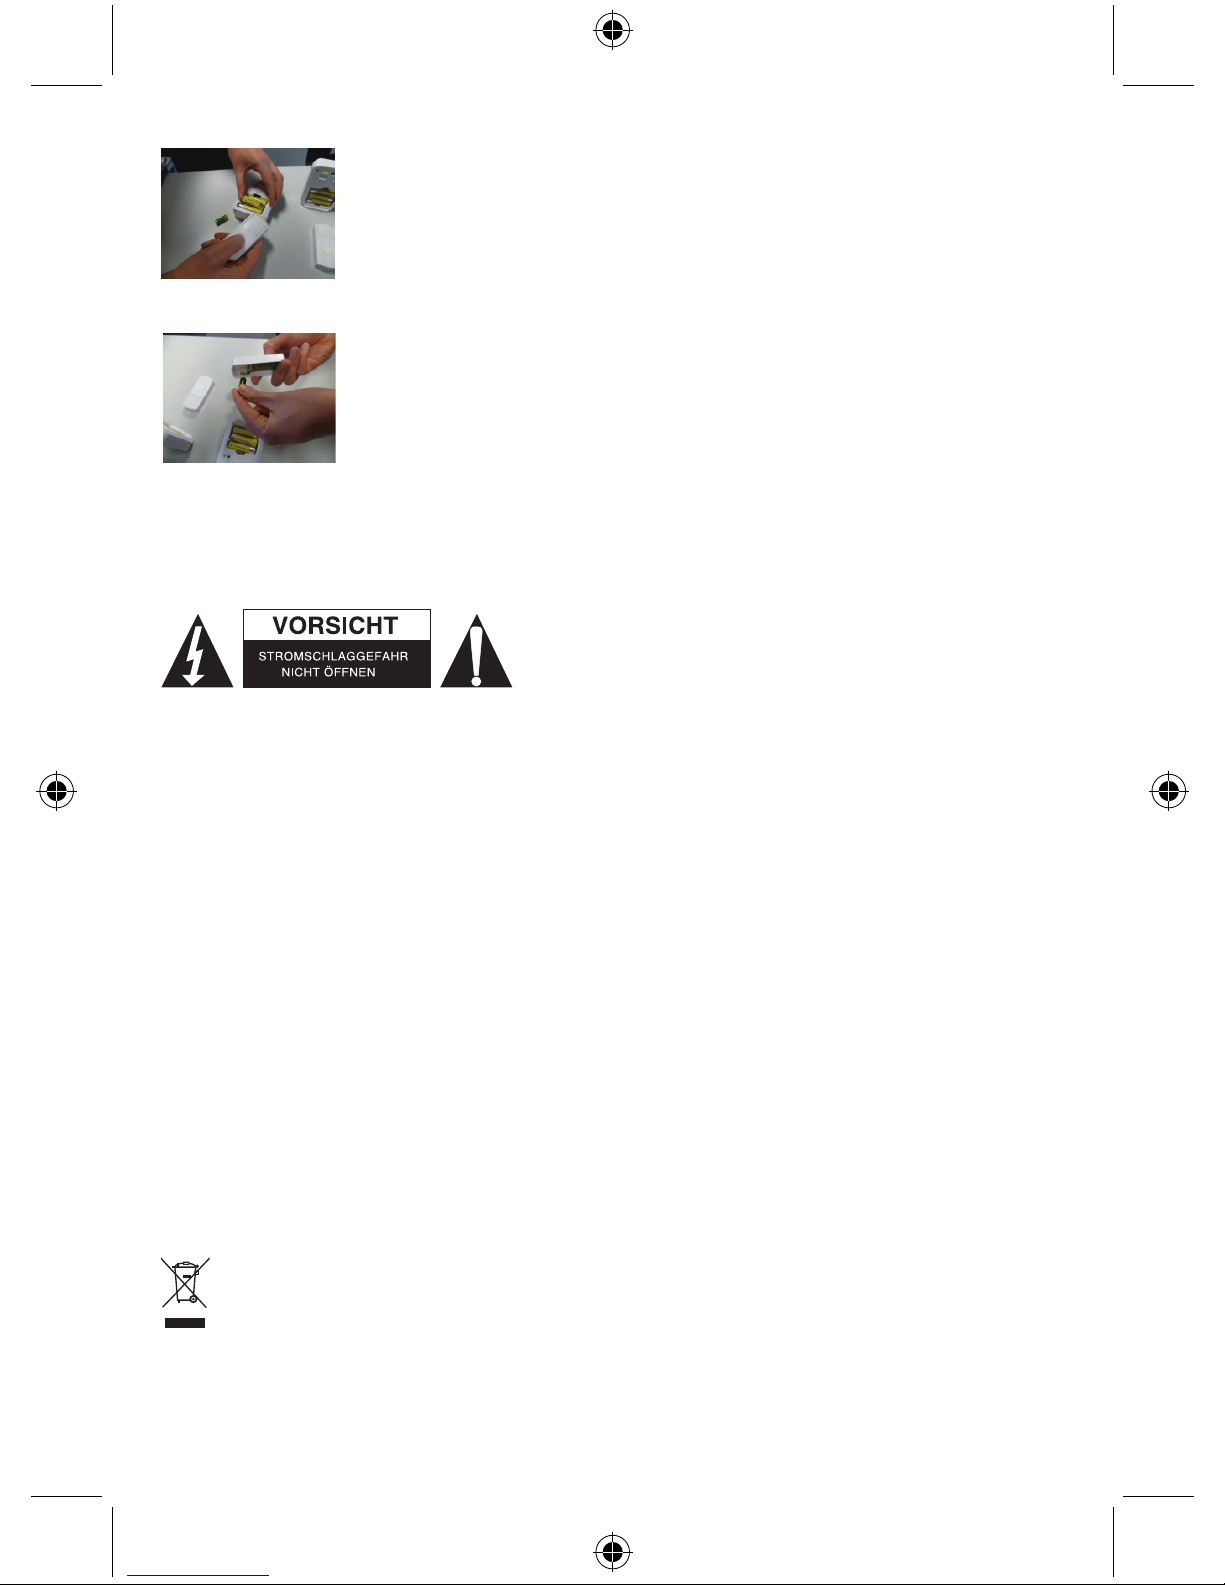
10.Use a small screwdriver and carefully open this cover on the base unit.
Insert a battery into the battery compartment in the correct polarity.
11. Use the double-sided tape to attach the unit to the desired place.

3
Specifications:
EL-WDB301
* 36 melodies for your selection
* Battery operated (3xAA and 1xV23GA)
* 100 meter reach
* Double blister packing
* Indicator light
* Waterproof transmitter
EL-WDB401
* 36 melodies for your selection
* Battery operated (2xAA and 1xCR2032)
* 80 meter reach
* Double blister packing
* Indicator light
* Waterproof transmitter
Supplement instructions
EL-WDB301
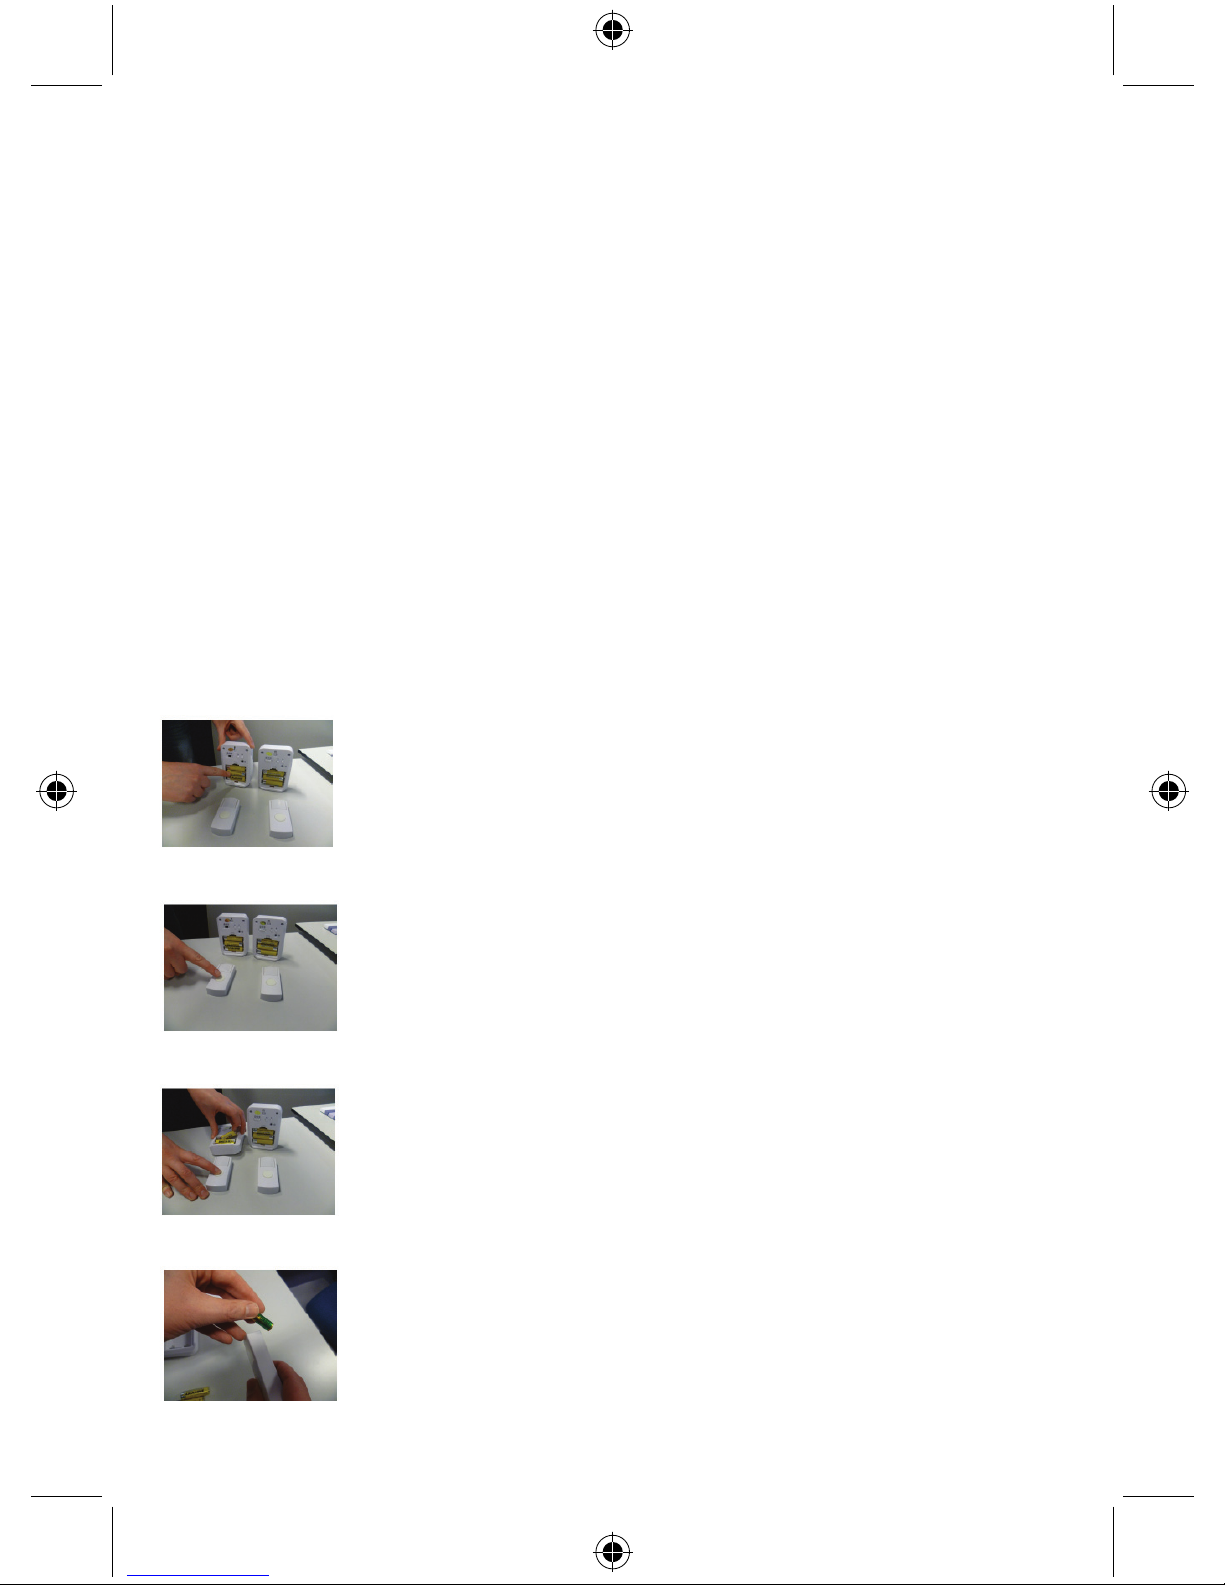
Follow the steps below to set the channel of several doorbells to 1 bell button or to set a different
channel from your neighbours.
First remove the back plate of the battery compartment of main unit and bell button.
Press and hold the bell button.
Keep pressing the bell button and remove the batteries from the main unit.

4
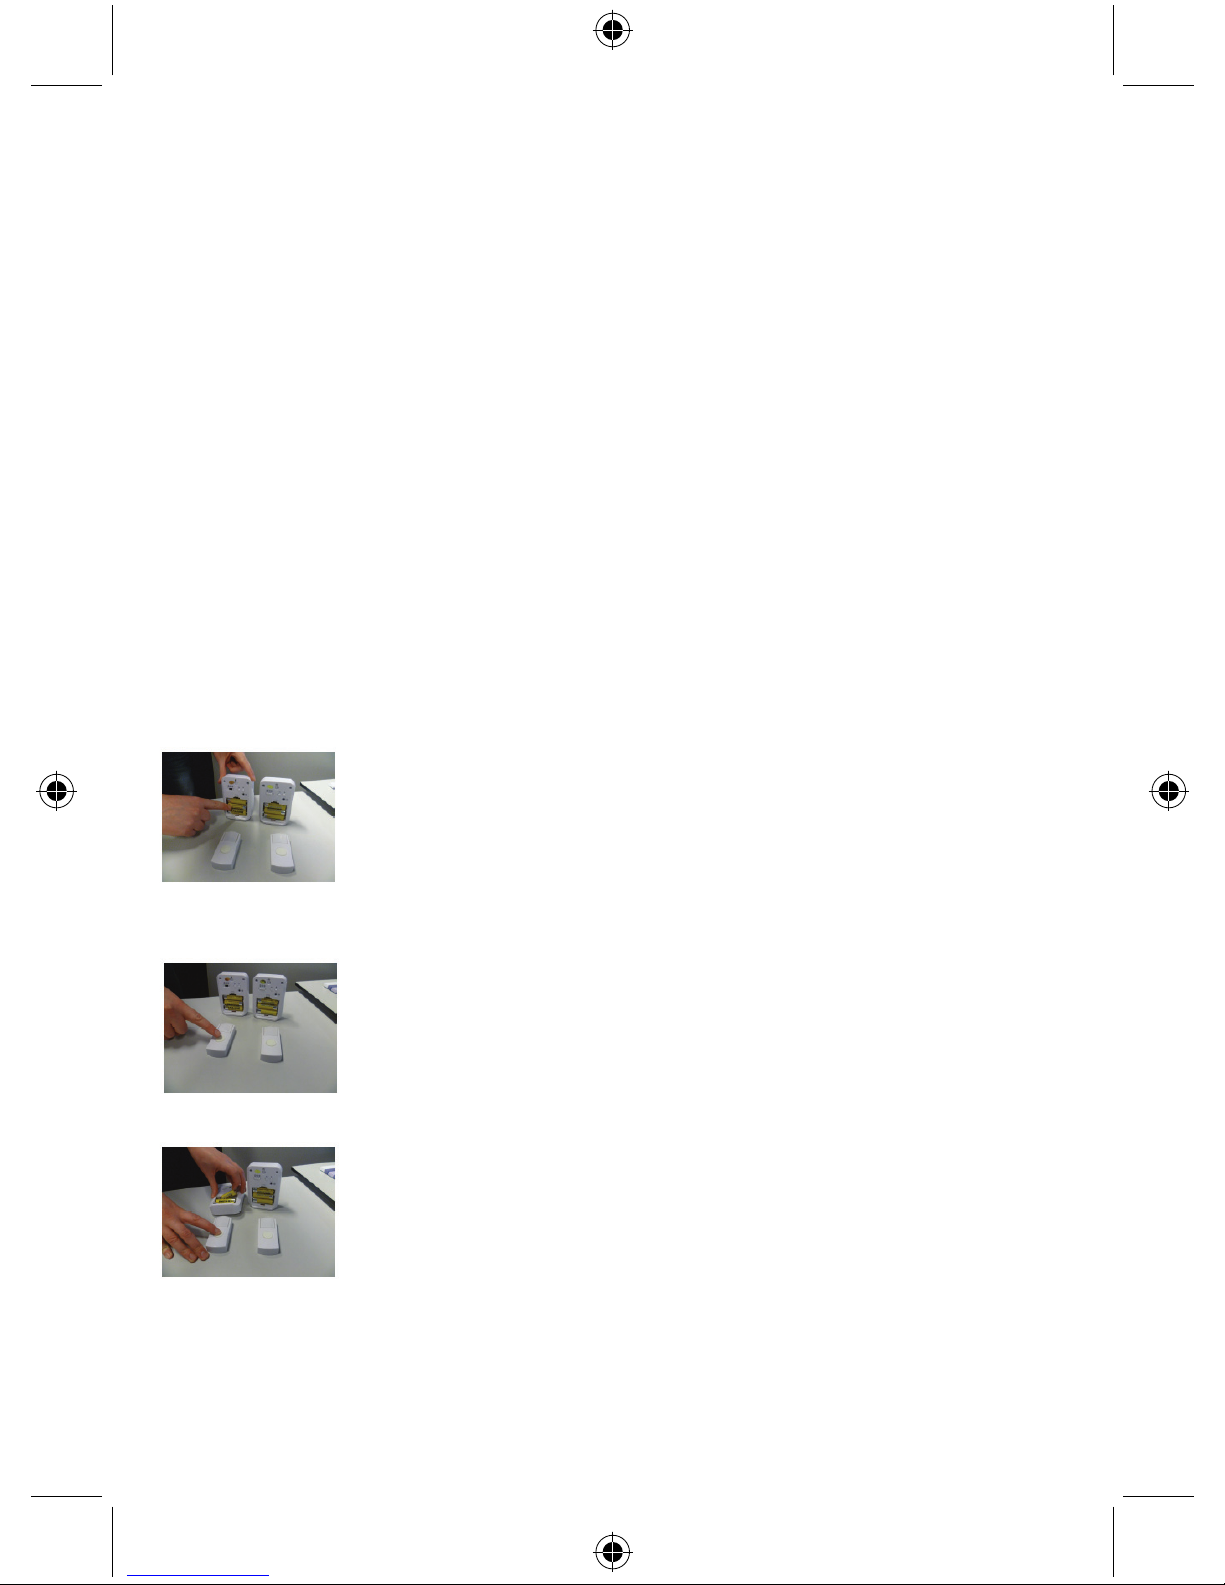
Keep pressing the bell button and now also remove the batteries from the bell button.
Keep on pressing the bell button and insert the batteries back into the main unit.
Keep on pressing the bell button and insert the batteries back into the bell button.
Now the channel of the doorbell is changed.
Safety precautions:
To reduce risk of electric shock, this product should ONLY be
opened by an authorized technician when service is
required. Disconnect the product from mains and other
equipment if a problem should occur. Do not expose the
product to water or moisture.
Maintenance:
Clean only with a dry cloth. Do not use cleaning solvents or abrasives.
Warranty:
No guarantee or liability can be accepted for any changes and modifications of the product or damage
caused due to incorrect use of this product.
General:
- Designs and specifications are subject to change without notice.
- All logos brands and product names are trademarks or registered trademarks of their respective
holders and are hereby recognized as such.
- This manual was produced with care. However, no rights can be derived. König Electronic can not
accept liability for any errors in this manual or their consequences.
- Keep this manual and packaging for future reference.
Attention:
This product is marked with this symbol. It means that used electrical and electronic products
should not be mixed with general household waste. There is a separate collections system for
these products.
5
DEUTSCH
Drahtlose Türklingel
1. Lautsprecher.
2. Befestigungsloch.
3. Klingeloption Umschalter: nur Klingelton, oder nur die LED blinkt, oder eine Kombination aus
Klingelton und LED.
4. Batteriefach.
5. Lautstärkeregler.
6. Melodie-Wahlschalter.
7. Halten Sie am Empfänger die Kodierungstaste gedrückt und drücken Sie gleichzeitig die Taste am
Klingeltaster. Lassen Sie die Kodierungstaste los, sobald der Klingelton ertönt. Lassen Sie dann
die Taste am Klingeltaster los. Damit ist die Kodierung der Türklingel eingestellt. Einlegen Batterie
für Klingeltaster.
8. Führen Sie den Riegel der Abdeckung in den Schlitz des unteren Gehäuses ein.
9. Drücken Sie mit Ihrer Hand, um die Abdeckung mit dem unteren Gehäuse zu verschließen.
10.Verwenden Sie einen Schraubenzieher und öffnen Sie vorsichtig den Deckel am unteren Gehäuse.
Legen Sie eine Batterie der richtigen Polarität entsprechend in das Batteriefach ein.
11. Befestigen Sie den Klingeltaster mithilfe des doppelseitigen Klebebands an einem Ort Ihrer Wahl.

6
Technische Daten:
EL-WDB301
* 36 Melodien zur Auswahl
* Batteriebetrieben (3 x AA und 1 x V23GA)
* 100 Meter Reichweite
* Kontrollleuchte
* Wasserfeste Sendereinheit
EL-WDB401
* 36 Melodien zur Auswahl
* Batteriebetrieben (2 x AA und 1 x CR2032)
* 80 Meter Reichweite
* Kontrollleuchte
* Wasserfeste Sendereinheit
Zusätzliche Anleitungen
EL-WDB301
Folgen Sie den nachstehenden Schritten, um den Kanal für mehrere Türklingeln für 1 Klingelknopf
oder einen anderen Kanal als Ihre Nachbarn einzustellen.
Öffnen Sie zunächst das Batteriefach der Klingel und des Klingelknopfes.
Halten Sie den Klingelknopf gedrückt.
Halten Sie den Klingelknopf weiterhin gedrückt und nehmen Sie die Batterien aus der Klingel.
Halten Sie den Klingelknopf weiterhin gedrückt und nehmen Sie auch die Batterien aus dem
Klingelknopf.
7
Halten Sie den Klingelknopf weiterhin gedrückt und setzen Sie die Batterien in die Klingel zurück.
Halten Sie den Klingelknopf weiterhin gedrückt und setzen Sie die Batterien in den Klingelknopf
zurück.
Der Kanal Ihrer Türklingel ist nun umgestellt.
Sicherheitsvorkehrungen:
Um das Risiko eines elektrischen Schlags zu verringern,
sollte dieses Produkt AUSSCHLIESSLICH von einem
autorisierten Techniker geöffnet werden. Bei Problemen
trennen Sie das Gerät bitte von der Spannungsversorgung
und von anderen Geräten ab. Stellen Sie sicher, dass das
Gerät nicht mit Wasser oder Feuchtigkeit in Berührung
kommt.
Wartung:
Nur mit einem trockenen Tuch säubern. Keine Reinigungs- oder Scheuermittel verwenden.
Garantie:
Es kann keine Garantie oder Haftung für irgendwelche Änderungen oder Modifikationen des Produkts
oder für Schäden übernommen werden, die aufgrund einer nicht ordnungsgemäßen Anwendung des
Produkts entstanden sind.
Allgemeines:
- Design und technische Daten können ohne vorherige Ankündigung geändert werden.
- Alle Logos, Marken und Produktnamen sind Marken oder eingetragene Marken ihrer jeweiligen
Eigentümer und werden hiermit als solche anerkannt.
- Diese Bedienungsanleitung wurde sorgfältig verfasst. Dennoch können daraus keine Rechte und
Pflichten hergeleitet werden. König Electronic haftet nicht für mögliche Fehler in dieser
Bedienungsanleitung oder deren Folgen.
- Bitte bewahren Sie Bedienungsanleitung und Verpackung für spätere Verwendung auf.
Achtung:
Dieses Produkt ist mit diesem Symbol gekennzeichnet. Es bedeutet, dass die ausgedienten
elektrischen und elektronischen Produkte nicht mit dem allgemeinen Haushaltsmüll entsorgt
werden dürfen. Für diese Produkte stehen gesonderte Sammelsysteme zur Verfügung.

8
FRANÇAIS
Carillon de porte à connexion sans fil
1. Haut-parleur de haute qualité.
2. Trou de fixation.
3. Interrupteur d'option de sonnerie : sonnerie uniquement ou voyant lumineux clignotant uniquement,
ou une combinaison des deux.
4. Compartiment de pile.
5. Interrupteur de volume.
6. Interrupteur de sélection de mélodie.
7. Maintenez le bouton de code d'association avec le récepteur et enfoncez le bouton du récepteur
simultanément. Relâchez le bouton de code d'association dès que la sonnerie s'enclenche. Puis
relâchez le bouton de l'émetteur en conséquence. À l'aide de cette procédure, la configuration du
code d'association du carillon de porte est achevée.
8. Insérez l'onglet de fixation du couvercle supérieur dans la fente de la base.
9. Appuyez ici avec une main pour fixer le couvercle supérieur à la base.
10.Utilisez un petit tournevis et ouvrez avec précaution ce couvercle de la base de l'appareil.
Insérez une pile dans le compartiment de pile en respectant la polarité.
11. Utilisez un ruban adhésif double-face pour installer l'appareil à l'endroit désiré.
9
Spécifications :
EL-WDB301
* 36 mélodies au choix
* Fonctionnement par piles (3 x type AA et 1 x type V 23 GA)
* 100 mètres de portée
* Double conditionnement sous emballage-coque
* Voyant lumineux
* Émetteur étanche
EL-WDB401
* 36 mélodies au choix
* Fonctionnement par piles (2 x type AA et 1 x type CR 2032)
* 80 mètres de portée
* Double conditionnement sous emballage-coque
* Voyant lumineux
* Émetteur étanche
Instructions complémentaires
EL-WDB301
Suivez les instructions suivantes pour régler le canal de plusieurs sonneries du bouton sonnerie ou
pour définir un canal différent de celui de vos voisins.
Commencez par retirer le couvercle du compartiment à piles de l'unité principale et du bouton sonnerie.
Maintenez enfoncée le bouton sonnerie.
Maintenez appuyé le bouton sonnerie et retirez les piles de l'unité principale.
Maintenez appuyé le bouton sonnerie et retirez les piles du bouton sonnerie.

10
Maintenez appuyé le bouton sonnerie et réinsérez les piles dans l'unité principale.
Maintenez appuyé le bouton sonnerie et réinsérez les piles dans le bouton sonnerie.
Ainsi le canal de la sonnerie vient d’être modifié.
Consignes de sécurité :
Pour réduire le risque de choc électrique, ce produit ne doit
être ouvert que par un technicien qualifié si une réparation
s’impose. Débranchez l’appareil et les autres équipements
du secteur s’il y a un problème. Ne pas exposer l’appareil à
l’eau ni à l’humidité.
Entretien :
Ne nettoyez l’appareil qu’avec un chiffon sec. N’utilisez pas de solvants ou de produits abrasifs.
Garantie :
Aucune garantie ou responsabilité ne sera acceptée en cas de modification et/ou de transformation du
produit ou en cas de dommages provoqués par une utilisation incorrecte de l’appareil.
Généralités :
- Le design et les caractéristiques techniques sont sujets à modification sans notification préalable.
- Tous les logos de marques et noms de produits sont des marques déposées ou immatriculées dont
leurs détenteurs sont les propriétaires et sont donc reconnues comme telles dans ce documents.
- Ce manuel a été produit avec soin. Toutefois, aucun droit ne peut en dériver. König Electronic ne
peut être tenu responsable pour des erreurs de ce manuel ou de leurs conséquences.
- Conservez ce manuel et l’emballage pour toute référence ultérieure.
Attention :
Ce symbole figure sur l’appareil. Il signifie que les produits électriques et électroniques ne
doivent pas être jetés avec les déchets domestiques. Le système de collecte est différent pour
ce genre de produits.

11
NEDERLANDS
Draadloze deurbel
1. Hoge kwaliteit luidspreker.
2. Montagegat.
3. Beloptie-schakelaar: alleen bel of LED-flitser, of een combinatie van bel en flitser.
4. Batterijvak.
5. Volumeschakelaar.
6. Melodiekeuzeschakelaar.
7. Houd de codeafstemknop op de ontvanger ingedrukt en druk op hetzelfde moment op de knop op
de ontvanger. Laat de codeafstemknop los zodra de bel afgaat. Laat vervolgens
dienovereenkomstig de knop van de zender los. Hiermee is het afstemmen van de code van de
deurbelset voltooid.
8. Steek de bevestiginglip van de bovenafdekking in de sleuf van de basis.
9. Druk hier met de hand om de bovenafdekking op de basis te bevestigen.
10.Gebruik een kleine schroevendraaier en open zorgvuldig deze afdekking op het basisstation.
Plaats een batterij in het batterijvak met de juiste polariteit.
11.Gebruik de dubbelzijdige tape om de eenheid op de gewenste plaats te hechten.

12
Specificaties:
EL-WDB301
* 36 melodieën voor uw selectie
* Werkt op batterijen (3x AA en 1x V23GA)
* 100 meter bereik
* Dubbele blisterverpakking
* Indicatie-LED
* Waterdichte zender
EL-WDB401
* 36 melodieën voor uw selectie
* Werkt op batterijen (2x AA en 1x CR2032)
* 80 meter bereik
* Dubbele blisterverpakking
* Indicatie-LED
* Waterdichte zender
Aanvulling gebruiksaanwijzing
EL-WDB301
Om meerderen bellen op 1 knop te zetten of om de bel niet gelijk te laten gaan met uw buren dient u
de volgende handelingen uit te voeren.
Verwijder als eerste de achterplaat van de batterij compartiment van de hoofdunit als ook van de
beldrukker.
Druk de knop van de beldrukker in en hou deze ingedrukt.
Hou de bedrukker nog steeds ingedrukt en verwijder de batterijen van de hoofdunit.

13
Hou nog steeds de beldrukker ingedrukt en verwijder nu ook de batterij van de beldrukker.
Ook nu, hou nog steeds de beldrukker ingedrukt en plaats de batterijen terug in de hoofdunit.
Ook nu nog steeds de beldrukker ingedrukt houden plaats u de batterij terug in de beldrukker.
Nu is het kanaal van de set gewijzigd.
Veiligheidsvoorzorgsmaatregelen:
Om het risico op elektrische schokken te voorkomen mag dit
product ALLEEN worden geopend door een erkende
technicus wanneer er onderhoud nodig is. Koppel het
product los van de elektrische voeding en van andere
apparatuur als zich problemen voordoen. Stel het product
niet bloot aan water of vocht.
Onderhoud:
Uitsluitend reinigen met een droge doek. Gebruik geen reinigingsmiddelen of schuurmiddelen.
Garantie:
Voor wijzigingen en veranderingen aan het product of schade veroorzaakt door een verkeerd gebruik
van dit product, kan geen aansprakelijkheid worden geaccepteerd. Tevens vervalt daardoor de
garantie.
Algemeen:
- Wijziging van ontwerp en specificaties zonder voorafgaande mededeling onder voorbehoud.
- Alle logo’s, merken en productnamen zijn handelsmerken of geregistreerde handelsmerken van de
respectievelijke eigenaren en worden hierbij als zodanig erkend.
- Deze handleiding is met zorg samengesteld. Er kunnen echter geen rechten aan worden ontleend.
König Electronic kan geen aansprakelijkheid aanvaarden voor eventuele fouten in deze handleiding
of de gevolgen daarvan.
- Bewaar deze gebruiksaanwijzing voor latere raadpleging.
Let op:
Dit product is voorzien van dit symbool. Dit symbool geeft aan dat afgedankte elektrische en
elektronische producten niet met het gewone huisafval verwijderd mogen worden. Voor dit
soort producten zijn er speciale inzamelingspunten.

14
ITALIANO
Campanello wireless
1. Altoparlante ad alta qualità.
2. Foro di montaggio.
3. Interruttore di selezione suoneria: solo suono, o solo lampeggiante LED, o combinazione di
suoneria e lampeggiante.
4. Compartimento batteria.
5. Selettore volume.
6. Selettore selezione tono.
7. Tenere il pulsante di accoppiamento codice sul ricevitore e premere il pulsante sul ricevitore
contemporaneamente. Rilasciare il pulsante di accoppiamento codice non appena il campanello
suona. Quindi di conseguenza rilasciare anche il pulsante del trasmettitore. Con ciò,
l'accoppiamento del codice campanello è settato e completato.
8. Inserire la placca di bloccaggio del coperchio superiore nell'incastro della base.
9. Premere qui con la mano per fissare il coperchio superiore sulla base.
10.Utilizzare un piccolo cacciavite e con attenzione aprire questo coperchio sulla base.
Inserire una batteria nell'alloggiamento batteria con la corretta polarità.
11. Utilizzare il nastro bi-adesivo per attaccare l'unità nel posto desiderato.
15
Caratteristiche:
EL-WDB301
* 36 melodie a vostra scelta
* Funzionamento a batteria (3xAA e 1xV23GA)
* 100 metri di portata
* Confezione a doppio blister
* Luce di indicazione
* Trasmettitore a prova d'acqua
EL-WDB401
* 36 melodie a vostra scelta
* Funzionamento a batteria (2xAA and 1xCR2032)
* 80 metri di portata
* Confezione a doppio blister
* Luce di indicazione
* Trasmettitore a prova d'acqua
Istruzioni supplementari
EL-WDB301
Seguire i passi sotto riportati per impostare il canale di molti campanelli al pulsante del campanello 1 o
per impostare un canale differente rispetto a quello dei vostri vicini.
Come prima cosa rimuovere la placca posteriore del comparto batteria dell'unità principale e del
pulsante campanello.
Premere e tener premuto il pulsante.
Continuare a premere il pulsante campanello e rimuovere le batterie dall'unità principale.

16
Continuare a premere il campanello ed ora rimuovere anche le batterie dal pulsante campanello.
Continuare a premere il pulsante campanello ed inserire le batterie nell'unità principale.
Continuare a premere il pulsante campanello ed inserire le batterie nel pulsante campanello.
Ora il canale del campanello è stato modificato.
Precauzioni di sicurezza:
Per ridurre il rischio di shock elettrico, questo prodotto
dovrebbe essere aperto SOLO da un tecnico autorizzato
quando è necessario ripararlo. Scollegare il prodotto
dall’alimentazione e da altri apparecchi se dovesse esserci
un problema. Non esporre il prodotto ad acqua o umidità.
Manutenzione:
Pulire solo con un panno asciutto. Non utilizzare solventi detergenti o abrasivi.
Garanzia:
Non sarà accettata alcuna garanzia o responsabilità in relazione a cambiamenti e modifiche del
prodotto o a danni determinati dall’uso non corretto del prodotto stesso.
Generalità:
- Il design e le caratteristiche tecniche sono soggetti a modifica senza necessità di preavviso.
- Tutti i marchi a logo e i nomi di prodotto sono marchi commerciali o registrati dei rispettivi titolari e
sono riconosciuti come tali in questo documento.
- Questo manuale è stato redatto con cura. Tuttavia da esse non possono essere avanzati diritti.
König Electronic non può accettare responsabilità per errori in questo manuale nè per eventuali
conseguenze.
- Tenere questo manuale e la confezione per riferimento futuro.
Attenzione:
Il prodotto è contrassegnato con questo simbolo, con il quale si indica che i prodotti elettrici ed
elettronici non devono essere gettati insieme ai rifiuti domestici. Per questi prodotti esiste un
sistema di raccolta differenziata.

17
ESPAÑOL
Timbre de puerta inalámbrico
1. Altavoz de alta calidad.
2. Orificio de montaje.
3. Interruptor de opción de timbre: solo timbre, solo flash LED o combinación de timbre y flash.
4. Compartimento de pilas.
5. Control de volumen.
6. Interruptor de selección de melodía.
7. Pulse el botón de vínculo de código en el receptor y el botón del transmisor al mismo tiempo.
Suelte el botón de vínculo de código cuando suene el timbre. A continuación, suelte el botón del
transmisor. De este modo se completa el vínculo de código del timbre de puerta.
8. Inserte la pestaña de cierre de la tapa superior en la ranura de la base.
9. Presione manualmente para fijar la tapa superior a la base.
10.Utilice un destornillador pequeño y abra con cuidado esta tapa en la unidad base.
Introduzca una pila en el compartimento de pilas con la polaridad correcta.
11. Use la cinta adhesiva doble para fijar la unidad en el lugar deseado.

18
Especificaciones:
EL-WDB301
* 36 melodías entre las que escoger
* Funcionamiento con pilas (3 x AA y 1 x V23GA)
* Alcance de 100 m
* Embalaje de blíster doble
* Luz indicadora
* Transmisor a prueba de agua
EL-WDB401
* 36 melodías entre las que escoger
* Funcionamiento con pilas (2 x AA y 1 x CR2032)
* Alcance de 80 m
* Embalaje de blíster doble
* Luz indicadora
* Transmisor a prueba de agua
Instrucciones complementarias
EL-WDB301
Siga los pasos que se detallan abajo para establecer el canal de varios timbres en 1 botón de timbre o
para fijar un canal diferente del de sus vecinos.
Retire primero la placa posterior del compartimento de las pilas de la unidad principal y del botón del
timbre.
Pulse y mantega pulsado el botón del timbre.
Siga pulsando el botón del timbre y retire las pilas de la unidad principal.

19
Siga pulsando el botón del timbre y ahora retire asimismo las pilas del botón del timbre.
Siga pulsando el botón del timbre y vuelva a insertar las pilas en la unidad principal.
Siga pulsando el botón del timbre y vuelva a insertar las pilas en el botón del timbre.
Ahora, ha modificado el canal del timbre.
Medidas de seguridad:
Para reducir el peligro de descarga eléctrica, este producto
SÓLO lo debería abrir un técnico autorizado cuando
necesite reparación. Desconecte el producto de la toma de
corriente y de los otros equipos si ocurriera algún problema.
No exponga el producto al agua ni a la humedad.
Mantenimiento:
Límpielo sólo con un paño seco. No utilice disolventes de limpieza ni productos abrasivos.
Garantía:
No se aceptará ninguna garantía o responsabilidad derivada de cualquier cambio o modificaciones
realizadas al producto o daños provocados por un uso incorrecto del producto.
General:
- Las ilustraciones y las especificaciones podrán sufrir cambios sin previo aviso.
- Todas las marcas de logotipos y nombres de productos constituyen patentes o marcas registradas a
nombre de sus titulares correspondientes, reconocidos como tal.
- Este manual se ha redactado con sumo cuidado. Aún así, no se ofrece ninguna garantía. König
Electronic no será responsable de los errores de este manual o de las consecuencias derivadas de
los mismos.
- Conserve este manual y el embalaje en caso de futura necesidad.
Atención:
Este producto está señalizado con este símbolo. Esto significa que los productos eléctricos y
electrónicos usados no deberán mezclarse con los desechos domésticos generales. Existe un
sistema de recogida individual para este tipo de productos.

20
MAGYAR
Vezeték nélküli ajtócsengő
1. Kiváló minőségűhangszóró.
2. Felerősítőfurat.
3. Jelzésbeállító kapcsoló: csak csengetés, csak LED villogtatás, vagy mindkettő.
4. Teleptartó.
5. Hangerőszabályzó.
6. Hangolásválasztó kapcsoló.
7. Tartsa nyomva a vevőkódillesztőgombját és egyidejűleg nyomja meg a vevőnyomógombját.
A csengőhang megszólalásakor engedje el a kódillesztőgombot. Utána engedje el az adó gombját
is. Ezzel befejeződött az ajtócsengőkódillesztése.
8. Illessze a felsőburkolat rögzítőfülét a talp kivágásába.
9. Itt nyomja meg kézzel, hogy a felsőburkolat a talpra pattanjon.
10.Kis csavarhúzóval óvatosan nyissa ki a talpnak ezt a fedelét.
Helyezze az elemet a teleptartóba, ügyelve a helyes polaritásra.
11. A mindkét oldalán tapadó szalaggal erősítse az egységet a kívánt helyre.
This manual suits for next models
1
Table of contents
Languages:
Other Konig Accessories manuals


