Korg HDIK-2 User manual

1
HDIK-2
Pa3X HD Installation Kit
Thank you for purchasing the Hard Disk Installation Kit for the Korg Pa3X Professional
Arranger! This kit allows you to install a standard internal 2.5” SATA hard disk drive in your
Pa3X. The hard disk drive is not supplied with the kit, so you should purchase it separately.
Warning: Korg is not responsible for any damage or injury caused by incorrect installation of
this kit.
Félicitations et merci d'avoir acheté le kit d'installation du disque dur pour Korg Pa3X Professio-
nal Arranger. Ce kit permet d'installer dans le Pa3X un disque dur SATA de 2,5 pouce. Le disque
dur n'est pas fourni dans le kit, il faut l'acheter séparément. Attention : Korg décline toutes res-
ponsabilités envers des dommages aux personnes et aux choses provoqués par l'installation du kit.
Vielen Dank dafür, dass Sie sich für den Bausatz zur Installation einer Festplatte in Ihrem Korg Pa3X Professional Arranger ent-
schieden haben. Hiermit können Sie eine 2,5" SATA-Festplatte in das Pa3X einbauen. Die Festplatte wird ohne Einbausatz
geliefert; dieser muss separat gekauft werden. Achtung: Korg übernimmt keine Haftung für Sach- oder Personenschäden bei
Installation des Bausatzes durch nicht autorisierte Personen.
Grazie per avere acquistato il kit di installazione dell’hard disk per il Korg Pa3X Professional Arranger. Questo kit permette di instal-
lare nel Pa3X un hard disk interno SATA da 2,5”. L’hard disk non è fornito con il kit, e va acquistato a parte. Attenzione: Korg non
si assume responsabilità per danni a cose o persone causati dall’installazione del kit da parte di personale non autorizzato.
LIST OF PARTS / CONTENU DE L’EMBALLAGE / LIEFERUMFANG / ELENCO DELLE PARTI
Before beginning with the installation, be sure to have all the parts listed in the following table. You also need a cross-point
screwdriver (not supplied).
Avant de procéder à l'installation, vérifier de posséder tous les éléments listés ci-dessous. Pour le montage, il faut disposer d'un tour-
nevis à lame cruciforme.
Versichern Sie sich vor Beginn der Installation, dass alle nachfolgend aufgeführten Teile vorhanden sind. Für die Montage ist ein
Kreuzschlitzschraubenzieher erforderlich.
Prima di iniziare l’installazione, assicuratevi di essere in possesso delle parti elencate di seguito. Per il montaggio è richiesto un cac-
ciavite a croce.
PRECAUTIONS / PRÉCAUTIONS / VORSICHTSMAßNAHMEN / PRECAUZIONI
• Installation of the kit is done at the user’s own risk. Korg will assume no responsibility for any damage or injury resulting from
its improper installation or use.
• Be sure to disconnect the instrument from the AC plug, before opening it.
• To prevent your body’s static electricity from damaging the board’s components, touch an unpainted metallic component
before proceeding with the installation.
• L’installation du kit est effectuée aux risques et périls de l’utilisateur. Korg décline toute responsabilité pour tout dommage ou bles-
sure résultant d’une mauvaise installation ou utilisation.
• Débranchez l’instrument de la prise de courant avant de l’ouvrir.
• Pour éviter que l’électricité statique de votre corps n’endommage les composants des circuits, touchez un composant métallique non
peint avant d’effectuer l’installation.
• Der Einbau des Sockels geschieht auf eigenes Risiko. Korg haftet nicht für Schäden oder Verletzungen, die sich aus einem
unsachgemäßen Einbau bzw. einer falschen Bedienung ergeben.
• Lösen Sie vor dem Öffnen des Gehäuses unbedingt den Netzanschluss.
• Um zu verhindern, dass statische Entladungen Ihres Körpers die Komponenten beschädigen, müssen Sie vor dem Einbau einen
Metallgegenstand berühren.
• L’utente si assume l’intero rischio per l’installazione del kit di montaggio. Korg non potrà essere in alcun caso ritenuta responsabile
per qualsiasi danno a cose o persone derivante da un non corretto uso del kit o dalla sua errata installazione.
a HDD interface Interface HDD HDD-Schnittstelle Interfaccia HDD ×1
b HDD support Fixation pour disque dur Festplattensockel Supporto HDD ×1
c M3x6 TC screws Vis M3x6 TC M3x6 TC-Schrauben Viti M3x6 TC ×6
m M3x4 TC screws Vis M3x4 TC M3x4 TC-Schrauben Viti M3x4 TC ×2

2
• Assicuratevi di staccare lo strumento dalla presa di corrente elettrica prima di aprirlo.
• Per prevenire danni ai componenti interni da parte dell’elettricità statica naturalmente presente nel corpo umano, toccate un com-
ponente metallico non verniciato prima di procedere con la sostituzione.
BACKUP / ARCHIVAGE DES DONNÉES / DATENARCHIVIERUNG / COPIA DI SICUREZZA
Before installing or replacing the hard disk, please bakup or save your User data to an USB storage device. If you do not know
how to do, please read the relevant instructions contained in the “Media” chapter of the User’s Manual.
Avant d’installer ou de remplacer le disque dur, songez à archiver vos données utilisateur sur un support USB. Si vous avez des doutes
quant à la façon de vous y prendre, voyez le chapitre “Media” dans le mode d’emploi.
Vor dem Einbau bzw. dem Austauschen der Festplatte sollten Sie alle Anwenderdaten auf einem USB-Datenträger archivieren.
Im Kapitel “Media” der Bedienungsanleitung wird erklärt, wie man das macht.
Prima di installare o sostituire l’hard disk, eseguite il backup o salvate i dati User in un dispositivo di memorizzazione USB. Se non
sapete come eseguire queste operazioni, vi preghiamo di consultare il capitolo “Media” del Manuale di istruzioni.
3
INSTALLATION / INSTALLATION / INSTALLATION / INSTALLAZIONE
1. Extract the hard disk kit from its package, being careful not to
touch any component on its surface with your fingers.
Retirez le disque dur de son emballage en veillant à ne tou-
cher aucun composant de sa surface avec les doigts.
Packen Sie den Sockel aus, aber berühren Sie auf keinen
Fall die Leiterplatte bzw. die darauf befindlichen Kompo-
nenten.
Estraete il kit dell’hard disk dalla confezione, prestando
attenzione a non toccare alcun componente della superficie
con le dita.
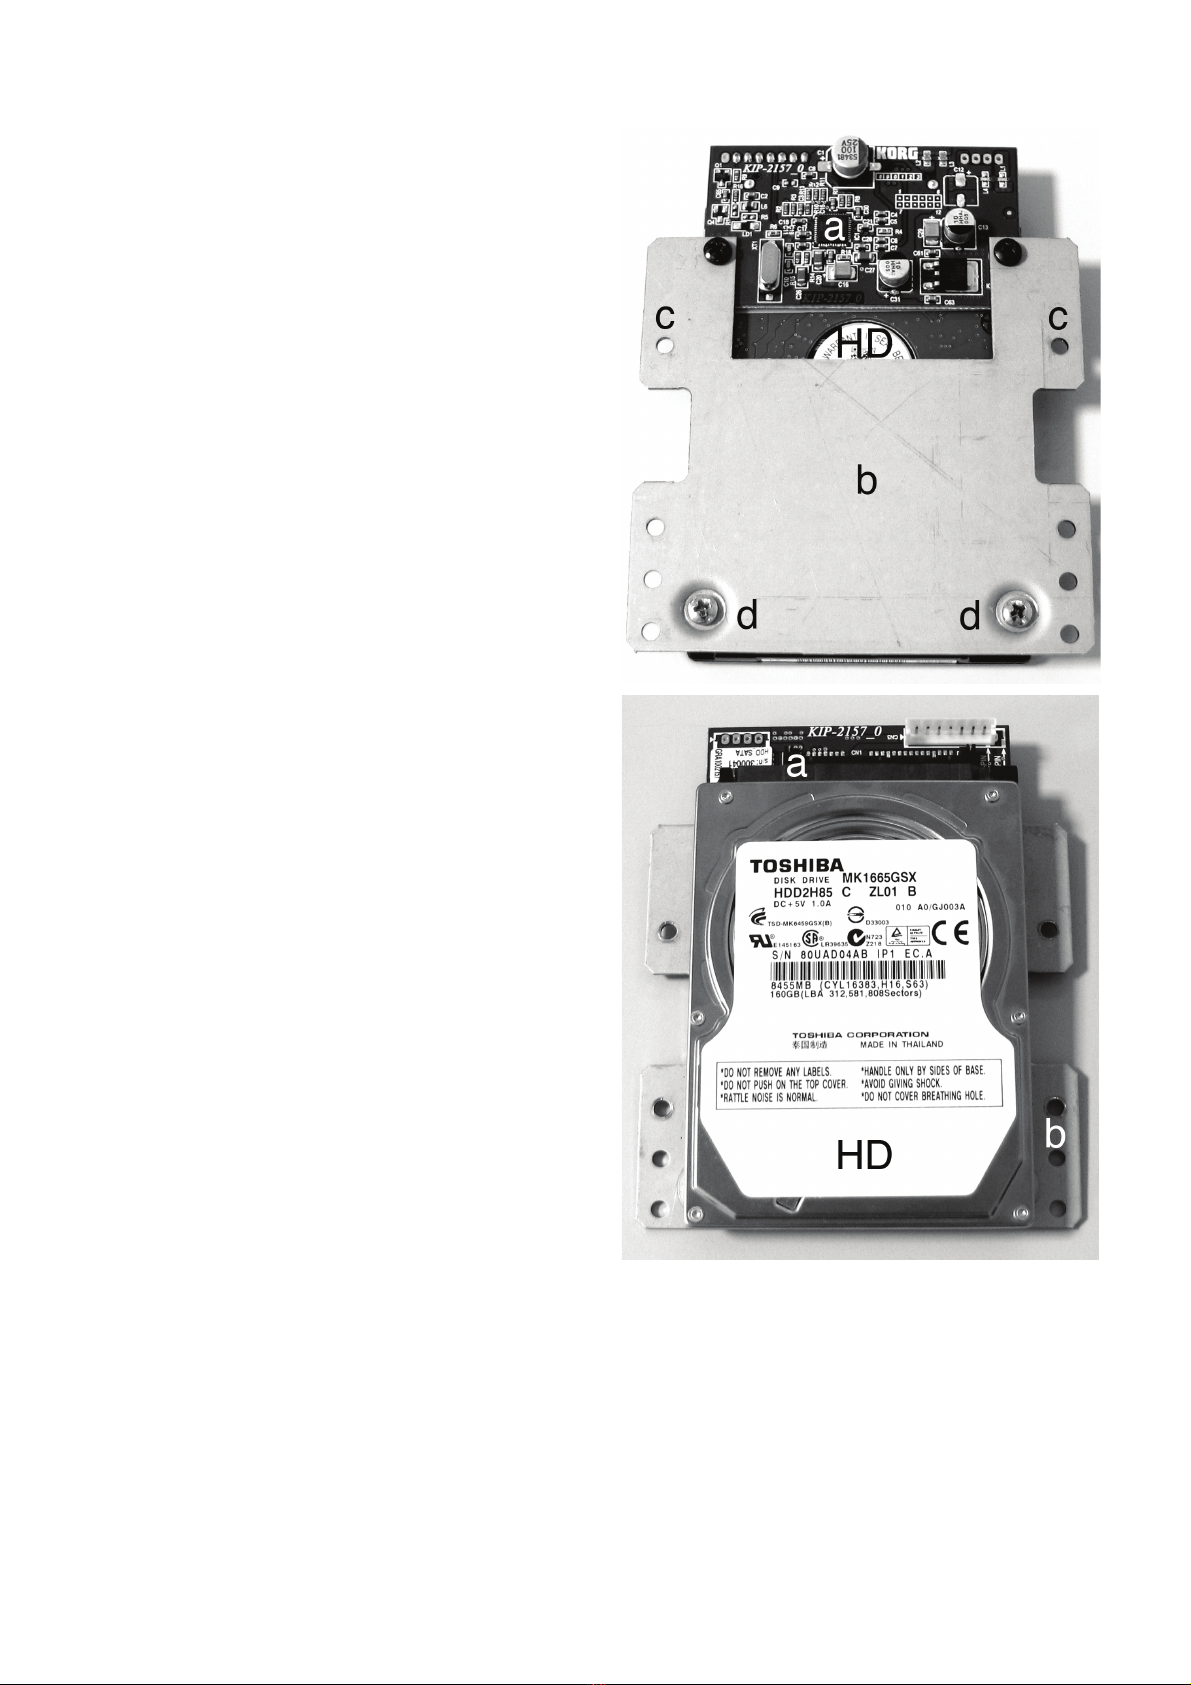
2. Use two screws (c) each to attach the hard disk (not supplied
with the kit) to the interface board (a) and the metal support
(b), as shown in the illustration. Use the two screws (d) to
secure the hard disk to the support (b).
Utilisez 2 vis (c) pour fixer le disque dur (non fourni avec le
kit) à la carte d’interface (a) et à la fixation métallique (b).
Voyez l’illustration. Utilisez les deux vis (d) pour attacher le
disque dur à la fixation (b).
Befestigen Sie die Festplatte (Sonderzubehör) mit Hilfe von
2 Schrauben (c) an der Schnittstellenplatine (a) und dem
Metallsockel (b). Siehe Abbildung. Verwenden Sie die
Schrauben (d) zum Befestigen der Festplatte am Sockel (b).
Utilizzate due coppie di viti (c) per unire l’hard disk (non for-
nito insieme al kit) alla scheda di interfaccia (a) e al supporto
in metallo (b), come mostrato in figura. Utilizzate due viti
(d) per assicurare l’hard disk al supporto (b).

4
3. From the bottom of the instrument, remove the six fixing
screws (e) and the three flat head fixing screws (f), and keep
them apart. Open the cover (g) to gain access to the inside of
the video board compartment, and keep the cover apart.
Sur le dessous de l’instrument, retirez les six vis de fixation (e)
et les trois vis de fixation à tête plate (f) et mettez-les de côté.
Ouvrez le couvercle (g) pour accéder à l’intérieur du compar-
timent de la carte vidéo et conservez le couvercle.
Entfernen Sie die 6 Schrauben (e) sowie die 3 Flachkopf-
schrauben (f) an der Unterseite des Instruments und
bewahren Sie sie an einem sicheren Ort auf. Öffnen Sie die
Blende (g), um Zugang zum Fach zu bekommen, indem
auch die Videoplatine eingebaut werden kann. Bewahren
Sie die Blende an einem sicheren Ort.
Sul fondo dello strumento, rimuovete le sei viti di tenuta (e) e
le tre viti a testa piatta (f), e conservatele da parte. Rimuovete
e tenete da parte la parte la placca di copertura (g) per accedere
al vano della scheda video.
4. Disconnect the USB key (h) from the cable (i), and remove the
board (h) by unscrewing the two fixing screws (j).
Débranchez le câble (i) du dispositif de mémoire USB. Dévis-
sez les deux vis de fixation (j) et retirez la carte du dispositif
de mémoire (h).
Lösen Sie die Verbindung des Kabels (i) mit dem USB-
Datenträger. Lösen Sie die beiden Schrauben (j) und entfer-
nen Sie die Datenträgerplatine (h).
Scollegate la chiave USB (h) dal cavo (i), e rimuovete la
scheda (h) togliendo le due viti di tenuta (j).
5. Place the previously assembled hard drive over the four dedi-
cated spacers inside the instrument (the drive can only be
installed in a way). Fix it with the last four screws (c) found in
the installation kit. Connect the hard drive to the cable (i) you
previously disconnected from the USB key.
Installez le kit (sur lequel le disque dur a été monté au préa-
lable) sur les 4 pieds situés dans l’instrument (le kit ne peut
être installé que dans un sens). Fixez le kit avec les 4 dernières
vis (c) fournies avec le kit d’installation. Branchez le câble (i)
(que vous avez débranché du dispositif de mémoire USB) au
disque dur.
Legen Sie den Festplattensockel (mitsamt der installierten
Festplatte) auf die 4 Abstandhülsen im Instrument (der
Sockel kann nur in einer Richtung installiert werden).
Befestigen Sie den Sockel mit den 4 beiliegenden Schrau-
ben (c). Schließen Sie das zuvor gelöste Kabel (i) (das Sie
vom USB-Datenträger entfernt haben) an die Festplatte an.
Posizionate l’hard drive precedentemente assemblato sopra i quattro spaziatori dedicati all’interno dello strumento (il drive può
essere orientato solo in un verso). Fissatelo con le ultime quattro viti (c) incluse con il kit di montaggio. Collegate l’hard drive al
cavo (i) precedentemente scollegato dalla chiave USB.

5
6. Place the cover (g) to close the instrument, being careful not to
damage the cable, by following in reversal the opening instruc-
tions.
Replacez le couvercle (g) sur l’instrument en veillant à ne pas
endommager le câble. Inversez les opérations effectuées pour
l’ouvrir.
Bringen Sie die Blende (g) wieder behutsam am Instrument
an. Achten Sie beim Festschrauben darauf, dass sie auf kei-
nen Fall das Kabel abklemmt und beschädigt.
Prestando attenzione a non danneggiare il cavo, ricollocate in
sede la placca di copertura (g) per chiudere il vano, eseguendo
al contrario la procedura descritta per la rimozione.
7. When the installation is finished, please connect the power
cord, and turn the instrument on again. You must now format
the hard disk, before accessing it for data storage.
Branchez le câble d’alimentation à l’instrument et mettez ce dernier sous tension. Le disque dur installé doit être formaté avant
de pouvoir être utilisé.
Schließen Sie das Netzkabel wieder an das Instrument an und schalten Sie dieses ein. Die soeben installierte Festplatte muss
jetzt zuerst formatiert werden.
Al termine dell’installazione, ricollegate il cavo di alimentazione elettrica e accendete lo strumento. Prima di poter utilizzare
l’hard disk, sarà necessario formattarlo.
Other Korg Recording Equipment manuals

Korg
Korg SDD-1200 User manual

Korg
Korg mr-2 User manual

Korg
Korg EASYSTART D1600MKII User manual

Korg
Korg SQ-10 User manual

Korg
Korg PXR4 Errata User manual

Korg
Korg MR-1000 General instructions

Korg
Korg EasyStart K Series Product information sheet

Korg
Korg PA4X User manual

Korg
Korg Pandora PX5D Product information sheet

Korg
Korg nanoKey User manual

Korg
Korg KONTROL49 User manual

Korg
Korg K25 User manual

Korg
Korg Toneworks AX10A User manual

Korg
Korg KAOSS PAD KP3 Product information sheet

Korg
Korg Trinity series User manual

Korg
Korg DRV-1000 User manual

Korg
Korg Pandora PX2 User manual

Korg
Korg A5 Guitar User manual

Korg
Korg KONTROL49 User manual

Korg
Korg Karma User manual


