Koros Wargames KD-HS-MD-P-001W User manual

© 2020 Koros Wargames LLC
All Rights Reserved
Page 1
Assembly Instructions
Medieval: Stable
P/N: KD-HS-MD-P-001W

© 2020 Koros Wargames LLC
All Rights Reserved
Page 2
Thank you for purchasing this product. This building is ideal for use in any Historical or Fantasy Medieval city, town,
or village setting. We hope you enjoy assembling and customizing the Medieval Stable model kit and spend
countless hours gaming with the piece.
Skill Level: Intermediate
Items Required for Assembly:
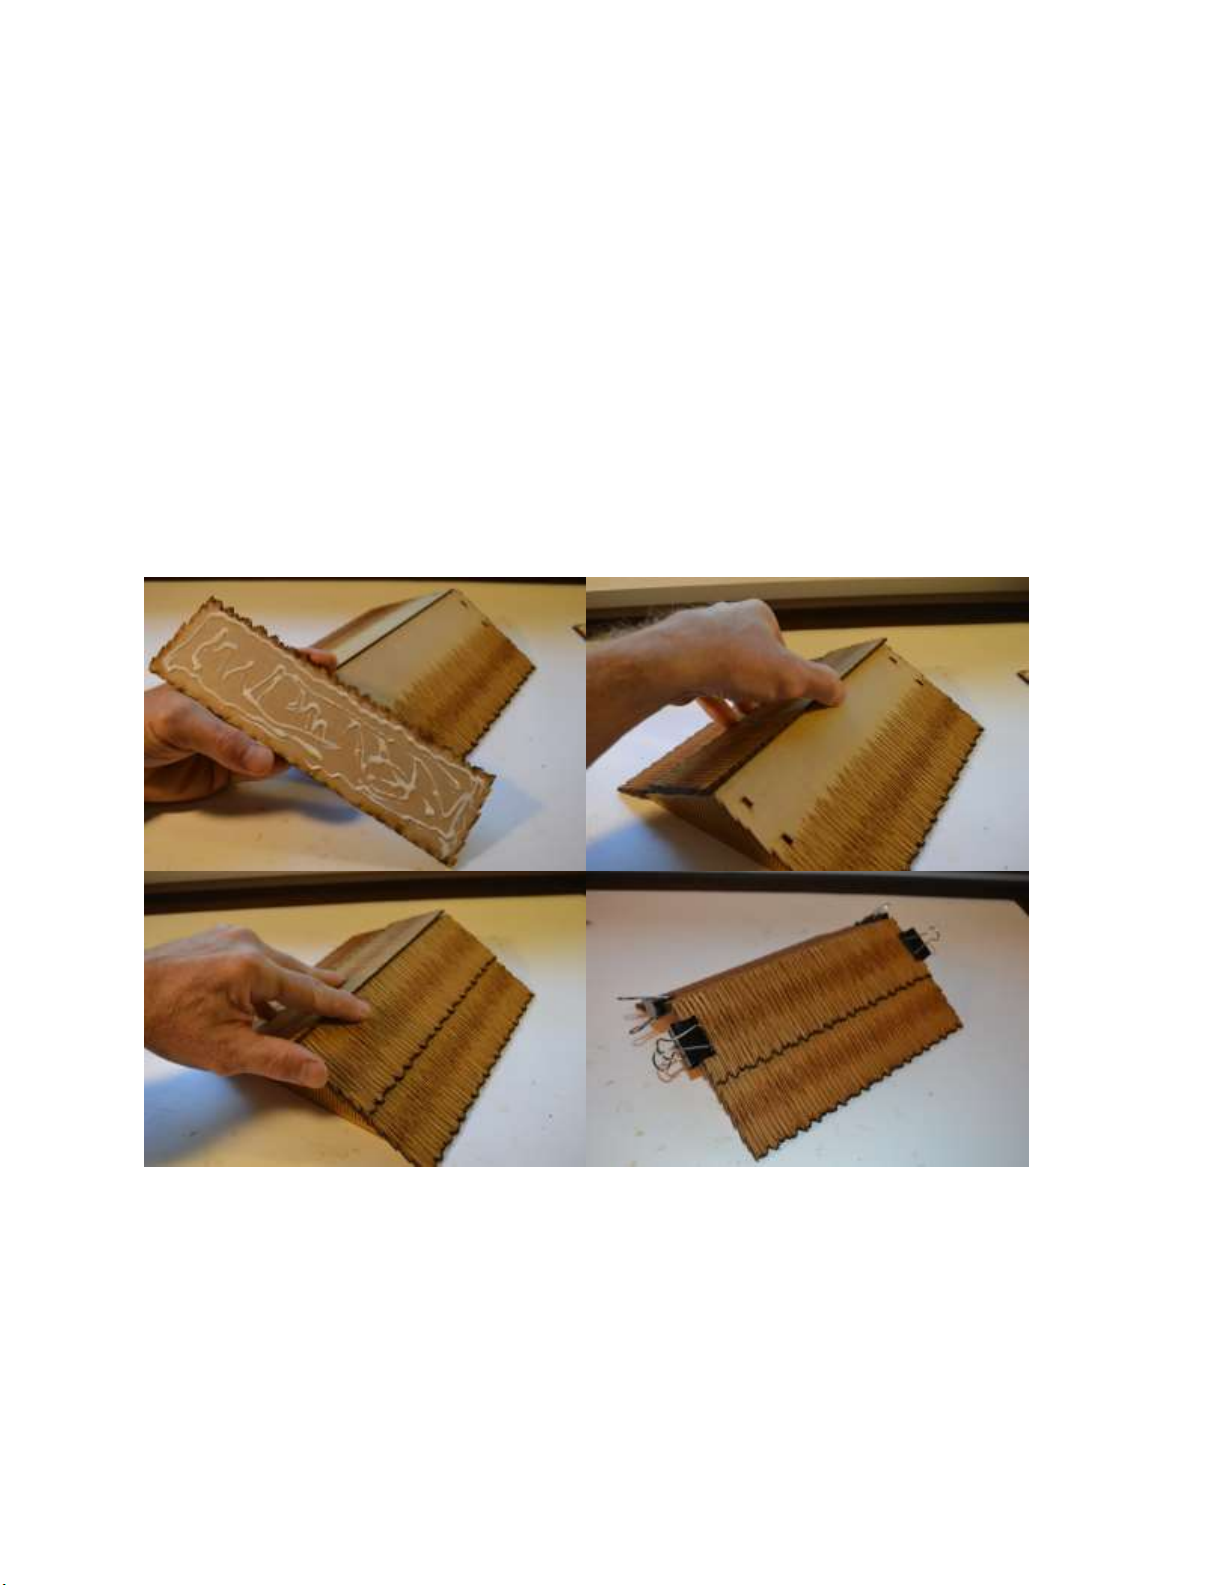
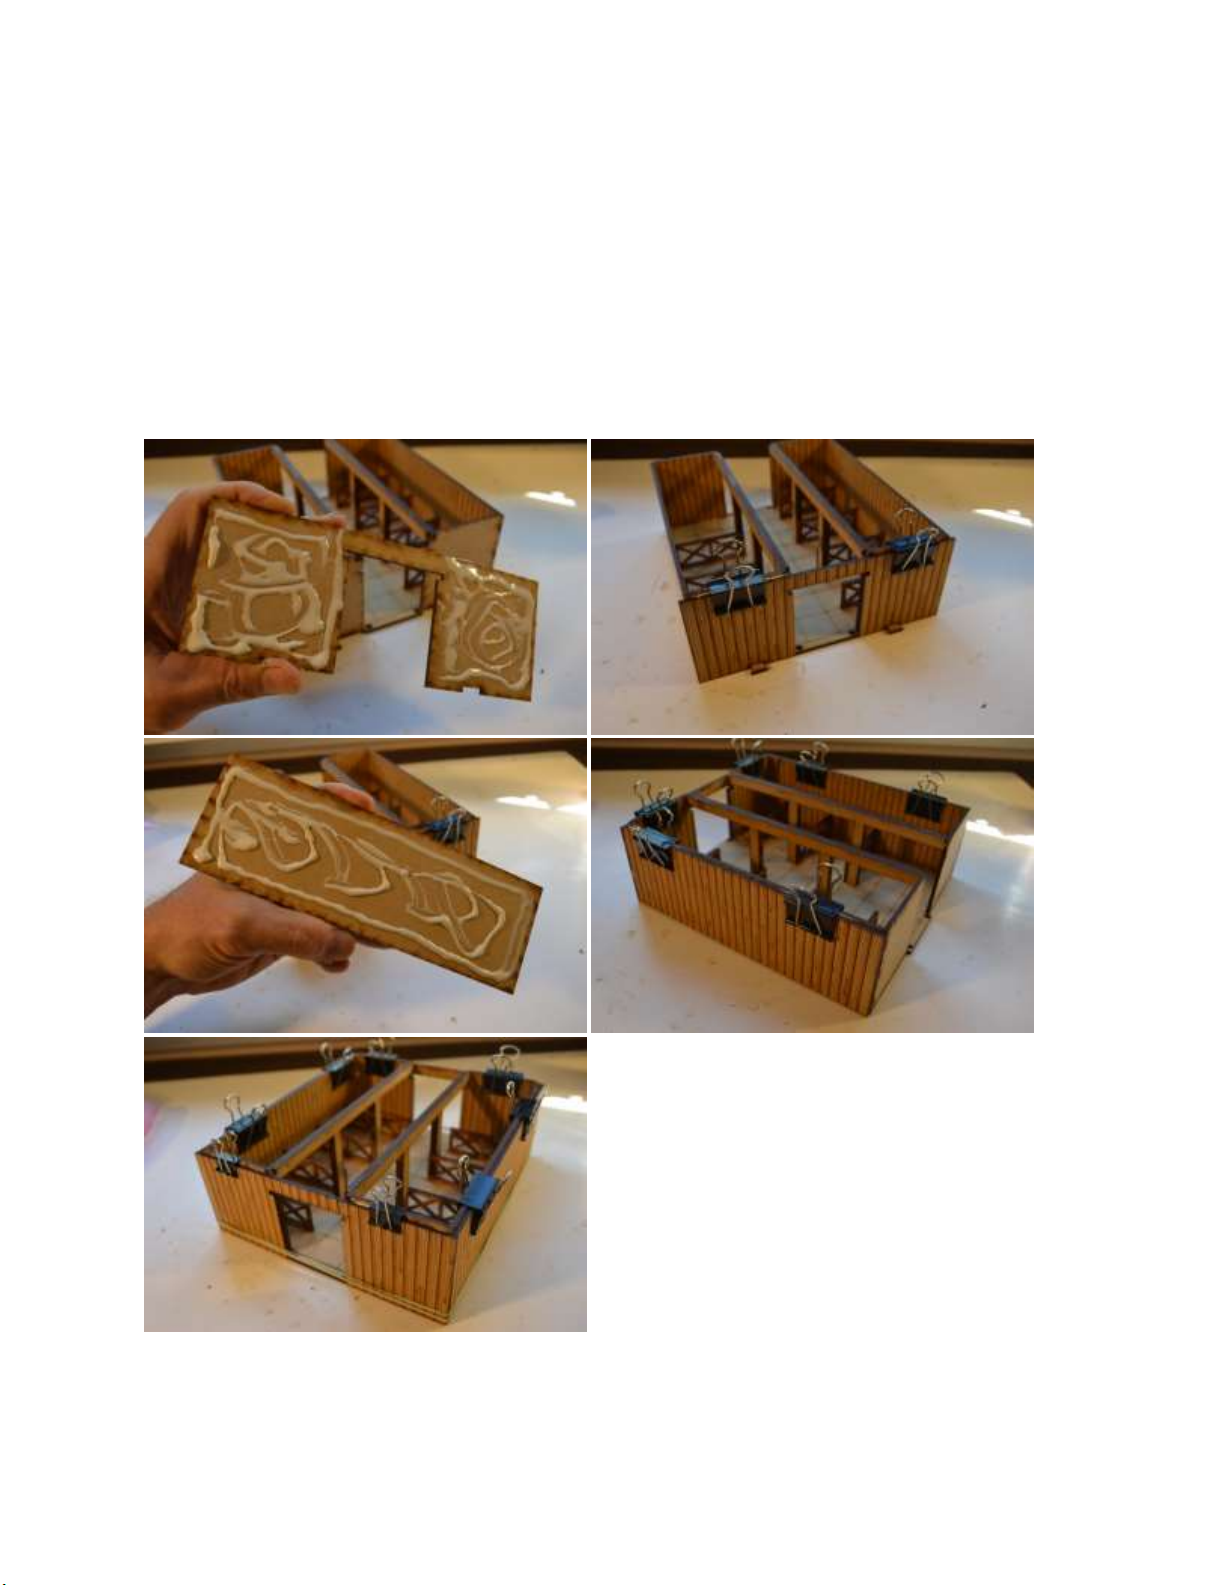
-Glue (We use fast drying wood glues, but note that there are many different glues on the market.)
Optional (Recommended):
-Several clamps/cloth pins/rubber bands
-Paper towel
-If painting the model, colored spray primer, desired acrylic paint colors, brushes, and clear flat or matte
spray lacquer for under and over coating finish.
-For painting ideas, please see our website gallery pictures.
Cautions:
-This model contains small parts, keep away from small children.
-All our models are designed for miniature enthusiasts and collectors, they are not toys.
-For ages 14+
-MDF is a pressed wood material; do not submerge in water as this will cause damage to the product.
-Avoid excessive moist environments.
Cleaning & Storage:
-Occasionally wipe with a slightly dampened cloth
-Store your building in a cool, dry location.
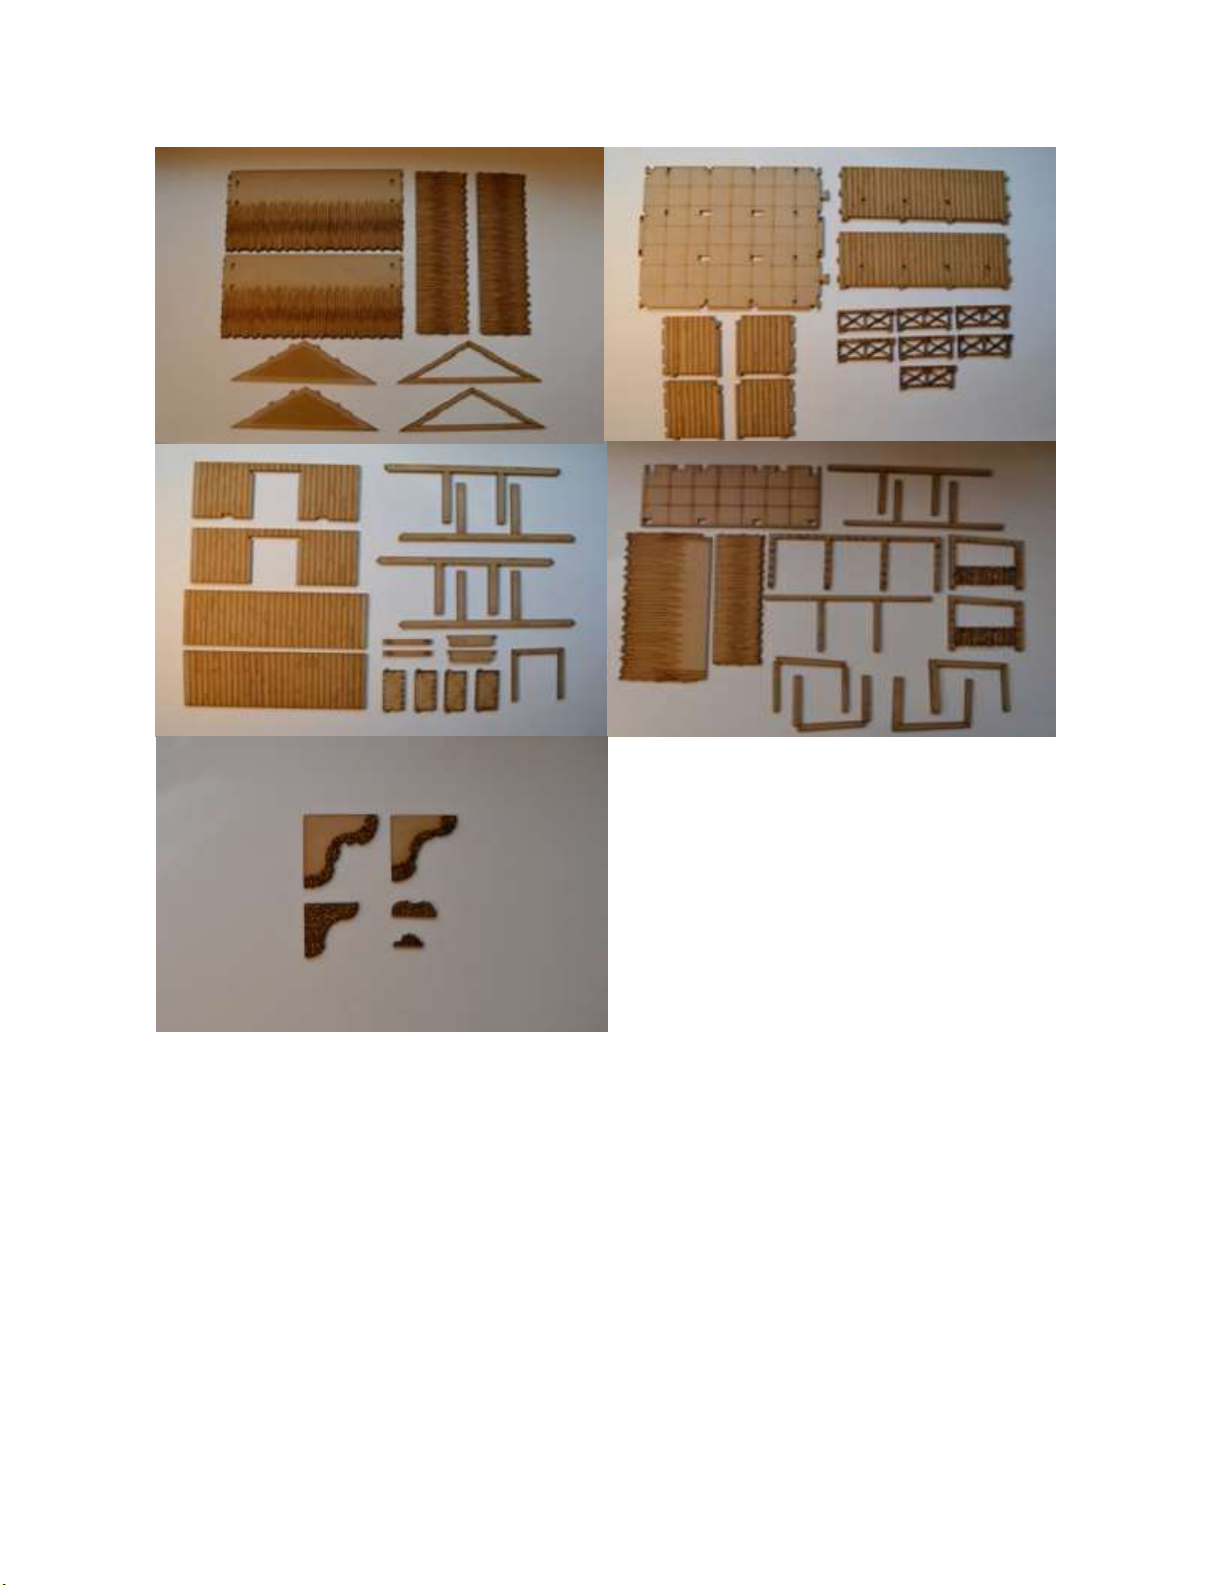
Pre-assembly:
Organize the model pieces in group and familiarize yourself with their purpose. A description of all the parts
included in your kit is on the next page.
*** If you are painting your model, we recommend that you first apply a clear flat/matte clear lacquer, then
follow by a spray primer (color of your choice) to all your pieces prior to assembly. This helps seal the porous
surface of the MDF and will provide a consistent surface to apply your paints.
Tips:
-Wipe off excessive glue
-If you can put a clamp on it or a rubber band to hold parts in place while glue bonds, do it.
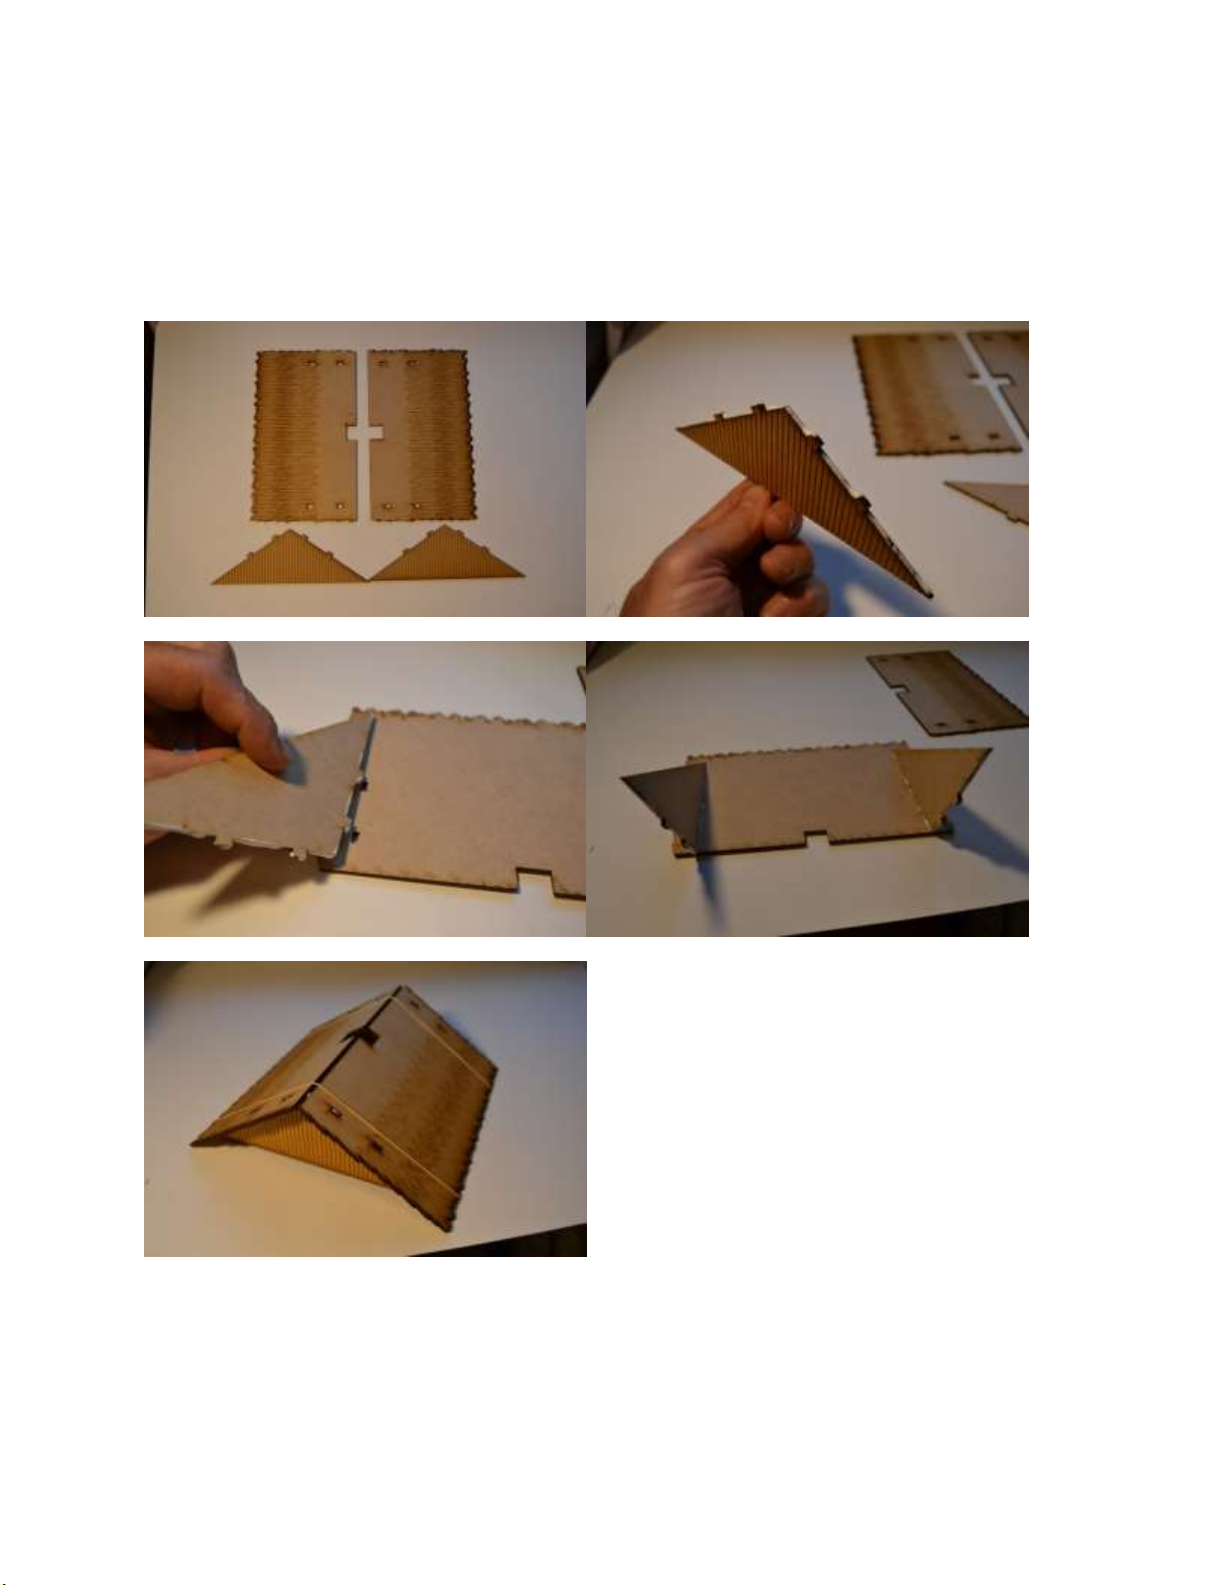
-Do a walkthrough of the assembly without gluing to get familiar with the way the connections and
pieces fit.

© 2020 Koros Wargames LLC
All Rights Reserved
Page 3
1
3
2
5
4
6
8
7
9
10
11
12
19
17
16
14
13
15
18
1 –Main Roof Panels
2 –Upper Roof Top Overlay
3 –Upper Roof Overlay
4 –Gable
5 –Gable Overlay
6 –Floor Panel
7 –Inner Side Wall Panel A
8 –Inner Side Wall Panel B
9 –Inner Short Wall Panels
10 –Corral Fences
11 –Outer Front Wall Panel
12 –Outer Rear Wall Panel
13 –Outer Side Wall Panels
14 –Inner Cross Beams
15 –Outer Cross Beams
16 –Upper Door Hinge
17 –Doorway Header Panels
18 –Doors
19 –Outer Rear Door Frame
20 –Outer Floor Panel
21 –Shelter Main Roof Panel
22 –Shelter Roof Overlay
23a –Shelter Front Roof Support A
23b –Shelter Front Roof Support B
24 –Shelter Rear Roof Support A
25 –Shelter Rear Roof Support B
26 –Shelter Middle Side Panels
27 –Shelter Inner Side Panels
28 –Shelter Outer Side Panels
29 –Haystack Bottom
30 –Haystack 2nd Tier
31 –Haystack 3rd Tier
32 –Haystack 4th Tier
33 –Haystack 5th Tier
20
21
22
23a
24
25
26
27
28
29
30
31
32
33
23b

© 2020 Koros Wargames LLC
All Rights Reserved
Page 4
Step 1: Start assembling the roof (parts 1 (x2), 4 (x2)). Apply glue to the roof
gable ends on the 4 edges that have the tabs. Insert Gable tabs into Main roof
panels to form the main roof structure. If needed, use rubber bands to help hold
the structure together while the glue takes hold. Set aside.

© 2020 Koros Wargames LLC
All Rights Reserved
Page 5
Step 2: Retrieve the two roof overlays (parts 2 and 3). Notice that the upper roof
top overlay, part #2 has a series of rounded bumps along the peak edge; the other
overlay peak edge is completely flat. This bumpy piece will set over the other
overlay at the peak.
Apply glue to the unfinished side of the upper roof top overlay #2. Attach to the
main roof with the bumpy edge about 1/8” over the peak. Now, apply glue to
overlay #3 and attach to the opposite side of the roof. Make sure that both
overlays are butted against each other at the peak and that #2 is about 1/16”
beyond the peak. To have a much stronger and consistent glue bond, place
clamps to hold the pieces in place.

© 2020 Koros Wargames LLC
All Rights Reserved
Page 6
Step 3: Placement of the Gable overlays (parts 5 (x2)). Apply glue to the
unfinished side of a gable overlay and place on the gable that is on the roof
assembly. Repeat this step for the other Gable Overlay. Clamp to improve the
bonding of the glue.
The main roof is now complete.

© 2020 Koros Wargames LLC
All Rights Reserved
Page 7
Step 4: Interior Walls and floor assembly. Begin with the floor panel (part 6) and
the interior walls (parts 7 and 9 (x2)). Position the floor panel so that the
triangular exterior tabs facing you. Apply glue to the bottom edge of the interior
wall (#7). Insert this wall onto the floor panel.
Next, find the interior short wall panel (#9) that fits the front left corner. Apply
glue to the notch and tab edges and attach to the building assembly. Repeat this
step with the other short panel.
Move immediately to the next step before glue sets.

© 2020 Koros Wargames LLC
All Rights Reserved
Page 8
Step 5: Install corral fences. Retrieve corral fences (parts #10 (x3)). Apply glue to
the two tab edges. Insert the fence into the far left set of notches on the floor and
interior wall. The interior wall (#7) will need to be tilted outward in order to get
the fence piece into position. Repeat this step for the remaining fences along the
wall.
Step 6: Install the cross beam (part 14 & 15). Apply glue to the unfinished side of
the inner cross beam. Insert the beam onto into the building assembly so that the
glue side is facing the center of the building. Next, attach the unfinished side of
the out cross beam (#15) to the building assembly. Clamp to improve bond.

© 2020 Koros Wargames LLC
All Rights Reserved
Page 9
Step 7: Repeat steps 4 through 6 for the other side of the building assembly. Note
that there will be one additional corral fence to install.

© 2020 Koros Wargames LLC
All Rights Reserved
Page 10
Step 8: Install outer wall panels (parts 11, 12, and 13(x2)). Retrieve the front wall
panel (#11) and apply glue to the unfinished side of the piece. Attach to the front
of the building assembly. Next, apply glue to the unfinished side of panels (#13
(x2)) and attach to building assembly. Finally, apply glue to the unfinished side of
(#12) and attach. Clamping and bandings will greatly improve the bonding and
positioning of these wall pieces, especially on the lower corners of the walls to
prevent small gaps.

© 2020 Koros Wargames LLC
All Rights Reserved
Page 11
Step 9: Install stable doors (parts 16 (x2) and 18 (x4)). In this step, glue will NOT
be used. Hold an upper door hinge (#16) and place a door (#18) so that the small
notch fits in the a hole. Repeat with the second door. Now carefully place this
door assembly into the two holes on the floor panel of the building assembly.
Push the door assembly into the wall so that the wall assembly is flush with the
outside of the building wall. Note: Sometimes excessive glue or slight wall
misalignment may make the slot small for the door assembly. Clean slot with a file
or hobby knife to ensure a proper fit.

© 2020 Koros Wargames LLC
All Rights Reserved
Page 12
Repeat step 9 with the rear door assembly.
Step 10: Install doorway headers (parts 17(x2)). Apply glue to the unfinished side
of doorway header (#17) and some glue to the center of the visible door assembly
that is showing in the interior of the building. Do not put glue in the door
assembly hinge holes. Insert header into position, with the finished side facing
the interior. Repeat with the other doorway. Wipe off excess glue and clamp to
improve bond.

© 2020 Koros Wargames LLC
All Rights Reserved
Page 13
Step 11: Rear doorway frame (part 19). Apply glue to the unfinished side of the
outer rear door frame. Attach the frame to the exterior face of the rear door
opening. The frame sit flush with the bottom of the building assembly and
centered on the doorway. Properly set, the doors should be prevented from
opening outward.
Step 12: Haystack assembly (parts 29, 30, 31, 32, and 33). Starting with the
bottom haystack tier (#29), apply glue and attach the tiers in order.

© 2020 Koros Wargames LLC
All Rights Reserved
Page 14
The haystack may be glued into the corner of the larger stall storage area or left
to be removable.
At this point, the main building is complete. Move onto the outer shelter.

© 2020 Koros Wargames LLC
All Rights Reserved
Page 15
Step 13: Shelter side walls and floor assembly (parts 20, 26(x2), and 27(x2). Apply
glue to the unfinished side of left shelter inner side panel (#27). Attach to the
middle side panel (#26). All the sides should be flush. Next apply glue to the
bottom post ends of the side assembly and insert into the left side of the floor
panel. Make sure the higher point of the side wall assembly is on the floor panel
side with the triangular notches. Repeat this step with the right side wall
assembly

© 2020 Koros Wargames LLC
All Rights Reserved
Page 16
Step 14: Rear roof support (parts 24 and 25). Apply glue to the rear roof support A
(#24) across the entire surface. Attach the unfinished side of rear roof support B
(#25). Next, apply glue to the bottom of the two inner posts. Insert the rear roof
assembly into the shelter assembly.

© 2020 Koros Wargames LLC
All Rights Reserved
Page 17
Step 15: Front roof support (parts 23a and 23b). Apply glue to the unfinished side
of front roof support A (#23a) across the entire surface. Attach the unfinished side
of front roof support B (#23b). Next, apply glue to the bottom of the two posts
and the top ends. Insert the front roof assembly into the shelter assembly.

© 2020 Koros Wargames LLC
All Rights Reserved
Page 18
Step 16: Attach shelter outer side panels (parts 28(x2)). Apply glue to the
unfinished side of an outer side panel and attach to the shelter building assembly.
Make sure all sides are flush with the shelter building assembly. Repeat with the
opposite side panel. Clamp and band to improve bond.

© 2020 Koros Wargames LLC
All Rights Reserved
Page 19
Step 17: Shelter roof assembly (parts 21 and 22). Apply glue to the unfinished side
of shelter roof overlay (#22). Center overlay against the flat edge of the shelter
main roof panel (#21) and attach. Clamp to improve bond.
Step 18: Attach shelter to main building assembly. The shelter attches via the
triangular tabs and notches. Glue is optional.

© 2020 Koros Wargames LLC
All Rights Reserved
Page 20
You have completed the model kit. Enjoy!
Other Koros Wargames Toy manuals