KOSTKA MUSHING User manual

Montážní návod koloběžek KOSTKA
User manual for KOSTKA footbike
Montageanleitung für die Tretroller KOSTKA
Návod 1701
TOUR, TWENTY, HILL, STREET, MUSHING
(PRO KOLOBĚŽKY S V-BRZDOU)
(FOR FOOTBIKES WITH V-BRAKE)
(FÜR ROLLER MIT V-BREMSE)

CZ
DE
EN
OBSAH BALENÍ: Smontovaná část koloběžky,sada montážních klíčů,
zadní osa náboje a přední osa náboje, přední a zadní kolo
INHALT DES PAKETS: Tretroller, Teile, Zubehöre, Werkzeug, Imbusschlüssel,
Schnellhebel für vorne, Achsstift für hinten, Vorderad und Hinterrad, Montageanleitung,
Garantierurkunde
PACKAGE CONTAINS: An assembled part of the scooter, a tool kit,
a front and a rear wheel with axles, assembly instructions.
TOUR
HILL
TWENTY
MUSHING
STREET
Výrobek je certikován Strojírenským zkušebním ústavem, číslo certikátu: J-32-20061-15
Product is certicated by Strojírenský zkušební ústav, certicate no.: J-32-20061-15
CZ
EN
NÁVOD
(MONTAGEANLEITUNG/MANUAL)

5
6
1
7
4
5
Koloběžku vybalte z krabice a odstraňte veškerý obalový materiál.
Den Tretroller aus dem Karton herausnehmen, die Kabelbinder abschneiden
und die Polster Plastik lösen.
Unbox and unwrap the kick scooter from the box.
CZ
DE
EN
Odejměte krytku na šroubu 1a šroub povolte. Víčko hlavového složení 2se
šroubem vytáhněte. Jednou rukou si přidržujeme vidlici koloběžky tak, aby
nedošlo k vypadnutí. Nasadíme představec s řidítky 3na sloupek vidlice 4.
Locken Sie den Imbusschraub 1, dann die Endkappe 2herausnehmen und
den Vorbau mit dem Lenker 3ansetzen.
Screw up the imbus bolt 1from the tube of fork, detache the cap 2and set the
stem with handlebars 3on the column of fork 4.
Nasaďte zpět víčko hlavového složení 2a dotáhněte šroubem 1(max. 5-6 Nm)
tak, aby v hlavovém složení nevznikala vůle. Na šroub 1nasaďte krytku.
Dann bringen Sie die Endkappe 2zurück und sichern Sie den Vorbau mit dem
Imbusschraube 1(max. 5-6 Nm)
Put back the cap 2and tighten the bolt 1(max.
5-6 Nm), save the headset in solid position.
CZ
DE
EN
CZ
DE
EN
1
2
3
2
1
3
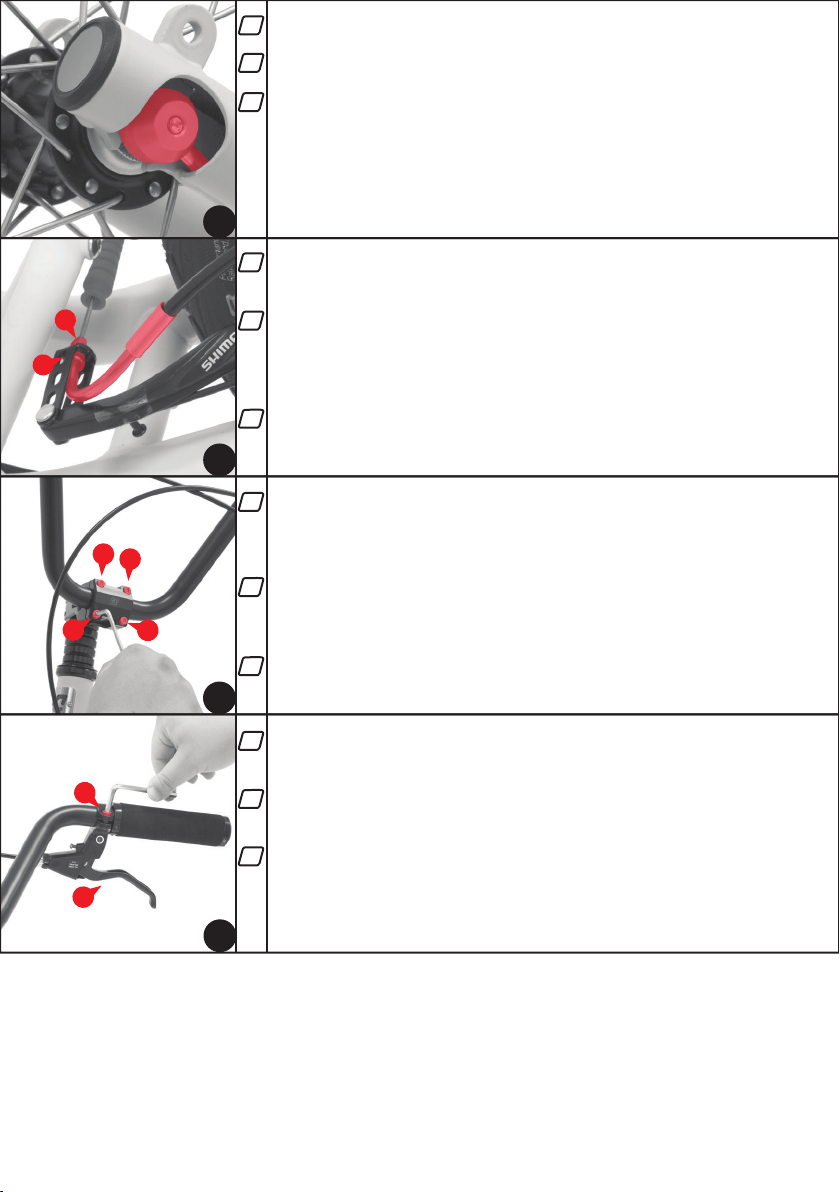
Vodítko lanka 5vysuňte z pozice 6přední brzdy, dojde k rozpojení přední brzdy.
Den Bremszug 5herausnehmen aus der Position 6und die beide Bremseteilen
(linke und rechte) abkuppeln.
Slide out the end cup of the metal cable guide 5from position 6and disconnect
the front brake.
Přední osu kola vsuňte do náboje a kolo vložte do přední vidlice. Dávejte pozor,
aby kolo bylo symetricky umístěno mezi rameny vidlice. Dotáhněte šroub 7max
8 Nm.
Vorne, achse in die Naben stecken und das Rad in die Gabel einsetzen.
Aufgepaßt, die Achse muss in der Gabel zentral einrasten, damit das Rad
optimal frei läuft. Die Schraube 7 anziehen bis 8 Nm.
Insert the axle into the front wheel hub and insert the whole wheel into the front
drop out. Make sure the wheel is fitted symmetrically. Tighten up the bolt 7max
8 Nm.
CZ
DE
EN
CZ
DE
EN
2
4

11
8
8
5
6
9
10
6
8
Řídítka srovnejte s předním kolem tak, že osa symetrie řídítek je rovnoběžná s
předním kolem. Dotáhněte šrouby 8na představci (max. 8-9 Nm).
Den Lenker mittig zentrieren, damit die Radachse gerade laufen kann. Die
Schrauben anziehen, damit diese fest sind. Die Schrauben 8anziehen. (8 - 9
Nm.)
Straighten out the handlebars with front wheel that the axis of handlebars
symmetry is parallel with front wheel. Tighten up the bolts 8. (8 - 9 Nm.)
CZ
DE
EN
Spojte přední brzdu. Nasaďte vodítko lanka 5zpět do pozice 6. Pro kontrolu
roztočte kolo, které se musí volně otáčet a po zmáčknutí přední brzdové páky
se musí zastavit
Vorne Bremsteilen ankuppeln. Den Bremszug 5wieder ansetzen in die Position
6. Drehen sie das Rad an, damit sie kontrolieren können, ob das Rad sich
problemlos dreht. Falls man drückt den Bremshebel das Rad muss anhalten.
Connect the front brake. Insert the end cup of the metal cable guide 5back into
position 6. Check whether the wheel is spinning freely. The wheel must stop if
you use the front brake.
Vodítko lanka 9vysuňte z pozice 10 a čelisti zadní brzdy rozpojte.
Den Bremszug 9herausnehmen aus der Position 10 und die beide Bremseteilen
(linke und rechte) abkuppeln.
Slide out the end cup of the metal cable guide 9from position 10 and disconnect
the brakes.
CZ
DE
EN
CZ
DE
EN
7
10
Rozpojená zadní brzda.
Abgekuppelte Bremse.
Disconnected rear brake.
CZ
DE
EN
Zadní osu kola vsuňte do náboje a kolo vložte do rámu. Dávejte pozor, aby kolo
bylo symetricky umístěno mezi zadními rameny rámu. Dotáhněte šroub 11 max
8-9 Nm.
Hintere, an der Achse die Naben ins hintere Rad in Gabel einsetzen. Aufgepaßt,
die Achse muss in der Gabel zentral einrasten, damit das Rad sich problemlos
dreht. Die Schraube 11 anziehen bis 8-9 Nm.
Insert the rear axle with the rear wheel into the rear drop out. Make sure the
wheel is fitted symmetrically. Tighten up the bolt 11 max 8-9 Nm.
CZ
DE
EN
9

10
9
12
12
1212
Povolte šrouby 12, srovnejte řidítka do vhodné polohy a šrouby dotáhněte. (max
8-9 Nm) Pozn.: Šrouby dotahujeme postupně do kříže proti sobě (všechny
stejným dotahovacím momentem).
Die Schrauben 12 im vorderen Teil lockern, den Lenker gerade ausrichten und
die Schrauben anziehen. Die Schrauben bitte über kreuz anziehen (max 8-9
Nm).
Loosen up the bolts 12, adjust handlebars to the right position and tighten up the
bolts. Note: Tighten up the bolt in cross pattern with the same torque (max 8-9
Nm).
CZ
DE
EN
13
14
Nastavte brzdové páky 13 do vhodné polohy tak, aby se nám snadno ovládaly a
dotáhněte šrouby 14 (max. 5-6 Nm) na objímce.
Bremsehebel 13 in die passende Position einstellen, so dass es einfach zum
drücken ist. Dann die Schraube 14 anziehen (max. 5 - 6Nm).
Adjust brake levers 13 into the right position for easy usage and tighten up the
bolts 14 (max 5-6 Nm).
CZ
DE
EN
14
13
11
12
Zobrazení detailu zajištění zadního kola.
Abbildung gesicherter Hinterrades mit sichertem Zapfen.
Make sure the pin on the axle nut is inside the frame as it is on the picture.
Spojte zadní brzdu. Nasaďte třmen 9zpět do pozice 10. Kolo se musí volně
otáčet, po zmáčknutí zadní brzdové páky musí zastavit.
Hintere Bremsteilen ankuppeln. Den Bremszug 9wieder ansetzen in die
Position 10. Drehen sie das Rad an, damit sie kontrolieren können, ob das Rad
sich problemlos dreht. wenn man den Bremshebel drückt, das Rad muss sich
anhalten.
Connect the rear brake. Put back the end cap of the metal cable guide 9into the
cable hook unit 10. Check whether the rear wheel is spinning freely. The wheel
must stop if you press the brake lever.
CZ
DE
EN
CZ
DE
EN

16
17
18
19
CZ
DE
EN
Do otvoru 16 našrubte šroub 17 společně s nasazenou podložkou 18.
Wir sichern die Dog-Antenne 16 durch Inbusschraub 17:
wir setzen die Unterlabe 18 auf den Schraub 17 und den
Schraub ins Loch des Vorbaus einschrauben.
Secure the flexible adapter with a screw 17: Put the washer
18 on the bolt 17and screw the bolt 17 into the hole
in the adapter. 16
Šroub 17 řádně dotáhněte a proveďte kontrolu dotažení stavěcích šroubů 19.
Die Schraube 17 pünktlich anziehen und die Schraube 19 kontrollieren, ob die
genug fest angezogen sind.
Secure the bolt 17 and make control the other bolts 19.
Vodítko 20 obtočte kolem kroužků navlečených na sloupec vidlice. Konec
vodítka prostrčte okem na druhé straně vodítka.
Winden sie die HundeLeine 20 um die Gabelrohre unter des Vorbaus und
stecken das Ende der Leine durch die Schlinge.
Turn the leash 20 around the steerer tube. Thread the end of the leash (with a
carbine) through the other end of the leash (with a springe).
Karabinku vodítka 21 provlečte okem 22 pružného adaptéru.
Die Hunderleine 21 stecken sie durch das loch 22 der Dog-Antenne.
Take the end of the leash 21 (with a carbine) and put it through the hole 22 in the
end of the flexible adapter.
CZ
DE
EN
CZ
DE
EN
CZ
DE
EN
CZ
DE
EN
17
15
Pružný adaptér 15 vsuňte do spodní drážky na představci.
Auf unterer Seite des Vorbaus setzen wir
die Dog-Antenne ein. 15
Put the flexible adapter 15 on the bottom side of the stem.
15
17
18
16
17
19
19
20
21
22
MONTÁŽ ADAPTÉRU VODÍTKA MANUAL FOR DOG PACKET MONTAGEANLEITUNG FÜR DOG-ANTENNE

www.KOSTKAfootbike.com
1 - stojan / stand / Ständer
2 - KlickLight/ adaptér na zadní světlo 65 mm / holder of end light 65 mm / halterung hinteres Licht 65 mm
3 - zadní blatník / rear fender / hinteres Schutzblech
4 - přední blatník / front fender / Vorderes Schutzblech
5 - KOSTKA Footbike Fender
6 - TRIP SET
7 - vymezovací kroužek / spacing ring / Distanzring
8 - přepravní taška / carrying bag / Transporttasche
3
6
2
5
1
7
4
DOPLŇKY / ACCESSORIES / ZUBEHÖR

KOSTKA - kolobka, s.r.o.
Purkyňova 649/127
612 00 Brno - Medlánky
Tel.: +420 583 231 025
E-mail: dotazy@kolobka.cz
www.KOSTKAfootbike.com
Other manuals for MUSHING
1
This manual suits for next models
4
Table of contents