manuals.online logo
Brands
  1. Home
  2. •
  3. Brands
  4. •
  5. KP Electronic Systems
  6. •
  7. Transmitter
  8. •
  9. KP Electronic Systems ATSU100SD Operating instructions

KP Electronic Systems ATSU100SD Operating instructions

ATSU100SD™
High-Power Long-Range
Radio Transmitter with
Built-in Dialer Interface
Programming Guide
Web Site: www.kpsystems.com
ISRAEL Office
Email: info@kpsystems.com
Tefen Industrial Park, Tefen 24959
Tel: 972-4-987-3066 Fax: 972-4-987-3692
USA Office:
KP ELECTRONICS INC.
Email: info@kpelectronics.com
415 Sargon Way Suite F Horsham PA 19044
Tel: (215) 442-7460 Fax: (215) 442-7461
P.N.: Book 139
Rev: New
Pg.1 of 2
Approved: Dror H.
27Apr2015
Introduction
The following communication parameters
can be programmed or modified:
Protocol
Station address
System
Group
Number of words (in a burst)
Alarm repetitions
Test repetitions
Periodic test (hours: min)
Parity
Input delay
Input polarity
Transmit frequency (MHz)
Preparing for Programming
Before installing the ATSU100SD™ on
site, perform the following actions:
Connect the ATSU100SD™ to the
GUP5000™utility program
Change Devices
Load Device Parameter Values
Change Device Parameter Values
Update Parameter Value Changes
Confirm Parameter Value Changes
Perform SELF-TEST
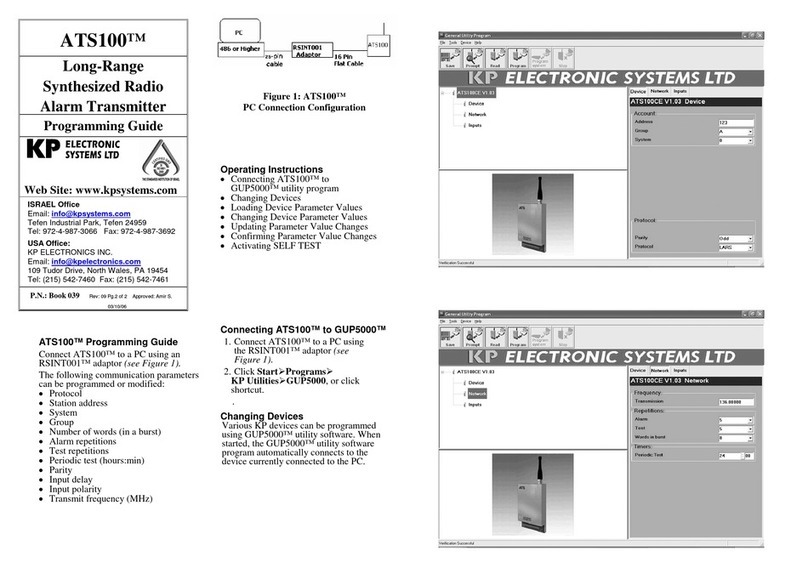
Connecting ATSU100SD™ to GUP5000™
1. Connect ATSU100SD™ to a PC using
the RSINT002™ adaptor (see
Figure 1).
2. Click StartPrograms
KP UtilitiesGUP5000, or click
shortcut.
The GUP5000™main screen opens,
showing the device type, version, and
suitable default parameters.
RSINT002
Adaptor
ATSU100SDTM
486 or higher
PC
USB
cable
6-pin
cable J3
Figure 1: ATSU100SD™PC Connection
Configuration
Changing Devices
Various KP devices can be programmed
using the GUP5000™ utility software.
When started, the GUP5000™ utility
software program automatically connects
to the device currently connected to the
PC.
Loading Device Parameter Values
Device parameter values must be loaded for each device connected to the GUP5000™
utility software. When devices are changed, ensure parameter values for the current device
are loaded.
To Load Device Parameter Values
1. From the GUP5000™ main screen, click Prompt (Ctrl-P).
2. Click Read (Ctrl-R).
The name of the device type, version, and suitable parameters are displayed.
The transmitter being programmed sends the following AB code to the central
receiver: “Warning, device parameters.”
Verify that the correct name and version of the device are displayed. If not, check that the
device is properly connected to the PC.
If the Communication Error screen continuously appears on the screen, consult KP
technical support.
Changing Device Parameter Values
Type the new parameter value in the designated parameter text box.
Updating Parameter Value Changes
To Update Parameter Value Changes
Click Program (Ctrl W).
Confirming Parameter Changes
Ensure that any parameter changes made
are updated.
To Confirm Parameter Changes
From the GUP5000™ main screen, click
Read (Ctrl R). The GUP5000™main
screen displays the updated device type,
version, and suitable parameters.
Performing SELF-TEST
After KP device parameter values have
been loaded, perform SELF-TEST to
ensure the device is working properly.
To Perform SELF-TEST:
1. Disconnect the device from the PC.
2. Press the SELF-TEST button.
3. Observe the SELF-TEST LED.
(Refer to Table 2 of the ATSU100SD™
Installation Manual for SELF-TEST
results.)
On-Line HELP
To view a brief explanation of any
ATSU100SD™ parameter, click the
required parameter text box. The cursor
appears in the designated text box. The
valid parameter range displays at the
bottom of the screen together with a brief
explanation.
The operator can select the suitable
parameter from the on-line HELP line.

Other KP Electronic Systems Transmitter manuals

KP Electronic Systems SIM900 User manual

KP Electronic Systems

KP Electronic Systems SIM900 User manual

KP Electronic Systems ATS100 Operating instructions

KP Electronic Systems

KP Electronic Systems ATS100 Operating instructions

Popular Transmitter manuals by other brands

Litepanels Apollo user manual

Litepanels

Litepanels Apollo user manual

LyxPro LYXBWR7 user guide

LyxPro

LyxPro LYXBWR7 user guide

Tek-Trol TEK-BAR 3120C instruction manual

Tek-Trol

Tek-Trol TEK-BAR 3120C instruction manual

AVPro Edge ConferX AC-CXWP-HDMO-T user manual

AVPro Edge

AVPro Edge ConferX AC-CXWP-HDMO-T user manual

IMG STAGE LINE TXS-606HSE instruction manual

IMG STAGE LINE

IMG STAGE LINE TXS-606HSE instruction manual

Tzone TZ-TT11 user guide

Tzone

Tzone TZ-TT11 user guide

Vega VEGABAR 86 operating instructions

Vega

Vega VEGABAR 86 operating instructions

Abilia IR-1S manual

Abilia

Abilia IR-1S manual

AMG AMG4787BER-SF manual

AMG

AMG AMG4787BER-SF manual

AMG AMG4684B R Series instruction manual

AMG

AMG AMG4684B R Series instruction manual

RKI Instruments 65-2396RK Operator's manual

RKI Instruments

RKI Instruments 65-2396RK Operator's manual

Kenwood T-599 operating manual

Kenwood

Kenwood T-599 operating manual

IRIS MNL221 instruction manual

IRIS

IRIS MNL221 instruction manual

Emerson Rosemount 8732EM Reference manual

Emerson

Emerson Rosemount 8732EM Reference manual

Comnet FVT80D8SFP Installation and operation manual

Comnet

Comnet FVT80D8SFP Installation and operation manual

Ebyte E104-BT30-TB1 user manual

Ebyte

Ebyte E104-BT30-TB1 user manual

Artel FiberLink 4040 Series user manual

Artel

Artel FiberLink 4040 Series user manual

nologo CARTY-R quick start guide

nologo

nologo CARTY-R quick start guide

manuals.online logo
manuals.online logoBrands
  • About & Mission
  • Contact us
  • Privacy Policy
  • Terms and Conditions

Copyright 2025 Manuals.Online. All Rights Reserved.