KQQ K8 User manual

KQQ Dash Cam
Driving Recording
User Manual
Mode K8


1
INDEX
INTRODUCTION ...................................................................................... 2
PRE CAUTIONS .......................................................................... ............ 2
WARNINGS ............................................................................................... 3
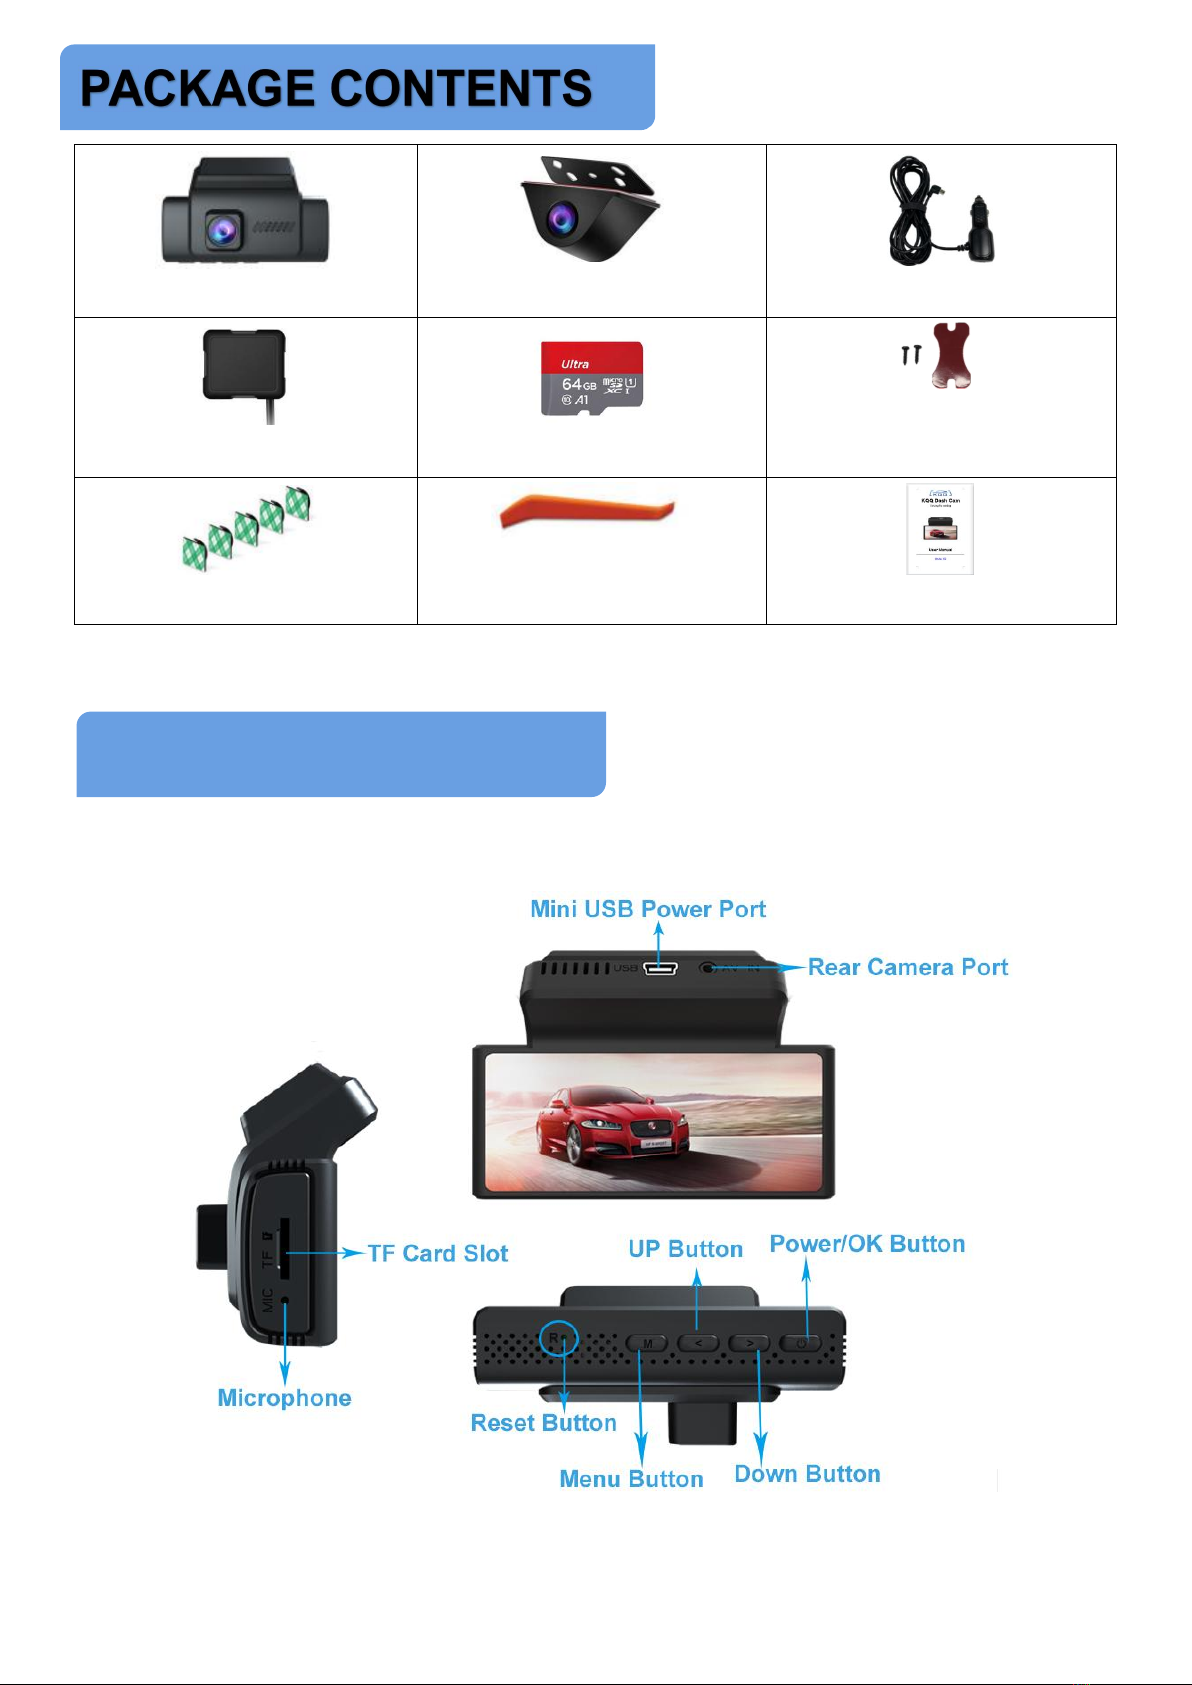
PACKAGE CONTENTS ............................................................. ............ 5
DASH CAM OVERVIEW ............................................................ ............ 5
SPECIFICATIONS ....................................................................... ............ 6
BUTTON SHORTCUTS .......................................................................... 6
GETTING STARTED ................................................................... ............ 8
1 Prepare Memory Card ..................................................... ............ 8
2 FAQ ..................................................................................... ............ 9
INSTALLATION ........................................................................................ 9
1 Notes for Installation ........................................................ ............ 9
2 Installation Steps .............................................................. .......... 10
2.1 Install the Dash Cam ................................................................. .............10
2.2 Connect GPS Module ............................................................................. 11
2.3 Connect Car Charger/Hardwire Kit ......................................... .............12
2.4 Install Rear Camera ................................................................................14
2.5 Remove Camera from Front Windshield .............................................15
OPERATIONAL GUIDELINE ............................................................... 16
1 How to Turn the Dash Cam On/Off ............................... .......... 16
2 How to Reset Camera? ................................................... .......... 17
3 Time Settings ............................................................................... 17
CAMERA MODES ....................................................................... .......... 18
1 Video Mode .................................................................................. 19
2 Photo Mode .................................................................................. 21
3 Playback Videos ............................................................... .......... 21
3.1 View Footage on Dash Cam Directly ...................................... .............21
3.2 View Footage on PC/MAC .....................................................................22
3.3 View Footage on Your Smartphone ........................................ .............23
CAMERA SETTINGS ............................................................................ 23
1 Setup Menu ........................................................................................ .............23
2 Photo Menu ........................................................................................ .............27
CONNECT WiFi & APP ........................................................................ 28
1 Install “Roadcam” APP ............................................................... 28
2 Connect WiFi ..................................................................... .......... 28
3 Introduction for Roadcam App .................................................. 30
4 How to Download Video/Image on App? ................................ 30
5 FAQ on WiFi and “Roadcam” App ................................. .......... 31
GPS PLAYER&GPS LOGS ....................................................... .......... 33
1 How to Install the GXPlayer on Your PC/Mac? ........... .......... 33
2 How to View GPS Log via GXPlayer? .......................... .......... 34
3 How to View GPS Logs via Phone APP? ............................... 34
Common Issues& Trouble Shooting .................................... .......... 35
About User Manual .................................................................... .......... 40
One Year Limited Warranty ..................................................... .......... 40
Thanks For Your Love .............................................................. .......... 41
Customer Service ...................................................................... .......... 42

2
Thank you for purchasing KQQ K8 - 4K Dash Cam. This exclusive
product is designed in a small size and elegant appearance, packed with
powerful features, records ultra clear and high-quality footage and
provides crucial evidence for what goes on the front and rear of your
vehicles while driving.
This book introduces functions, operation procedures, specifications and
installation steps of dash cam in detail. In order to operate the product
correctly, please read this introduction carefully before using.
A powerful, compact and reliable camera supports multi-functions:
4K + 1080P front and rear cameras record simultaneously
Built-in Wi-Fi & free App
External GPS module
G-Sensor and emergency locking
Loop recording
Back camera mirror horizontally
Parking monitoring & time-lapse recording
And more...
Please read this manual carefully before Installation and Operating. If
you have any questions, or needs accessories replacement, CONTACT
Please use original accessories provided in the package, just in case
of compatible issues after using others', especially using 2 or 3 in 1
cigar sockets will lead to the insufficient current supply.
Please check the functionality of camera and its all accessories

3
before installation. So as to prevent inconvenience and installation
cost loss caused by the machine problem after installation.
Please insert and format a TF card before using this device. The TF
card is used to store image and video files of the driving recorder.
Please check functionality of micro SD card termly and replace it if
needed in case videos cannot be saved properly.
Note:
1. Please use a high-speed TF memory card (above Class 10) with a
capacity of not less than 8GB (supports max to 128GB).
2. It is recommended to format or replace TF memory card once a month.
Please don't splice the rear camera cable, the monitor may lose
image signal of rear camera. The original extension cable of rear
camera is 23ft(7m), suitable for most types of cars. We also have 33
ft(10m) rear camera cable ( ASIN : B0B3DNT2MX) sold separately.
Please read all instructions before using this product. If any damage is
caused by failure to follow the instructions, the warranty will be voided.
Failure to comply with safety warnings and regulations can result
in serious injury or death.
1 For Safety:
Keep all small accessories out of the reach of children.
Please use provided/designated accessories. Use non-designated
parts may damage camera, or cause fire/electric shock/malfunction.
Need accessory replacement, CONTACT US:
LESA_16[email protected]
Don’t try to repair the device yourself. If its accessory has problems or
the camera is damaged/malfunctioning, stop using it and Contact Us
soon. Continued use may cause car’s damage, electric shock or fire.
Do not drop, puncture, disassemble or modify this product yourself. It
may cause an electric shock, malfunction or fire.
Do not install, operate the camera, or attempt to change any settings
while driving. If it interferes with driving, please DON'T do any of
these either because this may cause an accident. Make sure to Pull

4
off the main road first and only do so when it is safe.
This camera is used inside vehicles. Don’t install it where it will block
driver’s view including the top of dashboard/deployment of airbags.
2 For Maintenance:
Do not leave the camera in the direct sunlight for a long period of time
or where the temperature could go above 158°F (70°C).
Do not expose this product to rain, moisture, water, excessive heat,
dust, or under any circumstances that it will result in damage.
Do not use any chemical substance or cleaning solvent to clean this
device. Instead, use a soft moist cloth for cleaning to avoid scratches
that may compromise video quality.
It is recommended to remove the camera from vehicles when it’s not
in use to prevent the likelihood of theft or exposure to excessive heat.
3 Others
This product is compatible with DC12V/24V vehicles.
This product uses wide-angle lenses, part of images may be distorted,
which differs from actual perspective. This is a feature of wide-angle
lenses and it is not a malfunction.
The specifications and appearance of this product may be improved
without notice for improvement. Should any changes occurred, the
actual version of product shall prevail for all purposes.
Some countries or some USA states prohibit drivers from mounting
anything on windshields or on certain areas of windshields.
It is the owner/operator’s responsibility to mount or use this device in
compliance with local laws. The company is NOT responsible for the
loss of any data or content during operation or in any circumstance.
Any assistance needed?CONTACT US:LESA_1688@163.com
Or scan the QR Code to CONTACT US:

5
3.16″Dash Camera
Rear Cam(23ft cable)
1*USB Car Charger
1* GPS Module
1* 64GB Micro SD Card
2* Screws and Sticky
Pads for Rear Cam
5*Cable Clips
1* Cable Pusher Tool
1* User Manual
1 Camera Structure
2 Camera Indicators
The Two indicator lights on the upper right corner of screen’s edge.
DASH CAM OVERVIEW

6
(1) Red indicator light: Always turn on when the device is on.
(2) Blue indicator light: Always turns on when the device is on but not
recording. It flashes when the camera is recording.
Note: The device will automatically turns on and start recording when power
supplied, and the red indicator turns on and the blue one flashes.
Front Video Resolution
4K(3840*2160P),2K(2160*1440P),1080P(1920*1080P)
Rear Video Resolution
1080P(1920*1080P)
LCD Screen
3.16” IPS Screen
Camera Lens
170° + 150°
Lens Aperture
F1.8 FOV
Front Camera Adjust
45°
Image Format
JPG
Video Format
MP4
Microphone Speaker
Built-in
GPS
External GPS Module
WiFi
Built-in
Battery/Charger
Not battery powered
Control
Buttons
Operating Temperature
-20℃~70℃(-4°F~158°F)
Working Humidity
15-65%RH
Power Input
DC 5V
Memory Card
Micro SD card (Support 8GB ~ 128GB)
Button
Button Name
Functions & Shortcuts
Power Button;
OK(Confirm)
Button
1. Long press at least 3s to Turn ON/OFF device.
2. In Video Mode, short press once to Start/Stop
Recording.
3. In Photo Mode, short press once to Take Snapshot
and a shutter sound will be heard.
SPECIFICATION
BUTTON SHORTCUTS

7
4. In Playback Mode, short press once to Start/Pause
playing a video.
5. In Setup Menu, short press once to Enter submenu.
6. In a submenu, short press once to Confirm options.
Menu Button;
Mode Button
1. In Video Mode, when the camera is not recording,
short press once to Enter Setup Menu.
2. In Photo Mode, short press to access Photo Menu.
3. In a submenu, short press once to Exit it.
4. In Video Mode(camera not recording), Long Press
at least 3s to switch Video/Photo/ Playback Mode.
5. When camera is recording, LONG PRESS at least 3s
to take a photo and a shutter sound will be heard.
6. When camera is recording, short press once to Lock
current video, short press again to unlock it.
UP Button
1. In Setup Menu or a submenu, short press to Scroll
UP/Left to the previous settings.
2. In Video Mode, LONG PRESS at least 3s to Turn
ON/OFF WiFi.
3. Whne camera is recording or in Photo Mode, short
press to Switch between front and rear views.
4. In Playback Mode, short press once to Scroll to the
previous photo/video.
Down Button
1. In Setup Menu or a specific settings page, short
press once to Scroll Down/Right to next settings.
2. In Video Mode, short press once to Mute/UN-Mute
Microphone.
3. In Playback Mode, short press once to Scroll to the
next photo/video.
Note:
1. STOP Recording first before trying to access Setup Menu/switch modes.
2. In Video Mode, camera will access a specific page in a few seconds. Then
short press any buttons first to exit the page so you can do other operations.
3. If Screen Saver set to be 1/3/5Min, when the screen is off, short press any
buttons first to Light it UP. Then you can press buttons to fulfil their functions.

8
1 Prepare Memory Card
The memory card MUST be formatted via camera when it is first time
used in this device, so device can work smoothly and prevent problems.
1.1 Notice on Memory Card
You need to insert and format a memory card on this camera before you
can start recording. MUST use Brand Name, Class-10, U3 or higher
speed Micro-SD Card which is purchased from official channels. This
device supports 8 to 128GB memory card. A 64GB SD card is provided.
If you want a larger capacity one, we recommend SAMSUNG Class 10,
U3 Speed Micro-SD Card. Get it from Amazon here: https://a.co/2tXJzIL
NOTE:
1. If you experience camera FREEZING/LAGGING or STOP Recording after
a few seconds while using the device. It is the issue of the MEMORY CARD,
NOT the camera issue. (See common issues on page 28 or Contact US.)
2. This 4K camera requires High-Speed Rating SPECIFIC Micro-SD Cards.
3. Do NOT Purchase the memory card from third-party sellers on eBay or any
online channels. Otherwise, it may be fake/poor-quality card and won’t work.
4. It is recommended to format TF card manually via the camera every month.
As TF card may have problems like slow reading/writing after a long time use.
1.2 Insert a Memory Card
Turn OFF the camera. With the display screen of camera and the gold
CONTACTS of TF card facing towards you, insert the TF card into the
TF card slot. Use a paperclip to push the card inward until a click heard.
Note: DON’T remove/insert TF card when the camera is on.
1.3 Remove Memory Card
Turn the camera off first, push the edge of TF card inwards until a click is
heard, release it to eject automatically, then slide it out of TF card slot.
GETTING STARTED

9
1.4 Format Memory Card
Format memory card via this camera before your first use. Also, it is
recommended to format memory card once a month.
①Short press (Power/OK) Button to STOP recording first;
Note: If the Video Mode page disappears, only short press any buttons first
to return to Video Mode page can you press button to fulfill relative function.
②Short press (Menu) Button once to access the Setup Menu;
③Short press (UP)/(Down) Button to go to Format settings;
④Short press (Power/OK) Button once to enter Format submenu;
⑤Short press (Down) Button to skip to “Fast Format”, short press
(Power/OK) Button once to choose;
Note: Fast Format is already chosen if the check box turns green. It can
format SD card soon and is optional to choose.
⑥Short press (Down) Button to skip to the Confirm and short press
(Power/OK) Button once to start formatting;
⑦Short press (Menu) Button once to exit the submenu.
Note: Please make backup for important data before formatting the memory
card. Otherwise, data will be deleted and cannot be restored.
2 FAQ
(1) If the camera can’t turn on or work normally after power is supplied,
please keep the power on and press the Reset Button at the bottom of
the camera (See page 15). If it still doesn't work, CONTACT US.
(2) Please check whether your car cigar lighter is connected with ACC. If
camera WON'T turn OFF automatically after 1 minute the car is off, your
cigar power port is NOT connected with ACC. In this situation, please
use a hardwire kit, otherwise, it may exhaust your car's power.
1 Notes for Installation
①Before Installation: Power dash cam on in your car first, and check
whether its functions, screen display and accessories can work normally.
INSTALLATION

10
②During Installation: Don't pull wires hard when arranging cables.
Before powering the device on, please ensure that all cables are
connected correctly and all connecting ports are plugged in completely..
③After Installation: If the camera’s functions can work well before
installation, but they CAN’T work after installation. It may be problems
with installation. Please check cables and its connection ports.
④Don’t destroy or modify the original wires. If cables are damaged
during installation, cables MUST be replaced.
Scan the QR Code to CONTACT US
How to hide power cable inside your car dashboard?
Many people on YouTube have already demonstrated how and where to
arrange power cables in cars. You can view one of the possible ways in
the following link (NOT recorded by us): https://youtu.be/xwD8Ilk-MHU
Or Scan the QR Code to watch
2 Installation Steps
NOTE: MUST check the functionality of device and its accessories
before installation. If there is are problems, CONTACT US!
2.1 Install the Dash Cam
①Turn the camera off and insert a memory card into the TF card slot,
then format manually the TF card on the camera (see page ).
②Select a mounting position on the front windshield and clean it with

11
water/alcohol and a lint-free cloth to make it dry and free of dust, oil, etc.
③Remove the protective film of the windshield electrostatic sticker, then
attach it to the mounting position.
Note:
1. Use an electrostatic sticker, 3M tape may not leave mark after removing.
2. Make sure air bubbles between the sticker and windshield are removed.
④Remove the protective film of the mount's 3M sticker, and then press
the 3M mount firmly to the center of the electrostatic sticker.
Note:
1. Don’t insert/remove TF card when the device is on.
2. The dash cam should install in positions that won't obstruct driver's field of
view. It is recommended to install behind the rear view mirror in vehicles.
3. Avoid to fix the camera in the black particle area on the front windshield.
4. Make sure camera view won’t be obstructed by sun visor or other objects.
5. Must tear off protective films on camera lens to avoid videos/images fuzzy.
2.2 Connect GPS Module
①Plug the cable of GPS antenna into the USB port on the dash cam.
②Connect the car charger/hardwire kit into USB port on GPS module.
③Fix or hide the GPS module to a position that won’t block the field of
view of driver and camera. (As shown in figure)

12
2.3 Connect Car Charger/Hardwire Kit
Two different ways to get power to keep the dash cam working.
(1) Connect the Camera with Car Charger
Use a standard car charger (included in package) to connect camera
to car cigarette lighter, the camera will automatically turn on when you
start the car and will also auto turn off after seconds the car engine is off.
How to Install the Camera with a Car Charger?
①After the dash cam installed, plug the GPS module into USB port on
camera first, then plug the car charger into USB port on GPS module;
②Arrange the cable of car charger along from the top of front windshield,
A-pillar, door frame, all the way to passenger-side glove box, then
organize/hide the cable(As shown in figure below);
③Plug the car charger into car cigarette lighter and start your car, then
the camera will automatically turn on.
Note:
1. Please only use the provided original car charger.
2. If the camera DON'T turn OFF automatically after 1 minute the car engine
is off. It may be because the car cigar lighter doesn't connect with ACC, and it
is recommended to use hardwire kit to install the camera to avoid potential
car battery drained out.

13
(2) Connect the Camera with Hardwire Kit
Use a 3-lead hardwire kit to connect the camera to the car Fuse Box (not
included in package), so the camera can continue to work while parking
and the 24h Parking Monitoring function will be available.
Warning:
When mounting a hardwire kit, it is recommended to get HELP from a
machinist or other professionals to avoid damage to vehicle by improper
installation. If you want to install the hardwire kit yourself, please go to
Youtube and find relevant installation video according to your car model.
As different model of cars has different locations and designs for fuse
boxes, for which it may be different to install the hardwire kit.
How to Install the Dash Cam with a Hardwire Kit?
①With the dash cam installed, connect GPS module into the USB port
on dash cam first;
Note: Please fix or hide GPS module to prevent blocking visual views.
②Connect the 3-lead hardwire kit into the USB port on GPS module;
③Run cable along from the top of front windshield, door frame, A-pillar,
driver-side glove box, all the way to car fuse box(As shown in figure).
Note: A designated 3-lead Hardwire kit is required. Not included.

14
2.4 Install Rear Camera(Optional to Install)
Please check whether rear camera can work normally before mounting it,
(If not, CONTACT US). Two common mounting positions of rear camera:
Position 1: Install the rear camera near license plate.
(Note: Position 1 supports both rear viewing and reverse assist.)
①Plug the rear camera into the AV-IN rear camera port on the camera.
②Arrange the rear camera cable along from the top of windshield, door
frame, A-pillar, B-pillar, car boot, all the way to the car license plate, then
organize/hide the cable(As shown in the figure below).
③Choose a suitable mounting position near the license plate and fix the
rear camera with the provided screws.
Note: It is recommended to set the rear camera angle pointing slightly down.
④Connect the red wire on rear camera’s extension cable to the positive
lead of vehicle’s reversing lamp.
Note: It's no need to connect the red wire if you don't need reverse assist.
Position 2: Install the rear camera on rear windshield.
(Note: Position 2 supports rear view only and it is easier to mount.)
①Plug the rear camera into the AV-IN rear camera port on the camera.

15
②Arrange the rear camera cable along from the top of front windshield,
door frame, all the way to the rear windshield, then organize/hide the
cable(As shown in the figure below);
③Choose a mounting position, use the provided sticky pads to attach
the rear camera. Please place the rear camera correctly to prevent its
camera view being upside down.
TIP: While connecting the rear camera’s extension cable, please pay
attention to the recessed part and convexed part on rear camera cable
and rear camera and make them lock in place.
2.5 Remove Camera from Front Windshield
The back of camera's bracket is snap slot design. You can remove the

16
camera and its bracket from windshield without removing 3M tape: With
the camera screen facing towards you, hold the camera and push/pull it
to the right to make it unlock from 3M sticky base, then take camera off.
1 How to Turn the Dash Cam On/Off
1.1 Auto Power On/Off
This camera comes with a standard power cable (car charger) to get
power. After a memory card is inserted and formatted, the dash camera
will automatically turn on and start recording when the car engine starts,
then it will turn itself off after seconds that the car engine is off.
Note:
1. Please insert the TF card correctly before turning on the device.
2. Format the inserted TF card via this camera before first use. Otherwise,
the card or camera may be some unexpected issues.
3. Do NOT insert/remove memory card when the camera is turned ON.
4. Check whether videos can be recorded and saved before your journey.
5. If your car cigar lighter is NOT connected with ACC, the device WON’T
turn OFF automatically after your car is off.
1.2 Power On/Off Manually
(1) With the camera off, long press (Power/OK) Button for at least 3
seconds to turn it on. The camera will access the Video Mode and start
recording by default when it is turned on.
(2) In power-on state, long press (Power/OK) Button for at least 3
seconds to turn it off.
OPERATIONAL GUIDELINE

17
2 How to Reset Camera?
2.1 Reset Camera’s Hardware
If the camera doesn’t function, for example, can’t power on/off normally,
the TF card is inserted but reminds “No SD card”, buttons no response,
camera freezing/lagging, or any other operational or functional issues,
please Press the “Reset Button” to RESET the camera:
①Keep power supply, press the “Reset Button” at the bottom of camera
with a paperclip, and a click will be heard;
②Wait for seconds, long press (Power/OK) Button to turn camera
on, then check whether the issue has been solved.
2.2 Reset Camera’s Firmware
If you get stuck on any settings or if you want the camera to restore its
default settings, please set the “Default” in Setup Menu as follows:
①In Video Mode, when the camera is not recording, short press the
(Menu) Button once to access Setup Menu;
②Short press (UP)/ (Down) Button to navigate to “Default” ;
③Short press (Power/OK) Button once to access the submenu;
④short press (UP)/ (Down) Button once to go to “Confirm”,
and short press (Power/OK) Button to confirm to restore.
2 Time Settings
Please set Time Zone and Date/Time before using the camera to
retain effective and accurate footage for road disputes.
2.1 Set Time Zone
①In Video Mode and when the camera is not recording, short press the

18
(Menu) Button once to access Setup Menu;
②Short press (UP)/ (Down) Button to navigate to “Time Zone”;
③Short press (Power/OK) Button once to access the submenu;
④Short press (UP)/ (Down) Button to go to a needed option;
⑤Short press (Power/OK) Button once to confirm the option.
2.2 Set Date/Time
①In Video Mode, short press (Menu) Button to go to Setup Menu;
Note: Setup Menu can’t access when camera is recording. STOP it first.
②Short press (UP)/ (Down) Button to navigate to “Date/Time”;
③Short press (Power/OK) Button once to access the submenu;
④In the submenu, short press (UP)/(Down) Button to browse
options in a column, and short press (Power/OK) Button once to
confirm options and skip to next column;
⑤After set date and time, it skips to Date Format, short press (UP)/
(Down) Button to switch date formats, short press (Power/OK)
Button once to confirm option and skip to Time Format;
⑥In Time Format, short press (UP)/ (Down) Button to switch
formats, short press (Power/OK) Button once to confirm option and
skip to “Confirm”, then short press (Power/OK) Button once to
confirm all settings in Date/Time settings and exit the submenu.
Note: Continuous short press (Power/OK) Button to skip to a needed column.
This dash cam has 3 different modes:
Video Mode
CAMERA MODES
Table of contents
Other KQQ Dashcam manuals