manuals.online logo
Brands
  1. Home
  2. •
  3. Brands
  4. •
  5. Kriptonite
  6. •
  7. Indoor Furnishing
  8. •
  9. Kriptonite K3+ User manual

Kriptonite K3+ User manual

H
A
D
C
EF
C
1.1
1.2
K3 + Istruzioni / Instructions
COSA TI OCCORRE /
REQUIRED TOOLS
A
COMPONENTI / COMPONENTS
www.kriptonite.com
BRipiani
Shelves
CBarra
Bar
O ring
O ring
DViti a brugola
Screws
FViti a brugola
con distanziale
Screws with
spacer
H
Viti senza testa
Headless screw
GE Chiave Brugola
Allen Key
Una campata: Inserire gli O-ring (D) all’esterno delle barre (C) (fig.1.1); se non sono
già inseriti. Assemblare la struttura avvitando le spalle alle barre, utilizzando le viti
a brugola (F) (fig. 1.2) nei quattro fori in alto, lungo la spalla utilizzare le viti a bru-
gola con distanziale (H) (fig. 1.3). Le spalle vanno posizionate sempre con il foro più
grande verso l’esterno. Se la soluzione prevede più campate, passare al prossimo
step.
One span: Insert the O-rings (D) outside the bars (C) (fig.1.1); if they are not already
inserted. Assemble the structure by screwing the shoulders to the bars using the
Allen key(F) (Fig. 1.2) in the four holes at the top, along the shoulder use the allen
screws with spacer (H) (Fig. 1.3). The shoulders should always be positioned with
the largest hole outward. If the structure has more spans, go to the next step.
1
H
A
A
D
C
EF
C
1.1
1.2
1.3
Spalla
Upright
N.B. Le spalle esterne
della struttura vanno
montate sempre con il
foro grande rivolto verso
l’esterno.
The external shoulders
of the structure must
always be mounted with
the large hole facing
outwards.
EH
www.kriptonite.com
Panno umido, sapone neutro.
Damp cloth, mild soap.
30 Kg
=
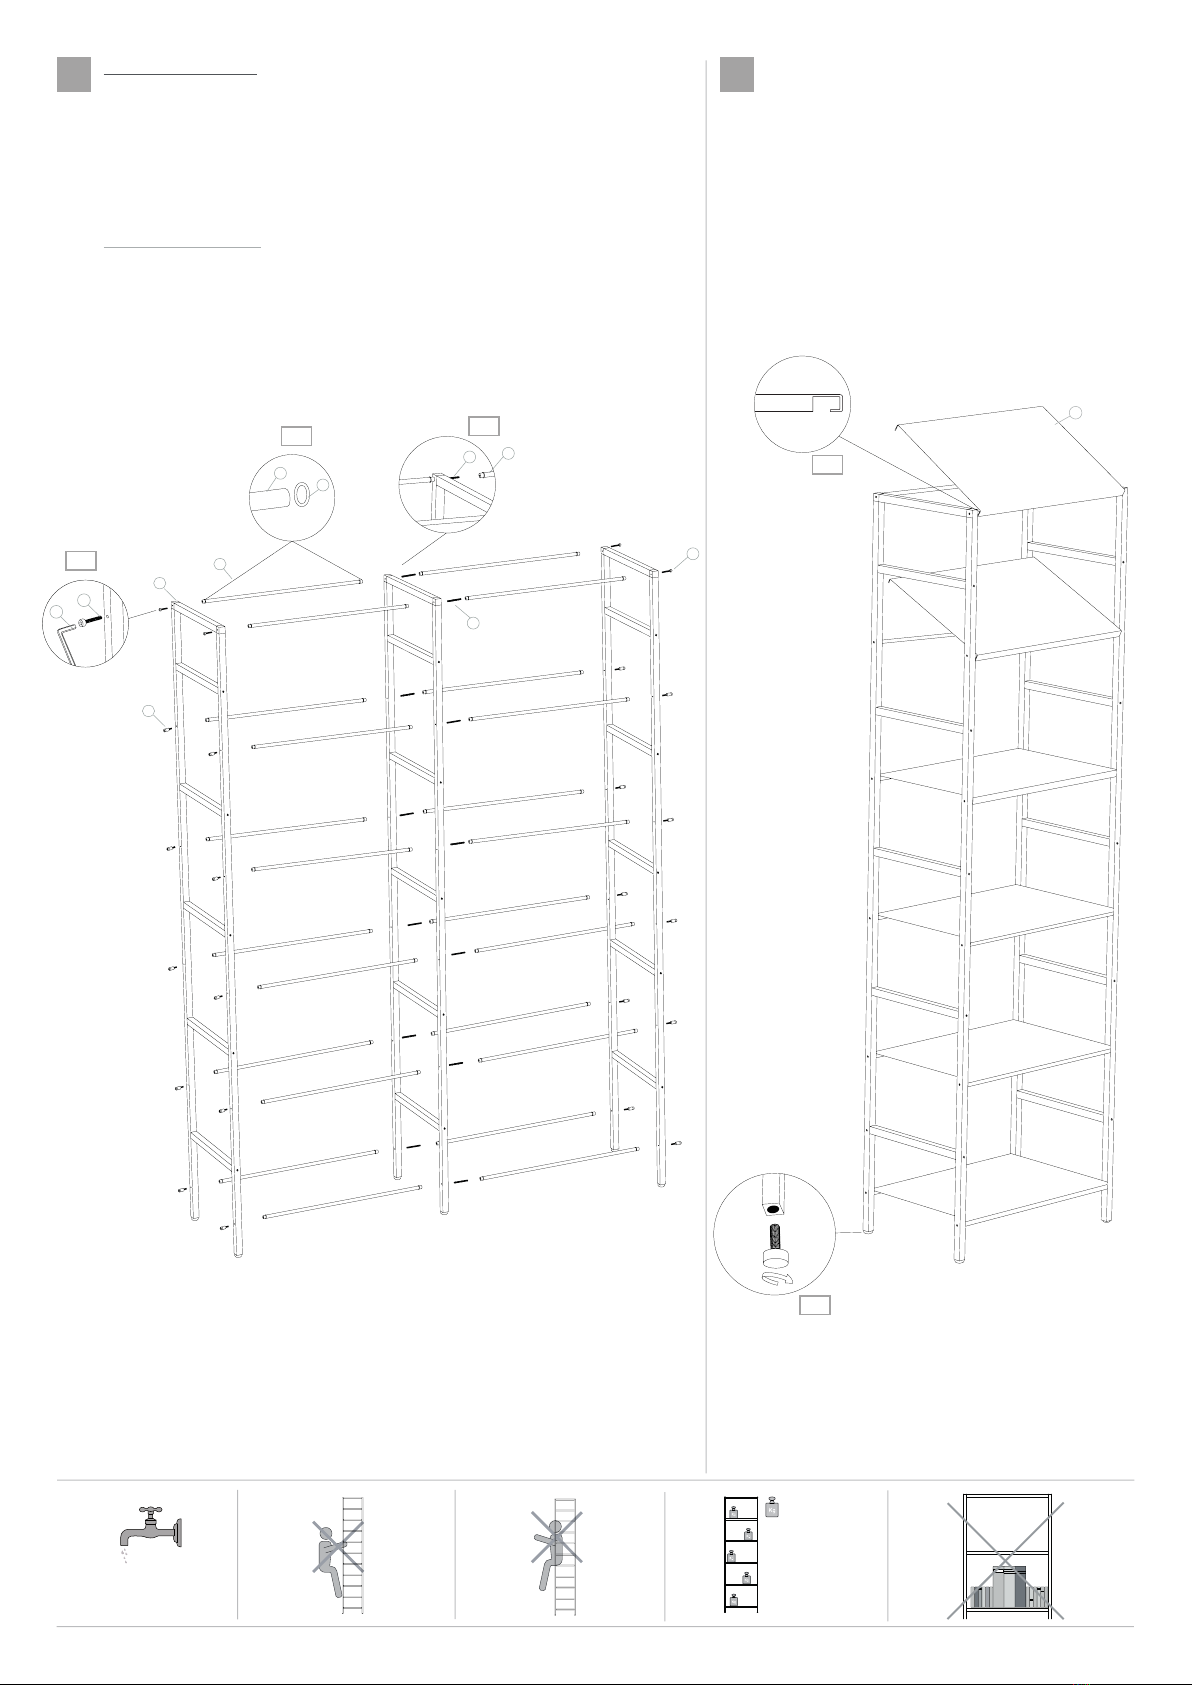
Due o più campate: Inserire gli O-ring (D) all’esterno delle barre (C)
(fig.2.1); se non sono già inseriti. Individua il lato esterno della prima
spalla, cioè quello con i fori più grandi. Avvitala alle barre tramite le
viti con testa a brugola (fig. 2.2). Nei fori della parte destra delle
barre, avvita per metà le viti senza testa (G), inserisci la seconda
spalla (Fig 2.3) e avvita i tubi della successiva campata. Procedi così
fino ad arrivare all’ultima spalla, la quale verrà chiusa con le viti a
brugola.
Two or More Spans: Insert the O-rings (D) outside the bars (C)
(fig.2.1); if they are not already inserted. Identify the outer side of the
first shoulder, which is the one with the largest holes. Fix it to the
bars with the screws using the Allen head (Fig. 2.2). In the holes of
the bars’ right side, put the headless screws (G) halfway, insert the
second shoulder (Fig. 2.3) and screw the bars of the next span. Pro-
ceed this way until reaching the last shoulder, which will be closed
with the Allen screws.
2 3 Inserire i ripiani (B), incastrando la piega
frontale all’interno della barra e spingendo
la parte posteriore verso il basso. Regolare i
piedini (fig. 3.1)
To insert the shelves (C), engage the front fold
on the bar and push the the back part
downwards. Adjust the feet (Img. 3.1)
Consiglio: Se devi fissare al struttura a parete, vai
direttamente al passaggio 4 prima di fissare i ripiani.
Tip: If you want to fix the structure to the wall, go directly to
the step 4 before fixing the shelves.
B
3.1
Fai attenzione ad
agganciare la
doppia piega del
ripiano, nella parte
frontale (Fig. 3.2)
Be careful to
engage the double
fold of the shelf
to the front part
of the bookshelf
(Fig. 3.2)
A
D
C
F
C
F
H
2.1 2.3
2.2
3.2
G
GC
EF
EF
K3 + Attacco a parete / Wall mount
Tasselli da muro
Wall plugs
B
CViti da muro
Wall screws
Attacco a parete
Wall hook
A
Se la struttura viene posizionata contro una parete, consigliamo di inserire gli attacchi a parete forniti.
Individuare la posizione in cui si desidera montare la libreria (fig. 4.0 ) ma soprattutto dove posizionare l’attacco a parete (fig.
4.1).
Vengono forniti dei grani per bloccare l’aggancio a parete alla spalla, le viti senza testa vanno avvitate in base alla profondità
scelta, o se è presente un battiscopa vedi esempio a lato della (fig. 4.1).
Con una matita indicare il punto dove forare il muro (fig. 4.2). Forare ed inserire il tassello (fig. 4.3), avvitare la vite (fig. 4.4).
If the structure is placed against the wall, we recommend to insert the supplied wall hooks.
Locate where the bookshelf is going to be mounted (fig. 4.0) and where the wall hook will be placed (fig. 4.1).
Grub screws are supplied to block the wall hook to the upright. They must be screwed according to the desired depth. In
presence of a baseboard, check the example on the fi. 4.1.
Using a pencil, mark the point where the wall must be drilled (fig. 4.2.). Drill and insert the dowel (fig. 4.3.), tighten the screw
(fi. 4.4.)
/ Grab screw positionning
/ Depth 36 cm
/ Depth 29 cm
Upright
Without baseboard With baseboard
4
COSA TI OCCORRE /
REQUIRED TOOLS
Ø6
DViti senza testa
Headless screws
4.1
4.0 4.2
4.3
4.4
B
C
A
ED
Prof. 29 cm
Prof. 36 cm
Con battiscopaSenza battiscopa
Posizionamento grani
Spalla/
EChiave Brugola
Allen Key
K3 + Aggancio Contenitori / Containers hooking
COSA TI OCCORRE /
REQUIRED TOOLS
1Scegliere la posizione dove inserire il contenitore
Determine the container’s position
Bloccare il contenitore alla spalla avvitando la vite senza
testa (A), utilizzando i fori ai lati del contenitore.
Fix the container to the shoulder by tightening the
headless screw (A), using the holes on the sides of the
container.
2
A B
Viti senza testa
Headless screws
Chiave Brugola
Allen Key
1.1 2.1
2.2
B
A

Other Kriptonite Indoor Furnishing manuals

Kriptonite K2 User manual

Kriptonite

Kriptonite K2 User manual

Kriptonite KROSSING User manual

Kriptonite

Kriptonite KROSSING User manual

Kriptonite CANTINETTA User manual

Kriptonite

Kriptonite CANTINETTA User manual

Kriptonite K3+ User manual

Kriptonite

Kriptonite K3+ User manual

Kriptonite KROSSING ROTANTE User manual

Kriptonite

Kriptonite KROSSING ROTANTE User manual

Kriptonite UMBRELLA STAND User manual

Kriptonite

Kriptonite UMBRELLA STAND User manual

Popular Indoor Furnishing manuals by other brands

Home Decorators Collection V174814 Use and care guide

Home Decorators Collection

Home Decorators Collection V174814 Use and care guide

Costway OP70932 user manual

Costway

Costway OP70932 user manual

Rauch M1697 Assembly instructions

Rauch

Rauch M1697 Assembly instructions

Napoleon NEFP30-3620RLB Installation and operation manual

Napoleon

Napoleon NEFP30-3620RLB Installation and operation manual

Costway KC52264 user manual

Costway

Costway KC52264 user manual

Coaster 102722GRY Assembly instructions

Coaster

Coaster 102722GRY Assembly instructions

Seville Classics WEB571 manual

Seville Classics

Seville Classics WEB571 manual

Canvas Office Landscape Private Office Hutch Installation and Disassembly for Recycling Instructions

Canvas

Canvas Office Landscape Private Office Hutch Installation and Disassembly for Recycling Instructions

Instant Desks IDA-8411 Assembly instructions

Instant Desks

Instant Desks IDA-8411 Assembly instructions

Freedom TORQUAY 23860438 Assembly instructions

Freedom

Freedom TORQUAY 23860438 Assembly instructions

modway EEI-2146 manual

modway

modway EEI-2146 manual

fully Jarvis Assembly instructions

fully

fully Jarvis Assembly instructions

BOWMAN Signature Series manual

BOWMAN

BOWMAN Signature Series manual

John Thomas TT21 Assembly instructions

John Thomas

John Thomas TT21 Assembly instructions

VIPACK AMORI BED AMBE9014 Assembly instructions

VIPACK

VIPACK AMORI BED AMBE9014 Assembly instructions

stilum ludo Mounting instructions

stilum

stilum ludo Mounting instructions

Venjakob 6555 Assembly instructions

Venjakob

Venjakob 6555 Assembly instructions

Hay COPENHAGUE DEUX CPH220 instruction manual

Hay

Hay COPENHAGUE DEUX CPH220 instruction manual

manuals.online logo
manuals.online logoBrands
  • About & Mission
  • Contact us
  • Privacy Policy
  • Terms and Conditions

Copyright 2025 Manuals.Online. All Rights Reserved.