Kronan City User manual

HANDBOK
MANUAL
KRONAN city liggDel
KRONAN CITY CARRYCOT

03 Introduktion
05 Säkerhet
07 Monteringsanvisning
till liggdel
13 Avmontering av
liggdelen från chassi
14 Tvättråd, skötsel
och underhåll
19 Garanti och
reklamation
Innehållsförteckning

Tack för att du har valt en
Kronan City Liggdel!
Vi hoppas att du och ditt barn får stor glädje och
nytta av er nya vagn. Kronan Barnvagn är gjord för
dig som vill ha en rejäl och stabil konstruktion som
klarar av familjevardagen, har hög komfort för barnet,
snygg design och är funktionell och smidig för dig
som förälder. För att du ska få bästa utbyte av din vagn
redan från början är det viktigt att du läser igenom den
här handboken instruktioner om rätt montering,
funktioner och skötsel. Om du har frågor eller
funderingar är du välkommen att kontakta Kronans
kundservice på telefon: 08-694 72 82 eller via e-post:
info@kronan.com.
Med vänlig hälsning
Kronan Trademark
Läs anvisningarna noga före användning. Spara dem för framtida bruk.
Ditt barns säkerhet kan riskeras om du inte följer anvisningarna!
Viktigt

54
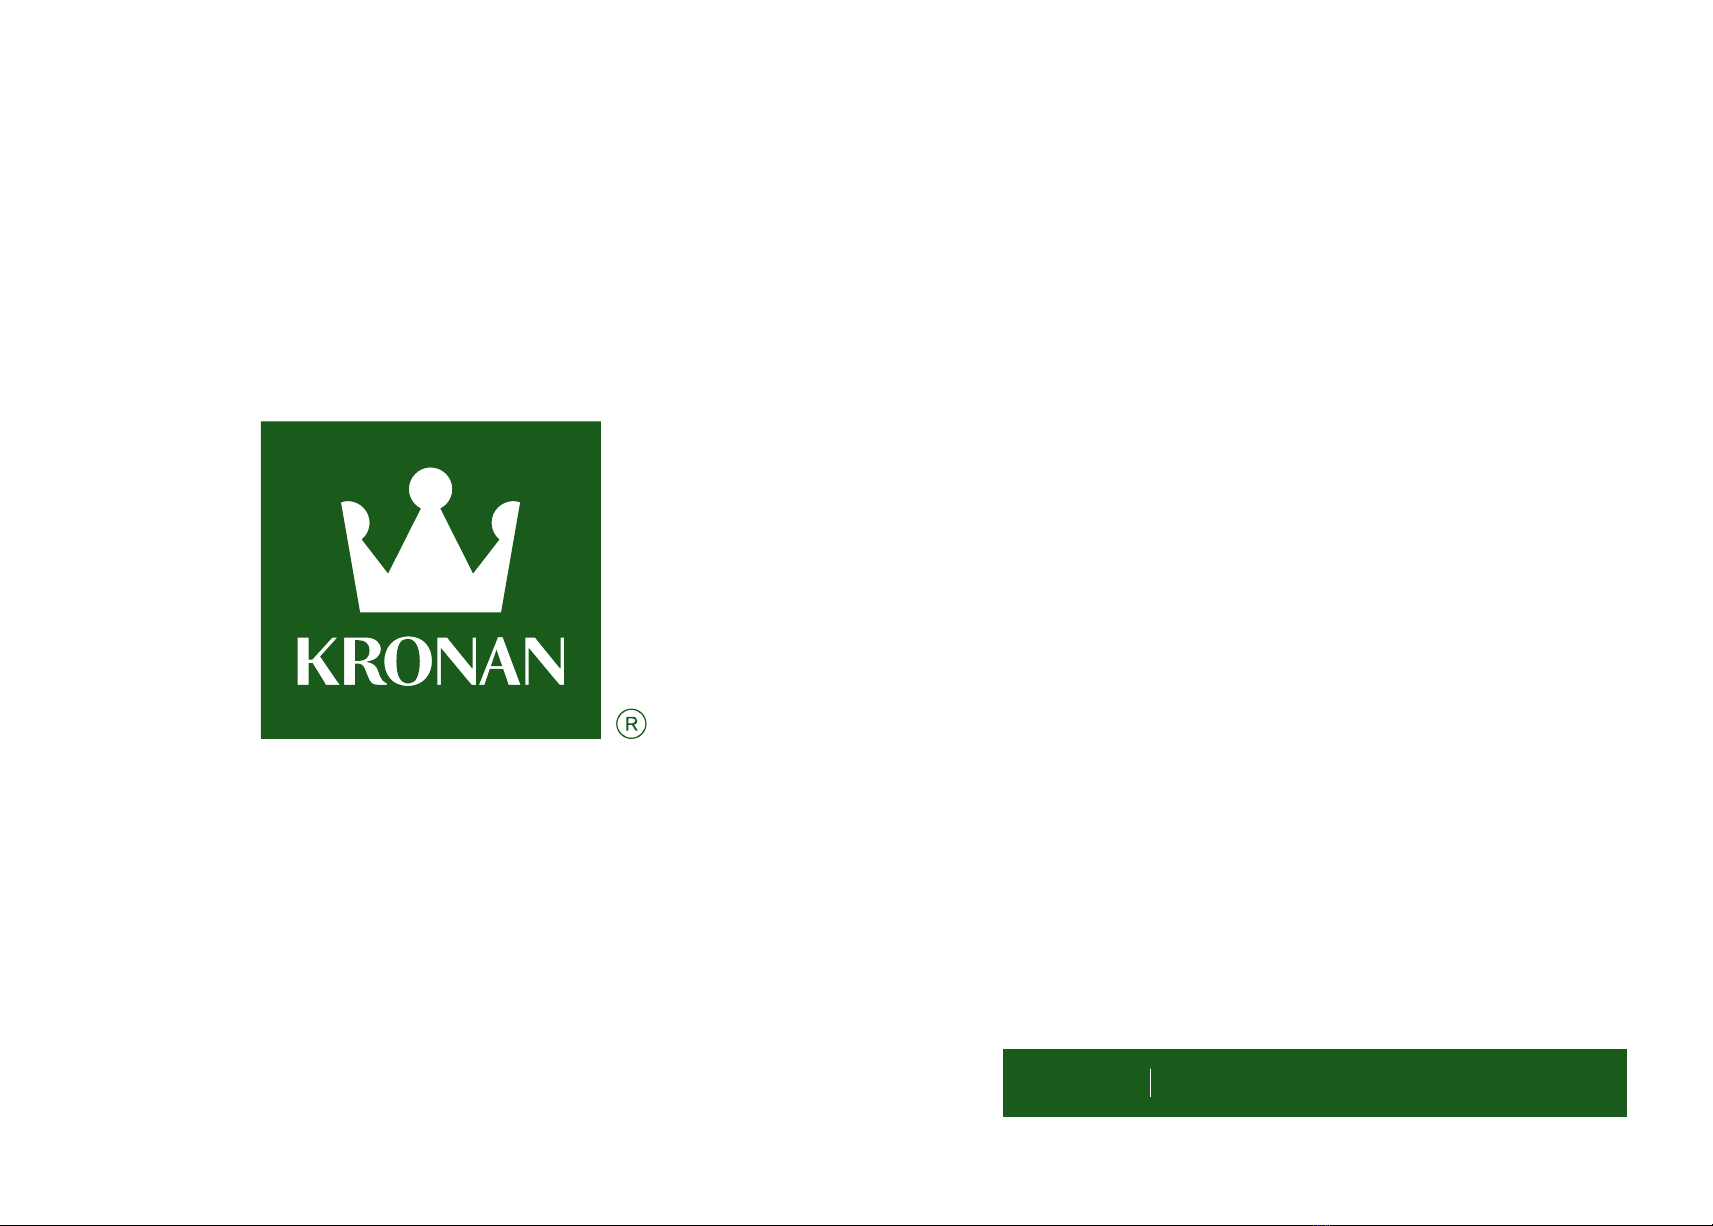
Översiktsillustration
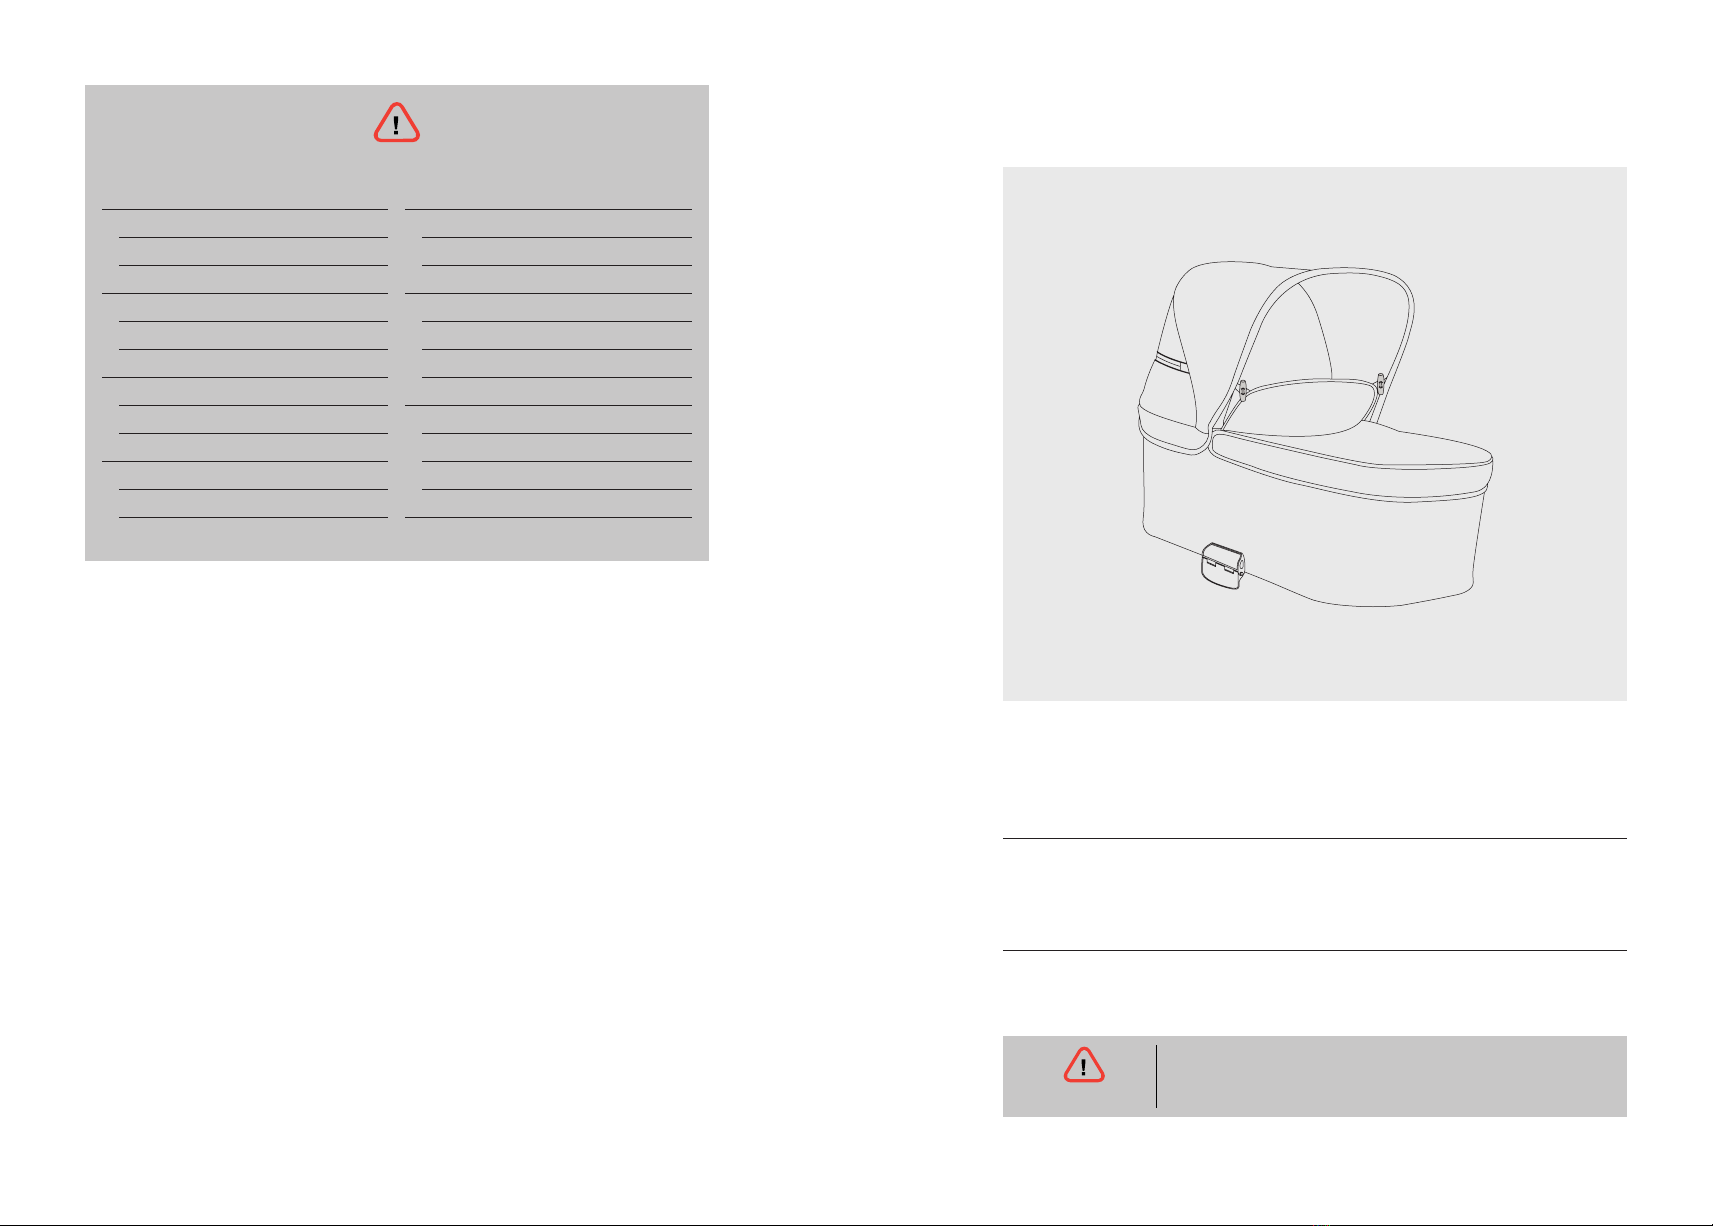
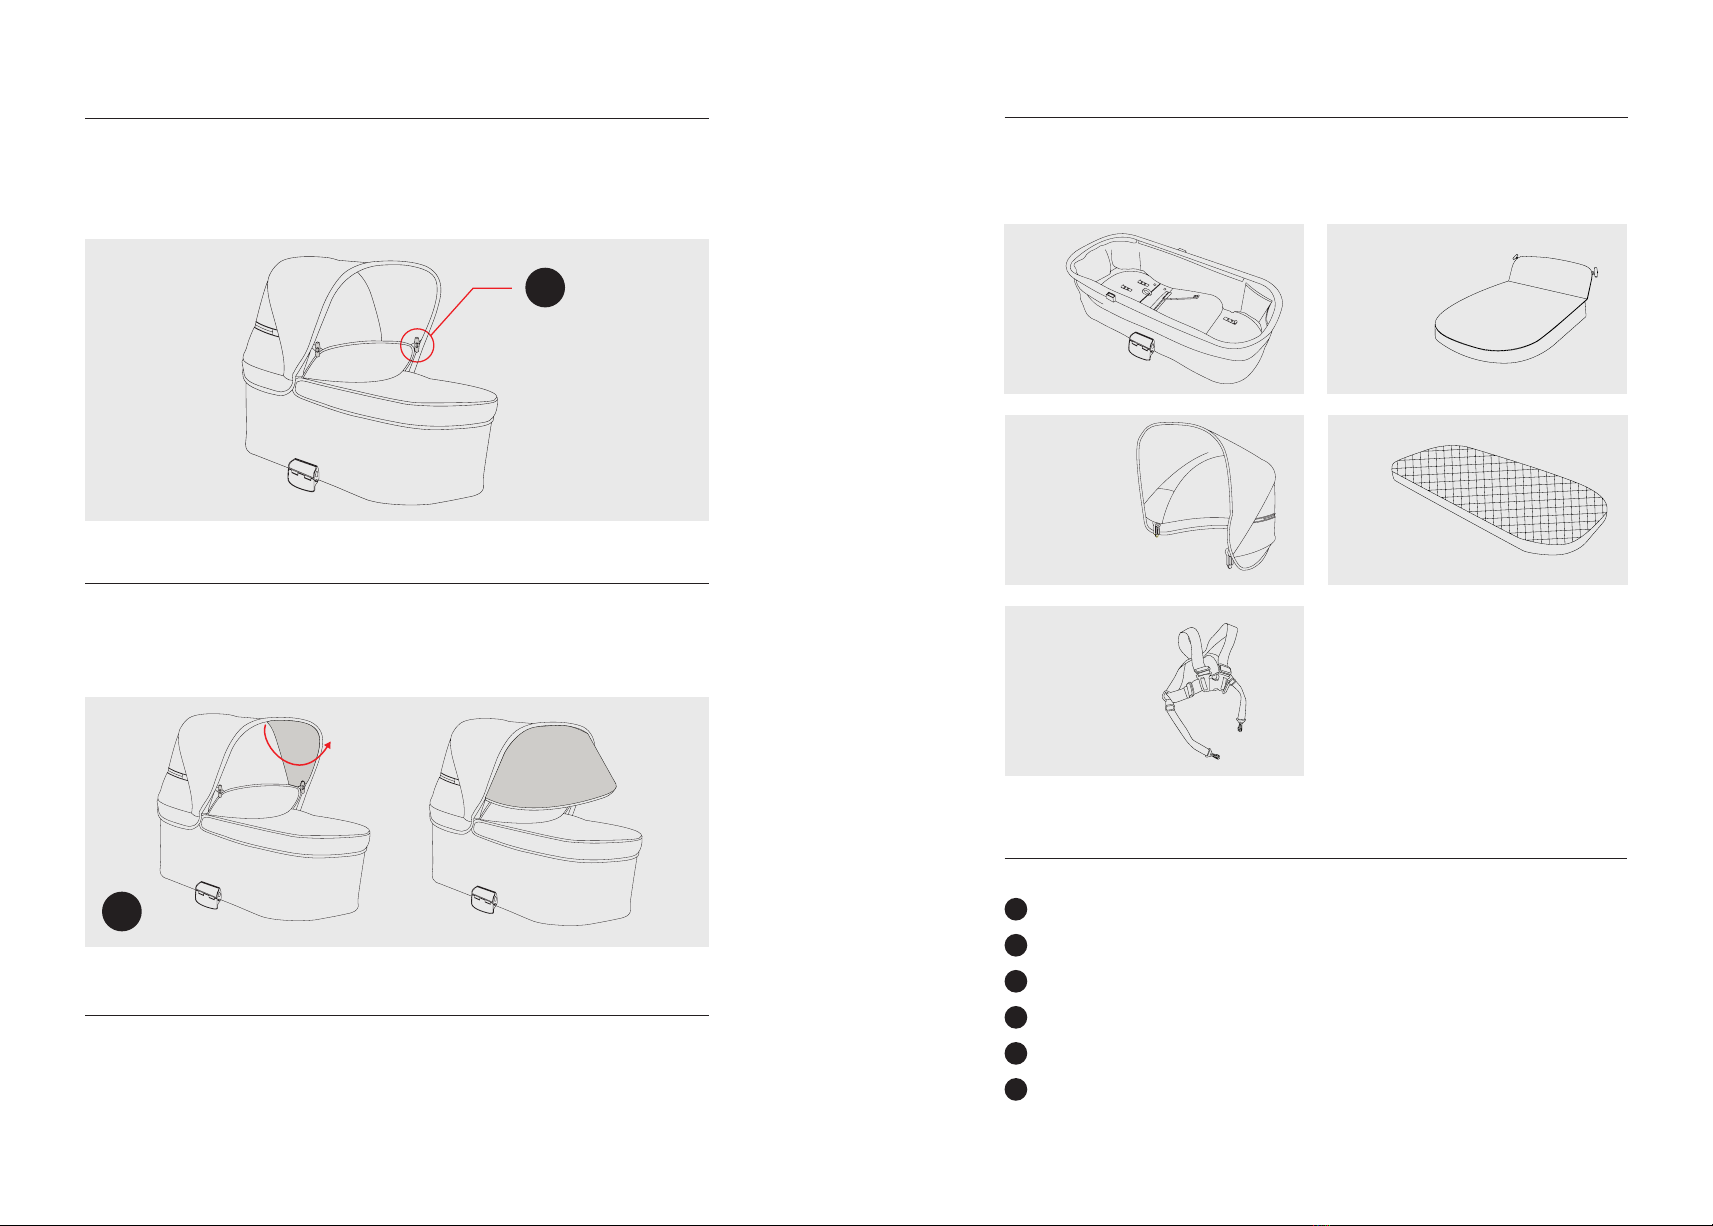
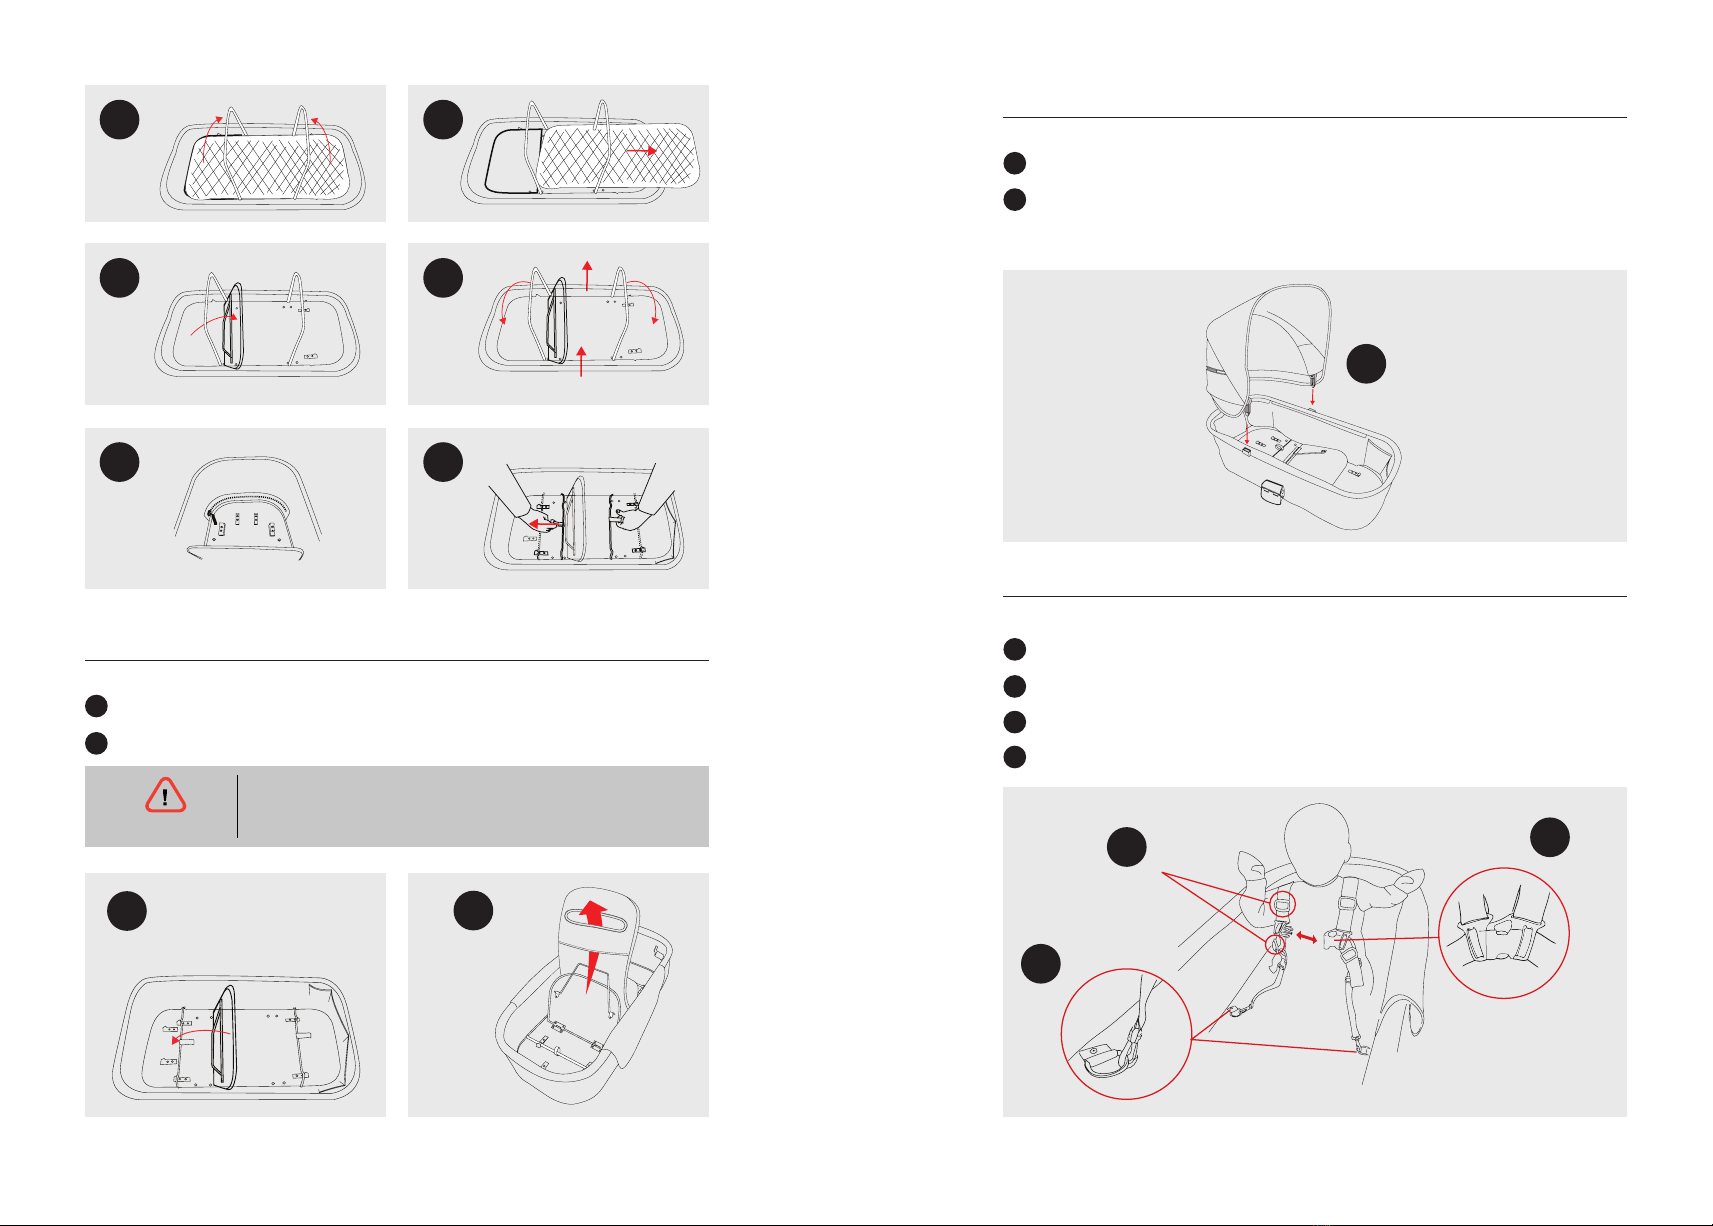
Liggdel
Säkerhet
Säkerhet är A och O och ingenting kan vara säkert nog när det gäller ditt barn. Därför är det
av största vikt att instruktioner och föreskrifter i denna handbok noga följs. Vi följer Konsu-
mentverkets rekommendationer och genomför löpande säkerhetstester för att säkerställa hög
standard och kvalité. Hör av dig till oss om något är oklart, så berättar vi hur du ska göra.
Nedan har vi lyft fram några särskilt viktiga säkerhetsaspekter:
VARNING
• VARNING: Det kan vara
farligt att lämna barn utan
tillsyn. Lämna aldrig ditt barn i
barnvagnen utan uppsikt.
• VARNING: Se till att samtliga
lås och spärrar fungerar innan du
använder vagnen.
• VARNING: För att undvika
olyckor, säkerställ att ditt barn
inte är i närheten av vagnen när
vagnen fälls upp eller ihop.
• Låt inte ditt barn leka med
denna produkt.
• Liggdelen är avsedd för barn
från 0 månader upp till
6 månader. Max vikt 9 kg.
• Sittdelen är avsedd för barn
från 6 månader upp till 4 år.
Maxvikt 15 kg.
• VARNING: Använd säkerhets-
selen så fort ditt barn kan sitta
utan stöd. Säkerställ att liggdel,
sittdel eller babyskydd är
korrekt monterat på chassi
innan du använder vagnen.
• VARNING: Det är ditt ansvar
att säkerhetsföreskrifter och
instruktioner följs.
• VARNING: De säkerhets-
föreskrifter och instruktioner
som bifogas den här handboken
täcker inte alla situationer som
kan tänkas uppstå.
• VARNING: Lämna aldrig
vagnen obromsad.
• VARNING: Se till att vagnen
är bromsad när du lyfter i och
ur barnet.
• VARNING: Av säkerhetsskäl –
använd endast reservdelar som
är godkända av Kronan.
• För bästa stabilitet – placera
alltid tyngre föremål i mitten
av varukorgen. Maxlast 10 kg.

76
VARNING
• VARNING: Varukorgen
får aldrig användas för
transport av barn.
• VARNING: Allt som hängs på
vagnens handtag försämrar
vagnens stabilitet.
• VARNING: Vagnen får inte
lastas med en totalvikt som
överskrider 25 kg.
• VARNING: Kronan Duovagn
är avsedd för max 1 barn.
• VARNING: Denna vagn är
inte lämplig för löpning och
skridskoåkning.
• VARNING: Vid transport på
exempelvis buss eller tåg,
placera alltid vagnen i
transportmedlets färdriktning.
• VARNING: Se till att
bärhandtagen är i sina
förvaringsfack när du inte
använder dessa.
Kronan City liggdel är stabil, ombonad och rymlig för att ditt barn ska uppleva bästa kom-
fort. Liggdelen är avsedd för ett barn upp till cirka 6 månader, maxvikt 9 kg.
Nedan beskriver vi några praktiska funktioner:
Liggdel
Ryggstöd
I liggdelen kan barnet även sitta, med hjälp av ett ryggstöd. När barnet börjar sitta ska selen
som medföljer alltid användas.
VARNING
Placera alltid bärhandtagen i för detta avsedda
fickor när de inte används.
Bärhandtag
Liggdelen har två rejäla vadderade handtag som är placerade i fack på liggdelens båda lång-
sidor. Ha alltid bärhandtagen undanstoppade när ditt barn är i vagnen. Maxvikt är 9 kg.

98
Solkeps
Suffletten är utrustad med en solkeps som du enkelt fäller ut. Den förhindrar att ditt barn får
sol i ögonen eller ger en lugnare miljö när barnet skall somna. För att fälla in solkepsen tar
du tag mitt på kepsen och för handen in och upp mot insidan av suffletten. Bild B.
Ventilationslucka
Suffletten är utrustad med en ventilationslucka. Använd denna när det är varmt ute för bra
ventilation i vagnen, men se upp så att det inte drar på barnet. Ställ aldrig vagnen i direkt
solljus när ditt barn är i.
A
B
Liggdelen är avsedd för ett barn och kan användas till dess ert barn är cirka 6 månader,
maxvikt 9 kg.
Monteringsanvisning – liggdel
Fyrpunktssele
Sufflett med klädsel Madrass med överdrag
Liggdel med klädsel Vindskydd
Vindskydd
Vindskyddet bör användas vid nederbörd eller när det blåser så pass kraftigt att barnet kan
utsättas för drag. Du kan välja att fästa vindskyddet på ut eller insida av solkepsen. Du fäster
vindskyddet enligt bild A.
Montering av liggkorg
Så här gör du:
Fäll upp staget. Bild A.
Ta bort madrassen. Bild B.
Vik fram ryggplattan mot fotändan. Bild C.
Tryck ner staget igen och lyft upp ramen. Bild D.
Dra igen den främre dragkedjan. Bild E.
Greppa nylonbanden som sitter på metallbågarna i främre delen av liggkorgen. Bild F.
1
2
3
4
5
6

1110
VARNING Använd inte en madrass som är tjockare än 40mm.
Montering av madrass
Så här gör du:
Fäll upp ryggstödet och fäll upp bygeln. Bild A.
Trä över den bakre delen av madrassen över bygeln och fäll ner bygeln. Bild B.
1
2
A
C
E
B
D
F
AB
Montering av sufflett på liggdel
Så här gör du:
Fäll upp suffletten.
Montera fästena i liggdelen enligt bild A. Om fästena har olika positioner vid
montering går det bra att montera det ena fästet först och sedan reglera tills det har
samma position som det andra innan du monterar det andra fästet.
Användarinstruktion för fyrpunktsele
Så här gör du:
Montera selen i de ringar som finns på mitten av liggdelen under madrassen. Bild A.
Montera selen på ditt barn och knäpp spännet. Bild B.
Justera selens axelband och midjebälte. Bild C.
Selen ska sitta åt för att fylla sin funktion och vara effektiv.
1
1
2
2
3
4
A
B
A
C

1312
Montering av liggdel på chassi
Så här gör du:
Bromsa chassi innan du monterar liggdelen.
Knäpp upp de båda fästena som är placerade på liggdelens yttre långsida. Bild A.
Fäst liggdelen på chassi och se till att de båda fästena glider i hållaren på chassi.
Bild A.
Knäpp de båda fästena och säkerställ att liggdelen sitter fast genom att dra
fotänden lätt uppåt. Bild B.
1
2
3
4
A
VARNING
Använd alltid fyrpunktsselen när ditt barn
sitter i liggdelen. B
A
Avmontering av liggdel från chassi
Så här gör du:
Knäpp upp de båda fästena som är placerade på liggdelens yttre
långsida och lyft uppåt. Bild A.
1
VARNING
Säkerställ att liggdelen är korrekt monterat på chas-
sit innan du använder vagnen. Detta gör du genom
att lätt dra liggdelen uppåt när den är monterad för
att se så att den sitter fast.

1514
Tvättråd, skötsel och underhåll.
Så här tar du av klädseln
Liggdel
Så här gör du:
Ta ur madrassen.
Lossa stagen från sina fästen och för dem inåt mitten av liggkorgen. Bild A.
Lossa dragkedja i huvud- och fotända.
Kräng av tyget från bottenplatta och ramverk.
Var noga med att dra igen alla dragkedjor innan du tvättar tyget.
Lossa sufflettbåge från sufflettfäste genom att trycka på knapparna på
sufflettfästets utsida.
Dra sufflettbågen ur sufflettfästet.
Lossa tyget från sufflettbågen genom att dra ur sufflettbågen.
Tvätta tyget i 30 grader och använd inte sköljmedel. Följ tvättanvisningarna som fölljer med
vid köp. Var noga med att dra igen alla dragkedjor innan tvätt. Låt tyget dropptorka och
montera klädseln lätt fuktig för att få bästa passform. Låt tyget torka ordentligt innan du
placerar ditt barn i vagnen.
1
2
3
4
5
6
7
A
Så här sätter du på klädseln
Liggdel
Så här gör du:
Lossa ramstagen från ramen genom att vrida dem parallellt med ramen, dra
lätt inåt. Bild A.
Trä på stagskydden samt nylonöglorna och sätt tillbaka stagen på ramen.
Sätt ner ramen i liggdelstyget. Det mittersta nylonbandet ska vara på
ramens ovansida. Bild B.
Notera att ramen hamnar åt rätt håll genom att sufflettfästena på ramen träs i
sina passningshål i liggdelstyget.
Vik upp båda ramstagen och placera bottenplattan i liggdelstyget. Alla tre
nylonband ska ligga under bottenplattan. Bild C.
Notera att bottenplattan placeras åt rätt håll genom att plastfästena på
undersidan stämmer med hålen i liggdelstyget.
Passa in plastfästena genom hålen på undersidan av liggdelstyget.
Vik tillbaka ramstagen så att plattan hamnar i botten och ramen högst upp i tyget.
Dra stagen mot fot- och huvudända tills de fastnar i sina fästen. Bild E.
Montera sufflett och fäst den på liggdelen. Bild F.
Montera madrass. Bild G.
1
2
3
4
5
6
7
8
9
10
11

1716
A
B
C
D
5cm
E

1918
F
G
Skötsel och underhåll
Tyget
Använd regn- och vindskydd vid regn eller snö.
Tvätta tyget när det är smutsigt. Smuts kan tillsammans med sol orsaka blekning.
Följ tvättrådinstruktioner på etikett som är fastsydd i klädseln.
Ställ gärna vagnen i skuggan. Direkt solljus kan förutom att irritera barnet även
bleka tyget vid långvarig exponering.
1
2
3
Om du har frågor om skötsel, underhåll eller tvättråd kontakta
gärna Kronans kundservice via tel: 08-694 72 82 eller e:post:
info@kronan.com.
Garanti och reklamation
Förlossningsgaranti
Om någonting skulle gå fel under graviditeten eller vid förlossningen har du alltid rätt att
lämna tillbaka vagnen och få pengarna tillbaka. Kontakta vår kundservice så ordnar vi med
alla praktiska detaljer. Vi kallar det Förlossningsgaranti.
Kronans garanti
När du köper en Kronan-produkt har du alltid ett års produktgaranti. Om problem uppstår
är det viktigt att du hör av dig till oss omgående så att vi kan hjälpa dig så fort som möjligt.
Fyll i reklamationsblanketten på vår hemsida www.kronan.com.
Var noga med att fylla i alla uppgifter.
Bifoga alltid kopia på kvitto eller inköpsbevis.
1
2
3

2120
Garantivillkor
Kronan Trademark garanterar att denna produkt vid inköpstillfället är fri från fel vad gäller
material, utformning och funktion. Om det under garantitiden, vid normal användning,
korrekt montering samt följda skötselråd ändå skulle uppstå problem med produkten, ska
dessa vara av sådan art att bristen går att påvisa i material, utformning eller funktion för
att garantin ska gälla. I sådana fall reparerar eller byter vi produkten i enlighet med nedan
specificerade villkor.
Garantin gäller endast mot uppvisande av inköpsbevis utfärdat av Kronan till köpare.
Kronan förbehåller sig rätten att vägra utföra garantiservice om inköpsbevis saknas.
Garantin gäller inte för någonting annat än fel i material, utformning och funktion.
Garantin täcker inte periodiska kontroller, underhåll, reparationer och utbyte av
delar beroende på normalt slitage samt skador som uppstår på produkten genom
felaktig användning eller hantering.
Kronan har rätt att vägra garantiservice om det är uppenbart att man ej följt rekom-
menderade skötselanvisningar. Läs gärna igenom dessa under ”Skötselråd” i hand-
boken.
Denna garanti påverkar inte konsumentens rättigheter enligt gällande tillämpad
lagstiftning. Om det inte finns någon tillämpad lagstiftning är köparens rättigheter
begränsade till vad som nämns i garantivillkoren. Kronan Trademark är inte ansvarig
för skador som följer på grund av brott mot uttalad eller underförstådd garanti för
denna produkt.
Vi lämnar ingen garanti för andrahandsköp.
1
2
3
4
5
6
7
Reklamation
Du har tre års reklamationsrätt. Om problem uppstår är det viktigt att du hör av dig till oss
omgående så att vi kan hjälpa dig så fort som möjligt.
Även om reklamationstiden har gått ut är det av stort värde för oss att få veta hur produkten
fungerar för dig. Så hör gärna av dig till oss och framför dina synpunkter.
Fyll i reklamationsblanketten på vår hemsida www.kronan.com.
Var noga med att fylla i alla uppgifter.
Bifoga alltid kopia på kvitto eller inköpsbevis.
1
2
3
Kontakt
Kontakta gärna vår kundservice
om du har frågor eller funderingar.
Telefon: 08 694 72 82
E-post: info@kronan.com
Kronan Trademark AB
Kemistvägen 6
18379 Täby

2322
Table of contents
25 Introduction
27 Safety
29 Instructions for assembly
for chassis, wheels and
brake
32 Assembly instructions
for carrycot
36 Removing carry cot
from chassis
37 Guarantee and complaints

2524
Thank you for choosing
a Kronan City carrycot!
We are glad that you have chosen a Kronan Sulky
and hope that you and your child will enjoy your new
pushchair, and find it functional and flexible in use.
It is important that you read through this manual
describing the correct assembly, function and care of
your pushchair, in order to enjoy its benefits fully from
the very start. Please contact the Customer Service
desk at Kronan if you have any questions or concerns
about the pushchair. Telephone: +46 8 694 7282, or
e-mail: info@kronan.com
With best wishes,
Kronan Trademark
Read the instructions carefully before using the pram. Keep them
safe for future reference. Failure to follow the instructions may
place your child at risk.
Important

2726
Overview
Carrycot
Safety
Safety is all-important, and no effort may be spared when ensuring the safety of your child. It is
therefore essential that the instructions and regulations in this manual are followed carefully.
We follow the recommendations published by the Swedish Consumer Agency and we are con-
tinuously carrying out safety testing, to ensure a high standard and quality. Please feel free to
contact us if anything is unclear, and we will explain the correct procedure.
Some particularly important safety considerations are listed below.
WARNING
• WARNING: Leaving a child
unattended may be dangerous
Never leave your child in the
pram without supervision.
• WARNING: Make sure that all
locks are working properly
before using the pram.
• WARNING: Ensure that your
child is not close to the pram
when you fold or unfold it, in
order to avoid injury.
• Do not allow your child to play
with this product. .
• The carrycot is intended for
children from 0 months up
to the age of 6 months
(maximum weight 9 kg).
• The seat unit is intended for
children aged from 6 months to
4 years (maximum weight 15 kg).
• WARNING: Use a safety
harness as soon as your child can
sit up without support. Ensure
that the carrycot, seat unit or
child protector is correctly fitted
on the chassis before using the
Kronan Duo.
• WARNING: It is your responsi-
bility to ensure that safety
regulations and instructions
are followed.
• WARNING: The safety
regulations and instructions
described in this manual do not
cover all possible situations.
• WARNING: Never leave the
pram without applying the brake.
• WARNING: Make sure that the
brake is applied before lifting the
child into and out of the pram.
• WARNING: To ensure safe use
of the pram, use only spare parts
and accessories that have been
approved by Kronan.
• Place heavier items in the
centre of the shopping tray to
achieve the best stability.
Maximum load 10 kg.

2928
• WARNING: The shopping tray
must never be used to transport
children.
• WARNING: Hanging items
from the handle of the pram
will impair stability.
• WARNING: The pram may not
be loaded with a total load
greater than 25 kg.
• WARNING: The Kronan Duo
Pram is intended to accommo-
date a single child.
• WARNING: This pram is not
suitable for use when jogging
or ice skating.
• WARNING: When travelling by
bus or train, for example, always
place the pram facing the
direction of travel.
• WARNING: Make sure the
carrying handles are placed in
their storage pockets when
not in use.
The carrycot of the Kronan City Pram is stable, cosy and spacious, to give your child the
greatest comfort. It is intended for use by children aged up to approximately 8 [sic, previ-
ously “6”] months, or of maximum weight 9 kg. Some of the practical functions of the car-
rycot are described below:
Carrycot
Back support
The child can sit in the carrycot with the aid of a back support. The harness that is supplied
as an accessory should always be used when a child starts to sit up.
VARNING
Always place the carrying handles in their holders
when they are not in use.
Carrying handles
The carrycot has two sturdy padded carrying handles located in holders on its sides. Always
keep the carrying handles out of the way when a child is in the pram. Maximum weight 9 kg.

3130
Sun visor
The hood is equipped with an easy-to-use sun visor. This prevents the child from having
the sun in his or her eyes, and it makes for calmer surroundings when the child is to sleep.
Withdraw the sun visor by holding it in the centre and moving your hand in and up into the
inside of the hood. See Figure B.
Ventilation
The hood has an opening to provide ventilation. Open this in warm weather to ensure good
ventilation, but make sure that the child is not sitting in a draught. Never place the pram in
direct sunlight when a child is in it.
A
B
Wind cover
The wind cover should be used when it is raining or when the wind is so strong that there
is a risk that the child sits in a draught. The wind cover is attached as shown in Figure A.
.
The carrycot is intended for use by a single child, and it can be used until the child is
approximately 6 months old. The maximum weight for a child in the carrycot is 9 kg.
Assembling the carrycot
Four-point harness
Wind cover
Fabric hood
Mattress with cover
Carrycot with fabric cover

3332
Mounting the hood
Do as stated below:
Lift the back support and lift the metal frame. Figure A.
Draw the rear part of the mattress over the metal frame and then push the frame down. Figure B.
1
2
WARNING Do not use a matress thicker than 40mm.
A
B
Mounting the carrycot
Do as stated below:
Pull the metal frame to a vertical position. Figure A.
Remove the matress. Figure B.
Fold back support towards the foot end. Figure C.
Push the metal frame down and lift the top frame. Figure D.
Close the zipper at the head end. Figure E.
Take hold of the two nylon tapes that are attached to the metal frame in the carrycot.
Figure F.
1
2
3
4
5
6
A
C
E
B
D
F

3534
Mounting the hood on the carrycot
Do as stated below:
Open up the hood.
Attach the fittings in the carrycot as shown in Figure A. If the fittings are in different
positions during the mounting, it is possible to attach one of them first and then adjust the
placing until it has the same position as the second fitting. Then attach the second fitting.
1
2
A
Instructions for the four-point harness
Do as stated below:
Fit the harness in the buckles that are positioned at the middle of the carrycot,
below the matress. Figure A.
Fit the harness onto your child and close the buckle (click). Figure B.
Adjust the shoulder straps and waist belt of the harness. Figure C.
The harness should fit the child snugly in order to fulfil its function safely.
1
2
3
4
B
A
C
Mounting the carrycot onto the chassis
Do as stated below:
Apply the brake before mounting the carrycot.
Undo the two fasteners located outside on the sides of the carrycot. Figure A.
Mount the carrycot onto the chassis and make sure that the two fasteners slide into
the holder on the chassis. Figure A.
Close the fasteners and ensure that the carrycot is firmly mounted by pulling the
foot end gently upwards. Figure B.
1
2
3
4
A
WARNING
Always use the four-point harness when the child
is sitting in the carrycot.

3736
B
A
Removing the carrycot from the chassis
Do as stated below:
Undo the two fasteners located outside on the sides of the carrycot and lift upwards.
Figure A.
1
WARNING
Check that the fasteners of the carrycot on the
frame are firmly secured before using the carrycot.
you do this by pulling the foot end gently upwards.
Guarantee and complaints
Safe birth guarantee
You always have the right to return the pram and receive a refund, if anything should go
wrong during the pregnancy or birth. Contact the Customer Service Desk to arrange the
practical details. We call this the “Safe Birth Guarantee”.
Terms of guarantee
Kronan Trademark guarantees that this product on the occasion of purchase and for one
year after purchase is free of faults with respect to material, design and function. If prob-
lems arise during the period of the guarantee, following normal use, correct mounting and
correct care of the product, these problems must be of a type that it is possible to demonstrate
the deficiency in material, design or function for the guarantee to be valid. We will in these
cases repair or exchange the product as specified below.
The guarantee is valid only after presentation of proof of purchase issued by Kronan
to the purchaser.
Kronan reserves the right to decline to carry out service under guarantee if proof of
purchase is missing.
The guarantee is valid solely for deficiencies in material, design or function.
The guarantee does not cover periodic inspection, maintenance, repair or exchange
of parts that are necessary following normal wear and tear, nor for damage that has
arisen through faulty use or management of the product.
Kronan has the right to decline to carry out service under guarantee if it is clear that
the recommended care instructions have not been followed. These instructions are
detailed under “Care, maintenance and cleaning” in the manual, and should be read
thoroughly.
1
2
3
4
5
The Kronan guarantee
Any product from Kronan is accompanied by a 1-year product guarantee. It is important that
you contact us immediately in the event of any problem arising, such that we can help you
as rapidly as possible.
Contact the Kronan Customer Service desk and we will send you a Guarantee Form.
The form can also be downloaded from our website, www.kronan.com.
Complete the form carefully.
Always attach a copy of the purchase receipt or proof of purchase.
Post the completed Guarantee Form to us, or send it by e-mail.
As soon as we have received the form, we will contact you and make sure that you
receive the best possible help.
1
2
3
4
5
Other manuals for City
1
Table of contents
Languages:
Other Kronan Baby Carrier manuals