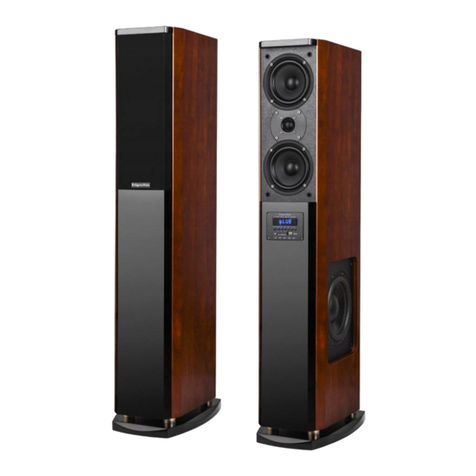
Kruger&Matz KM0503 User manual

Krüger&Matz
Deutsch
Română Polski English
HOME SPEAKERS
KM0503
KM0504


3
Bedienungsanleitung
Deutsch
LAUTSPRECHERINSTALLATION
Außer der Qualität der Lautsprechereinheiten, hängt die akustische Qualität des
Lautsprechersystems auch von Faktoren wie die Größe und Art der Zimmer,
Lautsprecher-Installationsmittel und so weiter ab. Achten Sie bitte auf die
folgenden Punkte während der Installation:
• Wenn der Lautsprecher direkt auf den Boden gestellt wird, ist der Tiefton-Effekt viel
zu offensichtlich. Um dieses zu vermeiden, sollte eine Zementplatte oder andere harte
Trägerplatte auf dem Boden platziert werden.
• Achtung: wenn der Lautsprecher und die Schallquelle oder der Verstärker auf dem
gleichen Träger-Objekt platziert sind, kann der Lautsprecher schmettern.
• Wenn es Wände oder Glastüren in kurzer Entfernung hinter oder vor dem
Lautsprechersystem gibt, beachten Sie bitte, dass schwere und starke Vorhänge an
der Wand oder der Glastür benötigt werden, um unnötige Resonanz und Nachhall-
Effekte zu vermeiden.
• Dieses Modell des Lautsprechersystems besitzt antimagnetisches Design.
Gewöhnliche Fernsehempfänger, können in der Nähe der Lautsprecher stehen mit
guter TV Bildqualität. Aber für einige Fernseher, können sich vielleicht die
Lautsprecher zu nahe benden, was zu schlechter TV Bildqualität führt. In dieser
Situation, vergrößern Sie bitte den Abstand zwischen Lautsprecher und Fernseher.
• Achtung: wenn es Magnetfelder oder Geräte gibt, die starke magnetische Felder
erzeugen, kommt es möglicherweise zu schlechter TV Bildqualität wegen der
Wechselwirkung zwischen dem Gerät und dem Lautsprecher.
LAUTSPRECHERANSCHLUSS
Bitte vergewissern Sie sich vor dem Anschließen des Lautsprechersystems,
dass der Verstärker ausgeschaltet ist.
• Gemeinsame Verbindung
Verwenden Sie die Lautsprecherkabel um die Lautsprecher-Anschlüsse und
die Verstärker-Klemmen zu verbinden. (Siehe Abbildungen) Bitte verbinden Sie
den linken Kanal des Lautsprechers mit dem "L" Klemme des Verstärkers und
der rechte Kanal des Lautsprechers sollte, an der "R" Klemme des Verstärkers
angeschlossen werden. Achten Sie auf die Markierungen von Pluspol und Minuspol
(mit entsprechenden "+" und "-"). Die Umkehrung von Plus- und Minuspol führt zu
Klang-Verzerrungen.

4
Bedienungsanleitung
Deutsch
HINWEISE
• Niemals dieses Lautsprechersystem für lange Zeit in der Sonne oder in der nähe von
Wärmequellen stehen lassen.
• Dieses Lautsprechersystem wird durch hohe Feuchtigkeit oder zu viel Staub
beschädigt werden.
• Sprühen Sie nie Pestizide in der Nähe dieses Lautsprechersystem oder benutzten
Benzin, Verdünner oder andere organische Lösungsmittel, um die Oberäche
des Lautsprechers zu abzuwischen. Dies führt zu einer Beschädigung der der
Lautsprecher-Oberäche. Ein weiches Tuch sollte verwendet werden, um den Staub
von der Lautsprecheroberäche zu entfernen.
• Versuchen Sie niemals die maximale Eingangsleistung des Lautsprechersystems zu
überschreiten.
• Nie solche Signale wie schneller Tonband-Rücklauf/Vorlauf abspielen.
GEMEINSAME VERBINDUNG
Rote Klemme
Schwarze Klemme
1. Bitte den Draht von
Hand straffen, um seine
herausragende Stellen zu
glätten und Kurzschluss zu
vermeiden.
2. Anschlussklemme gegen
den Uhrzeigersinn drehen
und Kupferkabel in das Loch
einstecken.
3. Anschlussklemme im
Uhrzeigersinn anziehen,
leicht am Kabel ziehen
um sicherzustellen dass die
Verbindung fest ist.
Anschlussklemme
im Uhrzeigersinn
anziehen, leicht
am Kabel ziehen
um sicherzustellen
dass die
Verbindung fest ist.
Mit dem
zugehörigen "-"
Terminal des
Verstärkers
verbinden

5
Bedienungsanleitung
Deutsch
TECHNISCHE DATEN
FRONTLAUTSPRECHER
Lautsprechergröße: 1" Tweeter x 1
5" Midrange x 2
8" Woofer x 1
Frequenzweiche: 3 Wege
Frequenzbereich: 36 Hz - 20 kHz
Sensibilität: 91 +/-3 dB
Impedanz: 4 Ohm
Maximale Leistung: 120 Watt
ZENTRALLAUTSPRECHER
Lautsprechergröße: 1" Tweeter x 1
5" Midrange x 2
Frequenzbereich: 70 Hz - 20 kHz
Sensibilität: 88 +/-3 dB
Impedanz: 4 Ohm
Maximale Leistung: 60 Watt
RÜCKSEITIGE LAUTSPRECHER
Lautsprechergröße: 1" Tweeter x 1
5" Midrange x 1
Frequenzbereich: 70 Hz - 20 kHz
Sensibilität: 87 +/-3 dB
Impedanz: 4 Ohm
Maximale Leistung: 45 Watt

6
Owner’s manual
English
SPEAKER INSTALLATION
Except the speaker units' quality, the acoustic quality of the speaker system also
depends on factors like the size and mode of rooms, speaker installation means
and so on. Thus, please pay attention to the following points during installation:
• When the speaker is placed directly on the oor, the subwoofer effect will be too much
obvious. Then one cement board or other hard support plate should be needed to be
placed on the oor.
• Attention: when the speaker and the sound source or the amplier are placed on the
same support object, the speaker may blare screams.
• If there are walls or glass door behind or before the speaker system in the short
distance, please note that heavy and strong curtains should be needed on the wall or
the glass door in order to avoid unnecessary resonance and reverberation effect.
• This model speaker system is with antimagnetic design. For common television
receiver, it can stand near the speaker without bad TV image result. But for some
television, maybe the speaker is too close to it and results in image color damage.
When this situation happens, please move the speaker a little away from the
television.
• Attention: if there is magnetic eld or equipment that creates strong magnetic eld,
it possibly results in television image damage because of the interaction between the
equipment and the speaker.
SPEAKER CONNECTION
Please make sure that the amplier is power-off before connecting the speaker
system.
• Common connection mean
Use the speaker cable to connect the terminals of the speaker rear side to the
terminals of the amplier. (Connection mean as illustrations show) Please connect
the left channel of the speaker to "L" terminal of the amplier, and the right channel of
the speaker should be connected to "R" terminal of the amplier. Attention to the mark
of positive pole and negative pole (with corresponding "+" and "-"). The invertion of
positive pole and negative pole results in sound distortion.

7
Owner’s manual
English
NOTICE
• Never put this speaker system in the sun for long time or approach to heat.
• This speaker system will be damaged under the circumstance of highly humid or too
much dust.
• Avoid spraying the pesticide near this speaker system, or use gasoline, thinner or
other organic solvent to wipe the surface of the speaker. This results in damage or
stains the surface of the speaker. Soft cloth should be used to clean the dust of the
speaker surface.
• Never try to make the input power beyond the maximum input power of the speaker
system.
• Never play such signals as audio tape's fast reverse and fast forward.
COMMON CONNECTION MEAN
Attention: the two pieces of the metal wire of the cable never be touched by each other.
Red terminal
Black terminal
1. Please tightening the wire
by hand in order to settle its
protruded places and avoid
short circuit.
2. Release the copper post in
counter clockwise direction,
and put the copper wire into
the hole.
3. Tightening the copper post in
clockwise direction, gently
pull the wire, and make sure
connection rmly.
Connection to
corresponding
"+" pole of the
amplier
Connection to
corresponding
"-" pole of the
amplier

8
Owner’s manual
English
TECHNICAL PARAMETERS
FRONT SPEAKER
Speaker size: 1" Tweeter x 1
5" Midrange x 2
8" Woofer x 1
Crossover: 3 way
Frequency response: 36 Hz - 20 kHz
Sensitivity: 91 +/-3 dB
Impedance: 4 Ohm
Max. power: 120 Watt
CENTRE SPEAKER
Speaker Unit: 1" Tweeter x 1
5" Midrange x 2
Frequency response: 70 Hz - 20 kHz
Sensitivity: 88 +/-3 dB
Impedance: 4 Ohm
Max. power: 60 Watt
REAR SPEAKER
Speaker Unit: 1" Tweeter x 1
5" Midrange x 1
Frequency response: 70Hz - 20kHz
Sensitivity: 87 +/-3 dB
Impedance: 4 Ohm
Max. power: 45 Watt

9
Instrukcja obsługi
Polski
INSTALACJA GŁOŚNIKÓW
Poza właściwościami fabrycznymi głośników, akustyczna jakość zestawu zależy
również od czynników takich jak kubatura czy wyposażenie pomieszczeń, jak
również sposób instalacji. Podczas instalacji, zaleca się poświęcić szczególną
uwagę poniższym wytycznym:
• W przypadku gdy głośnik znajduje się bezpośrednio na podłożu, efekt dźwięku
niskotonowego będzie zbyt dominujący. Zaleca się umieszczenia podkładki pod
głośnik.
• Uwaga: w razie umieszczenia głośnika i źródła dźwięku bądź wzmacniacza na tej
samej podkładce, dźwięk wydobywający się z głośnika nie będzie najwyższej jakości.
• Jeśli w niedalekiej odległości od zestawu znajduje się szklana ściana bądź drzwi
wykonane z tego samego materiału, zaleca się zasłonięcie powierzchni szklanych
grubym materiałem w celu uniknięcia rezonansu lub pogłosu.
• Ten typ głośników został zaprojektowany w systemie antymagnetycznym. Zestaw
nie zakłóca ani nie obniża jakości odbioru obrazu, w odniesieniu do większości
odbiorników telewizyjnych. W przypadku niektórych odbiorników, zestaw głośników
może powodować obniżenie jakości odbioru kolorów. W takiej sytuacji zaleca się
odsunięcie głośników od odbiornika.
• Uwaga: w wypadku istnienia pola magnetycznego bądź obecności urządzenia które
wytwarza silne pole magnetyczne, istnieje prawdopodobieństwo obniżenia jakości
odbioru obrazu w związku z współdziałaniem tego sprzętu i głośników.
PODŁĄCZENIE GŁOŚNIKÓW
Przed połączeniem głośników, upewnij się, że wzmacniacz jest wyłączony.
• Standardowy sposób podłączenia
Podłącz kable głośnika w wejścia znajdujące się na tylnej ścianie urządzenia z
wejściami na wzmacniaczu. (Sposób połączenia jak na załączonym obrazku). Lewy
kanał głośnika połącz z wejściem oznaczonym „L” na wzmacniaczu. Analogicznie,
prawy kanał głośnika połącz z wejściem oznaczonym „R” na wzmacniaczu. Zwróć
uwagę na prawidłowe podłączenie dodatnich i ujemnych pól (oznaczonych na
urządzeniu „+” i „-”). Połączenie niezgodne z wartościami pól skutkuje obniżeniem
jakości dźwięku.

10
Instrukcja obsługi
Polski
UWAGI
• Nie wystawiaj zestawu głośników na bezpośrednie działanie światła ani źródła ciepła.
• Zestaw ulegnie uszkodzeniu w środowisku o zbyt wysokiej wilgotności i zakurzeniu.
• Zaleca się unikania rozprzestrzeniania pestycydów w pobliżu zestawu. Zabrania się
również użycia benzyny i rozpuszczalników w celu czyszczenia powierzchni
głośników. Takie działania mogą prowadzić do uszkodzenia bądź powstania plam na
powierzchni głośników. Zaleca się czyszczenie urządzenia za pomocą suchej,
miękkiej ściereczki.
• Zabrania się używania urządzenia powyżej maksymalnej mocy wejściowej głośników.
• Zabrania się grania dźwięków odpowiadającym szybkiemu przewijaniu taśmy w przód
i w tył.
STANDARDOWY SPOSÓB POŁĄCZENIA
Wejście czerwone
Wejście czarne
1. Zagnij wystające części
kabla dłońmi, w celu
uniknięcia zwarcia.
2. Wyjmij miedzianą końcówkę
w kierunku przeciwnym do
wskazówek zegara, i umieść
miedziany drut w otworze.
3. Zegnij miedzianą końcówkę
zgodnie z ruchem wskazówek
zegara, delikatnie pociągnij
drut aby upewnić się, że
połączenie jest stałe.
Podłączenie z
analogicznym
wejściem
wzmacniacza
oznaczonym „+”
Podłączenie z
analogicznym
wejściem
wzmacniacza
oznaczonym „-”
Uwaga: Dwie części metalowego kabla nie mogą mieć części stycznych.

11
Instrukcja obsługi
Polski
SPECYFIKACJA TECHNICZNA
KOLUMNY PRZEDNIE
Rozmiar głośnikia: 1" głośnik wysokotonowy x1
5" głośnik średniotonowy x2
8" głośńik niskotonowy x1
Zwrotnica: 3 way
Pasmo przenoszenia: 36Hz - 20kHz
Czułość: 91 +/-3 dB
Impedancja: 4 Ohm
Moc max.: 120Watt
KOLUMNA CENTRALNA
Rozmiar głośnikia: 1" głośnik wysokotonowy x 1
5" głośńik średniotonowy x 2
Pasmo przenoszenia: 70Hz - 20kHz
Czułość: 88 +/-3 dB
Impedancja: 4 Ohm
Moc max.: 60Watt
KOLUMNY TYLNE
Rozmiar głośnika: 1" głośnik wysokotonowy x 1
5" głośnik średniotonowy x 1
Pasmo przenoszenia: 70Hz - 20kHz
Czułość: 87 +/-3 dB
Impedancja: 4 Ohm
Moc max.: 45Watt

12
Manual de utilizare
Română
INSTALARE DIFUZOR
În afară de calitatea difuzoarelor, a sistemului de boxe, calitatea auditiei depinde
si de alti de factori cum ar dimensiunea și tipul de cameră, modul de instalare a
difuzoarelor, etc.
Vă rugăm ca în timpul instalării să ți atenți la următoarele:
• In cazul in care difuzorul este plasat direct pe podea, acesta poate afecta efectul de
bass. Pentru a evita acest lucru, asezati un suport pe podea.
• Atentie: În cazul în care difuzorul și amplicatorul sunt amplasate pe același suport
sau obiect, difuzorul se poate distruge.
• În cazul în care există pereți sau uși de sticlă la o distanță mica în spatele sau în
fața sistemului de boxe, trebuie luate masuri pentru a evita efectele de rezonanță sau
de vibrații.
• Acest sistem de boxe este antimagnetic, ceea ce insemna ca cele mai multe
televizoare pot plasate langa difuzor fara pierderea calitatii a imaginii. La unele
televizoare, insa, daca boxele sunt prea aproape, rezulta o calitate slabă a imaginii
TV. În această situație, creșteti distanta dintre difuzor si televizor.
• Atenție: dacă există câmpuri magnetice sau dispozitive care generează câmpuri
magnetice puternice, s-ar putea sa aveti o calitate slabă a imaginii TV ca urmare a
interacțiunii dintre dispozitiv și difuzor.
CONECTAREA DIFUZOARELOR
Vă rugăm să va asigurați că, înainte de a conecta sistemul de boxe,
amplicatorul este oprit.
• Conexiune comună
Utilizați cablul difuzorului pentru a conecta terminalele difuzoarelor la terminalele de
amplicator.
(vezi gura)
Vă rugăm să conectați canalul stâng al difuzorului notat cu “L” și canalul din dreapta
al difuzorului notat cu “R” la iesirile corespunzatoare ale amplicatorului.
Acordati mare atentie la polaritatea relor de difuzor (“+ “ –pozitiv- și” - “negativ).
Inversarea polaritatii poate conduce la distorsionarea sunetului.

13
Manual de utilizare
Română
NOTE
• Nu expuneti boxele la soare si nu le lasati in apropierea surselor de caldura.
• Nu amplasati produsul in medii cu umezeala ridicata sau praf mare.
• Produsul trebuie curatat doar cu un material moale si uscat. Niciodata nu curatati cu
ceara de mobilier, benzina,
• insecticide sau alte lichide volatile deoarece ele pot distruge difuzorul.
• Nu încercați să depășiți puterea maximă de intrare a boxelor.
Atenție: cele două re dezizolate ale cablului de difuzor nu trebuie să se atingă intre
ele.
Terminal rosu
Terminal negru
1. Dupa dezizolarea capetelor
relor de difuzor, vă rugăm
să rasuciti rul cu mâna
pentru a-l uniformiza și pentru
a evita aparitia unui scurt-
circuit
2. Rotiți terminalul în sensul
acelor de ceasornic și
introduceți rul dezizolat al
difuzorului în oriciu.
3. Strângeți terminalul în sensul
acelor de ceasornic si apoi
trageți ușor de cablu pentru a
va asigura că rul este strans
si face un contact electric bun.
Conectați la
terminalul
corespunzător
“+ “al
amplicatorului
Conectați la
terminalul
corespunzător
“- “al
amplicatorului

14
Manual de utilizare
Română
DATE TEHNICE
DIFUZOR FRONTAL
Dimensiune: 1" Tweeter x 1
5" Midrange x 2
8" Woofer x 1
Filtru: 3 cai
Raspuns in frecventa: 36 Hz - 20 kHz
Sensibilitate: 91 +/-3 dB
Impedanta: 4 Ohm
Putere maxima: 120 Watt
DIFUZOR CENTRAL
Dimensiune: 1" Tweeter x 1
5" Midrange x 2
Raspuns in frecventa: 70 Hz - 20 kHz
Sensibilitate: 88 +/-3 dB
Impedanta: 4 Ohm
Putere maxima: 60 Watt
DIFUZOR SPATE
Dimensiune: 1" Tweeter x 1
5" Midrange x 1
Raspuns in frecventa: 70 Hz - 20 kHz
Sensibilitate: 87 +/-3 dB
Impedanta: 4 Ohm
Putere maxima: 45 Watt

15
Manual de utilizare
Română

This manual suits for next models
3
Table of contents
Languages:
Other Kruger&Matz Speakers manuals

Kruger&Matz
Kruger&Matz KM0526 User manual

Kruger&Matz
Kruger&Matz EXPLORER KM0552 User manual

Kruger&Matz
Kruger&Matz DISCOVERY XL User manual

Kruger&Matz
Kruger&Matz SOUL KM0518 User manual

Kruger&Matz
Kruger&Matz KM0501 User manual

Kruger&Matz
Kruger&Matz KM0522 User manual

Kruger&Matz
Kruger&Matz KM0505 User manual

Kruger&Matz
Kruger&Matz Executive KM0525 User manual

Kruger&Matz
Kruger&Matz KM0512 User manual

Kruger&Matz
Kruger&Matz SOUL KM0520 User manual