Krups GN9011 User manual

A
a1
b5
b1
b6
b2
a5
a4
a3
a2
B
a6a a8
d1
b3
TURBO
EJECT
b4
a6b a7
C
c3
c2
c4
c6 c7
c1
e f
c9
c10
c11
c12
c8
c5
G
g3
g1
g2
g4

A
a1
b5
b1
b6
b2
a5
a4
a3
a2
B
a6a a8
d1
b3
TURBO
EJECT
b4
a6b a7
C
c3
c2
c4
c6 c7
c1
e f
c9
c10
c11
c12
c8
c5
G
g3
g1
g2
g4

fig. 1
TURBO
EJECT
fig. 3
TURBO
EJECT
fig. 2
"click"
fig. 4
TURBO
EJECT
fig. 5
Turbo
fig. 6
2
1
3
1
3
TURBO
EJECT
fig. 7 fig. 8 fig. 9
"click"
fig. 10
1
2fig. 11 fig. 12
1
2
fig. 13 fig. 14
1
2fig. 15
fig. 16 1
2
fig. 17
1
2
3
fig. 18 fig. 19 fig. 20
fig. 21
2
1
fig. 22
2
fig. 23
1

fig. 1
TURBO
EJECT
fig. 3
TURBO
EJECT
fig. 2
"click"
fig. 4
TURBO
EJECT
fig. 5
Turbo
fig. 6
2
1
3
1
3
TURBO
EJECT
fig. 7 fig. 8 fig. 9
"click"
fig. 10
1
2fig. 11 fig. 12
1
2
fig. 13 fig. 14
1
2fig. 15
fig. 16 1
2
fig. 17
1
2
3
fig. 18 fig. 19 fig. 20
fig. 21
2
1
fig. 22
2
fig. 23
1

3
2
1
fig. 32
1
fig. 31
fig. 24
fig. 25
1
2
fig. 26
2
1
fig. 27 fig. 28 fig. 29
1
2
3
4
fig. 30
fig. 33 fig. 35
fig. 34

7
3
2
1
fig. 32
1
fig. 31
fig. 24
fig. 25
1
2
fig. 26
2
1
fig. 27 fig. 28 fig. 29
1
2
3
4
fig. 30
fig. 33 fig. 35
fig. 34
Nous vous remercions d’avoir choisi un appareil de la gamme KRUPS exclusivement prévu pour la préparation
des aliments, à usage domestique à l’intérieur de la maison.
DESCRIPTION
a Batteur
a1 Corps de l’appareil
a2 Turbo
a3 Sélecteur de vitesse
a4 Ejection des fouets
Marche/arrêt accessoire pied mixer
a5 Trappe arrière
a6 Fouets
a6a Fouets filaire
a6b Fouets bandes (selon modèles)
a7 Malaxeurs
a8 Fouet multibrins (selon modèles)
bAccessoire support avec bol rotatif (selon modèle)
b1 Bras articulé
b2 Corps de l’accessoire support
b3 Bol 2.75 l
b4 Spatule
b5 Bouton de déverrouillage du batteur
b6 Bouton de déverrouillage du bras articulé
c Coupe-légumes (selon modèle)
c1 Adaptateur
c2 Porte-tambours
c3 Poussoir
c4 Bague de blocage
c5 Pied
c6 Bouton de déverrouillage du porte-tambour
c7 Bouton de déverrouillage de l’adaptateur
c8 Tambour tranché
c9 Tambour râpé épais
c10 Tambour râpé fin
c11 Tambour à gratter
c12 Tambour à piler
d1 Pied mixeur (Selon modèle)
e Bol 1 l
f Bol 2.5 l
gMini hachoir (selon modèle)
g1 Bol
g2 Couteau
g3 Contre couvercle
g4 Couvercle
Avant toute utilisation de l’appareil, lire attentivement les consignes de sécurité dans le livret CONSIGNES IMPOR-
TANTES DE SECURITE joint et ensuite les conseils d’utilisation de l’appareil ci-dessous.
UTILISATION DE L’APPAREIL
FR
1 - FOUET/MALAXEUR/FOUET MULTIBRINS : pétrir, mélanger, battre, émulsionner, fouetter
1.1 M
ontage
Vérifiez que le sélecteur de vitesse (a3) est en position « 0 » (fig. 1).
Introduisez les tiges des fouets (a6) ou des malaxeurs (a7) ou le fouet multibrins (selon modèle) (a8) dans les orifices
prévus à cet effet. Le fouet multibrins (selon modèle) peut être positionné indifféremment dans l’orifice gauche ou droite
du corps de l’appareil. Une fois en place, les deux fouets doivent avoir la même longueur. Ils sont correctement fixés
et insérés lorsque vous entendrez un « clic » (fig. 2).
Branchez l’appareil.
1.2 U
tilisation
Selon la quantité à préparer, placez les ingrédients dans le récipient fourni (bol 1l (e) ou 2.5 l (f) selon modèle) ou
dans un récipient approprié (bol ou gobelet de préférence creux).
Plongez les fouets (a6) ou les malaxeurs (a7) dans le récipient et mettez l’appareil en marche à l’aide de la commande (a3).
Pour éviter les projections au démarrage ou pour les préparations délicates (crèmes et sauces) votre appareil est équipé
d’une fonction anti éclaboussure.
Pour l’utiliser :
- bien immerger les accessoires dans la préparation.
- poussez et maintenez la commande (a3) vers la gauche en position M. (fig. 3).
- relâchez la commande pour revenir en position « 0 ».
- poursuivez la préparation en choisissant une vitesse plus rapide (fig. 4).
Mettez en marche l’appareil à l’aide du sélecteur de vitesse (a3). Augmentez progressivement votre vitesse au fur et
à mesure que la préparation s’épaissit (fig. 4). Votre appareil est équipé d’une commande Turbo qui vous permet par
une simple pression sur la touche (a2) de disposer instantanément de toute la puissance (fig. 5). A la vitesse maximale
ou en position “Turbo”, n’utilisez pas l’appareil pendant plus de 5 minutes avec les fouets et avec les malaxeurs.

8
FR
1.3 D
émontage
Avant de sortir les fouets de la préparation, arrêtez l’appareil (vous éviterez les éclaboussures). Remettez la commande
en position « 0 » (fig. 1).
Débranchez l’appareil.
Dégagez les fouets, les malaxeurs ou le fouet multibrins (selon modèle) en appuyant sur la commande d’éjection (a4)
(fig. 6).
1.4 N
ettoyage
Débranchez l’appareil.
Ejectez obligatoirement les fouets, les malaxeurs ou le fouet multibrins (selon modèle) avant de les nettoyer (fig. 6).
Nettoyez les fouets, les malaxeurs ou le fouet multibrins (selon modèle) immédiatement après l’utilisation pour éviter
que les restes de mélange d’oeufs ou d’huile ne restent collés ou séchés.
Vous pouvez nettoyer les fouets, les malaxeurs ou le fouet multibrins (selon modèle) avec une éponge et du liquide
vaisselle. Ils peuvent être mis au lave-vaisselle.
Nettoyez le corps de l’appareil uniquement avec une éponge humide et séchez soigneusement.
Ne jamais laver l’appareil au lave-vaisselle.
N’utilisez pas d’éponges abrasives ou d’objets contenant des parties métalliques.
Ne plongez jamais le corps de l’appareil dans l’eau (fig. 7).
2 - ACCESSOIRE SUPPORT AVEC BOL ROTATIF : pétrir, mélanger, battre, émulsionner, fouetter (selon
modèle)
2.1 M
ontage
Le support s’utilise avec le batteur équipé des fouets ou des malaxeurs. Pour l’utilisation de ces accessoires, reportez
vous à la partie 1 - FOUET/MALAXEUR/FOUET MULTIBRINS.
N’utilisez pas le fouet multibrins avec le support.
Pour mettre le batteur sur le support, ouvrir la trappe arrière (a5) (fig. 8) et engagez le produit sur le bras articulé
jusqu’à ce qu’il se clipse (fig. 9).
Appuyez sur le bouton (b6) qui se trouve sur l’arrière du support pour déverrouiller le bras articulé (b1) et basculez le
en position levée en vous aidant de la poignée du batteur (fig. 10).
Insérez les fouets ou les malaxeurs jusqu’à leur blocage complet, accessoire denté dans ouverture dentée (fig. 11).
Insérez le manche de la spatule (b4) dans la fente du bras articulé. Cette spatule ramène les ingrédients dans la zone
de mélange du bol (fig. 12).
Mettez le bol en place.
Déverrouillez le bras articulé (b1) en appuyant sur le bouton (b6) qui se trouve sur l’arrière du support et faites le
descendre jusqu’à son enclenchement (fig. 13).
L’inclinaison et la rotation du bol assurent un brassage et un malaxage optimum.
Branchez le batteur.
2.2 U
tilisation
Selon la quantité à préparer, placez les ingrédients dans le récipient fourni (bol (b3))
Mettez en marche l’appareil à l’aide du sélecteur de vitesse (a3). Augmentez progressivement votre vitesse au fur et
à mesure que la préparation s’épaissit (fig. 4). Votre appareil est équipé d’une commande Turbo qui vous permet par
une simple pression sur la touche (a2) de disposer instantanément de toute la puissance (fig. 5).
Remarques :
- Ne faites pas fonctionner le batteur avec le bras articulé (b1) relevé.
- A la vitesse maximale ou en position “Turbo”, n’utilisez pas l’appareil pendant plus de 5 minutes avec les fouets ou
plus de 5 minutes avec les malaxeurs.
- La quantité maximum de pâte tous les ingrédients compris est de 2 kg sur la base de 1 kg de farine pour une pâte
levée et de 750g de farine pour une pâte brisée.
2.3 D
émontage
Après utilisation, débranchez le batteur.
Appuyez sur le bouton (b6) qui se trouve sur l’arrière du support pour déverrouiller le bras articulé (b1) et basculez le
en position levée en vous aidant de la poignée du batteur (fig. 14).
Ejectez les fouets ou les malaxeurs (fig. 15). Retirez le bol.
Pour enlever le batteur, appuyez sur le bouton (b5) et désengagez le (fig. 16).
2.4 N
ettoyage
Le bol, la spatule, les fouets et les malaxeurs peuvent être lavés au lave vaisselle.
Le support et le batteur doivent être lavés avec un chiffon humide.
3 - ACCESSOIRE COUPE LEGUMES : râper, trancher, piler, gratter (selon modèle)
3.1 M
ontage
Choisissez un des tambours suivants selon la nature des aliments et le résultat souhaité :
FR

9
FR
FR
Tambour c8 : trancher : pommes de terre, betteraves rouges, carottes, concombres, choux / Tambour c9 : râper
épais : pommes de terre, betteraves rouges, carottes, fromage / Tambour c10 : râper fin : fromage, carottes /
Tambour c11 : réduire en poudre : aliments secs (amandes, noix, noisettes, parmesan); réduire en filament : pommes
de terre / Tambour c12 : piler : glace.
Clipsez l’adaptateur (c1) sur le porte tambours (c2) et insérez le tambour choisi dans le réceptacle à tambours en le
tournant légèrement pour qu’il se place correctement dans son logement. Positionnez ensuite la bague de blocage
des tambours (c4) (fig. 17).
Insérez le pied dans les glissières situées de part et d’autre de l’adapteur (c1) puis du porte tambours (c2) (fig. 18).
Ne pas clipser le pied (c5) par le dessous (fig. 19).
Positionnez votre batteur à la verticale puis engagez l’adaptateur (c1) dans les orifices prévus à cet effet en le tournant
légèrement jusqu’au blocage complet (fig. 20).
Placez le récipient 2.5 l sous le coupe-légumes pour recueillir les aliments (fig. 21).
Branchez l’appareil.
3.2 U
tilisation
Mettez les aliments dans la cheminée en les guidant à l’aide du poussoir (c3) (fig. 21).
Mettez la commande sur la vitesse maximale.
3.3 D
émontage
Débranchez l’appareil.
Pour démonter le porte tambours (c2), appuyez sur le bouton (c6) situé à l’avant de l’adaptateur et retirez la cheminée
(fig. 22).
Appuyez sur le bouton (c7) à l’arrière pour enlever l’adaptateur (c1) du batteur (fig. 23).
Retirez le pied (c5) en le faisant glisser dans les glissières situées de part et d’autre de l’adaptateur (c1) puis du porte
tambours (c2).
3.4 N
ettoyage
Le porte tambours (c2), les tambours (c8 c9 c10 c11 c12), la bague de blocage des tambours (c4) et le poussoir (c3)
peuvent être lavés au lave vaisselle.
Le batteur et l’adaptateur doivent être lavés avec un chiffon humide.
Remarques :
- Utilisez toujours un poussoir pour guider les aliments dans la cheminée, jamais les doigts, ni fourchette, ni
cuillère, ni couteau ou tout autre objet.
- Lors du rangement de votre coupe-légumes, vous pouvez faire glisser le pied au dessus de la cheminée (fig. 24).
4 - ACCESSOIRE PIED MIXEUR : mixer, émulsionner (selon modèle)
4.1 M
ontage
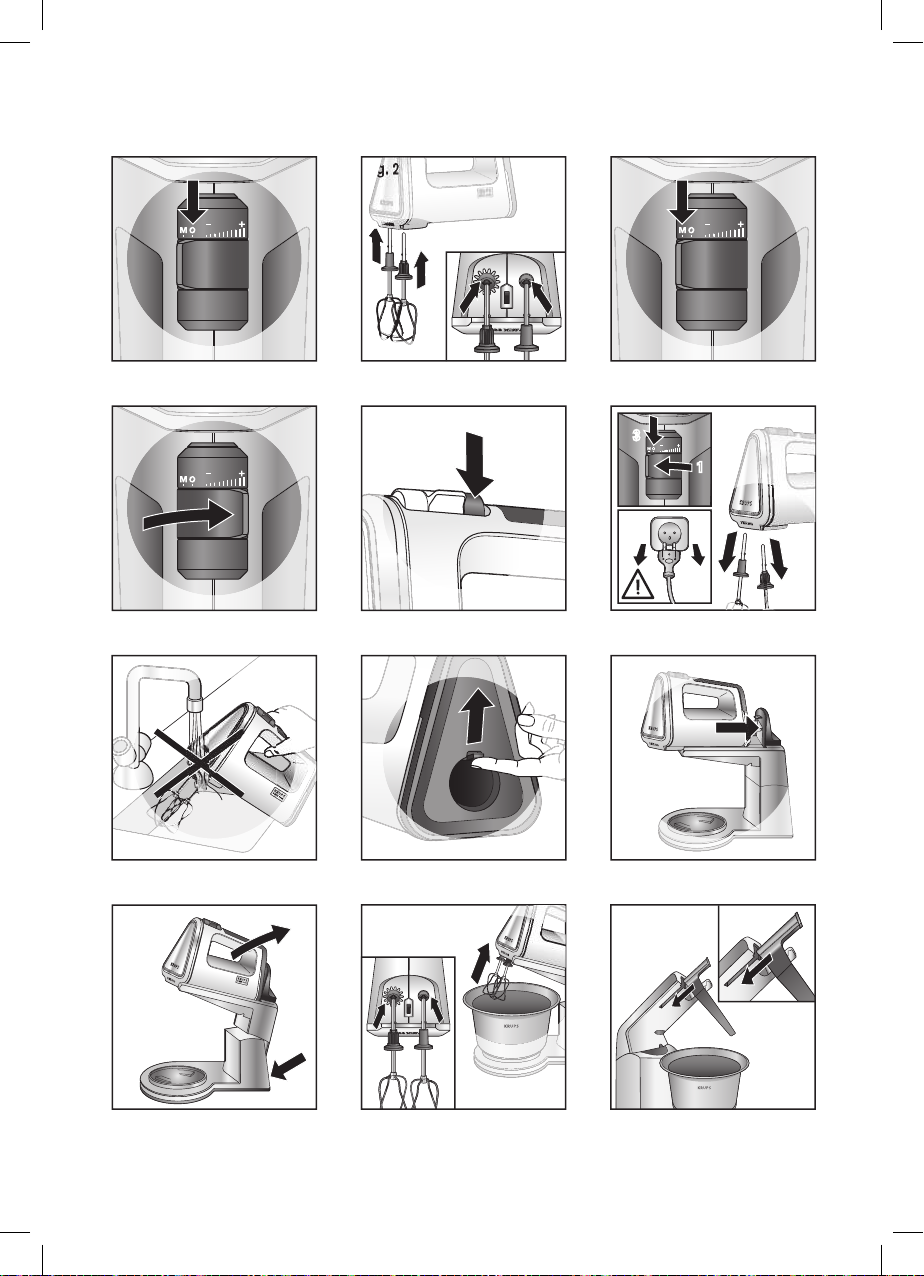
Pour insérer le pied mixeur (d1), ouvrir la trappe arrière (a5) (fig. 8).
Insérez le pied mixeur et visser fermement (fig. 25).
Branchez l’appareil.
4.2 U
tilisation
Selon le type de préparation, placez les ingrédients dans le récipient fourni (bol 1l (e) ou 2.5 l (f) selon modèle) ou
dans un récipient approprié (bol ou gobelet de préférence haut).
Lorsque vous mixez directement dans un récipient, retirez le récipient de cuisson de la source de chaleur pour mixer
les préparations chaudes.
La préparation doit couvrir au minimum le bas du pied mixeur pour garantir l’efficacité du mixage.
Le récipient doit être rempli au maximum aux deux tiers pour éviter tout débordement.
Pour mettre en marche, appuyez sur le bouton éjection des fouets (a4) (fig. 27).
Relâcher le bouton (a4) avant de sortir le pied mixeur (d1) de la préparation, vous éviterez ainsi les éclaboussures.
Conseils pratiques :
- Ne faites jamais fonctionner le pied mixeur à vide.
- Pour les préparations à base de fruits, coupez et dénoyautez les fruits préalablement.
- N’utilisez pas le pied mixeur avec des aliments durs tels que glaçons, sucre, grains de café, céréales et chocolat.
4.3 D
émontage
Débranchez l’appareil.
Dévissez le pied mixeur (fig. 28).
4.4 N
ettoyage
Le pied mixeur peut être lavé au lave vaisselle dans le panier inférieur, lames vers le haut (attention les lames sont
extrêmement coupantes) (fig. 29).
5 - Mini hachoir 150 ml (G) (disponible en accessoires)
5.1 M
ontage
Placez le couteau (g2) sur l’axe du bol (g1) (fig. 30).

10
CONSEILS
RECETTES ACCESSOIRES INGREDIENTS VITESSE TEMPS
CREME FOU-
ETTEE
FOUET MULTIBRINS/
FOUETS 250 g de crème UHT. 1 min. 30 en vitesse
minimum puis 1 min. 30
en vitesse maximum. 3 min.
BLANCS
EN NEIGE
FOUET MULTIBRINS 4 blancs d’oeufs + 1 pincée
de sel. vitesse maximum. 3 min.
FOUETS FILAIRE /
FOUETS BANDES
(selon modèles)
6 blancs oeufs minimum 30 s
maximum 1 min
30s
1 min
MAYONNAISE FOUET MULTIBRINS/
FOUETS
1 jaune d’oeuf, 1 cuillère à
café de moutarde, 1 cuillère à
soupe de vinaigre, sel, poivre,
250ml d’huile.
1 min. 30 en vitesse
minimum puis 1 min. 30
en vitesse maximum. 1 min. 30
PATE A PAIN
MALAXEURS AVEC
OU SANS BOL
ROTATI F
1kg de farine, 1 sachet de levure
sèche, 20g de sel, 600g d’eau.
Monter progressivement
la vitesse pendant
2 min., puis vitesse
maximum pendant
2 min. 50.
4 min. 50
PATE A PAIN
ALLEMANDE MALAXEURS
250g de farine type 55, 550g
de farine de seigle, coriandre,
piment, cumin, 100g de levain sec,
2 cuillère à café de sel, 1 sachet
de levure sèche, 1 cuillère à
café de sucre, 0,5L d’eau.
Monter progressivement
la vitesse pendant
2 min., puis vitesse
maximum pendant
2 min. 50.
4 min. 50
PÂTE À PAIN
MALAXEURS AVEC
OU SANS BOL
ROTATI F
625 g de farine, 375 g d’eau,
1 sachet de levure, 25 g de sel.
Monter progressivement
la vitesse pendant
2 min., puis vitesse
maximum pendant
2 min. 50.
4 min. 50
SOUPE PIED MIXEUR
100 g de poireaux, 100 g de
carottes, 100 g de pommes
de terre, 300 g d’eau.
Vitesse standard de
la fonction mixeur
(bouton a4) .
2 min.
FR
5.2 U
tilisation
Placez les aliments dans le bol (g1) puis placez le contre couvercle (g3) puis, le couvercle (g4).
Branchez le bloc moteur sur le mini hachoir (g) et appuyez sur le bouton de mise en marche (a4) (fig. 31).
Après utilisation, retirez la nourriture.
5.3 D
émontage
Attention aux lames coupantes lors du démontage.
Retirez le bloc moteur puis le couvercle (g4) puis, le contre couvercle (g3).
Retirez le couteau (g2) en le manipulant par la partie plastique.
Ne pas faire fonctionner cet accessoire à vide ou plus de 10 secondes.
5.4 N
ettoyage
Les lames sont très coupantes.
Débranchez l’appareil.
Ne mettez jamais au lave-vaisselle le couvercle du mini-hachoir (g4) (fig. 33).
Ne le plongez jamais dans l’eau ou sous l’eau courante. Nettoyez-le avec une éponge humide (fig. 34).
Les autres parties du mini hachoir (g1, g2 et g3) pourront être lavées au lave-vaisselle (fig. 35).
Vous pouvez laver le corps ,les lames et le support lame avec une éponge humide et du liquide vaisselle.
FR

11
FR
RECETTES ACCESSOIRES INGREDIENTS VITESSE TEMPS
«TRANCHER» COUPE-LÉGUMES Pommes de terre, betteraves
rouges, carottes, concombres,
choux. Vitesse maximum. 2 min.
«RÂPER
ÉPAIS» COUPE-LÉGUMES Pommes de terre, betteraves
rouges, carottes, fromage. Vitesse maximum. 2 min.
«RÂPER FIN» COUPE-LÉGUMES Fromage, carottes. Vitesse maximum. 2 min.
«RÉDUIRE
EN POUDRE»
«RÉDUIRE EN
FILAMENT»
COUPE-LÉGUMES
Aliments secs (amandes, noix,
noisettes, parmesan).
Pommes de terres.
Vitesse maximum. 2 min.
«PILER» COUPE-LÉGUMES Glace. Vitesse maximum. 1 min.
«HACHER» MINI HACHOIR Ail, fines herbes, oignons, 70 g
de boeuf découpé en cubes de
1x1x1 cm
Vitesse standard de la
fonction mixeur a4 3 sec.
FR
RECYCLAGE
Participons à la protection de l’environnement !
Votre appareil contient de nombreux matériaux valorisables ou recyclables.
Confiez celui-ci dans un point de collecte pour que son traitement soit effectué.
PROBLÈME CAUSE SOLUTION
Le produit s’est arrêté de fonctionner. Votre appareil est équipé d’un micro
processeur qui contrôle la puissance
en fonctionnement. Par sécurité, si
le temps de fonctionnement et/ou
la charge est trop important, votre
appareil s’arrête.
Pour redémarrer votre appareil,
ramenez le bouton (a3) sur la
position «0». Retirer une partie de la
préparation.
Laissez votre appareil reposer
quelques minutes. Vous pouvez alors
terminer votre préparation.
Mon produit ne démarre pas. Votre appareil n’est pas branché. Vérifier le branchement et la tension de
votre appareil.
La sécurité est enclenchée. Basculer le sélecteur de vitesse sur «
0 » pour ensuite le remettre en route.
Mon turbo ne fonctionne pas Vous avez déjà atteint la vitesse
maximale avec le sélecteur (a3) Le turbo permet d’atteindre la vitesse
maximale directement sans passer par
le sélecteur.(a3)
Je n’arrive pas a monter mes
accessoires fouets (a6) et malaxeurs
(a7)
Mauvais positionnement Respecter le sens de montage (fig. 2).
Le pied mixeur ne fonctionne pas Mauvaise manipulation : vous avez
utilisé le selecteur de vitesses au lieu
du bouton « ejection des fouets »
Utiliser le bouton (a4) pour actioner la
fonction pied mixeur (fig.27).
EN CAS DE PROBLEME
Votre appareil ne fonctionne toujours pas ? Adressez-vous à un centre agréé (voir liste dans le livret service).

12
USING THE APPLIANCE
1 - WHISK/MIXER/MULTI-BLADE MIXER: kneading, mixing, beating, emulsifying, whisking
1.1 A
ssembly
Check that the speed selector (a3) is set at “0” (fig. 1).
Insert the rods of the whisks (a6), mixers (a7) or the multi-blade whisk (depending on model) (a8) into the
corresponding holes. The multi-blade whisk (depending on model) can be inserted into the left or right hole
on the body of the appliance. Once inserted, the two whisks must be the same length. The “click” indicates
that the accessories are correctly in place (fig.2).
Connect the appliance.
1.2 U
se
Depending on the quantity to be prepared, place the ingredients in the container provided (1 l bowl (e) or
2.5 l bowl (f) depending on the model) or in a suitable container (bowl or beaker, preferably shallow).
Place the whisks (a6) or mixers (a7) in the container and turn the appliance on using the button (a3).
To prevent splashes when you start or for delicate preparations (creams and sauces), the appliance
has a non-splash function “M setting” to whisk or mix the ingredients on a very low speed to prevent
splashing.
To use:
- Make sure that the accessories reach the bottom of the bowl.
- Press and hold the button (a3) to the left at the M setting. (fig. 3).
- Release the button to return to the “0” setting.
- Continue the preparation by selecting a faster speed (fig. 4).
Turn the appliance on using the speed selector (a3). Increase the speed gradually as the preparation
thickens (fig. 4). Your appliance has a Turbo button which instantly provides full power by simply pressing
the button (a2) (fig. 5). Do not use the appliance for more than five minutes with the whisk (
a6a, a6b
and
a8
) and with the mixers
(a7)
, when at maximum speed or in the Turbo setting.
1.3 D
isassembly
Switch the appliance off before removing the whisks or mixers from the preparation (to avoid splashing).
EN
Thank you for choosing an appliance from the KRUPS range, which is exclusively designed for preparing
foods, for domestic use in the home.
DESCRIPTION
a Mixer
a1 Appliance body
a2 Turbo control
a3 Speed selector
a4 Whisk ejector
Blender attachment on/off switch
a5 Rear hatch
a6 Whisks
a6a Wire whisks
a6b Beaters (depending on model)
a7 Mixers
a8 Multi-blade whisk (depending on model)
b Base support accessory with rotating bowl
(depending on model)
b1 Articulated arm
b2 Body of base support accessory
b3 2.75 l bowl
b4 Spatula
b5 Mixer release button
b6 Articulated arm release button
c Vegetable cutter (depending on model)
c1 Adaptor
c2 Drum holder
c3 Pusher
c4 Locking ring
c5 Base
c6 Drum holder release button
c7 Adaptor release button
c8 Slicer drum
c9 Coarse grater drum
c10 Fine grater drum
c11 Grinder drum
c12 Ice crusher drum
d1Blender attachment (depending on model)
d1 Blender attachment
e 1 l bowl
f 2.5 l bowl
g
Mini chopper (
depending on model
)
g1 Bowl
g2 Blade unit
g3 Lid centre
g4 Lid
Before using the appliance always read the safety instructions in the attached booklet IMPORTANT SAFETY INSTRUCTIONS
before you read the directions for using the appliance, beneath.
EN

13
EN
Return the button to the “0” setting (fig. 1).
Disconnect the appliance.
Release the whisks, mixers or the multi-blade whisk (depending on the model) by pressing the ejection
button (a4) (fig. 6).
1.4 C
leaning
Disconnect the appliance.
The whisks, mixers or the multi-blade whisk (depending on the model) must be removed before cleaning (fig. 6).
Clean the whisks, mixers or multi-blade whisk (depending on model) immediately after use to prevent any
remaining egg or oil mixture sticking or drying.
You can clean the whisks, mixers or the multi-blade whisk (depending on model) with a sponge and washing
up liquid. They are also dishwasher-safe.
Clean the body of the appliance using a damp sponge only and dry carefully.
Never place the appliance in the dishwasher.
Do not use scouring pads or objects containing metal parts.
Never immerse the body of the appliance in water (fig. 7).
2 - BASE SUPPORT ACCESSORY WITH ROTATING BOWL: kneading, mixing, beating,
emulsifying, whisking (depending on model)
2.1 A
ssembly
The base support is used with the mixer equipped with whisks or mixers. To use these accessories, refer
to section 1 – WHISK/MIXER/MULTI-BLADE MIXER
Never use the multi-blade whisk with the base support.
To place the mixer on the base support, open the rear hatch (a5) (fig. 8) and attach the product to the
articulated arm until it clicks (fig. 9).
Press the button (b6) at the rear of the base support to release the articulated arm (b1) and tip it in the
raised position using the mixer handle (fig. 10).
Insert the whisks or mixers until they are completely locked, placing the toothed accessory into the toothed
opening (fig. 11).
Insert the spatula handle (b4) into the slot on the articulated arm. This spatula scrapes the ingredients to
the mixing area of the bowl (fig. 12).
Position the bowl.
Release the articulated arm (b1) by pressing the button (b6) on the rear of the base and lower it until it
locks (fig. 13).
The incline and rotation of the bowl ensures optimum mixing.
Connect the mixer to the mains socket.
2.2 U
se
Depending on the quantity to prepare, place the ingredients in the container provided (bowl (b3)).
Turn the appliance on using the speed selector (a3). Increase the speed gradually as the preparation
thickens (fig. 4). Your appliance has a Turbo button which instantly provides full power by simply pressing
the button (fig. 5).
Note:
- Do not turn the mixer on with the articulated arm (b1) raised.
- Do not use the appliance for more than five minutes with the mixers (a7) or five minutes with the whisk
(a6a, a6b or a8), when at maximum speed or in the Turbo setting.
- The maximum quantity of dough, including all ingredients, is 2 kg on the basis of 1 kg of bread flour for
a leavened dough and 750 g of flour for a shortcrust pastry.
2.3
D
isassembly
Disconnect the mixer after use.
Press the button (b6) at the rear of the base support to release the articulated arm (b1) and tip it in the
raised position using the mixer handle (fig. 14).
Release the whisks or mixers (fig. 15). Remove the bowl.
To remove the mixer, press the button (b5) and release it (fig. 16).
2.4 C
leaning
The bowl, spatula, whisks and mixers are all dishwasher safe.
The base support and the mixer must be washed with a damp cloth.
3 - VEGETABLE CUTTER ACCESSORY: grate, slice, crush and grind (depending on model)
3.1 A
ssembly
EN

14
EN
EN
Choose one of the following drums depending on the type of food and the desired result:
Drum c8:Slices: potatoes, red beetroot, carrots, cucumber, cabbage / Drum c9:Grates coarsely:
potatoes, red beetroot, carrots, cheese / Drum c10:Grates finely: cheese, carrots / Drum c11: Grinds: dry
foods (almonds, walnuts, hazelnuts, parmesan); Makes into strands: potatoes / Drum c12: Crushes: ice
Clip the adaptor (c1) onto the drum holder (c2) and insert the chosen drum into the drum receptacle turning
slightly so that it lodges correctly into its housing. Then position the drum locking ring (c4) (fig. 17).
Insert the base on the runners located on each side of the adaptor (c1) then the drum holder (c2) (fig. 18).
Do not clip on the base (c5) from below (fig. 19).
Position your mixer vertically then insert the adaptor (c1) into the corresponding holes turning slightly until
it locks completely (fig. 20).
Place the 2.5 l container under the vegetable cutter to collect the food (fig. 21).
Connect the appliance to the mains socket.
3.2 U
se
Place the food into the feeder tude, guiding them using the pusher (c3) (fig. 21).
Set the button to maximum speed.
3.3 D
isassembly
Disconnect the appliance.
To disassemble the drum holder (c2), press the button (c6) located at the front of the adaptor and remove
the feeder tube (fig. 22).
Press the button (c7) at the rear to release the adaptor (c1) from the mixer (fig. 23).
Remove the base (c5) by sliding it along the runners located at each side of the adaptor (c1) then the drum
holder (c2).
3.4 C
leaning
The drum holder (c2), drums (c8 c9 c10 c11 c12), drum locking ring (c4) and the pusher (c3) are dis-
hwasher safe.
The mixer and the adaptor must be washed with a damp cloth.
Note:
- Always use a the pusher (c3) to guide the food into the feeder tube, never your fingers, nor a fork,
spoon, knife or any other object.
- When putting away your vegetable cutter, you can slide the base over the feeder tube. (fig. 24).
4 - BLENDER ATTACHMENT ACCESSORY: mix, emulsify (depending on model)
4.1 A
ssembly
To insert the blender attachment (d1), open the rear hatch (a5) (fig. 8).
Insert the blender attachment and screw tightly (fig. 25).
Connect the appliance.
4.2 U
se
Depending on the type of preparation, place the ingredients in the container provided (1 l bowl (e) or 2.5
l bowl (f) (depending on the model) or in a suitable container (bowl or beaker, preferably deep).
When you blend directly in a container, remove the container from the heat source when mixing hot prepa-
rations.
The food must cover at least the lower part of the blender attachment to guarantee effective functioning.
The container must be filled to the maximum or two-thirds full to prevent spilling.
To start, press the ‘whisk ejection’ button (a4) (fig. 27).
Release the button (a4) before removing the blender attachment (d1) from the preparation to prevent
splashes.
Practical advice:
- Never operate the blender attachment when empty.
- For fruit preparations, chop and deseed/destone the fruit first.
- Do not use the blender attachment with hard food such as ice, sugar, coffee grains, cereals and chocolate.
4.3 D
isassembly
Disconnect the appliance.
Unscrew the blender attachment (fig. 28).
4.4 C
leaning
The blender attachment can be washed in the dishwasher, in the lower basket with blades facing upwards
(take care as the blades are extremely sharp) (fig. 29).
5 - 150 ml Mini Chopper (E) (available as an additional accessory)
5.1 Assembly
Place the blade unit (g2) on bowl (g1) (fig. 30).

15
5.2 U
se
Place the food in the bowl (g1), then fit the lid centre (g3), then the lid (g4).
Connect the motor unit to the mini chopper (g) and press the Start or Turbo button (a4) (fig. 31).
After use, remove the food.
5.3 Dismantling
Be careful not to touch the sharp blades when dismantling the appliance.
Remove the motor unit, then the lid (g4) and then the lid centre (g3).
Remove the blade unit (g2) taking it by its plastic part as it is extremely sharp.
Do not use this appliance for over 10 seconds if it is empty.
5.4 Cleaning
The blades are very sharp.
Always unplug the appliance before cleaning it.
Never put the mini chopper lid in the dishwasher. (g4) (fig. 33).
Never immerse these parts in water or place them under running water. Clean them with a damp sponge. (fig. 34).
The other parts of the mini chopper (g1, g2 and g3) are dishwasher friendly (fig. 35)
You may wash the body, the blades and the blade holder with a moist sponge and some washing-up liquid.
RECOMMENDATIONS
RECIPES ACCESSORIES*
depending on model INGREDIENTS SPEED MAX TIME
WHIPPED
CREAM
MULTI-BLADE
WHISK a8/
WHISKS a6a 250 g UHT cream.
1 min 30 sec’ at
minimum speed
then 1 min 30 sec’
at maximum speed.
3 min.
WHIPPED EGG
MULTI-BLADE
WHISK a8/
WHISKS a6a
4 egg whites +
1 pinch of salt. Maximum speed. 3 min.
WIRE WHISKS /
BEATERS a6a a6b
(depending on model)
6 egg whites minimum 30 secs
maximum 1 min
30 secs
1 min
MAYONNAISE MULTI-BLADE
WHISK a8/
WHISKS a6a
1 egg yolk, 1 teaspoon mild mustard,
1 tablespoon wine vinegar, salt,
pepper, 250 ml olive or sunflower oil.
(All ingredients should be at room
temperature).
1 min 30 sec’ at
minimum speed
then 1 min 30 sec’
at maximum speed.
3 min.
WHITE BREAD
DOUGH
MIXERS WITH
OR WITHOUT
ROTATING BOWL
1 kg strong white bread flour, 3 level
teaspoons salt, 3 level teaspoons fast
action or easy bake dried yeast, 4
teaspoons sugar, optional (for added
flavour and thicker crust), 600 ml
lukewarm water.
Gradually
increase the speed
for 2 min, then
maximum speed
for
2 min 50 sec’.
4 min 50 sec’.
GERMAN BREAD
DOUGH MIXERS a7
250 g strong white bread flour,
550 g rye flour, pinch of each of the
following ground coriander, Cayenne
pepper, ground cumin, 100 g dry
leaven*, 2 teaspoons salt, 1 sachet
active dried yeast (granular type), 1
teaspoon sugar, 500 ml warm water.
* Dry leaven may not be available in all
countries.
Gradually
increase the speed
for 2 min, then
maximum speed
for 2 min 50 sec’.
4 min 50 sec’.
WHITE BREAD
DOUGH
MIXERS WITH
OR WITHOUT
ROTATING BOWL
625 g flour, 375 g water,
1 packet of yeast, 25 g salt.
Gradually
increase the speed
for 2 min, then
maximum speed
for 2 min 50 sec’.
4 min 50 sec’.
EN
EN

16
DE
EN
RECYCLING
Think of the environment!
Your appliance contains valuable materials which can be recovered or recycled.
Leave it at a local civic waste collection point.
RECIPES ACCESSORIES*
depending on model INGREDIENTS SPEED MAX TIME
SOUP BLENDER BASE
100 g leeks, 100 g carrots, 100 g
potatoes, 300 g water.
Cook vegetables in salted water for
20-25 minutes or until tender.
Normal speed
for blender base
(button a4). 2 min.
«SLICE» VEGETABLE
CUTTER c8 Potatoes, red beetroot,
carrots, cucumber, cabbage. Maximum speed. 2 min.
«COARSE
GRATING»
VEGETABLE
CUTTER c9 Potatoes, red beetroot,
carrots, cheese. Maximum speed. 2 min.
«FINE
GRATING»
VEGETABLE
CUTTER c10 Cheese, carrots. Maximum speed. 2 min.
«GRINDING TO A
POWDER»
«CUTTING IN
STRANDS»
VEGETABLE
CUTTER c11
Dry foods (almonds, walnuts,
hazelnuts, parmesan).
Potatoes.
Maximum speed. 2 min.
«CRUSHING ICE» VEGETABLE
CUTTER c12 Ice. Maximum speed. 1 min.
«CHOPPING» MINI CHOPPER Garlic, herbs, onions, 70g of beef
cut up into 1x1x1 cm cubes
Standard speed of
the mixer function
a4
3 sec’.
PROBLEM CAUSE SOLUTION
The appliance has stopped working. Your appliance is installed with a
micro-processor which controls the
power of the appliance. For safety
reasons, if the functioning time is too
long and/or if there is too much food
in the bowl, the appliance will stop
working.
To restart your appliance, turn the
button (a3) to position ‘0’. Remove
part of the food.
Allow your appliance to cool down for
a few minutes. Then you can continue
to prepare your recipe.
My appliance does not turn on. Your appliance is not plugged in. Check the plug, power cable and
power supply.
The safety lock is on. Turn the speed setting to ‘0’ and then
turn on the appliance.
The turbo does not work You have already reached the maximum
speed with the speed setting (a3) The turbo allows you to directly reach
the maximum speed without using the
speed setting. (a3)
I am unable to attach the whisks (a6)
and dough hooks (a7) Incorrectly attached Ensure the accessories are correctly
attached (fig. 2).
The mixer attachment does not work. Incorrect use: you have used the
speed setting instead of the ‘whisk
ejection’ button.
Use the button (a4) to operate the
mixer attachment function (fig.27).
TROUBLESHOOTING

17
DE
Wir freuen uns, dass Sie sich für ein Gerät von KRUPS entschieden haben. Es ist nur für die Zubereitung von
Lebensmitteln, den Hausgebrauch und den Gebrauch in geschlossenen Räumen bestimmt.
BESCHREIBUNG
a Rührgerät
a1 Gerätekörper
a2 Turbotaste
a3 Geschwindigkeitsregler
a4 Auswurf (vorderer Antrieb)
An/Aus Mixstabzubehör
a5 Verschlussklappe Heckantrieb
a6 Rührbesen
a6a feine Rührbesen
a6b grobe Rührbesen (je nach Modell)
a7 Knethaken
a8 Schneebesen (je nach Modell)
b Rührständer mit Drehschüssel (je nach
Modell)
b1 Beweglicher Arm
b2 Körper des Rührständers
b3 Schüssel 2,75 Liter
b4 Spatel
b5 Entriegelungsknopf des Rührgeräts
b6 Entriegelungsknopf des beweglichen Arms
c Schnitzelwerk (je nach Modell)
c1 Adapter
c2 Trommelträger
c3 Stopfer
c4 Blockierring
c5 Fuß
c6 Entriegelungsknopf des Trommelträgers
c7 Entriegelungsknopf des Adapters
c8 Schneidetrommel
c9 Grobraspeltrommel
c10 Feinraspeltrommel
c11 Reibetrommel
c12 Trommel zum Zerkleinern von Eis
d Stabmixer (je nach Modell)
d1 Mixerstab
e Schüssel 1 Liter
f Schüssel 2,5 Liter
g
Zerkleinerer 150 ml (als Zubehör erhältlich)
g1 Behälter
g2 Messer
g3 Gegendeckel
g4 Deckel
GEBRAUCH DES GERÄTS
1 - RÜHRBESEN/KNETHAKEN/SCHNEEBESEN: Kneten, Mischen, Rühren, Emulgieren, Aufschlagen
1.1 M
ontage
Stellen Sie sicher, dass der Geschwindigkeitsregler (a3) auf der Position “0” steht (fig. 1).
Stecken Sie die Enden der Rührbesen (a6), der Knethaken (a7) oder des Schneebesens (je nach Modell)
(a8) in die hierzu vorgesehenen Öffnungen. Der Schneebesen (je nach Modell) kann entweder in die linke oder
die rechte Öffnung des Gerätekörpers gesteckt werden. Nach dem Einsetzen müssen die beiden Rührbesen/
Knethaken dieselbe Länge besitzen. Sie sind richtig eingesetzt und eingerastet, wenn Sie ein „Klick“ hören
(fig. 2).
Schließen Sie das Gerät an.
1.2 G
ebrauch
Geben Sie die Zutaten je nach zu verarbeitender Menge in den mitgelieferten Behälter (je nach Modell Schüssel
mit 1 Liter (e) oder 2,5 Liter (f)) oder in einen geeigneten Behälter (Schüssel oder bevorzugt tiefer Becher).
Halten Sie die Rührbesen (a6) oder Knethaken (a7) in den Behälter und schalten Sie das Gerät mit dem
Schalter (a3) an.
Um beim Anschalten Spritzer zu vermeiden, besitzt Ihr Gerät für problematische Massen (Cremes und Soßen)
eine Antispritzfunktion.
Um sie zu verwenden:
- Die Zubehörteile tief in die Masse eintauchen.
- Drücken Sie den Schalter (a3) nach links auf die Position M und halten Sie ihn dort (fig. 3).
- Lassen Sie den Schalter los, damit er wieder in die Position „0“ zurückkehrt.
- Fahren Sie mit einer höheren Geschwindigkeit fort (fig. 4).
Schalten Sie das Gerät mit dem Geschwindigkeitsregler (a3) ein. Steigern Sie Ihre Geschwindigkeit langsam in
dem Maße, in dem sich die Masse verdickt (fig. 4). Ihr Gerät besitzt einen Turbo-Schalter. Wenn Sie diesen drücken
(Taste a2), läuft Ihr Gerät sofort mit maximaler Leistung (fig. 5). Verwenden Sie das Gerät bei maximaler Geschwin-
digkeit oder auf der „Turbo“-Position nicht länger als 5 Minuten mit den Rührbesen und mit den Knethaken.
Lesen Sie bitte vor dem ersten Gebrauch die Sicherheitshinweise im beiliegenden Handbuch WICHTIGE
SICHERHEITSHINWEISE, und anschließend die u. s. Gebrauchshinweise zum Gerät aufmerksam durch.
EN

18
DE
DE
1.3 D
emontage
Schalten Sie das Gerät aus, bevor Sie die Rührbesen aus der Masse nehmen (um Spritzer zu vermeiden).
Stellen Sie den Schalter wieder auf die Position 0. (fig 1)
Trennen Sie das Gerät vom Stromnetz.
Entfernen Sie die Rührbesen, Knethaken oder den Schneebesen (je nach Modell), indem Sie auf die Auswurf-
taste drücken (a4) (fig. 6).
1.4 R
einigung
Trennen Sie das Gerät vom Stromnetz.
Entfernen Sie vor der Reinigung unbedingt die Rührbesen, Knethaken oder den Schneebesen (je nach Modell),
(fig. 6).
Reinigen Sie die Rührbesen, Knethaken oder den Schneebesen (je nach Modell) sofort nach der Verwendung,
um zu vermeiden, dass Reste von Eiern oder Öl daran kleben oder trocknen.
Sie können die Rührbesen, Knethaken oder den Schneebesen (je nach Modell) mit einem Schwamm und
Spülmittel reinigen. Sie sind spülmaschinenfest.
Reinigen Sie den Gerätekörper nur mit einem feuchten Schwamm und trocknen Sie ihn sorgfältig ab.
Reinigen Sie das Gerät niemals in der Spülmaschine.
Verwenden Sie keine Scheuerschwämme oder Objekte mit Metallteilen.
Tauchen Sie den Gerätekörper niemals in Wasser (fig. 7).
2 - RÜHRSTÄNDER MIT DREHSCHÜSSEL: Kneten, Mischen, Rühren, Emulgieren, Aufschlagen
(je nach Modell)
2.1 M
ontage
Der Rührständer wird mit dem Rührgerät mit Rührbesen oder Knethaken verwendet. Beziehen Sie sich bezüglich
der Verwendung dieser Zubehörteile auf den Teil 1 – RÜHRBESEN/KNETHAKEN/SCHNEEBESEN
Verwenden Sie den Schneebesen nicht mit dem Rührständer.
Wenn Sie das Rührgerät mit dem Rührständer verwenden wollen, öffnen Sie die hintere Klappe (a5) (fig. 8)
und stecken Sie das Produkt auf den beweglichen Arm, bis es einrastet (fig. 9).
Drücken Sie auf den Knopf (b6) auf der Rückseite des Ständers, um den beweglichen Arm (b1) zu entriegeln
und klappen Sie ihn mit Hilfe des Handgriffs des Rührgeräts nach oben (fig. 10).
Schieben Sie die Rührbesen oder Knethaken bis zum Anschlag hinein, den gezahnten in die gezahnte Öffnung
(fig. 11).
Schieben Sie den Spatel (b4) in den Schlitz des beweglichen Arms. Dieser Spatel führt die Zutaten immer
wieder in die Mitte der Schüssel zurück (fig. 12).
Setzen Sie die Schüssel ein.
Entriegeln Sie den beweglichen Arm (b1), indem Sie auf den Knopf (b6) auf der Rückseite des Ständers
drücken, und drücken Sie ihn nach unten, bis er einrastet (fig. 13).
Die Neigung und Rotation der Schüssel sorgen für optimales Rühren und Kneten.
Schließen Sie das Rührgerät an.
2.2 G
ebrauch
Geben Sie die Zutaten je nach Menge in den mitgelieferten Behälter (Schüssel (b3)).
Schalten Sie das Gerät mit dem Geschwindigkeitsregler (a3) ein. Steigern Sie Ihre Geschwindigkeit langsam
in dem Maße, in dem sich die Masse verdickt (fig. 4). Ihr Gerät besitzt einen Turbo-Schalter. Wenn Sie diesen
drücken (Taste a2), läuft Ihr Gerät sofort mit maximaler Leistung (fig. 5).
Anmerkungen:
- Lassen Sie das Rührgerät nicht laufen, wenn der bewegliche Arm (b1) hochgeklappt ist.
- Verwenden Sie das Gerät bei maximaler Geschwindigkeit oder auf der „Turbo“-Position nicht länger als 5
Minuten mit den Rührbesen oder 5 Minuten mit den Knethaken.
- Die maximale Teigmenge inklusive aller Zutaten beträgt 2 kg auf der Grundlage von 1 kg Mehl für Hefeteig
und 750 g Mehl für Mürbeteig.
2.3 D
emontage
Trennen Sie das Rührgerät nach der Verwendung vom Stromnetz.
Drücken Sie auf den Knopf (b6) auf der Rückseite des Ständers, um den beweglichen Arm (b1) zu entriegeln
und klappen Sie ihn mit Hilfe des Handgriffs des Rührgeräts nach oben (fig. 14).
Entfernen Sie die Rührbesen oder Knethaken (fig. 15). Entfernen Sie die Schüssel.
Um das Rührgerät zu entfernen, drücken Sie auf den Knopf (b5) und nehmen Sie es ab (fig. 16).
2.4 R
einigung
Die Schüssel, der Spatel, die Rührbesen und Knethaken sind spülmaschinenfest.
Der Rührständer und das Rührgerät müssen mit einem feuchten Lappen gereinigt werden.
3 - SCHNITZELWERK: Raspeln, Schneiden, Eis zerkleinern, Reiben (je nach Modell)
3.1 M
ontage
Wählen Sie je nach Lebensmittel und gewünschtem Ergebnis eine der folgenden Trommeln:

19
Trommel c8:Schneiden: Kartoffeln, Rote Beete, Karotten, Gurken, Kohl / Trommel c9:Grob raspeln: Kartoffeln,
Rote Beete, Karotten, Käse / Trommel c10: Fein raspeln: Käse, Karotten / Trommel c11: Mahlen: trockene
Lebensmittel (Mandeln, Walnüsse, Haselnüsse, Parmesan); Reiben: Kartoffeln / Trommel c12: Zerkleinern: Eis
Stecken Sie den Adapter (c1) auf den Trommelhalter (c2) und stecken Sie die gewählte Trommel in die Trom-
melöffnung, indem Sie sie leicht drehen, so dass sie korrekt an ihrem Platz sitzt. Positionieren Sie dann den
Blockierring für die Trommeln (c4) (fig. 17).
Schieben Sie den Fuß auf die Schienen auf beiden Seiten des Adapters (c1), dann des Trommelträgers (c2)
(fig. 18).
Den Fuß (c5) nicht von unten darauf klipsen (fig. 19).
Halten Sie Ihr Rührgerät vertikal, stecken Sie dann den Adapter (c1) in die hierzu vorgesehenen Löcher, indem
Sie ihn leicht bis zum Anschlag drehen (fig. 20).
Stellen Sie den 2,5 Liter Behälter unter das Schnitzelwerk, um die Lebensmittel aufzufangen (fig. 21).
Stecken Sie das Gerät an.
3.2 G
ebrauch
Geben Sie die Lebensmittel in den Einfüllstutzen und schieben Sie mit dem Stopfer nach (c3) (fig. 21).
Stellen Sie den Schalter auf maximale Geschwindigkeit.
3.3 D
emontage
Trennen Sie das Gerät vom Stromnetz.
Drücken Sie auf den Knopf (c6) auf der Vorderseite des Adapters und nehmen Sie den Einfüllstützen ab, um
den Trommelhalter (c2) zu demontieren (fig. 22).
Drücken Sie auf den Knopf (c7) auf der Rückseite, um den Adapter (c1) vom Rührgerät zu trennen (fig. 23).
Entfernen Sie den Fuß (c5), indem Sie ihn auf den Schienen an beiden Seiten des Adapters (c1), dann des
Trommelhalters (c2), entlang schieben.
3.4 R
einigung
Der Trommelhalter (c2), die Trommeln (c8 c9 c10 c11 c12), der Blockierring der Trommeln (c4) und der
Stopfer (c3) sind spülmaschinenfest.
Das Rührgerät und der Adapter müssen mit einem feuchten Lappen gereinigt werden.
■ Anmerkungen:
- Benutzen Sie stets den Stopfer, um die Lebensmittel in den Einfüllstutzen zu schieben, niemals die
Finger oder irgendwelche Utensilien wie Gabeln, Löffel oder Messer.
- Wenn Sie Ihr Schnitzelwerk verstauen, können Sie den Fuß auf den Einfüllstutzen stecken (fig. 24).
4 - STABMIXER: Mixen, Emulgieren (je nach Modell)
4.1 M
ontage
Um den Mixstab (d1) einzusetzen, öffnen Sie die Klappe auf der Rückseite (a5) (fig. 8).
Setzen Sie den Mixstab ein und drehen Sie ihn fest (fig. 25).
Schließen Sie das Gerät an.
4.2 G
ebrauch
Geben Sie die Zutaten je nach zu verarbeitender Menge in den mitgelieferten Behälter (je nach Modell
Schüssel mit 1 Liter (e) oder 2,5 Liter (f)) oder in einen geeigneten Behälter (Schüssel oder bevorzugt tiefen
Becher).
Nehmen Sie den Garbehälter von der Hitzequelle, um heiße Gerichte zu mixen, wenn Sie direkt in einem
Behälter mixen.
Das Gericht muss zumindest den unteren Teil des Stabmixers bedecken, damit das Mixen effizient ist.
Der Behälter darf maximal zu zwei Drittel gefüllt sein, um nicht überzulaufen.
Zum Anschalten drücken Sie die Auswurftaste für Rührbesen/Knethaken (a4) (fig. 27).
Lassen Sie den Knopf (a4) los, bevor Sie den Mixstab (d1) aus der Masse nehmen. So vermeiden Sie Spritzer.
■ Praktische Tipps:
- Lassen Sie den Stabmixer nie leer laufen.
- Stellen Sie das Gerät nie auf dem Mixstab ab.
- Arbeiten Sie nie mit dem Mixstab in heißem Fett.
- Lassen Sie den Mixstab nie trocken laufen.
- Lassen Sie den Mixstab nie länger wie eine Minute laufen.
- Schneiden und Entkernen Sie die Früchte bei Massen auf Fruchtbasis zuvor.
-
Verwenden Sie den Stabmixer nicht für harte Lebensmitten wie Eiswürfel, Zucker, Kaffeebohnen, Getreide und Schokolade.
4.3 D
emontage
Trennen Sie das Gerät vom Stromnetz.
Schrauben Sie den Mixstab ab (fig. 28).
DE
DE

20
DE
DE
4.4 R
einigung
Der Stabmixer kann im unteren Korb der Spülmaschine mit den Klingen nach oben gereinigt werden. Sorgen
Sie dafür, dass der Mixstab gut trocknet. (Achtung: Die Klingen sind extrem scharf.) (fig. 29).
5 - Zerkleinerer 150 ml (G) (als Zubehör erhältlich)
5.1 M
ontage
Setzen Sie das Messer (g2) auf die Achse des Behälters (g1) (fig. 30).
5.2
G
ebrauch
Geben Sie die Lebensmittel in den Behälter (g1), setzen Sie den Gegendeckel (g3) darauf, dann den Deckel (g4).
Montieren Sie den Motorblock auf den Zerkleinerer (g) und drücken Sie auf den Einschaltknopf (a4) (fig. 31)
Entnehmen Sie anschließend die Lebensmittel.
5.3 D
emontage
Bei der Zerlegung auf die Schneidemesser achten.
Entfernen Sie den Motorblock, dann den Deckel (g4), dann den Gegendeckel (g3).
Entfernen Sie das Messer (g2); greifen Sie es dazu am Kunststoffteil.
Lassen Sie dieses Zubehör nicht leer oder länger als 10 Sekunden laufen.
5.4 R
einigung
Die Klingen sind sehr scharf.
Trennen Sie das Gerät stets vom Stromnetz, bevor Sie es reinigen.
Reinigen Sie den Deckel des Zerkleinerers nicht in der Spülmaschine (g4) (fig. 33).
Tauchen Sie diese Teile nicht in Wasser, halten Sie sie nicht unter laufendes Wasser. Reinigen Sie sie mit einem
feuchten Schwamm. (fig. 34).
Die restlichen Teile des Mini-Fleischwolfs (g1, g2 und g3) können in der Spülmaschine gespült werden (fig. 35).
Sie können das Gehäuse, die Messer und den Messerhalter mit einem feuchten Schwamm und etwas Spülmittel reinigen.
TIPPS
REZEPTE ZUBEHÖR ZUTATEN GESCHWINDIGKEIT MAX. ZEIT
SCHLAGSAHNE SCHNEEBESEN /
RÜHRBESEN 250 g H-Sahne.
1 Min. 30 Sek.
Mindestgeschwindigkeit,
dann 1 Min. 30 Sek.
maximale Geschwindigkeit.
3 Min.
EISCHNEE
SCHNEEBESEN 4 Eiweiß + 1 Prise Salz. Maximale
Geschwindigkeit. 3 Min.
FEINE RÜHRBESEN /
GROBE
RÜHRBESEN (je nach
Modell)
6 Eiweiß mindestens 30 Sek.
maximal 1 Min.
30 Sek.
1 Min.
MAYONNAISE SCHNEEBESEN /
RÜHRBESEN 1 Eigelb, 1 TL Senf, 1 EL Essig,
1/4 Liter Öl, Salz, Pfeffer.
1 Min.
Mindestgeschwindigkeit,
dann 1 Min. 30 Sek.
maximale Geschwindigkeit.
3 Min.
WEISSBROTTEIG
KNETHAKEN MIT
ODER OHNE
DREHSCHÜSSEL
1 kg Mehl, 1 Päckchen
Trockenhefe, 20 g Salz, 600 g
Wasser.
Die Geschwindigkeit
2 Min. lang langsam
steigern, dann maximale
Geschwindigkeit
2 Min. 50 Sek.
4 Min.
50 Sek.
DEUTSCHER
BROTTEIG KNETHAKEN
250 g Mehl Typ 55,
550 g Roggenmehl, Koriander,
Piment, Kümmel, 100 g
trockener Sauerteig, 2 TL Salz,
1 Päckchen Trockenhefe, 1 TL
Zucker, 0,5 L Wasser.
Die Geschwindigkeit
2 Min. lang langsam
steigern, dann maximale
Geschwindigkeit
2 Min. 50 Sek.
4 Min.
50 Sek.
WEISSBROTTEIG
KNETHAKEN MIT
ODER OHNE
DREHSCHÜSSEL
625 g Mehl, 375 g Wasser,
1 Beutel Hefe, 25 g Salz
Die Geschwindigkeit
2 Min. lang langsam
steigern, dann maximale
Geschwindigkeit
2 Min. 50 Sek.
4 Min.
50 Sek.
This manual suits for next models
1
Table of contents
Languages:
Other Krups Hand Mixer manuals

Krups
Krups 3MIX9000 Series User manual

Krups
Krups F6081431 User manual

Krups
Krups 3 Mix 2000 XL GNA 2 Series User manual

Krups
Krups 3MIX6000 User manual

Krups
Krups F6081231 User manual

Krups
Krups F6080133 User manual

Krups
Krups F6085811 User manual

Krups
Krups GN492551 User manual

Krups
Krups 3MIX5000 User manual

Krups
Krups 3Mix 7000 User manual