Krups 3 Mix 2000 XL GNA 2 Series User manual

02
06
28
MAX

c
ACCESSOIRES ACCESSOIRES
j
k
l
m
n
d
GNA2
GNA4
F08B
F08C
F522 F522
F528 F528
F523
F529
F530
F531
F08B
F520
GNA6
GNA9 GNA2
GNA4 GNA6
GNA9
F08A
F303
F302
F532
301
F08A
F303
F302
F532
301
e
f
h
h1
i
F521
e
02
7
8
a
b
a2
a1
MAX

02
06
28
21
3
5
45
MAXMAXMAX

4

5
GNA2 3 Mix 2000 XL
GNA4 3 Mix 4000 XL
GNA6 3 Mix 5000 XL
GNA9 3 Mix 7000 XL
Deutsch 6
English 8
Français 11
Nederlands 13
Italiano 16
Español 18
Português 21
Dansk 23
Norsk 25
Svenska 27
Suomi 29
ΕλληνικÀ 31
0 Ελληνικ

6
Produktbeschreibung
.Geräteelemente
aBedienungsschalter
a1 Ein-/Ausschalter und 2 oder S +3
Geschwindigkeiten (je nach Modell)
a2 Auswurftaste
a3 Turbofunktion (je nach Modell)
bKabelaufwicklung mit Befestigungsclip
JE NACH MODELL ODER
SONDERZUBEHÖR
.Zubehörteile für vorderen Antrieb
cQuirle - Kunststoff
dQuirle - Metall
eKleine Kneter
fGrosse Kneter
gSchneebesen
hSchnitzelwerk
h1 Schnitzeleinsätze
iPassierstab
jZerkleinerer
.Gefäße
kPassiersieb
lSchüssel 2,75l
mSchüssel 2,5 l
nBecher 1l
Wichtige Sicherheits-
hinweise
•Lesen Sie die Bedienungsanleitung vor dem
ersten Gebrauch aufmerksam: ein nicht
durch die Bedienungsanleitung
vorgegebener Gebrauch entbindet Krups
von jeglicher Verantwortung.
•Ihr Gerät ist nur für den haushaltsgemäßen
Gebrauch und ausschließlich für den
Gebrauch innerhalb des Hauses bestimmt.
•Überlassen Sie Kindern nicht das Gerät,
wenn diese nicht beaufsichtigt werden. Die
Benutzung des Gerätes durch Kleinkinder
und Behinderte muss unter Aufsicht
erfolgen.
•Lassen Sie das Netzkabel nicht in der
Reichweite von Kindern hängen.
•Überprüfen Sie, dass die Anschlussspannung
Ihres Gerätes mit der Spannung Ihres
Stromnetzes übereinstimmt.
Bei falschem Anschluss erlischt die
Garantie.
•Das Netzkabel darf niemals in die Nähe oder
in Kontakt mit den rotierenden Teilen des
Gerätes, einer Wärmequelle oder scharfen
Kanten kommen.
•Tauchen Sie das Gerät, das Netzkabel oder
den Netzstecker niemals in Wasser oder
andere Flüssigkeiten.
•Falls das Netzkabel oder der Netzstecker
beschädigt sind, benutzen Sie das Gerät
nicht. Um jede Gefahr zu vermeiden, lassen
Sie diese durch einen Krups Kundendienst
(siehe Krups Service Stationen) ersetzen.
•Ziehen Sie nach jedem Gebrauch und vor
jeder Reinigung den Netzstecker.
•Benutzen Sie Ihr Gerät nicht, wenn es nicht
korrekt funktioniert oder wenn es
beschädigt wurde. Wenden sie sich in
diesem Fall an einen Krups Kundendienst
(siehe Krups Service Stationen).
•Jeder Eingriff, der über Reinigung und
normale Pflege des Gerätes hinausgeht,
muss durch einen Krups Kundendienst
durchgeführt werden.
•Benutzen Sie zu Ihrer Sicherheit
ausschließlich original Krups Zubehör und
Ersatzteile, die zu diesem Gerät gehören.
•Alle Geräte unterliegen einer strengen
Qualitätskontrolle. Es werden
stichprobenartige Gebrauchtests mit den
Geräten durchgeführt, was eventuelle
Gebrauchsspuren erklärt.
•Dieses Gerät darf nur unter Aufsicht des
Benutzers betrieben werden.
•Berühren Sie nicht die Quirle, Kneter,
oder Einsätze des Schnitzelwerkes
während das Gerät in Betrieb ist. Lassen
Deutsch
GNA2/GNA4/GNA6/GNA9.PM65 19/01/04, 15:136

7
Sie lange Haare, Schals, das Netzkabel
usw. während des Betriebes nicht über
den Zubehörteilen hängen.
•Ziehen Sie vor jedem Hantieren (Einsatz
und Entnahme der Zubehörteile) den
Netzstecker.
•Montieren sie niemals unterschiedliche
Zubehörteile gleichzeitig (z.B: Kneter und
Schneebesen...).
•Achtung: die Messer einiger
Zubehörteile sind scharf. Handhaben Sie
die Messer mit Vorsicht.
Vor dem ersten Gebrauch
•Reinigen Sie die verschiedenen Zubehörteile
Ihres Gerätes sorgfältig.
Gebrauch der Zubehörteile am
vorderen Antrieb
. Quirle und Kneter
•Wenn der Schalter (a) in der Position «0» ist,
setzen Sie die Quirle oder Kneter ein, bis sie
sicher verriegelt sind.
•Führen Sie das Werkzeug mit dem
Zahnkranz immer in die Öffnung des
Gerätes ein, welche ebenfalls mit einem
Zahnkranz gekennzeichnet ist (1).
•Stecken Sie den Netzstecker ein.
•Füllen Sie Zutaten, je nach zu verarbeitender
Menge, in ein geeignetes Gefäß (Krups
Rührschüssel oder Becher).
•Tauchen Sie die Quirle oder Kneter in das
Gefäß und schalten Sie das Gerät ein, indem
Sie den Schalter (a) nach rechts schieben.
Um Spritzer zu Beginn der Zubereitung zu
vermeiden und für empfindliche
Zubereitungen (Cremes, Soßen) ist Ihr Gerät je
nach Modell mit einer Antispritzfunktion
(Position «S») ausgestattet. Um diese zu
benutzen:
•Schieben Sie den Schalter (a) nach rechts in
Position «S» (2).
•Wählen Sie eine höhere Geschwindigkeit,
um mit der Zubereitung fortzufahren (3).
Je nach Modell ist Ihr Gerät mit einer Turbo-
Taste ausgestattet, die es Ihnen erlaubt,
durch einfachen Tastendruck sofort die
gesamte Leistung Ihres Gerätes zur Verfügung
zu haben (4).
•Stellen Sie den Schalter am Ende der
Zubereitung zurück auf Position «0».
•Ziehen Sie den Netzstecker.
•Lösen Sie die Quirle oder Kneter, indem Sie
den Bedienungsschalter (a) auf die Position
«Eject» (5) schieben.
.Schneebesen
Der Schneebesen (g) wird zur Zubereitung
luftiger Speisen verwendet (Cremes, Mayon-
naise, Eischnee)
•Benutzen Sie ihn in einem hohen geraden
Gefäß (Rührbecher ).
•Benutzen Sie den Schneebesen niemals zur
Zubereitung schwerer Speisen (Kuchenteig,
Brotteig, Püree).
.Was die übrigen Zubehörteile betrifft,
siehe entsprechende Zubehör-
Bedienungsanleitung.
Reinigung
•Ziehen Sie den Netzstecker.
•Reinigen Sie das Grundgerät nur mit einem
feuchten Tuch.
• Reinigen Sie Quirle und Kneter unter
fließendem Wasser oder in der
Spülmaschine.
Was tun im Falle eines
Defekts?
•Vergewissern Sie sich, ob das Zubehör richtig
installiert wurde.
•Überprüfen Sie den Netzanschluss.
Wenn Ihr Gerät immer noch nicht
funktioniert, wenden Sie sich an den Krups-
Kundendienst (siehe Liste im Krups-
Serviceheft).
GNA2/GNA4/GNA6/GNA9.PM65 19/01/04, 15:137

8
Description
. Components of the hand-mixer
a Control button
a1 Start / Stop control and 2 or
S+3 speeds (depending on model)
a2 Ejection
a3 Turbo function (depending on model)
bCord winder with holding clip
DEPENDING ON MODEL AND/OR
OPTIONAL
. Accessories on front outlet
cNut-shaped plastic whisks
dNut-shaped stainless steel whisks
eSmall turn dough hooks
fLarge turn dough hooks
gCooking whisk
hSlicer - grater
h1 Drums
iPuréeing attachment
jMini-chopper
. Containers
kSieve
l2.75 l bowl
m2.5 l bowl
n1 l cup
Safety recommendations
•Before using your hand-mixer, please read
the instructions carefully: any use which
does not conform to the instructions for use
will absolve Krups from all liability.
•Your hand-mixer is intended solely for
domestic use, only for the functions
indicated and within the house.
•Never leave the hand-mixer within the reach
of children without supervision. Use of this
hand-mixer by young children or
handicapped persons must be carried out
under supervision.
•Do not allow the power cable to hang down
within the reach of children.
•Check that the voltage of your hand-mixer
corresponds to that of your electrical system.
Any connection error will invalidate the
guarantee.
Wiring instructions for U.K and Ireland only :
APPLIANCES WITH FITTED PLUG
Important: For your convenience this
appliance is supplied complete with a plug
incorporating a 3 amp fuse.
In the event of replacing a fuse in the plug
supplied, a 3 amp fuse approved by ASTA to
BS1362 must be used.
If the socket outlets are not of the 13A BS
1363 type, and therefore do not accept the
plug connected to this appliance, cut off the
plug.
When cut off, this plug is a shock hazard if
inserted into a socket outlet and must
therefore be disposed of safely.
If the fuse cover is detachable, never use the
plug with the cover omitted. Replacement
covers can be obtained from your service
agent.
Fit the appropriate plug according to the
instructions in paragraph “Fitting a plug”.
With alternative plugs a 5 amp fuse must be
fitted either in the plug or adapter or at the
main fuse box.
APPLIANCES WITHOUT FITTED PLUG
FITTING A PLUG - IMPORTANT
The wires in the mains lead are coloured in
accordance with the following code:
BLUE : NEUTRAL
BROWN : LIVE
But the colours may not correspond with the
coloured markings identifying the terminals in
your plug, proceed as follows:
The wire which is coloured BLUE must be
connected to the terminal which is marked
with the letter ‘N’ or coloured black. The wire
which is coloured BROWN must be connected
to the terminal which is marked with the
letter ‘L’ or coloured red.
English
GNA2/GNA4/GNA6/GNA9.PM65 19/01/04, 15:138

9
This appliance is manufactured to conform to
the Low Voltage Electrical Equipment (Safety)
Regulations 1989 and is designed to comply
with BS 3456. It complies with the
requirements of the EEC Directive (89/336/
EEC).
•The power cable must never be close to or
touching the hot parts of your hand-mixer,
close to a source of heat or a sharp edge.
•Never put the hand-mixer, the power cable
or the plug into water or any other liquid.
•If the power cable or plug are damaged, do
not use the hand-mixer. In order to prevent
any risk, these must be replaced by an
approved Krups service centre (see “Krups
Service Stations” booklet).
•Unplug your hand-mixer once you have
finished using it and when you are cleaning
it.
•Never use your hand-mixer if it is not
working correctly or if it has been damaged.
In this case, contact an approved Krups
service centre (see “Krups Service Stations”
booklet).
•Any other intervention other than cleaning
and normal maintenance by the customer
must be carried out by an approved Krups
service centre.
•For your own safety, only use the accessories
and spare parts from Krups which are
adapted to your hand-mixer.
•All hand-mixers are subject to rigorous
quality checks. Practical usage tests are
carried out on hand-mixers at random,
which may leave traces of use.
•This hand-mixer is designed to be used
under supervision of the user.
•Never touch the whisks, dough hooks or
drums of the slicer-grater while the
hand-mixer is operating. Never allow
long hair, scarves, the cable, etc. to hang
over the accessories when they are in
use.
•Unplug the hand-mixer before any
handling (attaching and removing
accessories).
•Do not combine accessories with different
functions at the same time (e.g. dough hook
and cooking whisk).
•Caution: the blades on some accessories
are sharp. Handle all knives with care.
Before using for the first time
•Carefully clean the different accessories of
your hand-mixer.
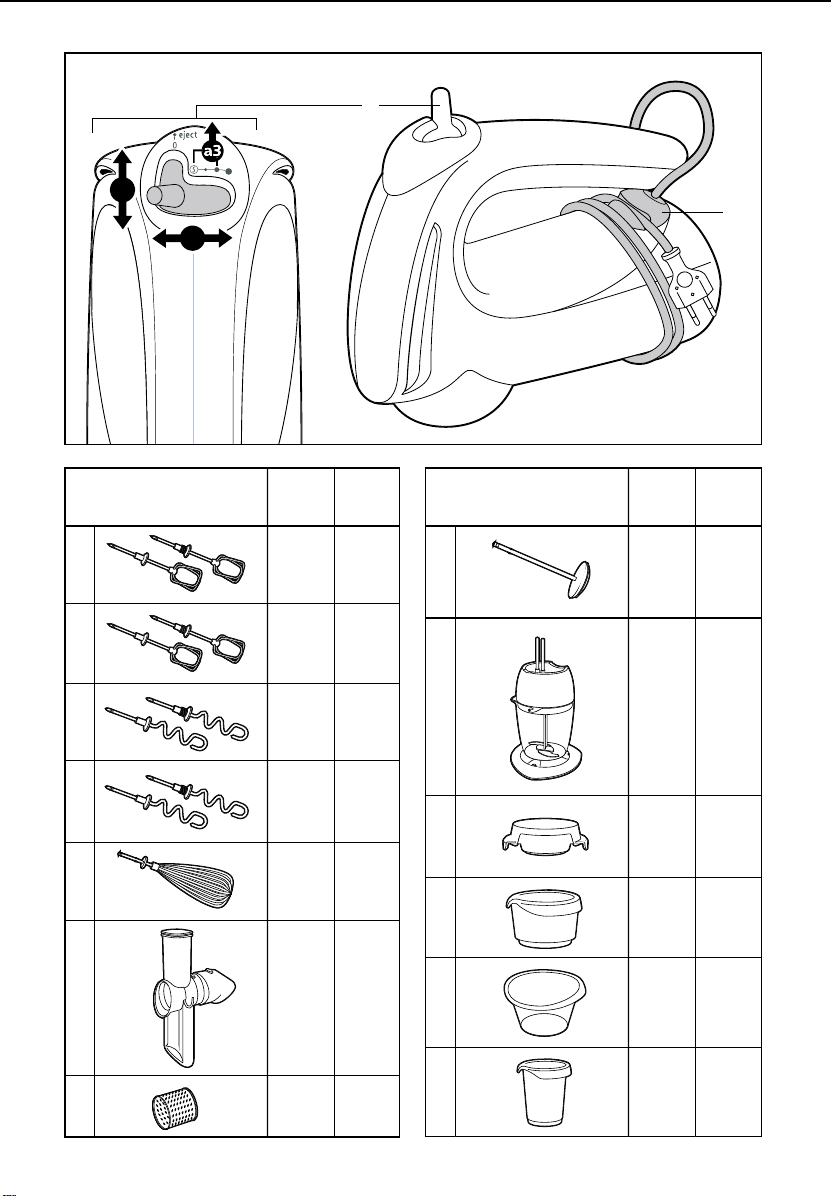
Use of accessories on front
outlet
. Whisks and dough hooks
•With the control button (a) on “0”, insert
the whisks or dough hooks until they are
fully locked in place. Always insert the
accessory fitted with a toothed ring into the
opening indicated on the hand-mixer by a
ring which is also toothed (1).
•Plug in the hand-mixer.
•Depending on the quantity being prepared,
place the ingredients into a suitable contai-
ner (Krups bowl or cup).
•Place the whisks or dough hooks into the
container and start the hand-mixer by
moving the control (a) to the right.
To prevent splashes when starting or for
delicate preparations (creams, sauces), your
hand-mixer is fitted (depending on the model)
with an anti-splash function (position “S”).
To use this:
•Push the control (a) to the right into position
“S” (2).
•To continue preparation, select a faster
speed (3).
Depending on the model, the hand-mixer is
fitted with a Turbo function which instantly
gives you full power (4) when you press
towards the front of the beater
•After use, return the control (a) to the “0”
position.
•Unplug the mixer.
•Release the whisks and dough hooks by
pushing the control (a) to the “Eject”
position (5).
GNA2/GNA4/GNA6/GNA9.PM65 19/01/04, 15:139

10
. Cooking whisk
The cooking whisk (g) is used to make light
preparations (whipped cream, mayonnaise,
egg whites).
•Use it in a tall, narrow container (the cup).
•Never use it for heavy preparations such as
cake mixtures or bread dough or for making
purée.
. For the other accessories, please refer to
their instructions for use.
Cleaning
•Unplug the mixer.
•Using only a damp cloth, clean the body of
the mixer.
•Clean the whisks / dough hooks under
running water or in the dishwasher. Rinse
and dry them.
What to do if your hand-mixer
does not work:
•Check that the accessories are correctly in
place.
•Check that the hand-mixer is correctly
plugged in.
If your hand-mixer is still not working,
contact an approved Krups service centre (see
list in the “Krups Service Stations” booklet).
GNA2/GNA4/GNA6/GNA9.PM65 19/01/04, 15:1310

11
Français
Description
. Eléments de l’appareil
aBouton de commande
a1 Marche/Arrêt et 2 ou S +3 vitesses
(selon modèle)
a2 Ejection
a3 Fonction Turbo (selon modèle)
bEnrouleur de câble avec clip
d’acccrochage
SELON MODELE ET/OU EN OPTION
. Accessoires sur sortie avant
cFouets noix plastique
dFouets noix inox
eMalaxeurs petite spire
fMalaxeurs grande spire
gFouet cuisinier
hEminceur-râpeur
h1 Tambours
iPied presse-purée
jMini-Hachoir
. Récipients
kPassoire
lBol 2,75 l
mBol 2,5 l
nGobelet 1 l
Consignes importantes de
sécurité
•Lisez attentivement le mode d’emploi avant
la première utilisation de votre appareil : une
utilisation non conforme au mode d’emploi
dégagerait Krups de toute responsabilité.
•Votre appareil est destiné uniquement à un
usage domestique, exclusivement pour la
fonction indiquée et à l’intérieur de la mai-
son.
•Ne laissez pas l’appareil à la portée des en-
fants sans surveillance. L’utilisation de cet
appareil par des jeunes enfants ou des per-
sonnes handicapées doit être faite sous
surveillance.
•Ne laissez pas pendre le câble d’alimentation
à portée de mains des enfants.
•Vérifiez que la tension d’alimentation de
votre appareil correspond bien à celle de
votre installation électrique.
Toute erreur de branchement annule la
garantie.
•Le câble d’alimentation ne doit jamais être à
proximité ou en contact avec les parties
chaudes de votre appareil, près d’une source
de chaleur ou sur un angle vif.
•Ne mettez pas l’appareil, le câble d’alimenta-
tion ou la fiche dans l’eau ou tout autre
liquide.
•Si le câble d’alimentation ou la fiche sont
endommagés, n’utilisez pas l’appareil. Afin
d’éviter tout danger, faites-les obligatoire-
ment remplacer par un centre service agréé
Krups (voir feuillet «Krups Service Stations»).
•Débranchez votre appareil dès que vous
cessez de l’utiliser et lorsque vous le net-
toyez.
•N’utilisez pas votre appareil s’il ne fonc-
tionne pas correctement ou s’il a été endom-
magé. Dans ce cas, adressez-vous à un cen-
tre service agréé Krups (voir feuillet «Krups
Service Stations»).
•Toute intervention autre que le nettoyage et
l’entretien usuel par le client doit être effec-
tuée par un centre service agréé Krups.
•Pour votre sécurité, n’utilisez que des acces-
soires et des pièces détachées Krups adaptés
à votre appareil.
•Tous les appareils sont soumis à un contrôle
qualité sévère. Des essais d’utilisation prati-
ques sont faits avec des appareils pris au
hasard, ce qui explique d’éventuelles traces
d’utilisation.
• Cet appareil est conçu pour une utilisation
sous surveillance de l’utilisateur.
•Ne touchez pas les fouets, les malaxeurs
ou les tambours de l’éminceur-râpeur
lorsque l’appareil est en fonctionne-
GNA2/GNA4/GNA6/GNA9.PM65 19/01/04, 15:1311

12
ment. Ne laissez pas pendre les cheveux
longs, les écharpes, le cordon, etc au
dessus des accessoires en fonctionne-
ment.
•Débranchez l’appareil avant toute mani-
pulation (montage et démontage des
accessoires).
• Ne positionnez pas des accessoires de
fonction différente en même temps (ex :
malaxeur et fouet cuisinier..)
• Attention : les lames de certains acces-
soires sont aiguisées. Manipulez les
couteaux avec précaution.
Avant la première utilisation
• Nettoyez soigneusement les différents acces-
soires de votre appareil.
Utilisation des accessoires en
sortie avant
. Fouets et malaxeurs
•Le bouton de commandes (a) en position
«0»,insérez les fouets ou les malaxeurs jus-
qu’à leur blocage complet. Introduisez tou-
jours l’accessoire muni d’une couronne den-
tée dans l’ouverture indiquée sur l’appareil
par une couronne également dentée (1).
•Branchez l’appareil.
•Selon la quantité à préparer, placez les ingré-
dients dans un récipient approprié (bol ou
gobelet Krups).
•Plongez les fouets ou les malaxeurs dans le
récipient et mettez l’appareil en marche en
poussant la commande (a) vers la droite.
Pour éviter les projections au démarrage ou
pour les préparations délicates (crèmes, sau-
ces), votre appareil est équipé selon modèle
d’une fonction anti-éclaboussures
(position «S»). Pour l’utiliser :
•Poussez la commande (a) vers la droite en
position «S» (2).
•Pour poursuivre la préparation, choisissez
une vitesse plus rapide (3).
Selon modèle, l’appareil est équipé d’une
fonction Turbo qui vous permet par une
simple pression vers l’avant du batteur de
disposer instantanément de toute la puissance
de votre appareil (4).
•En fin d’utilisation, remettez la commande
(a) en position «0».
•Débranchez l’appareil.
•Ejectez les fouets ou les malaxeurs en pous-
sant la commande (a) sur la position «Eject»
(5).
. Fouet cuisinier
Le fouet cuisinier (g) est utilisé pour réaliser les
préparations aérées (crèmes, mayonnaise,
blancs en neige).
•Utilisez-le dans un récipient haut et étroit (le
gobelet).
•Ne l’utilisez jamais pour des préparations
lourdes telles que gâteau ou pâte à pain ou
pour faire de la purée.
. Pour les autres accessoires, reportez-
vous à leur mode d’emploi.
Nettoyage
•Débranchez l’appareil.
•Nettoyez le corps de l’appareil à l’aide d’un
chiffon humide uniquement.
•Nettoyez les fouets / malaxeurs sous l’eau
courante ou au lave-vaisselle. Rincez et sé-
chez.
Si votre appareil ne fonctionne
pas, que faire ?
•Assurez-vous que les accessoires sont bien
en place.
•Vérifiez le branchement.
Si votre appareil ne fonctionne toujours
pas, adressez-vous à une centre service agrée
Krups (voir liste dans le livret «Krups Service
Stations»)
GNA2/GNA4/GNA6/GNA9.PM65 19/01/04, 15:1312

13
Beschrijving
. Onderdelen van het apparaat
aKnop
a1 Aan/Uit en 2 of S +3 snelheden
(afhankelijk van het model)
a2 Verwijderen
a3 Turbo Functie (afhankelijk van het
model)
bSnoer oproller met bevestigingsclip
AFHANKELIJK VAN HET MODEL EN/OF
ALS OPTIE
. Accessoires op de voorste uitgang
cPlastic garden in nootvorm
dRoestvrijstalen garden in nootvorm
eKleine deeghaken
fGrote deeghaken
gGarde
hSnijrasp
h1 Trommels
iPureerstaaf
jMinihakker
. Récipiënten
kVergiet
lKom 2,75 l
mKom 2,5 l
nBeker 1 l
Belangrijke veiligheidstips
•Alvorens Uw apparaat in gebruik te nemen
dient U eerst de gebruiksaanwijzing
aandachtig te lezen : gebruik in strijd met de
gebruiksaanwijzing ontslaat Krups van alle
aansprakelijkheid.
•Uw apparaat is alleen bestemd voor
huishoudelijk gebruik, uitsluitend voor de
aangegeven functie en binnenshuis.
•Laat het apparaat nooit zonder toezicht
binnen handbereik van kinderen. Het
gebruik van dit apparaat door kinderen of
minder validen dient onder toezicht te
gebeuren.
•Laat het snoer nooit binnen handbereik van
kinderen hangen.
•Controleer voor het aansluiten of de
spanning van de voedingstroom voor het
apparaat overeenkomt met die van de
netspanning.
Een verkeerde aansluiting leidt tot
vervallen van de garantie.
•Het snoer dient nooit in de nabijheid van of
in contact met de warme onderdelen van
het apparaat, een warmtebron of op een
scherpe hoek te komen.
•Plaats het apparaat, het snoer of de stekker
nooit in water of andere vloeistoffen.
•Indien het snoer of de stekker beschadigd is
dient U gebruik van het apparaat te
vermijden. Teneinde gevaarlijke situaties te
voorkomen dient U deze onderdelen door
een door Krups erkende onderhoudsdienst
te laten vervangen (zie de folder «Krups
Service Stations»).
•Trek de stekker van Uw apparaat eruit na elk
gebruik en bij het schoonmaken .
•In geval het apparaat niet naar behoren
functioneert of indien het beschadigt is dient
U elk gebruik te vermijden. In dit geval dient
U contact op te nemen met een door Krups
erkende onderhoudsdienst (zie de folder
«Krups Service Stations»).
•Elke handeling, buiten schoonmaken en
normaal onderhoud, dient door een door
Krups erkende onderhoudsdienst gedaan te
worden.
•Voor Uw eigen veiligheid dient U alleen de
Krups accessoires en onderdelen die voor
Uw apparaat bestemd zijn te gebruiken.
•Alle apparaten werden aan een strenge
kwaliteitscontrole onderworpen. Met
willekeurig gekozene apparaten worden
praktijktesten gehouden, dit verklaart
eventuele sporen van gebruik.
• Dit apparaat werd ontworpen om onder
toezicht van de gebruiker te functioneren.
Nederlands
GNA2/GNA4/GNA6/GNA9.PM65 19/01/04, 15:1313

14
•Wanneer het apparaat functioneert
dient men ten alle tijde contact met de
garden, de deeghaken of de trommels
van de snijrasp te vermijden. Laat ook
lange losse haren, hals- en draagdoeken
of het snoer tijdens het gebruik niet
boven de accessoires hangen.
•Trek de stekker van Uw apparaat eruit
alvorens handelingen te verrichten
(monteren en demonteren van de
accessoires).
• Nooit accessoires met verschillende functies
tegelijkertijd monteren (bijv. : deeghaak en
garde..)
• NB : de messen van sommige
accessoires zijn scherp. Hanteer deze
messen met zorg.
Vooraf aan het eerste gebruik
• De verschillende accessoires van Uw
apparaat zorgvuldig schoonmaken.
Het gebruik van de accessoires
op de voorste uitgang
. Garden en deeghaken
•Met de knop (a) in stand «0» steekt U de
garden of deeghaken in het apparaat totdat
ze geheel geblokkeerd zijn. U dient hierbij
altijd het accessoire dat is uitgerust met een
aandrijfwieltje in de opening van het
apparaat te steken dat hier een aanduiding
voor heeft (1).
•Steek de stekker in het stopcontact.
•Afhankelijk van de te bereiden hoeveelheid
doet U de ingrediënten in de toepasselijke
recipiënt (kom of beker van Krups).
•Steek vervolgens de garden of deeghaken in
de recipiënt en schakel het apparaat in door
de knop (a) naar rechts te duwen.
Teneinde wegslingeren van voedseldelen bij
aanvang te voorkomen of voor de bereiding
van verfijnde gerechten (crèmes, sauzen), is
Uw apparaat, afhankelijk van het model,
uitgerust met een “antispat” functie (stand
«S»). Om deze functie te gebruiken :
•Duwt U de knop (a) naar rechts in stand «S»
(2).
•Om de bereiding voort te zetten kiest U een
hogere snelheid (3).
Afhankelijk van het model is Uw apparaat
uitgerust met een Turbo functie die het
mogelijk maakt door een eenvoudige
drukbeweging naar voren van de mixer over
het totale vermogen van Uw apparaat te
beschikken (4).
•Wanneer U klaar bent met het gebruik, dient
U de knop (a) in stand «0» te zetten.
•Trek de stekker uit het stopcontact.
•Verwijder de garden of deeghaken door de
knop (a) in de stand «Eject» (5) te zetten.
. Speciale garde
De speciale garde (g) is bestemd voor het
bereiden van luchtige gerechten (crèmes,
mayonaise, Haagse bluf).
•Gebruik deze in een hoge, smalle recipiënt
(de beker).
•NU dient deze nooit te gebruiken voor het
bereiden van “zware gerechten” zoals taart
of brooddeeg of om aardappelpuree te
maken.
. Voor de overige accessoires verwijzen
wij naar de bijbehorende
gebruiksaanwijzingen.
Reiniging
•Trek de stekker uit het stopcontact.
•Reinig het apparaat zelf slechts met een
vochtige doek.
•Reinig de garden / deeghaken onder de
stromende kraan of in de vaatwasmachine.
Afspoelen en afdrogen.
GNA2/GNA4/GNA6/GNA9.PM65 19/01/04, 15:1314

15
Wat te doen als Uw apparaat
het niet doet?
•Controleer of de accessoires goed geplaatst
zijn.
•Controleer de aansluiting op de
netspanning.
Indien Uw apparaat het nog steeds niet
doet wendt U zich tot een door Krups
erkende onderhoudsdienst (zie de lijst in de
folder «Krups Service Stations»)
GNA2/GNA4/GNA6/GNA9.PM65 19/01/04, 15:1315

16
Descrizione
. Elementi dell’apparecchio
aPulsante commandi
a1 Avviamento / Arresto e 2 o S +3 velocità
(secondo il modello)
a2 Espulsione
a3 Funzione Turbo (secondo il modello)
bAvvolgicavo con clip di chiusura
SECONDO I MODELLI E/O IN OPZIONE
. Accessori con inserimento parte
anteriore
cFruste normali in plastica
dFruste normali in inox
eFruste impastatrici piccole a spirale
fFruste impastatrici grandi a spirale
gFrusta professionale
hTritatutto/grattugia
h1 Rulli
iPressatore purea
jMinitritatutto
. Contenitori
kPassaverdura
lCiotola 2,75 l
mCiotola 2,5 l
nBicchiere 1 l
Consigli di sicurezza
•Leggete attentamente il libretto delle
istruzioni del Vostro apparecchio al primo
utilizzo: un utilizzo non conforme al libretto
delle istruzioni libera la Krups di ogni
responsabilità.
•Il Vostro apparecchio è destinato
esclusivamente per un utilizzo domestico,
solo per la funzione indicata e all’interno
della propria abitazione.
•Non lasciate l’apparecchio alla portata dei
bambini senza sorveglianza. L’utilizzo di
quest’apparecchio da parte di bambini o di
persone handicappate deve essere fatto
sotto sorveglianza.
•Non lasciate che il cavo di alimentazione
penda alla portata dei bambini.
•Verificate che la tensione di alimentazione
del Vostro apparecchio corrisponda a quella
del Vostro impianto elettrico.
Qualunque errore di collegamento
annulla la garanzia.
•Non lasciate mai il cavo di alimentazione in
prossimità o a contatto con le parti calde
dell’apparecchio, né vicino a fonti di calore o
un angolo sporgente.
•Non immergete l’apparecchio, il cavo di
alimentazione o la spina in acqua o in
qualsiasi altro liquido.
•Non utilizzate mai l’apparecchio se il cavo di
alimentazione o la spina risultano
danneggiati. Per evitare qualsiasi pericolo,
fateli sostituire da un centro servizi
autorizzato Krups (vedere foglietto «Krups
Service Stations»).
•Scollegate l’apparecchio dopo averlo
utilizzato o mentre lo pulite.
•Non utilizzate mai l’apparecchio se non
funziona correttamente o se risulta
danneggiato.In questi casi, rivolgeteVi ad un
centro di assistenza tecnica autorizzato
Krups (vedere elenco nelle pagine gialle della
Vostra città sotto la voce «elettrodomestici -
riparazioni e vendita» o al n° verde:
800.012.045).
•Ogni intervento al di fuori della normale
manutenzione o pulizia, deve essere
effettuato in un centro di assistenza tecnica
autorizzato Krups.
•Per una Vostra totale sicurezza, utilizzate
solo pezzi di ricambio ed accessori originali
Krups.
• Tutti gli apparecchi sono sottoposti a rigorosi
controlli qualità. Alcuni apparecchi vengono
utilizzati a caso per delle verifiche pratiche:
questo spiega eventuali tracce d’uso.
• Questo apparecchio è ideato per essere
utilizzato sotto stretto controllo del cliente.
•Non toccate le fruste, le fruste
impastatrici o i rulli del tritatutto-
grattugia mentre l’apparecchio sta
funzionando. Non lasciate pendere i
capelli lungi, le sciarpe, la corda, ecc.. al
disopra degli accessori in funzione.
Italiano
GNA2/GNA4/GNA6/GNA9.PM65 19/01/04, 15:1316

17
•Scollegate l’apparecchio prima di ogni
manutenzione (montaggio o
smontaggio degli accessori).
•Non montate nello stesso tempo degli
accessori destinati a funzioni differenti (es. :
fruste impastatrici e fruste professionali...).
•Attenzione: le lame di alcuni accessori
sono molto taglienti, manipolatele con
tanta attenzione.
Precedentemente al primo
utilizzo
•Innanzi tutto pulite accuratamente gli
accessori del Vostro apparecchio.
Utilizzo degli accessori con
inserimento nella parte
anteriore dell’apparecchio.
. Fruste e fruste per impastare
•Inserite il pulsante commandi (a) posto sulla
posizione «0», inserite le fruste o le fruste
per impastare fino alla posizione di
bloccaggio. Introducete sempre l’accessorio
dotato di una corona dentata nell’apposita
apertura indicata sull’apparecchio da una
stessa corona dentata (1).
•Collegate l’apparecchio.
•Secondo la quantità da lavorare, mettete gli
ingredienti in un contenitore adatto (ciotola
o bicchiere Krups).
•Immergete le fruste nel contenitore e avviate
l’apparecchio premendo il pulsante (a) verso
destra.
In modo da evitare schizzi all’avviamento
dell’apparecchio o per la realizzazione di
preparati delicati (creme, salse), Il Vostro
apparecchio è dotato di una funzione anti-
schizzi (Position «S»), secondo il modello. Per
utilizzarla :
•Premete il pulsante (a) verso destra in
posizione «S» (2).
•Per proseguire la preparazione, scegliete una
velocità più elevata (3).
Secondo il modello, l’apparecchio è dotato di
una funzione «Turbo», che Vi permette, con
una semplice pressione sulla parte anteriore
dello sbattitore, di disporre all’istante della
massima potenza del Vostro apparecchio (4).
•Alla fine dell’utilizzo, riposizionate il pulsante
(a) sullo «0».
•Scollegate l’apparecchio.
•Estraete le fruste premendo il pulsante di
comando (a) sulla posizione «Eject» (5).
. Fruste «professionali»
Le fruste professionali (g) sono utilizzate per
preparati aerati (creme, maionese, chiare
d’uovo a neve).
•Utilizzatele con un contenitore alto e stretto
(il bicchiere).
•Non utilizzatele mai con preparati pesanti
come dolci o la pasta per il pane, o per
preparare la purè.
. Per gli altri accessori, leggete il libretto
delle istruzioni corrispondente.
Pulizia
•Scollegate l’apparecchio.
•Pulite il corpo dell’apparecchio soltanto con
un panno umido.
•Lavate le fruste sotto l’acqua corrente o in
lavastoviglie. Sciacquate ed asciugate.
Se il Vostro apparecchio non
funziona, che fare?
•AssicurateVi che gli accessori siano sempre
ben inseriti.
•Verificate il collegamento elettrico.
Se il Vostro apparecchio persiste nel non
funzionare, indirizzateVi presso un centro di
assistenza tecnica autorizzato Krups (vedere
elenco nel libretto «Krups Service Stations»).
GNA2/GNA4/GNA6/GNA9.PM65 19/01/04, 15:1317

18
Descripción
. Elementos del aparato
aBotón de mando
a1 Puesta en Marcha/Paro y 2
o S +3 velocidades (según modelo)
a2 Botón de eyección
a3 Función Turbo (según modelo)
bEnrollador del cable de conexión
eléctrica con clip de sujeción
SEGÚN MODELO Y/O EN OPCIÓN
. Accesorios que se acoplan a la salida
delantera
cVarillas de plástico
dVarillas de acero inoxidable
eVarillas amasadoras de espiral pequeña
fVarillas amasadoras de espiral grande
gEspumadera
hCortador- Rallador
h1 Tambores
iPie pasapurés
jMini-Picadora
. Recipientes
kColador
lBol de 2,75 l
mBol de 2,5 l
nVaso de 1 l
Normas de seguridad
importantes
•Lea atentamente las instrucciones de uso
antes de utilizar el aparato por primera vez:
un uso no conforme con dichas
instrucciones liberaría a Krups de toda
responsabilidad.
•Este aparato está destinado únicamente a un
uso doméstico, se deberá utilizar solamente
para la función indicada y en el interior de la
casa.
•No deje el aparato al alcance de los niños sin
vigilancia. El uso de este aparato por parte
de personas muy jóvenes o discapacitadas se
debe hacer bajo vigilancia.
•No deje que el cable de alimentación quede
colgando al alcance de los niños.
•Verifique que la tensión de alimentación
eléctrica del aparato corresponda con la de
su instalación eléctrica.
Cualquier error de conexión anula la
garantía.
•El cable de alimentación no debe estar
nunca cerca ni en contacto con las partes
calientes del aparato, cerca de una fuente de
calor ni sobre un ángulo recto.
•No sumerja nunca el aparato, el cable de
alimentación o el enchufe dentro del agua o
en cualquier otro tipo de líquido.
•Si el cable de alimentación o la clavija
estuvieran dañados, no utilice el aparato. A
fin de evitar cualquier riesgo, es
imprescindible hacerlos sustituir en un centro
de servicio técnico autorizado Krups (ver
folleto Krups Service Stations).
•Desenchufe el aparato cuando deja de
utilizarlo y para limpiarlo.
•No utilice el aparato si no funciona
correctamente o si ha resultado dañado. En
este caso, diríjase a un centro de servicio
técnico autorizado Krups (ver folleto Krups
Service Stations).
•Cualquier manipulación por parte del cliente
que no sea la limpieza y el mantenimiento
habitual deberá ser efectuada en un centro
de servicio técnico autorizado Krups.
•Para su seguridad, utilice únicamente
accesorios y piezas de recambio Krups
adaptados para su aparato.
•Todos los aparatos han sido sometidos a
controles de calidad estrictos. Para ello, se
realizan pruebas de funcionamiento
escogiendo aparatos de forma aleatoria, lo
que puede explicar que encuentre rastros de
utilización en su aparato.
• Este aparato ha sido diseñado para una
utilización bajo vigilancia.
Español
GNA2/GNA4/GNA6/GNA9.PM65 19/01/04, 15:1318

19
•No toque las varillas de batir ni las
amasadoras ni los tambores del
cortador-rallador cuando el aparato está
en funcionamiento. No deje que el
cabello largo, bufandas, el cable de
alimentación eléctrica, etc., queden
colgando por encima de los accesorios
en funcionamiento.
•Desenchufe el aparato antes de
cualquier manipulación (montaje y
desmontaje de los accesorios).
• No coloque accesorios de función diferente
al mismo tiempo (ej. : amasadora y
espumadera,...).
• Atención: las cuchillas de algunos
accesorios están muy afiladas.
Manipúlelas con mucha precaución.
Antes de utilizarlo por primera
vez
• Limpie cuidadosamente todos los accesorios
del aparato.
Utilización de los accesorios
que se acoplan a la salida
delantera
. Varillas y amasadoras
•Con el botón de mando (a) colocado en la
posición «0», introduzca las varillas o las
amasadoras hasta su completo bloqueo.
Introduzca siempre el accesorio provisto de
una corona dentada en la abertura del
aparato que está marcada también con una
corona dentada (1).
•Enchufe el aparato.
•Según la cantidad que vaya a preparar,
ponga los ingredientes en el recipiente más
apropiado (bol o vaso Krups).
•Sumerja las varillas o las amasadoras en el
recipiente y ponga el aparato en marcha
empujando el mando (a) hacia la derecha.
Para evitar salpicaduras al poner en marcha el
aparato o para los preparados delicados
(cremas, salsas), el aparato está equipado,
según el modelo, de una función
antisalpicaduras (posición « S »). Para
utilizarla:
•Empuje el mando (a) hacia la derecha hasta
llegar a la posición «S» (2).
•Para continuar con la preparación, elija una
velocidad más rápida (3).
Según el modelo, el aparato incluye una
función Turbo que permite, con una simple
presión hacia la parte delantera de la batidora
amasadora, de disponer instantáneamente de
toda la potencia del aparato (4).
•Al finalizar, vuelva a colocar el mando (a) en
la posición «0».
•Desenchufe el aparato.
«Extraiga las varillas o las amasadoras
empujando el mando (a) hasta la posición
«Eject» (5).
. Espumadera
La espumadera (g) se utiliza para realizar
preparaciones esponjosas (natillas, mayonesa,
clara a punto de nieve).
•Utilícela en un recipiente alto y estrecho (el
vaso).
•No la utilice nunca para preparados pesados,
como masa de pasteles o de pan, ni para
hacer puré.
. Para los demás accesorios, consulte las
instrucciones de uso correspondientes.
Limpieza
•Desenchufe el aparato.
•Limpie el cuerpo del aparato únicamente
con un paño húmedo.
•Limpie las varillas / amasadoras debajo del
agua del grifo o en el lavavajillas. Aclare y
seque.
GNA2/GNA4/GNA6/GNA9.PM65 19/01/04, 15:1319

20
¿Qué hacer si su aparato no
funciona ?
•Asegúrese que los accesorios están
correctamente colocados.
•Compruebe la conexión.
Si el aparato sigue sin funcionar, diríjase a
un centro servicio técnico autorizado
Krups (ver lista en el folleto «Krups Service
Stations»).
GNA2/GNA4/GNA6/GNA9.PM65 19/01/04, 15:1320
This manual suits for next models
4
Table of contents
Languages:
Other Krups Hand Mixer manuals

Krups
Krups GN492551 User manual

Krups
Krups 3MIX5000 User manual

Krups
Krups 3MIX6000 User manual

Krups
Krups GN9011 User manual

Krups
Krups GN9101 User manual

Krups
Krups F6081431 User manual

Krups
Krups 3Mix 7000 User manual

Krups
Krups F6081231 User manual

Krups
Krups 3MIX4000 User manual

Krups
Krups 3MIX9000 Series User manual