KTM bikepass User manual

bike industries
Great britain
BIKEPASS

2
Congratulations .....................................................................3
Safety andBehaviour ..........................................................4
Mountainbike | BMX | Di ................................................. 5
Racing Bike .......................................................................... 7
Trekking |Trekking-Oroad |ATB ....................................9
Children's Bike /Juvenile Road Bike ................................9
City Bike | Touring Bike | Spos Bike ............................ 11
Saddle Adjustment ............................................................ 12
Shiing Gears .................................................................... 14
Brakes .................................................................................. 15
Tyres .................................................................................... 16
Quick Release System forWheels/SeatPosts ......... 18
Suspension Adjustment .................................................. 19
Gear Shiing Adjustment ................................................ 19
BrakeControl (Cable) ...................................................... 20
Hydraulic Brakes Adjustment ........................................ 20
Handling of Carbon ........................................................... 21
AccessoriesandComponents ...................................... 22
Maintenance andCare .................................................... 22
Warranty ............................................................................. 24
Torque Specications ........................................................26
Completion Ceicate ......................................................27
Content

3
We would like to congratulate youon your decision
to buy a KTMproduct.We arecondent that your new
bike will more then meet your expectationsregarding
function,design,and quality—now andinthefuture.
Allof our bikesaremanufactured employing themost
modern production techniques and using material of
thehighest quality. They areequipped with thebest
components.Thereforeplease use your bike forits in-
tended use only. More information on page 6-13.
Aracing bike should notbe riddenon eah roadsand a
trekking bike should notbe riddenon downhill courses.
Inappropriate use canlead to material damageandse-
rious accidents. In orderto enjoy unlimited riding plea-
sure with your newKTMbike,we would like to askyou
to carefully read this manual.
In case of kid bikes for children please make sure your
child understands the contents of this manual espe-
cially regarding use and is able to handle the bike ap-
propriately.
Congratulations!
!
This QR-code guidesyou directly
to thedownload area on our home
page.

4
1. Please adhere to allnational lawsandregulations
of theroad.
2. Take care that theframe size matches your size
andthat theequipment hasbeen adjustedforyou.
3. Before everyride,checkwhetherbrakes, lights,
andother safety-relevantcomponents arefully
functional anderror-free.
4. Always use lights when riding at night!
5. Neverride your bike in pairs (exception:infants in
speci cchildren’s seats).
6. Considerother motoristsandcyclists, people
walking, andchildren andalways reckon with the
erraticbehaviour of others.
7. Consideranimals andplants when riding o the
road.
8. Please mind that riding characteristicscanchange
severely when transpoing loads.
9. Wear appropriate protective equipment!
10. Do notadjust brakes or gearshi assembly while
riding.
11. Not to lose controloveryoubike,don't take your
handso thehandlebar.
Safety andBehaviour

Der neue
Tren
D
spor
T
sporT
spor
:
Almr
AD
lern.
facebook.com/almradler
spor
T
sporT
spor
lern.

6
Due to theirdesign andequipment, thesebikesarenot
intendedfor use on public roads. Before being used on
public roads, thebike hasto be retrotted with lights,
mudguards, etc. according to thepaicularnational
lawsandregulations.
Bikes of this type aredesigned forriding in rough ter-
rain. Thesafety-related equipment required foro-road
use is includedinthedeliveryandhasto be checked
regularly by the user or by an expe. If necessary, it
needsto be repaired.
Neithermanufacturer nordealer take responsibility for
any use beyond the intendedoneandfornon-compli-
ance with thesafety-related directionsof this manu-
al andtheresulting damage, respectively. This applies
especially to overload and incorrectlyrepaired defects.
Thetotal load is 118kg / 260lb (rider + luggage). Ple-
asenote theload limitsof componentmanufacturers
in the supplement if applicable. Intended use also in-
cludescompliance with themanufacturer’s operating,
servicing, andmaintenance conditions speciedinthe
operating manual.
MTB | BMX | Di

22
19
21
17
28
27
1
2
34
5
6
7
8
9
10
11
12
13
23
18
20
26
25
14
15
16
29
24
7

8
Due to theirdesign andequipment, racing bikesare
intendedfor use on public roadsforthe purpose of
exercise andcompetitions. In orderto be used legally
on public roads, thebike mayhave to be retrotted
with head lights,reectors, mudguards, etc. according
to thepaicularnational lawsandregulationsof sp
cic countries.Please clarify this with your specialist
dealer.
Thesafety-related equipment of theracing bike requi-
redforexercising or competitions is includedinthe
deliveryandhasto be checkedregularly by the user or
by an expe. If necessary, it needsto be repaired. Neit-
hermanufacturer nordealer take responsibility forany
use going beyond the intendedoneandforno compli-
ance with thesafety-related directionsof this manual
andtheresulting damage, respectively.
This appliesespecially to using theracing bike in o-
road conditions, overload,and incorrectlyrepaired de-
fects.
Thetotal load is 118kg / 260lb (rider + luggage). Ple-
asenote theload limitsof componentmanufacturers
in the supplement if applicable. Intended use also in-
cludescompliance with themanufacturer’s operating,
servicing, andmaintenance conditions speciedinthe
operating manual.
Racing Bike

21
20
17
25
1
2
3
4
5
6
7
8
22
18
24
23
14
15
16
19
9
10
11
12
13
26
9

10
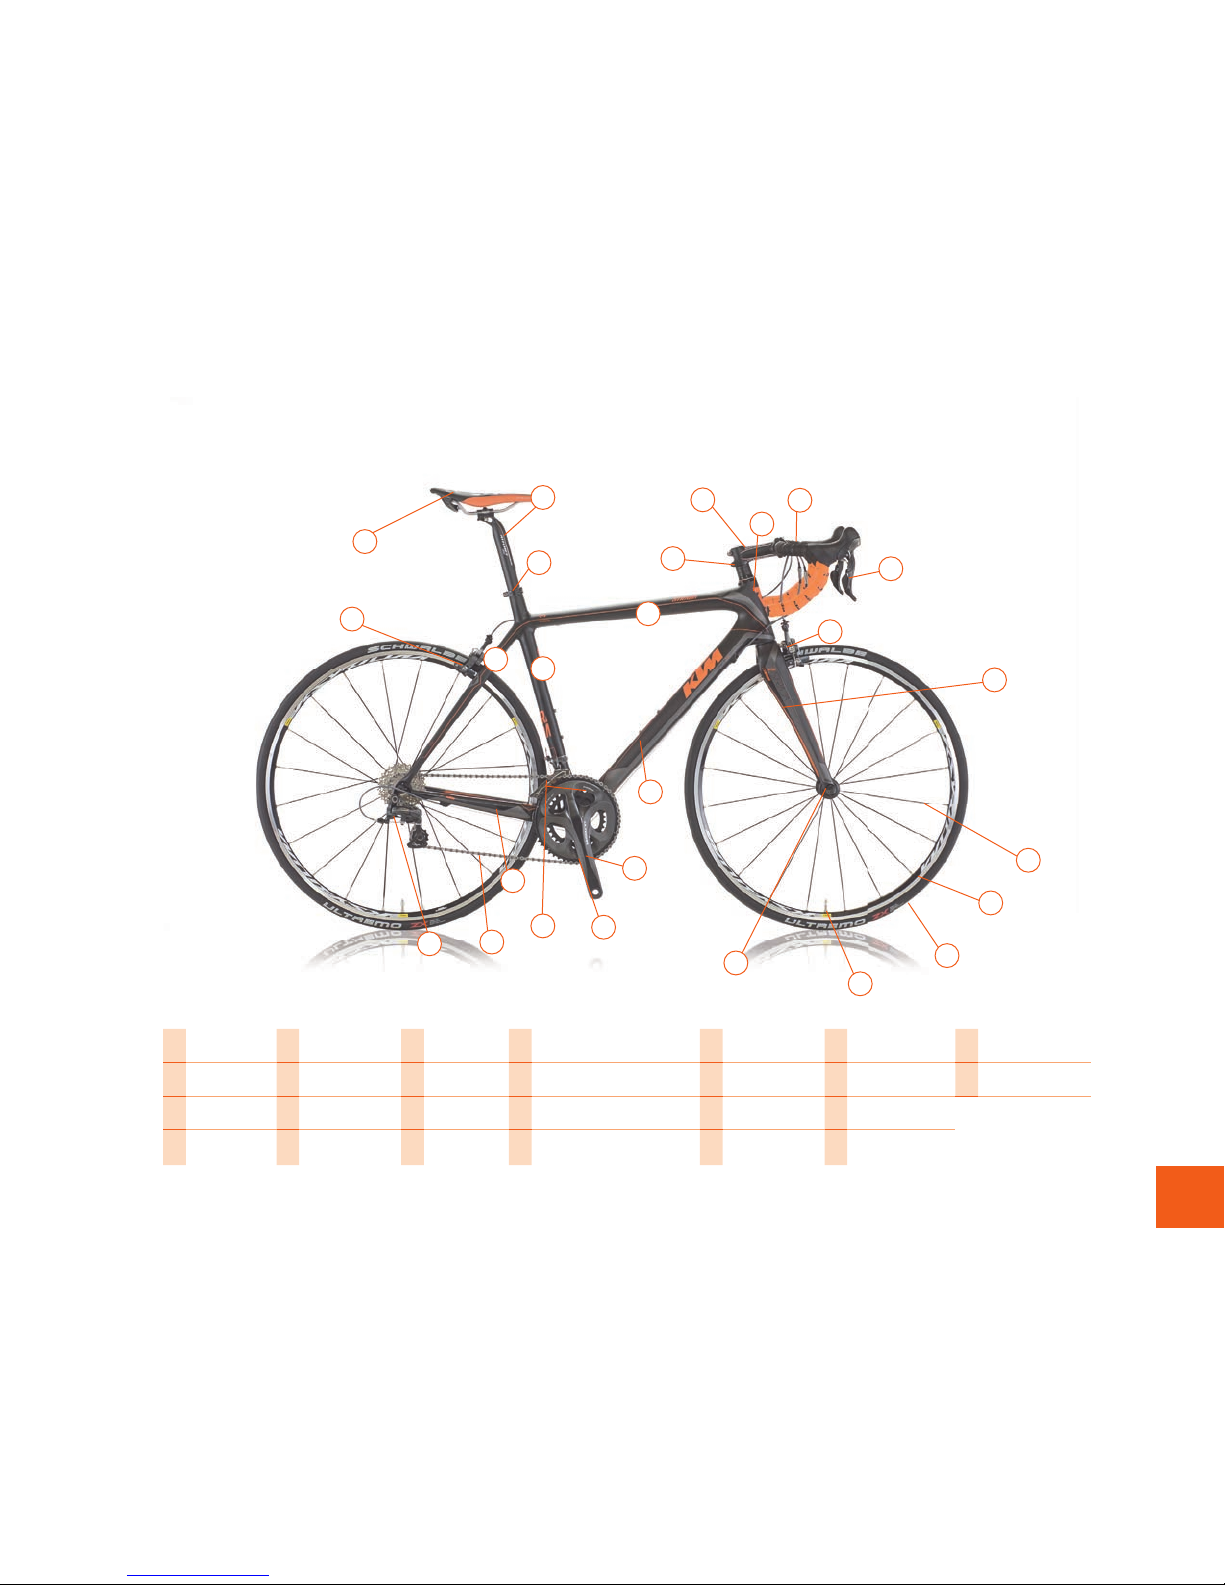
Children's Bike / Juvenile Road Bike
Due to theirdesign andequipment (e.g.active andpas-
sive lighting equipment), thesebikesare intendedfor use
on public roadsandpaths. Bikes belonging to thetrekking
/o-road group do notcomply with therequirements for
use in tracandhave to be consideredas spos equip-
ment. Before being used on public roads, thesebikeshave
to be retrotted with lights,mudguards, etc. according to
thepa icular national lawsandregulations.
Allof theses bikescanbe used in lighto-road terrain.
Thesafety-related equipment required forthis type of ri-
ding is includedinthedeliveryandhasto be checkedre-
gularly by the user or by an expe. If necessary, it needs
to be repaired.
Neithermanufacturer nordealer take responsibility forany
use going beyond the intendedoneandfornoncompli-
ance with thesafety-related directionsof this manual and
theresulting damage, respectively.
This appliesespecially to using thebike in extremeo-
road conditions, overload,and incorrectlyrepaired de-
fects. Thetotal load is 118kg / 260lb (rider + luggage).
Please note theload limitsof componentmanufacturers
in the supplement if applicable.
BMXbikesandchildren’s MTBs areexcludedfrom use
in trac. Thesebikeshave to be consideredas spos
equipment andhave to be retrotted with lights,mudgu-
ards, etc. according to thepa icular national lawsandre-
gulations. Thesafety-related equipment required forroad
bikes is includedinthedeliveryandhasto be checked
regularly by the user or by an expe. If necessary, it needs
to be repaired. Neithermanufacturer nordealer take res-
ponsibility forany use going beyond the intendedoneand
fornon-compliancewith thesafety-related directionsof
this manual andtheresulting damage, respectively.
This appliesespecially to using thesebikesinoroad
conditions, overload,and incorrectlyrepaired defects. The
total load is 60kg / 132lb (rider + luggage).
Intended use also includescompliance with the
manufacturer’s operating, servicing, andmaintenance
conditions speci ed in theoperating manual.
Trekking |Trekking-Offroad |ATB

www.austria.info
It’s the real
experience of living
that helps you
wind down.
Find out how you can discover Austria’s bike trails
with KTM here: www.austria.info

12
Due to theirdesign andequipment (e.g.active andpas-
sive lighting equipment), thesebikesare intendedfor
use on public roadsandpaths.
Thesafety-related equipment required forthis type of
riding is included in thedeliveryandhasto be checked
regularly by the user or by an expe. If necessary, it
needsto be repaired. Neithermanufacturer nordealer
take responsibility forany use going beyond the inten-
dedoneandfornon-compliancewith thesafety-rela-
ted directionsof this manual andtheresulting damage,
respectively.
This appliesespecially to using thebike in extreme
o-road conditions, overload,and incorrectlyrepaired
defects.
Thetotal load is 118kg / 260lb (rider + luggage). Please
note theload limitsof componentmanufacturersinthe
supplement if applicable.
Intended use also includescompliance with the
manufacturer’s operating, servicing, andmaintenance
conditions speciedintheoperating manual.
City Bike | Touring Bike | Spos Bike

20 17
1
2
3
4
5
6
78
9
18
30
31
29
15
14
16
19
10
11
12
13
22
23
24
25
26 27 28
21
32
13

14
Thesaddle is correctlyadjustedwhen your heel
reaches the pedal (whenthe pedalisatthelowest
point) while your legiscompletelystraight. When
youare pedaling your leg should be bent at the
knee.See Image 1.
While adjusting theheight
pay attention that theseat
post does notexceed the
maximumextension
(see image 2)
If theseat post is notcorrect-
ly inse ed this maycause a
fall or abroken frame.
If it is not possible to adjust
theheightthis way, choose a
larger frame.
A guideline to nd your
frame-size canbe found in
our catalogue or on
www.ktm-bikes.at/service
Thesaddle should be assembledinhorizontal po-
sition. You canuseawaterlevelto optimize your
adjustment (image 3). Thearea in whichthesaddle
rails should be clamped is marked on everysadd-
le. Make sure youdo notclamp thesaddle outside
themarking.
Use the giventorques you can fi nd on the saddle rails/
Saddle AdjustmentImpoant information
Image 1
Image 2

15
seat post or in your user manual
(see image 4).
If you have a seat post with two
screwsyou have to check them
mutually afteryou have tighte-
ned the screwsto avoid unequal
torques.
Be carfeul not to assemble it back-
to-front!
!
In principle the handlebar-heigt is correctly adjusted
when the saddle and the stem are on the same level
(see image 5). Please notice: At mountain and racing
bikes the saddle top edge can be about 5-11 cm above
the handlebar. At City-, Dirt-,Downhill- and Freeride-
Bikes the handlebar should be about 15cm above the
saddle top edge.
Image 3
Image 4
Image 5

16
You will have thebiggest benet foryour health
paired with endurance and performancewhen pe-
daling with afrequencyof about 60-90 revolutions/
minute andaloweo.. In orderto maintain a perfect
rhythm during changing conditions use thewhole
rangeof your
.
Shiing Gears
•It is necessaryto keep on pedaling with loweo-
while shiing.
•Themobile pas of the shiing gear should be
cleanedandadequately lubricatedaer aride in
therain.
•Avoid afast shiing thorugh all gears. Never shi-
while pedaling backward! Risk of ajammed chain.
Because of thehuge varietyof shiing control types it
is not possible to explaineach functioning. Therefore
askyour dealer forfuher explanationsor read the
manufacturer’s user manual carefully
Derailleur gear:Theright shier movestherear derail-
leur fortherear sprockets. Thele shier movesthe
frontderailleurforthefrontchainrings.
Thevarious chainrings/rear sprocketscombinations
determine the gear.
As soon as youhave mastered the shiing your expe-
rience will show youwhich gear is thebest foryou.
To avoid excessive wear or damageof thechain, the
chainring or therear sprocketsprefer thefollowing
combinations:
•Big chainring (front) – little rear sprockets
•Middle chainring (front) – middle rear sprockets
•Little chainring (front) – bigrear sprockets
!
Shiing Gears

17
As arule thelebrakeleveroperates thefrontbrake
while therightoneoperates therear brake.
Exception: Bikes with acoasterbrake. Theirbrakelever
forthefrontbrakeison theright side of thehandlebar.
Depending on themodeltherecanbe asecond
brakeleverfortherear brakeon theright side of the
handlebar.
In this case thebrakeleverforthefrontbrakewould be
on thele side of thehandlebar.
Pay attention notto lock up thewheels when applying
thebrake. Alocked up wheelmakesyoulose grip and
maycause a fall. Practice to applythebrakes in low-
traclocationswhichare suitableforthis.
Neverapplythebraketoohard or too suddenly. Danger
of being pitchedoverthehandlebar. When applying the
braketryto shi weighton therear wheelbymoving
backon thesaddle.
With alocked up frontwheeltheriderisnotable to
maintainbalancethrough steering anymoreandafall
is very probable.
Alocked up rear wheelcancareer sdewards. Apply
both brakes foran optimal slow down.
Impoant: when riding on looseor wet surfacesthe
braking distanceismuch longer.
Disc brakes do notwork perfectlywhen they arenew!
They need about 30 - 100 applicationsforan optimal
eectiveness.
With extended use, disc brakes canbecome
very hot! Do nottouch: risk of burn !
!

18
Tyre pressure:
The tyre pressure should be adaptedto themanufac-
turer’s
recommendation.Always pay attention to
therecommendationson the tyre’s sidwall [e.g.min. 3
bar (42, 6 psi)-max. 4,5 bar (65 psi)]
Guideline for tyre pressure:
Tyre puncture:
Inside thebicycle tyre isatube.
(Exception:tubeless systems-inthat case please
read themanufacturer’s manuals)
What to do when having a tyre puncture:
• Dismantlethewheel
• Push alltheair out of thetube
• Remove the tyre on one side from therimwith a
tyre lever
• Easily inate thenewor repaired tube and put it into
the tyre
• Put thevalve through thehole in therim
• Pull the tyre to both sidesovertherim
When inating pay attention thetube is notsqueezed
between tyre andrim!
Optimalpressure: see guideline on thele side!
Aerwardsmake sure thebrake’s arefully operative!
Tyres

19
Rims
Please notice that bikesequipped with rimbrakes
have ahuge eectconcerning therims wear.
When doing longdownhill-ridesand/or riding during
wetconditions (rain, snow) therimcan show signsof
wear even aer a sho period of time.
Every type equipped with rimbrakes (ex works) have
special wear indicators (exceptracing bikes). Depend-
ing on the type this canbe ahollow (see image1)or
little points (see image2)on therim. Fuher there
canbe an invisible wear indicatorwhich signalizes a
defect rimthrough acrack.
Im. 1
Im. 2

20
Riding with anotproperly locked quick releasesystem
maycause falls andserious injuries! Thefollowing is
very impoant:
1. If youhave any questionsconcerning theright
use of the quick releasesystem read the user
manual carefully or contactyour dealer!
2. It is impoantto learnhowto montageand
use the quick realease system properly in
orderto x thewheels/seat post correctly!
3. Before everyride checkyour quick release
systems!
The quick release system’s lever has to be closed
with force so that the quick release system does not
open during the ride.
If it can be closed to easily the nut on the other side
has to be tightened up a bit. Now you should feel more
resistance when closing the lever. If the lever can still be
closed too easily repeat the tightening up of the nut.
Quick Release System forWheels/SeatPost
Table of contents
Other KTM Bicycle manuals