manuals.online logo
Brands
  1. Home
  2. •
  3. Brands
  4. •
  5. Kurzweil
  6. •
  7. Synthesizer
  8. •
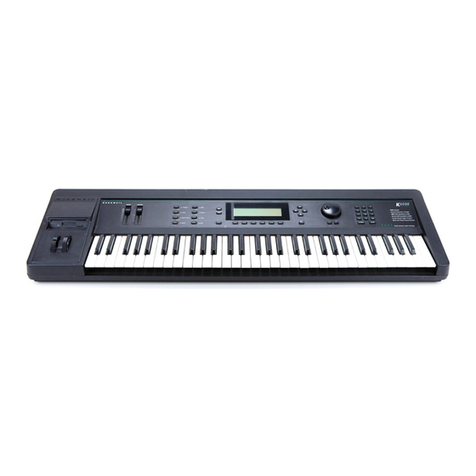
  9. Kurzweil K2000R User manual

Kurzweil K2000R User manual

,
..
KURZWEIL
K2000lK2000R
SERVICE
MANUAL
KURZWEIL
~--s~~-
Kurzweil
is
a product line
of
Young Chang America,
Inc.
----
-"
-- ---..... -
Young Chang America
13336 Alondra Blvd.
Cerritos,
CA
90701-2205
PIN
92002000
techwarn.doc
12/22/92
!** IMPORTANT INFORMATION **!
READ THIS PAGE BEFORE PROCEEDING!
THERE
ARE
NO
USER SERVICEABLE
COMPONENTS
OR
ASSEMBLIES
INSIDE
THIS
INSTRUMENT.
This
service
manual
is
written
for
use
by
qualified
service
personnel
only.
Possession
of
this
service
manual
does
not
qualify
its
owner
or
user
as
a
competent
service
technician
on
this
product.
Any
attempts
to
repair,
modify,
adjust
or
service
any
internal
component
or
assembly
by
non-approved
personnel
may
void
all
existing
warranties
on
this
instrument
and
any
installed
options.
Only
the
Kurzweil
Service
Department
has
the
authority
to
make
the
determination
as
to
who
is
a
qualified
technician.
For
further
information,
contact
the
Kurzweil
National
Service
Manager
at
(310)
926-3200.
&
'fllllllIillLL
EXPLANATION OF GRAPHIC SYMBOLS:
RISK
OF
ELEC'l'RK:
SB>CJ[
DO
NOT
OPEN
WARNKx
TO
RF.DU:E
TIiE
RISK
Cf
ELFCTIOC
SID<X
DO
f\OT
RFMJVE
TIiE
BOITQ\1.
NO
lliER
SERVaABLE
B\RTS
IN)[)E
REFER
SEIMJNG
TO
QlWJFIED
SERVU
1'ERSCNN8...
The lightning
tIash
with
the
arrowhead symboL within
an
equiIIatenI triangle,
i5
intended to alert the userto the presence
ofWlinsulated "dangerous voltage" wiithin the producrs
enclosure that may
be
of
sufficient magnitude
to
constirute a
risk
of
electric shock
to
persons.
The exclamation pointwithin an equilateral traiagle
is
intended
to alert the user
to
the presence
of
important operating and
maintenance (servicing) ins1ructions in the literature
accompanying
the
product
IMPORTANT
SAFETY
AND
INSTALLATION INSTRUCTIONS
INSTRUCTIONS
PERTAINING
TO
THE
RISK
OF
FIRE,
ELECTRIC SHOCK,
OR
INJURY
TO
PERSONS
WARNING
-When
using
electric
products,
basic
precautions
should
always
be
followed,
including
the
following:
1.
Read
all
of
the
Safety
and
Installation
Instructions
and
Explanation
of
Graphic
Symbols
before
using
the
product.
2.
This
product
must
be
grounded.
If
it
should
malfunction
or
breakdown,
grounding
provides
a
path
of
least
resistance
for
electric
current
to
reduce
the
risk
of
electric
shock.
This
product
is
equipped
with
a
power
supply
cord
having
an
equipment-grounding
conductor
and
a
grounding
plug.
The
plug
must
be
plugged
into
an
appropriate
outlet
which
is
properly
installed
and
grounded
in
accordance
with
all
local
codes
and
ordinances.
DANGER
-
Improper
connection
of
the
equipment-grounding
conductor
can
result
in
a
risk
of
electric
shock.
Do
not
modify
the
plug
provided
with
the
product
-
if
it
will
not
fit
the
outlet,
have
a
proper
outlet
installed
by
a
qualified
electrician.
Do
not
use
an
adaptor
which
defeats
the
function
of
the
equipment-grounding
conductor.
If
you
are
in
doubt
as
to
whether
the
product
is
properly
grounded,
check
with
a
qualified
serviceman
or
electrician.
3.
WARNING
-
this
product
is
equipped
with
an
AC
input
voltage
selector.
The
voltage
selector
has
been
factory
set
for
the
main
supply
voltage
in
the
country
where
this
unit
was
sold.
The
setting
of
the
voltage
selector
can
be
seen
just
to
the
right
of
the
power
input
receptacle
on
the
back
of
the
product.
Changing
che
voltage
selector
may
require
the
use
of
a
different
power
supply
cord
or
attachment
plug,
or
both.
The
reduce
the
risk
of
fire
or
electric
shock,
refer
servicing
to
qualified
maintenance
personnel.
4.
Do
not
use
this
product
near
water
-
for
example,
near
a
bathtub,
washbowl,
kitchen
sink,
in
a
wet
basement,
or
near
a
swimming
pool,
or
the
like.
5.
This
product
should
only
be
used
with
a
stand
or
cart
that
is
recommended
by
the
manufacturer.
6.
This
product,
either
alone
or
in
combination
with
an
amplifier
and
speakers
or
headphones,
may
be
capable
of
producing
sound
levels
that
could
cause
permanent
hearing
loss.
Do
not
operate
for
a
long
period
of
time
at
a
high
volume
level
or
at
a
level
that
is
uncomfortable.
If
you
experience
any
hearing
loss
or
ringing
in
the
ears,
you
should
consult
an
audiologist.
7.
The
product
should
be
oriented
such
that
its
location
or
position
does
not
interfere
with
its
proper
ventilation.
8.
The
product
should
be
located
away
from
heat
sources
such
as
radiators,
heat
registers,
or
other
products
that
produce
heat.
9.
The
product
should
be
connected
to
a
power
supply
only
of
the
type
described
in
the
operating
instructions
or
as
marked
on
the
product.
10.
This
product
may
be
equipped
with
a
polarized
line
plug
(one
blade
wider
than
the
other).
This
is
a
safety
feature.
If
you
are
unable
to
insert
the
plug
into
the
outlet,
contact
an
electrician
to
replace
your
obsolete
outlet.
Do
not
defeat
the
safety
purpose
of
the
plug.
11.
The
power
supply
cord
of
the
product
should
be
unplugged
from
the
outlet
when
left
unused
for
a
long
period
of
time.
When
unplugging
the
power
supply
cord,
do
not
pull
on
the
cord,
but
grasp
it
by
the
plug.
12.
Care
should
be
taken
so
that
objects
do
not
fall
and
liquids
are
not
spilled
into
the
enclosure
through
openings.
13.
The
product
should
be
serviced
by
qualified
service
personnel
when:
A.
The
power
supply
cord
or
the
plug
has
been
damaged;
or
B.
Objects
have
fallen,
or
liquid
has
been
spilled
into
the
product;
or
C.
The
product
has
been
exposed
to
rain;
or
D.
The
product
does
not
appear
to
be
operating
normally
or
exhibits
a
marked
change
in
performance;
or
E.
The
product
has
been
dropped,
or
the
enclosure
damaged.
14.
Do
not
attempt
to
service
the
product
beyond
that
described
in
the
user
maintenance
instructions.
All
other
servicing
should
be
referred
to
qualified
service
personnel.
15.
WARNING
-
Do
not
place
objects
on
the
product's
power
supply
cord,
or
place
where
anyone
could
trip
over,
walk
on,
or
roll
anything
over
cords
of
any
type.
rest
on
or
be
installed
over
cords
of
any
type.
Improper
installations
of
this
a
fire
hazard
and/or
personal
injury.
the
product
in
a
position
Do
not
allow
the
product
to
type
create
the
possibility
of
SAVE
THESE
INSTRUCTIONS
WARNING.PUB
11/03/92
ii
radiotv.doc
12/22/92
RADIO
AND
TELEVISION
INTERFERENCE
Warning:
Changes
or
modifications
to
this
instrument
not
expressly
approved
by
Young
Chang
could
void
your
authority
to
operate
the
instrument.
Important:
When
connecting
this
product
to
accessories
and/or
other
equipment
use
only
high
quality
shielded
cables.
The
cable(s)
supplied
with
this
instrument
must
be
used.
Note:
This
instrument
has
been
tested
and
found
to
comply
with
the
limits
for
a
Class
B
digital
device,
pursuant
to
Part
15
of
the
FCC
Rules.
These
limits
are
designed
to
provide
reasonable
protection
against
harmful
interference
in
a
residential
installation.
This
instrument
generates,
uses,
and
can
radiate
radio
frequency
energy
and,
if
not
installed
and
used
in
accordance
with
the
instructions,
may
cause
harmful
interference
to
radio
communications.
However,
there
is
no
guarantee
that
interference
will
not
occur
in
a
particular
installation.
If
this
instrument
does
cause
harmful
interference
to
radio
or
television
reception,
which
can
be
determined
by
turning
the
instrument
off
and
on,
the
user
is
encouraged
to
try
to
correct
the
interference
by
one
or
more
of
the
following
measures:
•
Reorient
or
relocate
the
receiving
antenna.
•
Increase
the
separation
between
the
instrument
and
the
receiver.
•
Connect
the
instrument
into
an
outlet
on
a
circuit
different
from
the
•
If
necessary
consult
your
dealer
or
an
experienced
radio/television
technician
for
additional
suggestions.
You
may
find
the
following
booklet
prepared
by
the
Federal
Communications
Commission
to
be
helpful:
"How
To
Identify
and
Resolve
Radio-TV
Interference
Problems"
This
booklet
is
available
from
the
u.s.
Government
Printing
Office,
Washington,
D.C.
20402,
Stock
No.
004-000---345-4.
NOTICE
This
apparatus
does
not
exceed
the
Class
B
limits
for
radio
noise
emmissions
from
digital
apparatus
set
out
in
the
Radio
Interference
Regulations
of
the
Canadian
Department
of
Communications.
AVIS
Le
present
appareil
numerique
n'emet
pas
de
bruits
radioelectriques
depassant
les
limites
applicables
aux
appareils
numeriques
de
la
class
B
prescrites
dans
Ie
Reglement
sur
Ie
brouillage
radioelectrique
edicte
par
Ie
ministere
des
Communications
du
Canada.
©
1992
All
rights
reserved.
Kurzweil
is
a
product
line
of
Young
Chang
Akki
Co.,
LTD.
Kurzweil,
K2000,
and
MIDIScope
are
trademarks
of
Young
Chang
Akki
Co.,
LTD.
The
names
Akai,
S1000,
Apple,
MacIntosh,
DX7, IBM, DOS, MS-DOS,
and
Roland
are
registered
trademarks
of
the
respective
companies
using
these
names.
This
manual
is
current
with
K2000
version
1.00
software.
Product
features
and
specifications
are
subject
to
change
without
notice.
iii
content
•.
doc
01/04/93
K2000/K2000R
TABLE
OF
CONTENTS
NOTE:
Any
sections
not
specifically
identified
with
the
K2000
or
the
K2000R
apply
to
both
units.
SPECIFICATIONS
GLOSSARY
SETUP
K2000
OPERATIONAL
CHECKOUT
K2000
POWER-UP
CHECK
K2000R
OPERATIONAL
CHECKOUT
K2000
DISASSEMBLY/ACCESS
K2000R
DISASSEMBLY/ACCESS
K2000
MAINTENANCE
K2000/K2000R
TROUBLESHOOTING
DIAGNOSTICS
K2000R
MAINTENANCE
OPTIONS
TECHNICAL
THEORY
K2000
PARTS
LIST
K2000R
PARTS
LISTS
1
5
1
5
11
17
1
7
1
7
11
47
A
1
1
9
K2000/K2000R
WIRING GUIDE 1
SCHEMATICS/DIAGRAMS
iv
1
2
3
4
5
6
7
8
SECTION 1 2000SPEC.OOC
01/03/93
1.0
K2000 SPECIFICATIONS
1.1
K2000
FEATURES
•
61-key
spring
return
synth
action
keyboard
•
Sends
and
receives
mono
(channel)
pressure;
receives
poly
pressure
•
Spring
loaded
Pitch
Wheel
•
Full
throw
Modulation
Wheel,
programmable
•
Volume
Slider
•
Programmable
Controller
Slider
• Two
programmable
switch
pedal
inputs
•
Programmable
continuous
controller
input
•
240
x
64-pixel
backlit
graphic
display
with
adjustable
contrast
•
3.5
inch
floppy
disk
drive,
for
DO
or
HD
disks,
DOS
compatible
• MIDI
IN,
THRU
and
OUT
•
24-note
polyphony
with
dynamic
voice
allocation
•
Multi-timbral,
for
multi-track
sequencing
and
recording
•
199
factory
preset
programs,
and
100
factory
preset
setups
• Up
to
3
layers
per
program,
up
to
32
layers
for
programs
on
drum
channel
•
3-zone
setups
transmit
on
3
MIDI
channels
with
independent
programmable
controls
•
15,000
note
scratchpad
sequencer
for
recording
from
keyboard
or
via
MIDI;
loads
and
plays
MIDI
Type
0
sequences
•
Easy-to-use
programming
interface
including
soft
buttons,
Alpha
Wheel,
and
alphanumeric
pad
• 8
Megabytes
of
16-bit
sample
ROM,
including
acoustic
instrumental
sounds,
waveforms,
and
noise
•
20
KHz
maximum
bandwidth
•
Optional
stereo
sampler
with
analog
and
digital
inputs
•
Sound
ROM
expandable
to
a
total
of
24
Megabytes
•
Sound
sample
playback
• 4
SIMM
sockets
for
optional
sample
RAM
-
up
to
64
Megabytes
•
Akai™
S1000
sample
disk
compatibility
• Two
1/4
inch
mixed
audio
outputs
(stereo
pair)
•
Four
1/4
inch
audio
outputs
programmable
as
2
stereo
pairs
or
as
four
separate
outputs,
with
insert
capability
for
effects
patching
•
Stereo
headphone
jack
•
128
KB
battery
backed
RAM
for
user
programs,
setups
and
other
objects
•
SCSI
port
for
connection
with
external
SCSI
disk
or
CD-ROM
•
Optional
internal
hard
disk
•
Real-time
DSP
for
each
voice:
31
programmable
DSP
algorithms
incorporating
filters,
EQ,
distortion,
panning,
pulse
width
modulation,
and
more;
up
to
3
programmable
DSP
functions
per
voice
•
Filters:
Lowpass,
Highpass,
Allpass,
Bandpass,
Notch,
programmable
resonance
•
Programmable
stereo
multi-effects
on
MIX
outputs,
including
simultaneous
reverb,
chorus,
delay,
flanging,
EQ
-
and
more
•
Real-time
internal
and
MIDI
control
of
effects
parameters
• MIDI
standard
sample
dump
capability
•
System
Exclusive
implementation
•
MIDIScope™,
for
analyzing
MIDI
events
1
SECTION 1
2000SPEC.
DOC
01/03/93
1.2
K2000R
FEATURES
The
Kurzweil
K2000R
offers
the
same
powerful
features
as
the
K2000
including:
•
Convenient
3-space
rack
module
•
240
x
64-pixel
backlit
graphic
display
with
adjustable
contrast
•
3.5-inch
floppy
disk
drive,
for
DD
or
HD
disks,
DOS
compatible
• MIDI
In,
Thru,
and
Out
• MIDI
LED
to
indicate
MIDI
activity
•
24-note
polyphony
wiht
dynamic
voice
allocation
•
Multi-timbral,
for
multi-track
sequencing
and
recording
•
199
factory
preset
programs,
and
100
factory
preset
setups
•
Up
to
3
layers
per
program,
up
to
32
layers
for
programs
on
drum
channel
•
Receives
mono
(channel)
pressure
and
poly
(key)
pressure
•
3-zone
setups
transmit
on
3 MIDI
channels
with
independent
programmable
controls
•
15,000
note
scratchpad
sequencer
for
recording
from
keyboard
or
via
MIDI;
loads
and
plays
MIDI
Type
0
sequences
•
Easy-to-use
programming
interface
including
soft
buttons,
Alpha
Wheel,
and
alphanumeric
pad
•
20KHZ
maximum
bandwidth
•
Stereo
sample
playback
capability
Programmable
stereo
multi-effects
on
MIX
outputs,
including
simultaneous
reverb,
chorus,
delay,
flanging,
EQ
••.
and
more
•
Realtime
internal
and
MIDI
control
of
effects
parameters
•
Kurzweil's
proprietary
VASTTW
(Variable
Architecture
Synthesis
Technology)
system
• 31
sound
shaping
algorithms
•
Three
programmable
DSP
functions
for
each
voice
• 8
Megabytes
of
ROM
(16-bit)
samples
•
Built-in
3.5"
floppy
drive
(HD/DD)
•
Two
SCSI
buses,
for
connection
with
external
SCSI
disks,
CD-ROM,
or
MacIntosh
computers.
• Ten
analog
outputs,
including
four
stereo
pairs
and
a
stereo
master
pair
•
Internal
ROM
expansion
capability
to
24
Megabytes
•
Two
8
Megabyte
ROM
sound
blocks
(ROM-1,
ROM-2)
can
be
purchased
and
installed
separately
•
Sampling
Option
Kit
(DSMP-R),
which
allows
for
user
sampling
via
analog,
digital
or
optical
inputs
•
AES-EBU
and
SPDIF
digital
ins
and
outs
are
offered;
the
version
2.0
software*
included
with
this
kit
provides
extensive
sample
editing
and
audio
processing
capabilities
•
Sample
RAM
can
be
expanded
via
four
standard
SIMM
memory
modules
(up
to
64
Megabytes)
•
Program/Sequence
memory
expansion
option
(DP-RAM)
expands
battery
backed
memory
from
120K
to
760K
•
CD-ROM
compatible
with
Sony
and
Toshiba
drives
•
Capacity
for
an
optional
internal
hard
drive
(up
to
240
Megabytes
or
more)
•
Standard
equipped
with
version
1.27
software,
allowing
the
user
to
port
over
stereo
samples
via
the
SCSI
bus
(SMDI
protocol)
using
Passport's
AlchemyTW
or
through
sample
dump
over
MIDI
•
Reads
sample
data
from
Akai
S1000
HD
disks
*Version
2.0
software,
which
is
part
of
the
SMP-R
sampling
option,
allows
for
graphic
waveform
editing
via
the
built-in
240
x 64
display.
Features
include
powerful
sample
editing
and
DSP
functions
(time
compression/expansion,
sample
rate
conversion,
sample
mixing
and
splicing,
normalizing
gain,
audible
sample
cueing,
cross
fade
looping,
auto
looping,
fade
in/out
and
more)
.
2
SECTION 1 2000SPEC.DOC
01/03/93
Version
2.0
also
adds
extensive
library
compatibility
functions
to
the
K2000/K2000R,
including
the
ability
to
read
Ensoniqn.
EPS
disks
(samples,
keyrnaps
and
constructs
programs)
and
Akain.
S1000
(samples,
keyrnaps
and
constructs
programs).
This
version
also
provides
visual
editing
of
K2000/K2000R's
internal
ROM
samples
as
well
as
RAM
samples,
plus
user-
programmable
loop
type
per
sample
(forward,
bi-directional,
off)
and
direction
(forward,
reverse),
new
alternate
release
parameters
(samples
may now
play
after
the
release
loop)
and
much
more.
Version
2.0
software
will
also
be
available
separately
from
the
Sampling
Option
Kit.
1.3
ENVIRONMENTAL
SPECIFICATIONS
Temperature
ranges
For
operation:
minimum 410 F (50
C)
maximum 1040 F (400
C)
For
storage:
minimum
-13
0 F (_250
C)
maximum
186
0 F (850
C)
Relative
humidity
ranges
(non-condensing):
Operation
and
storage
= 5 -
95%
1.4
PHYSICAL SPECIFICATIONS
Overall
dimensions:
X2000
Width
Depth
Height
Weight
Overall
dimensions:
X2000R
Width
Depth
Height
Weight
40
15/16
in.
13
7/16
in.
4
1/8
in.
26
lb.
16.9
in
.•
13.9
in.
5.1
in.
22
lb.
•
Excluding
the
rack-mount
brackets
1.5
ELECTRICAL SPECIFICATIONS
104
ern
34.1
ern
10.5
ern
11.
8 kg
43
cm
35.4
ern
13
cm
10 kg
AC
supply:
selectable;
100V, 120V, 220V, 240V;
.75
amps
at
120
volts
nominal
Safe
voltage
ranges
(volts
rms)
Voltage
setting:
100V 120V
220V
240V
Safe
voltage
range:
85
-
107V
95
-
125V
180
-
232V
190
-250V
Safe
frequency
range:
48 -
65
Hz
48
-
65
Hz
48
-
65
Hz
48 -
65
Hz
If
the
voltage
drops
below
the
minimum
safe
level
at
any
voltage
setting,
the
K2000
will
reset,
but
no
data
will
be
lost.
If
the
voltage
exceeds
the
maximum
safe
level,
the
K2000 may
overheat.
SPECIFICATIONS
SUBJECT
TO
CHANGE
WITHOUT
NOTICE
3
SECTION 1
GLOSSARY.
DOC
12/13/92
1.6
GLOSSARY
OF
TERMS
Algorithm
Aliasing
~litude
Analog
Bandwidth
Bank
Cent
Continuous
Control
Control
Source
DSP
In
the
K2000,
a
preset
configuration
of
programmable
digital
signal
processing
functions.
Each
of
a
program's
layers
uses
its
own
algorithm,
which
determines
the
type
of
synthesis
each
layer
uses
to
generate
its
sound.
A
type
of
distortion
which
occurs
in
digitally
sampled
sounds
when
higher
pitches
(increased
sample
playback
rates)
introduce
partials
that
were
not
present
in
the
original
sound.
These
partials
mayor
may
not
be
musically
useful.
The
intensity
of
a
signal,
perceived
as
loudness
in
the
case
of
audio
signals.
A
term
used
widely
in
electronics-related
fields
to
describe
a
method
of
representing
information,
in
which
the
method
of
representation
resembles
the
information
itself.
Analog
synthesizers,
for
example,
use
gradual
variations
in
electrical
voltage
to
create
and
modify
sounds.
The
oscillations
in
voltage
are
analogous
to
the
waveforms
of
the
sounds
they
generate.
Compare
digital.
In
terms
of
sound
generation,
the
range
of
frequencies
within
which
a
device
functions.
The
human
ear
has
a
"bandwidth"
of
almost
20
KHz
(it
can
distinguish
sound
at
frequencies
from
20
Hz
to
20
KHz).
The
K2000's
20
KHz
bandwidth
enables
it
to
produce
sounds
which
span
the
entire
range
of
human
hearing.
There
are
two
types
of
banks
in
the
K2000's
memory:
memory
banks,
which
store
and
organize
the
programs
and
other
objects
you
create,
and
Quick
Access
banks,
where
you
can
store
programs
and
setups
for
one-button
access
while
in
Quick
Access
mode.
1/100th
of
a
semi
tone.
The
standard
increment
for
fine
adjustment
of
pitch.
A
device
which
converts
motion
into
a
range
of
128
possible
values
which
can
modulate
a
sound
source.
The
Mod
Wheel,
a
standard
volume
pedal,
and
controllers
like
Breath
and
Aftertouch
are
continuous
controls.
Compare
switch
controls.
Anything
which
can
be
used
to
modify
some
aspect
of
a
program's
sound.
LFOs,
envelopes,
Mod
Wheel
messages
(MIDI
01),
and
FUNs
are
just
a
few
examples
of
the
K2000's
control
sources.
Digital
Signal
Processing.
5
SECTION 1
DSP
Functions
Default
Dialog-
Dig-ital
Drum
Prog-ram
DSP
GLOSSARY.DOC
12/13/92
the
K2000's
collection
of
digital
signal
processing
functions
are
what
give
the
Variable
Architecture
Synthesis
system
its
flexibility.
Within
each
layer's
algorithm,
you
can
select
from
a
long
list
of
DSP
functions
like
filters,
EQ,
oscillators,
and
a
few
that
are
unique
to
the
K2000.
Each
DSP
function
has
a
corresponding
page
which
enables
you
to
assign
numerous
control
sources
to
define
how
the
DSP
functions
affect
the
sound
of
the
program
being
edited.
The
starting
condition
of
a
system.
The
settings
for
the
K2000's
parameters
are
at
their
defaults
when
you
unpack
it,
and
they
stay
there
until
you
change
them.
A
hard
reset
will
erase
RAM
and
restore
all
parameters
to
their
defaults.
A
page
which
prompts
you
to
enter
information
that
the
K2000
needs
in
order
to
execute
an
operation.
Dialogs
appear,
for
example,
when
initiating
a
Save
or
Delete
operation.
A
term
used
widely
in
electronics-related
fields
to
describe
a
method
of
representing
information
as
a
series
of
binary
digits
(bits)
-
Is
and
Os.
Digital
computers
process
these
strings
of
Is
and
Os
by
converting
them
into
an
electrical
signal
that
is
always
in
one
of
two
very
definite
states:
"on"
or
"off."
this
is
much
more
precise
than
the
analog
method,
therefore
digital
computers
can
operate
at
speeds
unattainable
by
analog
devices.
Digital
synthesizers
like
the
K2000
are
actually
computers
which
process
vast
strings
of
digital
information
signals,
eventually
converting
them
(at
the
audio
output)
into
the
analog
signals
which
flow
into
PAs
and
other
audio
systems.
See
also
Analog.
The
only
difference
between
a
drum
program
and
an
ordinary
program
is
the
drum
program
can
contain
up
to
32
layers
instead
of
the
usual
maximum
of
three.
Since
each
layer
has
its
own
keyrnap
and
algorithm
(not
to
mention
all
the
other
control
sources),
this
gives
you
enormous
control
over
whatever
sounds
assigned
tot
he
layers
in
a
drum
program.
Digital
Signal
Processing;
this
term
refers
to
a
vast
range
of
functions,
all
of
which
have
in
common
the
fact
that
they
act
upon
an
electric
current
as
it
flows
through
a
circuit
or
group
of
circuits.
A
simple
form
of
signal
processing
is
the
distortion
box
used
by
many
guitarists.
Digital
signal
processing
refers
to
similar
processes
which
are
performed
by
digital
circuitry
as
opposed
to
analog
circuitry.
Many
of
the
effects
devices
available
today
use
digital
signal
processing
techniques.
6
SECTION 1
Editor
Enve10pe
Fi1e
G10bal
Bard
Reset
Keymap
LFO
GLOSSARY.OOC
12113/92
The
complete
set
of
parameters
used
to
modify
a
particular
aspect
of
the
K2000,
for
example,
the
currently
selected
program,
which
is
modified
with
the
Program
Editor.
The
Program
Editor
spans
several
display
pages,
which
can
be
viewed
by
using
the
soft
buttons
(labeled
"<more>").
An
aperiodc
modifier.
In
other
words,
a
way
to
cause
a
sound
to
change
over
time
without
necessarily
repeating
the
change
(unlike
periodic
modifiers
like
LFOs,
which
repeat
at
regular
intervals)
•
A
group
of
objects
stored
to
a
floppy
or
hard
disk,
or
loaded
into
the
K2000's
RAM
from
disk.
In
this
manual,
used
primarily
in
reference
to
control
sources.
A
global
control
source
affects
all
notes
in
a
layer
uniformly.
If
a
layer
uses
a
global
control
source,
that
control
source
begins
to
run
as
soon
as
the
program
containing
it
is
selected.
Its
effect
on
each
note
will
be
completely
in
phase,
regardless
how
many
notes
are
being
played.
Compare
Local.
Resets
all
parameter
values
to
their
defaults,
and
completely
erases
the
contents
of
RAM.
Press
the
Reset
button
in
Master
mode
to
do
a
hard
reset:
This
is
a
quick
way
to
restore
the
factory
defaults
to
the
K2000,
but
EVERYTHING
in
RAM
(all
the
objects
the
owner/artist
has
created)
will
be
erased,
so
objects
you
wish
to
keep
should
be
saved
to
disk
or
SyxEx
dump.
A
hard
reset
would
not
be
used
to
recover
if
your
K2000
is
hung
up,
except
as
a
last
resort.
See
Soft
Reset.
A
keymap
is
a
collection
of
samples
assigned
to
specific
keys
and
keys
trike
velocities.
Keymaps
usually
contain
numerous
sample
roots
pitch-shifted
across
a
range
of
several
keys.
When
you
strike
a
key,
the
keymap
tells
the
K2000
what
sound
to
play,
at
what
pitch
and
at
what
loudness.
Low
frequency
oscillator.
An
oscillator
is
an
electrical
signal
which
cycles
regularly
between
a
minimum
and
maximum
amplitude.
The
simplest
oscillating
waveform
is
the
sine
wave,
but
an
LFO
waveform
can
have
almost
any
shape.
The
number
of
times
each
second
that
an
oscillator
repeats
itself
is
called
its
frequency,
which
is
measured
in
Hertz
(Hz).
Anything
up
to
50
Hz
is
considered
low-frequency
in
musical
applications.
Use
an
LFO
whenever
you
want
to
generate
a
periodic
(repeating)
effect.
Adjusting
the
rate
of
the
LFO
will
change
the
repetition
rate
of
the
effect.
7
SECTION 1
Layer
Leslie
Effect
Local
Memory
Banks
MIDI
MIDI
Device
MIDI
Master
MIDI
Slave
NL
DSP
Function
GLOSSARY.DOC
12/13/92
A
layer
consists
of
a
keymap
processed
through
an
algorithm.
Layers
can
be
stacked
together
within
a
program.
Each
layer
uses
one
of
the
K2000's
24
available
voices.
Each
K2000
program
can
contain
up
to
three
layers
-
except
drum
channel
programs,
which
can
contain
up
to
32
layers.
This
classic
vibrato
effect
was
originally
created
by
mounting
a
speaker
in
its
cabinet
so
the
speaker
could
be
rotated
at
varying
speeds.
This
applied
a
vibrato
of
varying
rate
to
all
sounds
played
through
the
rotating
speaker.
In
this
manual,
used
primarily
in
reference
to
control
sources.
A
local
control
source
affects
each
note
in
a
layer
independently.
For
example,
if
a
local
LFO
is
used
as
a
control
source,
a
separate
LFO
cycle
will
begin
with
each
note
start.
The
LFOs
do
not
run
in
phase
unless
notes
are
started
simultaneously.
Compare
Global.
The
K2000's
memory
is
divided
into
ten
spaces
where
you
can
store
any
object
you
edit.
These
spaces
are
called
banks.
Each
bank
can
hold
up
to
100
objects
of
each
type,
so
we
refer
to
them
as
the
100s
bank,
the
200s
bank,
and
so
on.
The
ID
of
an
obJect
determines
in
which
bank
it
is
to
be
stored.
An
object
with
an
ID
of
399,
for
example,
would
be
stored
in
the
300s
bank.
ROM
objects
are
stored
in
the
Zeros
and
100s
banks.
RAM
objects
can
be
stored
in
any
bank.
Musical
Instrument
Digital
Interface.
A
specialized
format
for
representing
musical
information
in
terms
of
standardized
computer
data,
which
enables
electronic
musical
instruments
to
communicate
with
computers.
Any
device
-
keyboard,
computer,
wind
instrument,
etc.
-
which
is
capable
of
transmitting
and
receiving
MIDI
messages.
A MIDI
device
which
is
configured
to
control
one
or
more
other
MIDI
devices.
The
MIDI
Out
port
of
the
master
is
connected
by
cable
to
the
MIDI
In
port(s)
of
the
slave
device(s).
A MIDI
device
which
is
configured
to
receive
MIDI
messages
from
a
master
device.
The
MIDI
In
port
of
the
slave
is
connected
by
cable
to
the
MIDI
Out
port
of
the
master.
Non-linear
DSP
functions
like
SHAPER
and
WRAP
add
waveforms
to
those
already
present
in
a
sound,
while
linear
DSP
functions
act
upon
the
existing
waveforms
without
adding
new
ones.
8
SECTION 1
Note
state
Object
Page
Parameter
Pixel
Program
Program
Edi
tor
RAM
ROM
Sample
GLOSSARY.DOC
12113/92
Any
K2000
is
either
on
or
off;
this
is
its
note
state.
Normally,
any
given
note's
Note
state
switches
on
when
you
strike
the
key
for
that
note.
It
switches
off
when
you
release
the
key,
and any
sustain
controls
you
may
have
applied
to
the
note
(Sustain
or
Sostenuto
pedal,
etc.).
A
chunk
of
information
stored
in
the
K2000's
memory.
Programs,
setups,
keyrnaps,
and
samples
are
all
objects.
There
are
several
others
as
well.
A
set
of
performance
or
programming
parameters
which
appear
as
a
group
in
the
display.
The
entry
level
page
for
each
mode
appears
when
you
select
the
mode.
Most
other
pages
are
selected
with
the
soft
buttons,
from
within
an
editor.
A
programming
feature.
The
name
of
the
parameter
describes
the
function
it
controls
-
transposition,
for
example.
Each
parameter
has
a
value
associated
with
it,
which
indicates
the
status
of
the
parameter.
A
contraction
of
"picture
element."
The
K2000's
display
consists
of
a
screen
with
small
square
dots
(the
pixels).
Each
pixel
lets
light
through
or
blocks
it
depending
on
whether
it
is
receiving
an
electrical
charge.
The
combination
of
light
and
dark
dots
creates
a
pattern
which
you
recognize
as
text
or
graphics.
The
K2000's
display
is
240-by-64
pixels,
in
other
words,
64
horizontal
rows,
each
containing
240
pixels,
for
a
total
of
15360
pixels.
The
K2000's
basic
performance-level
sound
object.
Programs
can
consist
of
up
to
3
layers
(32
layers
for
programs
on
the
drum
channel);
each
layer
has
its
own
keyrnap
(set
of
examples)
and
sound-processing
algorithm.
The
set
of
parameters
that
lets
you
modify
the
sound
of
ROM
or
RAM
programs.
Enter
the
Program
Editor
by
pressing
the
EDIT
button
while
in
Program
mode,
or
any
time
the
currently
selected
parameter
has
program
as
its
value.
Random
Access
Memory,
one
of
the
two
basic
types
of
computer
memory.
RAM
can
be
both
read
from
and
written
to.
When
you
load
samples
into
the
K2000
you
are
writing
to
RAM.
Compare
ROM.
Read
Only
Memory,
one
of
the
two
basic
types
of
computer
memory.
You
can
retrieve
the
information
stored
in
ROM,
but
information
cannot
be
written
to
it.
The
onboard
sounds
of
the
K2000
are
stored
in
ROM.
A
digital
recording
of
a
sound
that
can
be
assigned
to
a
keyrnap
as
part
of
the
process
of
building
a
program.
Samples
are
stored
in
ROM
(factory-installed)
or
in
RAM
(loaded
from
disk)
.
9
SECTION 1
SCSI
Semi
tone
Setup
Soft
Reset
Switch
control
Toggle
Value
VAST
GLOSSARY.DOC
12/13/92
Pronounced
"skuzzy,"
this
acronym
stands
for
Small
Computer
Systems
Interface.
It
is
simply
a
standardized
form
of
information
exchange
which
allows
any
SCSI
equipped
device
to
communicate
with
any
other
SCSI
device.
Two
or
more
SCSI
devices
-
they
can
be
computers,
hard
disks,
printers,
just
about
anything
that
sends
or
receives
information
in
standardized
form
-
are
connected
via
special
cables
to
their
SCSI
ports.
This
configuration
is
much
faster
than
serial
information
exchange,
the
precursor
to
SCSI.
The
standard
interval
between
the
twelve
notes
in
the
scale.
There
are
twelve
semitones
to
an
octave.
The
interval
between
C
and
C#
is
one
semi
tone.
A
multi-timbral
performance
object.
A
setup
consists
of
three
zones,
each
of
which
can
be
assigned
its
own
program,
MIDI
channel,
and
control
assignments.
These
assignments
control
the
K2000's
operation
while
in
Setup
mode,
as
well
as
determining
the
Program
Change
numbers
and
controller
messages
the
K2000
sends
via
MIDI.
Returns
the
K2000
to
Program
mode
without
affecting
the
contents
of
RAM.
Press
the
+/-,
0,
and
CLEAR
buttons
to
do
a
soft
reset.
IF
your
K2000
is
hung
up
for
some
reason,
this
will
usually
get
take
care
of
the
problem.
See
Hard
Reset.
A
device
which
converts
motion
into
discrete
on/off
signals.
A
switch
control,
like
the
sustain
pedal,
is
either
on
or
off.
Compare
continuous
control.
As
a
verb,
to
switch
between
(usually)
two
conditions
using
a
device
which
makes
the
switch.
As
a
noun,
the
device
which
makes
the
switch.
For
example,
pressing
the
"View"
soft
button
on
the
top
level
Program
mode
page
toggles
between
small-type
and
large-type
views
of
the
current
Program.
the
current
setting
of
a
parameter.
Each
parameter
has
a
range
of
available
values,
one
of
which
you
select
while
editing.
The
Transposition
parameter
on
the
Program
mode
page,
for
example,
has
a
default
value
of
o.
Change
the
value
to
change
the
parameter's
effect
on
the
current
program.
Variable
Architecture
Synthesis
Technique;
the
term
created
by
Kurzweil
engineers
to
describe
the
multi-
faceted
capabilities
of
the
K2000,
which
combines
sample
playback
(ROM
and
RAM),
and
waveform
generation
with
a
broad
array
of
processing
functions.
This
architecture
provides
preset
algorithms
created
by
Kurzweil
sound
engineers,
which
include
filters,
distortion,
panning,
EQ,
waveform
oscillators,
waveform
shaper,
hard
sync
oscillators,
amplitude
modulation,
gain,
crossfade,
and
more.
10
SECTION 1
Zero
Crossing
GLOSSARY.
DOC
121
13/
92
Any
of
a
number
point
in
the
digital
representation
of
a
sound's
waveform
where
the
digital
signal
is
neither
positive
or
negative.
When
looping
samples,
starting
the
loop
at
one
of
these
points
will
reduce
or
eliminate
the
click
or
change
in
timbre
that
can
occur
in
sample
loops.
11
SECTION 2
2.0
2.1
2.1.1
WARNING:
WARNING:
2.1.2
1.
2.
3.
4.
5.
6.
7.
SETUP1.PUB
12/21/92
SETUP
AND
OPERATIONAL
CHECKOUT
VOLTAGE
SELECTION
The
K2000
is
equipped
with
a
voltage
selector
which
allows
operation
on
single-phase
AC
of
100
Volts,
120
Volts,
220
Volts,
or
240
Volts.
The
selector
is
set
at
the
factory
for
the
AC
line
voltage
most
commonly
in
the
country
of
destination.
The
setting
can
be
checked
by
looking
at
the
small
panel
just
to
the
left
of
the
AC
power
connector
- a
white
indicator
pin
is
visible
in
the
hole
next
to
the
selected
voltage.
Do not attempt to operate the K2000 on any AC voltage other than the one selected -extensive
damage to the unit
may
result!
CHANGING
THE
VOLTAGE SELECTORMAY REQUIRE THE USE
OF
A
DIFFERENT LINE CORD
OR
ATTACHMENT PLUG,
OR
BOTH.
TO
REDUCE
THE
RISK OF FIRE
OR
ELECTRIC SHOCK,
REFER
SERVICING TO QUALIFIED
SERVICE PERSONNEL
To
change
the
selected
voltage:
Turn
the
unit
off
and
remove
the
AC
line
cord
from
the
AC
power
connector.
Open
the
cover
of
the
fuse/voltage
select
compartment
using
a
small
blade
screwdriver
or
similar
tool.
Pull
the
voltage
selector
card
straight
out
of
the
housing,
using
the
indicator
pin
(See
Figure
2.1
below).
Orient
selector
card
so
the
desired
voltage
is
readable
at
the
bottom.
Orient
the
indicator
pin
to
point
up
when
the
desired
voltage
is
readable
at
the
bottom
(See
Figure
2.2
below)
.
Insert
the
voltage
selector
card
into
the
housing
with
the
printed
side
of
the
card
facing
towards
the
AC
power
connector,
and
the
edge
marked
with
the
desired
voltage
first.
If
changing
from
100V
or
120V
to
220V
or
240V,
or
vice-versa,
change
fuse(s)
and
fusing
arrangement
as
described
under
"Fuses"
Figure
2.1
-
Voltage
Selector
Card
Removal
8.
Replace
compartment
cover.
Verify
the
indicator
pin
shows
the
desired
voltage.
Figure
2.2
-
Voltage
Selector
Card
Orientation
I
SECTION 2
2.2
WARNING:
2.2.1
2.2.2
2.2.3
SETUPl.PUB
12/21/92
FUSES
FOR
CONTINUED
PROTECTION AGAINST
THE
RISK
OF
FIRE,
REPLACE FUSES
ONLY
WITH
THE
TYPE
AND
RATING
SPECIFIED.
FUse
Replacement:
In
North
America
and
other
locations
where
the
AC
supply
voltage
is
1--
-
120V/60Hz,
replace
the
fuse
only
with
Type
AGC,
~"
x
1~",
Fast-Acting,
250
Volt,
1
Amp
fuse
as
per
Figure
2.3
below.
In
Europe
and
other
locations
where
the
AC
supply
voltage
is
220
-
240V/50Hz,
there
are
two
fuses
-
wone
on
Line
and
one
on
Neutral.
Either
of
these
fuses
should
be
replaced
only
with
a
Type
GOB,
5mm
x 20mm,
Quick-Acting
(F),
Low-
Breaking
Capacity,
250
Volt,
.50
Amp
fuse
as
per
Figure
2.4
below.
Fiqure
2.3
-
American
fu~e
Figure
2.4
-
European
fu~e
NOTE: When
preparing
the
unit
for
use
on
European
or
other
220
-
240V/50Hz
AC
lines,
the
fusing
arrangement
must
be
changed
in
order
to
fully
protect
the
instrument.
To
change
from
the
North
American
to
the
European
fusinq
arranqement:
1.
2.
3.
4.
5.
6.
7.
8.
NOTE:
Refer
to
Figure
2.5
below
for
details.
Turn
the
unit
off
and
remove
the
AC
line
cord
from
the
AC
power
connector.
Remove
the
cover
of
the
fuse/voltage
select
compartment
using
a
small
screwdriver
or
similar
tool.
Loosen
the
Phillips
screw
2
turns.
Remove
fuse
block
by
sliding
up,
then
away
from
the
PHillips
screw,
and
lifting
up
from
the
pedestal.
Figure
2.5
-
North
American
to
European
fuse
conversion
Invert
the
fuse
block
both
the
upper
(Hot)
Slide
the
fuse
block
pedestal.
and
install
the
.50
Amp
GOB
fuses
in
and
lower
(Neutral)
holders.
back
onto
the
Phillips
head
screw
and
Tighten
the
Phillips
head
screw.
Replace
the
cover.
2
SECTION 2
SETUP.
PUB
1110,
2.3
2.3.1
2.3.2
2.3.3
1.
2.
3.
4.
5.
6.
RAM
EXPANSION
User
RAM
in
the
02000
may
be
expanded
with
the
installation
of
SIMMs
(Single
In-line
Memory
Modules)
in
pairs.
SIMMs
for
the
K2000
must
be
30
pin,
8
bit,
and
120ns
or
faster,
with
maximum
dimensions
not
exceeding
3.5"
wide
x
2.2"
high
x
.25"
thick
-
SIMMs
with
ICs
on
both
sides
are
not
supported.
The
following
memory
sizes
are
supported:
256KB
x 8 1MB x 8
4MB
x 8 16MB x 8
Installation
of
SIMMs:
Turn
the
unit
off
and
remove
the
AC
line
cord
from
the
AC
power
connector.
Open
the
unit
as
described
in
Section
3,
"Disassembly".
Locate
the
SIMM
sockets
on
the
Engine
board
(Figure
2.6).
There
are
two
banks
of
SIMM
sockets,
the
two
inner
sockets
are
Bank
A
and
the
two
outer
sockets
are
Bank
B.
When
installing
one
bank
(2
SIMMs),
install
the
SIMMs
in
the
Bank
A
sockets.
When
installing
two
banks
(4
SIMMs)
of
different
sizes,
make
certain
the
2 SIMMs
in
the
Bank
A
sockets
are
the
same
size,
and
the
2
in
the
Bank
B
sockets
are
the
same
size.
Insert
a
SIMM
into
the
proper
socket
at
a
60
angle
(Figure
2.7)
•
Press
the
SIMM
firmly
into
the
socket
until
it
clicks
into
place.
Pull
the
latches
on
each
end
of
the
socket
outward,
rotate
the
SIMM
to
a
vertical
position,
and
release
the
latches.
8ri
8
D
D
D
Figure
2.6
-
Engine
Board
memory
chip
layout
back
of
unit
orderoIlnstalJation • 4 SIMMs
--
2 3 4
2SIMMs
__
, 2
Figure
2.7
-SIMK
in.,tallation
7.
Repeat
steps
3 - 5
to
install
remaining
SIMMs.
8.
Once
all
SIMMs
have
been
inserted,
inspect
for
proper
installation
-
make
sure
the
top
edges
of
all
like
SIMMs
are
at
the
same
height
and
parallel
to
the
printed
circuit
board.
9.
Close
the
unit
as
described
in
Section
3.
To
verify
the
SIMMS
are
functional:
1.
Plug
in
the
power
line
cord,
and
turn
the
unit
on.
2.
After
the
K2000
has
initialized,
press
the
"DISK"
button.
3.
Confirm
the
"Samples:####K"
figure
displayed
in
the
center
of
the
status
bar
corresponds
to
the
total
amount
of
user
RAM
just
installed.
3
SECTION 2 SETUP.
PUB
11/04/;
2.4
2.4.1
Changing
System
Software
(Engine)
NOTE:
The
ICs
containing
the
K2000's
software
are
static
sensitive
devices.
OSE
ALL
STANDARD
ANTI
-STATIC
PRECAUTIONS
WHEN
HANDLING
THESE
DEVICES'
To
replace
the
ICs:
1.
turn
the
unit
off
and
remove
the
AC
line
cord
from
the
AC
power
connector.
2.
Open
the
unit
as
described
in
Section
3.
3.
Locate
the
old
software
ICs
U3
and
U6,
on
the
Engine
Board
(Figure
2.6
above).
Remove
the
old
ICs
using
an
IC
puller
or
similar
tool.
Be
careful
not
to
damage
the
traces
on
the
board.
4.
Carefully
insert
the
new
IC
labeled
"LO"
in
the
socket
at
U3,
and
the
new
IC
labeled
"HI"
in
the
socket
at
U6.
Make
certain
the
ICs
are
oriented
with
pin
1
toward
the
front
of
the
unit.
Pin
1
is
on
the
end
of
the
IC
with
the
indentation.
5.
Inspect
for
proper
installation
-
make
sure
the
ICs
are
firmly
seated
into
the
sockets
and
that
none
of
the
pins
are
bent.
6.
Blose
the
unit
as
per
the
instructions
in
Section
3.
7.
Always
BARD
RESET
the
instrument
after
changing
the
software.
Note
that
all
user
data
in
RAM
will
be
erased.
A
hard
reset
can
be
performed
on
power-up
by
pressing
and
holding
the
"1",
"2"
and
"3"
buttons
on
the
numeric
keypad.
4
SECTION 2 STARTUP.OOC
12122192
2.5
BASIC
STARTUP
CHECKLIST
•
•
•
•
•
•
•
•
•
•
•
•
2.6.
2.6.1
2.7
2.7.1
Make
certain
the
k2000's
voltage
setting
matches
the
voltage
in
your
location.
Set
the
K2000
on
a
hard
flat
surface
or
a
stable
keyboard
stand,
and
leave
plenty
of
room
for
ventilation.
Connect
the
power
cable.
Make
sure
the
sound
system
is
at
a
safe
volume
level.
Plug
in
a
pair
of
stereo
headphones
or
run
standard
(~
inch)
audio
cables
from
the
MIX
audio
outputs
to
your
sound
system
(use
the
left
MIX
output
for
mono)
.
Plug
the
included
foot
pedal
into
the
rear
panel
jack
marked
"Foot
Switch
1".
Power
up
the
unit
and
begin
playing.
If
distortion
is
heard,
reduce
the
gain
on
the
mixing
board,
or
use
the
pad
if
it
has
one.
Scroll
through
the
Program
list
with
the
Alpha
Wheel
(the
large
knob
to
the
right
of
the
display)
.
Press
the
Setup
mode
button,
then
use
-the
Alpha
Wheel
to
select
tri-zone
setups
with
independent
programs,
MIDI
channels
and
controls
in
each
zone.
Press
the
Quick
Access
mode
button
and
use
the
numeric
keys
to
select
from
programmable
banks
of
ten
programs
or
setups.
Insert
a
program
library
disk
into
the
floppy
drive.
Press
the
Disk
mode
button,
then
scroll
through
the
files
with
the
Alpha
Wheel.
Press
"Load",
then
press
"OK"
twice.
Then
check
out
the
programs
numbered
in
the
200s.
STARTUP -
THE
DETAILS
This
section
will
walk
you
through
the
hookup
of
the
K2000.
We'll
take
a
look
at
the
rear
panel,
then
describe
the
power,
audio,
and
other
cable
connections.
BEFORE STARTING
...
Before
connecting
anything,
make
certain
the
K2000
is
properly
and
safely
situated.
It
will
rest
securely
on
most
standard
keyboard
and
instrument
stands.
Otherwise,
it
should
rest
on
a
hard
flat
surface.
In
this
case,
it
ma.t
rest
on
its
rubber
feet,
and
NOT
on
the
bottom
panel.
NEVER
block
the
ventilation
openings
on
the
rear
panel;
doing
so
can-cause
overheating
which
will
seriously
damage
the
K2000.
To
provide
adequate
ventilation,
the
rear
panel
should
be
at
least
four
inches
from
any
vertical
surface.
5

Other manuals for K2000R

3

Other Kurzweil Synthesizer manuals

Kurzweil K2661 User manual

Kurzweil

Kurzweil K2661 User manual

Kurzweil K2500 User manual

Kurzweil

Kurzweil K2500 User manual

Kurzweil ENSEMBLE GRANDE MARK 150 Installation guide

Kurzweil

Kurzweil ENSEMBLE GRANDE MARK 150 Installation guide

Kurzweil K150 - ANNOTATED PROGRAM LIST User manual

Kurzweil

Kurzweil K150 - ANNOTATED PROGRAM LIST User manual

Kurzweil K2600 - MUSICIANS GUIDE REV A PART NUMBER 910330 CHAP... User manual

Kurzweil

Kurzweil K2600 - MUSICIANS GUIDE REV A PART NUMBER 910330 CHAP... User manual

Kurzweil K2500 User manual

Kurzweil

Kurzweil K2500 User manual

Kurzweil KP-100 User manual

Kurzweil

Kurzweil KP-100 User manual

Kurzweil PC3 User manual

Kurzweil

Kurzweil PC3 User manual

Kurzweil K2000 - MUSICIANS GUIDE User manual

Kurzweil

Kurzweil K2000 - MUSICIANS GUIDE User manual

Kurzweil K2600 BEST OF VAST - REV A Technical document

Kurzweil

Kurzweil K2600 BEST OF VAST - REV A Technical document

Kurzweil PC3K Series User manual

Kurzweil

Kurzweil PC3K Series User manual

Kurzweil K150FS Technical manual

Kurzweil

Kurzweil K150FS Technical manual

Kurzweil K2500 - PERFORMANCE GUIDE REV F PART NUMBER 910251 CHAP... User manual

Kurzweil

Kurzweil K2500 - PERFORMANCE GUIDE REV F PART NUMBER 910251 CHAP... User manual

Kurzweil K2600R Technical document

Kurzweil

Kurzweil K2600R Technical document

Kurzweil K2600 BEST OF VAST - REV A Operating instructions

Kurzweil

Kurzweil K2600 BEST OF VAST - REV A Operating instructions

Kurzweil K2500 User manual

Kurzweil

Kurzweil K2500 User manual

Kurzweil K1000 EXPANDERS - MUSICIAN S GUIDE User manual

Kurzweil

Kurzweil K1000 EXPANDERS - MUSICIAN S GUIDE User manual

Kurzweil K2500 - PERFORMANCE GUIDE REV F PART NUMBER 910252 CHAP... User manual

Kurzweil

Kurzweil K2500 - PERFORMANCE GUIDE REV F PART NUMBER 910252 CHAP... User manual

Kurzweil K2600 BEST OF VAST - REV A User manual

Kurzweil

Kurzweil K2600 BEST OF VAST - REV A User manual

Kurzweil K2600 BEST OF VAST - REV A User manual

Kurzweil

Kurzweil K2600 BEST OF VAST - REV A User manual

Kurzweil K2500 User manual

Kurzweil

Kurzweil K2500 User manual

Kurzweil K2600 BEST OF VAST - REV A User manual

Kurzweil

Kurzweil K2600 BEST OF VAST - REV A User manual

Kurzweil K2600 - MUSICIANS GUIDE REV A PART NUMBER 910331 CHAP... User manual

Kurzweil

Kurzweil K2600 - MUSICIANS GUIDE REV A PART NUMBER 910331 CHAP... User manual

Kurzweil K2500 User manual

Kurzweil

Kurzweil K2500 User manual

Popular Synthesizer manuals by other brands

Siel Sielorchestra owner's manual

Siel

Siel Sielorchestra owner's manual

Alesis qs6.1 Reference manual

Alesis

Alesis qs6.1 Reference manual

Akai AX80 Service manual

Akai

Akai AX80 Service manual

SDI CS-1 Programming manual

SDI

SDI CS-1 Programming manual

Suzuki OM-300 Omnichord instruction manual

Suzuki

Suzuki OM-300 Omnichord instruction manual

Yamaha CS-5 owner's manual

Yamaha

Yamaha CS-5 owner's manual

CreamWare PRO-12 ASB user manual

CreamWare

CreamWare PRO-12 ASB user manual

Roland E-66 owner's manual

Roland

Roland E-66 owner's manual

Korg MONOPOLY POLYSIX MS-20 owner's manual

Korg

Korg MONOPOLY POLYSIX MS-20 owner's manual

Roland D-05 Parameter guide

Roland

Roland D-05 Parameter guide

Korg PA 900 Musikant user manual

Korg

Korg PA 900 Musikant user manual

Oberheim Matrix-12 owner's manual

Oberheim

Oberheim Matrix-12 owner's manual

Moog Drummer From Another Mother user manual

Moog

Moog Drummer From Another Mother user manual

Sequential prophet 5 instructions

Sequential

Sequential prophet 5 instructions

Tone2 Saurus ANALOG SYNTHESIZER Reference manual

Tone2

Tone2 Saurus ANALOG SYNTHESIZER Reference manual

Keysight Technologies M9347AH02 Getting started guide

Keysight Technologies

Keysight Technologies M9347AH02 Getting started guide

Casio Casiotone MT-100 Operation manual

Casio

Casio Casiotone MT-100 Operation manual

Harris HFS6801+ Installation and operation manual

Harris

Harris HFS6801+ Installation and operation manual

manuals.online logo
manuals.online logoBrands
  • About & Mission
  • Contact us
  • Privacy Policy
  • Terms and Conditions

Copyright 2025 Manuals.Online. All Rights Reserved.