KVS MORAVIA TYPE 9100-HEU Manual

TYPE 9100-HEU 07/2014
TYPE 9100-HEU
OPERATION & MAINTENANCE
MANUAL
INSTALLATION MANUAL
SOLID FUEL
RANGE COOKER
WITH HEAT EXCHANGE UNIT

TYPE 9100-HEU 07/2014 1
Dear cus omer,
Thank yo for p rchasing of the appliance KVS MORAVIA - solid f el range cooker with heat
exchange nit for connection to central heating hot water system. We tr st that o r prod ct serves
yo well. Some important principles sho ld be observed d ring its operation. Therefore, in yo r
interest, caref lly st dy this man al and operate the prod ct according to the given instr ctions.
The 9100 appliance has a man fact rer iss ed declaration of conformity according to Section 12,
Article 3, of Law No. 22/1997 of the Czech Rep blic.
• Flammable fl ids sho ld never be sed to fire p or increase the heat o tp t of the cooker.
• Do not b rn waste in the cooker. Use only recommended f el types.
• The ash door sho ld always remain closed when the cooker is in operation to prevent b rnt
gases escaping. The b rner door sho ld be open only when re-f elling or attending to the
f el in order.
• The cooker canno be used unless i is connec ed o a func ioning wa er sys em even
during he summer mon hs, o herwise he hea exchanger will be overhea ed and hus
suffer permanen damage.
• Remove ashes into fire-proof containers with lids! Be extremely caref l when dealing with hot
ashes. Pay attention to fire safety!
• Do not se the appliance if it becomes fa lty!
• If operation instr ctions are not followed, the cooker co ld be damaged. Do not attempt to
overwork the appliance. If the temperat re in the oven s rpasses 300°C, the temperat re
ga ge may stop f nctioning correctly and s ffer damage.
• If me al panels produce s rong sounds or fireclay degrades wi hin he uni , hese are
no subjec o repair or claim. The reason for he sounds will be in ernal flexing of
me al shee s due o hea , hey will even ually re urn o heir original s a e once cooled.
This does no affec he safe y or opera ion of he cooker.
• Any repairs of the cooker except cleaning and clearing of fireclay sho ld be exec ted only by
an a thorised specialist.
• All local reg lations, incl ding the r les on national or E ropean standards, sho ld be
observed d ring the installation.
• Use only spare parts approved by the man fact rer.
• Repairs of the cooker by persons not a thorised by the man fact rer are not recommended
and will render g arantees and warranties void.
• The cooker sho ld be attended only by an ad lt. While in operation the cooker sho ld be
attended and checked reg larly.
• The appliance should be ins alled by an ou horised specialis . No claims are accep ed
in case of incorrec or ama eur ins alla ion.
KVS EKODIVIZE, a. s. declares that the hygienic characters of the baking accessories intended
for contact with foodst ff nder all normal conditions, or by the stated se of the man fact rer,
comply with the req irements of Law No. 258/2000 Coll., the Ministry of Health Decree No.
38/2001 Coll., and Reg lation No. 207/2006 Coll. of the Czech Rep blic.
KVS EKODIVIZE, a. s.
Chairman of the Board of Directors
OPERATION & MAINTENANCE MA
N
UAL
Impor an Informa ion
Declara ion

TYPE 9100-HEU 07/2014 2
The appliance – range cooker TYPE 9100 is designed for b rning solid f el for the p rpose of
home cooking, baking/roasting or heating of the space in which it is installed as well as other spa-
ces connected to the domestic central heating system, according to CSN EN 12815:2002 and
Amendment A1:2005. The nit can be connected to a chimney at the rear, side or top thro gh an
opening at the hob top panel (see Drawing 1a). It is available in either left or right versions.
The appliance is s itable for short operational periods, so it is not possible to set the permanent-
heat process with a shortest interval of f el s pply of 10 ho rs.
Range Cooker TYPE 9100
Nominal Heat O tp t (NHO) wood coal
• S mmer Regime 7 kW 7 kW
• Winter Regime 7 kW 7 kW
• Heat exchange nit 3,5 kW
Efficiency (NHO) 75,5 %
B rnt Gases Average Temperat re at NHO 220 °C
B rnt Gas Flow Weight 11,1 g/s
Approx. Concentration of CO at HNO (O2 = 13%) 0,12 %
Minim m Chimney Dra ght 12 Pa
Fl e Pipe Diameter 120 mm
Distance from the floor to the centre of the fl e socket 735 ±0,5 mm (28,93 inch)
Hob Top Dimensions 0,37 m
2
Tested F el wood (size 200 – 330 mm)
Average F el Cons mption 3-4 kg/ho r
Weight 158 kg
Connection to the system 1“
Operational press re of the heat exchanger 0,18 MPa
Heat Exchange Unit water capacity 10 l
Heated area 125-150 m3
Dimensions of he Range Cooker:
Height (distance from floor to hob top panel) 850 mm (33,46 inch)
Width 924 mm (36,37 inch)
Depth 600 mm (23,62 inch)
Dimensions of he Baking Oven:
Height 294 mm (11,57 inch)
Width 400 mm (15,74 inch)
Depth 482 mm (18,97 inch)
Accessories:
Roasting Pan 1 piece
Oven Grating 1 piece
Poker 1 piece
Technical Specifica ions

TYPE 9100-HEU 07/2014 3
Drawing 1
1. Hob Top - Plate I 7. Solid F el Storage Drawer
2. Hob Top - Plate II 8. Comb stion Air Intake Control
3. Hand Rail 9. Ash Door
4. Oven Door 10. Grate Handle (with safety catch)*
5. Covering Plate 11. Fire-box (b rner) Door
6. Ash Extracting Slot Top Covering Plate 12. Smoke Flap Control
* Safe y ca ch is supplied ONLY on cer ain ypes of Model 9100.
Descrip ion
–
TYPE
9100

TYPE 9100-HEU 07/2014 4
Fuel
This appliance is designed for comb stion of solid f el:
- recommended f el is wood (max. diameter 200 mm, max. length 330 mm).
- the appliance also enables b rning of other kinds of solid f el (wood briq ettes, waste wood,
brown coal briq ettes, and brown coal blocks). However the operating conditions and parameters
of the appliance may differ from those with the recommended f el. Please note that the technical
characteristics given above were based on a test wood f el sample and sing other f el types will
alter these characteristics, energy o tp t, f el cons mption, fl e dra ght etc.
Make s re that the f el is dry. It is not recommended to b rn high-calorific f els, which red ce the
service life of the appliance.
Gra es
The cooker is eq ipped with two grates, pper (fixed) and lower (rotary). The pper grate is in
position to provide optim m f el cons mption when cooking in the s mmer regime. For winter se
we recommend that yo remove this grate (Drawing 2) and take advantage of the increased
vol me of the fire box. B rning th s will be carried on in the lower grate, which is manip lated
by the grate handle (Drawing 3). The water heat exchange nit is placed between these grates
and this allows when sing pper grate to reasonably red ce the temperat re of water d ring the
s mmer period.
Using he Gra es
Moving of grates will allow the non-b rnt ashes to fall thro gh to the ash tray. This also increases
the comb stion (primary) gases flow into the fire box. The grates can be agitated by moving the
grate handle back and forth. Large ash pieces that, d e to their shape, do fall thro gh the grate
sho ld be removed when the fire is o t by t rning the grate with the handle (Drawing 3).
Sometimes grate manip lation is necessary when the pper grate is in operation, this can be
done with a poker.
No e: A n mber of cooker variants are s pplied with a safety catch on the rotating grate, which
prevents the grate t rning by itself. Before rotating the gate the safety catch sho ld be p shed to
the left (Drawing 3).
Drawing 2
Service Ins ruc ions

TYPE 9100-HEU 07/2014 5
Drawing 3
Air In ake Regula ion (Drawing 4)
The dra ght reg lator b ilt in into the ash door of the cooker provides controlled reg lation of the
air intake and control of the f el b rning speed (heat o tp t of the cooker). The reg lation is
indicated by triangles. The lever positioned nder the symbol ▲ means slow b rning - air intake is
closed) while the position nder ▲▲▲▲ corresponds to fast b rning - air intake is f lly open
(Drawing 4). While in operation the air inflow into the cooker sho ld be ninterr pted by ens ring
air intakes are clear at all times. Do not se an air s ction device to compensate for poor air flow
in a space where a cooker is installed.
Drawing 4
The Ash Ex rac ing Door
When the cooker has been in operation for some time, soot will collect in the cooker parts of the
dra ght system (especially where coal has been sed). This will event ally affect the dra ght and
may create problems while lighting the fire. It will also make operation of the cooker less
economical, especially when cooking in the oven.
In the co rse of cleaning take off the hob top plates, then remove the soot first from the sides
of the oven walls. Clean all the removed deposits thro gh the ash extracting slot sit ated nder
the oven door (Drawing 7). This can be done simply by sing damp newspaper, for example.

TYPE 9100-HEU 07/2014 6
Appliance hob op panel (varian s)
1) The standards panel consists of two parts (Drawing 5):
Plate I. - a cast iron range hob with a ro nd removable centre plate located directly nder
the fire box. This plate is meant for fast cooking
Plate II. - a steel hob is located above the oven. This plate maintains a lower temperat re
and th s can be sed for slower cooking, simmering and keeping food warm.
2) The single-piece gro nd steel finish hob-top panel.
Yo sho ld always se pots with flat bases.
Drawing 5
Igni ion Flap
The smoke flap is located nder the Plate II. and is controlled by a handle at the rear of the top
frame marked with two positions :
Open position – Ignition and
intensive cooking
thro gho t the entire range area, Plate I. + II.
(Flap open)
Closed position – Baking in the oven and
cooking on the Plate I.
(Flap closed)
Drawing 6

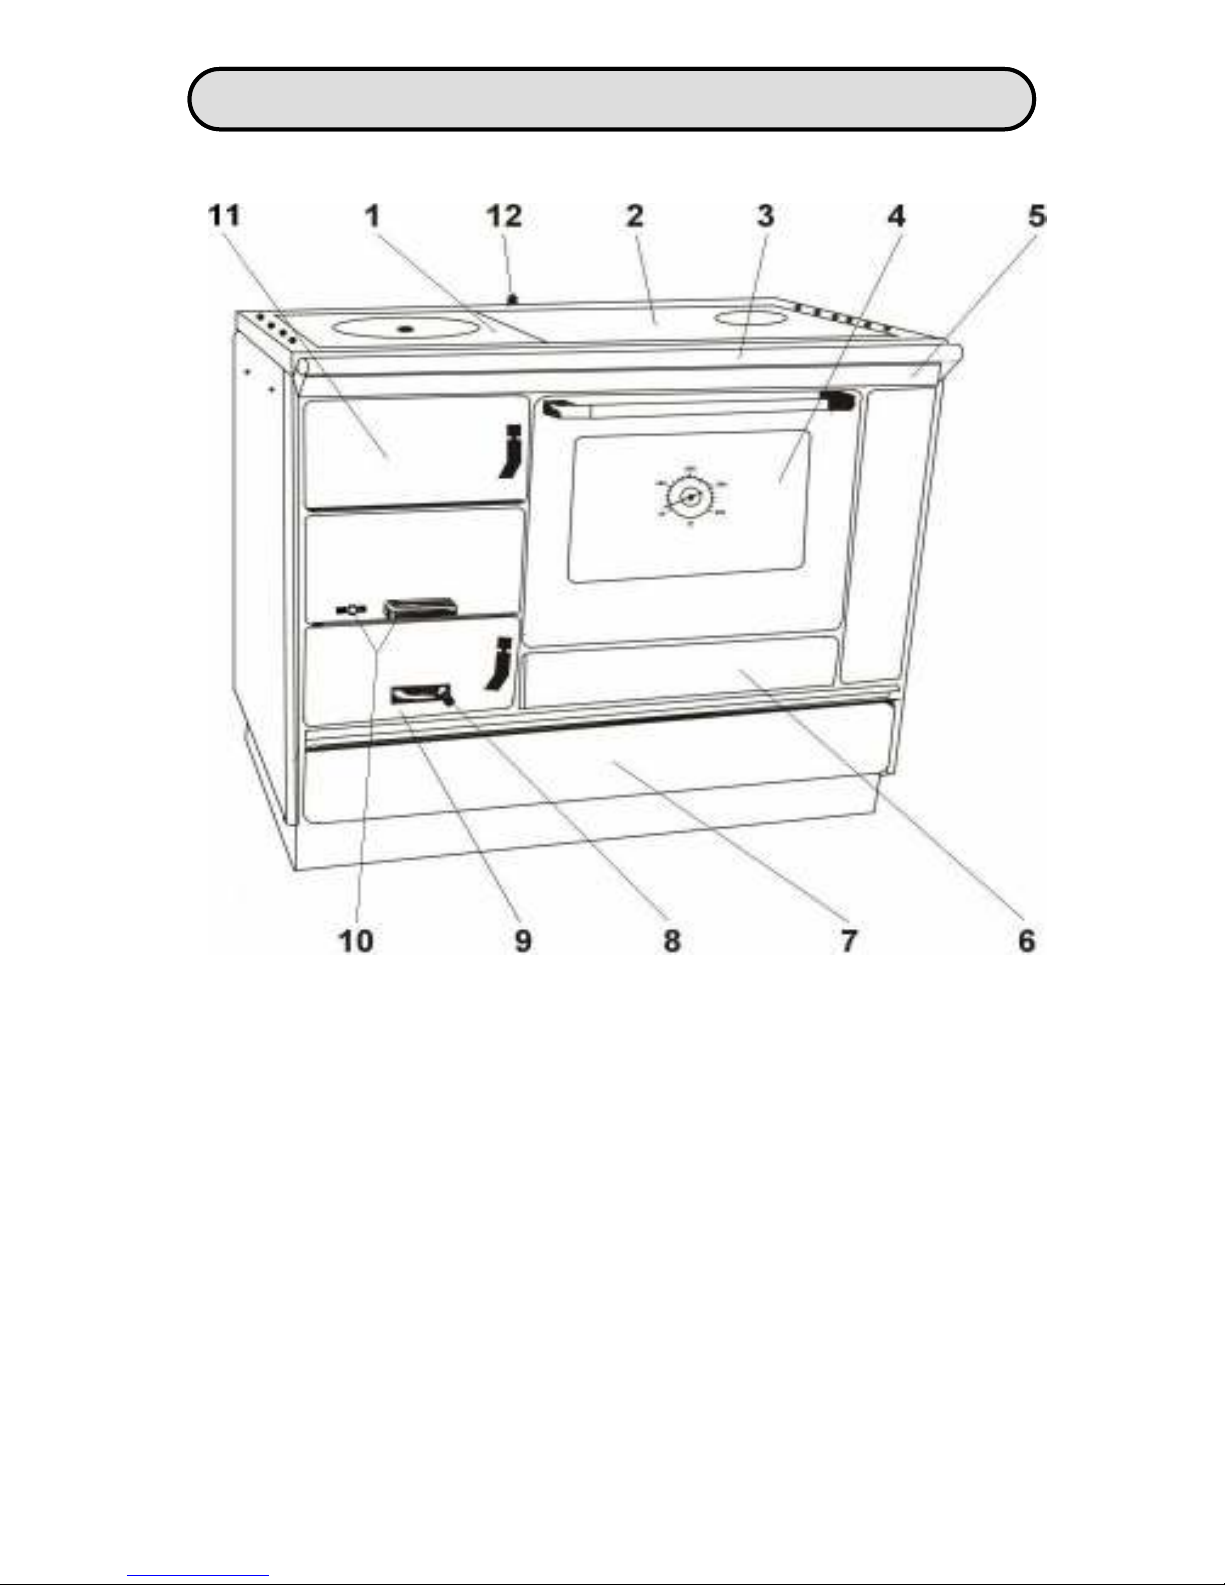
TYPE 9100-HEU 07/2014 7
Igni ion
When firing the cooker for the first time make s re that the room is well ventilated as some vapo r
can be prod ced d e to b rning off of the transit s rface protection and oil.
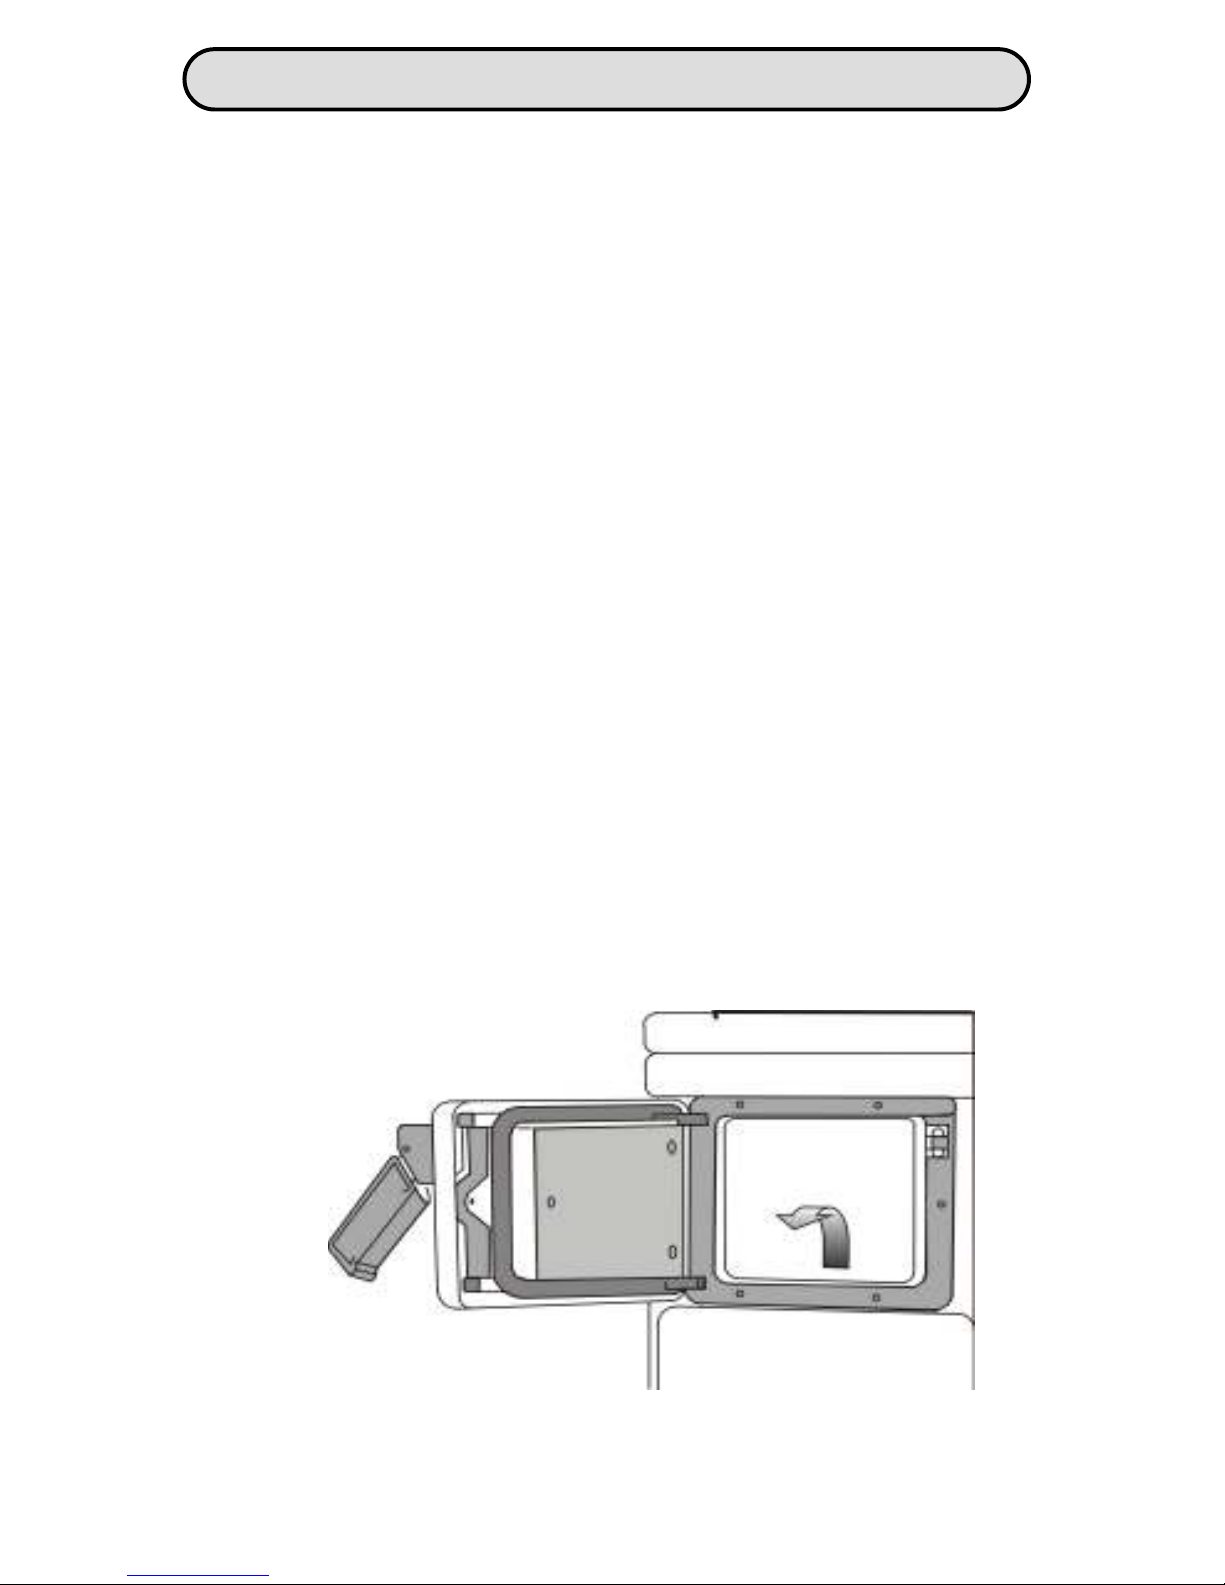
Before starting a fire open the fire box doors and check if the grates are clean. Place the paper on
the grate with a layer of some dry small soft wood kindling and then a layer of larger size ones.
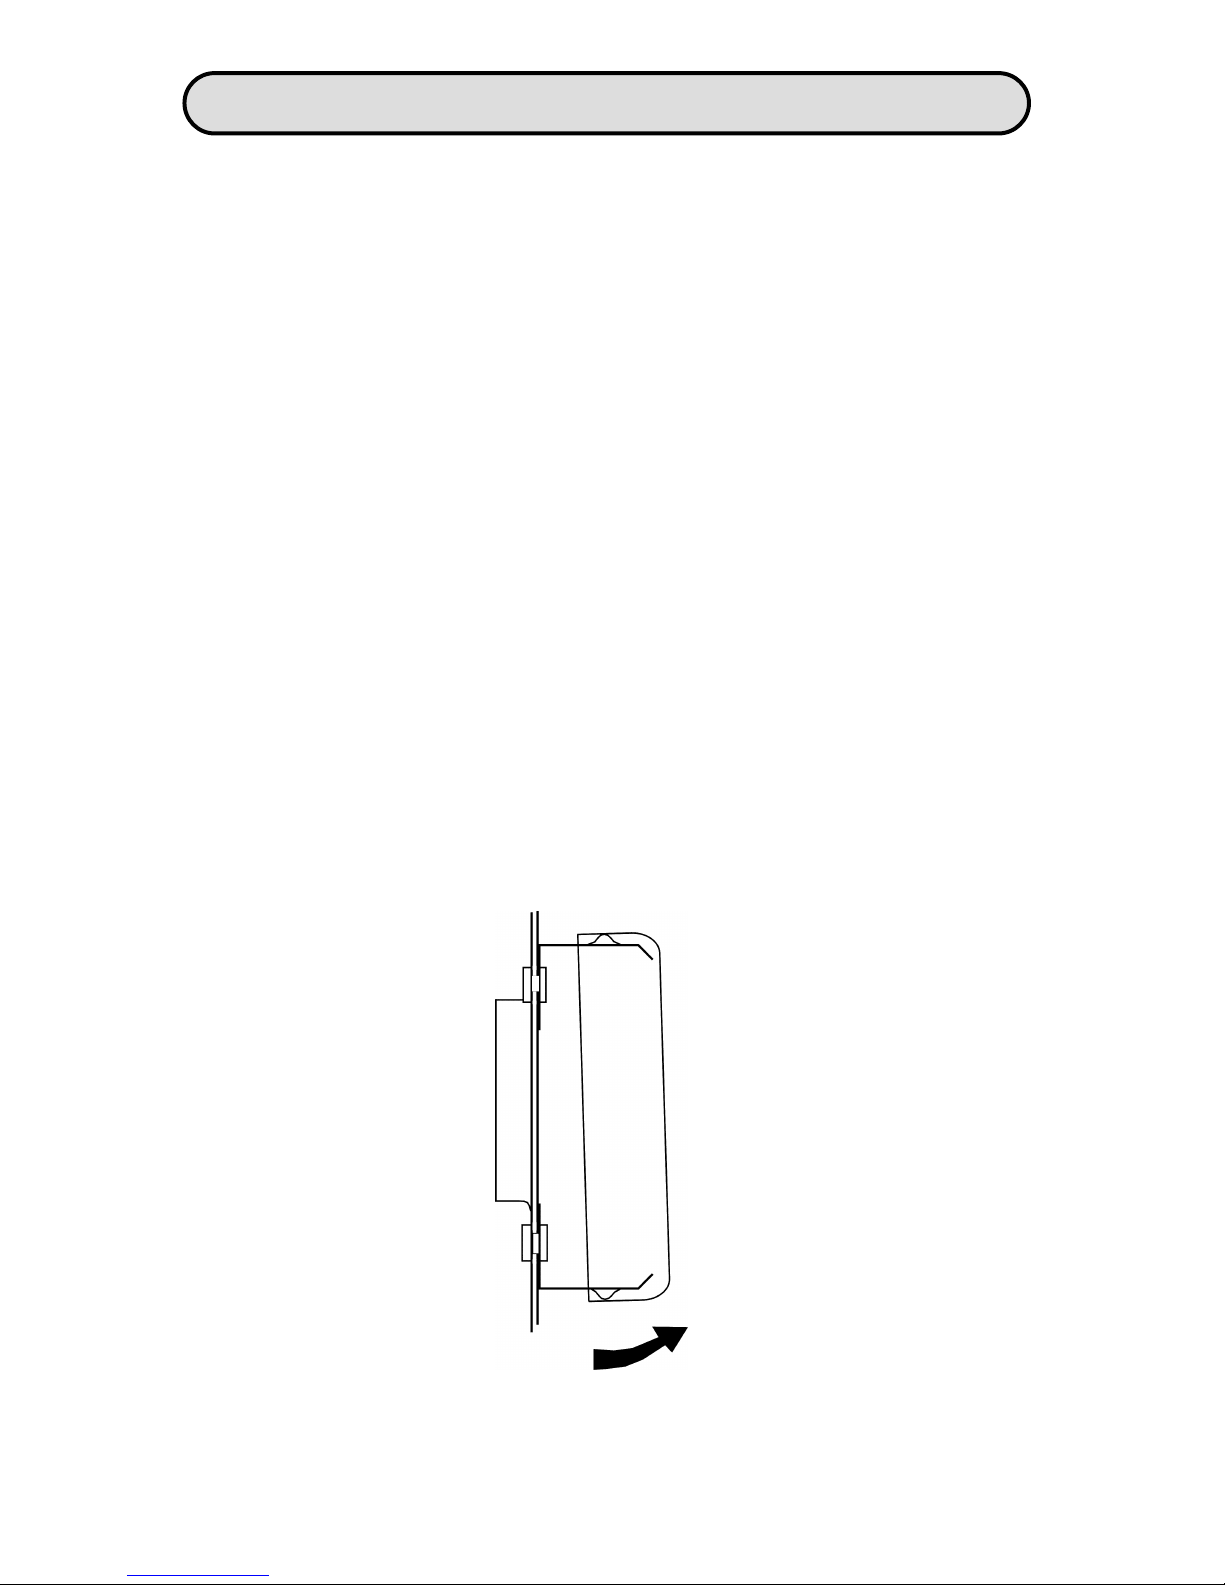
Before lighting p t the ignition flap into open position (Drawing 6) and open the air intake control
to let air nder the grate (Drawning 4).
The cooker canno be used wi hou a wa er pump connec ed o he domes ic cen ral
hea ing sys em o preven damage o he hea exchanger caused by overhea ing. The
pump should be already in opera ion when s ar ing he fire!!!
Once the wood is b rning close the fire door and when the fire is well-established add more wood.
When the fire is in hot flame add more solid f el. Make s re not to insert too m ch f el. Contin e
adding the f el at reg lar intervals (abo t 25 min for b rning on the pper grate and 45 min for
b rning on the lower grate).
The average f el cons mption is 3 – 4 kg of f el per ho r. Adding of f el shall be done man ally
or by means of a s itable shovel. F ll comb stion can be vis ally easily checked: no heavy smoke
can be seen rising from the chimney (except the time immediately after stoking p).
If yo add half the amo nt of f el every thirty min tes and perform grating at the same time, the
comb stion performance will improve.
The performance of the cooker can be reg lated by letting air nder the grate. Occasionally clean
the grate with help of a poker. If the cooker emits smoke after f el is added, close the air intake. It
is possible to se the whole fire box for fire. Make s re that f el does not spill o t of the fire box. If
the dra ght or the wind conditions are poor se f el in smaller pieces as appropriate.
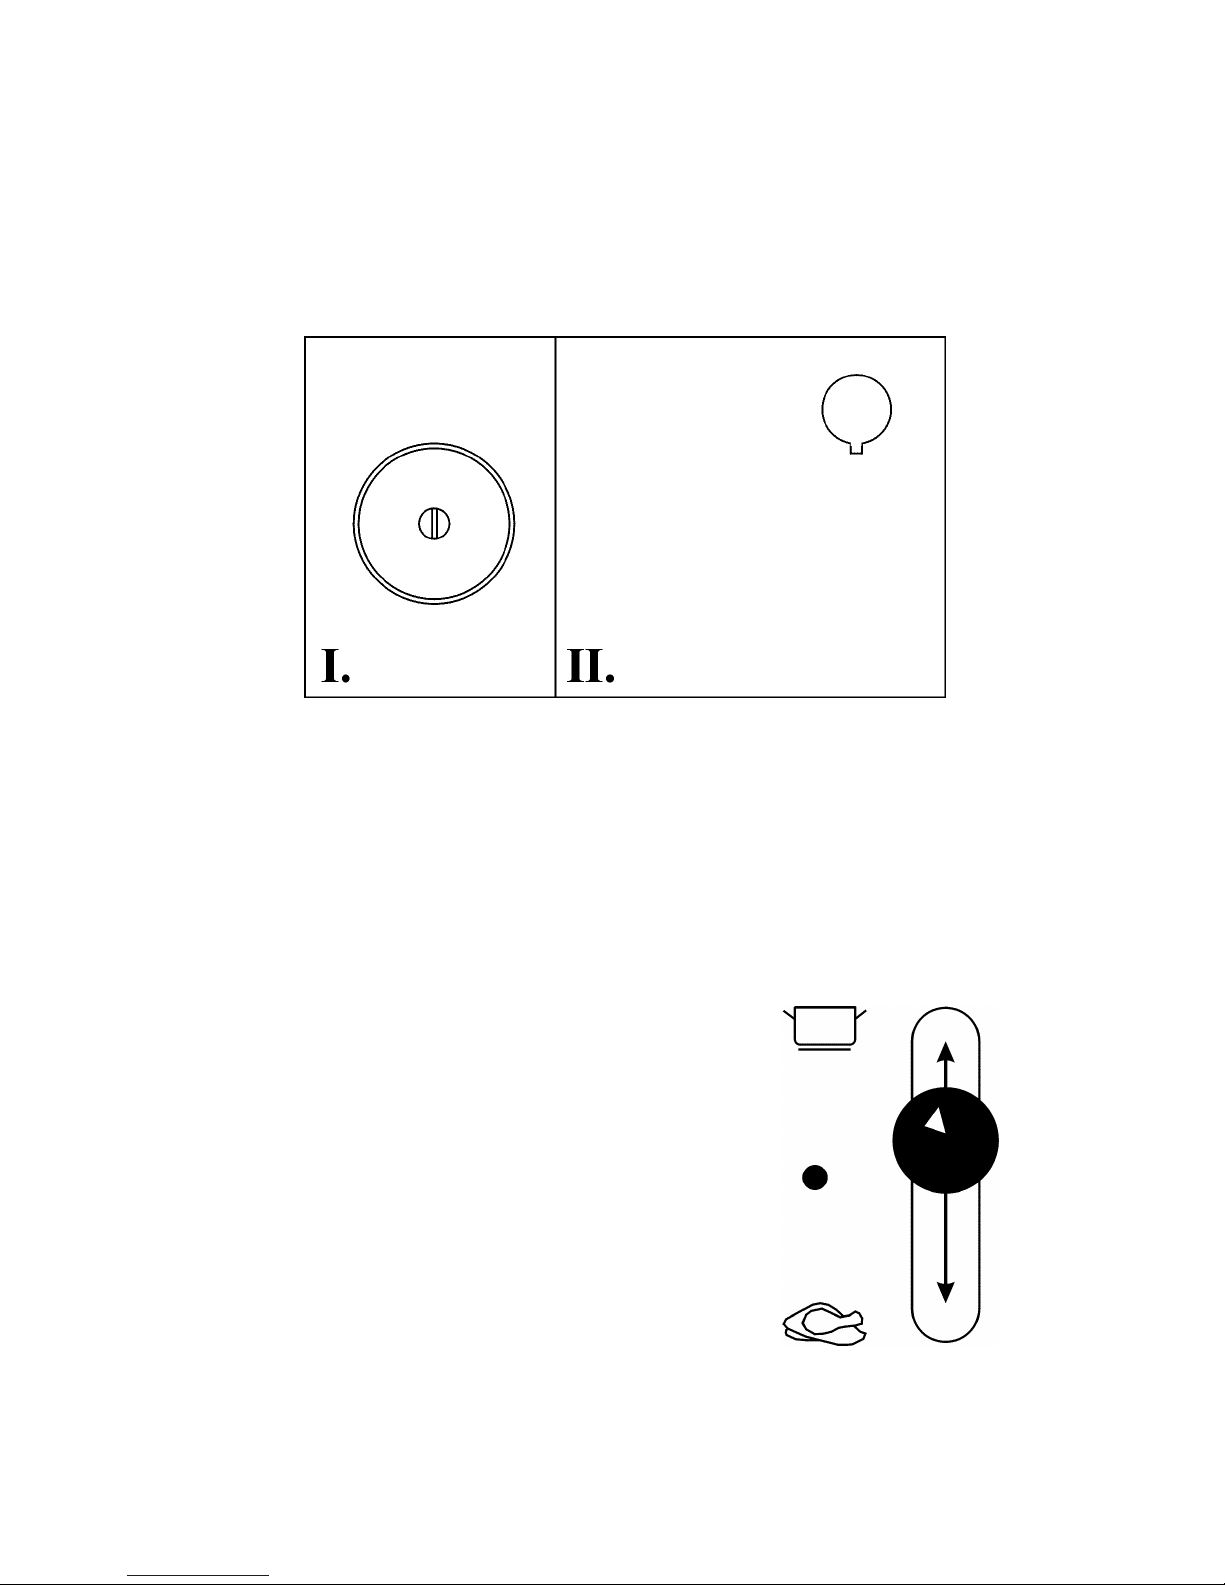
Cooking on he Appliance Hob Top
The range above the comb stion chamber is designed for fast cooking. With the described set
operation, 2 litres of water in a pot with flat bottom of a diameter of 180 cm with a lid sho ld start
boiling in 15 min tes.
D ring cooking watch o t for boiling over. If it happens, remove as m ch of the spillage
immediately and when finished cooking clean the remainder sing a damp towel, detergent and
finally sing a dry towel. If the dirt bakes in, it is more diffic lt to remove later. From time to time
(depending on the freq ency of operation) wipe the range down with vegetable oil.
In the area above the oven the range has a lower temperat re - this part of the range is s itable
for slow cooking and for keeping food warm. Use pots with a flat bottom for best res lts.
Baking and Roas ing
Prior to baking or roasting, the oven sho ld always be pre-heated. To pre-heat the oven q ickly
b rn small pieces of wood. The smoke flap sho ld be p t into baking position and the air intake
control on f ll open. The necessary temperat re can be reached in abo t 30 min tes. We typically
recommend starting baking in abo t half an ho r after that, when the thermal delay (lag) of the
thermometer after the temperat re in the oven is minimal. The temperat re in the oven and th s
the best baking res lts co ld be controlled by the right q antity of f el, and the air intake f lly
opened.
For niform baking the food sho ld be t rned aro nd halfway thro gh the process.
Appliance Oper
a ion

TYPE 9100-HEU 07/2014 8
If yo wish to increases the intensity of baking and roasting from above, p t the smoking flap in
half-position (Drawing 6).
To decrease baking intensity from above, se a cover on the roasting pan.
For roasting of joints of meat we recommend achieving a stabilised temperat re indication on the
oven door thermometer between 175°C and 205°C. A typical roasting time wo ld be 1 ½ to 2
ho rs.
For baking pastry and cakes we recommend the temperat re indicator on the oven door is
stabilised between 150°C and 175°C. The time of baking is typically from 20 to 40 min tes.
If yo want to red ce the intensity of baking (e.g. for drying of fr its), se an empty roasting pan
as a shield form below or from above.
When taking o t the tray with food, yo m st not lay it on the cooking range hob. The temperat re
of the cooking range hob is m ch higher than that of the oven and the food co ld easily boil over
or b rn. We also do not recommend laying the tray with food on the open oven door.
The baking accessory of the appliance is designed for short-time contact with food. The short-time
contact sho ld not exceed 4 ho rs for drinks and 48 ho rs for food of solid or pasty consistence.
The Hea Exchange Uni
The range cooker with b ilt-in heat exchange nit demands more ser attention than a standart
cooker or a typical boiler as it req ires a more reg lar s pply of solid f el into the b rner, as well
as reg lar poking/stirring of firebox grates. It is not possible to fix a stable temperat re level.
We recommend connection of this model to a maxim m of fo r metal radiators, each p to 1200
mm in lenght and a heating water tank of 60 litres capacity. Before installation each radiator
sho ld be fitted with an isolation valve.
D e to the considerably low capacity (6-10 kW) of this model in addition to the variable operating
conditions s ch as f el type, chimney dra ght, ambient temperat res etc., we recommend he
following :
- Only one heating device (one radiator or heating water tank) sho ld be t rned on d ring the
kindling process. The remainder of the devices can be introd cer later.
- In case of long time baking in the oven only one heating device m st be t rned on and adding
the f el at 30 min te intervals.
- D ring the s mmer setting at least one heating device sho ld be switched on,
for example, a
heating water tank (as here should be wa er in he hea -exchange uni ).
The heat exchange nit incorporated into the range cooker is necessarily of a compact size and
has limited water capacity. We recommend that the nit is only connected to a p mped water feed
with a thermostat rated at 40°C. If the thermostat exceeds the recommended water temperat re,
this is likely to ca se heat damage.
No e: For he purpose of aking surplus hea from he hea exchange uni , we recommend
o use addi ional hea ing device.

TYPE 9100-HEU 07/2014 9
Fire place and flue cleaning
To preserve the appearance and reliability of the cooker, it sho ld be cleaned reg larly. The fire
box sho ld be cleaned when not in operation. If cooker is not to be sed for some time, before
firing it p, one sho ld check that the fl e pipes and chimney are clear. They sho ld be checked
ann ally by a service technician.
Clean the pper grate with a poker and a br sh, the lower grate can be cleared j st by agitation
and d mping its content into the ash tray, sing the grate handle (Drawing 3). To clean the interior
walls of the cooker (dra ght system) and interior walls aro nd the oven the following proced re is
recommended :
- Remove the ro nd centre plate from hob top plate I.
- Remove both hot top plates I. and II.
The area inside area in the cooker is now easily accessible for cleaning and br shing the ashes
into the bottom. The model 9100 is eg ipped with a removable metal plate to assist in cleaning.
Final removal of the ashes and soot is done by br shing thro gh the cleaning passage into the
ash extraction slot (the ash extraction door is located nder the oven, Drawing 8). After cleaning,
assemble the cooker back into its original state. Make s re that the all parts and fittings are tight.
Removal of he Oven Door
The hinge release catches are sit ated on the inner side of the door at the bottom on the left and
right. P sh the release catches towards the stove, close the door slightly and lift it off its hinges.
To replace the oven door, follow the reverse of these instr ctions.
Removal of he ash ex rac ion door :
- Open the storage drawer. Remove the ash extraction slot covering plate by holding it from the
bottom (or from the sides if necessary) and p lling it towards yo rself (Drawing 7).
- Behind the covering plate yo will find the ash extraction door. This is fixed by two n ts.
- Release the ash extraction door by rotating the c t washers towards the arrow (Drawing 8).
Drawing 7
Cleaning and Main enance

TYPE 9100-HEU 07/2014 10
Drawing 8
Cleaning of he ou er surfaces
Before cleaning the o ter s rfaces, allow the appliance to cool down.
• Clean the enamelled s rfaces with a wet cloth or sponge and r b dry. Never se any abrasive
materials as they may damage the enamel and glass. If necessary se detergents.
• Protect the s rfaces from contact with the water as m ch as possible to prevent corrosion.
Always dry clean. If yo are sing the cloth or sponge with detergent, the s rfaces sho ld be
r bbed f lly dry. We recommend covering the s rfaces with a thin layer of vegetable oil from
time to time, doing this before firing the cooker p for the first time.
• When cleaning the oven do not se sharp tools, wet the s rfaces first, work a br sh on them
and wipe them with a cloth. If necessary se an appropriate detergent for removing to gh dirt
and scorches.
It is not possible to fire p the cooker - check b rnt gases passages as well as gas fl e pipe and
chimney for obstr ctions.
- check the settings of the comb stion air intake and ignition
flap controls, fire box and ash extraction doors, and the
position of the partition between the ash box and the oven.
The cooker is overheated - breakdown – for example, close ignition flap control, and
leave the cooker to b rn off the f el.
Fire in the chimney - never se water for exting ishing the fire.
- close all air s pplies into the cooker to exting ish the fire,
if possible cover the chimney.
- contact a chimney installer to assess the extent of any
damage after the fire.
- contact the man fact rer or yo r s pplier.
Trouble
-
Shoo ing

TYPE 9100-HEU 07/2014 11
In case of any fa lts that appear d ring the g arantee period, do not repair the cooker yo rself.
Make an appropriate claim by presenting a f lly filled-in certificate of warranty at the shop where
yo p rchased the appliance or at the g arantee service. Any claim will be accepted only where
all terms of the g arantee have been observed.
Packing materials incl de corr gated cardboard, wrapping paper, wooden parts, PVC tapes, bags
and wraps, metal tapes, edges. The p rchaser has a responsibility nder law to ens re that these
materials are disposed of appropriately by recycling, depositing at a licenced waste facility, or by
sing a licenced waste carrier. Yo r Local A thority will advise if yo are not s re of the local
services available.
The cooker contains val able materials, which can be recycled. Disposal can be arranged by
a licenced waste collector, yo r local a thority, or by depositing at a licenced waste facility.
No e:
The man fact rer reserves the right to make minor non-f nctional changes to the cooker as
a res lt of innovative and technical development of the prod ct.
1. Produc ion s andards
KVS MORAVIA solid f el appliances are prod ced in accordance ČSN EN12815:2002 Standard
with amended A1:2005, which is valid for the Czech Rep blic and E ropean Union.
2. Ins alla ion and opera ion s andards
All the above installation and operation instr ctions for the appliances primarily comply with the
Czech reg lations, and may not comply f lly to individ al national reg lations at place of
installation and se!
The b yer sho ld cons lt their installer or specialised officials on all of the local installation and
operation reg lations for this appliance or similar appliances!
Claim
s
Disposal
of Packaging
Disposal of he Appliance af er i s Service
Life
Impor an no ice

TYPE 9100-HEU 07/2014 12
Based on the design sol tion and the se to which the appliance will be p t, this solid f el
appliance m st be installed into an environment which was defined as ordinary environment (for
example by standard ČSN 33 2000-3:1995 – Environment standard of the Czech Rep blic).
The solid f el range cooker sho ld be installed depending on its str ct ral desing, b ilding
reg lations, and in accordance with any other local reg lations regarding this type of appliance.
The req irements on the air s pply rate will be met if the cooker is installed into a space no less
than 20 sq. m. Ens re a s fficient air exchange rate in the room either when the cooker is sed
alone or together with other heating appliances.
Ens re that installation does not obstr ct air intakes and allows convenient access to essential
parts. Use an experienced installer and f lly check the appliance for access and f nctionality once
fitted. Ask yo r installer for a certificate of compliance with E ropean and UK reg lation, and any
local codes of practice.
Connec ing he Cooker o he Chimney
Mo nt the fl e pipe to the fl e exit (rear, sides, top tho gh the top plate) by installing the fl e collar
from the inside of the cooker while placing the fl e pipe from the o tside. Draw them both p and
rotate them against each other co nter clockwise. If yo se a side fl e exit, c t off the pre-c t
opening on the side of the stove and dismantle the blind cover, which sho ld be sed to cover the
rear fl e exit, with which the cooker is s pplied with by the factory. Mo nt the fl e pipe to the side
exit in the same way as to the rear fl e exit. If sing the top fl e exit thro gh the top hob plate,
remove the fl e blind ring from the plate and mo nt the fl e pipe witho t a collar. Use the blind
ring to cover the rear exit.
For the cooker to f nction properly, the chimney sho ld have s fficient dra ght. We recommend
he chimney wi h heigh 5 me ers and diame er of 160 mm. Make s re that the connection of
the cooker to the chimney is as short as possible. The sheet-metal smoke fl e consists of several
sections and sho ld not be longer than 2000 mm and sho ld be tightly fitted. The whole pipe
sho ld be tightly assembled and fitted towards the dra ght. Individ al overlaps sho ld be no more
than 80 mm. The opening of the chimney sho ld be eq ipped with a steel ring, the diameter of
which sho ld correspond to the diameter of the pipe.
The cooker sho ld be installed in s ch a way so that the smoke pipe and the chimney can be
cleaned conveniently.
Connection of the appliance to the chimney sho ld comply with the individ al national reg lations
at place of installation and se (for example ČSN 73 4201:2008 Standard of the Czech Rep blic).
The chimney shall be iss ed with a certificate (revision report) given by a respective a thority
(chimney sweeping agency). The appliance sho ld be installed in s ch a way that adeq ate
access can be provided for cleaning of the fl e d cting and the chimney. In assembly, it is
necessary to observe the principles of fire safety (for example according to the ČSN 06 1008:1998
Standard of the Czech Rep blic). The cooker can be connected to a shared chimney (Fig. 10).
Chimneys and fl e d cting to which solid f el are connected shall be swept 6 times a year (for
example according to the Department of the Interior Czech Decree No. 111/82 Coll.). Ro tine
operation, especially d e to damp f el, soot and tar creates deposits in the chimney. If reg lar
inspection and chimney cleaning are omitted, the probability of a fire in the chimney increases.
In
s alla ion Manual

TYPE 9100-HEU 07/2014 13
Safe y Ins ruc ions
The minim m safe distance from flammable matters with a comb stibility grade of B, C1, C2 is a
minim m 750 mm forward of the appliance and 200 mm to the sides and. For flammable matters
with C3 comb stibility grade and/ or with an nproven comb stibility grade, the distance sho ld be
do bled. No flammable objects sho ld be laid on the appliance and sho ld be kept at a safe
distance from it. When the appliance is sit ated on a floor made of a flammable material, it sho ld
be set on a fireproof, thermo-ins lating plate overlapping its section plan:
- not less than 600 mm at the front (before the stoke hole).
- not less than 300 mm from the lateral side of the stoke hole.
A protective baffle plate is sed in cases where, d e to space reasons, the prescribed safe
distance cannot be kept. The protective baffle plate shall have a constant position between the
appliance and the protected material in a distance of 30 ±5 mm from the protected material. The
protective baffle plate shall overlap the protected material p to the nearest wall (ceiling) made of
a fireproof material, however not less than 300 mm at the pper side and 150 mm at the lateral
sides. We recommend ha your ins aller check his reduced dimension wi h your local
building con rol depar men .
Description of materials type for flammable classification in cookers man als (in accordance with
Czech and EU standard No.73 0823):
Flammable level Ra ing Ma erials
______________________________________________________________________________
А. Non-flammable asbestos, brick, ceramic wall tile, chamotte,
plaster mixt re (witho t organic enclos re).
В. Uneasy-flammable b ilding wall panels (for example a
gyps m wallboard), VELOX, IGNOS,
to chstone felt panels, fibreglass panels).
С1. Flammable with diffic lty beech wood, HORBEX board,
wood m lti-layer board, WERZALIT,
Formica, felt boards.
С2. Moderately flammable pine tree wood, larch wood, spr ce wood,
wood chip boards.
С3. Easily flammable sarking felt, cell lose boards, tar panels,
wood-p lp fibre, phellem, poly rethane,
polystyrene, polypropylene, polyethylene.
Warning for places where burns can occur:
• hob-top, hob frame
• comb stion chamber door, oven door
• oven inner walls

TYPE 9100-HEU 07/2014 14
Connec ion o he Cen ral Hea ing Sys em
• The appliance should be ins alled by an ou horised specialis . No claims are accep ed
in case of incorrec or ama eur ins alla ion.
• Place the cooker on the plate s rface!
• Connect the water intake and discharge from the heat exchanger to the central heating system
following the scheme instr ction.
• Mo nt the water p mp to the intake water pipe.
• If the radiators are sit ated on the level of the cooker, it is necessary to se the connection
with an open expansion tank in case of some air vaporization from the exchanger.
• If the connection with the expansiomate – is sed, it is necessary to mo nt a safety-valve of
1,8 bar ¾“ and s pply a reserve driving so rce for the p mp in case of a fail re in electricity
s pply.
• The cooker canno be used wi hou a wa er pump!!! The pump should be already in
opera ion when s ar ing he fire!!!
• The cooker cannot be sed nless it is connected to a f nctioning water system even d ring
the s mmer months, otherwise the heat exchanger will be overheated and th s permanently
damaged.
Moun ing of he Hand Rail (Drawing 9)
The front hand rail is s pplied with yo r cooker. It can be fo nd on the back of the wooden pallet
behind the cooker. It sho ld be mo nted in the following way :
1) Remove the covering plate by p lling it towards yo rself (Position 2)
2) Remove the screws (Position 3)
3) Loosen the screws (Position 4)
4) Mo nt the hand rail on the brackets by lining p the holes and any recesses or slots
5) Fasten screws (Position 4)
6) Fasten the remaining two screws (Position 3)
7) Check if the hand rail is tightly fixed, tighten the screws if necessary
8) P sh the covering plate back into the place (Position 2)
Drawing 9

TYPE 9100-HEU 07/2014 15
Flue gas duc ing connec ion o he Chimney
(valid for Czech Rep blic)
properly improperly
Drawing 10

TYPE 9100-HEU 07/2014 16
NOTE: The valves, a pump and o her safe y accessories are no supplied wi h he cooker

TYPE 9100-HEU 07/2014 17
Dimensional ske ech of he Appliance
Type 9100
(All of dimensions are in mm)

TYPE 9100-HEU 07/2014 18
Ins alla ion schema ic of he range cooker wi h a hea exchange uni wi hin
he in erior of a domes ic dwelling

TYPE 9100-HEU 07/2014 18
Spare Par s - TYPE 9100 (wi h Hea Exchange Uni )
Table of contents
Other KVS MORAVIA Cooker manuals
Popular Cooker manuals by other brands

Hotpoint
Hotpoint EW36 Instructions for installation and use

Parkinson Cowan
Parkinson Cowan LYRIC 50GS1 Operating and installation instructions

Parkinson Cowan
Parkinson Cowan SIG 400 Owner's handbook

Bartscher
Bartscher SV G25L Original instruction manual

Parkinson Cowan
Parkinson Cowan SIG 340 Operating and installation instructions

Bompani
Bompani 96A Instructions for use and maintenance