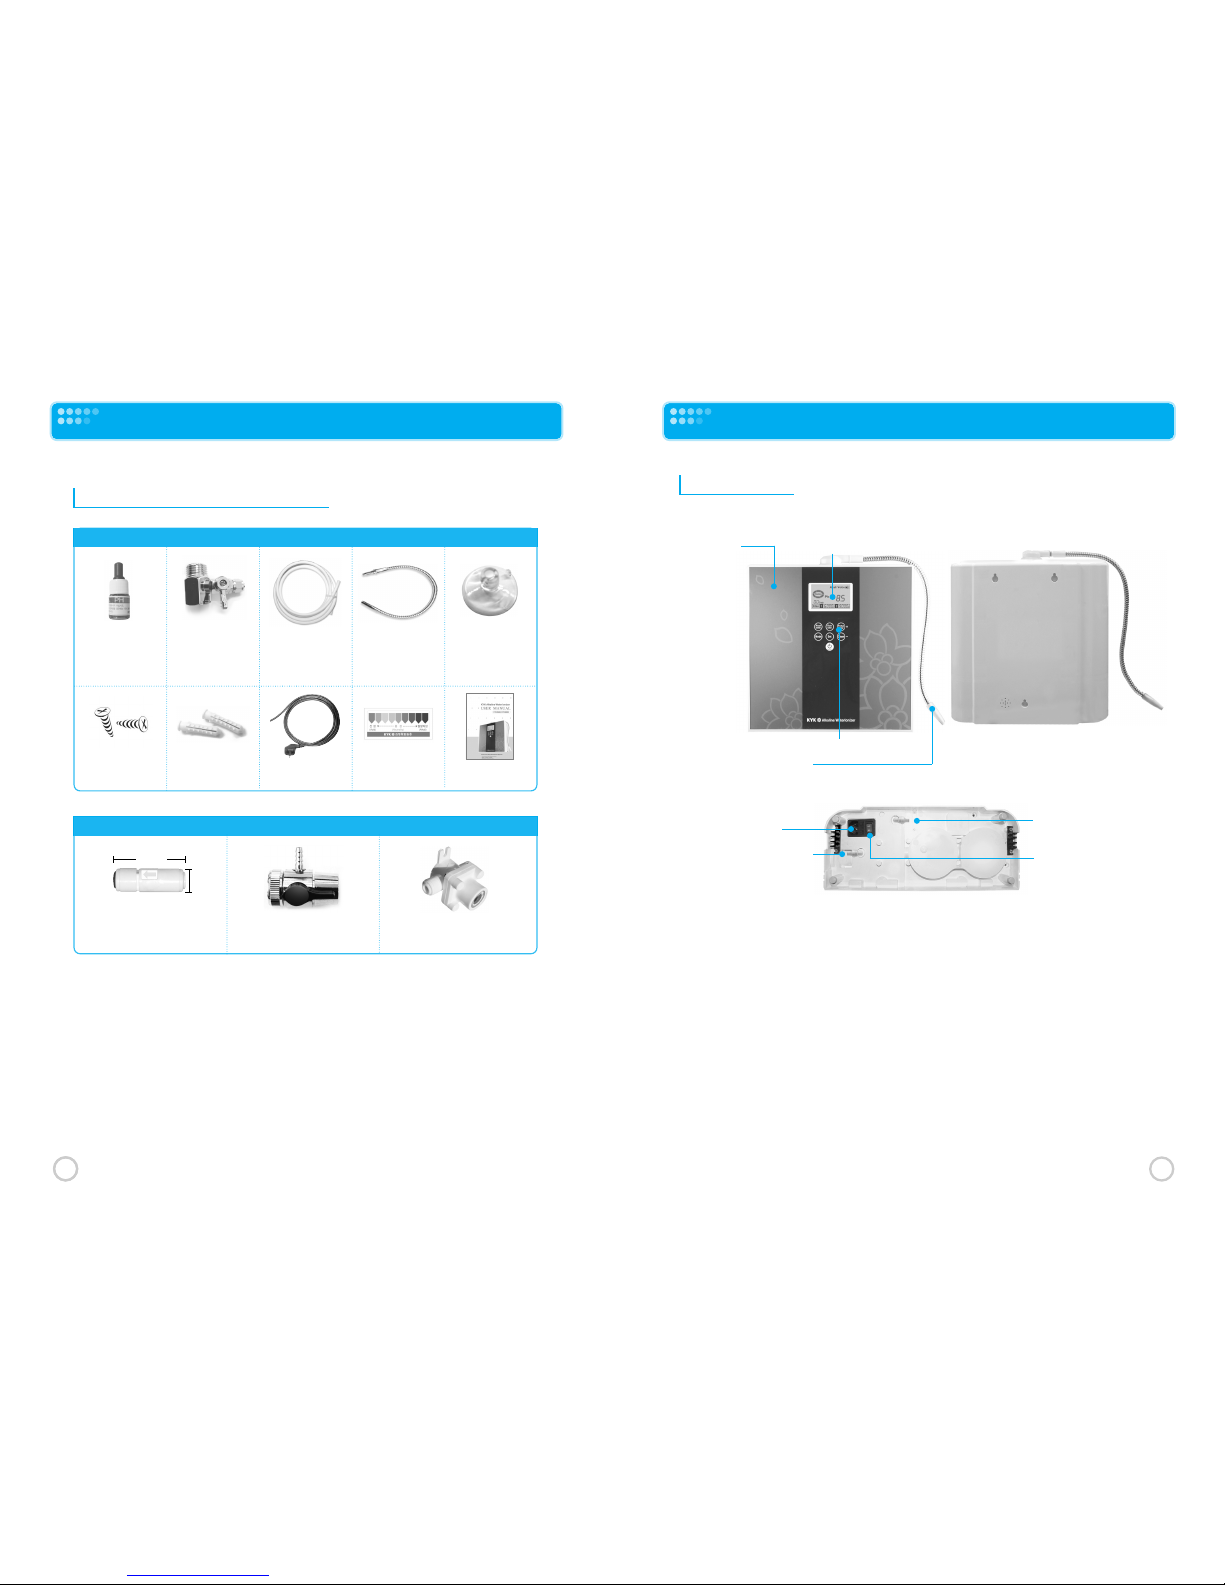
KYK KYK25000 User manual

TEL:
The head office address / Manufacturing Company :
KYK co.,Ltd #407 Sun-i technopia, 440 Sangdaewon-Dong,
Joongwon-Gu, Sungnam City, Kyunggi-Do, KOREA zipcode 462-120
82
-
31
-
777
-
3939
FAX:
82
-
31
-
777
-
3456
●●●●●●
●●●●●
●●●●●
●●●●●
●●●●●
●●
COMMON USE MANUAL
KYK Co. Ltd promises to treat every customer fair y and
respectfu y with their hea th and happiness our number one priority.
●●●●●●
●●●●●●
●●●●●●
●●●●●●
KYK Alkaline Water Ionizer

Note: This product is a medica substance producer and you shou d read
this manua carefu y before operating the product.
Thank you for Being our Customer!
Dear Customer,
We sincere y appreciate your purchase of KYK a ka ine water Ionizer medica substance
producer and we hope your hea th and happiness.
Before operating the product, you must read the user manua carefu y.
In the user manua , it contains the direction for operation as we as the characteristic
of the product, so you can get the utmost out of an efficient and duration of product by
using the characteristic of the product. And you can use the product more efficient y by
proper operating of product and various use of characteristics.
A emp oyees of company a ways respect the customer’s opinion and promise to try for
the customer’s va ue, hea th and happiness.
If you have an inconvenience and an improvement of product, you wi contact us at any
time.
Again, we sincere y va ue you as our customer and hope that this wi be the beginning
of a satisfying re ationship.
Thank you.
Sincere y
A emp oyees of KYK Co., Ltd.
|Table of Contents
Note: The design and specifications of this product may be improved at any time.
Special features
Before installation
Major Components
Touch Sensor Functions
LCD Display Description
Programming the KYK Al aline Water Ionizer
Installation Cautions
Installation InstructionsⅠ
How to install-Separation cool and hot water type
How to install-
Under sin water supply system-General model type
How to install and the chec list
Another Installation OptionsⅡ
Installation Components
Installation Components Continued
Optional Under Counter Water Supply Line Diverter
Valve Installation Instructions
List of Auto-Diagnosis Errors
Water Applications
How to change the filters
Notices for Safety
Product Specifications
Warranty Registration
4
6
7
10
12
13
15
16
18
19
21
22
23
24
27
29
30
32
34
37
38

5
4
Special Features
❶Cutting edge slotted electrolysis plate technology
!
Oversize p atinum titanium e ectro ysis p ates incorporate KYK's s otted p ate techno ogy, providing
the best of a wor ds; extreme y ong ife-span, optima e ectro ysis and optima
ionization, with none of the prob ems associated with mesh p ates or the ess effective ionization
capabi ities of non-s otted p ates.
❷SMPS (switched mode power supply)
power control system
!
SMPS power supp ies provide extreme y stab e power e iminating power oss and shortened ife-span
as is typica with o der techno ogy transformer-based power supp ies systems.
❸Dual high capacity filters
!
An activated carbon fi ter ensures pure water for 9000 iters (2377 ga ons), and a specia ized media
fi ter removes f uoride and heavy meta s for 6000 iters (1585 ga ons).
Both fi ters have extreme y ong ife-spans, cutting down on the cost per ga on.
Mode -GenerationⅡ: An activated carbon fi ter ensures pure water for 6000 iters (1585ga ons),
and a specia ized media fi ter removes f uoride and heavy meta s for 6000 iters (1585ga ons).
❹Electronically controlled filter life indicators
!
The KYK Product tracks actua water usage rather than the amount of time that the unit is
operating as do many other water ionizer products a so reducing cost per ga on.
❺Electronically controlled filter contamination sensors
!
The KYK Product continua y monitors the c ean iness of its fi ters and prompt y notifies you
when the fi ters need to be rep aced.
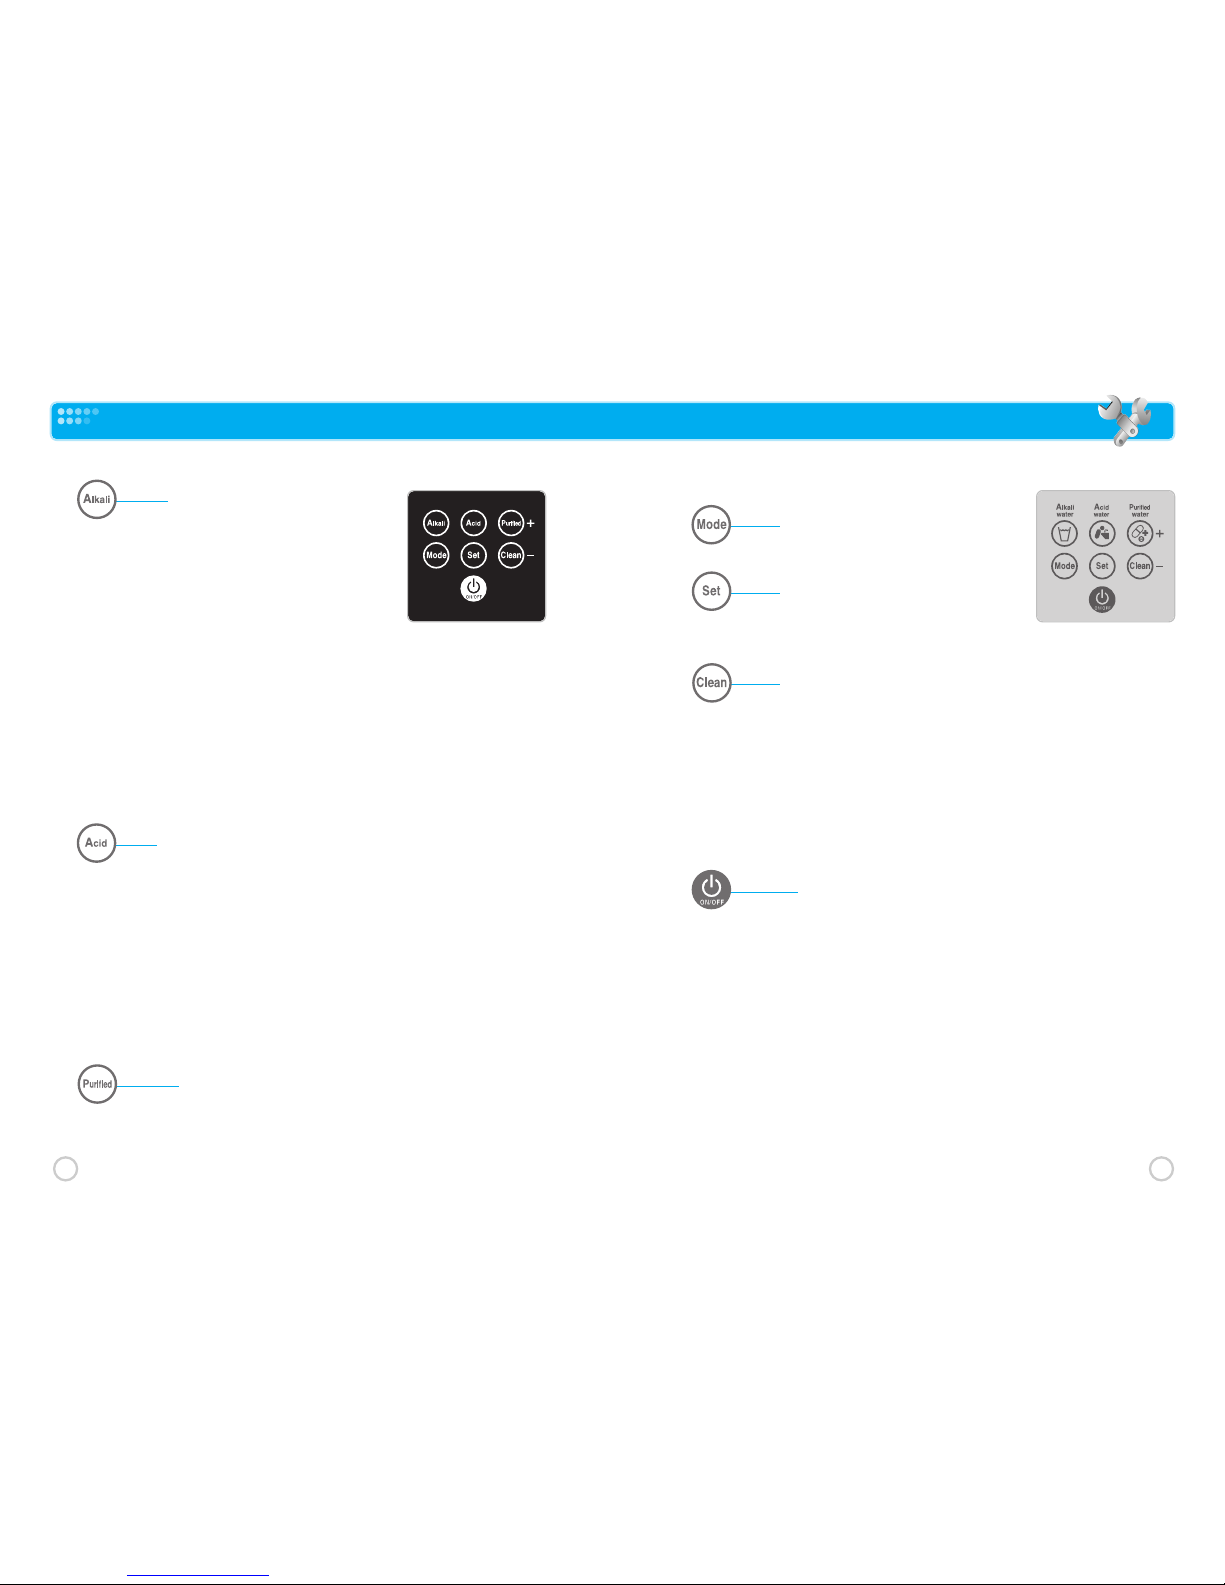
❻Nine preset pH levels
!
Four a ka ine water settings (8.5pH, 9.0pH, 9.5pH, and 11.5pH), one pure water (fi tered on y) setting
and four acidic water settings (5.5pH, 5.0pH, 4.5pH, and 2.5pH), a with a convenient touch sensor
se ection system.
❼76 programmable pH and ORP levels
!
The KYK Product a ows you to program near y any pH and ORP combination, so as to customize
your pH and ORP to the eve that's right for you. This feature is essentia due to the wide range of tap
water qua ity in North America. Non-programmab e ionizers cannot adjust to oca tap water
conditions, so these ionizers are at the mercy of your tap water and a handfu of pre-set pH eve s.
The actua pH eve s of non-programmab e ionizers can vary great y from the pH eve s posted on the
contro pane of the unit. Simp y put, when used in two different cities or states, a non-programmab e
ionizer wi typica y get two comp ete y different pH eve outputs when kept at the same pH setting.
❽Seven color LCD Display
!
Shows pH eve estimates, ORP eve estimates, auto-diagnosis error codes, actua number of iters of
fi ter ife eft in each fi ter, water f ow rate, and sound eve s.
❾Choice of pH or ORP display
!
The KYK Product can show either the ORP or the pH of the water being ionized.
❿Voice prompt system
!
The KYK Product notifies you of each system function with soothing voice prompts, chimes, and soft
music -- a of which have five vo ume eve s, as we as mute.
Complete auto-diagnosis system
!
The KYK Product continua y monitors six interna operating systems ensuring that you are
immediate y notified in the high y un ike y event of a prob em.
Automatic cleaning system
!
The KYK Product automatica y initiates a c eaning cyc e after each use.
Automatic draining system
!
Drains water into the e ectro ysis ce system and fi ter to enhance fu system c eaning and great y
extend the ife-span of the KYK Product system over other water ionizer products.
Automatic pH and ORP control and display
!
The KYK Product contro s the pH and ORP of your water by adjusting the ionization according to the
minera content of your tap water. This a ows the KYK Product to estimate and disp ay the pH and
ORP of your water. No other system can do this.
Stainless steel adapters
!
Un ike the p astic adaptors which are used in other systems and are prone to prob ematic eaks and the
subsequent need for rep acement, the KYK Product comes equipped with stain ess stee attachments for
your faucet or co d water ine.
Contemporary design
!
The KYK Product easi y fits in with any decor in your home.

Parts
6
Chec parts and accessories
❶Check a parts.
❷Turning off source water before insta ation.
❸Connect the body with the co d tap water.
(Connecting with hot water causes an out of order of the product.)
Before installation
pH testing drops Stain ess stee
diverter va ve for
(under the counter)
co d water ine
connection
Hose Stain ess stee hose
Optional
In ine fi ter
4.5cm
1.5cm
Drain ine sink
(suction) attachment
Stain ess stee faucet
head diverter va ve
White pressure reducer
Screws for
wa mounting C-b ock Power cord Co or
comparison tab e User manua
Major Components
7
General body
❻
Power Cord Receptacle
❶Housing : Houses a components.
❷Stainless Steel Water Output Hose : Output for a ka ine, acidic or purified water as se ected by user.
❸LCD Display : Disp ays pH, ORP, remaining fi ter ife (both fi ters), error messages
and water f ow rate.
❹Touch sensors : Used to turn the Genesis on and off (standby mode), to se ect various eve s of a ka ine
and acid water and to se ect fi tered on y water: A so used to program the product.
❺Water drain OUTLET (Quick Connect : Connection for drain (tubing) from the product.
❻Power Cord Receptacle : power cord p ug connect
❼Water supply INLET (Quick Connect : Connection for water supp y (tubing) to the product.
❽Master ON/OFF power switch : To contro power to the body
❽
Master ON/OFF power switch
❼
Water supply INLET (Quic Connect)
❸
LCD Display
❺
Water drain OUTLET (Quic Connect)
❹
Touch sensors
❷
Stainless Steel Water Output Hose
~Front View ₩~Rear View ₩
~Bottom View ₩
❶
Housing

9
8
Major Components
Touch Sensor Control Panel
❶
Alkali Water : A ka ine water pH eve se ect
❷
Acid Water : Acid water pH eve se ect
❸
Purified Water : Fi tered water on y se ect
❹
Mode : Used for Product programming
❺
Set : pH/ORP se ect/programming exit
❻
Clean : Product c eaning function se ect
❼
ON/OFF : Product activation/standby mode se ect
LCD Display
❶
Alkali : A ka ine water is being produced
❷
Working : Ionized water being produced
❸
Flow Rate : Ionized water production in Liters/Minute
❹
Voice : Voice prompt (on/off), Voice eve
❺
pH Level : pH eve (disp ay togg ed between pH using SET Touch Sensor)
❻
Filter 1 : Fi ter ife remaining for 1
st
fi ter (in iters)
❼
Filter 2 : Fi ter ife remaining for 2
nd
fi ter (in iters)
❽
Acid Level: Acid water is being produced
❾
ORP Level: ORP eve (disp ay togg ed between ORP using SET Touch Sensor)
❹
Voice
❺
pH Level
❸
Flow rate
❷
Wor ing
❶
Al ali
❻
Filter 1
❼
Filter 2
❾
ORP Level
❽
Acid Level
~Al aline water display₩
~Acidic water display₩~ORP level display₩
❻
Clean
❸
Purified Water
❷
Acidic water
❼
ON/OFF
❶
Al ali Water
❹
Mode
❺
Set
❻
Clean
❸
Purified Water
❷
Acidic water
❼
ON/OFF
❶
Al ali Water
❹
Mode
❺
Set
KYK25000, 30000, 33000
GenerationⅡ

Mode
See Programming the product.
Set
Switches between pH eve and ORP va ue readouts.
A so used to terminate programming function. See Programming
the product.
Clean
Manua y starts the Se f C eaning process. You must touch the ON/OFF touch sensor after
you touch the C ean touch sensor to start the c eaning process.
However, the product performs an automatic c eaning cyc e at startup when c eaning is
required so you shou d not need to use this function.
When the amount used is 30L or continuous amount used is 30L,if you are using the
product, it wi automatica y c ean the product during 20 seconds.
(※The duration of c eaning according to the amount used differ as the setup of capacity.)
ON/OFF
Switches the product from production mode to standby (off) mode.
Touch this sensor to start producing water. The product wi automatica y start producing
water at the ast se ected a ka ine waters pH 8.5 (first step), pH 9.0 (second step) or pH 9.5
(third step). If the previous y water types were pH 10.0 a ka ine water, acidic water or
purified water, the product wi automatica y start producing pH 9.0 a ka ine water.
You can increase or decrease the water a ka inity by touching the A ka i water touch sensor,
se ect acidic water by touching the Acid water touch sensor or se ect purified water on y by
touching the Purifi touch sensor. At startup, the product may enter into a se f c eaning cyc e.
Let this cyc e run its course before using any of the water produced during c eaning.
Discard this water.
(※When you turn on the power and use this product for the first time, it performs automatic
c eaning during 20 seconds.)
11
10
Touch Sensor Functions
Al ali
Touch this touch sensor to produce a ka ine water
(water with a pH greater than 7.0). Continue touching this
touch sensor to increase or decrease the pH eve (a ka inity)
of water to be produced. The pH eve or the ORP va ue of the
water being produced wi be disp ayed on the LCD disp ay.
Touch the “Set” touch sensor to switch between pH eve and
the ORP va ue. The se ected water type is de ivered through
the stain ess stee hose on the top of the product.
If the voice prompt is turned on a message te s you what eve of a ka ine water is being
produced. There are four preset a ka ine water eve s or steps:
first step = pH 8.5, second step = ph 9.0, third step = pH 9.5 and fourth step = pH 10.0 .
The product remembers your atest pH setting for the next usage EXCEPT for step 4.
If you have se ected step 4 pH 10.0 water, the next time you use your product it wi have
automatica y start at step 2, pH 9.0 water (pH 10.0 water is genera y too strong to drink).
You can adjust the pH eve up or down from 9.0 using this A ka i Water touch sensor.
Acid
Touch this touch sensor to produce acid water (water with a pH ess than 7.0).
Continue touching this touch sensor to increase or decrease the pH eve of acid water to be
produced.
The pH eve or the ORP va ue of the water being produced wi be disp ayed on the LCD
disp ay. Touch the “Set” touch sensor to switch between the pH eve and ORP va ue.
The se ected water is de ivered through the stain ess stee hose on the top of the product.
If the voice prompt is turned on, a message ets you know what eve of acid water is being
produced. There are four preset acidic water eve s or steps: first step = pH 5.5, second step = pH
5.0, third step = pH 4.5 and fourth step = pH 4.0. The next time you use your product, it wi
have automatica y switched back to a ka ine water for safety reasons (do not drink acid water).
Purified
Touch this sensor to get fi tered on y water. No ionization is performed.
pH of the water wi be same as the pH of the supp y water (tap water).
Purified water wi be de ivered through the stain ess stee hose.

13
12
LCD Display Description
The LCD Display shows the current
function(s) being performed as well
as diagnostic information. When you
touch the ON/OFF touch sensor to
start water production, you will see
the following items on the LCD
display.
Al ali wi be disp ayed in the upper midd e of the LCD disp ay when a ka ine water is
being produced.
pH eve of the water being produced. See “A ka i Water” in the Touch Sensors section for
information on how to change the a ka inity of the water being produced.
NOTE: ORP (Oxidation Reduction Potentia ) va ue in mi ivo ts (MV) of the water being
produced can be disp ayed instead of pH eve by touching the SET touch sensor.
Acid wi be disp ayed in the upper eft- of the LCD disp ay when acidic water is being
produced. See “Acid Water” in the Touch Sensors section for information on changing the
acidity of the water being produced.
Purifi wi be disp ayed in the upper eft center of the LCD disp ay when fi tered on y (not
ionized) water is being produced. See “Purified Water” in the Touch Sensors section for
information on se ecting purified water output.
Spinning Oval appears with the word “Working” f ashing on and off anytime water is
entering the unit and being processed (a ka ine, acid or fi tered on y water).
Flow Rate in iters/minutes (ℓ/min) is disp ayed direct y under the spinning ova .
Voice in the upper right corner of the disp ay indicates that the voice prompt is on as we
as voice vo ume. See Programming section for instructions on adjusting the voice eve pr
muting the voice (not recommended).
Filter 1 Disp ays fi ter ife remaining in fi ter # # 1 in iters.
Filter 2 Disp ays fi ter ife remaining in fi ter # # 1 in iters
Programming the KYK Al aline Water Ionizer
Programming your product is not absolutely necessary.
However, programming will maximize its performance.
The thing(s) you may want to program are:
(1) adjusting the voice volume or muting the voice (Step 6),
setting the pH level of the incoming water (step 8) and maximizing the ORP value (step 14).
You may also consider performing step 12. You must start at step #1.
You can exit programming at any time by touching the Set touch sensor.
❶Wait for the Genesis to go into the STANDBY mode (LCD disp ay goes dark).
❷Continue touching the Mode touch sensor unti the LCD disp ay ights up and “OFF”f ashes
on the disp ay. Continue by:
❸Touching the Mode touch sensor ONCE.
❹“Purifi”wi be f ashing on the LCD disp ay and a pH va ue wi be disp ayed. This enab es you
to choose between pH and ORP being disp ayed on the LCD disp ay when you begin producing
ionized water. It is recommended you eave this on the pH setting. During operation, you can switch
between the pH eve and the ORP va ue by touching the Set touch sensor. Continue by:
❺Touching the Mode touch sensor ONCE.
❻‘Voice’wi be f ashing on the LCD disp ay. This a ows you to (1) set the voice vo ume or (2)
turn off the voice). Use the “+”(Purified water) touch sensor to increase the voice vo ume.
Use the “–”(C ean) touch sensor to decrease the voice vo ume. To turn the voice off, continue
touching the “–”(C ean) touch sensor. If you have turned off the voice and want to turn it back on
again, touch the “+”(Purified water) touch sensor and then adjust the vo ume eve by using the “+”
and “–”touch sensors. Continue by:
❼Touching the Mode touch sensor ONCE.
❽“pH”and “Purifi”wi be f ashing on the disp ay. This is used to set the pH eve of the
incoming tap water. Setting the pH eve of the water coming into the product makes the four preset
a ka ine water pH va ues and the four present acidic water pH eve s more accurate. Typica y this
shou d be set between 6.5 and 7.0 (the product comes preset at a pH of 7.0). Most city provided
water is at or near a pH eve of 7.0. We water may be s ight y acidic at between 6.5 and 6.8.
You can test the pH of your water (or have it tested) and adjust this setting according y.
To increase the pH of the incoming use the “+”touch sensor. To decrease the pH of the incoming
water use the “–”(C ean) touch sensor. Note: pH 6.5 is the strongest eve of e ectro ysis.
Continue by:

15
14
Programming the KYK Al aline Water Ionizer
❾Touching the Mode touch sensor ONCE.
❿“Clean”wi start f ashing on the LCD disp ay.
This sets how often the automatic c eaning operates. Leave as programmed. Continue by:
Touching the Mode touch sensor ONCE.
“Al ali”and “pH”wi be f ashing. This a ows you to increase or decrease the a ka inity of the
four present a ka ine water eve s. The present va ues are: pH 8.5 (step one), pH 9.0 (step two), pH
9.5 (step three) and pH 10.0 (step four). This step is not necessary, but it wi optimize pH for the
a ka ine water de ivered at the stain ess stee output hose. This step wi a so optimize the acidity of
the water de ivered at the ower output (drain) ine. If your product is insta ed such that the drain ine
empties into your sink (not connected direct y to a permanent drain, you can bott e acidic water
(from the ower drain ine) whi e you are making a ka ine water de ivered at the upper stain ess stee
hose. If you want to do this programming, read the fo owing paragraph. If you want to skip this step,
continue by touching the Mode touch sensor ONCE.
To do this programming, increase the va ue shown on the disp ay to the maximum number. Then
touch the A ka i touch sensor once. This sets the first a ka ine eve . Once again, increase the va ue
shown on the disp ay to the maximum and touch the “Al ali”touch sensor once. This sets the
second a ka ine eve . Increase the va ue on shown on the disp ay to the maximum number and touch
the “Al ali”touch sensor once. This sets the third a ka ine eve . Increase the va ue shown on the
disp ay to the maximum number and touch the “Al ali”touch sensor. This sets the fourth a ka ine
eve . Continue by:
Touching the Mode touch sensor ONCE.
“Al al”and “ORP”wi be f ashing. This a ows you to increase or decrease the ORP va ue of
the four a ka ine preset a ka ine water eve s. A higher ORP setting wi give the water more
antioxidant capabi ities (more abi ity to counter free radica activity in the body). It is recommended
that you do this. Ho d the “+”touch sensor down to obtain the highest negative ORP va ue and then
touch the “Al al”touch sensor once to se ect the first maximum ORP va ue. Ho d the “+”touch
sensor down again to obtain the highest negative ORP va ue and then touch the “Al al”touch
sensor once to se ect the second maximum ORP va ue. Repeat this procedure for the third and
fourth eve s.
You are done programming your product. Touch the “SET”touch sensor to exit product
Programming.
Installation Cautions
Your Product must be connected ONLY to a 110 Vo t or 220 Vo t power source.
Higher vo tage supp y wi damage the unit. so before connecting the e ectricity code,
you must check the vo tage.
Do not insta the product at the area which exposes direct y to the sun and
be ow zero. (There is a danger of distortion and frost wedging of product.)
Do not insta the product in an area of direct and constant sun ight anddirector heat
(a furnace vent for examp e).
Connect the product ONLY to the co d water supp y Make sure the faucet is turned to
the co d water position. Hot water wi damage the unit
The acidic water draining hose is p aced ower than the body. If the ength of hose is
onger or higher than the body, it wi affect the ionization and be possib e to change
a taste of water. ※After insta ation, do not turn and bush the acidic water hose.
Do not a ter the product intentiona y. This cou d resu t in fai ure of the unit and
danger to the user.
Check your input and
output hoses for kinks.
Check to make sure that
none of the supp y or
drain tubing is kinked.
Do not insta the product
on the inc ination and
keep the body on the
horizonta p ane.
Insta the product on a
eve surface.
Insta the product on a
higher p ace than a tap
for water draining.
(For draining and
protecting the freezing)
Do not p ace and ift
the acidic water draining
hose over higher than
the product.
×
○
×○
×
Do not insta
the product over
1 meter from a drain.
Keep the product out of
direct ays, a heater,
moisture and oi content.

17
16
Installation InstructionsⅠ
Installation
Installation of separation cool and hot water type
Non-hole Valve
Hot Water Releasing Hole
Cold Water Releasing Hole
‘O’ Shape Pac ing
Water Entrance Control Valve
Hole Valve
‘O’ Shape Pac ing
‘O’ Shape Pac ing
‘O’ Shape Pac ing
All hoo up part of pipe arrangement has to be covered by teflon tape for avoiding the lea age and you
control the bounding number of tape for eeping the level of a horizontality and a perpendicularity.
When you decompose and reassemble the product, if you give the over force, it will be possible to lea after
assembling the product because of a pipe arrangement distortion of raw water, a brea out of rubber pac ing
and a brea age.
❶After ocking a raw water of insta ation area or type switch va ve fixed on the
wa for co d and hot water connected with a water service pipe behind a tap as shown
in the figure by using a type screwdriver, check to cut off water comp ete y by
opening a tap.
❷Separate from the pipe for co d and hot water connected with a tap. (See the top figure)
※Warning-When you decompose the product, if a rubber packing attached on the
nipp e for preventing the eakage is worn out, you wi change that.
un ess it wi cause a eakage of product.
❸You wrap a tef on tape for preventing the eakage severa times on nipp es without
a ho e and with a ho e and ink them.
Water Entrance Control
Valve Elbow
Product Water Entrance Hole
※But standard of a nipp e with a ho e differs according to the area and a manufacturer
and if the size is not correct, you wi order it separate y.- We accept a request in the A/S
center.)
※Warning-You wrap the tape for preventing the eakage 4~5 times not to harm on the
connection between nipp e and piping and after comp ete connection, you have to adjust
the direction of a va ve not to make a prob em on the connection with the product.
❹You ink the switch va ve with the nipp e with a ho e connected in 3) as shown
in the figure.
※Warning-You wrap the tape for preventing the eakage proper times not to harm on the
connection between nipp e and piping and after comp ete connection, you have to adjust
the direction of a va ve not to make a prob em on the connection with the product.
(As shown in the figure, after stopping down the nipp e, the switch va ve wi be horizonta
so you contro the amount of eakage tape as the same amount.)
❺Insert the hose stop down nut at the hose and push the hose in the switch va ve at the end.
After that connect the hose stop down nut with switch va ve and stop down with proper
strength.
※Warning-If you stop down the nut too strong, the water wi be possib e to eak because
the hose in the hose stop down nut can be torn. Or if you stop down the nut too oose,
the water wi eak because the hose is missed from the switch va ve.
So you connect the hose safe y by giving the proper strength carefu y.
❻How to connect with the product after connecting the hose with a tap pipe
After selecting the proper place for the product, cut the length of hose with some extra to
the product. As shown in the figure, remove a rubber plug in the raw water inlet and put
the hose in the raw water inlet. At this time, you put the hose at the end not to miss from
the product.
Power cord
Receptacle
ON/OFF power switch
Water drain
outlet
Water supply inlet

19
18
How to instal-Separation cool and hot water type
How to install - Under sin water supply system/General model type
Installation
Under sink installation
Nipple with a hole
Nipple with a hole
Switch valve of incoming water
(Controlling the water pressure)
c
‘O’ Shape Pac ing
‘O’ Shape Pac ing
Switch valve of incoming raw water
The connecting hose with product
for incoming water
General model type installation
Nipple with a hole
Switch valve of incoming water
Hose stop down nut
‘O’ Shape Pac ing
‘O’ Shape Pac ing
The connecting hose with
product for incoming water
I
f you mix up the raw water inlet with the acidic water outlet, alkali water will not be produced
and be the cause of a failure. So you must not install reversely between the raw water inlet and
the acidic water outlet. If the failure happens because of a reverse installation, the man who
installs the product will have to be charged with the failure.
❼Cut the acidic water draining hose about 50cm~70cm and connect with the acidic water out et
(after removing the rubber stopper) as the same connecting way at the raw water in et in 11 page.
You have to cut the acidic water draining hose within 1m because if the ength is over 1 m,
we wi be possib e to sme in the water.
The acidic water draining hose is p aced ower than the body not to affect the qua ity of water.
❽Connect and assemb e the a ka i water de ivery pipe (f exib e hose) by turning to c ockwise
direction with the a ka i water out et p aced on the upper side of the body.
(When the eakage is happened, reassemb e the product after wrapping up the tape proper y.)
❾Before operating the product, check the eakage by opening the switch va ve and there is
no prob em then operate the system.
◆How to chec the water pressure and set up
1) When you use a measuring instrument: Measure the pressure of raw water with a measuring
instrument and if the water pressure is low then you will increase the pressure of raw water
and if the incoming water pressure to the product is low then, you will increase the pressure
by using the water pressure controlling valve (see the installation figure).
(Standard -Adjust over 2.0ℓ/min.)
2) When you do not have a measuring instrument (A simple measuring way)
: If water can be filled in the vending machine cup during 6~7 seconds, the water pressure is
about 1.8ℓ/min and it is the proper water pressure for operating the product

21
20
❶After ocking a raw water of insta ation area. (Ii is main y p aced at a tap water meter)
❷Separate from the pipe for co d and hot water connected with a tap. (See the figure in 13 page)
※Warning-When you decompose the product, if a rubber packing attached on the nipp e for
preventing the eakage is worn out, you wi change that. Un ess it wi be cause a eakage
of product.
❸You ink the switch va ve with the nipp e with a ho e connected in ❷as shown in the figure.
※You wrap the tape for preventing the eakage proper times not to harm on the connection
between nipp e and piping and after comp ete connection, you have to adjust the direction
of a va ve not to make a prob em on the connection with the product.
(As shown in the figure, after stopping down the nipp e, the switch va ve wi be horizonta
so you contro the amount of eakage tape as the same amount.)
❹The check items for contro ing the water pressure
The proper water pressure for the norma operation is 1.5~3.0kgf/cm2.
Keep the product out of the direct rays of the sun and do not change the origina setting
va ues intentiona y.
How to install - Under sin water supply system/General model type
How to install and the chec list
Information-Connecting with a tap type
Fixing with a screw type- Insert at the end of a tap by
adjusting a ba ance and stop out a screw.
Forma ring-Remove the ring from the end of a tap
and turn and insert a forma ring.
After inking the ON/OFF va ve with a tap and connect with
the in et of the product.
A hose band
Connecting with the product
Chec list
Installation Troubleshooting
If there is no water f ow:
☞
Check to make sure you removed the rubber stoppers on the in et and out et va ves.
☞
Check the faucet or under sink adapter to make sure that the va ve is open and water
can get through.
If there is an improper ratio of a ka ine water and acidic water:
☞
Increase the water pressure to at east 1.5 iters a minute.
If the water pressure is too ow, then there wi be too much acidic water and
not enough a ka ine.
☞
Check to make sure the draining hose isn’t bent or kinked.
If it is, there won’t be enough acid water and the a ka ine water wi be weak.
After finishing insta ation and troub eshooting, connect the KYK Product to
an AC 110V or 220V out et.
All hoo up part of pipe arrangement has to be covered by teflon tape for avoiding the lea age and you
control the bounding number of tape for eeping the level of a horizontality and a perpendicularity.
When you decompose and reassemble the product, if you give the over force, it will be possible to lea after
assembling the product because of a pipe arrangement distortion of raw water, a brea out of rubber pac ing
and a brea age.
※
How to lin the hose with the product after connecting a tap water pipe
- Do as the same way described in 17 and 18 page.
※Reference
▶
The case that ground water or so id qua ity of water is used.
-If the qua ity of groundwater is bad, you must mount a preprocessing fi ter.
-For the ife and performance of the product, push the acidic water button 1~2
times in one week and drain acidic water during 1~2 minutes.
-In the area which has high so idity and ca careous, there is soi ed as white by the ca cium,
so in the midd e of water f ow, you push the acidic water button 2~3 times in the week and
drain water during 30~60 seconds.

23
22
Another Installation OptionsⅡInstallation Components
Faucet Diverter Valve
see faucet diverter va ve components – Page 27
Water Supply Tubing (to product)
see genesis bottom view – page 27
Water Disposal Tubing (from product)
see product bottom view – page 27
Ionized Water STAI LESS Steel Delivery Hose
See productFront View – page 28
Product Power Cord - see page 28
Product Touch Sensor Panel – See page 28
LCD DISPLAY – See page 28
Acid water drain tubing/suction cup holder
See acid water drain tubing – page 28
~Countertop Installation Components₩
There are two installation configurations.
❶Connection to the faucet.
With this insta ation configuration option, the product sits on the countertop and the water
supp y ine is connected to your faucet by removing the existing aerator and insta ing the
provided faucet diverter va ve. The drain ine from the product is p aced in the sink.
The product power cord is p ugged into an above the counter e ectrica out et.
Ionized water is de ivered via the ionized water output hose on top of the product.
The information on pages 25 & 26 provides insta ation instructions for the product
countertop insta ation option. This is the simp est insta ation configuration.
❷Connection to the co d water ine.
Your product is shipped with an optiona co d water supp y ine diverter va ve.
This diverter va ve is insta ed on the co d water supp y ine in the cupboard area be ow the
sink. This e iminates the need to attach the product water supp y to the faucet head.
To imp ement this option, you wi need a 1/4" access ho e through either the ip of the sink
or the counter top depending on what type of sink you have and how it is mounted.
If you have an accessory you do not use ( ike a soap dispenser) you can remove that
accessory and use that ho e.
If an access ho e is not avai ab e, you wi need to dri one.
Instructions for insta ing the co d water supp y ine diverter va ve are on page 26.

25
24
1.Lay the product on its back on your countertop where it wi be p aced when you are operating it so that
the bottom of the unit is accessib e.
2.Attach the power cord to the bottom of the product and turn the master power switch to the ON position.
See “Power Cord” on page 24. DO NOT p ug the unit in at this time.
3.Press the power cord into the midd e guide s ot on the side from which the power cord wi exit the unit
towards the e ectrica out et into which the product wi be p ugged.
4.Using a pair of scissors carefu y cut the p astic c asps that are attached to the 1/4 inch tubing provided
with your product.
5.Cut this tubing into two equa ha ves.
6.Remove the gray p ugs in the IN and OUT quick connect connector by ocating the outer ring around the
p ug, then pushing this ring toward the body of the product, whi e gent y pu ing the p ug out.
7.Insert one end of one of the tubing ha ves into the IN quick connect connector on the bottom of the
product. See “Bottom View (A)” on page 24. To insert the tubing, ho d the connector with one hand and
insert the tubing into the connector with the other hand unti it is pressed a the way into the connector
(IMPORTANT).
8.Insert one end of the other tubing ha f into the OUT quick connect connector on the bottom of the Genesis.
See “Bottom View (B)” on page 24. Make sure the tubing is pressed a the way into the connector
(IMPORTANT).
Note: To remove tubing from a quick connect connector, push the ring on the connector in (towards the body
of the product) and gent y pu out the tubing, just ike removing the p ugs.
9.Turn the connectors (and tubing) in the direction needed to exit the tubing toward the sink.
10.Press the tubing into the guides at the edge of the product. See “ Bottom View (E) on page 24.
11.Attach the tubing connected to the OUT connector to the acid ine sink attachment. “See Acid Water
Drain Tubing” on page 24. This wi insure that the IN tubing and the OUT tubing can be correct y identified
ater without having to recheck the bottom of the unit.
12.Set the product in an upright position and p ace it where you intend to use it.
13.Both the “IN” tubing and the “OUT” tubing shou d be exiting the product toward sink.
If they are not, ay the unit on its back and switch the direction of the connectors and tubing according y.
14.Locate the stain ess stee faucet head diverter va ve and the stain ess stee ma e/ma e adapter and set
these next to your sink.
A
:
Water Drain Tubing
B
:
Suction Cup
De ivery Hose Connection Ionized Water De ivery Hose
A
:
1/4″Water Supp y Tubing
B
:
Faucet Diverter Va ve
C
:
Water Conter Knob
A
:
Water Supp y In et Va ve (Labe ed in)
B
:
Drain Water Out et Va ve (Markee out)
C
:
Master power ON/OFF switch
D
:
Power cord receptac e
E
:
Guides for Tubing and Power Cord
Power CordTouch Sensor Pane
Installation Components Continued Countertop Installation Instructions

27
26
Countertop Installation Instructions Continued
15.Remove the existing aerator that is insta ed on your faucet head. Store this aerator in a safe p ace in the
event you need to use it at a ater date.
16.Depending on what threads are your faucet head, you may or may not need to use the ma e/ma e adapter
to match the threads on the faucet head diverter va ve. If required, screw the adapter onto the faucet head. Then
screw the faucet head diverter va ve onto the faucet head. Tighten secure y.
17.Measure the ength of the IN tubing needed to reach the diverter va ve insta ed on the faucet head.
18.With the product p aced where it wi be used on a dai y basis, take the IN tubing, which is the tubing
without the acid ine sink attachment and run it to the pin on the faucet head diverter va ve. Do not pu on the
tubing when measuring the ength needed. You want the tubing to have some s ack so you can move the
Genesis when c eaning the counter top.
19.If your faucet head is designed to rotate, you wi need to a ow amp e tubing for the faucet to move free y
once the tubing is attached to the faucet head.
20.Press this IN tubing onto the pin of the faucet head diverter va ve.
21.Remove the acid ine sink attachment from the OUT tubing.
22.Position the tubing in the sink where you want it to drain ( eaving some s ack).
23. Mark the OUT tubing at the desired ength with a marker and cut it with a razor b ade or sharp knife to the
desired ength.
24. Reattach the acid ine sink attachment to the OUT tubing. The acid ine sink attachment a ows you to
secure the OUT ine to the side of the sink.
25. S ight y wet the suction cup of the acid ine sink attachment and the area of the sink where you want to
insta the acid ine and press the suction cup onto the wetted area of the sink. “See Acid Water Drain Tubing”
on page 24.
26.Connect the stain ess stee water output de ivery hose to the product. Screw the threaded end of the de iver
hose into the adapter on top of the product. Tighten the hose secure y. See “de ivery Hose Connection” on page
27.P ug the Genesis power cord into a AC120V(American type) and AC 220V~240V (European type)
e ectrica out et.
28.Adjust the input water pressure (water f ow rate) into the product using the faucet. You want the water
f ow rate on the product LCD Disp ay to read between 1.7 and 2.5 iters/minute when you are producing.
Optional Under Counter Water Supply Line
Diverter Valve Installation Instructions
Installing the optional water supply line diverter valve that is shipped with your product enables you to connect
the product IN quic connect connector on the bottom of the product directly to the cold water supply line
under the counter. This eliminates the need to connect the product water supply tubing to the faucet.
If you have an electrical outlet under the counter, you can also plug the product power cord into this outlet.
IMPORTANT
If you have an electrical outlet under the sin and you want to plug your
product into this outlet (recommended if an outlet is available) you will need to ma e the
access hole large enough to accommodate both the product power cord plug and the 1/4"
water supply tubing. DO NOT plug the product in at this time.
WATER SUPPLY KIT:
❶TURN OFF the COLD water va ve (usua y the
right hand va ve).
❷Turn on the co d water faucet to (1) make sure you
shut off the correct va ve and (2) that the shut off
va ve is functioning probab y (actua y shutting off the
water). If co d water sti runs after shutting off the
va ve, check to make sure you shut off the correct
va ve. If you are not sure which va ve is the co d water
supp y, turn off both va ves. If co d water is sti running, the shut off va ve is defective and must
be rep aced before you can insta this kit. This requires that water be shut off at the main water
input to the house. DO NOT attempt to comp ete this insta ation if co d water sti runs after
you have shut off the co d water supp y va ve.
DRILLING THE ACCESS HOLE
❶Determine where you want to p ace the product on your countertop. You wi want the water
output hose ocated on top of the product to reach the sink. The access ho e shou d be re ative y
c ose to the product in order to minimize the amount of tubing that wi be exposed above the
counter.
❷Dri a 1/4” ho e in the se ected access ho e ocation.

❸Check to see what type of water ine you have connecting the
co d water shut off va ve to the co d water faucet. You probab y
wi have one of two types: a copper ine or stee f ex hose.
❹-A COPPER LINE: If you have a copper ine, it is
high y recommended that you rep ace it with a 30" f exib e
stain ess stee hose that you can purchase at Home Depot or
Lowes for about $6.00. This wi make the job much easier.
Remove the ine at both ends; at the co d water shut off va ve
and at the faucet. Discard this ine and rep ace it with the 30"
stee f ex hose.
❹-B Thread the fema e end of the diverter va ve onto either the COLD water faucet stem or
the COLD water copper ine running from the sing e hand e faucet MAKE SURE the o-ring
stays in the female end of adapter. Tighten secure y.
❹-C Thread the 1/2" fema e end of the 30" stee f ex hose onto the ma e threads of the
diverter va ve. Tighten secure y.
❹-D Thread the 3/8" fema e end of the stee f ex hose onto the co d water shut-off va ve.
Tighten secure y.
❺-A STEEL FLEX HOSE: Disconnect the hose ONLY at the faucet (end). You wi
reuse this hose.
❺-B Thread the fema e end of the diverter va ve onto either the COLD water faucet stem or
the COLD water copper ine running from the sing e hand e faucet. MAKE SURE the o-ring
stays in the female end of adapter. Tighten secure y.
❺-C Thread the 1/2" fema e threads on the disconnected end of the stee f ex hose onto the
ma e threads of the diverter va ve. Tighten secure y.
❻Feed the 1/4" tubing connected to the IN quick connect connector on the bottom of the
product down through the access ho e.
❼Connect this tubing to the water adjust va ve on the diverter va ve. Tighten the nut secure y
but NOT too much.
29
28
Call the service center.
E0
The water pressure from your supp y hose is ess than 1.0 iter per minute
and the KYK Product does not have enough water to ionize.
P ease increase the water pressure so that the water can be ionized.
E1
An imitation or recyc ed fi ter has been insta ed or the contamination
sensor has a prob em.
E2
Bad connection to the fi ter or inferior goods have been insta ed.
E3
There is a prob em with the fi ter ife disp ay.
E4
There is prob em with the fi ter seria number.
E5
The product has been running for too ong and needs to coo down,
or there is a prob em with the supp y water qua ity (minera y deficient
or too hard). Ca your service center.
List of Auto-Diagnosis Errors
How to install and the chec list List of Auto-Diagnosis Errors
Instead of adjusting the water pressure (water flow rate) to the product using the faucet (standard countertop
installation option), you will adjust the water pressure (water flow rate) to the product using the water flow
adjust valve attached to the water supply line diverter valve. After you have turned the cold water shut off
valve bac on (AND CHECKED FOR LEAKS), adjust the water adjust valve unit the water flow rate on the
product LCD displays reads between 1.8 and 2.5 liters/minute.

31
30
※The pH level of filtered only water is the pH level of your tap water and can
change according to temperature, quality, and water pressure of your supply water.
Water Applications
pH8.5 (1st level al ali)
About Al aline Water About Acidic Water
pH5.5 (1st level acidic)
pH5.0 (2nd level acidic)
pH4.5 (3rd level acidic)
pH4.0 (4th level acidic)
Use this eve when taking medication.
pH9.0 (2nd level al ali)
pH9.5 (3rd level al ali)
pH10.0 (4th level al ali)
Use this eve when you first start drinking a ka ine water.
Drink this eve for one to two weeks before progressing to 9.0 pH.
This is a so a good eve for mixing with powdered mi k and for those with gastroenteric issues.
After drinking pH 8.5 water for one to two weeks, drink this water for one to two weeks before
drinking 9.5 pH.
This is the eve most adu ts choose to drink.
This is a so a good eve for making tea; it enhances natura f avors and shortens stewing time.
If you drink a coho , this eve of water is good to he p with hangovers.
High a ka inity water has a detergent- ike effect and is ab e to disso ve and draw out
oi -based substances (pesticides are often oi -based and not removed with standard
water). pH 10.0 high a ka inity water more effective y emu sifies oi , c eans oi y or
greasy items, strips oi -based pesticides off produce and infuses vegetab es with
negative ions that retard their degeneration. Some specific uses inc ude:
C ean cutting boards, knives and dishes
Steri ize (soak) vegetab es, beef, pork and fresh fish. A so he ps to bring out natura f avors
and reduce acid.
Great for making soups.
First rinse rick in pH 8.5 a ka ine water and then cook that rice in pH 10.0 water to quicken
cooking time, reduce damage to the rice and maintain it natura f avor.
Remove spots and stains
Reduce detergent use
Soak vegetab es to remove bitterness. Boi vegetab es in this water to he p maintain their
nutrients and co or.
Effective y remove pesticides from fruits and vegetab es
Infuse vegetab es with a high negative ORP providing a ready supp y of antioxidants.
Good for garg ing and brushing your teeth.
Use this eve water when making the batter for fried foods to make them crunchier.
A so good for boi ing nood es.
Has exce ent c eansing and astringent qua ities-tightens pores ike a toner
Idea for bathing sensitive skin & Infants
Use this pH eve when you take a bath or wash your face.
A so good for washing an infant.
Restores shine to hair / ends si ky softness to skin
Re ieves sunburn
Re ieves skin prob ems such as psoriasis, rashes, eczema and dryness.
Good for removing sediment in a teapot or a tea cup.
Use this pH in your humidifier.
Strong acidic water has exce ent disinfecting powers that can prevent food poisoning.
This water ki s HIV and other viruses such as staph, strep, Candida, ath ete’s food fungus,
e. co i, sa mone a and a host of pathogens in as itt e as 30 seconds. Common uses inc ude:
Disinfect knives, cutting boards and counter tops (soak for 20-30 minutes)
Sanitize dish rags and sponges (soak for 20-30 minutes)
Wash Dishes
Sanitize your tooth brush (soak for 20-30 minutes)
Soak burns, eczema, psoriasis or other skin sores
C ean cuts, bruises and scrapes
About Filtered water only select
Reduce inf ammation and redness
Soak vegetab es and fruits to remove impurities
Soak fish to remove impurities.
C ean your house without using toxic chemica s

When to change the filters
The LCD screen disp ays countdown usage on the amount of iters fi tered by Fi ter 1 and Fi ter 2.
When it reaches 70L on either fi ter, the system wi te you to change that fi ter. As a bui t-in
precautionary measure, if the fi ter is not changed before the counter reaches 0, the KYK ionizer wi
auto-shutdown unti a fi ter change is made.
2nd filter 1nd filter
How to change the filters
Turn off the power and water supp y of the product.
Remove the front cover of the product. Simp y push the circu ar hook on both sides of the
product simu taneous y to open the front cover, ift the front cover to about 1/3 height and p ace
it aside. You shou d see the fi ters inside- 1st fi ter (right), 2nd fi ter ( eft).
Take out the o d fi ter to be rep aced by pu ing it forward. Unhook the e ectric wire connected to the
fi ter sensor ocated on top of the fi ter.
(Fi ter sensing sensor chip is attached on the fi ter upper part and it is taken out when raise up after
pressing the chip front part.)
Ho d the fi ter and turn it to the right (OPEN), then pu out. The o d fi ter can now be taken out of the
product.
P ease remove the safety sea of the new fi ter. Insert the new fi ter bottom side first, push in, then turn
it to the eft (CLOSE)
Caution: Ma e sure that the O-ring is seated properly and isn’t damaged.
If it isn’t seated right or is damaged, there may be water lea age.
Connect the e ectric wire to the fi ter monitoring sensor.
Put back the front cover of the product by s iding it in from the top. The new fi ter has been rep aced.
Turn on the power and water supp y of the product. Touch the “ON/OFF” button on the front cover.
The product wi do a se f-c eaning process for about 20 seconds. When it turns to standby, touch the
“ON/OFF” button again and et the water f ow for about 2~3 minutes. The fi ter rep acement procedure is
comp ete and the water is ready to drink!
※arning!If your water ever smells bad or the flow rate is severely reduced, you will need
to change the filters even though the display shows remaining filter life.
This will happen in the case of overly contaminated or hard water.
If your supply water is really bad, you’ll need to install pre-filters.
33
32
How to change the filters

35
34
How to drin al aline water from the KYK Product
Notices for Safety
Notices for safety
■This product must on y use AC120V(American type) and AC 220V~240V (European type) .
KYK generationⅡ:
This product must on y use 110V .
■Keep the e ectrica p ug free from dust and dirt.
■If the e ectrica p ug is broken, do not use the KYK Product.
■Do not connect too many e ectrica p ugs to one power supp y.
■Dry your hands before inserting or removing the e ectrica p ug.
■Do not bend or pu the e ectrica p ug with too much strength.
■Do not take apart or repair the KYK Product without certification.
■Do not expose the KYK Product to high y moisturized environments such as rain,
your bathroom, or your shower.
■Do not p ace a heavy object on the KYK Product.
■Insta the KYK Product on a so id and horizonta countertop or she f.
■On y use co d water with the KYK Product.
■Do not move the KYK Product when it is operating.
■Do not shock the KYK Product.
■Do not twist or bend the water supp y hose.
To avoid electric shock, leak and / or fire.
To avoid problems and failures with the KYK product.
To avoid leakage.
■Do not use thinner, benzene, or wax when you c ean the KYK Product.
To avoid staining and peeling.
■Keep out of direct sun ight or heat.
To avoid distortion of the KYK Product exterior.
■Be sure to on y supp y c ean, qua ity water to the KYK Product.
Do not hook up direct y to a we , ake, river, etc.
To avoid impure water and KYK Product malfunctioning.
■When an adu t first starts drinking a ka ine water, he/she shou d start off drinking the 1ss a ka ine water
eve (8.5 pH) and drink 2~3 g asses a day for 1 week, then drink 2~3 g asses a day of the 2nd eve
a ka ine water (9.0 pH) for the second week. Typica y, most adu ts stay on the number 2 a ka ine water eve .
Some drink the number 3 eve (9.5 pH). This is just advice and shou d not rep ace the instructions of a doctor.
■Do not drink the number 4 a ka ine water eve (10.0 pH). On y use it for cooking.
■Use fi tered on y water when taking medications, not ionized water.
■When you first start drinking a ka ine water, its advisab e for you to consu t a doctor.
■If you experience discomfort or prob ems beyond norma detoxification symptoms, you shou d stop drinking
a ka ine water and consu t a doctor.
■If you have kidney prob ems such as rena fai ure, or a potassium evacuation disorder, you shou d not drink
a ka ine water.
■You shou d check the pH eve of the KYK Product by using the provided drops once a month.
■It’s best to drink a ka ine water as soon as it’s made, but if you want to preserve it:
-
Put it in an airtight g ass or po ycarbonate bott e (never p astic). Store it in a refrigerator.
The water wi maintain its a ka inity for approximate y 3 days.
If the container is not airtight, the water wi return to neutra pH in about 12 hours.
■If you have ach orhydria, p ease consu t a doctor before drinking a ka ine water.
■Norma detoxification symptoms inc ude minor diarrhea, b oated fee ing, body aching, increased body odor,
and pimp es. If the symptoms are too much, decrease the pH eve or the amount of water consumed.
If symptoms don’t improve, consu t a doctor.
■On y drink eve 4 a ka ine water under a doctor’s prescription and supervision.
■Do not drink acidic water.

Product SpecificationsSummary of Operation Notices
36 37
■Do not use this product for any purpose other than what’s described in this manua .
■Do not modify this product intentiona y
■Do not p ace heavy objects on this product.
■Do not ift this product body ho ding the stain ess stee tube, it wi break.
■A ways keep the disposa out et open so water can drain.
■A ways use AC120V(American type) and AC 220V~240V (European type) with this product.
KYK generationⅡ: A ways use 110V with this product.
■Do not use over y contaminated water with this product. Tap water is best.
■If there is a prob em with this product, p ease ca your service center.
■Do not use hot water with this product.
■When the fi ter change signa is disp ayed, p ease change the fi ter as soon as possib e.
■When you do not use this product for more than two days, run water through it for 1~2 minutes before using.
■When you use this product for the first time, run water through it for 2~3 minutes.
■When you do not use this product for a ong time (over 1 week), p ease unp ug it, remove the fi ters,
and dry it out.
■Be carefu when changing the fi ters to not damage the O ring. Change the fi ters carefu y.
■Do not use we water, groundwater, contaminated water and water contained with high amounts of heavy meta s.
■Do not use water hotter than 35
。C
with this product. Room temperature water is best.
■Do not supp y unit with ionized water.
■Do not use a coho for c eaning and washing the product. (On y use a gent e soap)
■Change the fi ter regu ar y.
■Do not take this product apart.
■Do not shock or shake the unit.
Summar of Operation Notices
Manufacturer Approval Code
Product Name
Manufacturing Company
Manufacturing No. and Date
Composition and Water Supply Typ
Available Temperature
Electrolysis Method
LCD Display
Size and weight
Standard Voltage and Frequency
The object of Product
Electrical Consumption
Mineral Port
Power Source Protector
Over-current Detector
Over Temperature Protector
Electr-
olysis
Filter
OutputCapacity
Electrolysis Ability
Electrolysis Cell
Electrode Sheet Wash
Filter Life Estimate
Message to indicate
Filter Change
Filtering Material
(Made in Korea)
Filter change
instructions
This product is connected directly to tap water and
creates al aline reduced water by first purifying
the water with two special hybrid filters, then ionizing
the water using 5 or 7 platinized titanium plates.
5。C ~ 30。C Touch sensor
Continuous e ectro ysis (inc uding f ow sensor) 1.5~ 3.0kgf/cm2
Disp ays pH and ORP eve s, 7 co ors, water f ow rate per minute, water purification,
sound indicator, fi ter ife for 1
st
and 2
nd
fi ter, auto-diagnosis codes, water purification
2 iter of a ka i water/minute, 1.5 iters acidic water/minute
4 eve s of acidic water, fi tered on y water
5 or 7 sheets of P atinized Titanium KYK generationⅡ: 7 sheets of P atinized Titanium
Automatic washing (contro ed by mycom)
1st filter: 6,000 liters 2nd filter: 9,000 liters
(may differ region to region, nation to nation)
KYK generationⅡ: 1st filter: 6,000 liters 2nd filter: 6,000 liters
Disp ays on LCD disp ay when the fi ter ife indicator reaches 70 iters.
If the taste and sme of water is not norma , you shou d change the fi ter anyway.
1
st
filter: composite fi ter
2
nd
filter: composite fi ter
Fi ter Change (see the user manua )
Adding Ca cium for Forced Disso ution
Fuse 250V AC,5A
Automatica y stops the output of e ectro ytic ce s
Temperature detector circuit insta ed inside SMPS power supp y automatica y stops the device.
2213
A ka ine Water Ionizer
KYK Co., Ltd.
(#406,407 Sangdaewon-Dong Joongwon-Gu, Sungnam City, Kyunggi-Do, Korea)
See Backside of Product
80W (whi e operating)
07-667
KYK generationⅡ,KYK25000, KYK30000, KYK33000
Product Approval Code
Model
Available Water
Pressure
Controlling Method
Standing or wa -mounted. Direct connection to tap water.
Size: 340(W) x 340 (H) x 150 (D) (mm), Weight:6kg
AC120V, 60Hz(American type) and AC 220V~240V, 50/60Hz (European type)
Production of a ka i water over pH 8.5 for drinking
KYK generationⅡ: AC 110V, 50/60Hz
KYK generationⅡ: 300W (whi e operating)

Warranty Registration
1. Our company will pay for repair, labor and shipping for five ears to guarantee performance and
operations. If repair of the produce is not possible, we will replace the product.
2. Customer will pay for repair charges including shipping under the following conditions
(1) A malfunction occurs after the warranty has expired.
(2) The unit is damaged by the customer.
(3) Damage is caused by customer attempting to repair the unit themselves or the unit is repaired
by an unauthorized service center.
(4) Damage is caused by using the incorrect electrical voltage.
(5) Damage is caused by using an imitation filter.
(6) Damage is caused by a natural disaster.
(7) Damage is caused by exposing the electronics to water or moisture.
Terms of Warranty: one years parts and abor.
Purchase Date:
Customer’s Address:
Name:
Phone No:
Se er
Company:
Name:
Representative:
Phone No:
The KOTRA Sea of Exce ence is given to a se ect
group of Korean companies that meet the highest
standards of business.
KOTRA proud y recommends the awarded Korean
companies
and products to you on the basis of their professiona ism.
The KOTRA Sea of Exce ence has se ected through
comprehensive y examining based on their financia
soundness, high qua ity, advanced techno ogy and
market appea .
: Korea Trade-Investment Promotion Agency
KYK awarded KOTRA Seal of Excellence
This manual suits for next models
3
Table of contents
Popular Water Filtration System manuals by other brands

BWT
BWT 40067000 Installation and operating instructions

Wisy
Wisy Vortex Fine Filter WFF 150 Installation and operating instructions

GE
GE Profile PNRQ21LBN Owner's manual and installation

Graf
Graf one2clean+ XXL Instruction for operation and maintenance

Reverse Osmosis
Reverse Osmosis RO-CRISTALLE owner's manual

Kärcher
Kärcher WPC 5000 SW-AM manual