Kymeta KyWay U7 8W User manual

KyWay™ Terminal Quick Start Guide
Document number: 700-00009-001
Revision A
07 February 2018

Table of contents
1 Introduction 1
2 Specification 1
3 Package contents 2
4 Indoor unit components and cables 3
5 Tools required 4
6 Request commissioning 4
7 Prepare the outdoor unit (ODU) 5
8 Connect the cables 6
9 Power on the KyWay™ terminal 7
10 Access the ASM 7
11 Access the modem 7
12 Documentation 7
13 CE declaration of conformity 8
14 FCC notifications 8
15 Legal disclaimer 8
16 Contact information 8
17 Revision history 8

© 2018 Kymeta Corporation. 1 07 February 2018
KyWay™ Terminal Quick Start Guide
1 Introduction
Thank you for choosing the Kymeta KyWay™ terminal and welcome to the new era of satellite connectivity.
For your safety and ease of use, please read this Kymeta KyWay Terminal Quick Start Guide and the Kymeta
KyWay Terminal Safety and Handling Guide in their entirety before beginning assembly.
To ensure the KyWay terminal is installed for maximum performance in each deployed platform, only Kymeta-certified
installers should install and commission the unit.
2 Specification
AC power 110 – 240 VAC
AC line frequency 50/60 Hz
Power 8 W BUC: peak: 500 W || typical: 300 W
16 W BUC: peak: 600 W || typical: 400 W
ODU dimensions 82.3 cm × 82.3 cm × 16.5 cm
(32.4 in. × 32.4 in. × 6.4 in.)
mTenna™ I/O dimensions W 48.26 cm × D 22.21 cm × H 4.37 cm
(W 19 in. × D 8.745 in. × H 1.72 in.)
iDirect X7 modem dimensions W 44.5 cm × D 30.5 cm × H 4.37 cm
(W 17.5 in. × D 12 in. × H 1.72 in.)
Terminal weight 27.2 kg (59.8 lb.)
ODU weight 21.3 kg (46.9 lb.)
IDU weight 5.9 kg (12.9 lb.)

© 2018 Kymeta Corporation. 2 07 February 2018
KyWay™ Terminal Quick Start Guide
3 Package contents
Box 1: KyWay terminal ODU
(1) ASM with the attached RF chain (BUC, diplexer, LNB)
(6) cable ties
(1) KyWay™ Terminal Quick Start Guide
(1) KyWay™ Terminal Safety and Handling Guide
(1) KyWay™ Terminal Limited Warranty
Box 2: mTenna I/O
(1) mTenna I/O
(1) power cable
(8) screws and nuts
Box 3: Modem
(1) modem
(1) power cable
(8) screws and nuts
(1) Ethernet cable
(2) N-type to F-type adapter
Box 4: ODU Interface cable (accessory)
(1) ODUinterface cable (three lengths available: 3.66 m, 7.62 m, 15.24 m)
Box 5: RF cables (accessory)
(1) Rx cable (three lengths available: 3.66 m, 7.62 m, 15.24 m)
(1) Tx cable (three lengths available: 3.66 m, 7.62 m, 15.24 m)

© 2018 Kymeta Corporation. 3 07 February 2018
KyWay™ Terminal Quick Start Guide
4 Indoor unit components and cables
NOTE: Drawings are not to scale.

© 2018 Kymeta Corporation. 4 07 February 2018
KyWay™ Terminal Quick Start Guide
5 Tools required
Note that installation tools are not provided with the product.
Tool diagram Tool description
Torque screwdriver
0.2 N-m (2 in.-lb.) minimum torque rating
Hex bit
4 mm for the mTenna I/O and the modem
Break-over torque wrench for N-type connectors
0.9 N-m (8.1 in.-lb.) torque rating
6 Request commissioning
Congratulations on your purchase of the Kymeta™ KyWay™ terminal. Contact the KĀLO™ support team to schedule
your commissioning window by sending an email to support@kalo.net.
Have the following information ready for your commissioning:
ASM serial number
Modem serial number
Purchase date
Confirmation of the service plan choice

© 2018 Kymeta Corporation. 5 07 February 2018
KyWay™ Terminal Quick Start Guide
7 Prepare the outdoor unit (ODU)
1. Make sure you have a clear, clean, flat surface for assembling the Kymeta KyWay terminal.
2. Open the KyWay terminal ODU box. With two people, lift the ODU out of the case. Do not lift the ODU by any
RF component (LNB, diplexer, or BUC) as this may damage sensitive components and potentially void your
warranty. Keep the ODU parallel to the floor and lay it on the clean flat surface (ASM logo side down).
3. Refer to the Connect the cables section for further instructions.

© 2018 Kymeta Corporation. 6 07 February 2018
KyWay™ Terminal Quick Start Guide
8 Connect the cables
Avoid confusing the Rx and Tx cables. Before installing the cables, apply colored tape to each end of the cable, or install
one cable at a time. The recommended convention is RED for the Tx cable and BLUE for the Rx cable.
1. Connect the ODU interface cable 31-pin connector to the back of the ASM by carefully aligning the connector
keys on the inside bulk and on the inside of the outer ring. The connector should seat firmly without forcing it. You
may feel a slight click as the connector reaches the end of travel.
2. Connect the ODU interface cable 12-pin Amphenol connector to the 12-pin receptacle on the BUC.
3. Connect the Tx cable (RED) to the BUC (use the torque wrench).
4. Connect the Rx cable (BLUE) to the ASM Rx OUT port (use the torque wrench).
5. Connect the ODU interface cable 18-pin connector to the mTenna I/O.
6. Connect the Rx cable (BLUE) to the modem primary Rx IN port (Rx 1) (finger-tighten). Do not use the Rx 2 port.
7. Connect the Tx cable (RED) to the Tx OUT of the modem (finger-tighten).
8. Connect the Ethernet cable to the mTenna I/O and port 1 on the modem.
9. (optional) Connect the customer Ethernet cable to the modem (port 5-8 for DHCP).
10. Connect one power cable to the mTenna I/O and another one to the modem.
✎Use cable ties to clean up loose cables.

© 2018 Kymeta Corporation. 7 07 February 2018
KyWay™ Terminal Quick Start Guide
9 Power on the KyWay™ terminal
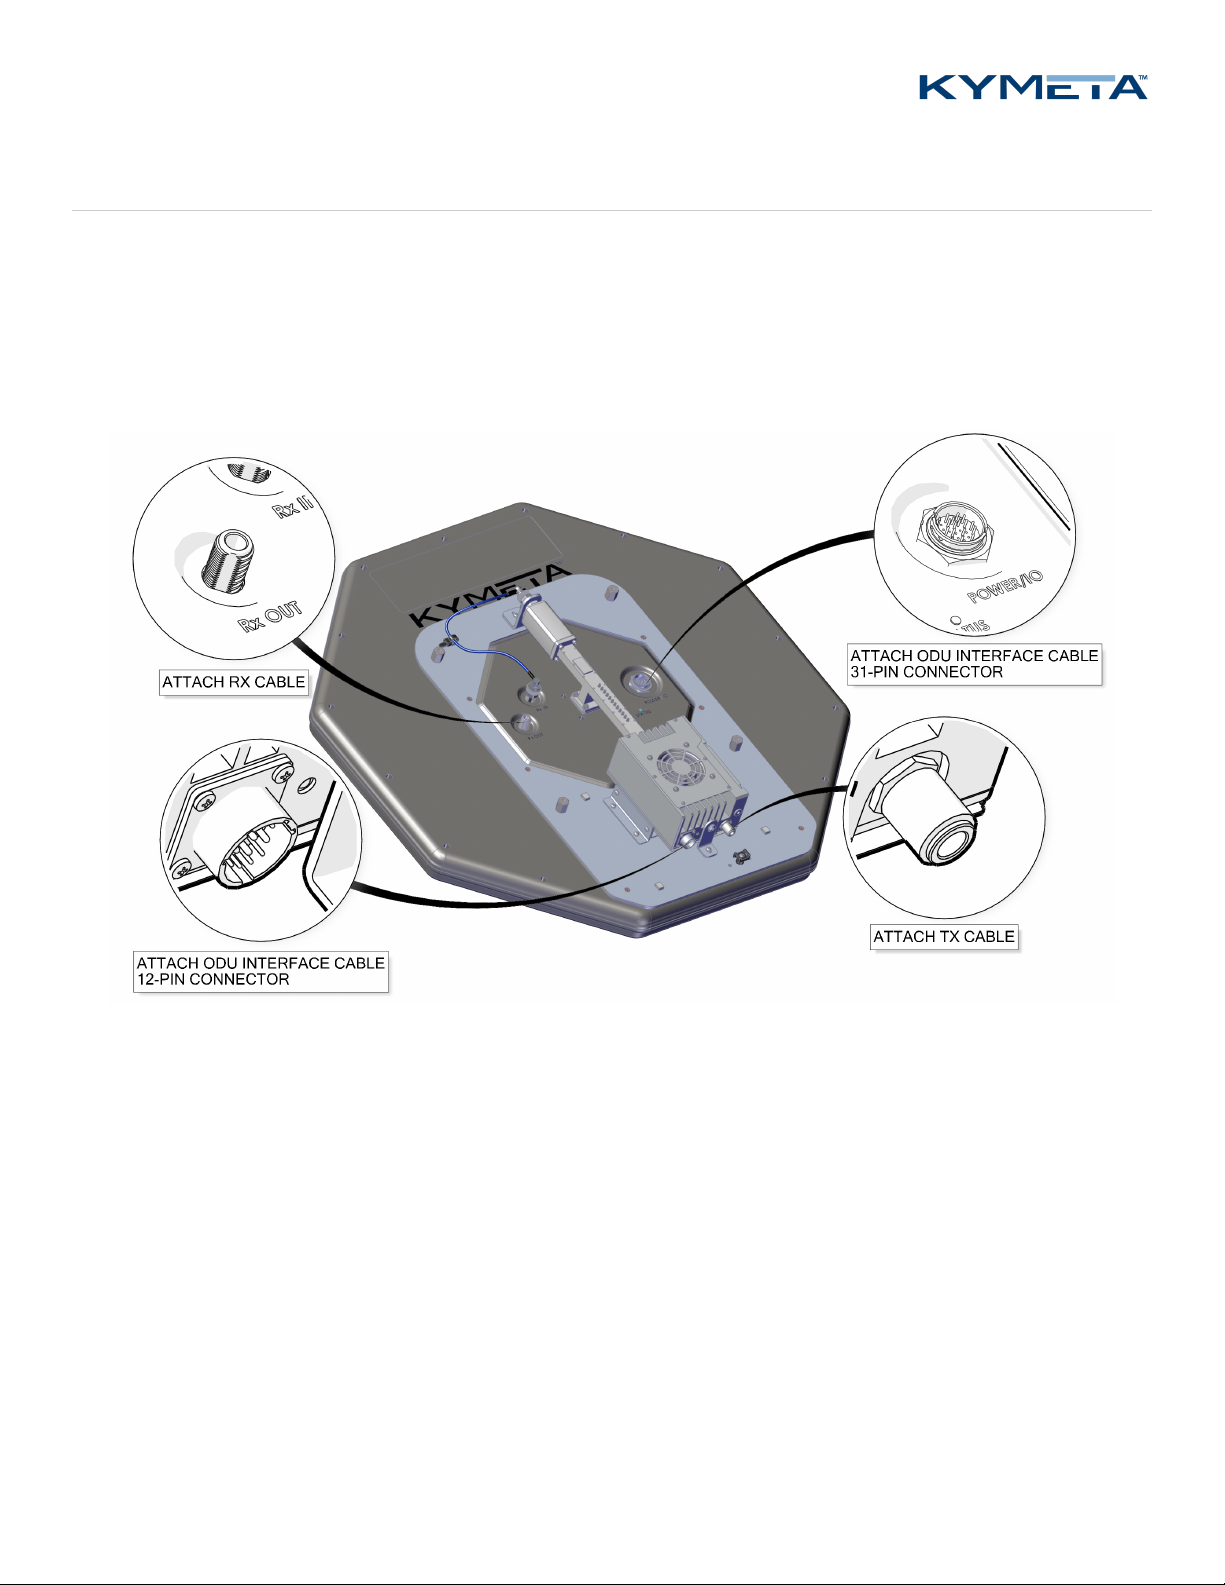
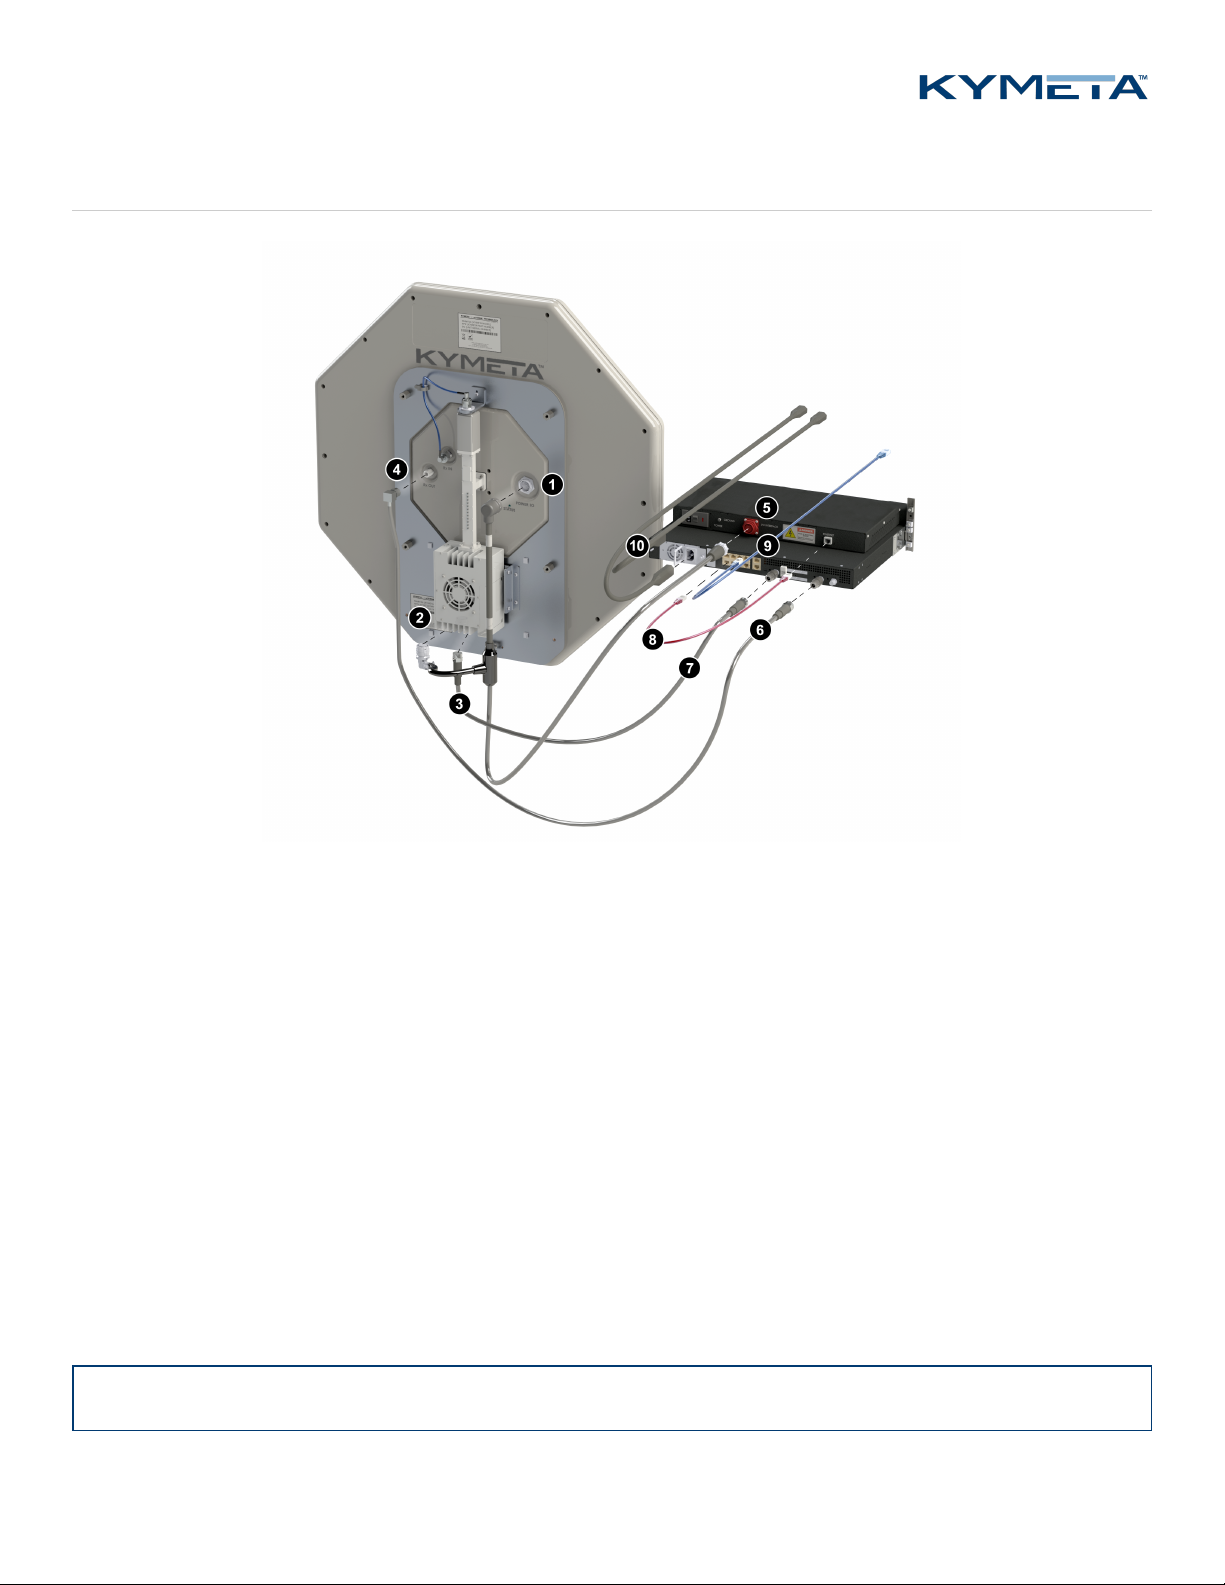
1. Check that all cables are connected, as shown in the Connect the cables section.
2. Power on the mTenna I/O and confirm that the power light on the front is solid green.
3. Confirm that the light on the back of the ASM is solid green.
4. Power on the modem and confirm that the Power, Status, and Temp lights on the front are solid green.
5. Wait 90 seconds and then verify that the Ethernet port 1 link light on the back side of the modem is blinking.
✎To access the ASMprior to commissioning, refer to the Kymeta mTennaᵘ⁷ Antenna Subsystem Module Software
User Guide.
10 Access the ASM
Kymeta supports Chrome and Firefox browsers.
To access the mTennau7 ASM web-based user interface, do the following:
1. Connect an available Ethernet port on your workstation to the Ethernet port 2 on the modem.
2. Configure the TCP/IPv4 properties of the Ethernet port to use static IP address/subnet mask of 192.168.44.3 /
255.255.255.0.
3. In your browser, go to http://192.168.44.2.
4. In the Authentication Required window, provide the following credentials: username: admin, password:
2Cfg^Ant.
✎Refer to the KyWay Terminal Troubleshooting Guide, section "Cannot access the web-based UI" if you cannot
access the mTennau7 ASM web-based user interface.
The ASM automatically reboots every 24 hours. To set the auto-reboot time based on your local timezone, go to the
Settings page > System window, and then update the time in the Auto Reboot Time. Click Apply.
11 Access the modem
Do not make changes to your modem until you talk to a KᾹLOservice representative. See the Request commissioning
section for details.
12 Documentation
To obtain the most current version of the KyWay terminal documentation, contact your Kymeta representative.

© 2018 Kymeta Corporation. 8 07 February 2018
KyWay™ Terminal Quick Start Guide
13 CE declaration of conformity
This equipment conforms with the essential requirements and other relevant provisions of Radio Equipment Directive
(2014/53/EU).
14 FCC notifications
This device complies with Part 15B of the FCC rules. Operation is subject to the following conditions:
1. This device may not cause harmful interference.
2. This device must accept any interference received, including interference that may cause undesired operation.
This product complies with the requirements set forth in CFR 47 Section 1.1307 addressing RF Exposure from radio
frequency devices as defined in Evaluating Compliance with FCC Guidelines for Human Exposure to Radio Frequency
Electromagnetic Fields.
This product complies with EN 50835 for RF exposure.
The product is a transmit and receive satellite terminal; the user must comply with all applicable local, national, and
international laws and regulations regarding the installation and use of this product.
15 Legal disclaimer
© 2018 Kymeta Corporation. KYMETA, CONNECTED BY KYMETA, MTENNA, KYWAY, KĀLO image, and KĀLO are trademarks of Kymeta
Corporation, with registrations or applications for these marks pending in Brazil, the European Union, Japan, Norway, Singapore, South
Korea, and the United States.
16 Contact information
12277 134th Ct NE, Redmond, WA 98052, USA | +1 (425) 896-3700 www.kymetacorp.com
twitter.com/KymetaCorp | facebook.com/kymetacorp | instagram.com/kymeta | linkedin.com/company/kymeta-
corporation
17 Revision history
Revision Change Date
A Initial document. 7 February 2018
Table of contents
Popular Marine GPS System manuals by other brands

Iridium
Iridium 9500 quick reference

EchoStar
EchoStar Hughes 9450 Series user guide

Garmin
Garmin Echomap Plus 40 series installation instructions

Thuraya
Thuraya MarineStar MNB-01 user manual

Garmin
Garmin GPSMAP 430x - Marine GPS Receiver Template

KVH Industries
KVH Industries TracPhone V7-HTS Conversion instructions