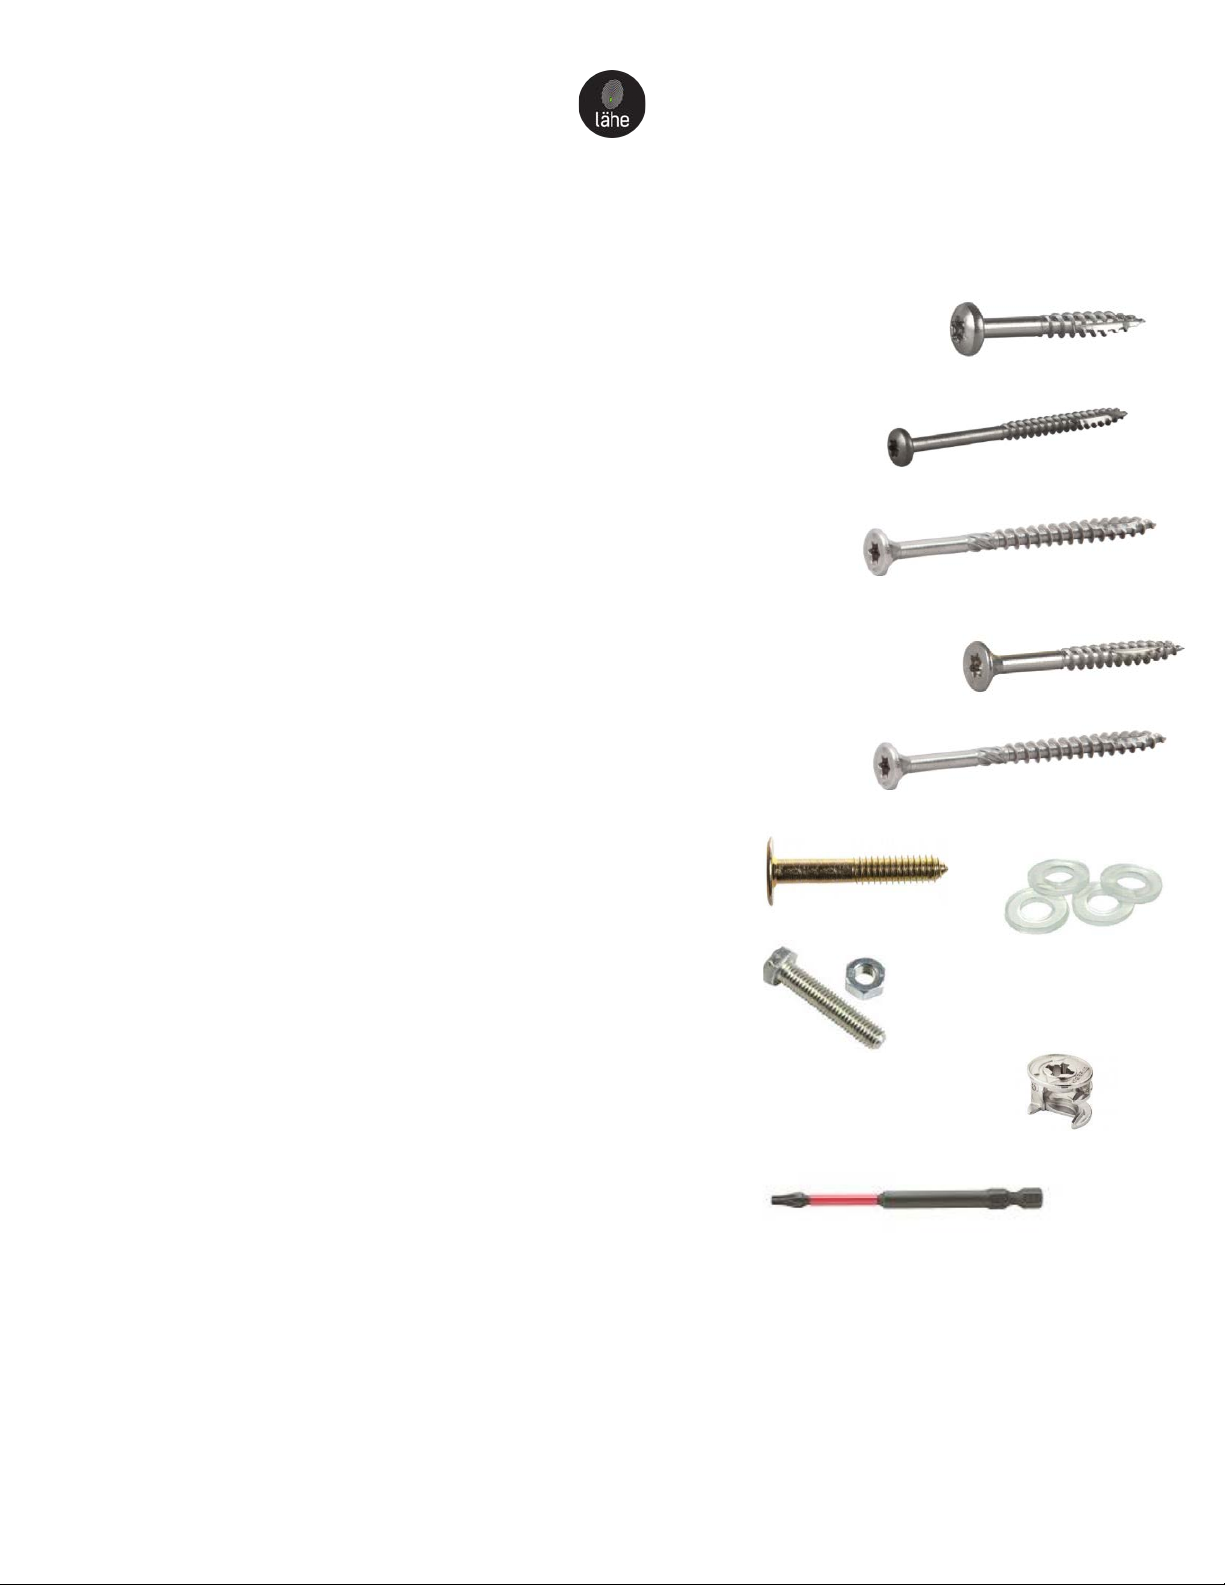
manuals.online logo
Brands
  1. Home
  2. •
  3. Brands
  4. •
  5. Lähe
  6. •
  7. Greenhouse Kit
  8. •
  9. Lähe 3 User manual

Lähe 3 User manual

Popular Greenhouse Kit manuals by other brands

Dancover TITAN Arch 196 manual

Dancover

Dancover TITAN Arch 196 manual

ACD PRESTIGE MR3 H manual

ACD PRESTIGE

ACD PRESTIGE MR3 H manual

Vitavia VA0040-TRP Assembly instructions

Vitavia

Vitavia VA0040-TRP Assembly instructions

VegTrug Nursery manual

VegTrug

VegTrug Nursery manual

Riverstone Networks Monticello 041315V Assembly instructions

Riverstone Networks

Riverstone Networks Monticello 041315V Assembly instructions

CLIMA POD Spirit V7 Series Assembly instructions

CLIMA POD

CLIMA POD Spirit V7 Series Assembly instructions

Vitavia GAIA JUMBO Assembly instructions

Vitavia

Vitavia GAIA JUMBO Assembly instructions

Palram Harmony 6'x4' Assembly instructions

Palram

Palram Harmony 6'x4' Assembly instructions

ClearSpan Storage Master 104598 instruction manual

ClearSpan

ClearSpan Storage Master 104598 instruction manual

Sproutwell GRANGE - 5 Assembly instructions

Sproutwell

Sproutwell GRANGE - 5 Assembly instructions

STC Easy Grow 6x12 Greenhouse Assembly instructions

STC

STC Easy Grow 6x12 Greenhouse Assembly instructions

Growhouse Lean To 6 x 8 Erection and Glazing Instructions

Growhouse

Growhouse Lean To 6 x 8 Erection and Glazing Instructions

Riverstone Networks Grower's 181010V Assembly instructions

Riverstone Networks

Riverstone Networks Grower's 181010V Assembly instructions

GrowSpan 500 Series manual

GrowSpan

GrowSpan 500 Series manual

Stocker 9641/2 manual

Stocker

Stocker 9641/2 manual

Outsunny 845-421V02 manual

Outsunny

Outsunny 845-421V02 manual

ACD Piccolo 03 manual

ACD

ACD Piccolo 03 manual

Riverstone Networks MONT-8 Assembly instructions

Riverstone Networks

Riverstone Networks MONT-8 Assembly instructions

manuals.online logo
manuals.online logoBrands
  • About & Mission
  • Contact us
  • Privacy Policy
  • Terms and Conditions

Copyright 2025 Manuals.Online. All Rights Reserved.

GREENHOUSE INSTALLATION
MANUAL
Model No 3
www.lahehouse.com
2
Dear Customer
Thank you for choosing Lähe Greenhouse!
Please read this guide carefully before installing a greenhouse. Reading the installation manual
will help you avoid mistakes when installing the greenhouse and ensure better results with less
time.
If you have no previous experience in installing a greenhouse or construction work, we
recommend using the services of an experienced craftsman or construction company.
ATTENTION: When opening the greenhouse packaging, the presence of parts and possible
defects must be checked immediately. Missing details and defects must be reported before
installing the greenhouse. Otherwise, the greenhouse may lose its warranty.
All Lähe greenhouses are made of natural, high-quality Nordic heat-treated pine. Wood is a
natural material, so it is not possible to avoid twigs, cracks caused by drying, differences in
shade and other characteristics of wood. Since the wooden parts of our greenhouses are made of
natural wood and not chemically treated, it is natural that they will turn gray over time.
We wish you a successful installation!
Lähe House
3
1. FOUNDATION
Greenhouse installation always starts from preparation of the foundation. The appropriate type of
foundation depends on the soil, the purpose and the size of the greenhouse. For Lähe
greenhouses, a strong concrete slab or tape foundation must be used.
The foundation must be horizontally level and all angles 90 degrees. Only a proper, level and
load-bearing foundation ensures an impeccable result. A failed foundation makes it difficult to
install details, causes problems with the operation of doors and windows, and reduces the
stability and lifespan of the greenhouse. We recommend consulting a construction specialist
when choosing a suitable foundation.
NB! Subsequent damage to the greenhouse due to the wrong foundation is not covered by
the warranty!
NB! Laying the foundation in the garden
Leave at least 2 meters of free space from both sides. Required for installing
roof glasses!
4
2. TOOLS
Please check that you have all neccessary tools and safety equipment before installation!
Cordless drill (preferably 2pcs), drill bits (TX20-25, HEX4), phillips screwdriver, ladder,
clamping screws (2pcs), wood drill (2, 4 and 5mm), leveling tool, wrench 10mm (2pcs),
wooden support bar (4pcs lenght ca 3m), glass lifting suction cups (preferably 2pcs).
3. DETAILS
Numerous wooden details can be confusing at the
arrival of the greenhouse, but sorting the details will
help solve the buzzle.
Remove the parts from the package and assemble the
similar parts into bundles. Follow the markings on the
details. Two parts with the same symbol will be
connected during installation.
During sorting, you get full confidence that all the
necessary details are present and without defects.
List of details
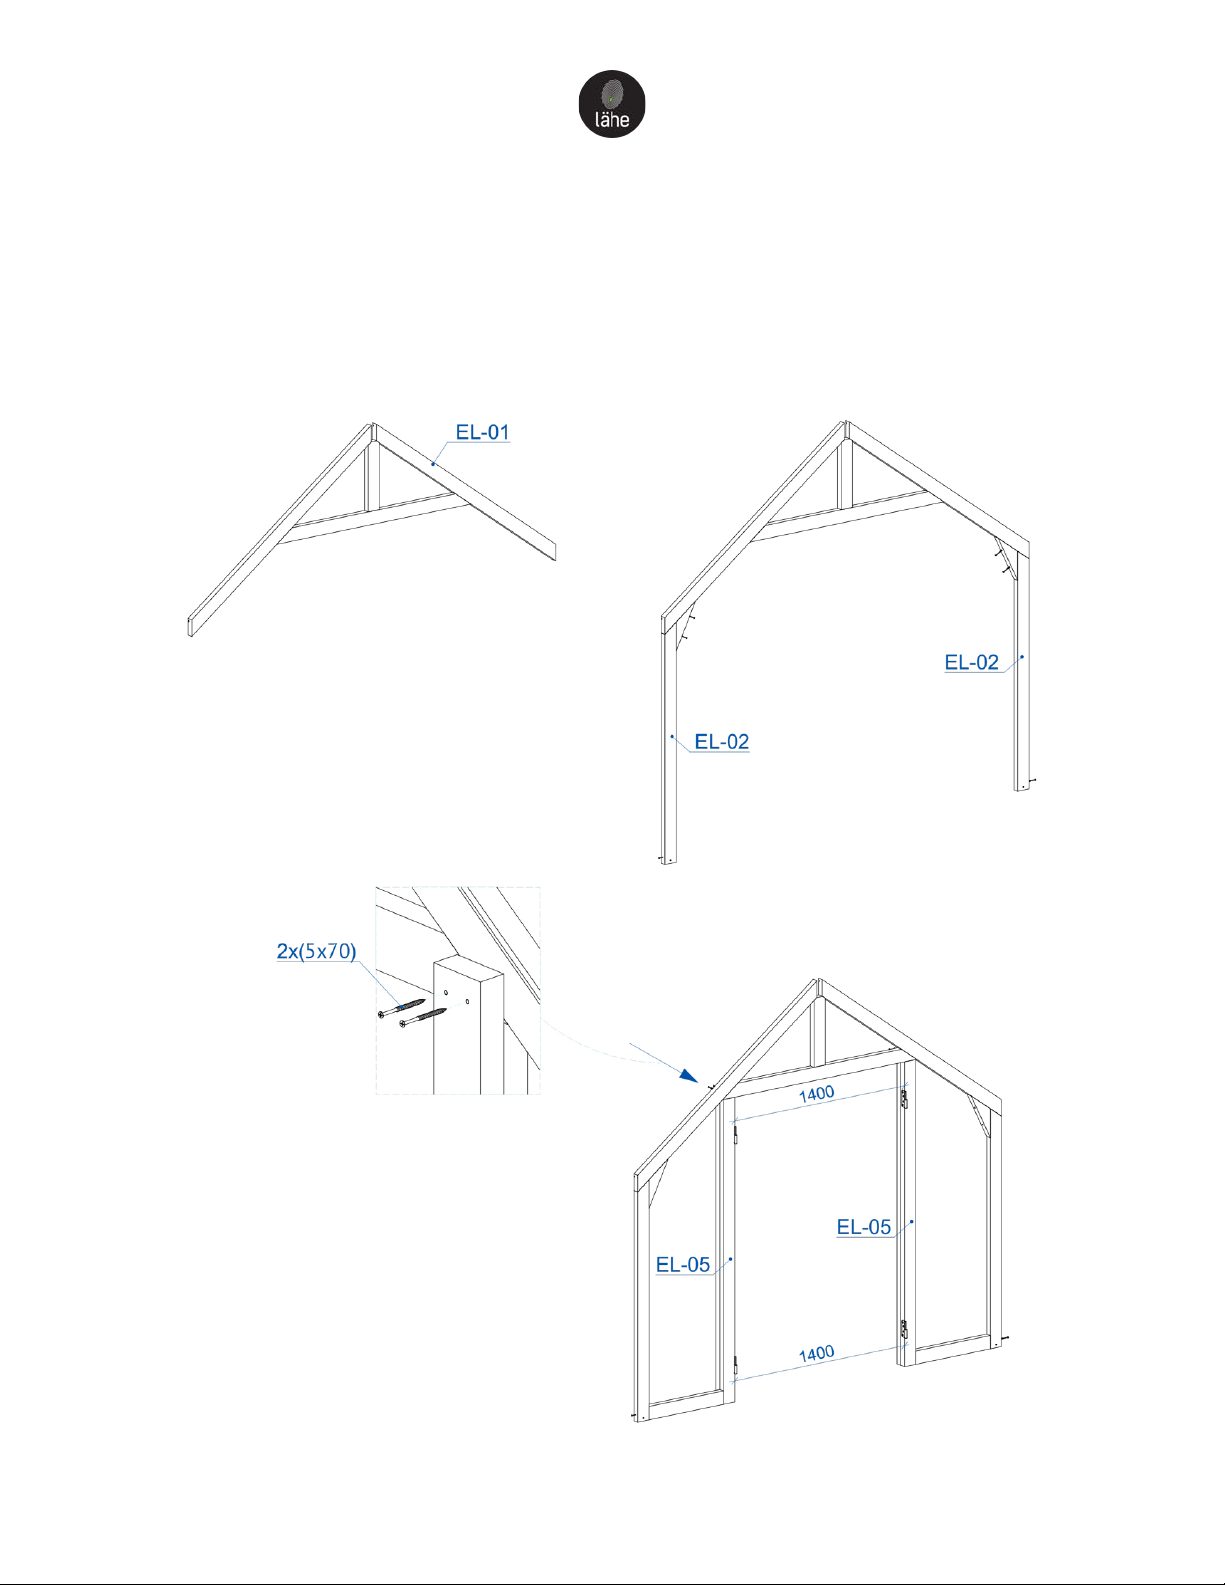
1. End wall upper triangle (EL-01) – 2 pcs
2. End wall post (EL-02) – 4 pcs
3. Back wall base detail (EL-03) – 1 pc
4. Back wall inner post (EL-04) – 3 pcs
5. Doorpost (EL-05) – 2 pcs
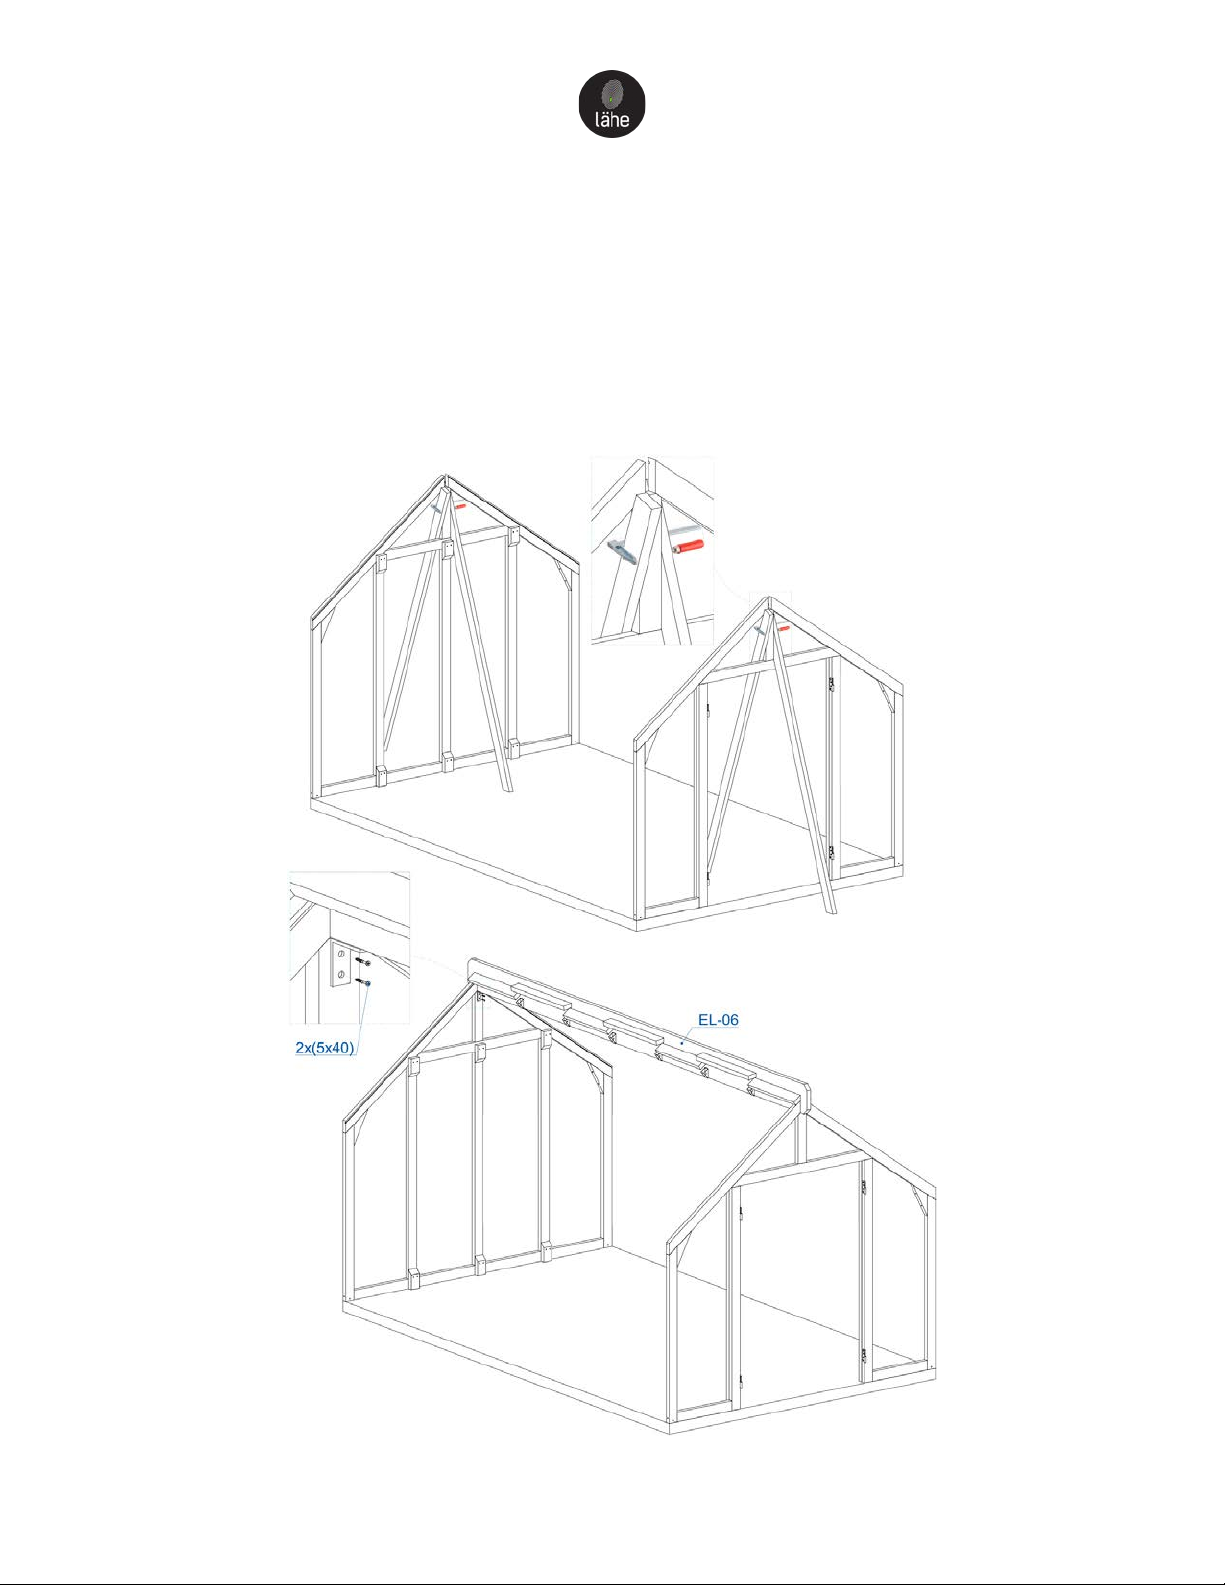
6. Ridge beam (EL-06) – 1 pc
7. Rafter (EL-07) – 12 pcs
8. Roof window (EL-08) – 3 pcs
9. Left side door (EL-09) – 1 pc
10. Right side door (EL-10) – 1 pc
11. Rafter middle detail (DET-01) – 14 pcs
12. Lower base detail (DET-02) – 14 pcs
13. Upper base detail (DET-03) – 14 pcs
14. Roow window middle detail (DET-04) – 3 pcs
NB! Start installing the greenhouse on the foundation only after sorting the
details and thoroughly reading the installation manual.
5
Detail views
6
4. GLASSES
1. Endwall glass (OK-01) – 4 pcs 5. Roof glass (KK-02) – 11 pcs
2. Endwall glass (OK-02) – 4 pcs 6. Roof glass (KK-03) – 3 pcs
3. Endwall glass (OK-03) – 2 pcs 7. Roof window glass (KL-01) – 3 pcs
4. Side glass (KK-01) – 14 pcs
7
5. FASTENERS
1. Wood screw 4x20 (drill bit TX20)
Quantity: 45 pcs
2. Wood screw 5x50 (drill bit TX25)
Quantity: 24 pcs
3. Wood screw 5x70 (drill bit TX25)
Quantity: 66 pcs
4. Wood screw 5x40 (drill bit TX25)
Quantity: 4 pcs
5. Wood screw 6x80 (drill bit TX25)
Quantity: 4 pcs
6. Glass screw 6,3x30 (drill bit HEX4) + pvc washer
Quantity: 169 pcs + 169 pcs
7. M6 x 55mm bolt + nut + washer
Quantity: 12 pcs + 12 pcs + 24 pcs
8. Minifix fastener
Quantity: 28 pcs
9. Long drill bit SHW TX25 for 5x50
Quantity: 1 pc
NB! There may be extra amount of fasteners included!
8
6. INSTALLATION OF FRONT WALL
Holes drilled in advance. Screws partially placed in holes. Tighten to the end.
NB! Make sure that the width of the door opening is 1400 mm from both the top and
bottom (otherwise the doors will not open properly). Look also section 15.
9
7. INSTALLATION OF BACK WALL
Holes drilled in advance. Screws partially placed in holes. Tighten to the end.
NB! Make sure distances between posts are equal.
10
8. INSTALLATION OF RIDGE BEAM
Set front and back wall to the foundation ends (use two longer wooden bars as a support and
fasten them with a clamping screw) and raise ridge beam on top of them.
Attach ridge beam to the front and back wall (metal brackets are already attached).
NB! Ridge beam position determines the side of the roof windows. Make sure the roof
windows get to the desired side. Look also section 13.