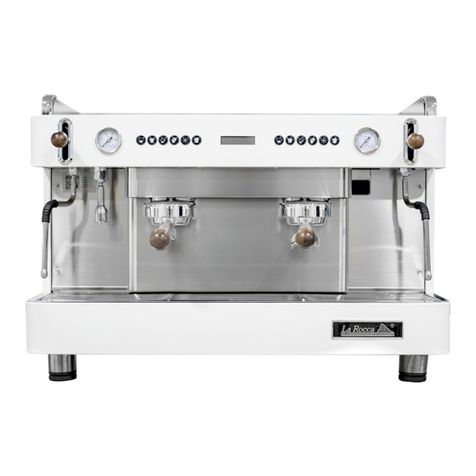
La Rocca Expres JAVA-Pro User manual

La Rocca Exprés, S.A. Modelo JAVA Pro – Manual del Usuario
Modelo / Model
JAVA-Pro
MANUAL DEL USUARIO
USER’S GUIDE
INDICE / INDEX
Descripción de los elementos externos de la máquina
Desembalaje
Ubicación de la máquina
Instalación de la máquina
Puesta en marcha por primera vez
Puesta en funcionamiento habitual
Programación de la dosis
Limpieza y mantenimiento
Características técnicas
Machine Elements
Unpacking the machine
Machine placement
Preliminary Instruction
First connection
Daily operation
Programming the Dosage
Cleaning and maintenance
Technical specifications
DESCRIPCIÓN DE LOS ELEMENTOS EXTERNOS DE LA MÁQUINA.

La Rocca Exprés, S.A. Modelo JAVA Pro – Manual del Usuario
Figura 1
1.- Pomo
g
rifo a
g
ua caliente 8.- Led indicador calentamiento
2.- Grupo ero
g
ación café 1 9.- Interruptor
g
eneral
3.- Salida a
g
ua caliente 10.- Pomo vaporizador
4.- Bande
j
a de traba
j
o 11.- Botonera
g
rupo 2
5.- Pie re
g
ulable cafetera 12.- Manómetro presión caldera
6.- Vaporizador 13.- Botonera Grupo 1
7.- Led indicador encendido máquina
DESEMBALAJE
Aldesembalarsumáquinadecafé,encontrarásobrelabandejacalientatazasyla
bandejadetrabajolossiguientesaccesorios:
‐1Tubodedesagüe
‐1Latiguillode1,5metros
‐1CacilloCiego
‐FichaTécnica
AdemásdeéstemanualdefuncionamientoconladeclaracióndeconformidadCEy
tantosportafiltroscomogrupostengasumáquina.
Asegúresedequedichosaccesoriosvienenincluidos.
Retire la cobertura de plástico que cubre la carrocería y revise si la máquina ha
sufridodañosdurantesutransporte.
UBICACIÓN DE LA MÁQUINA
Lamáquinadeberásituarsealaalturaadecuadaparaseroperadaconcomodidad
ysinnecesidaddeposturasforzadas.
Alahoradebuscarubicaciónparalamáquina,tengaencuentalanecesidadde
alimentacióneléctrica,asícomodeobteneraguadelaredyverteraundesagüe
Dejeunaciertadistanciadeventilaciónaambosladosyporlapartetraseradela
máquina.
Noinstalelamáquina:
Enlugaressometidosaluzsolardirecta,expuestosalalluviaoconposibilidadde
recibirgolpes.
Cercadeobjetosoaparatosquepuedanresultarafectadosporelvaporoelcalor
emitidosporlamáquina.
INSTALACIÓN DE LA MÁQUINA
Antes de instalar la máquina, se aconseja comprobar la eficienciadelaredde
alimentacióndelaguaydelaredeléctrica.
ConexiónalaReddeAgua
Paraconectarlamáquinaalareddeagua,deberáemplearellatiguilloincluido.Laentrada
deaguaalamáquinaquedaaccesiblelevantandolabandejadetrabajo.

La Rocca Exprés, S.A. Modelo JAVA Pro – Manual del Usuario
Unavezhechalaconexión,podráabrirlallavedepasoparacomprobar que no
existefugaalgunadeagua.Siseobservarapérdidadeagua,apretardenuevolatuercadel
latiguillo.
A continuación se llevará a cabo la conexión del desagüe, mediante el tubo de
desagüe, que deberá insertarse en el colector situado bajo la bandeja de trabajo,
asegurándosedequeeltuboquedabienancladoenelmismoafindeevitarescapesde
agua.
Una vez conectado el tubo de desagüe, comprobar que no tiene pliegues ni
estrangulamientosqueimpidanlalibresalidadelagua.
ConexiónalaRedEléctrica
Antesdeprocederaconectarlamáquinadecaféalaredeléctrica,seránecesario
comprobarquelatensiónyfrecuenciadelaredeléctricadesuministrocorrespondenalas
delamáquina(indicadasenlaplacadecaracterísticasdelamisma).
Dicha red eléctrica deberá ajustarse obligatoriamente a la normativa vigente
(ReglamentoelectrotécnicodeBajaTensión)encuantoainstalación de interruptor
magnetotérmico,diferencial,tomaeficazdetierra,etc.
Antesdeprocederalapuestaenfuncionamientodelacafetera,comprobarqueel
interruptorgeneral(9)seencuentraenlaposición0/OFF.
Para conectar la máquina, basta insertar la clavija en una toma de corriente
compatibleconloindicadoenlaplacadecaracterísticasencuantoatensióneintensidad
decorriente.
Unavezconcluidastodaslasconexiones,ajustarlaalturadelaspatasdeformaque
lamáquinaquedeestableynivelada.
PUESTA EN MARCHA POR PRIMERA VEZ
TodoslosmodelosJAVAProestándotadosdecargaautomáticadeaguaencaldera,
independientemente de si la erogación es programable o no. Lospasosaseguirpara
efectuarlapuestaenmarchasonlossiguientes:
Pasar el interruptor general (9) a posición 2/water load (asegurándose de que el
interruptor de resistencia (8) se encuentra apagado). Se encenderáelpilotoazuly
transcurridos 2 ó 3 segundos la electroválvula de carga comenzará a introducir el agua
automáticamenteenlacaldera.
Silacargaseprolongadurantemasdedosminutos(estoocurreenocasionesenlasredes
con muy poca presión), entonces se detendrá la carga de agua y parpadearán los leds
situados en los pulsadores de dosis. Llevar en ese momento el interruptor general a la
posición0/OFFalmenosduranteunpardesegundos,yacontinuaciónvolverasituarloen
2/waterload.
Unavezlacargasehayadetenidoylospilotosnoesténparpadeando,pulsarlosbotones
dedosisdeambosgrupos(13)y(11),hastaquesalgaaguaporlos gruposparaexpulsar
todoelairedelcircuitohidráulico.
Enésemomento,sepuedepasarelinterruptorgeneral(9)alaposición 1/ON. Se
encenderáelpilotoderesistencia(8).
Comprobarquelosgrifosdevaporyaguacalienteseencuentrancerrados,yesperaraque
la máquina se caliente, hasta que el manómetro de caldera (12) alcance la presión de
trabajode1bar.
PUESTA EN FUNCIONAMIENTO HABITUAL
La puesta en funcionamiento habitual de la máquina se lleva a cabo situando el
conmutadorgeneral(9)enlaposición1/ON.Seencenderánlospilotosazul(7)yrojo(8),y
elaguaenelinteriordelacalderacomenzaráacalentarsedurante unos minutos hasta
llegaralapresióndetrabajo,1Kg/cm²aproximadamente.

La Rocca Exprés, S.A. Modelo JAVA Pro – Manual del Usuario
Lamáquinapodrácomenzaraservircafé,aguacalienteyvaporencuantoelpiloto
rojoseapagueporprimeravez.
PROGRAMACIÓN DE LA DOSIS:
Para conseguir dosificar de acuerdo con sus necesidades la cantidaddecaféa
obtener,deberáseguirlospasosdetalladosacontinuación:
1. Colocarunvasootazadebajodelgrupoaprogramar,procurandoquela
totalidaddelaguacaigaendichorecipiente.Serecomiendautilizarduranteelprocesoel
portafiltroadecuadoaladosiselegida.Utilíceloconcaféparaunadosificaciónmásexacta.
2. Pulsar el botón de programación (botón de la derecha de cada botonera) y
mantenerlopulsadodurante5segundos,hastaqueelledcorrespondiente pase a
intermitencia.
3.Apretarelbotóndeladosisaprogramarycomenzarálaerogacióndecafé.Una
vezalcanzadaladosisquesedesee,volverapulsarelbotón,cesarálasalidadecaféyse
apagaráelleddeladosis,indicandoquelaprogramaciónhasidocorrecta
4.Volverarealizarlospasos2‐3conlasotrasdosis.
5.Sisedesealamismaprogramaciónentodoslosgrupos,éstadeberáhacerseenel
grupodelaizquierda(13).
6.Paraobtenerunaprogramacióndistintaencadagrupo,habráque comenzarla
programaciónporelgrupodelaizquierda(13)yunavezterminada,continuarconeldela
derecha(11).
LIMPIEZA Y MANTENIMIENTO
La limpieza y cuidado de la máquina es un elemento decisivo en su duración y
rendimientofuturos.
La limpieza del grifo de vapor se deberá realizar después de cada utilización,
simplementepasandountrapohumedecidoporlapartedelgrifoquehayasidocubierta
porellíquidocalentado.
Lalimpiezadelosgrupossedeberárealizardiariamente,alfinalizarlajornadaoperativade
la cafetera. Para ello, colocar en un portafiltros el cacillo ciego que se entrega con la
máquinaycolocarloentodosycadaunodelosgrupos,haciendocircularelaguadentro
delgrupoduranteuntiempoaproximadode10segundos.Detenerlacirculacióndeagua
paraquelasuciedadquesehayaacumuladodescarguealabandejadesagüe.Repetirla
operación5vecesencadagrupo.
Por último, apagar el interruptor general, retirar los portafiltros de los grupos
erogadoresyefectuarunalimpiezadesalidasdevaporyagua,filtros,bandejadetrabajoy
partesexterioresdelamáquina.
Periódicamente deberá realizarse una revisión y mantenimiento del grupo,
motobomba, filtro y depuradores si los hubiera, así como de todos los elementos de
seguridadycontrol.
¡¡PRECAUCIÓN!!
Noretirelasbandejasdelamáquina,niefectúelimpiezaalgunaenelinteriordela
máquinasinasegurarsedequelamáquinaseencuentradesconectadadelaredeléctrica.
Asimismo,paraefectuarcualquierlimpieza,seránecesarioesperarhastaquelamáquina
seenfríecompletamente.
CARACTERÍSTICASTÉCNICAS
Modelo Grupos Capacidad
Caldera
(
l.
)
Peso
(
k
g)
Resistencia
(
W
)
Absorción
(
A
)
AI-Java
Pro
2 8 40 1800 8.2
AI-Java
Pro
1 4 40 1800 8.2
Todos los modelos: Voltaje: A.C. 230/380 V. 50/60 Hz
(240V/110V bajo demanda)

La Rocca Exprés, S.A. Modelo JAVA Pro – Manual del Usuario
MACHINE ELEMENTS .
Figure 1
1.- Hot water knob 8.- Heatin
g
element indicator
2.- Group 1 9.- Main switch
3.- Hot water outlet 10.- Steam knob
4.- Workin
g
tra
y
11.- Ke
y
board
g
roup 2
5.-
A
d
j
ustable feet 12.- Boiler pressure
g
au
g
e
6.- Steam outlet 13.- Ke
y
board
g
roup 1
7.- ON/OFF Indicator
UNPACKING THE MACHINE
When unpacking your machine, you will find the following accessories over
the working and cup-warmer trays:
-1 drain flex hose
-1 Stainless steel-flex hose
-1 Blind filter
-Installation card
-This instruction manual with the CE declaration of conformity, and so many
filterholders as the machine groups’.
Be sure that these accessories are included.
Remove carefully the plastic cover of the stainless steel parts, and check if
the machine has suffered damages during its carriage.
MACHINE PLACEMENT
The machine must be placed at the optimum position to be operated
without taking a forced posture.
When you have to decide the right place for the machine, you must keep in
mind the needing of electrical supply, a net intake and a drain outtake.
Leave a certain distance between the machine and the walls both sides
and the back of the machine for air circulation.
Do not install the machine:
In places exposed to the sun light, the rain or where it may be hitted.
Near objects that can result damaged because of the steam and heat
emitted by the machine.
PRELIMINARY INSTRUCTIONS
Before you start to install the machine, you must be sure of the efficiency of
the electrical and the water net (if needed).
Connection to the water net (for models without reservoir)
To connect the machine to the water net, you must use the included hose. The
water intake of the machine is visible when removed the working tray.
Once made the connection, you must open the main faucet. If loss of water is
observed, tighten again the nut of the hose.
The next connection to be done is the water-drainage, by means of the
flexible hosepipe, that will have to be inserted in the collector under the work tray,
making sure that the hose is anchored in the collector in order to avoid water
escapes.

La Rocca Exprés, S.A. Modelo JAVA Pro – Manual del Usuario
Once the pipe is connected you must verify that it does not have any fold or
strangling that impedes the free water exit.
Filling the reservoir (only models with reservoir)
To fill the reservoir with water, you must remove the upper tray, remove then the
silicon pipes inside the reservoir, and pull it up and fill under a faucet. You can also
fill it through the hole visible on the upper tray, by pouring water carefully.
The 5 l. reservoir is equipped with a security device that disconnects all the
functions when it has a low level, so it is not recommended to pour more than 4
litres any time the machine warns for low water level.
Connection to the Mains
Before connecting the espresso machine to the mains, it is necessary to
verify that tension and frequency of the mains are equal to the machine
specifications.
It will have to adjust obligatorily to the valid norm, as far as installation of
thermal and protection switches, the correct ground take, etc.
Before starting with the operation of the machine, verify that the general
switch is in 0 position and the group’s switches are deactivated.
Once all connections are concluded, fit the height of the machine foot to keep
it stable and levelled.
FIRST CONNECTION
All the JAVA Pro models are equipped with automatic water load into boiler,
independently about if the dose are programmable or not. The steps are the
following ones:
-Turn on the main switch (7) to “water load”. The blue pilot will light and some
seconds later water load will begin automatically. Make sure that the element
switch (6) is off.
When the load time is longer than two minutes (due to small pressure in the
water network or for any reservoir machine), then water load will stop and leds will
start blinking. Then take the main switch (8) to off for two seconds, and then turn on
again.
If the level reached during first stage of the water load were not sufficient, the
machine will continue loading water until the necessary level is reached.
You will notice that water load is finished when the pump stop charging water
into the boiler. Then you can turn on the element switch (6) to on.
The red led (5) will light indicating the resistance is beguinning to warm up
the water of the boiler.
In order to carry out this heating in less time, press the dose buttons of every
group about 10 seconds each to expel all the air from the hydraulic circuit, and so
that the faucets of steam and water are closed.
Once reached the 1 bar pressure, extract hot water and steam by both
faucets.
At this moment, the coffee making can already be initiated, as well as the
services of water and steam.
DAILY OPERATION
The daily operation of the machine is carried out by taking to on the main
switch(9). The pilots will light blue and red, and the water inside the boiler will begin
to warm up itself during minutes until arriving at the work pressure, 1 bar approx.
The machine will be able to serve coffee, hot water and steam as soon as the
red pilot turns off for the first time.
If your machine is equipped with reservoir, when the water level into the
reservoir is low, all the functions will be disconnected and the red led on the
element switch (6) will light. Fill the reservoir with a maximum of 3 litres.
DOSE PROGRAMMING
In order to be able to dose according to your necessities the amount of coffee
obtained follow the next steps:
1. Place a glass or cup underneath the group to be programmed,
trying that the totality of the water falls in this container. It is recommended to use
the filterholder adapted to the chosen dose. Use it with coffee for an exact
metering.
2. Press the programming button and keep it pressed during 5
seconds, until the corresponding LED starts to blink.
3. Push the button of the dose to be programmed and the coffee
pouring will start. Once reached the desired dose, press the button again, the
pouring will stop and the LED of the dose will turn off. Wait for 10 seconds so the
microprocessor memorize the dose.
4. Repeat steps 2 - 3 with the remaining button.
5. If the same programming is desired for all the groups, this will have
to be done in the left group, having to wait after the programming 10 seconds and
the memory keeps the change done to the other group.
6. To have a different programming in each group, it will be necessary
to begin the programming cycle by the left group and once finished, continue with
the other group.
CLEANING AND MAINTENANCE
Care and cleaning of the machine is a decisive element in its future duration
and reliability.
The cleaning of the steamer must be done after each use, simply passing a
rag dampened by the steamer outlet covered by the warmed up liquid.
The cleaning of the groups also must be done daily, when the working day of
the machine is finished. To do it, place the blind small filter that is provided with the
machine into the filterholder, and place it in all and each one of the groups, making

La Rocca Exprés, S.A. Modelo JAVA Pro – Manual del Usuario
circulate the water within the group during an approximated time of 10 seconds.
Stop the water circulation to allow the accumulated dirt unloading to the drain tray.
Repeat the operation 5 times in each group.
Finally, close the main power switch, remove the filterholders from the groups
and carry out a cleaning of steam and water outlets, filters, working tray and outer
parts of the machine.
Periodically a revision and maintenance of the group and pump it must be
done. And also to the filter and water softeners, as well as all the security and
control elements.
CAUTION!!
Do not remove the machine trays and do not make any cleaning at the inside
of the machine without being sure that it is disconnected from the mains.
To make any cleaning of the machine, you will have to wait until the machine
cools off completely.
TECHNICAL SPECIFICATIONS
Model Groups Boiler
volume
(
l.
)
Weight
(
k
g)
Power (W) Amperes
AI-Java
Pro
2 8 40 1800 8.2
AI-Java
Pro
1 4 40 1800 8.2
All models: A.C. 230/380 V. 50/60 Hz (240V/110V under request)
© La Rocca Exprés, S.A. 2012
Table of contents
Languages:
Other La Rocca Expres Coffee Maker manuals