LACOSTE 3-HAND Series Manual

LACOSTE WATCHES
OPERATING INSTRUCTIONS, CARE & MAINTENANCE,
AND WARRANTY & SERVICE INFORMATION

2
LACOSTE WATCHES
Lacoste has a unique heritage in the sports fashion market. Developed with the meticulous attention to function and
detail, the water-resistant Lacoste watch collection offers easy, elegant designs that reflect Lacoste’s style codes and
trademark crocodile logo – one of the most recognized brand symbols in the world.
Congratulations on your purchase.
CONTENTS
OPERATING INSTRUCTIONS
(1) 2- AND 3-HAND MODELS
(2) DATE/DAY – DATE MODELS
(3) DUAL TIME MODELS – With GMT 24-hour and minute hand
(4) MULTI-EYE MODELS TYPE A – With day/date with or without 24-hour hand without pushers
(5) MULTI-EYE MODELS TYPE B – With day/date with or without 24-hour hand with pushers
(6) ANALOG CHRONOGRAPHS TYPE A – Analog chronograph minutes/seconds counters/24-hour hand/date
(7) ANALOG CHRONOGRAPHS TYPE B – Analog Chronograph 1/10 Second
(8) ANALOG CHRONOGRAPHS TYPE C – Analog chronograph with 30-minute counter and date
(9) SPECIAL FEATURES
- Screw Down Crown
- Mesh Bracelet Sliding Clasp
CARE AND MAINTENANCE
WARRANTY
OBTAINING SERVICE
2

3
(1) 2- AND 3-HAND MODELS
Crown Positions:
Position 1 - Normal position. Crown pushed into case.
Position 2 - To set TIME: Rotate crown in either direction.
NOTE: When setting the minute hand, advance it 4 to 5
minutes ahead of the desired time and then turn it back to the
exact time.
Power depletion warning function: When the battery nears its
end, the second hand moves at two-second intervals instead of
the normal one-second intervals. In that case, have the battery
replaced with a new one as soon as possible. The watch remains
accurate while the second hand is moving at two-second inter-
vals.
Figure A
1 – 2
Figure B
1 – 2
M
H
M
H
S
Legend
1, 2 – Crown positions
H – Hour hand
M – Minute hand
S – Second hand

4
(2) DATE/DAY-DATE MODELS
Legend
1, 2, 3 – Crown positions
H – Hour hand
M – Minute hand
S – Second hand
K – Date window
E – Day window
Crown Positions:
Position 1 - Normal position. Crown pushed into case.
Position 2 - To set DATE: Rotate crown clockwise.
NOTE: For models with DAY/DATE display(s):
Rotate crown clockwise to set DATE,
and counterclockwise to set DAY.
Position 3 - To set TIME: Rotate crown in either direction.
CAUTION: Never set the date when the hands are between 9:00
PM and 3:00 AM. Doing so could damage the calendar mecha-
nism.
NOTE: The functioning of the watch is not affected during
date setting. When the watch is running, the date will change
gradually during the period from 9:00 PM to 3:00 AM.
Power depletion warning function: When the battery nears its
end, the second hand moves at two-second intervals instead of
the normal one-second intervals. In that case, have the battery
replaced with a new one as soon as possible. The watch remains
accurate while the second hand is moving at two-second inter-
vals.
1 – 2 – 3
H
Figure A
K
Figure B
H
S
S
M
1 – 2 – 3
M
1 – 2 – 3
M
K
E

5
(3) DUAL-TIME MODELS
With GMT 24-hour and minute hand
Legend
1, 2 – Crown positions
A– Push button to set dual time hour
B – Push button to set dual time minute
H – Hour hand
M – Minute hand
S– Second hand
F– Dual time hour hand (24 hrs)
L– Dual time minute hand
Crown Positions:
Position 1 – Normal running position; crown pushed into case.
Position 2 – To set TIME: Time setting and rapid correction of
dual time.
Local time is indicated by the hour H, minute M and second S
hands, while center-mounted Dual time hands indicate dual
time hours and minutes.
After changing the battery, before setting the time, check if the
dual time hour hand and dual time minute hand are at «0» (12
o’clock position). If either the dual time hour hand or the dual
time minute hand is not in the «0» position, reset it/them fol-
lowing the
following procedure:
1. Pull crown out to position 2.
2. Keep the buttons A& Bpressed at the same time for more
than 2 seconds, then release the buttons (dual time hands
move and return to where they were).
3. Press button Aor Bto reset the dual time hands to
«0» position.
Button A: dual time hour hand move clockwise.
Button B: dual time minute hand move clockwise.
The dual time hands move quickly if the respective buttons
are kept pressed.
4. Push crown back in to position 1.
To set local time:
1. Pull crown out to position 2, watch stops.
2. Rotate crown in either direction to move hands to
desired time.
3. Push crown back in to position 1; watch restarts, now set to
correct time.
To set dual time:
1. Crown should be in position 1.
2. Adjust the Dual time hour hand Fby pushing button Ato
go back 1 hour per push or by pushing button Bto advance
1 hour per push.
3. Pull crown out to position 2 when second hand Sis at
12 o’clock position.
4. Adjust the Dual time minute hand Lby pushing button Ato
go back 1 minute per push or by pushing button Bto
advance 1 minute per push.
5. Push crown back into position 1; watch restarts, now set to
correct time.
1 – 2
A
Figure A
H
F
S
M
L
B
1 – 2
M

6
(4) MULTI-EYE MODELS – TYPE A
With day/date with or without 24-hour hand without pushers
Legend
1, 2, 3 – Crown positions
H – Hour hand
M – Minute hand
S – Seconds hand
J – 24 Hour hand
T – Date hand
D – Day hand
Crown positions:
Position 1 – Normal running position; crown pushed into case.
Position 2 – To set DATE: Rotate crown clockwise.
Position 3 – To set TIME: Rotate crown in either direction.
To set the time:
1. Pull crown out to position 3 when the second hand is at the
12 o’clock position, watch stops.
2. Turn crown clockwise to advance the hour and minute hands
until the day hand is set to the desired day of the week, if
applicable for your model. The day hand will not move back
by turning the crown counterclockwise.
3. Turn crown in either direction to move hands to desired
time. The 24 hour hand Jis moving correspondingly with the
hour hand. When setting the minute hand, advance it 4 to 5
minutes ahead of the desired time and then turn it back to
the exact time.
4. Push crown back in to position 1; watch restarts, now set to
correct time.
To set the date:
1. Pull crown out to position 2.
2. Turn the crown counterclockwise to set the date hand.
Do not set the date hand between 9.00pm and 2.00am.
The date hand will not move back by turning the crown
clockwise.
3. Push crown back in to position 1; watch restarts, now set to
correct date.
H
T
M
S
Figure A
D
1 – 2 – 3
H
S
M
Figure B
T
D
1 – 2 – 3
J

7
(5) MULTI-EYE MODELS – TYPE B
With day/date with or without 24-hours hand with pushers
Legend
1, 2 – Crown positions
A – Push button to set the day
B– Push button to set the date
H– Hour hand
M– Minute hand
S– Second hand
T– Date hand
J– 24-hour hand
D– Day hand
Crown Positions:
Position 1 - Normal position. Crown pushed into case.
Position 2 - To set TIME: Rotate crown in either direction.
To set the time:
1. As soon as the second hand reaches 12 o’clock,
pull the crown out to position 2; watch will stop.
2. Turn crown in either direction to move hands to correct time,
taking AM/PM into consideration.
3. Push crown back into position 1.
To set the day and the date:
1. Press pushbutton Ato set the day. Each press and release
will advance the Day hand by one day.
2. Press pushbutton Bto set the date. Each press and release
will advance Date hand by one number.
IMPORTANT: Never correct the Date when the time is between
9pm and 4am when automatic calendar changes are in progress;
doing so could damage the mechanism.
3. Following a month with fewer than 31 days, you will need to
adjust the Date.
Figure A
A
J
T
B
D
S
Figure B
1 – 2
2 – 1
A
B
T
H
D
S
HM
M

8
(6) ANALOG CHRONOGRAPHS – TYPE A
With day/date/24-hour hand
Legend
1, 2, 3 – Crown positions
Button A– Start/Stop
Button B– Reset
H – Hour hand
M– Minute hand
S – Second hand
P – Chronograph Minutes Counter
Q – Chronograph Seconds Counter
F– 24-Hour hand
Crown position 3 is only applicable with date function.
Crown Positions:
Position 1 - Normal running position; crown pushed into case.
Position 2 - To set TIME: if no date function.
To set DATE: applicable with date function.
Position 3 - To set TIME: applicable with date function.
The time measured indicated by the stopwatch hands is inde-
pendent from the center hands.
The stopwatch can measure up to 60 minutes.
To set the time:
1. Pull crown out to position 2 when the second hand is at the
12 o’clock position, watch stops.
2. Turn crown in either direction to move hands to desired time.
*If applicable for your model, make sure to respect AM/PM
*Do not press any button, otherwise the chronograph hands will
move.
3. Push crown back in to position 1; watch restarts, now set to
correct time.
To set the date (if applicable):
If your watch has a date window, your crown will have 3 posi-
tions.
Position 2 is used to set the date:
1. Pull crown out to position 2.
2. Turn crown clockwise until the correct date appears.
Crown Position 3 is used to set the time as per above
explanation.
Simple Chronograph Functions:
To measure the duration of a single, non-stop event (up to 60
minutes):
1. Press pushbutton Ato start chronograph.
2. Press pushbutton Aa second time to stop chronograph.
3. Press pushbutton Bto reset chronograph hands to zero.
Measuring Cumulative Times:
1. Press pushbutton Ato start chronograph.
2. Press pushbutton Ato stop chronograph timing.
3. Press pushbutton Ato restart.
4. Repeat steps 2 and 3 as many times as desired.
5. When through timing, press button Bto reset chronograph
hands to zero.
Measuring Split Times:
1. Press pushbutton Ato start chronograph.
2. Press pushbutton Bto momentarily stop chronograph and
read an intermediate or split time.
3. Press pushbutton Bto restart; chronograph hands will
advance rapidly to catch up with ongoing event.
4. Repeat steps 2 and 3 to take as many intermediate or split
times as desired.
5. Press pushbutton Ato stop chronograph timing.
6. Press pushbutton Bto reset chronograph hands to zero.
Figure A
Q
P
1 – 2 – 3
S
HM
A
B
F

9
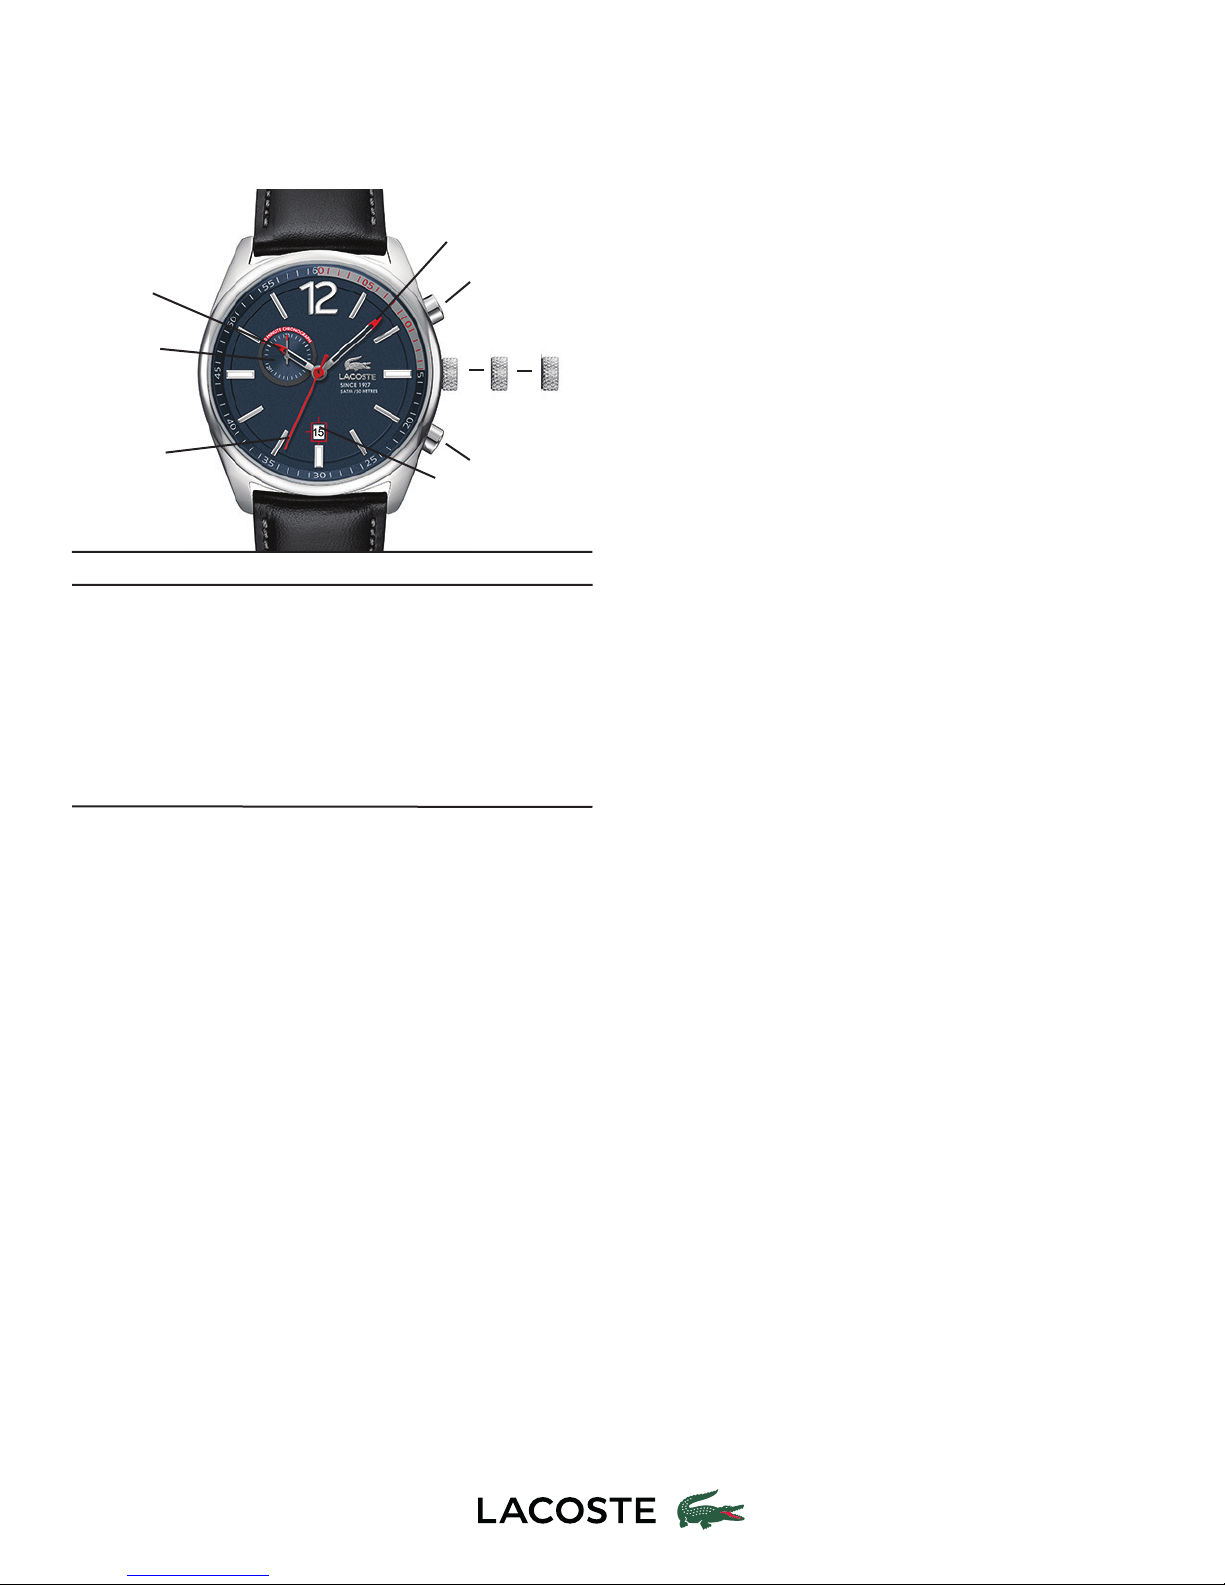
(7) ANALOG CHRONOGRAPHS– TYPE B
Chronographs 1/10 Second
Legend
1, 2, 3 – Crown positions
Button A– Start/Stop
Button B– Reset
H – Hour hand
M– Minute hand
S – Second hand
P – Chronograph Minutes hand
Q – Chronograph Seconds hand
X– Chronograph 1/10-of-a-seconds Chronograph hand
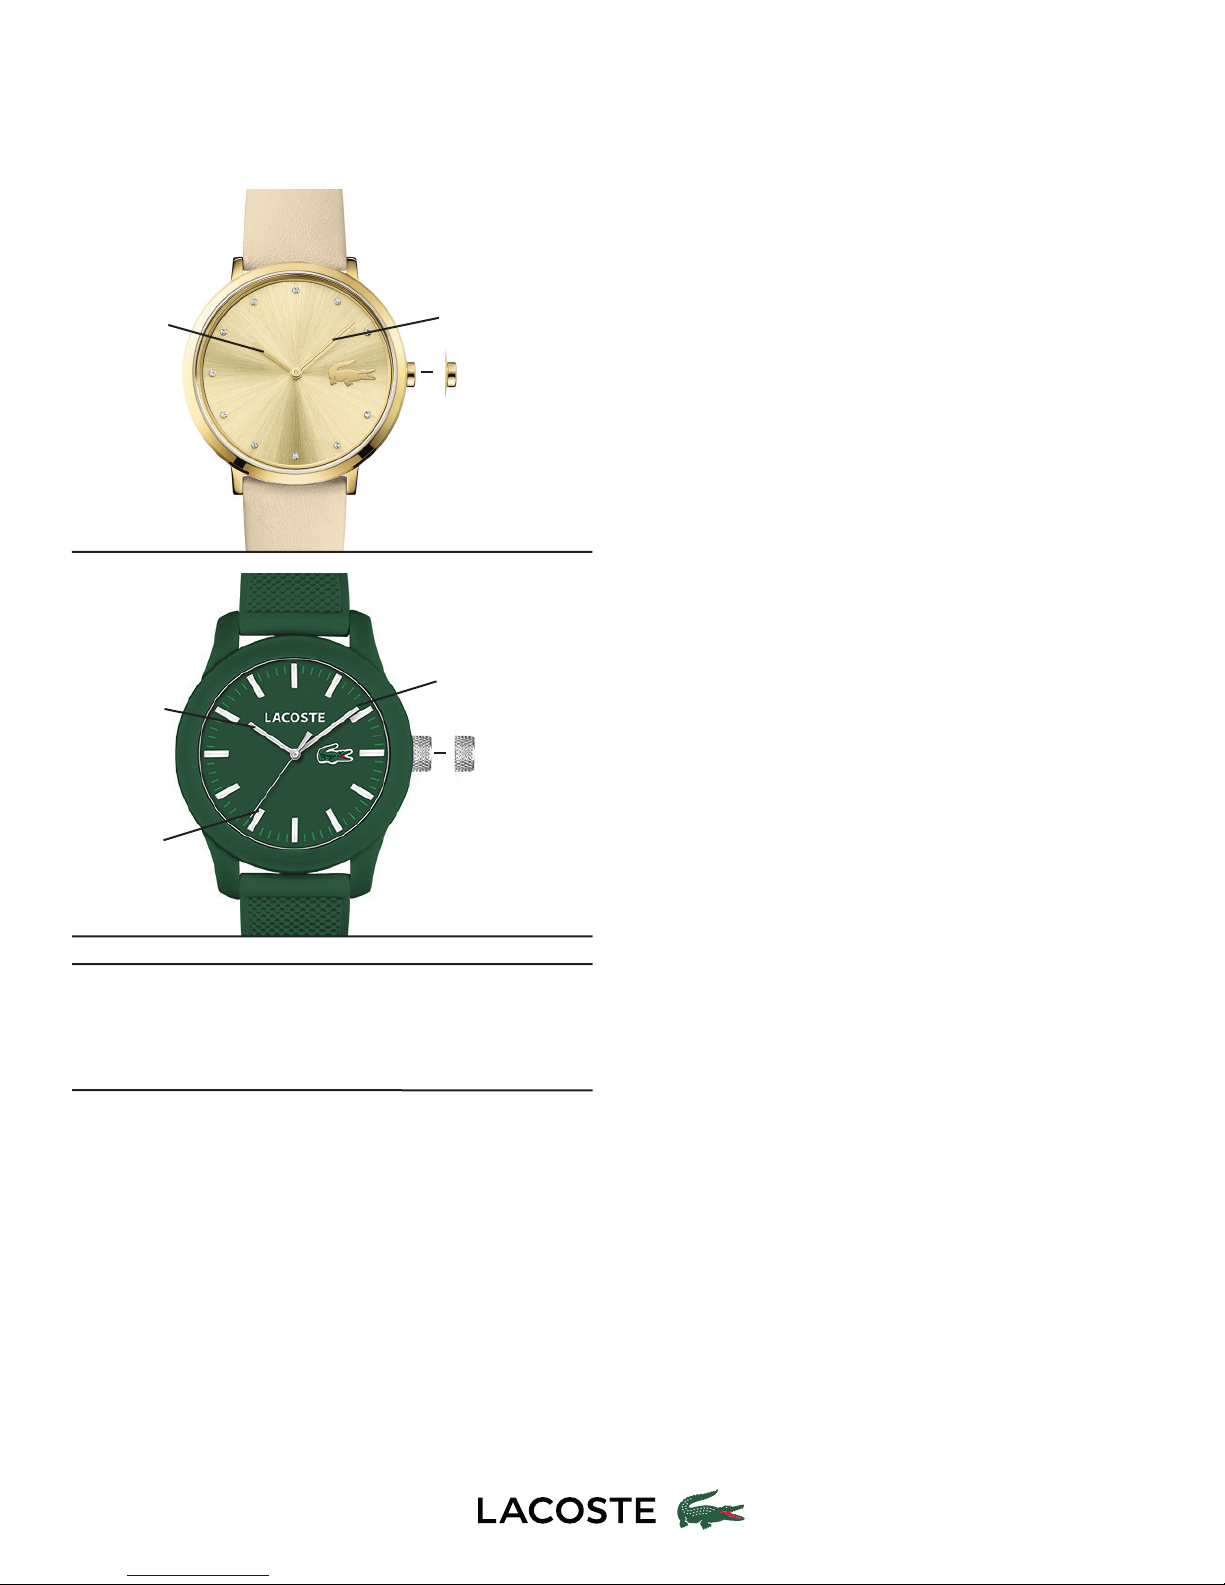
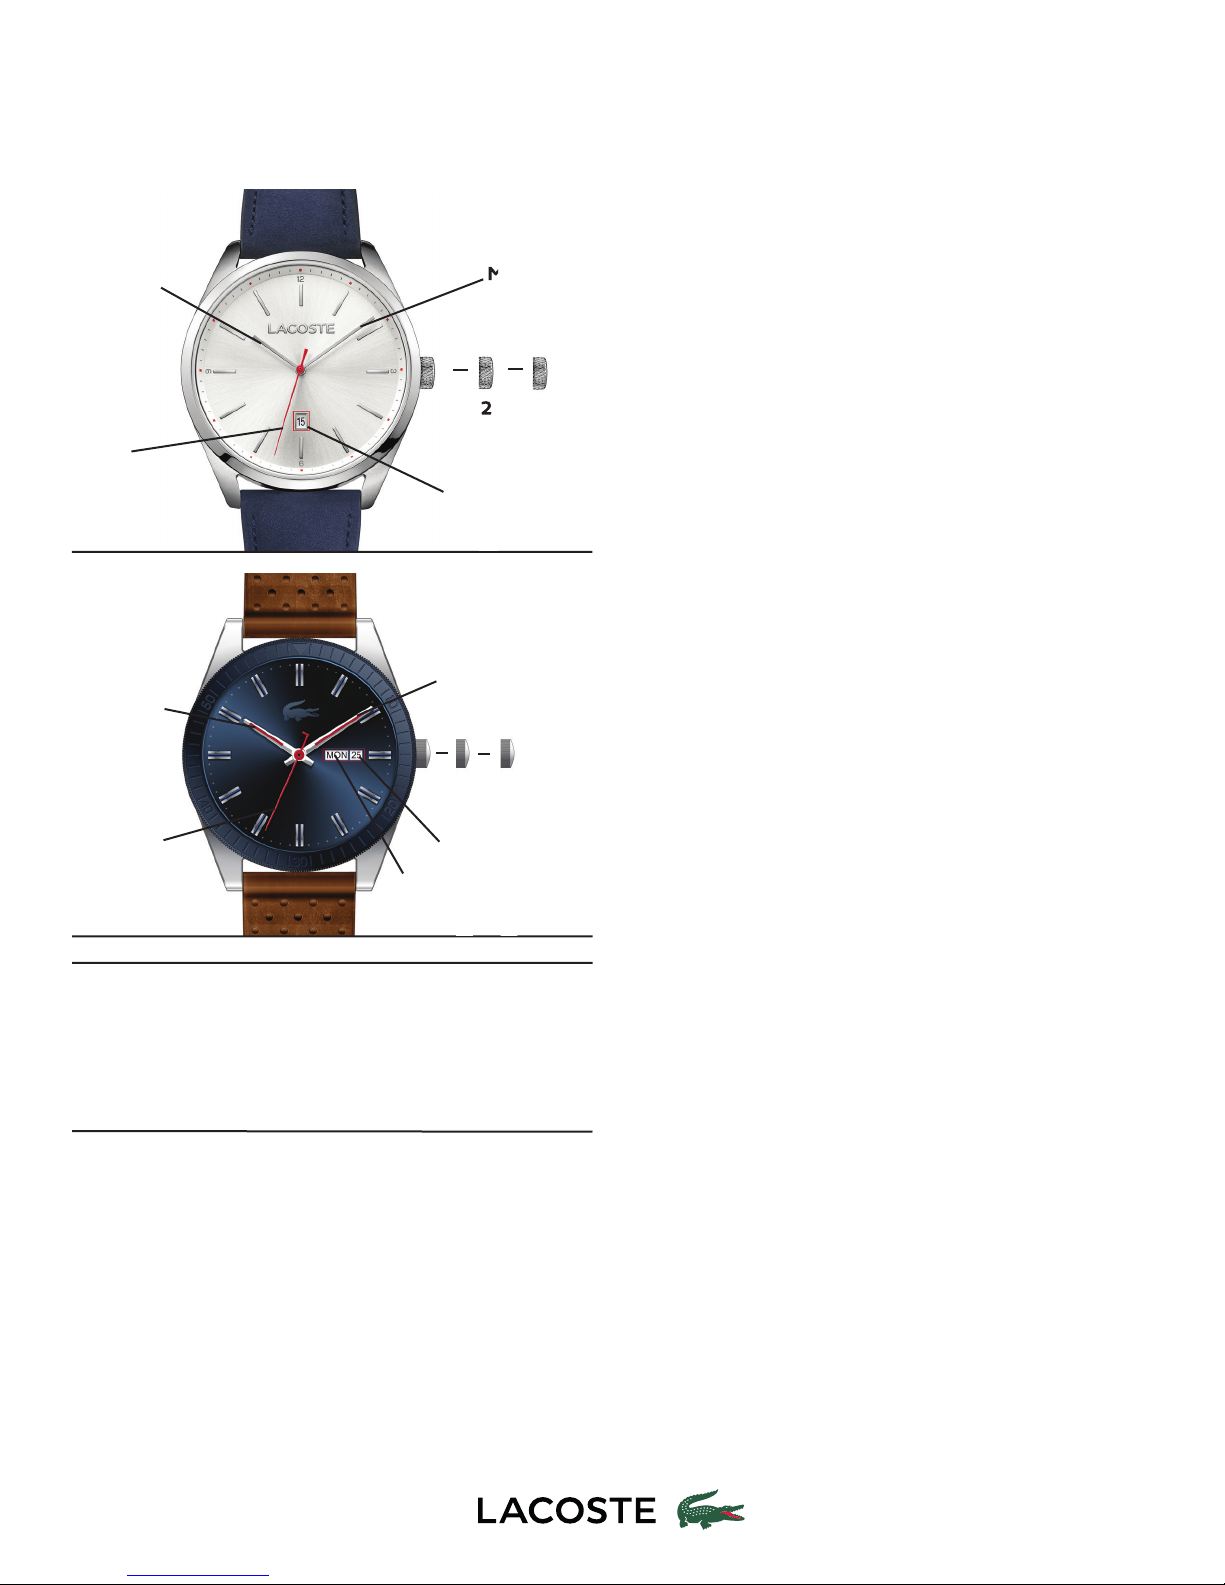
Crown Positions:
Position 1 - Normal running position; crown pushed into case.
Position 2 - To set TIME: if no date function.
To set DATE: applicable with date function.
Position 3 - To set TIME: applicable with date function.
The time measured indicated by the stopwatch hands is inde-
pendent from the center hands.
The stopwatch can measure up to 60 minutes.
The stopwatch measures in 1/10 second increments.
To set the time:
1. Pull crown out to position 2 when the second hand is at the
12 o’clock position, watch stops.
2. Turn crown in either direction to move hands to desired time.
If applicable for your model, make sure to respect AM/PM
Do not press any button, otherwise the chronograph hands
will move.
3. Push crown back in to position 1; watch restarts, now set to
correct time.
To set the date (if applicable):
If your watch has a date window, your crown will have
3 positions. Position 2 is used to set the date:
1. Pull crown out to position 2.
2. Turn crown clockwise until the correct date appears.
Crown Position 3 is used to set the time as per above explana-
tion.
Simple Chronograph Functions:
To measure the duration of a single, non-stop event (up to 60
minutes):
1. Press pushbutton Ato start chronograph.
2. Press pushbutton Aa second time to stop chronograph.
3. Press pushbutton Bto reset chronograph hands to zero.
Measuring Cumulative Times:
1. Press pushbutton Ato start chronograph.
2. Press pushbutton Ato stop chronograph timing.
3. Press pushbutton Ato restart.
4. Repeat steps 2 and 3 as many times as desired.
5. When through timing, press button Bto reset chronograph
hands to zero.
Measuring Split Times:
1. Press pushbutton Ato start chronograph.
2. Press pushbutton Bto momentarily stop chronograph and
read an intermediate or split time.
3. Press pushbutton Bto restart; chronograph hands will
advance rapidly to catch up with ongoing event.
4. Repeat steps 2 and 3 to take as many intermediate or split
times as desired.
5. Press pushbutton Ato stop chronograph timing.
6. Press pushbutton Bto reset chronograph hands to zero.
1 – 2 – 3
H
Figure A
Q
1 – 2 – 3
Figure B
M
H
S
S
M
X
A
B
T
P
Q
A
B
1 – 2 – 3
1 – 2 – 3
X
P

10
(8) ANALOG CHRONOGRAPHS – TYPE C
Chronograph with 30-minute counter and date
Legend
1, 2, 3 – Crown positions
Button A– Start/Stop
Button B– Reset
H – Hour hand
M– Minute hand
S – Second hand
P – Chronograph Minutes hand
K– Date Window
Crown positions:
Position 1 - Normal running position; crown pushed into case.
Position 2 - To set DATE: Rotate crown clockwise.
Position 3 - To set TIME: Rotate crown in either direction.
Setting the time:
1. Pull crown out to position 3. Watch will stop.
2. Turn crown in either direction to move hands to correct time.
3. Push crown back into position 1.
Setting the date:
1. Pull crown out to position 2.
2. Turn crown clockwise until the correct date.
IMPORTANT: Never correct date between 9pm and 3am when
automatic calendar changes are in progress; doing so could
damage the mechanism.
3. Push crown back into position 1.
Chronograph Functions:
NOTE: After 2 hours of continuous running, the chronograph
stops and resets automatically to save battery.
Measuring Cumulative Times:
To measure the combined time of a series of shorter events:
1. Press pushbutton Ato start chronograph.
2. Press pushbutton Ato stop chronograph and read
elapsed time.
3. Press pushbutton Ato resume measurement.
4. Repeat steps 2 and 3 to add each interval of time.
NOTE: Each time you stop chronograph, chronograph hands will
indicate total accumulated time.
5. After final reading, push button Bto reset chronograph
hands.
Measuring Split Times:
To take intermediate time readings as an event progresses:
1. Push button Ato start timing.
2. Push button Bto stop chronograph and read split time.
NOTE: Chronograph continues to run in background.
3. Push button Bto restart; chronograph hands to catch up with
ongoing event.
4. Repeat steps 2 and 3 to take any additional split times.
5. Push button Ato stop chronograph.
6. Push button Bto reset chronograph hands.
1 – 2 – 3
H
Figure A
B
S
M
P
K
A

11
(9) SPECIAL FEATURES
SCREW DOWN CROWN
Some models are equipped with a special screw-down crown
that helps seal the case against water and moisture. Before
attempting to set the time or date, you must first unlock the
screw-down crown by turning it counterclockwise until it
loosens (approximately six rotations).
Unlocking is not required with standard crowns.
A. To unlock the crown:
Rotate the crown counterclockwise (left) until it releases
from the case.
B. To re-lock the crown after time/date setting:
Rotate the crown clockwise (right) while pushing it in, and
tighten firmly.
A B

12
(9) SPECIAL FEATURES
MESH BRACELET SLIDING CLASP
The mesh bracelets found on select models feature a hooking
jewelry clasp that allows you to size the bracelet by sliding
the pin-bar half of the clasp along the bracelet to achieve a
customized fit.
Above: Open mesh bracelet side with pin-bar half of sliding
clasp locked in position.
To size the bracelet:
1. Use tool such as a small flat-head screwdriver to pop open
metal plate on pin-bar half of clasp, releasing the clasp position
locking mechanism.
2. Slide pin-bar half of clasp along the mesh bracelet in either
direction to desired position.
3. Close metal plate, locking the pin-bar half of the clasp in new
position on the bracelet.
1. Normal Position
Slide Buckle Adjustments
2. Pull the metal plate with tools
3. Move the slide buckle to the correct position
4. Close the metal plate
1. Normal Position
Slide Buckle Adjustments
2. Pull the metal plate with tools
3. Move the slide buckle to the correct position
4. Close the metal plate
1. Normal Position
Slide Buckle Adjustments
2. Pull the metal plate with tools
3. Move the slide buckle to the correct position
4. Close the metal plate
1. Normal Position
Slide Buckle Adjustments
2. Pull the metal plate with tools
3. Move the slide buckle to the correct position
4. Close the metal plate

13
CARE AND MAINTENANCE
Your LACOSTE WATCH has been developed with meticulous attention to quality, function and detail. Please read the
following information and instructions carefully to learn about the features, proper care and operation of your new time-
piece. For additional information on service and repairs, please see the Service and Warranty section.
Never open the watch yourself. If your watch needs repair or adjustment, take or mail it directly to an authorized Service
Center. For a complete worldwide listing, visit us online at www.mgiservice.com
SHOCK
All of our watches have shock-resistant movements and are tested to meet international standards for shock resistance.
MAGNETISM
The exposure of a timepiece to a strong magnetic field will affect its time-keeping, and may cause it to stop. A quartz watch
should resume working with its original accuracy when removed from the magnetic field; an automatic or hand-wound
mechanical timepiece, however, may require demagnetization before it will operate again.
WATER RESISTANCE
All our watches meet international standards for water resistance to at least 3ATM / 30M/ 99 feet, so faucet spray or rain
won’t hurt them as long as the case, crown and crystal remain intact. Timepieces marked water resistant to 50M / 5ATM/
165 feet may be worn while showering or swimming, but not scuba diving.
CAUTION: Do not operate your watch crown or the push-buttons on a chronograph or multi-function model when the
watch is under water, or it will not remain water resistant.
Water resistance applies only to the watch case; some watch straps should not be worn under water or subjected to wet
conditions. Please see STRAP CARE.
Avoid exposing your watch to sudden and excessive temperature variations.
Do not drop your watch or bang it against a hard surface. Water resistance must be rechecked after every violent shock.
Carefully wipe your watch using a soft cloth dampened with fresh water after exposure to chlorine or sea water.
OTHER PRECAUTIONS:
If your watch is equipped with a screw-down crown, be sure to screw it back down into the case after every operation.
STRAP CARE
While the life span of a watch strap depends on your care and wearing habits, as well as climate in which you live, proper
care will extend its life.
Leather strap should be kept dry. Exposure to water may cause a leather watch strap to become brittle and eventually
break. To preserve the finish of the leather, contact with perfumes should be avoided. Following exposure to chlorinated or
salt water, gently damp wipe your leather strap with fresh water, and air dry.
To help preserve the natural elasticity and quality of a silicone or rubber strap, rinse it using a soft cloth soaked in fresh
water following exposure to salt water, chemicals or abrasive substances.
Use warm water and a neutral pH soap applied to a soft cloth to gently clean a white silicone or rubber strap; then wipe
with a second clean cloth dipped in warm water, or rinse carefully under warm running water. Contact with acetone and
ethyl alcohol should be avoided.
NOTE: Watch straps are not covered by the watch warranty.
BATTERY INFORMATION
Your quartz analog watch or chronograph has a battery specially designed for watches. It will last approximately 18-36
months under normal use.

14
CARE AND MAINTENANCE
NOTE: Frequent use of special functions, like the stopwatch timer on chronograph models, may shorten battery life.
End-of-life feature: The second hand on many models will start to move haltingly in 2 or 4 second increments when the
battery is almost exhausted, signaling the need to have it replaced.
Battery replacement: Take or send your watch to an Authorized Service Center to have battery changed – your old battery
will be disposed of/recycled properly. Do not attempt to change the battery yourself.
Collection and treatment of end of life quartz watches*
This product should not be discarded with household waste. To protect the environment and human health, it must
be returned to a local authorized collection system for proper recycling.
*Valid in the EU member states and in any countries with corresponding legislation.

15
WARRANTY INFORMATION
Not only is each Lacoste watch beautiful in design, it is crafted with quality materials and components to offer precise, reli-
able performance. We proudly stand behind every Lacoste watch we sell.
Lacoste Watches Limited Warranty
Lacoste Watches warrants to the original consumer that, for a period of two (2) years from the date of purchase, his/her
watch will be free from defects in materials and workmanship that prevent the watch from functioning properly under
normal use.
Our responsibility for defects covered by this warranty is limited to repairing or (at the sole discretion of Lacoste Watches)
replacing the defective watch, free of charge.
This limited warranty does not cover batteries, straps, bracelets, crystals, gold- or ionic-plating or PVD finishing, cosmetic
issues such as scratches or normal wear and tear, or any damage arising from accidents or misuse, or from any alteration,
service or repair performed by any party other than an Lacoste Watches Authorized Service Center.
This warranty is void if the timepiece was not purchased from an Authorized Lacoste Watches Dealer, as evidenced by valid
proof of purchase – a dated sales or gift receipt showing the name of the retailer and an identifying style number for the
Lacoste watch.
Any other warranty provided by the retailer is entirely their responsibility. No person or company is authorized to change
the terms of this warranty. This warranty gives the consumer specific legal rights. He/she may also have other statutory
rights which may vary from state to state and country to country. However, to the extent not prohibited by law, this limited
warranty is exclusive and in lieu of all other warranties, oral, written, statutory, express or implied (including without limita-
tion the warranties of merchantability and fitness for a particular purpose), all of which are expressly disclaimed.

16
OBTAINING SERVICE
UNDER WARRANTY
Should warranty service be required, pack your watch properly (see below) and send it along with (1) the original sales
receipt and (2) a completed copy of the Lacoste Watches Service Request Form(s) to the nearest Lacoste Watches Service
Center. A list of authorized service centers can be found on this website – just return to the Lacoste Watches service
website home page and click on the Warranty and Service Information link.
OUT OF WARRANTY
The Lacoste Watches Service Center can also perform repairs not covered by the Lacoste Watches
warranty as well as service after the expiration of the warranty period. Should your watch require parts
or service not covered under the terms of your warranty, a written estimate will be sent for your approval
and payment before the work is undertaken. Please copy and use the form(s) from this file.
BATTERY REPLACEMENT
The Lacoste Watches Service Center can also change the battery on your Lacoste watch, for a fee.
PACKING YOUR WATCH
Pack your watch securely in padded wrapping materials for protection against shock. Be sure to include a completed copy
of the Lacoste Watches Service Request Form.
INSURING YOUR WATCH
We recommend that you use registered mail and insure your watch for its full replacement value.
ADDITIONAL INSTRUCTIONS
Charges will be made for all repairs unless the original dated purchase or gift receipt showing the name of the retailer
and an identifying watch style number is returned with the product, and repairs are covered under terms of warranty.
Authorized Service Center locations can accessed from the link on the www.mgiservice.com/lacoste homepage.

17
LACOSTE WATCHES SERVICE REQUEST FORM A
Name _________________________________________________
Address ________________________________________________
City__________________________________________________
State/Province ___________ Country ___________ ZIP/Postal Code ___________
E-mail _______________________ Phone (_____)_________________
Watch Model _____________________________________________
What needs service, replacement or repair: _______________________________
____________________________________________________
____________________________________________________
____________________________________________________
____________________________________________________
____________________________________________________
___________________________________________________
____________________________________________________
__________________________________________
---------------------------------------------------------------------------------------------------------------------------------------------------------
LACOSTE WATCHES US/CANADA SERVICE REQUEST FORM B
Include with all service requests sent to LACW Service Centers in the U.S. or Canada
ITEM PRICE TOTAL
Battery $35.00 USD/
$35.00 CAD $__________
Shipping $15.00 USD/ $15.00 USD or
& Handling $15.00 CAD $15.00 CAD
TOTAL: $_________
Payment method:
___ Check or Money Order
___ MasterCard
___ Visa
Account number: ________________________________
Expiration date:_________________________________
Signature:_____________________________________
(Required for credit card purchases)
OBTAINING SERVICE
This manual suits for next models
8
Table of contents
Other LACOSTE Watch manuals