Lad Weather Sensor Master V User manual

Instruction Manual
Sensor Master V
Multi Sensor with Pedometer and Optical Heart Rate Watch

1.0 Introduction
2.0 Button Layout
3.0 Major Function Mode - Timekeeping and Sensor Mode
4.0 Current Time Mode - Function Display
[S]
[EL]
[M] [L/R]
[S/S]
[S]
[M]
[M]
[M]
[M]
[S] [S]
[S]
Hold
[S]
Thank you for purchasing of this Watch.Your
Watch features electronic sensors which
measures and shows the outdoor conditions:
weather forecast, temperature, air pressure,
altitude and compass directions.
Your Watch also provides the essential
information about your body during exercise,
like current heart rate, walking steps,
traveling speed, distance, etc.
Your Watch also includes current time, daily
alarm, chronograph, timer and world time
function.
Mode Button [M]
- To select among Current Time, Daily Alarm,
Chronograph, Timer and World Time Mode.
- To select among the setting items under setting display.
Sensor button [S]
- To select between timekeeping and sensor menu.
- To select between Trip, Barometer and Compass mode
in sensor menu.
Start/Stop Button [S/S]
- To activate the ’Start’ or ’Stop’ function under
Chronograph, Timer and Trip Mode.
- To select the current city time.
- To increase the setting value under setting display.
Lap/Reset Button [L/R]
- To activate the ’Reset’ function under Chronograph,
Timer and Trip Mode (stop counting).
- To enter Battery Status View.
- To decrease the setting value under setting display.
Back light Button [EL]
- To turn on the EL back light for about 3 seconds.
To get the most of your purchase, it is
advisable to use this Watch in conformity with
the below notes:
- Be sure to carefully read this manual and
keep it on hand for later reference when
necessary.
- Avoid exposing your Watch to extreme
conditions for an unreasonable time.
- Avoid rough usages or severe impacts to
your Watch.
- Do not open the Watch’s case unless a
certified service agency because your
Watch contains precise electronic sensors
and components.
- Clean your Watch with a soft cloth occasion-
ally that working for a longer use life of your
watch.
- Keep your Watch away from magnets or the
appliances which contains magnetic
objects such as mobile phones, speakers
and motors.
- Store your Watch in a dry place when it is
not in use.
Functional Display
- The Current Mode includes 4 kinds of
functional display:
- Day of Week Display
- Temperature Display
- Altitude Tendency Display and
- Sea Level Pressure Tendency Display
- To select among different functional
display, press the [S/S] button following the
adjacent diagram.
Trip Mode
Day of Week
Display
day of week weather
forecast
Current
time
Date
Temperature
Display
Altitude Tendency
Display
Sea Level Pressure
Tendency Display
Current Time
Mode
Chronograph
Mode
Timer Mode
World Time
Mode
Compass
Mode
Barometer
Mode
Sensor Mode Timekeeping Mode
Current Time Mode
[S/S]
[S/S] [S/S]
[S/S]
WARNING !
DO NOT use this Watch for commercial or
professional purposes.
This Watch is a supplementary device for
measuring heart rate; it is NOT a substitute
for medical devices. You should periodically
compare the heart rate readings acquired by
this watch with the readings from a doctor.
Consult a doctor or trainer before setting
your Upper and Lower heart rate limits.
Alarm Mode
[M]

Weather Forecast Symbols
4.1 Current Time Mode - Weather Forecast Feature
4.2 Current Time Mode - Setting the Current Time
Weather Forecast Feature
A special feature of the Watch is the
coming weather predicting function. It works by
analyzing the changes of the past air pressure.
How to Indicate the Coming Weather
The Watch provides 5 different symbols to
indicate the forecast weather, which includes:
- Sunny
- Cloudy with Sun
- Cloudy
- Raining
- Storm
The symbols will be shown only in Current Time
Mode and World Time Mode.
IMPORTANT: Since the Watch predicts the
coming weather by using the data of the changes
in the air pressure, it is highly recommended to
stay at the same altitude for at least 24 hours for
a higher accuracy predication.
IMPORTANT: The Watch predicts the weather
by adopting general weather prediction principles,
it is NOT capable to reflect the dramatic changing
of weather within a very short period of time.
Note: To allow storm prediction, see 7.1 to set
storm alert On/Off.
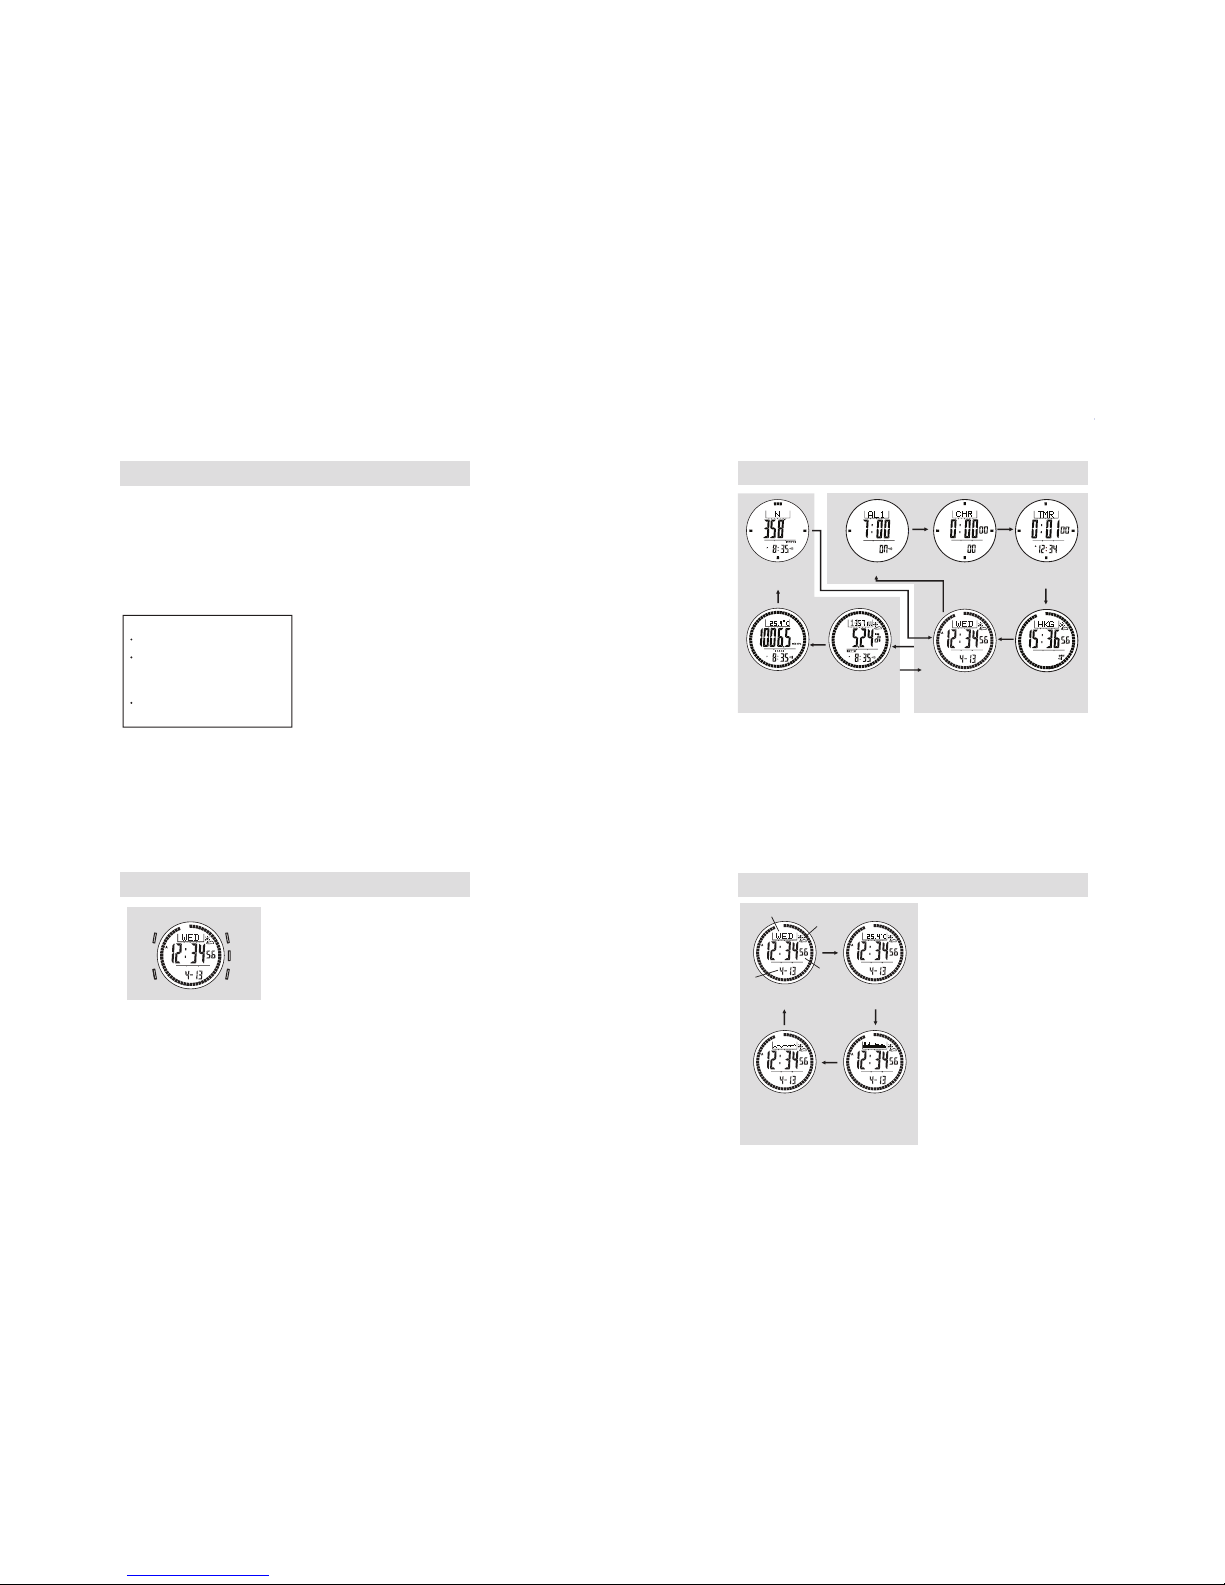
How to Set Current Time
- To select the setting display, press and hold
the[M] button for about 2 seconds in Current
Time Mode. In setting display, the flashing
"SET" icon will appear.
- In setting display, press the [M] button to
change the selection following the adjacent
Current Time Setting Sequence.
- When the digits are flashing (selected), press
the [S/S] or [L/R] button to increase /
decrease the number. (Hold down the button
change the number at a higher speed).
- When the setting is completed, press and hold
the [M] button to exit the setting display.
Sunny
Cloudy
with Sun Cloudy Raining Storm
Current
Time Mode
Hold [M]
[S/S] / [L/R]
Hold [M]
Time Zone
Second
Minute
Increase/Decrease
the number
Increase/Decrease the
number at a higher speed
Hour Year
Month
Date
Date
Format
Hour
Format
DST
On/Off
key Tone
On/Off
LCD
Contrast
[M]
[M]
Hold [S/S] / [L/R]
[M]
[M]
[M]
[M]
[M]
[M]
[M]
[M]
[M]
[M]
Current Time Setting Sequence
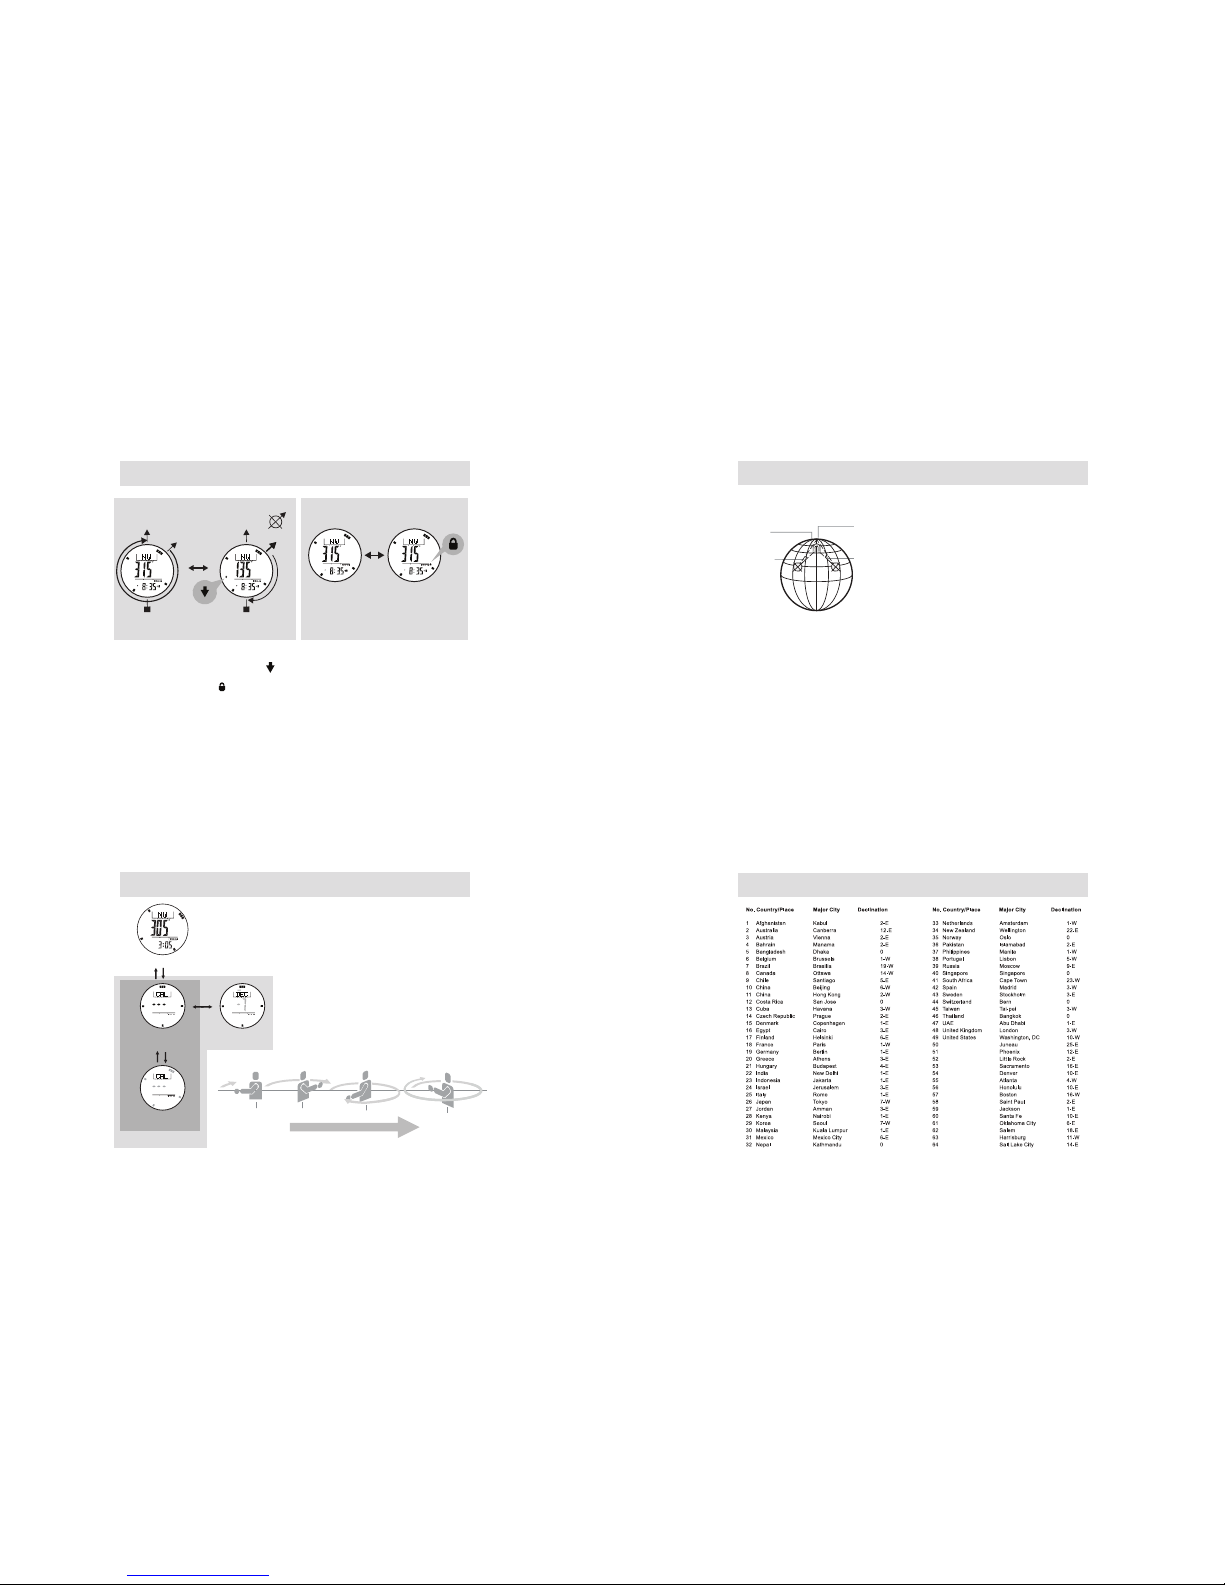
5.1 Trip Mode - Using the Trip function
How to Start/Stop Trip Mode
- The watch has a built-in 3-axis accelerometer sensor which
monitors and records your physical activity. One of the 3
types (Steps, Distance and Calories) can be selected as
the trip goal and display on the watch.
- In Trip Mode, press [S/S] to start. Press [S/S] once again to
stop.
- When Trip Mode start “ ” will appear and “ ”
icon will start flashing.
- During the Trip, Highest Peak point will save to peak record
automatically when Trip mode is activated.
How to Reset Trip Mode
- When Trip Mode is stopped, press and hold [L/R] to reset.
- All the previous Trip record data will be erased.
How to Record Trip Point Data
- When Trip Mode is started, press and hold [L/R] to save
your trip point record, “ ” will appear.
- Max 30 Trip point data can be saved and recall.
- If smart lap by distance is On, the watch will save your Trip
point record at preset distance interval.
- See Trip record recall to check the Trip Point Data.
Note: Personal data such as Birthday, Gender, Height and Weight have to be input to get more accurate
estimation of distance and calories burnt.
Trip Mode
Progress
of goal %
10%100%
20%90%
30%80%
40%70%
50%60%
Distance Display
Trip
Point
Trip
Point
Trip
Point
Trip
Point
Peak
Point
Peak
Point
Date Date
Start
Stop
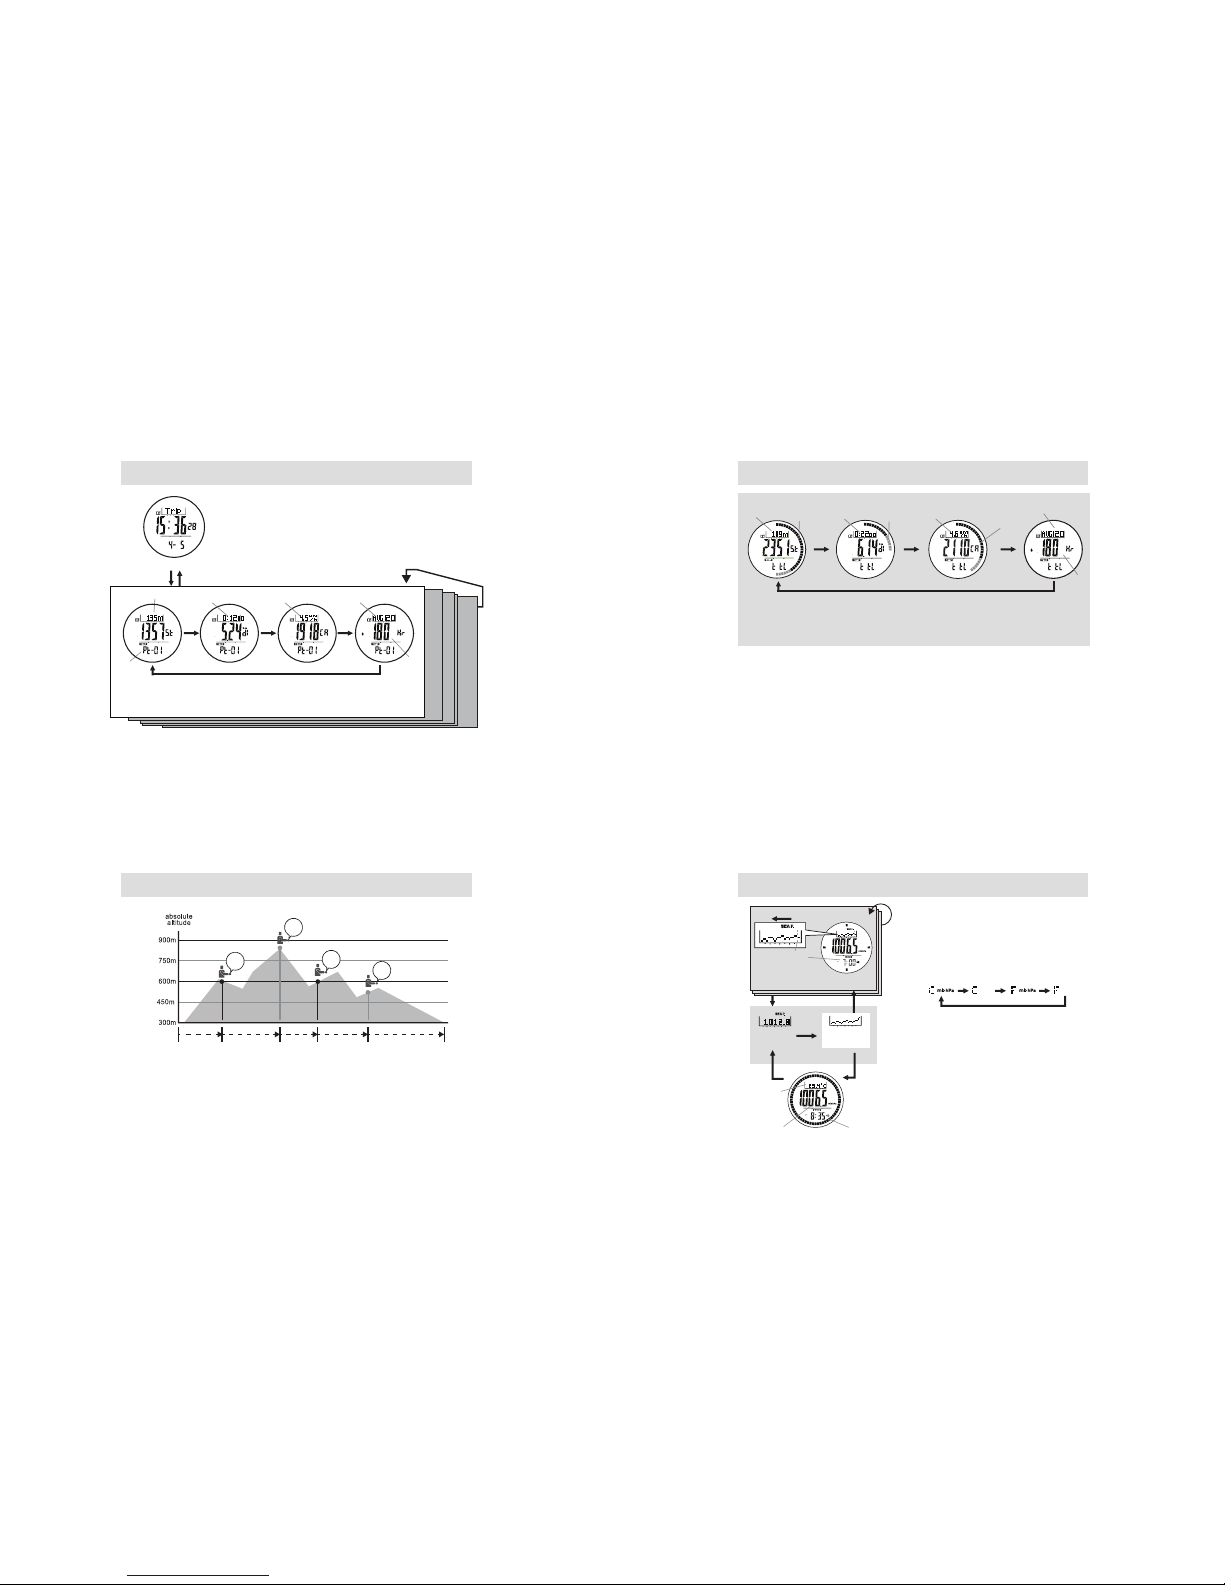
5.0 Trip Mode - Function Display
Main Trip Display
- The Trip Mode includes 3 kinds of Goal Type
display:
- Distance Display
- Step Display
- Calories Display
- See Trip Setting mode to select Goal Type display
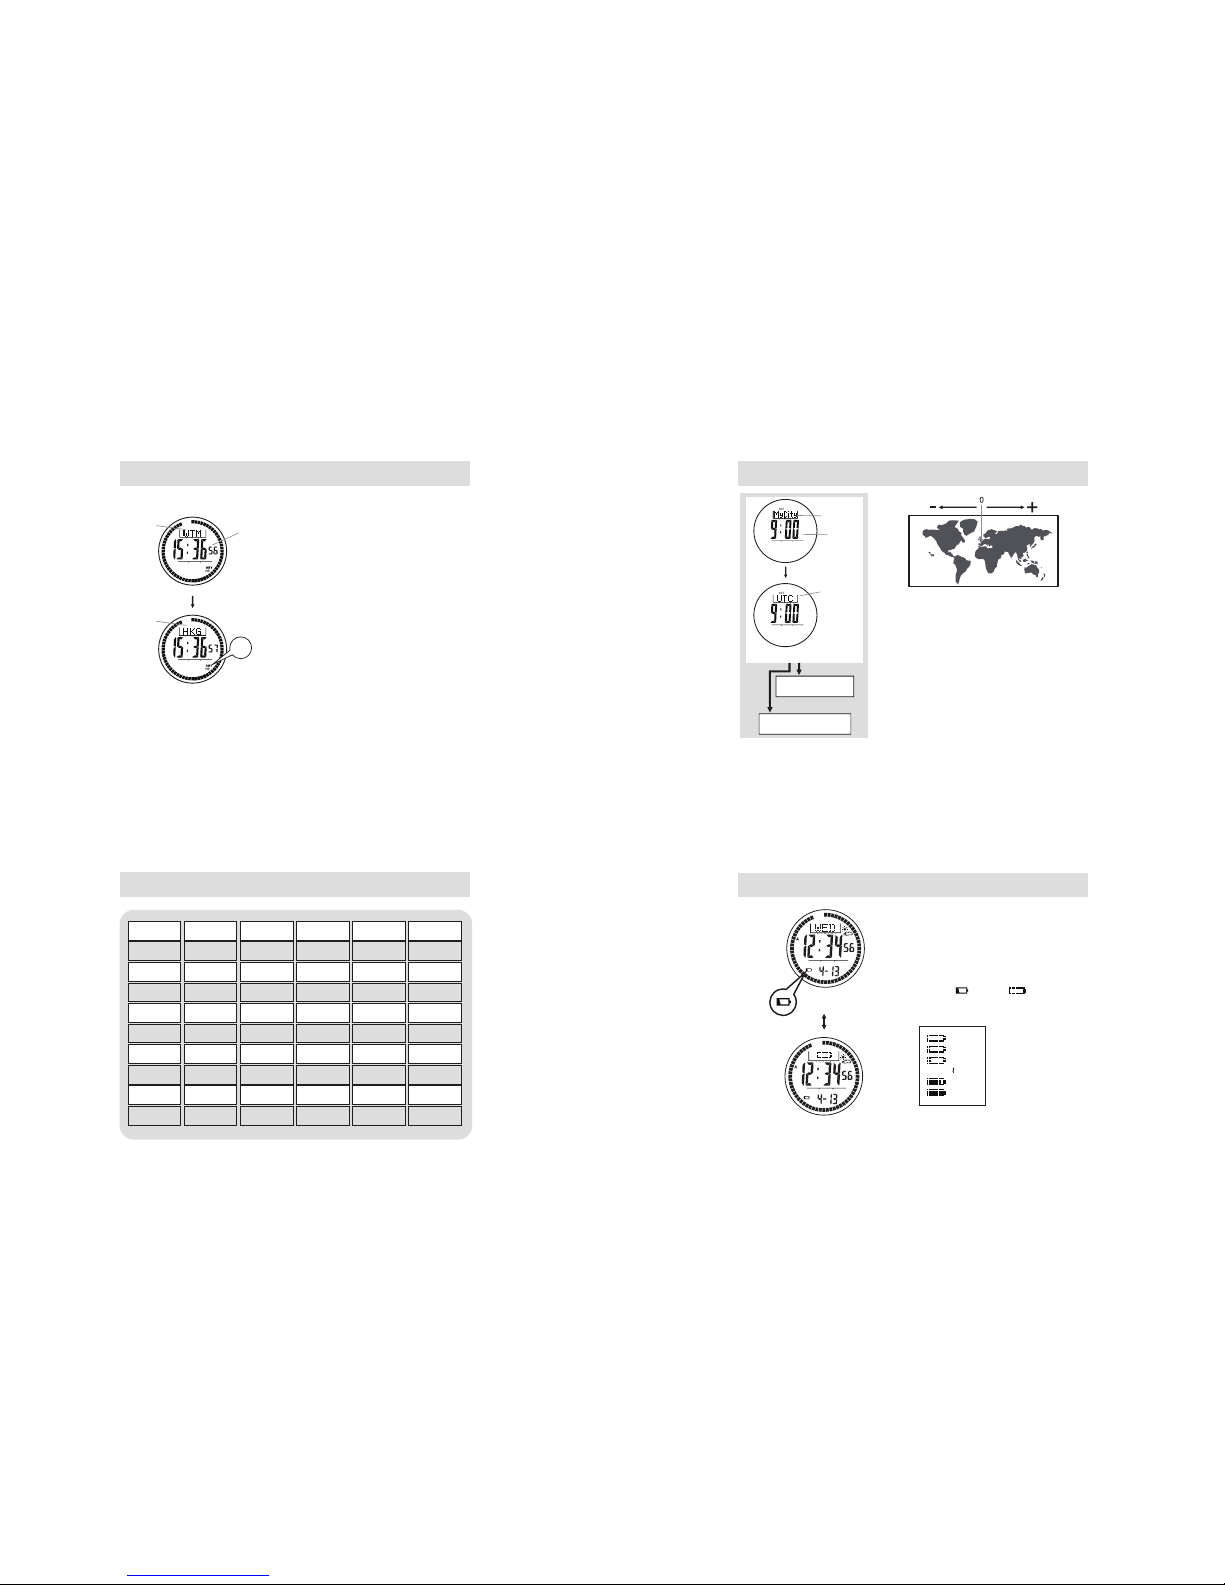
Functional Display
- The Trip Mode includes 7 kinds of functional
display:
- Steps Display
- Current Heart Rate Display
- Travelled Time Display
- Current Speed Display
- Calories Display
- Current Altitude Display and
- Record Display
- To select among different functional display, press the
[L/R] button following the adjacent diagram.
Note: If Distance / Step / Calories are selected in Goal
Type display, functional display will not be shown again
in the upper row.
Steps
Travelled Time
Current Heart Rate
Current Speed
Calorie
Current Altitude
Record
[L/R]
[L/R]
[L/R]
[L/R]
[L/R]
[L/R]
[L/R]
Trip Mode
Functional
Display Goal Type
Display
Progress
of goal
Current
Time
[L/R]
(Distance Display)
Functional Display

5.2 Trip Mode - Setting
[M]
Trip Mode
Hold
[M]
Hold
[M]
[M]
[M]
[M]
[M]
[M]
[M]
[M]
On
[M] [M]
[M] User
[M]
[M][M]
[M]
[M] [M]
On
[M]
Off
[M]
Off
Year of
Birth
Gender
Unit
Weight Height
Max Heart
Rate
Goal Data
Auto Stride
On/Off
Heart Rate
Zone:
Walk Stride
Run Stride
- User
- Health
- Fat Burn
- Aerobic
Off
[M] On
Other
Smart Lap
On/Off
[M]
Smart Lap
Distance
Altitude
Alarm Data
[M]
[M]
[M]
Factory
Default
Altitude
Alarm
On / Off
How to Set Trip Mode
- Press and hold [M] to enter Trip mode setting.
- Press [M] to select among the settings.
- If altitude alert is set On, when the current altitude is equal to or higher than the
preset altitude level, the watch starts beeping for about 10 seconds and “ ”
icon starts flashing.
- After the first beeping, the watch will beep again for every 2 minutes if the
current is still equal or higher than the preset value.
Note: Altitude alarm will be sounded in Trip Mode only.
Min Heart
Rate
[M]
Heart Rate
Alert (Min)
On/Off
Heart Rate
Alert (Max)
On/Off
Goal Type:
- Distance
- Step
- Calorie
Calibrate
Absolute
Altitude
%
EMHR
Lower
Limit
Upper
Limit
Heart Rate Zone
AEROBIC
FAT-
BURN
HEALTH USER
50% 55% 65%
65% 75% 80%
In Zone
eAbov Zone
5.3 Trip Mode - Heart Rate Zone
What is Heart Rate Zone
Some particular training/exercise objective like
‘Aerobics’, ‘Fat burnt’, or ‘Health’ require the trainee /
exercise to maintain his/her heart rate (exercise pace)
within one particular heart rate zone during the exercise.
WARNING: Consult a doctor or trainer prior to
setting the heart rate alert zone for a serious
Cardio-fitness training.
How to select a Heart Rate Zone ( for Heart Rate
Zone Alert )
In general, a user may get the cardio-fitness training
advice from those prestigious organization websites, for
example: www.heart.org
This Watch includes three pre-defined heart rate zone
(’Aerobic’, ‘Fat-burn’, ‘Health’) and one user-defined
Heart rate zone (’My Zone’) for selection.
The Upper and Lower limits of these Zones are shown in
the adjacent diagram.
Heart Rate Zone setting based on the
percentage of Estimated Max Heart Rate
(EMHR):
EMHR = 220 - Age
Example: Your age is 20
( Your EMHR is 200 )
If you current Heart Rate is 100
%EMHR = = 50%
100
200
User
defined
Below Zone
Inactive Heart Rate
measurement
Trip Mode
Distance Display
5.5 Trip Mode - Trip Record Recall (Highest peak record)
Highest Peak record
- Max 10 highest Peak record can be recall.
- In Trip Mode - Record View display, Press and hold [M] to enter
Trip Record Recall Mode, Press [M] to enter highest peak record.
Press [L/R] to select between 1 - 10 highest peak record.
- In Highest Peak Record view, press [S/S] to select between time
date stamp and altitude view.
To Reset Highest Peak Record
- In Highest Peak Record View, Press and Hold [L/R] to reset Peak
records.
Trip Mode
Date
Stamp
Date
Stamp Altitude
Peak
No.
Time
Stamp
Time
Stamp
Trip Record
Time and Date Altitude
Highest Peak Record
Record View
Display
Trip Mode
Distance View
Display
Hold
[M]
Hold
[M]
[M]
[M]
[S/S]
[L/R]
Peak
Point
1
Peak
Point
2
....
Note:
The Different Heart Rate Zones and
the Corresponding Indications
The Desirable Heart Rate Zone
The Below Heart Rate Zone
The Above Heart Rate Zone
the Above
limit
the Below
limit
Heart Rate
(Beats per minute)
Audio
Indication
'beep' 'beep' 'beep'
'beep'
No beep sound
- When enter Trip Mode (Trip is not started), Heart Rate Measurement will be activated for
1 minute.
- Various audio indications will be show according to his/her heart rate and the pre-set
limits.
- Please refer to chapter 5.2 for detail on how to set and turn ON/OFF the Zone Alert.
5.4 Trip Mode - Heart Rate Zone Alert

Functional Display
- The Barometer Mode includes 3 kinds of
Functional display:
- Current Temperature Display
- Sea Level Pressure Display
- Sea Pressure Chart Display
- Press and hold [S/S] to select Temperature / Baro
Unit:
Sea Pressure History Display
- The watch records the sea pressure in every hour
- In Sea Pressure Chart display, press [L/R] to enter
Sea pressure history display.
- Press [L/R] to move cursor left cyclically, then the
respective pressure record will appear on the
display
Note: If you want to have an accurate reading of air
temperature, you must remove the watch form the
wrist ( for 20 - 30 minutes ) that allows no body
temperature effect on your watch.
6.0 Barometer Mode- Function Display
Barometer Mode
Current
Pressure
Current
Temperature
Flashing
Current
Time
Current Temperature display
Sea Level
Pressure
[S/S]
[L/R]
[S/S]
[S/S] [S/S]
Functional Display
Sea Pressure
Chart
Sea Pressure History Display
Last 23hr record
cursor moving direction
[L/R]
inHg inHg
[S/S]
Trip Point Data
- The watch will record Absolute Altitude, Lap Step, Lap Distance, Lap Time, Lap
Calories Burnt, Lap Average Speed, Average and Highest Heart Rate in each Trip
Point Data.
- In Total Trip Point data view: Final Trip Point Altitude, Total Step, Total Traveled
Distance, Total Calories Burnt, Total Traveled Time, Total Average Speed, Average
and Highest Heart Rate.
Trip Point Data
- In Trip point data view, press [S/S] to recall the recorded trip point and
total Trip point data.
- In each Trip point data view, press [L/R] to select between Lap Step /
Lap Distance / Lap Calories / Heart Rate View
5.5.0 Trip Mode - Trip Record Recall ( Trip Point Data )
5.5.1 Trip Mode - Trip Record Recall ( Trip Point Data )
No. of
Point
Highest
Heart
Rate
Altitude
Lap Step View Lap Distance View Lap Calories View Heart Rate View
Lap Time Lap Avg. Speed
Trip Record
Trip Point Data view
[S/S] [M]
[L/R] [L/R] [L/R]
[L/R]
Avg. Heart Rate
Total
Trip
Point
Data
Trip
Point
1
Trip
Point
2
....
Trip
Point
Trip
Point
Trip
Point Trip
Point
Hold [L/R]
Trip Point 1
Save
[S/S]
Start
Hold [L/R]
Trip Point 2
Save
Hold [L/R]
Trip Point 3
Save
Hold [L/R]
Trip Point 4
Save
[S/S]
Stop
Trip Point Data
- In Total Trip point data view, press [L/R] to select between Total Step / Total Distance / Total
Calories Burnt / Heart Rate view
- Press [M] to exit Total trip point data view
- Press and hold [M] to exit trip recall mode
5.5.2 Trip Mode - Trip Record Recall ( Trip Total Data )
Altitude Progress of
Step goal
Progress of
Distance goal
Progress of
Calories
Burnt goal
Total
Step View
Total
Distance View
Total
Calories Burnt
View
Total Time Total Avg. Speed
Trip Total Data view
[L/R] [L/R] [L/R]
[L/R] Highest
Heart
Rate
Heart Rate
View
Avg. Heart Rate

Hold [M]
[M]
[M]
[M]
[M]
Barometer Mode
Current Temperature display
Storm Alert
Sea Pressure
Calibration
Air Pressure
Calibration
Factory Default
Barometer Setting Sequence
Increase/
Decrease
the number
Increase/Decrease
the number at a
higher speed
Hold [S/S] / [L/R]
[S/S] / [L/R]
Barometer setting
- In Barometer mode, press and hold [M] to enter
setting mode. Press [M] to select among the
settings.
- When Storm alert is ON, 30 second beep alert
will be given and “ ” will shown in Current
and World time mode when the watch predicts
the upcoming weather is stormy.
- Before calibrate the sea level pressure, consult
the nearest observatory to get the sea and air
pressure of your current position.
Important: Storm alert is triggered when pressure
drops quickly with a certain period of time. But
sometimes, a very fast pressure changes maybe
due to altitude changes. This pressure changes
due to altitude variation may result in exactly the
same pattern as storm alert false alarm may
occur.
Note:
- Input an incorrect pressure during the
adjustment procedure may results an incorrect
pressure reading in the future.
6.1 Barometer Mode- Setting
Compass Mode
7.0 Compass Mode - Tips and Precautions
Navigation
Direction
Magnetic North
Pole Pointer
Compass
Direction
Bearing
direction of
navigation
direction
Current time
Keep the Watch away from Magnetic
sources, like:
- Speakers,
- Motors,
- Mobile phones and etc.
Avoid measuring direction when:
- Close to a magnetic object
- Close to metallic object
- Close to an electrical appliance
- Inside a moving object.
Perform compass calibration or magnetic
declination compensation process when:
- The Watch is using for the first time,
- The battery has been replaced,
- The bearing direction digits are flashing, and
the compass bearing and compass
direction are flashing
- The compass uses in a location that is apart
from the place in which the compass had
been calibrated,
- The user intends to regulate the precision of
the digital compass.
7.1 Compass Mode - Compass Directions and Bearings
NOTE:
- This Watch includes both compass directions and compass bearings.
object B
object B
object C
Compass Directions
Compass Bearings object C
object D
object D
angular
difference
N
E
90°
SE
135°
NW
315°
point
A
point
A
0°
0°
N
Marks
N
NE
E
SE
SSE
SSW
WNW
NNW
Compass Directions Compass Bearing
North 349° - 11°
Northeast
East
Southeast
East Southeast
South Southwest
North Northwest
S
SW
W
NW
South
Southwest
West
Northwest
ESE
ENE
WSW
NNE
West Northwest
West Southwest
South Southeast
East Northeast
North Northeast 12° - 33°
34° - 56°
57° - 78°
102° - 123°
79° - 101°
124° - 146°
147° - 168°
169° - 191°
214° - 236°
192° - 213°
237° - 258°
259° - 281°
304° - 326°
282° - 303°
327° - 348°
7.2 Compass Mode - Compass Display
NOTE:
- If NO key has been operated for about 1 minute, the Watch will go to IDLE Mode automatically. Press
[S/S] or [L/R] to resume the compass to normal operation .
- If distortion is detected, the compass bearing and compass direction are flashing. See 7.4 to restore
the compass to normal operation when distortion occurs.
Compass Mode Compass Idle Distortion
Compass
bearing
Compass
direction
the north
pole pointer
NO key has been
operated for
1 minute
[S/S] or [L/R]
Current
Time

7.6 Compass Mode - Magnetic Declination at Major Cities
7.5 Compass Mode - Setting Magnetic Declination
True North
Magnetic
Declination
Magnetic
Declination
Magnetic
North
What is Magnetic Declination
- The Magnetic North Pole which is slightly different from
the True North Pole. This Watch, like most magnetic
compass, points to the Magnetic North Pole, while
everything measure from a map is related to the True
North Pole.
- The angular difference between Magnetic North Pole
and True North Pole is called magnetic declination. Its
amount (degrees and minutes) and direction (easterly
and westerly) depend on where you are in the world.
- For serious compass user or whom intends to perform
accurate navigation, this Watch must be adjusted for
magnetic declination.
Magnetic Declination Information
- Most topographic maps include a small arrow which
shown magnetic north pole and or the magnetic
declination information.
- This manual includes the magnetic declination for some
major cities. See the coming chapter 'Magnetic
Declination at Major Cities' for more detail.
- For the cities are not included in the list, please refer to
the online magnetic declination calculator at:
- http://geomag.nrcan.gc.ca/apps/mdcal_e.php
- http://www.ngdc.noaa.gov/seg/geomag/jsp/Declina-
tion.jsp
7.3 Compass Mode - Backward Bearing and Compass Lock
NOTE:
- When the 'Backward Bearing indicator ' ' is appeared, the Watch is showing the backward
bearing direction of the navigating direction.
- When the 'Lock' indicator ' ' is appeared, the compass direction, bearing direction and the
magnetic north pole pointer are locked and would not be changed.
- The Compass Lock will be released automatically when the Watch enter IDLE Mode.
Normal Bearing Backward Bearing
315˚
135
0˚ 0˚
0˚
backward
bearing
indicator
navigating
direction
navigating
direction
Direction Unlock Direction Locked
compass
lock indicator
[L/R]
[S/S]
7.4 Compass Mode - Calibrating the Compass
Compass Mode
Rotation Calibration
Stop Display
Magnetic Declination
Display
Rotation Calibration
Start Display
Calibration Display
- In Compass Mode, press and hold [M] to enter
Compass Calibration display
- To start rotation calibration, press [S/S] button once.
The pointers will start rotating, turn the watch ( keep
parallel to the horizon) in the same direction of the
rotation pointers for more than 2 turns.
- Press [S/S] or [L/R] button to stop the calibration when
the 2-turn rotation calibration is completed.
- When the pointer stop rotation, hold [M] button to back
to the Compass Mode or press [M] button once to set
the magnetic declination.
Hold [M]
[M]
Hold [M]
[S/S]
[S/S] /
[L/R]
Compass Calibration
turning axis
start turn
turn
turn
Completed
'Rotation' Process

7.7 Compass Mode - Magnetic Declination Mode
What is Magnetic Declination
- Check the “Magnetic Declination at Major Cities”
to get the magnetic declination of the city which is
close to your current position. That angle will be
inputted into the Watch during the calculation.
- In Compass Calibration display, press [M] to enter
Magnetic Declination Display.
- Press [S/S] or [L/R] button to increase / decrease
the number. ( Hold down the button changes the
number at a higher speed )
- Hold [M] to confirm and exit the adjustment
display
Compass Mode
Rotation Calibration
Stop Display
Hold [M]
[M]
Hold [M]
Declination Setting
Magnetic Declination
Display
[S/S] / [L/R]
Increase/Decrease
the number
Increase/Decrease the
number at a higher speed
Hold [S/S] / [L/R]
9.0 Chronograph Mode - Start/Stop the Chronograph
Chronograph Mode
• The Watch includes a function elapsed times,
accumulative elapsed time and lap times -
Chronograph Mode.
• The display shows the ‘All Zeros’ display when the
chronograph is being selected the first time or the
chronograph has been reset.
How to Start/Stop the Chronograph
• When the chronograph is stopped (not counting).
press the [S/S] button once to start the chronograph;
press the [S/S] button once again to stop the
chronograph.
• The elapsed time between the two keystrokes will
appear on the display.
• Repeat the above mentioned steps to get the
accumulative elapsed time of which the chronograph
is running.
How to Reset the Chronograph
• To record a new set of elapsed time, hold down the
[L/R] button for 2 seconds to reset the chronograph to
‘All Zeros’ display when the chronograph was
stopped.
NOTE: When the chronograph is reset, the record lap
time(s) will be deleted at the same time.
8.0 Daily Alarm Mode -
Daily Alarm 1, Daily Alarm 2 and Chime Display
Daily Alarm 1 and Daily Alarm 2
- The Watch includes two daily alarms: Daily
Alarm 1 and Daily Alarm 2. The Daily Alarm 1
and Daily Alarm 2 are working independently.
- Press the [S/S] button to switch among the Daily
Alarm 1, Daily Alarm 2 and Chime Display
following the adjacent diagram.
How to Turn ON/OFF the Daily Alarm
- To turn ON/OFF the Daily Alarm 1 (2), press the
[L/R] button in Daily Alarm 1 (2) Display.
- When the Daily Alarm 1 (2) is ON, the alarm
indicator ' ' will appear.
- If the alarm indicator is appeared, the Watch will
sound at the preset alarm time every day. When
the alarm sounds, press any button to stop
the beep.
How to Turn ON/OFF the Hourly Chime
- To turn ON/OFF the Hourly Chime, press the
[L/R] button in Chime Display.
- When the chime is ON, the Chime
indicator ' ' will appear. If the Chime
indicator is appeared, the Watch will beep once
at the hour every hour.
Daily Alarm Mode
Daily Alarm 1
Display
Alarm “ ON ”
Display
Daily Alarm 2
Display
Hourly Chime
Display
[S/S]
[L/R]
[L/R]
[S/S]
[S/S]
8.1 Daily Alarm Mode - Setting the Alarm
hold
[M]
hold
[M]
Daily Alarm 1 Display
Digits have been
selected (flashing)
Setting Display
Daily Alarm Time Setting Sequence
[M]
Minute Hour
[S/S] / [L/R]
Increase/Decrease
the number
Increase/Decrease the
number at a higher speed
Hold [S/S] / [L/R]
How to Set the Alarm 1 and Alarm 2
- To select the setting display, hold the [M] button
for about 2 seconds in Alarm 1 (2) Display, then
the flashing “SET” icon will appear.
- In setting display, press the [M] button to change
the selection between minute and hour.
- When the digits are flashing (selected), press
the [S/S] or [L/R] button to increase /
decrease the number. (Hold down the button
change the number at a higher speed).
- When the set is completed, press and hold
the [M] button to exit the setting display.

10.0 Timer Mode - Setting the Target Time
NOTE:
- The Timer starts counting from the Target Time to zero.
- The Watch includes 6 Quick-Set-Values : 1,3, 5, 10, 15 and 45 minutes setting the Target Time faster.
- The User Target Time can be set by user, see 10.1 for the details of the setting.
Timer Mode
Target Time Setting Sequence
Preset
Timer
Current
Time
[L/R]
1 min 3min [L/R] [L/R]
[L/R]
[L/R][L/R]
[L/R]
5min 10min
15min45min
User
Defined
10.1 Timer Mode - Setting the User Target Time
NOTE:
- The setting range is up to 99 hours 59 minutes 59 seconds.
Current
Time Timer Mode
User Target Time Setting Sequence
[M] [M]
Hold
[M]
Hold
[M]
Hour Minute
[M]
Second
[S/S] / [L/R]
Increase/Decrease
the number
Increase/Decrease the
number at a higher speed
Hold [S/S] / [L/R]
10.2 Timer Mode - Using the Countdown Timer
NOTE:
- The Watch will prompt (during the counting) as follows:
a) Beep once every minute for the last 10 minutes, i.e 10'00",
9'00" and etc.
b) Beep once every 10 seconds for the last minute, i.e 0'50",
0'40" and etc.
c) Beep once every seconds for the last 5 seconds.
d) Beep for 30 seconds when timer reaches zero (Press any
button CAN stop the beep instantly).
- The Target Time will be reloaded automatically.
time
(minute)
[S/S]
[S/S] [S/S] [S/S] [S/S]
03
123 2
2. Multiple Countdown
1. Single Countdown
3 2 1 0
Single and Multiple Countdown
[L/R] [L/R]
3
3
TargetTime
Zero
Counting
Stop Counting
[S/S]
[L/R]
[S/S]
Beep
Beep
Beep
Beep
9.1 Chronograph Mode - Recording and Recalling Lap Time
How to Record Lap Time
• The chronograph can measure elapsed time
without stopping the counting - Lap time.
• The Chronograph Mode allows recording lap time
up to 100 laps.
• When the chronograph is counting, press the [L/R]
button once to record a lap time (this key
operation will not affect the counting).
• The lap number and lap time will appear on the
display for 10 seconds, and it returns to counting
display automatically.
• Repeat the steps mentioned above to get another
lap time.
How to Recall Lap Times
• To recall lap times, hold the [M] button in the
Chronograph Display (not counting).
• When the Total Time Display is appeared, press
the [S/S] or [L/R] button to check the next /
previous lap time.
• Hold down the [M] button any time to back to the
Chronograph Display.
How to Reset Lap Times
• To record a new set of lap times, hold the [L/R]
button for 2 seconds in the Chronograph Stop
Display.

11.2 World Time Mode - Setting
About UTC (Coordinated Universal Time)
- Since the sun shines time on different places is different.
Therefore, our world is divided in to several time zones so that
people in different places can get a more accurate and
common time.
- All the time zone calculations are relative to coordinated
Universal Time (UTC). For example, the time zone of London is
‘UTC +0’. Los Angeles is 8 hours behind the time of UTC.
Therefore, Los Angeles’ time zone is ‘UTC-8’.
Setting of the User - defined city
- In World Time Setting Mode, press and hold [M] to enter World
Time Setting Mode display. Press the [S/S] / [L/R] button in step
of 15 minutes to set the correct UTC.
- When setting is completed, hold down the [M] button to finish.
WorldTime Setting Mode
1 Second
City Code
User
Defined
Time Zone
Time Zone
UTC+9
[S/S] / [L/R]
Increase/Decrease
the number by 15 min
Increase/Decrease the
number at a higher speed
Hold [S/S] / [L/R]
11.0 World Time Mode - Function Display
View the World Time
- Press [M] button until enter World Time Mode.
- Press the [S/S] or [L/R] button to select the world
time city. The city name will be shown firstly and
then show the city initial code with UTC
afterwards.
Toggle the Daylight Saving Time (DST)
- Hold down the [L/R] button to toggle the daylight
saving time On/ Off.
- When Daylight Saving Time is On, one hour will be
adjusted (added) for this setting.
World Time Mode
1 Second
City
Code
World Time
Mode World Time
DST
11.1 World Time Mode - City Initial Code Table
Ci ty C ode Table
1. ADL
Adelaide
11.BRU
Brussels
21 .DE N
Denver
31. KHI
Karachi
41.NOU
Noumea
51.S IN
Singapore
2. AKL
Auckland
12. BUE
Buenos Aires
22.DUB
Dublin
32. LAX
Los Angeles
42. NYC
New York
52. STO
Stockholm
3. AMS
Amsterdam
13. CAI
Cairo
23. DXB
Dubai
33. LIM
Lima
43. OSL
Oslo
53. SYD
Sydney
4. ANC
Anchorage
14. CA S
Casablanca
24.FRA
Frankfurt
34. LIS
Lisbon
44. PAR
Paris
54. TPE
Taipei
5. ATH
Athens
15. CCS
Caracas
25. HE L
Helsinki
35. LON
London
45. RIO
Rio De Janeiro
55. TYO
Tokyo
6. BCN
Barcelona
16. CHI
Chicago
26. HK G
Hong Kong
36. LUX
Luxembourg
46. ROM
Rome
56. VIE
Vienna
7. BER
Berlin
17. CPH
Copenhagen
27. HNL
Honolulu
37. MEL
Melbourne
47. SCL
Santiago
57. YTO
Toronto
59. ZRH
Zurich
60. MY CITY
Selectable
8. BJS
Beijing
18. CPT
Cape Town
28. IST
Istanbul
38. MEX
Mexico
48. SEL
Seoul
58. YVR
Vancouver
9. BKK
Bangkok
19. DAC
Dhaka
29. JKT
Jaka rta
39. MNL
Manila
49. S F O
San Francisco
10. BOM
Mumbai
20. DE L
New Delhi
30. JRS
Jerusalem
40. MOW
Moscow
50. SHA
Shanghai
12.0 Battery Status View and Low Battery indication
[L/R]
<=0%
1-10%
11-20%
81-90%
91-100%
Battery Status View
• Press [L/R] in Current Time mode to enter
Battery Status View
• Press [L/R] or wait for 3 seconds, it will resume
previous display.
Low Battery indication
• When the battery is running low, Low Battery
indicate “ ” and 0% “ ” will be shown
( Battery Status View).
• See following chapter to recharge the battery.
Current Time
Mode
Battery Status
View Mode

13.0 Power Saving Mode
Power Saving Mode
- This Watch has a Power Saving Function which can turn Off
the LCD display so that the battery can last longer.
- In the Power Saving Mode, the watch function is still
working normally. (i.e. The timekeeping function is still
running in Power Saving Mode.)
How to enter/exit the Power Saving Mode
- To enter the Power Saving Mode, hold down the [L/R]
button in Current Time Mode for about 5 seconds and the
LCD display will be turned Off.
- Press any Button in Power Saving Mode to exit this mode
and the LCD display will be resumed.
Current Time
Mode
Power Saving
Mode
Hold
[L/R]
Any
Button
13.0 Specifications - Timekeeping Mode
13.1 Specifications - Sensor Mode
Timer Sounds:
- Last 10 minutes beep once every minute
- Last 1 minute beeps once every 10 seconds
- Last 5 seconds beeps once every second
- Sounds for 30 seconds when count to zero
World Time Mode
- Preset Time Zone: 59 cities
- Time Zone setting range (GMT): -13:00 ~
+13:00
Chronograph Mode
- Resolution: 1/100 second resolution
- 100 Lap memories
- Measuring range: 23 hours 59 minutes 59.99
seconds
Current Time Mode
- Hour, minute, second, am, pm, month, date
- Day of week, weather forecast, temperature, sea
level pressure history display or altitude history.
- Time System: 12-hour or 24-hour format
- Daylight Saving Time (DST)
Calendar System
- Auto-Calendar pre-programmed from the year
2000 to 2099
- Weather Forecast: 5 symbols to indicate the
predicated weather
Daily Alarm Mode
- 2 daily alarms
- Hourly chime
- Alarm Sound
- Sounds for 30 seconds at preset time
Countdown Timer Mode
- Resolution: 1 second resolution
- Measuring range: 99 hours 59 minutes 59
seconds
- Quick Set : 6 quick set Values (1, 3, 5, 10, 15, 45
minutes) and 1 User Define.
Barometer Mode
- Resolution/ Measuring Range: 300 hPa/mbar to
1100 hPa/mbar (8.85 inHg to 32.48 inHg)
- Sampling Interval : First 5 min: 1 second; After 5
min: 1 min
- History Recall: Maximum 24 hours history recall
Thermometer
- Resolution: 0.1 ˚C (0.1˚F)
- Measuring range: -10.0 ˚C to 60.0 ˚C (14.0 ˚F to
140.0 ˚F)
Compass Mode
- Resolution: 16 display (digital)
- Measuring range: 0˚ to 359˚ (digital)
- Others: Digital bearing reading Lock
- Digital backward bearing
- Declination Setting: Range: +90˚ to -90˚
Backlight
- Electro-Luminescent (EL) backlight
Battery
Watch: 3V lithium battery (CR2032) 1 piece
Trip Mode - Pedometer
- 3 Target Goal: Distance, Steps and Calories
- Step range: 0-99999
- Moving Timer: 0:00:00 to 9:59:59
- Distance Measurement: max. 99 km
- Speed Measurement: max. 65 km/h
- Maximum 30 Trip point data recall
- Maximum 10 Peak Points recall
Trip Mode - Altimeter
- Resolution : 1m (1ft)
- Measuring range: -706m to 9164m (-2316ft to
30067ft)
- Sampling Interval: First 5 min: 1 sec; After 5 min: 1
minute
12.1 Charging the battery
To charge the battery
- Make sure the 2 connection pads on the case back are dry.
- Align the clip guide and pins with the notch and contacts at
the bottom of the watch.
- Make sure the clip is secured.
- Plug the other end of the USB cable into one of the PC’s USB
connectors.
- The display will indicate the battery in charging animation.
- When the battery is finished charging, the display will indicate
“ ”.
Battery charging
animation
Battery is fully
charged
Clip guide
Table of contents
Other Lad Weather Watch manuals