Ladegerät BC 10 User manual

Gebrauchsanweisung Seite 2
Im Fahrzeug mitzuführen!
Operating instructions Page 10
To be kept in the vehicle!
Mode d‘emploi Page 18
À garder dans le véhicule !
Istruzioni per l‘uso Pagina 26
Da tenere nel veicolo!
Gebruiksaanwijzing Pagina 34
In het voertuig meenemen!
Brugsanvisning Side 40
Skal medbringes i køretøjet!
Bruksanvisning Sida 48
Skall medföras i fordonet!
Ladegerät BC 10
Gebrauchsanweisung Seite 3
Im Fahrzeug mitzuführen!
Operating instructions Page 7
To be kept in the vehicle!
Mode d‘emploi Page 11
À garder dans le véhicule !
Gebruiksaanwijzing Pagina 15
In het voertuig meenemen!
Brugsanvisning Side 19
Skal medbringes i køretøjet!
Istruzioni per l‘uso Pagina 23
Da tenere nel veicolo!
Bruksanvisning Sida 27
Skall medföras i fordonet!
Ladegerät BC 10

GB
GB • 7
CONGRATULATIONS
to the purchase of your new professional switch mode battery charger.
COMFORT CONNECT – eyelet
COMFORT CONNECT
MAINS CABLE
COMFORT CONNECT – clamp
CHARGE CABLE
SUPPLY PLUG*
*Supply plugs may differ to suit your wall socket.
Attach the temperature sensor to the charger.
Attach the temperature sensor to the clamp/battery.
WET/GEL
BATTERY
PROGRAM
ERROR LAMP
AGM
BATTERY
PROGRAM
FULLY CHARGEDREADY TO USE
OPTIMA
BATTERY
PROGRAM
SUPPLY
PROGRAM
POWER
LAMP
CHARGING
1. Connect the charger to the battery.
2.Connect the charger to the wall socket. The power lamp will indicate that the mains
cable is connected to the wall socket. The error lamp will indicate if the battery clamps
are incorrectly connected. The reverse polarity protection will ensure that the battery
or charger will not be damaged.
3.Press the MODE-button to select charging program.
4.Follow the 8-step display through the charging process.
The battery is ready to start the engine when STEP 4 is lit.
The battery is fully charged when STEP 7 is lit.
5.Stop charging at any time by disconnecting the mains cable from the wall socket.
MODE-
BUTTON
TEMPERATURE
SENSOR
TEMPERATURE
SENSOR
INDICATOR
MANUAL
1
1
2
2

8 • GB
BATTERY SIZE (Ah) TIME TO 80% CHARGED
20Ah 2h
50Ah 5h
100Ah 10h
200Ah 20h
READY TO USE
The table shows the estimated time for empty battery to 80% charge
CHARGING PROGRAMS
Settings are made by pressing the MODE-button. After about two seconds the charger
activates the selected program. The selected program will be restarted next time the
charger is connected.
The table explains the different Charging Programs:
Program Explanation Temp range
Wet
Gel
WET/GEL battery program
Use for WET batteries, Ca/Ca, MF and for most GEL
batteries
-20°C–+50°C
(-4ºF–122ºF)
AGM AGM battery program
Use for AGM batteries. -20°C–+50°C
(-4ºF–122ºF)
Optima Optima battery program
Use for Optima batteries. -20°C–+50°C
(-4ºF–122ºF)
Supply
Supply program
Use as 12V power supply or use for float maintenance
charging when 100% capacity of the battery is
required. Supply program activates step 7 without time
or voltage limitation.
-20°C–+50°C
(-4ºF–122ºF)
ERROR LAMP
If the error lamp is lit, check the following:
1. Is the chargers positive lead connected to the batterys
positive pole?
2. Is the charger connected to a 12V battery?
3. Has charging been interrupted in STEP 1, 2 or 5?
Restart the charger by pressing the MODE-button. If charging is still
being interrupted, the battery...
STEP 1: ...is seriosly sulphated and may need to be replaced.
STEP 2: ...can not accept charge and may need to be replaced.
STEP 5: ...can not keep charge and may need to be replaced.
TEMPERATURE SENSOR
The charger is equipped with an external temperature sensor. The tempera-
ture sensor is attachable. If so, the charger will compensate voltage accor-
ding to ambient temperature. Activated temperature sensor will be indicated
by a lit temperature sensor indicator lamp.
WARNING!
The spark protection on the battery charger
is disabled during SUPPLY program.
POWER LAMP
If the power lamp is lit with a:
1. STEADY LIGHT
The mains cable is connected to the wall socket.
2. FLASHING LIGHT:
The charger has entered the energy save mode. This happens if the
charger isn´t connected to the battery in 2 minutes.

GB
GB • 9
STEP 1 DESULPHATION
Detects sulphated batteries. Pulsing current and voltage, removes sulphate from the lead
plates of the battery restoring the battery capacity.
STEP 2 SOFT START
Tests if the battery can accept charge. This step prevents that charging proceeds with a
defect battery.
STEP 3 BULK
Charging with maximum current until approximately 80% battery capacity.
STEP 4 ABSORPTION
Charging with declining current to maximize up to 100% battery capacity.
STEP 5 ANALYSE
Tests if the battery can hold charge. Batteries that can not hold charge may need to be replaced.
STEP 6 RECOND
Choose the Optima program to add the Recond step to the charging process. During the Recond step
voltage increases to create controlled gasing in the battery. Gasing mixes the battery acid and gives
back energy to the battery.
STEP 7 FLOAT
Maintaining the battery voltage at maximum level by providing a constant voltage charge.
STEP 8 PULSE
Maintaining the battery at 95–100% capacity. The charger monitors the battery voltage and gives a
pulse when necessary to keep the battery fully charged.
CHARGING PROGRAM
DESULPHATION SOFT START BULK ABSORPTION ANALYSE RECOND FLOAT PULSE
*Supply program is not time or voltage limited.
CURRENT (A) VOLTAGE (V)
Wet
Gel
15.8V 10A until 12.6V Increasing voltage to
14.4V @ 25°C
10A
14.4V @ 25°C
Declining current Checks if voltage drops
to 12V 13.6V
10A 12.7V–14.4V
10–5A
AGM
15.8V 10A until 12.6V Increasing voltage to
14.7V @ 25°C
10A
14.7V @ 25°C
Declining current Checks if voltage drops
to 12V 13.6V
10A 12.7V–14.7V
10–5A
Optima
15.8V 10A until 12.6V Increasing voltage to
14.7V @ 25°C
10A
14.7V @ 25°C
Declining current Checks if voltage drops
to 12V Max 15.8V
1.5A 13.6V
10A 12.7V–14.7V
10–5A
Supply 13.6V
10A
Limit: Max 8h Max 8h Max 20h Max 16h 3 minutes Max 1h 10 days. Charge
cycle restarts if voltage
drops*
Charge cycle restarts
if voltage drops

10 • GB
TECHNICAL SPECIFICATIONS
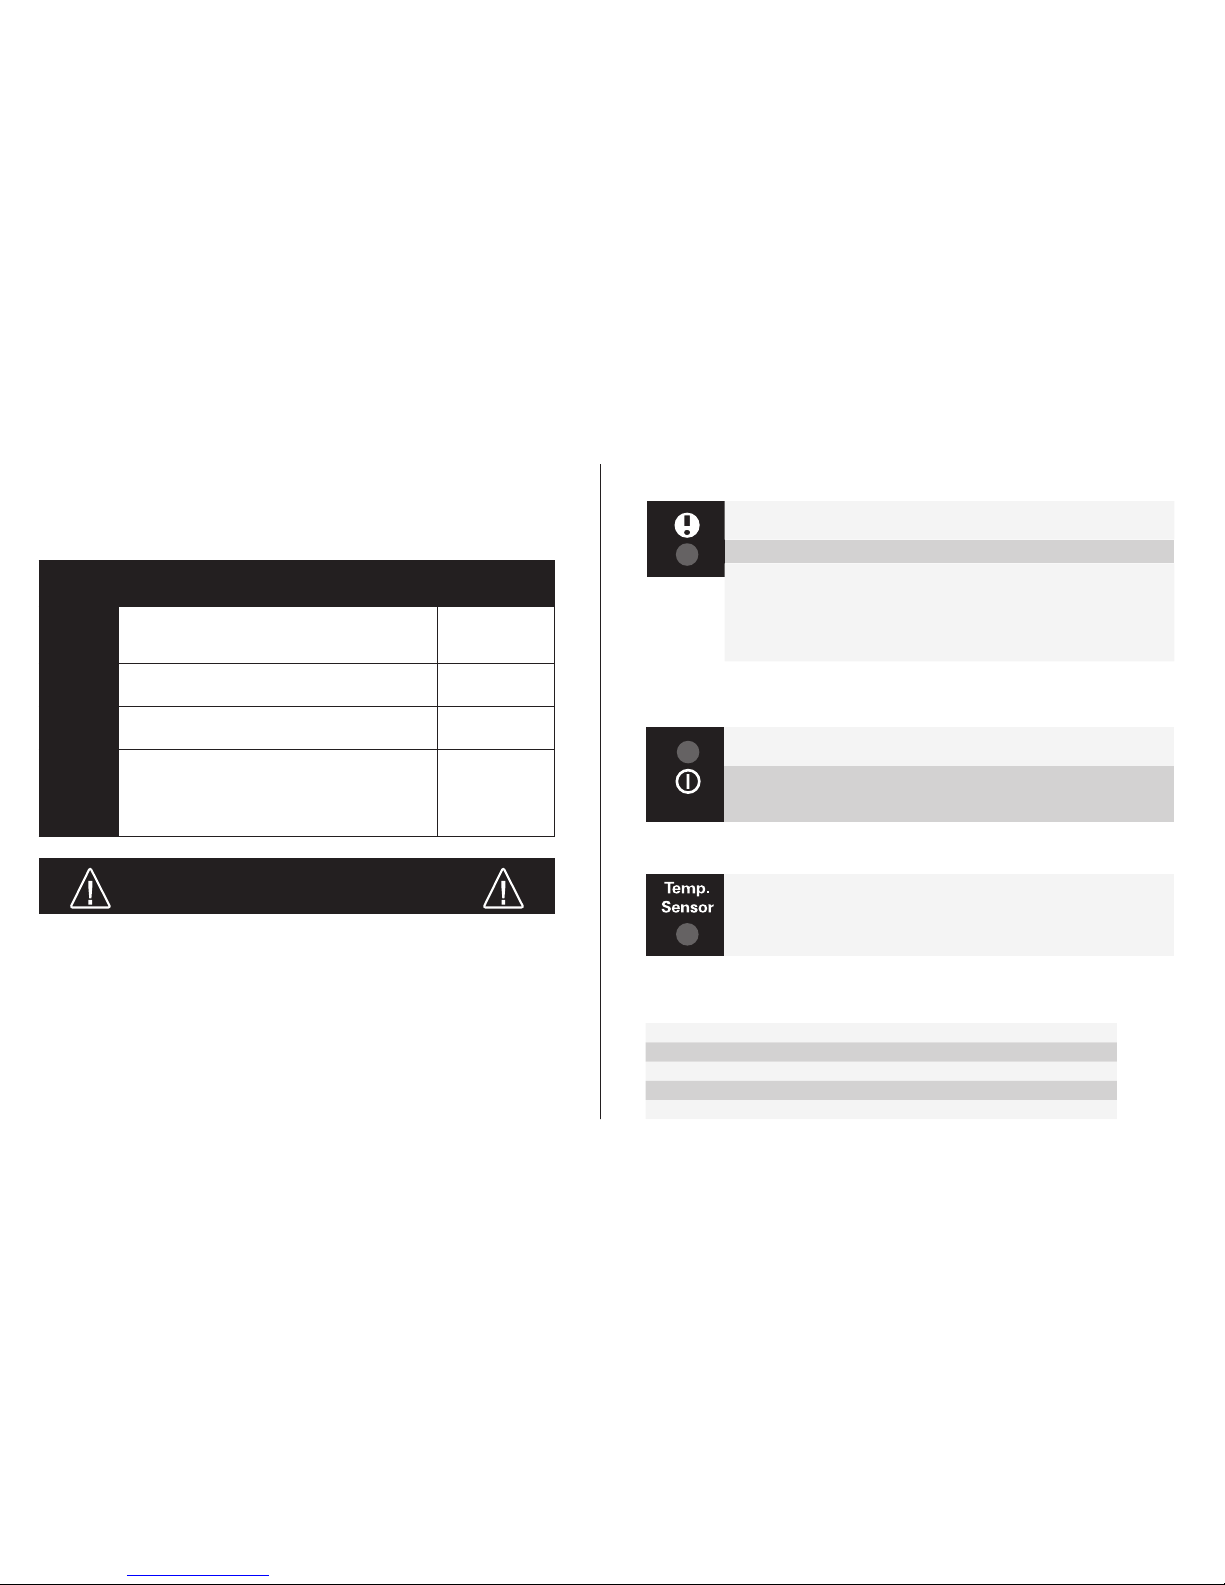
Model number 7212
Rated Voltage AC 220–240VAC, 50–60Hz
Charging voltage WET/GEL 14.4V, AGM 14.7V, Optima 15.8V, Supply 13.6V
Start voltage 2.0V
Charging current 10A max
Current, mains 1.0A rms (at full charging current)
Back current drain* <1Ah/month
Ripple** <4%
Ambient
temperature -20°C to +50°C, output power is reduced
automatically at high temperatures
Charger type Eight step, fully automatic charging cycle
Battery types All types of 12V lead-acid batteries
(WET, MF, Ca/Ca, AGM and GEL)
Battery capacity 20―200Ah up to 300Ah for maintenance
Dimensions 230 x 95 x 50 mm (L x W x H)
Insulation class IP65
Weight 0.75kg
*) Back current drain is the current that drains the battery if the charger is not connected
to the mains. The charger has a very low back current.
**) The quality of the charging voltage and charging current is very important. A high
current ripple heats up the battery which has an aging effect on the positive electrode.
High voltage ripple could harm other equipment that is connected to the battery. The
charger produce very clean voltage and current with low ripple.
SAFETY
• The charger is designed for charging only for batteries according to the technical
specification. Do not use the charger for any other purpose. Always follow battery
manufacturers recommendations.
• Never try to charge non rechargeable batteries.
• Check the charger cables prior to use. Ensure that no cracks have occurred in the cables
or in the bend protection. A charger with damaged cables must not be used.
A damaged mains cable must be replaced by a retailer.
Never charge a damaged battery.
• Never charge a frozen battery.
• Never place the charger on top of the battery when charging.
• Always provide for proper ventilation during charging.
• Avoid covering the charger.
• A battery being charged could emit explosive gasses. Prevent sparks close to the
battery. When batteries are reaching the end of their lifecycle internal sparks may occur.
• All batteries fail sooner or later. A battery that fails during charging is normally taken
care of by the chargers advanced control, but some rare errors in the battery could still
exist. Don’t leave any battery during charging unattended for a longer period of time.
• Ensure that the cabling does not jam or comes into contact with hot surfaces or sharp
edges.
• Battery acid is corrosive. Rinse immediately with water if acid comes into contact with
skin or eyes, seek immediate medical advice.
• Always check that the charger has switched to STEP 7 before leaving the charger
unattended and connected for long periods. If the charger has not switched to STEP 7
within 55 hours, this is an indication of an error. Manually disconnect the charger.
• Batteries consume water during use and charging. For batteries where water can be
added, the water level should be checked regularly. If the water level is low add distilled
water.
• This appliance is not designed for use by young children or people who cannot read or
understand the manual unless they are under the supervision of a responsible person to
ensure that they can use the battery charger safely. Store and use the battery charger
out of the reach of children, and ensure that children cannot play with the charger.
• Connection to the mains supply must be in accordance with the national regulations for
electrical installations.

Truma Gerätetechnik GmbH & Co. KG
Wernher-von-Braun-Straße 12
85640 Putzbrunn
Deutschland
Service
Telefon +49 (0)89-4617-2020
Telefax +49 (0)89 4617-2159
www.truma.com
20019939B 00000-00000 · 01 · 12/2013 ·
Bei Störungen wenden Sie sich bitte an das Truma
Servicezentrum oder an einen unserer autorisierten
Servicepartner (siehe Truma Serviceheft oder
www.truma.com).
Für eine rasche Bearbeitung halten Sie bitte Gerätetyp und
Fabriknummer (siehe Typenschild) bereit.
Always notify the Truma Service Centre or one of our
authorised service partners if problems are encountered
(see Truma Service Booklet or www.truma.com).
In order to avoid delays, please have the unit model and
factory number ready (see type plate).
Veuillez vous adresser au centre de SAV Truma ou à un de
nos partenaires de SAV agréés en cas de dysfonctionnements
(consultez votre livret de service Truma ou www.truma.com).
Pour un traitement rapide de votre demande, veuillez tenir
prêts le type d’appareil et le numéro d’usine (voir plaque
signalétique).
Bij storingen kunt u contact opnemen met het Truma
Servicecentrum of met een van onze erkende servicepartners
(zie Truma Serviceblad of www.truma.com).
Voor een snelle bediening dient u apparaattype en
fabrieksnummer (zie typeplaat) gereed te houden.
Ved fejl kontaktes Trumas serviceafdeling eller en af vores
autoriserede servicepartnere (se Truma servicehæftet eller
www.truma.com).
Sørg for at have oplysninger om apparattype og
fabriksnummer (se typeskiltet) klar for hurtig behandling.
In caso di guasti rivolgersi al centro di assistenza Truma o a
un nostro partner di assistenza autorizzato (vedere il libretto
di assistenza Truma o il sito www.truma.com).
Affinché la richiesta possa essere elaborata rapidamente,
tenere a portata di mano il modello dell’apparecchio e il
numero di fabbrica (vedere targa dati).
Vid fel kontakta Truma servicecenter eller någon av våra
auktoriserade servicepartner (se Truma servicehäfte eller
www.truma.com).
För snabb handläggning bör du ha aggregatets typ och
fabriksnummer (se typskylten) till hands.
©
Table of contents
Popular Batteries Charger manuals by other brands

VOITAS
VOITAS X11 6,5 M user manual

Intelligent Charging
Intelligent Charging MB73P+ Operator's manual

Wallbox
Wallbox PULSAR installation guide

Ergotron
Ergotron LTSC30 Series owner's manual

Analytic Systems
Analytic Systems BCA310MS Installation & operation manual

therm-ic
therm-ic Heated Beanie Instructions for use