Lahoux Optics Spotter Series User manual

Lahoux Spotter series
Thermal imagers
User manual

Remarks
The user manual describes the use of the devices
in the Lahoux Spotter series and the precautions
for use. In order to ensure the safety of the user, the
reasonable and effective maintenance and use of the
Lahoux Spotter, as well as to ensure the normal life of
the Lahoux Spotter, Lahoux Optics requires the user
to read the operating instructions completely and to
strictly observe the regulations before the Lahoux
Spotter is used.
The use and maintenance of the Lahoux Spotter
is only subject to the supplied user manual. Other
materials are for reference purposes only.
All information in this document is subject to change
as Lahoux devices are constantly being updated to
ensure the best user experience.
If you experience any problems while using the
Lahoux Spotter, please forward your feedback to your
retailer or Lahoux Optics as soon as possible.

1
Contents
1 Button functions ............................................................... 5
Switch on ..............................................................................5
Switch off ..............................................................................5
Standby-mode ......................................................................5
Dioptre adjustment ...............................................................6
Switch the image mode........................................................6
E-Zoom .................................................................................6
Photo and video ...................................................................6
Hot spot tracking ..................................................................6
Rangefinder ..........................................................................6
2 Menus ............................................................................... 7
2.1 Main menu ......................................................................7
Ultra clear mode .........................................................7
Wifi functions .............................................................7
Screen brightness .......................................................8
Video out .....................................................................8
Image warmth .............................................................8
Image calibration ........................................................8
Picture in picture (PiP) ................................................8
2.2 Secundary menu ............................................................9
Digital compass ..........................................................9
Motion sensor ............................................................9
Auto standby ...............................................................9
Motion calibration ........................................................9
System information......................................................9
Factory reset ................................................................9
2.3 Charging ......................................................................10
2.4 Data download................................................................. 10
3 Technical specifications................................................. 11
4 Customer support .......................................................... 12

2
Precautions
• Do not clean non-optical surfaces of the thermal imager with
a chemical solvent, but wipe with a soft cloth.
• The lens has a special coating to enhance the optical
performance. Cleaning is only necessary if the lens is clearly
dirty. Rubbing too hard can cause the lens coating to wear
out. Do not touch the surface of the lens, as acidic materials
of the skin can damage the coating. Use compressed air or a
soft brush or possibly a soft spectacle cloth.
• When the thermal imager will not be used for a longer
period, please check it every six months.

3
Warning
• Do not expose the thermal imager directly to high intensity
radiation sources such as the sun, carbon dioxide lasers and
electric welding machines.
• Keep the time interval between power on and power off at
least 20 seconds.
• The Lahoux Spotter contains advanced optical and
electronic components. Prevent unnecessary shock, drops
and vibrations to prevent damage.
• Do not disassemble the thermal imager yourself. In case
of malfunction, contact the supplier in time. Unauthorized
disassembly of the Lahoux Optics will irrevocably void the
warranty.

4

5
1 Button functions
Switch on
The camera will be switched on by pressing the power button
for 3 seconds when the camera is off, the indicator light will be
turned on, and the start-up screen will be shown.
Switch off
The camera will be switched off by pressing the power button
for 3 seconds when the camera is on. Release the button when
the countdown timer has changed from 3 to 0.
Standby-mode
When the camera is on, short press the power button it will en-
ter into standby mode with indicator light blinking. When WiFi
is on or camera is recording or outputting video, standby mode
will not be activated. Short press the power button to resume
from standby mode to normal mode.
Indicator
Focusable lens
Diopter knob
Power
Image mode
E-Zoom
Photo/video
Heat sink
USB/MCX port
Eyeshade
Carrying strap attachment

6
Dioptre adjustment
The dioptre knob can help the user to have the clearest image,
set for the users eye. Adjust the knob to sharply focus on the
start-up screen, the symbols or the menu.
Switch the image mode
Short click the Image Mode button to switch the image mode.
There are 5 different modes: White hot , Black hot , Red
hot , Pseudo colour and Bird mode circularly.
E-Zoom
Short click the E-zoom button when the camera is on. The
image will be digitally zoomed 1×, 2× to 4× circularly.
Photo and video
In the normal display mode, short press the Photo button to
take photos and long-press for a video recording. A video
symbol appears in the upper-right corner. Long press again to
stop and save the video.
Hot spot tracking
Long press the Image Mode button and Photo button simul-
taneously to start the hot spot tracking function to track the
hottest objects on the display.
Rangefinder
Long press the E-zoom button and the Image Mode button to
turn the stadiametric rangefinder indication on or off. By short or
long pressing the Image Mode button or the Photo button the
selecting lines can be adjusted to the size of the target. The dis-
tance indication of a human (1.7m target), wild boar (0.9m target)
and hare (0.2m target) is displayed behind the corresponding
symbol.

7
2 Menus
2.1 Main menu
Long press the E-zoom button to enter the main menu, then
short press the Image mode button or the Photo button to toggle
up and down. And short press the E-zoom button to adjust/
select the following settings: ultra clear mode, WiFi, screen
brightness, video output, hue selection, image calibration and
picture in picture. When done, long press the E-zoom button to
exit the menu.
Ultra clear mode
In this mode, the image contrast is enhanced, which is
suitable for cloudy, rainy, foggy and other harsh weather
conditions.
Wifi functions
The photos and videos on the camera can be viewed via
the “Lahoux Spotter” App. This app can be downloaded
for free from the App Store and Google Play store.
• Enable WiFi via the Spotter menu and make a connecti-
on with the smartphone.
• The WiFi password is 12345678. After connection:
• Open the Lahoux App and press connect.
When you see the real-time image, you can watch, even
with several phones, or download photos or videos.
Using the tab foto/video/FTP in the menu you can access
fotos selecting FTP. There the folders and files are shown.
Via photo/video in this menu tab the photos or videos are
shown that are stored on you phone.
When the Spotter is connected through WiFi with a
computer, the data in the camera can be seen with an
internet browser, (Windows Explorer, Mac Safari for
example) or an FTP-client. The cameras IP address is
ftp://192.168.11.123.
Deleting files
Using the iPhone App: The unwanted file can be deleted
from the Lahoux Spotter memory by swiping to the left
and pressing delete.
Using the Android App: Highlight the file by long pressing
and confirm the delete by short pressing.
See also 2.4 Data download for an alternative method.

8
Screen brightness
Switch screen brightness levels 1–4. Default brightness is
level 2.
Video out
When you turn on the analogue video in the menu, and
a video output symbol appears in the lower-right corner
of the image. The camera is ready to send video with the
video cable via the MCX connector.
Image warmth
There are two hues to select from: C (cool) hue and W
(warm) hue. Short press the E-zoom button to switch
between C and W.
Image calibration
When the image degrades it can be improved by a man-
ual correction. There are two mode available: B (back-
ground) and S (shutter) that can be selected in the menu.
Long press the E-zoom and Photo button simultaneously
to perform the manual correction. When the B mode is
selected, the lens must be covered during the correction.
Picture in picture (PiP)
When the PIP function is turned on, a small window
appears at the top centre of the screen, showing the dou-
bled zoom of the central area of the image shown.

9
2.2 Secundary menu
In the Main menu select the icon. Short press the E-zoom
button to enter the secondary menu. Short press the Image
mode button or the Photo button to toggle up and down.
And short press the E-zoom button to adjust/select following
settings: digital compass, motion sensor, auto standby, cursor
calibration, system information, factory reset.
Digital compass
When the digital compass function is switched on in the
menu it will be displayed in the centre top of the screen.
Motion sensor
When the motion sensor function is switched on in the
menu, the roll and pitch angle will be displayed on the
right hand side of the screen. Below the indicators the
angles are shown in degrees.
Auto standby
When the auto standby mode is switched on the device
will automatically enter standby mode after 15 minutes
of inactivity. After 15 minutes in standby mode the device
will automatically be switch off.
Motion calibration
Short press the E-zoom button and rotate the camera
around its axis in all three indicated directions to calibrate.
System information
Select the ‘i’ symbol and short press the E-zoom button
to view the system information of the device.
Factory reset
Short press the E-zoom button for factory reset. Select
√ (Yes) or × (No) with a short press of the Image mode
button or Photo button. Press the E-zoom button briefly
to confirm your selection.
If Yes is selected, the following settings will be restored to
the factory state: Image Mode - white hot mode, Bright-
ness - level 2, E-zoom - ×1, Calibration Mode - S, Image
Hue - warm, and the other functions are off.
Note: Restoring factory settings will format the memory,
so please save the data in advance.

10
2.3 Charging
When the indicator in the left bottom of the screen is red ( ),
the battery had insufficient capacity left. Please charge in time.
You can charge with the USB power adapter or any other power
supply like a USB power bank.
The LED indicator is orange/red when charging and turns
green when fully charged.
ATTENTION
1. The rated charging voltage of this product is 5V standard
USB, please charge timely when power is low, to avoid loss
of service life caused by battery over-discharge.
2. It is not recommended to use the thermal imager during high
temperatures, the camera will shut down automatically. Rec-
ommended operating temperature range: -10 °C to 50 °C.
3. Use in extreme environments will affect the Lahoux Spotter’s
runtime.
4. Make sure that the USB/MCX port cover on the bottom of the
camera is tightly closed when it is used in wet environments,
like rainy days.
5. The B calibration mode will diminish the automatic shutter
correction after the Lahoux Spotter is thermically stable.
Should the image become less good, please cover the lens
and perform a manual background correction.
2.4 Data download
It is possible with the newer Lahoux Spotter to use the included
USB-C cable to transfer the files directly to a PC or tablet.
When you connect the camera and turn it on, the Lahoux Spotter
will be visible as an external disk. The files can be downloaded or
deleted individually or completely.

11
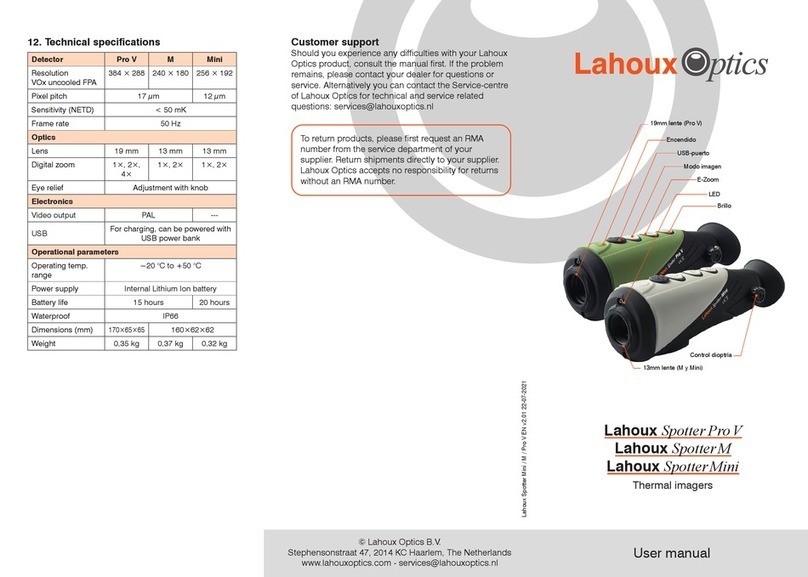
3 Technical specifications
Spotter
25
Spotter
35
Spotter
Elite 35V
Spotter
Elite 50V
Detector
Resolution
uncooled FPA
384 × 288 640 × 480
Pixel pitch 12 µm
Spectral range 8-14 µm
Sensitivity (NETD) < 50 mK
Frame Rate 50 Hz
Optics
Lens 25 mm 35 mm 50 mm
Digital Zoom 2×, 4×
FOV (field of view)
10.5°×7.9° 7.5°×5.7° 12.5°×10° 8.8°×7.0°
Electronics
Video output PAL
USB For charging, can be powered
with USB power bank
Image
Transmission
Photo/Video transmission through WiFi in
combination with Lahoux App
Operational parameters
Operating temp.
range
−10 °C to +50 °C
Power supply Internal Lithium Ion battery
Battery life 7 hours* 6 hours*
Encapsulation IP67
Dimensions (mm)
181×65×64 188×65×64 mm 202×65×64
Weight 0.45 kg 0.52 kg
* The actual operation time depends on the intensity of WiFi and photo/
video use and the temperature.

12
4 Customer support
Should you experience any difficulties with your Lahoux Optics
product, consult the manual first. If the problem remains,
please contact your dealer for questions or service. Alternative-
ly you can contact the Service-centre of Lahoux Optics for tech-
To return products, please first request an RMA number
from the service department of your supplier. Return ship-
ments directly to your supplier. Lahoux Optics accepts no
responsibility for returns without an RMA number.

13

Lahoux Spotter serie EN V3.00 13-08-2021
© Lahoux Optics B.V.
Stephensonstraat 47, 2014 KC Haarlem, The Netherlands
This manual suits for next models
4
Table of contents
Other Lahoux Optics Laboratory Equipment manuals
Popular Laboratory Equipment manuals by other brands

Witeg
Witeg WITOPET economy operating manual

Weinmann
Weinmann ACCUVAC WM 15261 Description of the equipment and instructions for use

Pentair
Pentair BIOSHIELD 522635 Installation and user guide

Organomation Associates
Organomation Associates ROT-X-TRACT-LC 13318 instruction manual

Gilson
Gilson MICROMAN E M10E user guide

Leonton
Leonton GINJ-0201-EBT-T Hardware user manual