Lakeland 63483 User manual

INSTRUCTION BOOKLET
Model: 63483
TOUCHSCREEN
BREAD MAKER

2

3
LAKELAND TOUCHSCREEN BREAD MAKER
Thank you for choosing the Lakeland Touchscreen Bread Maker. We are sure you will be
delighted with the performance and will enjoy many years of making and baking your
own delicious home-made bread.
Please take a little time to read this booklet before getting started and keep it in a safe
place for future reference.
This Touchscreen Bread Maker makes three sizes of loaf - 1000g, 1250g and 1500g. This
allows you to choose the size of loaf depending on your needs. This versatile machine
has 12 settings allowing you to make basic, whole-wheat, gluten free and sweet breads
as well as excellent cakes, dough and quick breads. A jam and yoghurt setting with
delay start and keep warm functions, makes this bread maker a great all round versatile
appliance.
Here at Lakeland, our award-winning family-owned business still offers the same excellent
quality, value for money and exceptional customer service as when we founded the
company back in the 1960s.
Our products are hand-picked and thoroughly tested so you can be sure that everything
you purchase will be a pleasure to use for many years to come.

4
CONTENTS
Product features..............................................................................................................5
Safety cautions.............................................................................................................6-7
The control panel and programmes............................................................................8-12
How to assemble the Touchscreen Bread Maker and using for the very first time............13
Instructions for use ..................................................................................................14-16
Table for programme cycle times ...................................................................................17
A guide to ingredients..............................................................................................18-20
Adapting your own recipes............................................................................................20
Hints and tips................................................................................................................21
Recipes .........................................................................................................................22
Programme 1 – BASIC ...............................................................................................23
Programme 2 – QUICK ..............................................................................................24
Programme 3 – SWEET..............................................................................................25
Programme 4 – WHOLE-WHEAT ................................................................................26
Programme 5 – GLUTEN FREE....................................................................................27
Programme 6 – DOUGH.......................................................................................28-29
Programme 7 – KNEAD .............................................................................................30
Programme 8 – CAKE................................................................................................31
Programme 9 – JAM .................................................................................................32
Programme 10 – YOGHURT....................................................................................33-34
Programme 11 – BAKE ................................................................................................35
Programme 12 – CUSTOM ..........................................................................................36
Troubleshooting .......................................................................................................37-41
Care and cleaning .........................................................................................................42
Technical information....................................................................................................43
Electrical connections....................................................................................................43
Recycling your electricals ...............................................................................................43

5
6. Control panel
7. Air vents
8. Measuring cup
9. Measuring spoon
10. Hook
PRODUCT FEATURES
1. Viewing window
2. Lid
3. Kneading paddles
4. Removable bread
pan with handle
5. Main unit
810
3
5
2
1
4
7
9
6

6
SAFETY CAUTIONS
Carefully read all the instructions before using the appliance and keep in a safe place
for future reference. Always follow these safety cautions when using the appliance to
avoid personal injury or damage to the appliance. This appliance should be used only as
described in this instruction book.
• This appliance can be used by children aged from 8 years
and above and persons with reduced physical, sensory or
mental capabilities or lack of experience and knowledge if
they have been given supervision or instruction concerning
use of the appliance in a safe way and understand the
hazards involved. Children shall not play with the appliance.
Cleaning and user maintenance shall not be done by
children unless they are older than 8 and supervised.
• Make sure your electricity supply matches the voltage shown on the appliance.
• Ensure all packaging materials and any promotional labels or stickers are removed from
the appliance before the first use.
• Always inspect the appliance before use for noticeable signs of damage. Do not use if
damaged or has been dropped. In the event of damage, or if the appliance develops a
fault contact the Lakeland customer care team on 015394 88100.
• Do not use this appliance if the lead is damaged. Contact the Lakeland customer care
team on 015394 88100.
• Always use the appliance on a dry, level, heat resistant surface.
• Unplug from the mains when not in use and before cleaning. To disconnect, turn
the socket to “off” and remove the plug from the mains socket. Allow to cool before
cleaning the appliance.
• Do not use any accessories or attachments with this appliance other than those
recommended by Lakeland.
• To protect against fire, electric shock or personal injury, do not immerse cord, plug or
unit in water or other liquids.
• Do not leave the lead hanging over the edge of a kitchen table or worktop. Avoid
contact between the lead and hot surfaces.
• For indoor use only.
• For domestic use only.
• This appliance should be used for preparation of food as described within the
instructions for use that accompany it.
• Always ensure that your hands are dry before removing the plug from the mains socket.
Never pull the plug out of the mains socket by its lead.
• To avoid injury or possible fire, do not cover the appliance when in use.

7
• Do not connect this appliance to an external timer or remote control system.
• An extension cable may be used with care. The electrical rating of the cable should be
at least as great as the appliance. Do not allow the cable to hang over the edge of the
worktop or touch any hot surfaces.
• This appliance complies with the basic requirements of Directives 2014/30/EU
(Electromagnetic Compatibility) and 2014/35/EU (Low Voltage Directive).
• WARNING: A cut off plug inserted into a 13 amp socket is a serious safety (shock)
hazard. Ensure the cut off plug is disposed of safely.
• CAUTION: The plastic bags used to wrap this appliance or the packaging may
be dangerous. To avoid risk of suffocation, keep these bags out of reach of
babies and children. These bags are not toys.
• Do not operate empty unless the instructions advise otherwise e.g. for the first use.
• Do not touch any moving parts whilst in use.
• Do not lift or move the appliance whilst in use.
• Do not cover the appliance or block the air vents in the lid or sides whilst in use.
• Make sure there is plenty of air circulation around the appliance.
• The bread pan will be very hot - always use oven gloves to remove the hot bread pan
from the oven chamber.
• The kneading paddles will be very hot after use, always use an oven glove or cloth when
handling.
• Do not place hands in the oven chamber after the bread pan has been removed as it will
be very hot.
WARNING - HOT SURFACES
• The Touchscreen Bread Maker and surfaces marked
with this symbol will get very hot during use.
• DO NOT TOUCH these surfaces as possible injury
could occur.
• Wear oven gloves when removing the bread pan from
the base unit. Allow the appliance to cool completely
before touching these surfaces, handling, moving or
storing this appliance.
• Be careful when opening the lid, as hot steam will
escape and can burn.

8
THE CONTROL PANEL AND PROGRAMMES
The Touchscreen Bread Maker does not have a separate on/off switch. Simply plug in and
switch on at the socket. After switching on at the socket the power button on the LCD
display screen will be illuminated and you will hear a beep.
PROCESSING PHASES
The phase currently in process is indicated on by blinking (flashing) symbols.
CONTROL PANEL LOCK
The control panel is protected against unintentional manipulation, 1 minute after the start
of a programme, the control panel screen will automatically lock. A lock symbol will
appear on the display. With the control panel locked, all buttons are disabled except for
the button MENU. When you press and hold the MENU button for about 3 seconds, you
will hear a signal sound and at this time the control panel has unlocked.
preheat knead
1
rest
1
knead
2, 3, 4
rest
2
rise
1, 2, 3
bake keep
warm
MENU
WORKING TIME
CONTROL PANEL LOCK
POWER
ON/OFF
LIGHT MEDIUM DRIED FRUITLOAF SIZE
LOAF SIZE
DARK
MENU TIME + TIME –
TIMER
START/STOPCOLOUR

9
START/PAUSE/STOP
This button is used to start, pause and stop the programme.
When you press the START/PAUSE/STOP button, the colon between the digits will start
flashing and the programme will start. When you shortly press the START/PAUSE/STOP
button again, the programme will pause. To indicate that the programme is paused, the
time and colon will be flashing.
When you press and hold the START/PAUSE/STOP button for about 3 seconds, you will
hear a beep and the programme will stop. The same applies when you wish to stop the
temperature maintenance mode.
Warning: Use the PAUSE function for a short time only, maximum of 5 minutes. When
paused, the you can push the dough more towards the bottom of the bread pan with a
spatula. If the programme is paused for a longer time, it could have a negative impact on
the dough processing, and consequently on the baking results.
MENU
The MENU button is used to set your selected programme.
Press the MENU button repeatedly to scroll through the menu – the programmes will
show in the display screen accompanied by short beeps.
When you see the number of the programme you require together with the programme
time – stop pressing. If you go past your chosen programme, keep pressing the button
until the programme number comes round again.
The programmes are as follows:
1. BASIC
Kneading, rising and baking normal bread. You may also add ingredients to increase
flavour.
2. QUICK
Kneading, rising and baking loaves, for a fast preparation of white, wheat and rye bread.
Breads made on this setting usually have a denser texture and are smaller.
3. SWEET
Kneading, rising and baking of sweet bread with a crispier crust than the Basic
programme.
4. WHOLE-WHEAT
Kneading, rising and baking of whole wheat bread. This setting has a longer preheating
time to allow the grain to swell up and expand. It is not recommended to use the delay
function with this programme.
5. GLUTEN FREE
A special programme for those who use gluten-free flours and baking mixes. The
programme has a long second rising time. The dough is usually more like a batter and is
wetter than ordinary doughs.

10
6. DOUGH
Kneading and rising. No bake. You can remove the raw dough and shape into rolls, pizzas
etc. to cook in the conventional oven. Ideal if you like to make your dough in the bread
maker and then oven bake your loaf.
7. KNEAD
The programme is intended for kneading dough only, without proving. When kneading
dough, you can use various ingredients for a variety of baked products e.g. bread rolls,
pizzas, etc.
8. CAKE
This programme is designed for kneading and mixing of ingredients which are then baked
for a pre-set time. We recommend that you mix your wet and dry ingredients together
first and pour them in the bread pan. In this mode, you cannot set the cake size. You may
find that cakes made in the bread maker will be smaller and a little more dense than those
baked in a conventional oven but will be just as moist.
9. JAM
This programme is for making jams, marmalades or compotes from fresh fruit.
10. YOGHURT
This programme is for preparation of home-made yoghurt.
11. BAKE
This programme is for baking only - no kneading or rising.
You can also use the BAKE programme to darken crusts if the finished loaf is too light at
the end of your chosen programme. Simply select BAKE and leave the loaf to bake for
longer, taking the loaf out of the machine when you are happy with the colour. Bread can
also be crisped and freshened using the BAKE programme.
12. CUSTOM
This programme is intended that you can set the times for the individual bread making
processing phases of kneading, proving and baking.
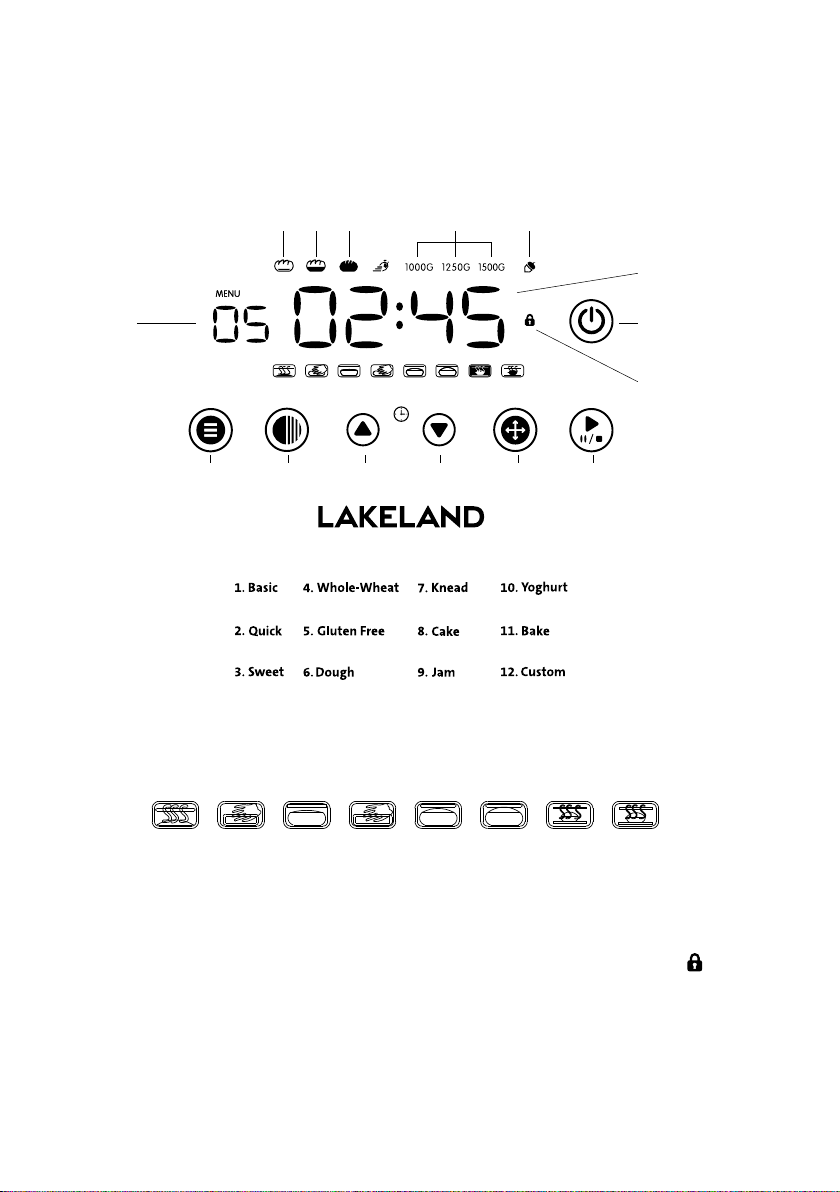
COLOUR
Press the COLOUR button to select a LIGHT, MEDIUM or DARK coloured crust. This cannot
be used with the DOUGH, KNEAD, JAM or YOGHURT programmes.
With the COLOUR button you can speed up the pre-set RAPID. This will shorten the
baking time. This setting is only possible with the following programmes: BASIC, SWEET
and WHOLE-WHEAT.
LOAF SIZE
Press this button to select your loaf size either 1000g, 1250g or 1500g and programme
times will vary according to the loaf size selected. The programme time will be visible on
the display screen.
You can select either a 1000g, 1250g or 1500g loaf on these programmes: BASIC, QUICK,
SWEET, WHOLE-WHEAT, and GLUTEN FREE.
You cannot use the LOAF SIZE button on the following programmes: DOUGH, KNEAD,
CAKE, JAM, YOGHURT, BAKE and CUSTOM.

11
DELAY FUNCTION
TIME (this enables you to delay the start time). The maximum delay time is 15 hours (this
includes the time of the selected programme).
If you want to delay the start time so that the bread cooks overnight and is ready to eat in
the morning:
Example:
It is 8.30pm and you want your bread ready at 7am the following day – i.e in 10 hours
and 30 minutes.
• Select your programme, loaf size and colour.
• Press the TIME+ button to add the time until 10.30 appears on the display
screen.
• Press the START/STOP button to activate the delay function.
• The dots will flash and the numbers will count down to show you the remaining time.
• The bread will be ready for you at 7am. If you don’t take the bread out immediately the
keep warm mode will begin for 1 hour.
DO NOT USE THE DELAY TIME WHEN USING INGREDIENTS THAT WOULD SPOIL
SUCH AS EGGS, MILK, FRUIT, ONIONS, CREAM OR CHEESE.
NOT SUITABLE THE FOR GLUTEN-FREE PROGRAMME.
WE DO NOT RECOMMEND USE OF DELAY TIME SETTING WITH BREAD MIXES AS
YOU CANNOT SEPARATE THE YEAST FROM THE LIQUID.
The delay start function can not be set for the following programmes: KNEAD, CAKE,
JAM, YOGHURT, BAKING.
PLEASE NOTE: The TIME buttons can also be used to set the programme time for the
following programmes: KNEAD, YOGHURT and BAKE, and to set the time of the individual
processing phases of the programme CUSTOM.
AUDIBLE ALERT TO TELL YOU WHEN TO ADD ADDITIONAL INGREDIENTS
Part way through certain programmes the machine will beep 10 times and display .
This tells you that you can add additional ingredients such as fruit, olives, nuts etc. (see
table on page 17). The beeps are very clear and can be easily heard, calling you back to
the machine.
KEEP WARM
The Touchscreen Bread Maker will automatically keep the bread warm for 60 minutes after
baking. At the end of the programme the appliance will beep and the display screen will
show “0:00” the : will flash and will be indicated on the display screen indicating that
the machine is in KEEP WARM mode. Press and hold the START/STOP button to switch off
the appliance. The KEEP WARM feature means that bread can be served warm if preferred
and helps to minimise moisture build up if the loaf is not removed from the bread maker
immediately after baking. You can also hold down the START/STOP button for 3 seconds,
hear a buzzer and exit the keep warm function.
Note: For best results however, remove the bread as soon as the baking cycle is complete
and allow it to cool on a cooling rack. You may find that the crust becomes crisper if kept
on the keep warm mode after baking.

12
POWER FAILURE BACKUP SYSTEM
The Touchscreen Bread Maker is equipped with a power failure backup system or memory.
If the power system is interrupted during the course of bread making, the process of
making bread will be continued automatically within 10 minutes, even without pressing
the START/STOP button. If the interruption time exceeds 10 minutes, the memory cannot
be kept and you must discard the ingredients in the bread pan and start again. If the
dough has not entered the rising phase when the power supply breaks off, you can press
the START/STOP button directly to continue the programme from the beginning.
ENVIRONMENT
The machine works well in a wide range of temperatures, but there could be a difference
in loaf size between a very warm room and a very cold room. We suggest the room
temperature should be between 15˚C and 34˚C.
WARNING DISPLAY
If the display screen shows “H HH” after you have pressed the START/STOP button and the
machine beeps 5 times the temperature inside is too high. Press the START/STOP button,
open the lid and allow the bread maker to cool down for 10 - 20 minutes.
If the display screen shows “E:E0” after the START/STOP button has been pressed the
temperature sensor has developed a fault. Contact Lakeland Customer Services for further
advice.

13
HOW TO ASSEMBLE THE TOUCHSCREEN BREAD
MAKER AND USING FOR THE VERY FIRST TIME
When the Touchscreen Bread Maker is used for the first time it may emit a slight burning
smell when first switched on. This is completely normal with a new heating element. You
will need to operate the bread maker empty for the very first use. This will also show you
how easy the bread maker is to use.
• Wash the bread pan and kneading paddles in hot, soapy water, rinse and dry
thoroughly.
• Place the bread maker on a flat, dry, heat-resistant surface.
• Position the bread pan in the baking chamber holding it at a slight angle and turning it
clockwise until it clicks into place.
• Fix the kneading paddles onto the drive shafts.
• Close the lid.
• Switch on at the socket.
• The bread maker will beep and the display screen will show the default setting
“1250g, MEDIUM, 3:10”
• Press the MENU button repeatedly – the programme numbers will scroll through. Stop
pressing at programme number 12, CUSTOM. If you go past the number you require
simply keep pressing until programme 12 comes around again.
• Select programme 12, CUSTOM and press START/STOP.
• The bread maker will begin to count down and you can follow this on the
display screen. Leave the bread maker for 10 minutes. You may hear some
intermittent clicks during this time.
• Press the START/STOP button firmly to stop the programme.
• Open the bread maker and allow to cool completely.
• Lift out the kneading paddles then remove the bread pan by turning anti-clockwise and
lifting out.
• Wash, rinse and dry the bread pan and kneading paddles again and replace.
• You are now ready to make your first loaf.

14
INSTRUCTIONS FOR USE
HOW TO MEASURE INGREDIENTS
One of the most important steps for making good bread is to use the exact measure of
ingredients. Always use the measuring cup and spoon provided with your bread maker.
• Any liquid should be measured with the measuring cup or spoon provided. Observe the
level of the measuring cup at eye level.
• When measuring cooking oil or other liquids, wash, rinse and dry the measuring cup
and spoon thoroughly before measuring any other ingredients.
• Dry ingredient measuring must be done by gently spooning ingredients into the
measuring cup and then, once filled, level it off with a knife. Do not be tempted to add
more than required or to pack it down tightly into the cup as it will affect the recipe.
• When measuring small amounts of dry ingredients e.g. yeast, sugar and salt, use the
measuring spoon supplied. Measurements must be level, not heaped, as this could
affect the recipe.
The measuring cup holds approximately 160g of flour, or 250ml
1 teaspoon = 5ml
1 tablespoon = 15ml
ADDING ADDITIONAL FLAVOURINGS AND INGREDIENTS
You can do this in three ways (or a combination of them):
1. You can add extra ingredients to the bread pan with your basic ingredients. If added
at the start of the programme they will be more finely distributed throughout the
mixture and will not remain whole – they will however add flavour and colour to the
dough.
2. If the programme has a time function to add ingredients, the appliance will beep
10 times and display , when extra ingredients can be added by opening the lid.
3. If using the DOUGH programme you can knead extra ingredients in by hand before
shaping and baking.
TIPS: 1. Do not add too much fruit, seeds etc., 50-80g is appropriate.
2. Do not add very hard ingredients, they can cause abrasion and damage the
non-stick coating of the bread pan.
Suggestions of ingredients to be added - nuts e.g. walnuts (chopped), poppy seeds,
cheese (grated), sunflower, fennel, caraway and cumin seeds.

15
MAKING A LOAF – Things to remember
Place the pan in position and turn it clockwise until it clicks in correct position. Rub a little
margarine or butter onto the kneading paddles and position onto the drive shafts. This
prevents the dough from sticking to the kneading paddles and assists with removing the
paddle from the bread after baking.
Ensure the ingredients are put into the bread maker in the exact order given in the recipe,
for example;
• First, liquid ingredients - oil, milk, water etc. It is recommended that you also
add the salt now as you can be sure it will be kept separate from the yeast – this is
especially important if you are using the time delay.
• Second, dry ingredients - flour, sugar, milk powder etc. Add the flour gently and make
sure it is evenly distributed over the liquid. If you tip it onto the liquid too fiercely
the liquid may seep up through the flour and affect the action of the yeast. This is
particularly important if you are using the time delay.
• Last, yeast. The yeast must be kept separate from the wet ingredients and salt. Create
a small hole in the dry ingredients using your finger or a spoon and place the yeast in
the hole. Make sure the yeast is fresh – check the use by date.
• Ensure the ingredients are at room temperature unless otherwise stated. Water should
be cold unless the recipe states otherwise.
Select your recipe – it is a good idea to use one of the recipes we have included in this
booklet. The BASIC bread recipe on page 23 is a good recipe to start with. When you are
familiar with the bread maker you can use or adapt your own recipes.
1. Add the ingredients to the bread maker as recommended in the recipe.
2. Close the lid gently and plug the power cord into a wall outlet.
3. You will hear a beep. The display panel will illuminate and show the default setting
“1250g, MEDIUM, 3.10”
4. Press the MENU button repeatedly until the programme you require is reached.
5. Press the LOAF SIZE button to select a 1000g, 1250g or 1500g loaf (where applicable).
Salt
Yeast or soda
Dry ingredients
Water or liquid

16
6. Press the COLOUR button to select the desired crust colour (LIGHT, MEDIUM or
DARK).
7. If you want to delay the time the bread maker will start press the TIME + or TIME -
button (for full details see page 11). Skip this step if you want the bread maker to
start immediately.
8. The remaining time and the programme stage will be visible on the display screen.
9. Check the dough after a few minutes to make sure that all the flour is incorporated
into the dough. Sometimes flour may be left in the corners of the bread pan.
Press the START/STOP button, open the lid and, using a non-stick spatula, simply
loosen the flour so it will be evenly mixed in.
10. Close the lid again and press START/STOP to recommence the programme.
11. When the programme is complete you will hear 10 beeps and the display screen will
show “0:00” the bread will now be automatically kept warm for 60 minutes if you do
not switch the bread maker off.
12. Press the START/STOP button firmly for approx. 2 seconds to stop the machine. The
default setting will appear in the display screen “1250g, MEDIUM, 3.10”
13. Open the lid and using an oven glove, firmly grasp the bread pan handle, turn the
bread pan anti-clockwise and gently pull the pan straight up out of the machine using
the handle. CAUTION: the bread pan and bread may be very hot. Handle with care.
14. Turn the bread pan upside down and gently shake the loaf onto a cooling rack.
If the loaf does not fall out straight away gently loosen the sides of the loaf with a
non-stick spatula.

17
15. Leave the loaf to cool for about 20 minutes before slicing. Sometimes the kneading
paddles may remain in the loaf. If it does, use the hook to remove the paddles from
the base of the loaf. Take care as the kneading paddles will be very hot. Always
remove the kneading paddles before slicing the loaf.
REMEMBER:
If you do not stop the bread maker and remove your loaf, the bread maker will
automatically switch to “KEEP WARM” mode. Your bread will be kept warm for
60 minutes to prevent it from becoming soggy. The crust may become crisper depending
on how long it is kept warm.
For best results, remove the bread as soon as the baking cycle is complete and allow it to
cool on a cooling rack.
TABLE FOR PROGRAMME CYCLE TIMES (HOURS:MINUTES)
Loaf Size Timings
Time to
Add
Ingredients
RAPID
Time
Time to
Add
Ingredients
Crust Colour
Delay
Timer
Light Medium Dark
1. Basic 1000g
1250g
1500g
3.05
3.10
3.15
2.40
2.45
2.50
2.05
2.10
2.15
1.40
1.45
1.50 ••••
2. Quick 1000g
1250g
1500g
2.05
2.10
2.15
1.45
1.50
1.55 ••••
3. Sweet 1000g
1250g
1500g
3.25
3.30
3.35
2.25
2.30
2.35
1.55
2.00
2.05
1.35
1.40
1.45 ••••
4. Whole-Wheat 1000g
1250g
1500g
3.05
3.10
3.15
2.20
2.25
2.30
2.05
2.10
2.15
1.35
1.40
1.45 ••••
5. Gluten Free 1000g
1250g
1500g
2.30
2.35
2.40
2.00
2.05
2.10 ••••
6. Dough 1.50 •
7. Knead 0.10
8. Cake 1.50 1.35 •••
9. Jam 1.20
10. Yoghurt 10.00
11. Bake 1.00 •••
12. Custom 3.10 ••••

18
A GUIDE TO INGREDIENTS
The major ingredient in bread making is flour, so selecting the right one is the key to a
successful loaf.
Wheat flours
Wheat flours make the best loaves. Wheat consists of an outer husk, often referred to as
bran, and an inner kernel which contains the wheat germ and endosperm. It is the protein
within the endosperm which, when mixed with water, forms gluten. Gluten stretches like
elastic and the gases given off by the yeast during fermentation are trapped, making the
dough rise.
Strong or Very Strong White Bread flours
These flours have the outer bran and wheat germ removed, leaving the endosperm which
is milled into a white flour. It is essential to use strong or very strong white flour or white
bread flour because this has a higher protein level essential for the development of the
gluten. Do not use ordinary plain white flour or self raising flour for making yeast raised
breads in the bread maker because you will not get a good result. There are several brands
of white bread flour in the shops – look for STRONG or BREAD flour on the bag.
Strong or Very Strong Wholemeal or Whole Wheat Bread flours
Wholemeal flours include the bran and wheat germ and have a nutty flavour. Wholemeal
flour gives a coarser textured bread. Again, look for STRONG or VERY STRONG wholemeal
bread flour. If you make a loaf using all wholemeal flour it will be denser than white
loaves. Wholemeal doughs rise more slowly which is why there is a special programme on
this machine. For a lighter loaf replace part of the wholemeal flour with white flour.
Granary Strong Bread flours
A combination of white, wholemeal and rye flours with malted whole-wheat grains,
which adds texture and flavour. You can use this on its own or in combination with strong
white flour.
Non Wheat flours
Other flours such as rye can be used with white and wholemeal bread flours to make
traditional breads like pumpernickel or rye bread. Adding even a small amount can add
an interesting tang to your loaf. Do not use it on its own as the dough will be very sticky
and the loaf will be heavy and very dense. Other grains e.g. millet, barley, buckwheat,
cornmeal and oatmeal; These grains cannot be used alone to make bread as they are
unsuitable but they can be added in small quantities to white bread flour – try replacing
10 - 20% of white bread flour with any of these.
Salt
A small quantity of salt is essential for bread making. It helps to develop the dough and
gives flavour. Use fine table salt or sea salt rather than coarse ground salt which is best
kept for sprinkling on top of hand-shaped rolls etc. to give a crunchy texture. Low salt
substitutes are best avoided as most do not contain sodium.

19
• Salt strengthens the gluten structure and makes the dough more elastic.
• Salt inhibits the growth of yeast to prevent over-rising and stops the dough collapsing.
• Take care to add the correct amount as too much salt will kill the yeast or prevent it
rising sufficiently.
Sweeteners
Use white or brown sugars, honey, malt extract, golden syrup, maple syrup, molasses or
treacle.
• Sugar and liquid sweeteners help with the colour of the bread and add a golden colour
to the crust.
• Sugar attracts moisture which improves the keeping quality of the bread.
• Sugar provides food for the yeast. It is not essential as modern types of dried yeast are
able to feed on the natural sugars and starches found in the flour, but it will help to
make the dough more active.
• Sweet breads have a moderate level of sugar with the fruit, glaze or icing adding extra
sweetness. Use the SWEET programme for these breads.
• If substituting a liquid sweetener for sugar then the total liquid quantity of the recipe
will need to be reduced slightly.
Fats and Oils
A small amount of fat or oil will give a softer crumb and helps to extend the freshness
of the loaf. Use butter, margarine or lard in small quantities. Make sure they are at room
temperature and cut into small pieces so they mix in well. Do not use low fat spreads as
they contain up to 40% water and can affect the overall quantities in your recipe.
Liquid
Some form of liquid is essential. Usually water or milk is used. Water gives a crisper result
than milk. Water can be combined with skimmed milk powder. If using the time delay it is
important to use water and skimmed milk powder as ordinary milk will deteriorate if left
to stand for too long. For most programmes you can use water straight from the tap but
if using the RAPID BAKE programmes it needs to be lukewarm.
• On very cold days measure the water and leave to stand at room temperature for 30
minutes before use.
• If using milk, don’t use it straight from the fridge, leave it to stand at room temperature
for 30 minutes before use.
• Buttermilk, yoghurt, sour cream and soft cheeses such as Ricotta, cottage or fromage
frais can all be used as part of the liquid content and will give a more moist and tender
crumb.
• Eggs can be added to the dough to enrich it. Eggs improve the colour and help to add
structure and stability to the gluten during rising. If you are using eggs, reduce the
liquid content accordingly. Place the egg in the measuring cup and top up with liquid
to the correct level for the recipe.
Yeast
All the recipes in this book have been tested using easy blend, fast-action yeast which
does not require dissolving in water first, is very easy to use and tends to give better
results. It is placed in a well in the flour where it is kept dry and separate from the liquid
until the mixing commences.

20
• For best results use easy blend, fast-action yeast.
• Use only the amount of yeast stated in the recipe. If too much is added it will cause the
dough to spill out over the top of the bread pan.
• Once a sachet of yeast is opened it should be used within 48 hours.
• Always use yeast before its use by date.
• You may also find dried yeast that has been specially designed for use in bread makers.
• Always follow the instructions on the packet.
ADAPTING YOUR OWN RECIPES
After you have made some of the recipes supplied, you may wish to adapt a few of your
own recipes. Start by selecting one of the recipes in this booklet, which is similar to your
own and use this as a guide.
Read through the following guidelines and be prepared to make adjustments as you go
along.
• Make sure you use the correct quantities for the bread maker. This bread maker
has settings for 1000g, 1250g and 1500g loaves. If using your own recipe books use
the quantities given for the 1000g, 1250g and 1500g loaf sizes. Do not use more than
the recommended amount of flour and follow the recipe in metric or imperial - do not
mix the two.
• Always add the liquid to the bread pan first. Separate the yeast from the liquid by
adding after the flour.
• Add the flour carefully and spread it over the liquid. If tipped in too fiercely, the liquid
may seep up through the flour and come into contact with the yeast.
• Replace fresh yeast with easy blend dried yeast. Note: 6g fresh yeast = 1 teaspoon (5ml)
dried yeast.
• Use skimmed milk powder and water instead of fresh milk if you are delaying the
start time.
• If your recipe uses egg, add the egg as part of the total liquid measurement, unless the
recipe states otherwise.
• Keep the yeast separate from the other ingredients in the bread pan until mixing
commences.
• Check the consistency of the dough during the first few minutes of mixing. Bread
makers do require slightly softer dough so you may have to add extra liquid; add it
slowly a teaspoon at a time so you don’t add too much. The dough should be wet
enough to gradually relax back.
Table of contents
Other Lakeland Bread Maker manuals
Popular Bread Maker manuals by other brands

Morphy Richards
Morphy Richards Fastbake breadmaker owner's manual

Oster
Oster 5838-EXPRESSBAKE-BREAD-MAKER User manual & bread recipes

Kenwood
Kenwood BM200 series Instructions & recipes

Unold
Unold 68511 BACKMEISTER EXTRA Instructions for use

Black & Decker
Black & Decker B2500C Use & care manual

Electrolux
Electrolux LMP500BF specification