Lakeland 32925 User manual

INSTRUCTION BOOKLET
Model: 32925
7L STAND MIXER

2
LAKELAND 7 LITRE STAND MIXER
Thank you for choosing the Lakeland 7 Litre Stand Mixer.
Please take a little time to read this booklet before getting started and keep it in a safe
place for future reference.
The 7 Litre Stand Mixer is perfect for mixing, whipping and kneading ingredients for
your favourite cakes, bakes, biscuits and breads. The 7 Litre Stand Mixer has a built-in
fermenting function.
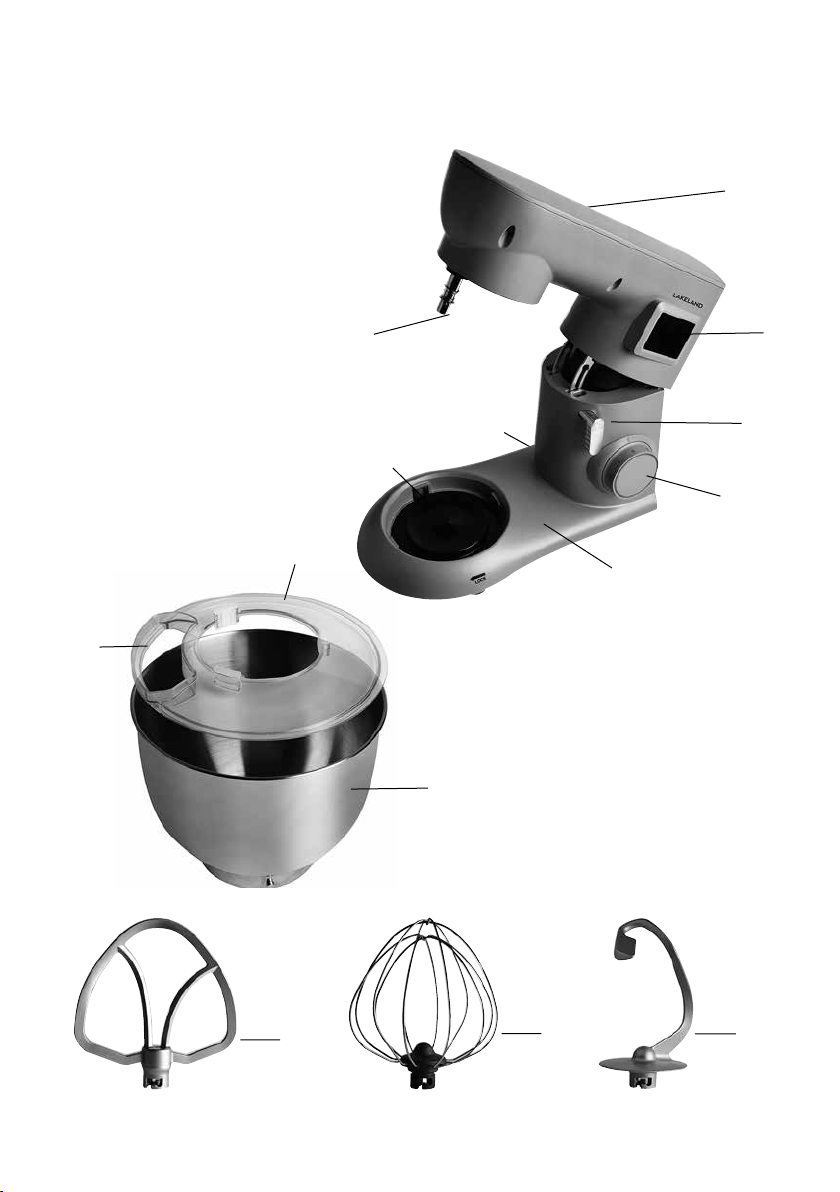
It has three versatile attachments; a dough hook, for kneading to use on lower speeds
for combining dry ingredients with liquid, and thicker mixtures like bread dough and
muns; a beater, for mixing to use on medium speeds to mix cakes, icing and dips; and
a whisk, for whisking to use with higher speeds for whipping cream, meringues and
eggs. The planetary mixing action works at 6 speeds to ensure even blending and the
powerful 1800W motor. The stand mixer has a built in timer and a stainless steel 7 litre
bowl has a splatter guard to minimise mess.
Here at Lakeland, our award-winning family-owned business still offers the same
excellent quality, value for money and exceptional customer service as when we founded
the company back in the 1960s.
Our products are hand-picked and thoroughly tested so you can be sure that everything
you purchase will be a pleasure to use for many years to come.
CONTENTS
Product features ...............................................................................................................................3
LED Control panel..............................................................................................................................4
To use the LED control panel ..........................................................................................................5
Safety cautions ............................................................................................................................. 6-7
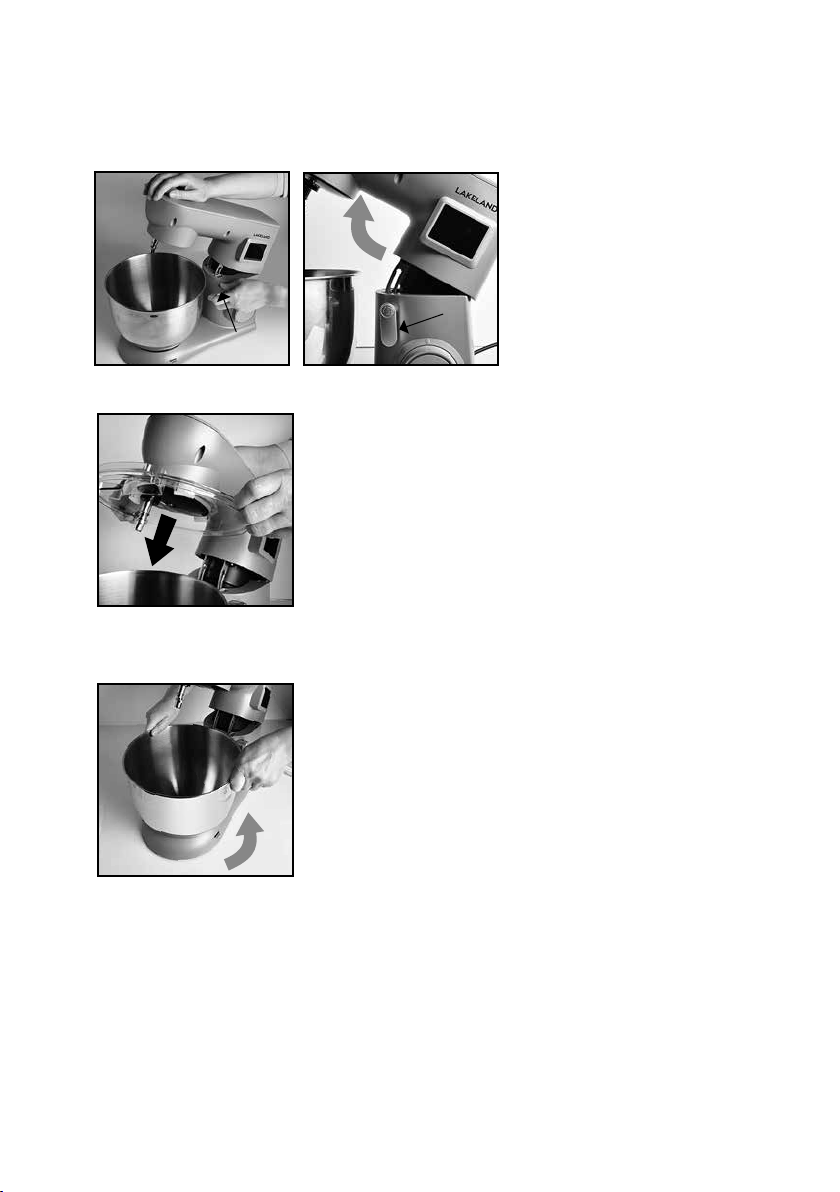
Assembling your 7 Litre Stand Mixer and using for the rst time ..................................... 8-9
Instructions for use........................................................................................................................ 10
A guide to speed settings ............................................................................................................. 11
Fermenting....................................................................................................................................... 12
Hints and tips .................................................................................................................................. 13
Frequently asked questions ........................................................................................................ 13
Care and cleaning .......................................................................................................................... 14
Technical information.................................................................................................................... 15
Electrical connections .................................................................................................................. 15
Recycling your electricals ............................................................................................................ 15

3
1. Arm
2. Attachment lock
3. Cord and plug
4. LED control panel
5. Tilt lever
6. Speed control dial
7. Base unit
8. Bowl lock
9. Splatter guard feed hole
10. Splatter guard
11. Mixing bowl
12. Beater
13. Whisk
14. Dough hook
PRODUCT FEATURES
1
5
4
2
14
6
8
7
3
9
12 13
10
11

4
1. Kneading icon
2. Speed function icons
3. Time function icons
4. Decrease button
5. Time button
6. Increase button
7. Fermenting icon
8. Mixing icon
9. Whisking icon
LED CONTROL PANEL
2
3
4
1 9
7
6
8
5

5
TO USE THE LED CONTROL PANEL
When the stand mixer is plugged in and switched on at the wall socket the LED control
panel and speed control dial will illuminate, the appliance will beep 5 times and will enter
standby mode.
CHANGING THE SPEED SETTINGS
• When the LED control panel is illuminated, the speed function will show ‘00’.
To change the speed setting between 1 and 6, twist the speed control dial clockwise
through the various settings.
• On the LED control panel, settings 1 and 2 are for Kneading, settings 3 and 4 are for
Mixing and settings 5 and 6 are for Whisking, the corresponding words will appear the
LED control panel.
• Once you have chosen your desired speed the stand mixer will start and can work
independently without the timer in operation.
• When in operation the LED control panel will show the speed function and show the
name of it.
• The timer will count up in minutes and seconds ‘mm:ss’.
TO SET THE TIMER FUNCTION
• To activate the timer function, press the time button, the default working time is 10
minutes. The LED control panel will change from showing ‘00:00’ which is not ashing
to ’10:00’ which will be ashing.
• 10 minutes is the default time for the mixing functions and 60 minutes is the default
time for the fermenting setting.
• The time can be reset by pressing the ‘+’ and ‘-‘ buttons.
• Press either the increase button ‘+’ to change the timer in minutes and seconds
‘mm:ss’ between 0 seconds and 99 minutes and 59 seconds. You can decrease by
pressing the decrease button ‘-‘.
• The time will increase in either 1 minute or 5 second intervals, press and hold the
increase or decrease buttons to move through the time more quickly.
• Next, set the speed by rotating the speed control dial, the LED control panel shows
speed and function synchronously, and the appliance will start working.
• The time on the screen will start to countdown.
• When the timer has counted down to 00:00 the appliance will stop working and there
will be an audible quick beep,10 times. Turn the dial to the ‘0’ position.
If no buttons are pressed with in 3 minutes the LED control panel will go off and the
stand mixer will go back into standby mode. The speed control dial can be rotated to
take the appliance out of standby mode.

6
SAFETY CAUTIONS
Carefully read all the instructions before using the appliance and keep in a safe place
for future reference. Always follow these safety cautions when using the appliance to
avoid personal injury or damage to the appliance. This appliance should be used only as
described in this instruction book.
• This appliance can be used by children aged from 8 years and
above and persons with reduced physical, sensory or mental
capabilities or lack of experience and knowledge if they have
been given supervision or instruction concerning use of the
appliance in a safe way and understand the hazards involved.
Children shall not play with the appliance. Cleaning and user
maintenance shall not be done by children unless they are older
than 8 and supervised.
• Make sure your electricity supply matches the voltage shown on the appliance.
• Ensure all packaging materials and any promotional labels or stickers are removed
from the appliance before the rst use.
• Always inspect the appliance before use for noticeable signs of damage. Do not use if
damaged or has been dropped. In the event of damage, or if the appliance develops a
fault contact the Lakeland customer care team on 015394 88100.
• Do not use this appliance if the lead is damaged. Contact the Lakeland customer care
team on 015394 88100.
• Always use the appliance on a dry, level, heat resistant surface.
• Unplug from the mains when not in use and before cleaning. To disconnect, turn the
socket to “off“ and remove the plug from the mains socket.
• Do not use any accessories or attachments with this appliance other than those
recommended by Lakeland.
• To protect against re, electric shock or personal injury, do not immerse cord, plug or
base in water or other liquids.
• Do not leave the lead hanging over the edge of a kitchen table or worktop. Avoid
contact between the lead and hot surfaces.
• For indoor use only.
• For domestic use only.
• This appliance should be used for preparation of food as described within the
instructions for use that accompany it.
• Always ensure that your hands are dry before removing the plug from the mains
socket. Never pull the plug out of the mains socket by its lead.
• To avoid injury or possible re, do not cover the appliance when in use.
• Do not connect this appliance to an external timer or remote control system.

7
• An extension cable may be used with care. The electrical rating of the cable should be
at least as great as the appliance. Do not allow the cable to hang over the edge of the
worktop or touch any hot surfaces.
• This appliance complies with the basic requirements of Directives 2014/30/EU
(Electromagnetic Compatibility) and 2014/35/EU (Low Voltage Directive).
• WARNING: A cut off plug inserted into a 13 amp socket is a serious safety (shock)
hazard. Ensure the cut off plug is disposed of safely.
• CAUTION: The plastic bags used to wrap this appliance or the packaging may
be dangerous. To avoid risk of suffocation, keep these bags out of reach of
babies and children. These bags are not toys.
• Do not use the appliance with wet hands.
• Do not put your hands or utensils inside the mixing bowl while the stand mixer is on,
to avoid the risk of injury and damage to the appliance. Avoid contact with rotating
parts.
• To add food to the bowl, twist the speed control dial to ‘0’ off position rst. If you
are using the splatter guard add food through the feed hole, pulse the mixer if the
attachment is blocking the feed hole.
• Replace the attachments if they show any signs of damage.
• Never leave the appliance unattended while switched on.
• Do not operate the appliance when empty.
• Do not use the appliance near an oven, hot surface or other source of heat. Use it at
least 10cm away from walls and other surfaces to allow sucient airow.
• Make sure the attachments are securely locked into place before switching on
the appliance.
• Heavy mixtures: Do not operate the stand mixer continuously for more than
6 minutes. Allow the motor to rest for 10 minutes between each use.

8
• With one hand on top of the arm twist the ‘TILT’ lever, and gently raise it.
ASSEMBLING YOUR 7 LITRE STAND MIXER AND USING
FOR THE FIRST TIME
• Unpack the stand mixer, remove all the packaging materials.
• Hold the bowl with both hands and twist anticlockwise to remove it from the
base unit.
• Before rst use, wipe the base unit with a clean damp cloth.
• Wash the attachments, bowl and splatter guard in warm soapy water rinse and dry
thoroughly.
• Make sure that all parts are clean and dry before assembling the product.
• Warning: Do not insert the plug into a socket and turn on the stand mixer before you
have fully assembled it.
• Place the base unit on a at surface near a socket at least 10cm away from walls and
other surfaces to allow sucient airow.
• Hold the splatter guard with both hands and gently push it down off the end of the
arm. It may be stiff the rst few times you do this.
TWIST
TWIST

9
Attaching the splatter guard
• You can use the splatter guard when mixing
our and liquid, to prevent splattering and our
dusting. For other jobs you may not need the
splatter guard.
• Holding the splatter guard with both hands,
gently place it over the attachment lock and
lift up over the end of the arm to secure in
place. There are three rubber grips which hold
it in place.
Attaching the bowl
• Place the bowl onto the bowl lock slotting the
tabs around the bottom, into the notches inside
the bowl lock. Hold the bowl with both hands and
twist clockwise following the ‘Lock’ arrow, until it
is securely in place.
Adding the attachments
• Select your attachment. Place this over the end of
the attachment lock, locating the two notches into
the slits on either side.
• Push the attachment up as far as it will go, then
twist the attachment anticlockwise to lock it into
position.
• Make sure the attachment is securely locked
into place.
• Press the ‘TILT’ lever and move the arm into the
downward position with your other hand.
The splatter guard should t over the bowl.
• The 7 Litre Stand Mixer is now ready to use.
To remove the attachments
• Push the attachment upwards into the attachment
lock as far as it will go, then twist clockwise to
release.
When adding or removing the bowl, splatter guard or attachments the arm must
always be raised. Press the ‘TILT’ lever to raise the arm.
PUSH
PUSH
TWIST
LOCKING
TABS
LOCKING
TABS

10
INSTRUCTIONS FOR USE
The 7 Litre Stand Mixer is fully interlocked for safety, it won’t switch on unless the arm is tilted
downwards.
• Check the speed control dial is in the ‘0’ off position
• Plug in and switch on the stand mixer at the socket.
• Place the stand mixer on a dry, level surface.
• The light around the speed control dial will blink.
• Press the ‘TILT’ lever to raise the arm into the upwards position. Add your ingredients into
the mixing bowl.
• Do not operate the appliance when empty. The maximum working capacity is 2 litres
(2kg), or 1.5 litres (1.5kg) for heavier ingredients such as our and water, or dough.
• Press the ‘TILT’ lever to lower the arm into the downwards position.
• When you switch on the stand mixer for the rst time there may be a slight burning smell,
this is normal for a new appliance and will stop after a few uses.
• To start mixing, twist the speed dial clockwise. Move slowly through the speeds to the
speed you require, the light around the speed dial will be solid when the appliance is
mixing.
• DO NOT put your hands or utensils inside the mixing bowl while the stand mixer is on.
If adding food to the bowl. While the stand mixer is on, twist the speed control dial to the
‘0’ off position rst. If you are using the splatter guard, add food through the feed hole,
pulse the mixer if the attachment is blocking the feed hole.
• If you need to scrape down food from the sides of the bowl, switch off the appliance and
use a spatula.
• Always switch off and unplug the appliance before you attach or remove any of the
attachments.
• Heavy mixtures: Do not operate the stand mixer continuously for more than 6 minutes.
Allow the motor to rest for 10 minutes between each use. Most mixing tasks will take
around 3 minutes.
• To stop the stand mixer, twist the speed control dial to the ‘0’ off position rst. The stand
mixer will continue to rotate for a few seconds after being switched off. Wait until it has
fully stopped before pressing the ‘TILT’ lever to raise the arm and remove the bowl.

11
A GUIDE TO SPEED SETTINGS
The stand mixer has 6 speed settings for mixing, whipping and kneading ingredients for
your favourite cakes, bakes, biscuits and breads, plus a fermenting setting.
Begin mixing your ingredients on the ’1’ setting, twist the speed dial clockwise to
increase the speed settings one at a time to the speed you require.
Here is a guide to the attachments and the speeds we recommend.
Attachment Speed Time
(min)
Use Tips
Dough hook 1-3 3-5 Use on lower speeds for
combining dry ingredients
with liquid, and thicker
heavier mixtures like
biscuits, scones, bread
dough, pizza bases, pastry
and muns. Maximum
ingredients 1000g our and
530g water. For best results
use speed 1 for 30s, then
speed 2 for 20s, then speed 3
for 2-3 minutes until a dough
ball forms.
Turn the speed dial to
‘O’as soon as the mixture
has formed a ball. Press
the ‘TILT’ lever to raise
the arm into the upwards
position. The mixture can
now be removed using
a spatula. Always use
cold ingredients for short
crust pastry.
Beater 2-4 3-10 Use on medium speeds
to mix cakes, batter, dips,
icing and to cream butter
or margarine with sugar.
Use for medium to heavy
mixtures Maximum
ingredients 660g our and
840g water. For best results
use speed 2 for 20s, then
speed 4 for more than 2
minutes 40 seconds.
Butter and margarine
should be at room
temperature.
Whisk 6 3-10 Use to whisk egg whites,
meringues and cream.
Use for light mixtures.
Minimum ingredients 3 egg
whites. For best results use
speed 5 or 6 for 3 minutes.
For best results,
whisk eggs at room
temperature.

12
FERMENTING
• When dough requires fermenting, remove the dough hook from the attachment and also
make sure the splatter guard is in position to help retain heat in the mixing
bowl.
• Fermenting is carried out at a low temperature by adjusting the speed control dial to ‘F’.
The default time is 60 minutes.
• The speed function on the LED control panel will show ‘OF’ as the speed function. The
word ‘Fermenting’ will appear.
• The time can be adjusted whilst the speed control dial is in the ‘0’ position. Press
the time button in the middle and it will show ’10:00’ the default time for the speed
functions, press the time button again to switch to the default fermenting time of 60
minutes and it will show ’60:00’.
• Adjust using the ‘+’ and ‘-‘ buttons.
• The maximum time setting is 99 minutes and 59 seconds. After the timing setting is
completed, the equipment enters the low-temperature heating and fermentation
working state.
• Then turn the dial anticlockwise to activate the Fermenting setting.
• Once fermenting time has nished, the appliance will stop working and there will be
an audible quick beep,10 times. Turn the dial to the ‘0’ position.

13
HINTS AND TIPS
• For best results, add liquids to your mixture rst.
• Use the splatter guard when mixing our and liquid, to prevent splattering and
our dusting.
• DO NOT use the stand mixer with very heavy ingredients or the motor may overheat.
If the appliance seems to be struggling to mix, switch off and unplug the appliance at
the socket and reduce the amount of ingredients in the bowl.
FREQUENTLY ASKED QUESTIONS
Question: Why is my stand mixer not working?
Answer: The stand mixer may not be plugged in and switched on, or the speed has
not been selected. Check the stand mixer is plugged in and switched on, the
light around the dial will be blinking. Move the speed switch to speed 1
to check. Check that the attachments and splatter guard are properly tted,
so that the arm is fully tilted down or the stand mixer will not work.
Question: Why is the beater struggling to rotate?
Answer: The mixture is too thick or you have added too many ingredients to the
bowl, add more liquid. If your recipe states otherwise, your mixture cannot
be mixed with the stand mixer. You may need to soften the ingredients or
chop them into smaller pieces before further mixing.
Question: Why is my mixture splattering over the work surface?
Answer: The speed may be set too high, select a lower speed.
Make sure the splatter guard is attached to the bowl.
Question: Why is the mixing bowl making a noise when mixing?
Answer: The mixing bowl may not be located properly, check that is is locked
correctly into place. The attachment might not be correct attached.
Question: Why is the stand mixer moving across the worksurface when in use?
Answer: Check that all the anti-slip suction feet are in position and that the appliance
is on a dry, level surface.

14
CARE AND CLEANING
• Unplug the stand mixer before cleaning.
• Clean thoroughly before using for the rst time and after every use.
• Check the parts for wear or damage after every few uses.
• Do not use abrasive cleaners or steel wool.
• Always use plastic or silicone spatulas.
• Never immerse the base unit in water or any other liquid.
• To clean the outer surfaces, wipe the base unit with a clean damp cloth and dry
thoroughly before storing.
• Wash the attachments, bowl and splatter guard in warm, soapy water, rinse and dry
thoroughly. Dishwasher safe.
• Do not soak the beaters in water for a long period of time.
• Store the 7 Litre Stand Mixer with the power cable loosely coiled. Never wrap it tightly
around the appliance.

15
TECHNICAL INFORMATION
• Power: 1800W.
• Voltage: 220-240V.
• Frequency: 50-60Hz.
• RPM: 40-210RPM. Min. ±20%.
• Flex length approx. 100cm. (39¼”).
• Product weight: 8kg.
ELECTRICAL CONNECTIONS
THIS APPLIANCE MUST BE EARTHED
This appliance is tted with a fused three-pin plug to BS1363 which is suitable for use in
all homes tted with sockets to current specications.
CHANGING THE 10 AMP FUSE
Use a 10 amp BS1362 fuse. Only BSI or ASTA approved fuses should be used. If you are
unsure which plug or fuse to use, always refer to a qualied electrician.
Note: After replacing or changing a fuse on a moulded plug which has a fuse cover, the
cover must be retted to the plug; the appliance must not be used without a fuse cover.
If lost, replacement fuse covers can be obtained from an electrical shop. This appliance
complies with the following EU Directives: 2014/35/EU (Low Voltage Directive) and
2014/30/EU (EMC Directive).
RECYCLING YOUR ELECTRICALS
The Waste Electrical and Electronic Equipment (WEEE) Directive requires
UK distributors to maximise separate collection and environmentally
friendly processing of WEEE.
UK distributors (including retailers) are required to provide a system which
allows all customers buying new electrical equipment the opportunity to
recycle their old items free of charge.
As a responsible retailer, we have met these requirements by offering all
customers buying new electrical and electronic equipment free take-back
of their old electricals on a like-for-like basis.

Lakeland
Alexandra Buildings, Windermere, Cumbria, UK LA23 1BQ
Tel: +44(0)15394 88100 lakeland.co.uk
32925_160222_v1
Table of contents
Other Lakeland Mixer manuals