LaMotte DPD 1A P-6740-G User manual

1. Fill sample bottle (0689) with water sample. Replace cap.
2. Fill clean tube (0205) to the 5 mL line with water sample.
Cap tube with blue cap.
3. Insert tube into the ColorQ 2x.
4. Press button to turn meter on . When “Blank” appears
press button to “Blank” the meter, and go to Free Chlorine
(FCL). Remove tube.
1. Add 5 drops of DPD 1A and 5 drops of DPD 1B to same tube.
2. Cap tube with blue cap. Invert 3 times to mix. Insert tube into the
ColorQ 2x.
3. Press button to read “FCL” Free Chlorine.
NOTE: To read as Bromine, press button past “FCL” and “TCL” to “Br”.
4. Press button to go to “TCL” Total Chlorine. Remove tube.
2DPD 1A P-6740-G/P-6740-CN-G
*DPD 1B *P-6741-G/*P-6741-CN-G
Blank
1. Llene la botella (0689) de muestra con la muestra de agua.
Coloque de nuevo el tapón.
2. Llene el tubo limpio (0205) hasta la línea de 5 mL con el
agua de muestra. Tubo de tapa con tapa azul.
3. Inserte el tubo en el ColorQ 2x.
4. Presione el botón para ENCENDER el medidor . Cuando
aparezca «Blank», pulse el botón para dejar enblanco el
fotómetro y vaya a Cloro libre (FCL). Retire el tubo.
1. Añada 5 gotas de DPD 1A y 5 gotas de DPD 1B al mismo tubo.
2. Tubo de tapa con tapa azul. Dele la vuelta 3 veces para mezclar.
Inserte el tubo en el ColorQ 2x.
3. Pulse el botón para leer «FCL» Cloro libre.
NOTA: para leer como Bromo, pulse el botón después de «FCL» y
«TCL» a «Br».
4. Pulse el botón para leer «TCL» Cloro total. Retire el tubo.
1. Remplissez le flacon (0689) d'échantillon avec l'eau
d'échantillon. Remettez le bouchon.
2. Remplissez une éprouvette (0205) propre avec l'échantillon
d'eau jusqu'à la ligne de 5 mL. Tube de bouchon avec
bouchon bleu.
3. Insérez l'éprouvette dans le ColorQ 2x.
4. Appuyez sur le bouton pour ALLUMER lecteur . Lorsque
«Blank» s'affiche, appuyez sur le bouton pour remettre
à zéro l'instrument et accédez à Chlore libre (FCL). Enlevez
l'éprouvette.
1. Ajoutez 5 gouttes de DPD 1A et 5 gouttes de DPD 1B dans la même
éprouvette.
2. Tube de bouchon avec bouchon bleu. Renversez le récipient 3 fois
pour mélanger la solution. Insérez l'éprouvette dans le ColorQ 2x.
3. Appuyez sur le bouton pour mesurer le chlore libre (FCL).
REMARQUE : pour mesurer le brome, appuyez sur le bouton jusqu'à
atteindre Brome («Br»), situé après Chlore libre («FCL») et Chlore
total («TCL»).
4. Appuyez sur le bouton pour atteindre Chlore total («TCL»). Enlevez
l'éprouvette.
ColorQ 2x Range/Distancia/Gamme
0-10 ppm Chlorine/Chloro/Chlore
0-22 ppm Bromine/Bromo/Brome
FREE CHLORINE/BROMINE
CHLORO LIBRE/BROMO
CHLORE LIBRE/BROME
BLANK (CALIBRATION)
BLANCO (CALIBRACIÓN)/BLANC (ÉTALONNAGE)
FCL/Br
555
FCL
1
1
3x
©2020 LaMotte Company
11
www.calcert.com [email protected]1.800.544.2843 0
5
10
15
20
25
30

3
1. Remove cap from reacted FCL (Free Chlorine) tube.
2. Add 5 drops of DPD 3 to the tube.
3. Cap tube with pink cap. Invert 3 times to mix. Insert tube into the ColorQ 2x.
4. Press button to read “TCL” Total Chlorine.
5. Press button past “Br” to “pH”. Remove tube.
1. Fill a clean tube (0205) to the 5 mL line with water sample.
2. Add 5 drops of pH.
3. Cap tube with red cap. Invert 3 times to mix. Insert tube
into the ColorQ 2x.
4. Press button to read pH. Remove tube.
pH 7037-G/7037-CN-G
DPD 3 P-6743-G/P-6743-CN-G
3. Tub
en el
1. Retire el tapón del tubo de FCL (Cloro libre) reaccionado.
2. Añada 5 gotas de DPD 3 al tubo.
o de tapa con tapa rosado. Dele la vuelta 3 veces para mezclar. Inserte
el tubo ColorQ 2x.
4. Pulse el botón para leer «TCL» Cloro total.
5. Pulse el botón para pasar de «Br» a «pH». Retire el tubo.
1. Llene el tubo limpio (0205) hasta la línea de 5 mL con el agua de
muestra.
2. Añada 5 gotas de pH.
3. Tubo de tapa con tapa roja. Dele la vuelta 3 veces para mezclar.
Inserte el tubo en el ColorQ 2x.
4. Pulse el botón para leer «pH». Retire el tubo.
3.
4.
1. Enleve
ayan z le bouchon de l'éprouvette de mesure du chlore libre contenant la
5.
Tube de bouchon avec bouchon rose. Renversez le récipient 3 fois pour
mélanger la solution. Insérez l'éprouvette dans le ColorQ 2x.
Appuyez sur le bouton pour mesurer le chlore total («TCL»).
Appuyez sur le bouton jusqu'à atteindre «pH», situé après Brome («Br»).
Enlevez l'éprouvette.
solution t réagi.
2. Ajoutez 5 gouttes de DPD 3 dans l'éprouvette.
1. Remplissez une éprouvette (0205) propre avec l'échantillon
d'eau jusqu'à la ligne de 5 mL.
2. Ajoutez 5 gouttes de pH.
3. Tube de bouchon avec bouchon rouge. Renversez le récipient
3 fois pour mélanger la solution Insérez l'éprouvette dans le
ColorQ 2x.
4. Appuyez sur le bouton pour mesurer le «pH». Enlevez
l'éprouvette.
ColorQ 2x Range/Distancia/Gamme 6.5-8.5 pH
TOTAL CHLORINE
CHLORO TOTAL/CHLORE TOTAL pH
ColorQ 2x Range/Distancia/Gamme
0-10 ppm Chlorine/Chloro/Chlore
0-22 ppm Bromine/Bromo/Brome
TCL
TCL Br
5
pH
3x 3x
5
4 pH
www.calcert.com [email protected]1.800.544.2843 0
5
10
15
20
25
30

Alk 6
ALK 2X IG 3896A-J/3896A-CN-J
1. Press button to go to “Ca Hard” Calcium Hardness.
2. Fill a clean tube (0205) to the 5 mL line with water sample.
3. rush with tablet crusher.Add 1 CA HARD 2X IG tablet. C
Cap tube with purple cap.
4. Invert 3 times to mix. Insert tube into the ColorQ 2x.
5. Press button to read “Ca Hard” Calcium Hardness. Remove tube.
Avertissement! Cet ensemble contient des produits chimiques qui
peuvent être nocifs s'ils sont mal utilisés. Lire attentivement les
précautions sur les conteneurs individuels. Ne pas être utilisé par
des enfants sauf sous la supervision d'un adulte.
5Ca Hard *CA HARD 2X IG *3887A-J/*3887A-CN-J
WARNING! This set contains chemicals that may be harmful
if misused. Read cautions on individual containers carefully.
Not to be used by children except under adult supervision.
1. Pulse el botón para ir a «Ca Hard» Dureza de calcio.
2. Llene el tubo limpio (0205) hasta la línea de 5 mL con el agua de muestra.
3. Añada 1 pastilla de CA HARD 2X IG. Triturar con un triturador de pastillas.
Tubo de tapa con tapa morada.
4. Dele la vuelta 3 veces para mezclar. Inserte el tubo en el ColorQ 2x.
5. Pulse el botón para leer «Ca Hard» Dureza de calcio. Retire el tubo.
1. Appuyez sur le bouton pour atteindre Dureté calcique («Ca Hard»).
2. Remplissez une éprouvette (0205) propre avec l'échantillon d'eau jusqu'à la
ligne de 5 mL.
3. Ajoutez 1 pastille CA HARD 2X IG. Triturez la pastille à l'aide du broyeur.
Tube de bouchon avec bouchon violet.
4. Renversez le récipient 3 fois pour mélanger la solution. Insérez l'éprouvette
dans le ColorQ 2x.
5. Appuyez sur le bouton pour mesurer la dureté calcique («Ca Hard»). Enlevez
l'éprouvette.
TOTAL ALKALINITY
ALCALINIDAD TOTAL/ALCALINITÉ TOTAL
CALCIUM HARDNESS
DUREZA DE CALCIO/DURETÉ CÁLIQUE
ColorQ 2x Range/Distancia/Gamme
0-600 ppm
ColorQ 2x Range/Distancia/Gamme
0-300 ppm
ATENCIÓN: Este set contiene productos químicos que pueden ser dañinos
si no se utilizan adecuadamente. Lea atentamente las preconciones en los
recipientes individuales. Evite que los niños lo utilicen sin la supervisión do
un adulto.
3x
Alk
10x
1. Press button to go to “Alk” Total Alkalinity.
2. Fill a clean tube (0205) to the 5 mL line with water sample.
3. Add 1 ALK 2X IG Tablet. Crush with tablet crusher.
4. Cap tube with green cap. Invert 10 times to mix. Insert tube into
the ColorQ 2x.
5. Press button to read “Alk” Total Alkalinity. Remove tube.
1. Pulse el botón para leer «Alk» Alcalinidad total.
2. Llene el tubo limpio (0205) hasta la línea de 5 mL con el agua de
muestra.
3. Añada 1 pastilla de ALK 2X IG. Aplástela con la trituradora.
4. Tubo de tapa con tapa verde. Dele la vuelta 10 veces para mezclar.
Inserte el tubo en el ColorQ 2x.
5. Pulse el botón para leer «Alk» Alcalinidad total. Retire el tubo.
1. Appuyez sur le bouton pour atteindre Alcalinité totale (« Alk »).
2. Remplissez une éprouvette (0205) propre avec l'échantillon d'eau
jusqu'à la ligne de 5 mL.
3. Ajoutez 1 pastille ALK 2X IG. Triturez la pastille à l'aide du
broyeur.
4. Tube de bouchon avec bouchon vert. Renversez le récipient 10 fois
pour mélanger la solution. Insérez l'éprouvette dans le ColorQ 2x.
5. Appuyez sur le bouton pour mesurer l'alcalinité totale (« Alk »).
Enlevez l'éprouvette.
Ca Hard
www.calcert.com [email protected]1.800.544.2843 0
5
10
15
20
25
30

1. Appuyez sur le bouton pour accéder á
«CYA» (l’acide cyanurique).
2
. Remplissez une éprouvette (0206)
propre avec l'échantillon d'eau jusqu'à la
ligne.
3
. Ajoutez 1 pastille CYANURIC ACID
IG.Triturez SOIGNEUSEMENT la pastille
à l'aide du broyeur. Tube de bouchon
avec bouchon gris.
4. Renversez le récipient 3 fois pour
mélanger la solution. Laissez reposer
pendant DEUX minutes.
l'acide cyanurique («CYA»). Enlevez !
l'éprouvette.
7. Appuyez sur le bouton pour revenir à
l'écran de remise à zéro de l'instrument
ou maintenez le bouton enfoncé
jusqu'à ce que s'affiche. Enlevez
l'éprouvette.
6.
5. No mez
clar. Insert
e el tubo en el
ColorQ 2x.
7. Pulse el botón para volver a poner en
blanco el fotómetro o mantenga
presionado el botón hasta que
aparezca (símbolo de encendido).
Retire el tubo.
1. Pulse botón para ir a «CYA» Ácido
cianúrico.
2. Llene el tubo limpio (0206) hasta la línea
con el agua de muestra.
3. Añada 1 pastilla de CYANURIC ACID IG.
Triturar COMPLETAMENTE con un
triturador de pastillas. Tubo de tapa con
tapa gris.
4. Dele la vuelta 3 veces para mezclar. Deje
reposar el tubo durante DOS minutos.
*CYANURIC ACID IG - *6996A-J/*6996A-CN-J
PRO 7 Kit
02.21 62086
CYANURIC ACID
ÁCIDO CIANÚRICO/ACIDE CYANURIQUE
ColorQ 2x Range/Distancia/Gamme
0-150 ppm
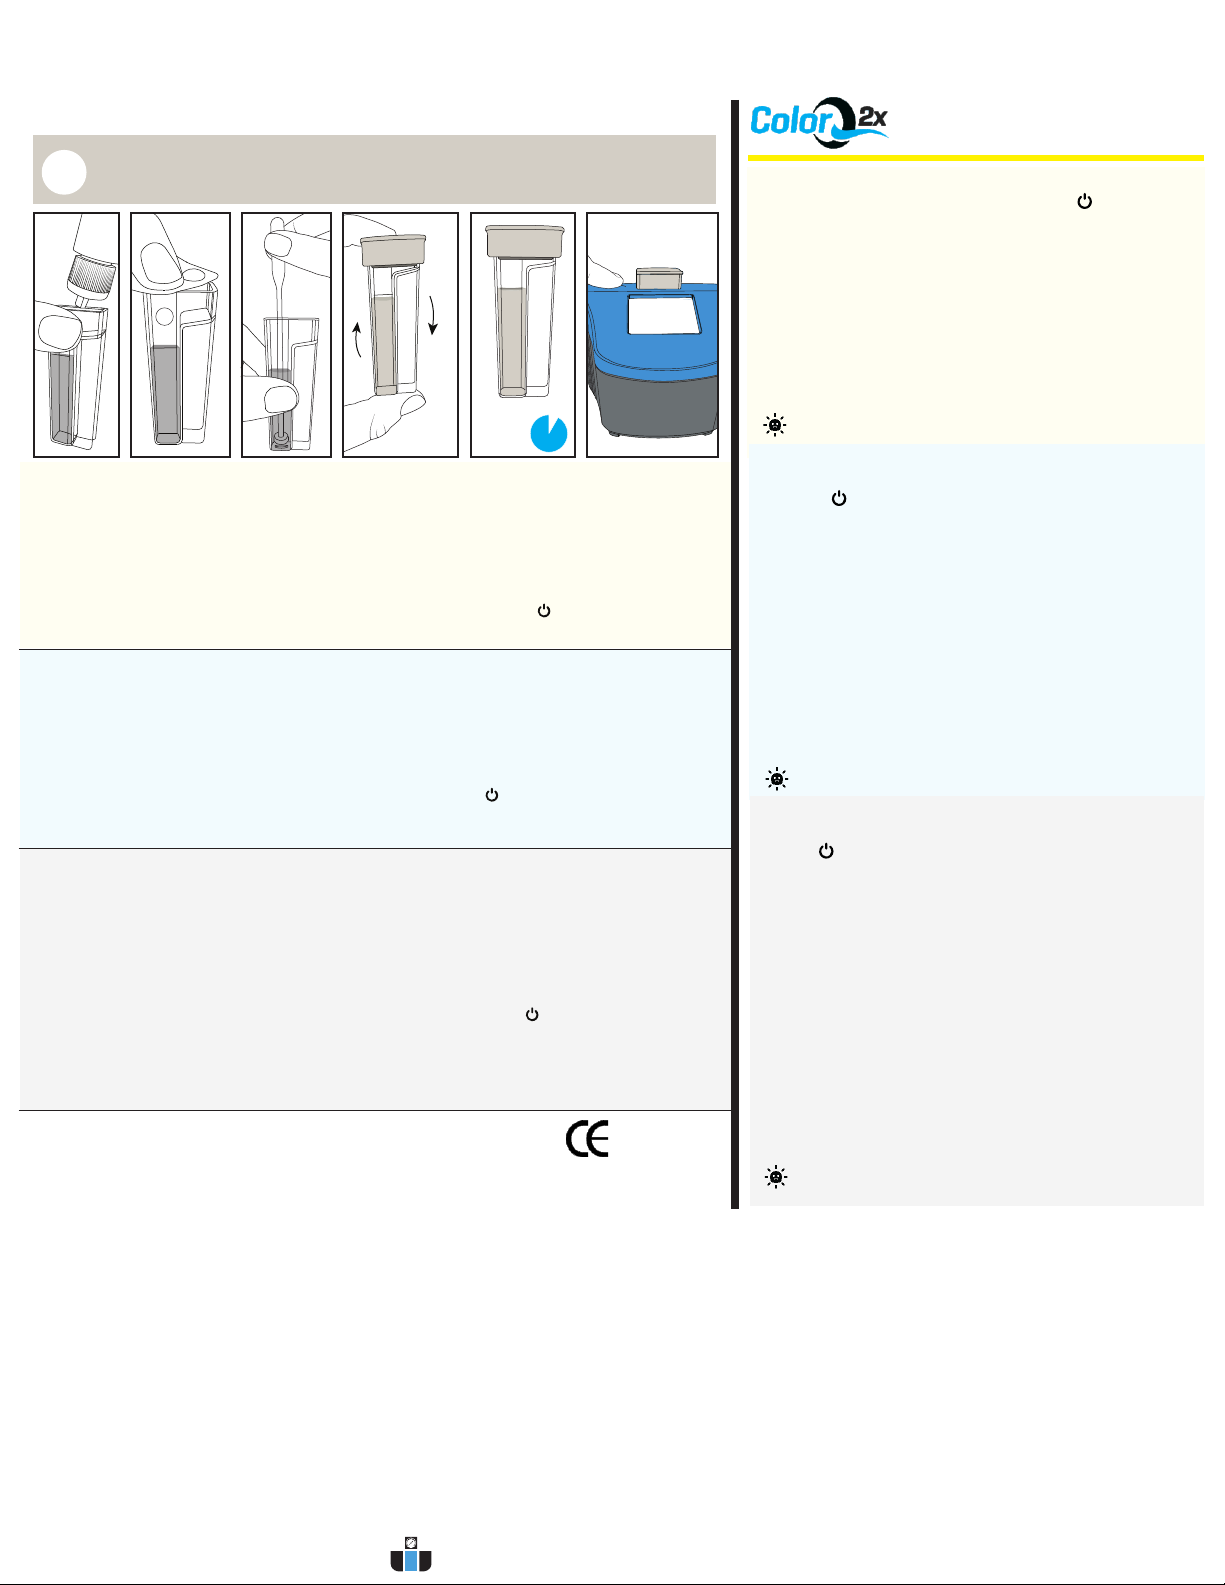
4. Invert 3 ti mes t o mix. Allo w tube to s it
for TWO minutes.
5. Do not mix. Insert tube into the
ColorQ 2x.
6. Press button to read “CYA” Cyanuric
Acid. Remove tube.
7. Press button to return to blank meter or
hold button until is displayed.
Remove tube.
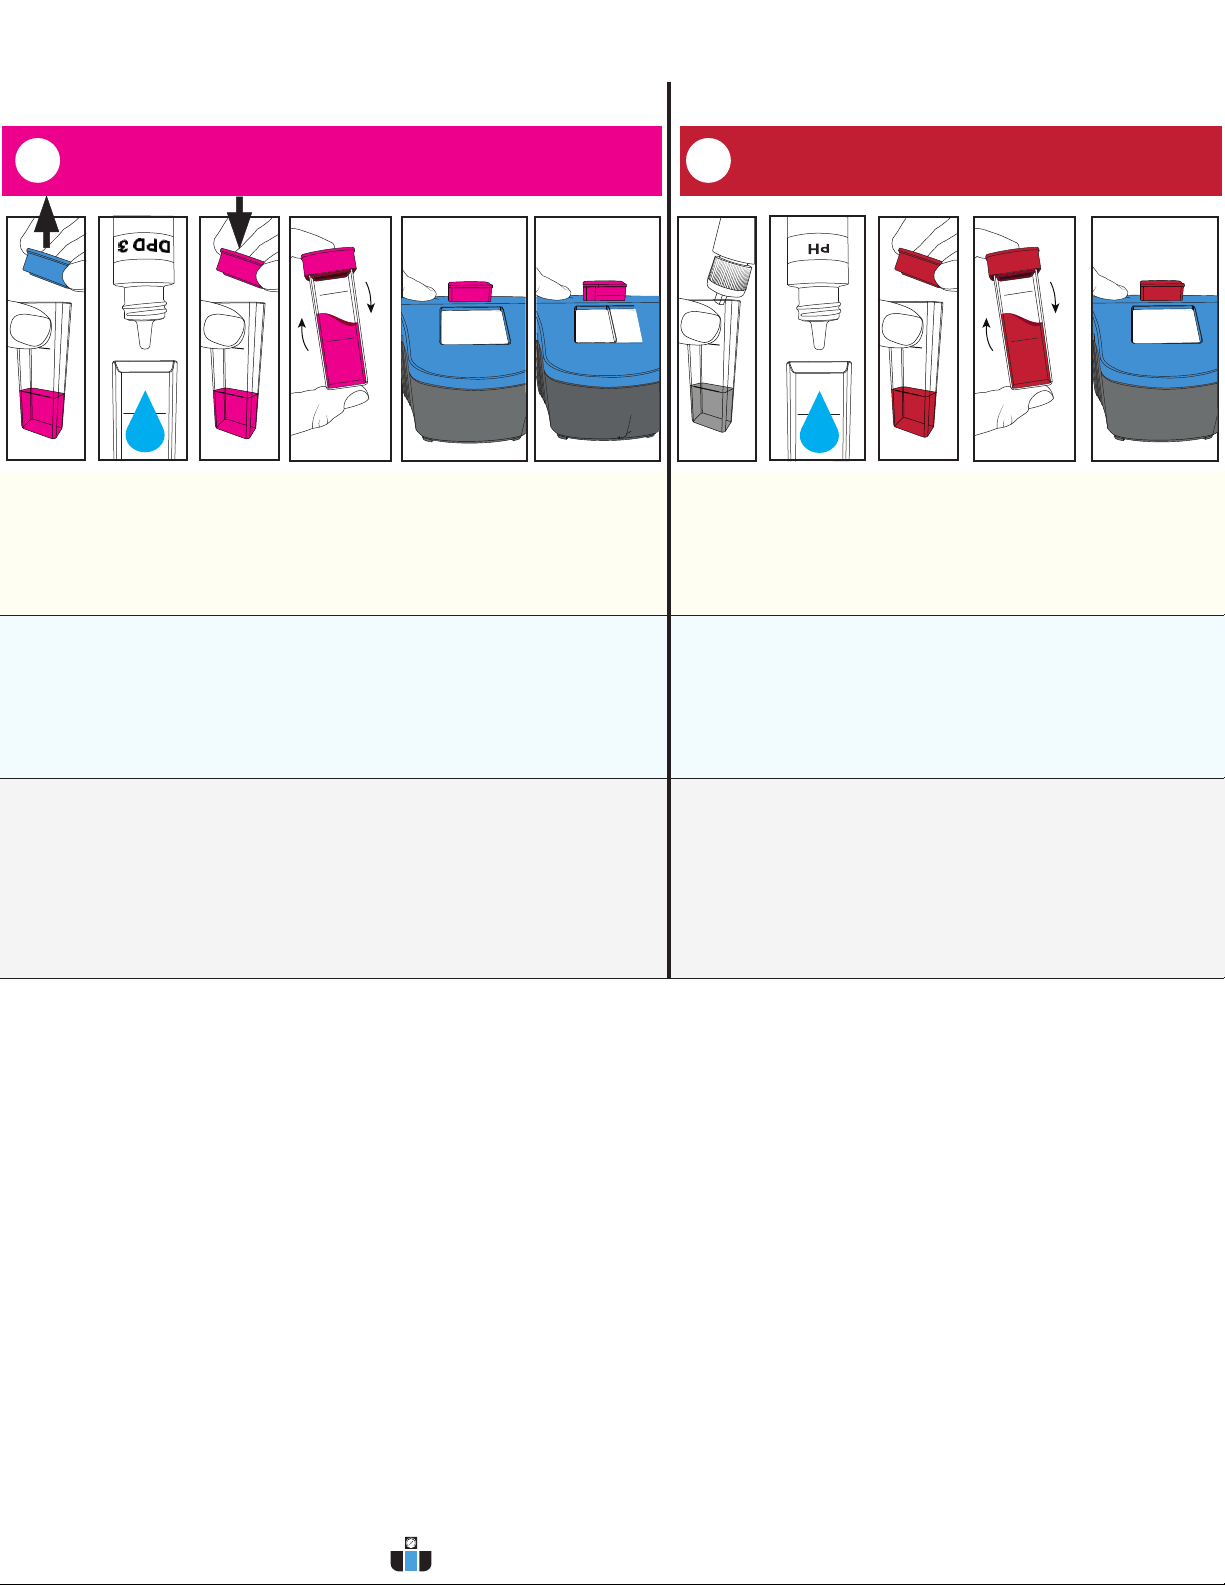
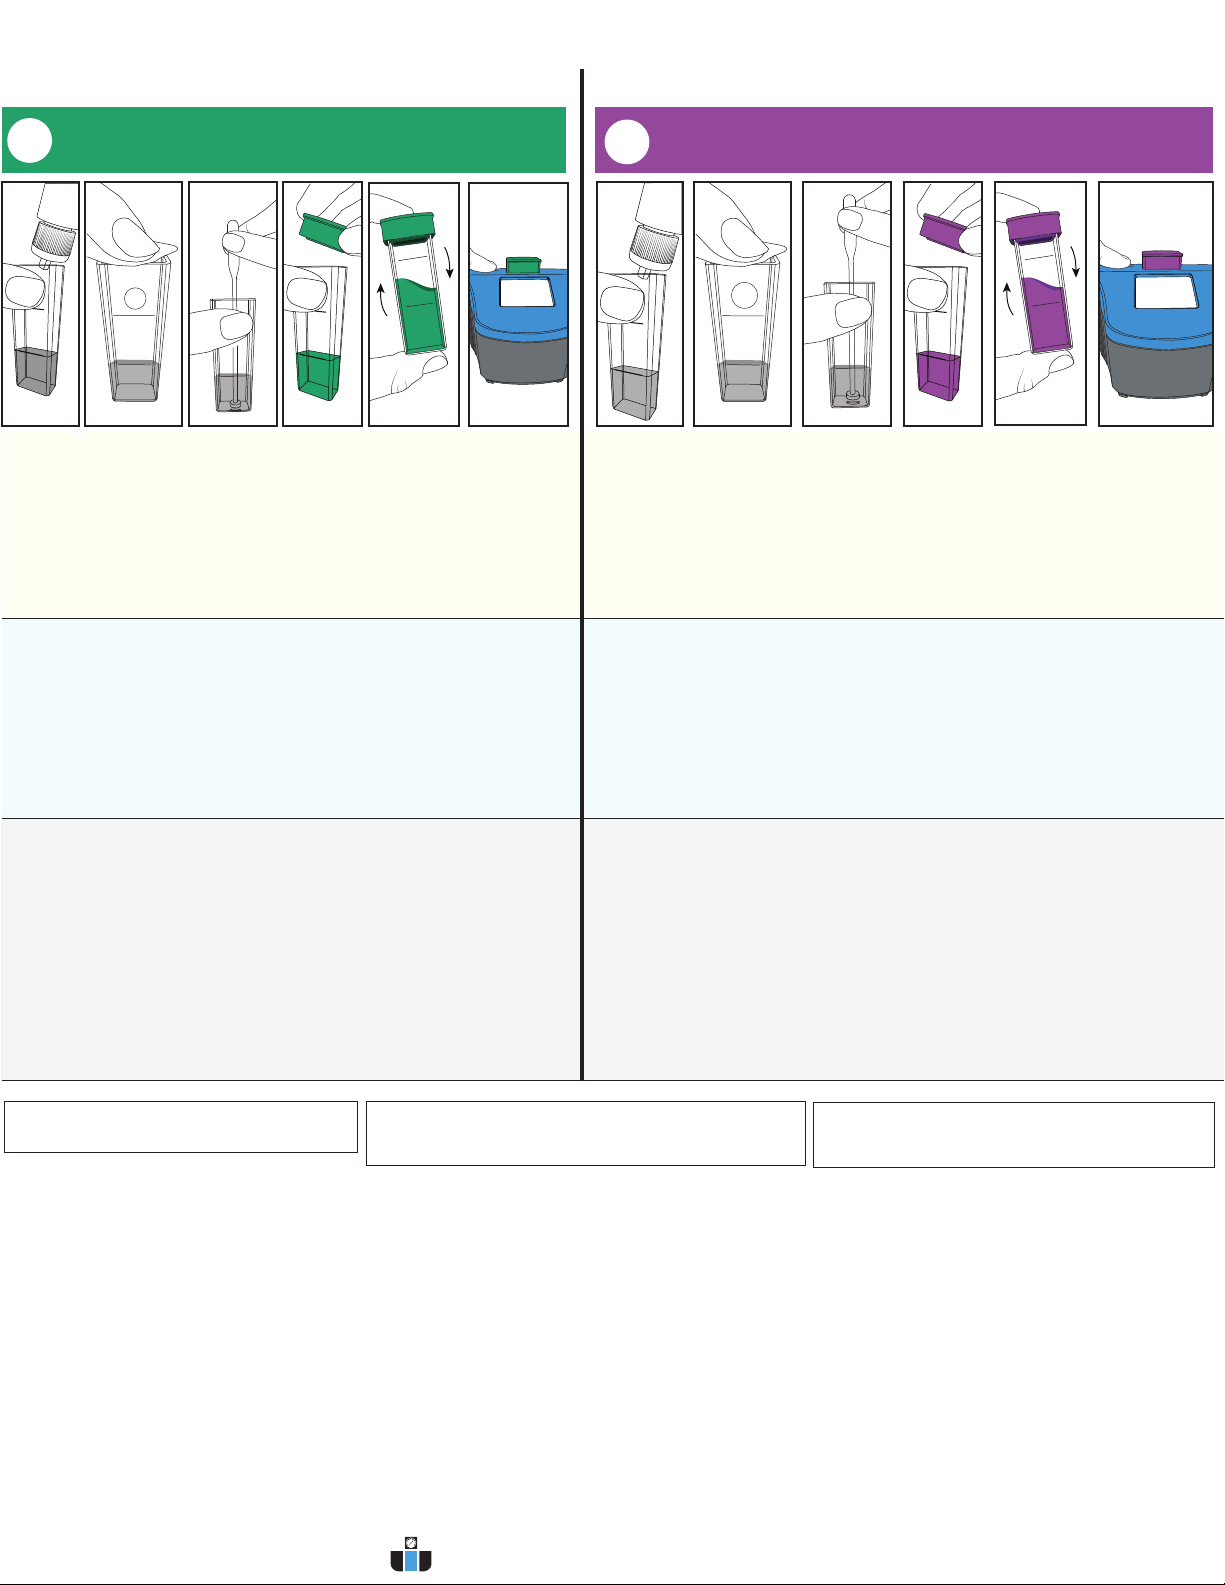
1. Press button to go to “CYA” Cyanuric
Acid.
2. Fill a clean tube (0206) to the line
with water sample.
3. Add 1 CYANURIC ACID IG tablet. Crush
thoroughly with tablet crusher. Cap tube
with grey cap.
CODE/CODIGO
2086/2086-CN
ColorQ
CYA
2
3x
!Fermez correctement les éprouvettes pour éviter toute
fuite.
5. Ne pas mélanger. Insérez l'éprouvette
dans le ColorQ 2x.
6. Appuyez sur le bouton pour mesurer !N’echangez pas les bouchons à code couleur.
!Appuyez sur le bouton pour ALLUMER et ÉTEINDRE le
lecteur
Séchez les éprouvettes avant de les placer dans la
chambre.
!Rincer le broyeur de comprimés après chaque
utilisation. Brosser et rincer les tubes, les bouchons et le
broyeur de comprimés après le test.
!Laissez sécher les éprouvettes avant de les remettre
dans la mallette.
!Lisez les instructions avant d'effectuer une analyse.
!Vous devez utiliser l'éprouvette indiquée dans la
procédure d'analyse.
!Refermez bien les flacons des réactifs.
!Utilisez uniquement les recharges de réactif LaMotte.
!Si l'instrument s'éteint automatiquement pendant
!
l'analyse, rincez une éprouvette et remplissez-la.
Effectuez à nouveau la remise à zéro de l'appareil et
reprenez l'analyse.
= Tube de bouchon pour éliminer la luminere
parasite.
!
!Debe utilizarse el tubo especificado en el procedimiento
de análisis.
Pulse el botón para leer «CYA» Ácido !
Reemplace firmemente los tapones de los reactivos.
cianúrico. Retire el tubo. Use solo reactivos de reemplazo de LaMotte.
!Si la unidad se apaga automáticamente durante el
análisis, enjuague y llene un tubo. Repita el blanco y
vuelva a analizar.
!Lea las instrucciones antes de realizar el análisis.
!Presion
e el botó
n p
ara ENCENDE
R y APAGAR el
medidor
!Tape firmemente los tubos para evitar fugas.
!No intercambie tapas codificadas por colores.
!Seque los tubos antes de colocarlos en la cámara.
!Enjuague la trituradora de tabletas después de cada
uso. Cepille y enjuague los tubos, tapas y trituradora de
tabletas después de la prueba.
!Deje secar los tubos antes de volver a colocarlos en el
maletín.
!= Tapa del tubo pasa eliminar la luz parásita.
!Use only LaMotte replacement reagents.
!Read the instructions before testing.
!Press button to turn meter ON and OFF
!Cap the tubes securely to prevent leaks.
!Do not interchange color-coded caps.
!Dry the tubes before placing them in the chamber.
!Rinse tablet crusher after each use. Brush and rinse
tubes, caps and tablet crusher after testing.
!Allow the tubes to dry before returning them to the case.
!The tube specified in the test procedure must be used.
!Replace reagent caps securely.
!Cap tube to eliminate stray light.
!If unit should auto-off during testing, rinse and fill a tube.
Repeat Blank and return to testing.
Send pool or spa test results from the ColorQ 2x through Bluetooth to the
®
WaterLink Solutions App for chemical recommendations and dosage amounts.
Traducción de las instrucciones originales.
Traduction des instructions originales.
7 CYA
www.calcert.com [email protected]1.800.544.2843 0
5
10
15
20
25
30
This manual suits for next models
5
Other LaMotte Laboratory Equipment manuals
Popular Laboratory Equipment manuals by other brands

Thermo Scientific
Thermo Scientific Jewett Installation and operation manual

DÜPERTHAL
DÜPERTHAL HNA-18 II ATEX F user manual

Hirschmann
Hirschmann Opus Titration instruction manual

Metrohm
Metrohm Titrino 784 KFP Instructions for use

PI
PI V-417.E1XYH Series user manual

DIGISYSTEM
DIGISYSTEM PS-600T instruction manual