Lampociclo E bike User manual

USER GUIDE
USER GUIDEUSER GUIDE
USER GUIDE
www.lampociclo.com info@lampociclo.com
Content
Driving functions 2
Risk 2
Your Lampociclo key points 3
Package content 3
Recommendation about battery 4
Unpacking and assembly and first ride 4
Periodical maintenance
Extra maintenance
Troubleshooting 6
Guarantee 7
Driving functions

User guide rev 7 .doc - Page 2
LAMPOCICLO USER GUIDE
www.lampociclo.com info@lampociclo.com
Your E bike is normally an approved bicycle, to be used in public traffic or a non street legal version to be
employed on private premises only.
T e 250 Watt integrated electric motor of your Ebike supports you during pedaling, up to a speed of 25
km/ . You can proceed faster by muscle power, but you s ould not exceed a speed of over 45 km/ . Your
Pedelec provides up to 2 ½ times of driver’s power in t e ybrid mode, and it will allow you ig er average
speed and easier ill climbing.
Riders of t e Lampociclo must be over 14 years old and possess t e p ysical and mental ability to lead a
bicycle safely. Rules for bikes and Pedelecs may vary in some EU countries. Please be aware and comply
wit t e ig way code applicable to your region.
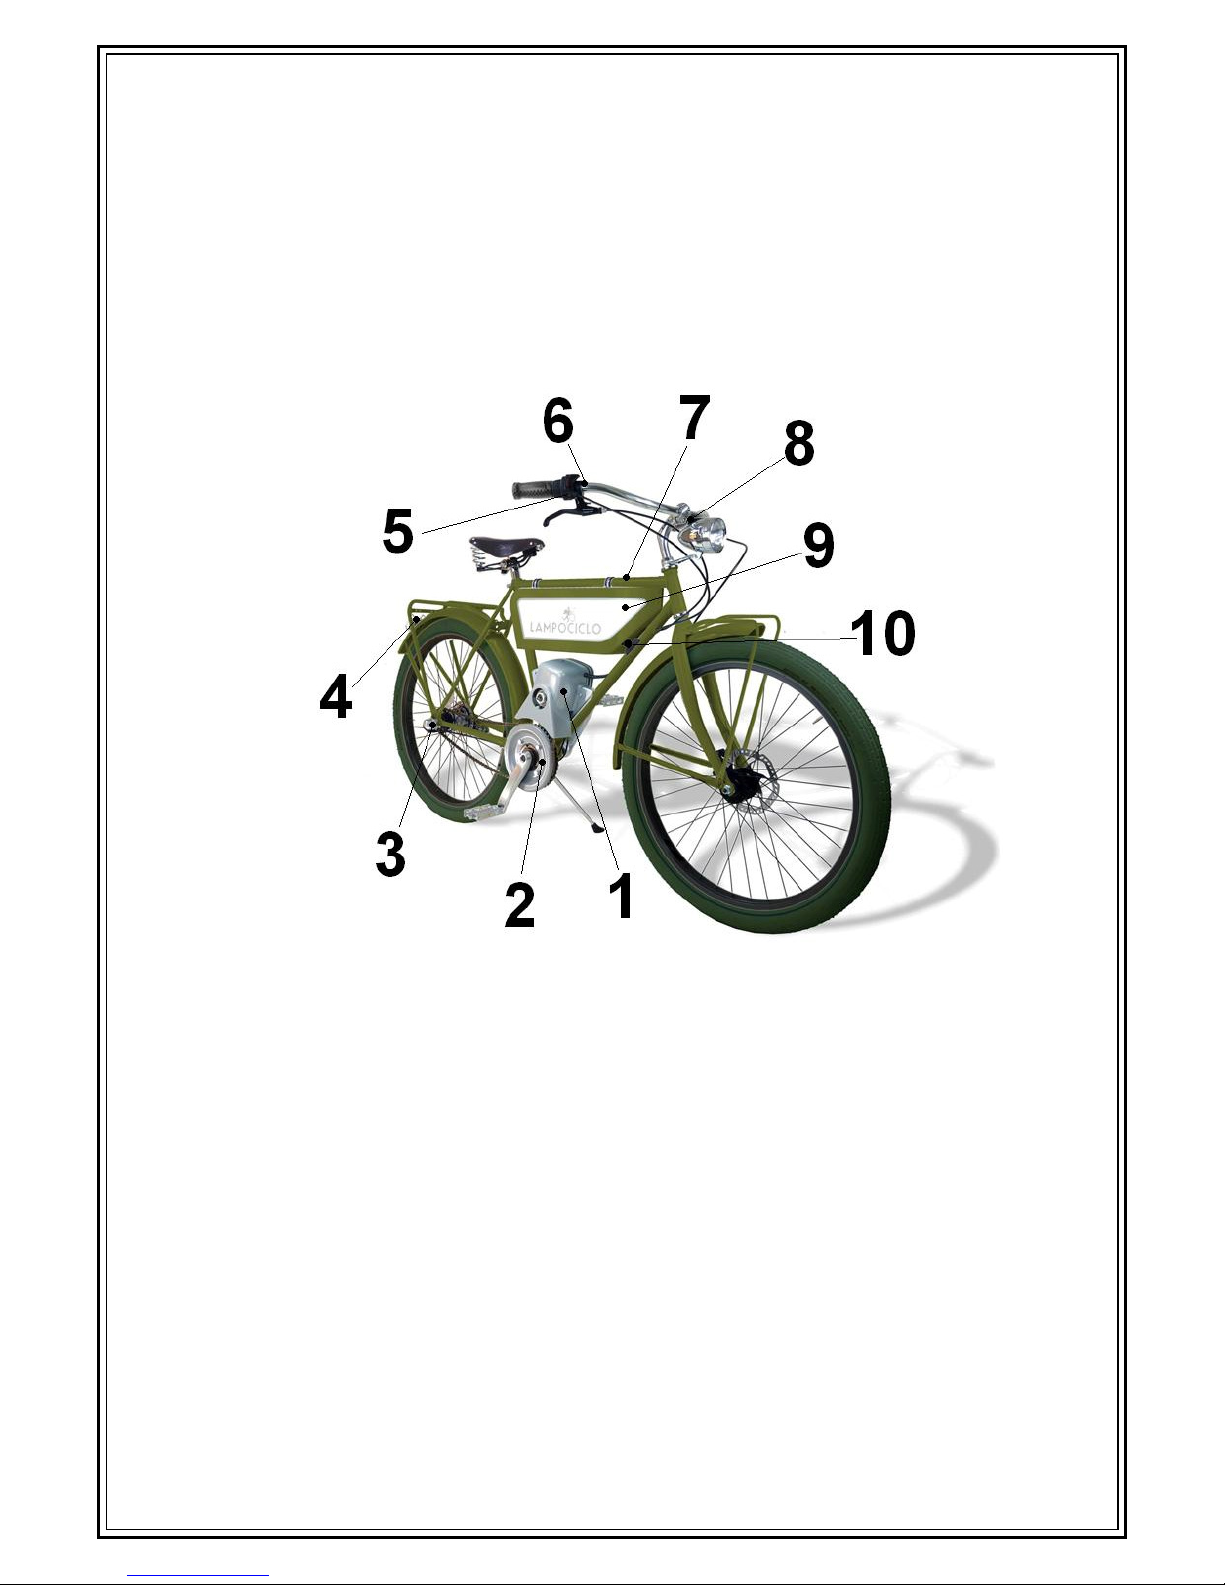
Your ybrid bike as all basic functions of a standard bicycle wit t e addition of an electric motor to
provide power w en required. To turn on power rotate power key “on” and start pedaling.
If your bike is equipped wit a booster button w ic allows t e cyclist to reac speeds of up to 6km/ , t is
function will stop immediately once t e button is released.
To turn off electric motion you ave t e following options:
•Stop pedaling
•Engage bot brakes
•Set t e power key to “off”
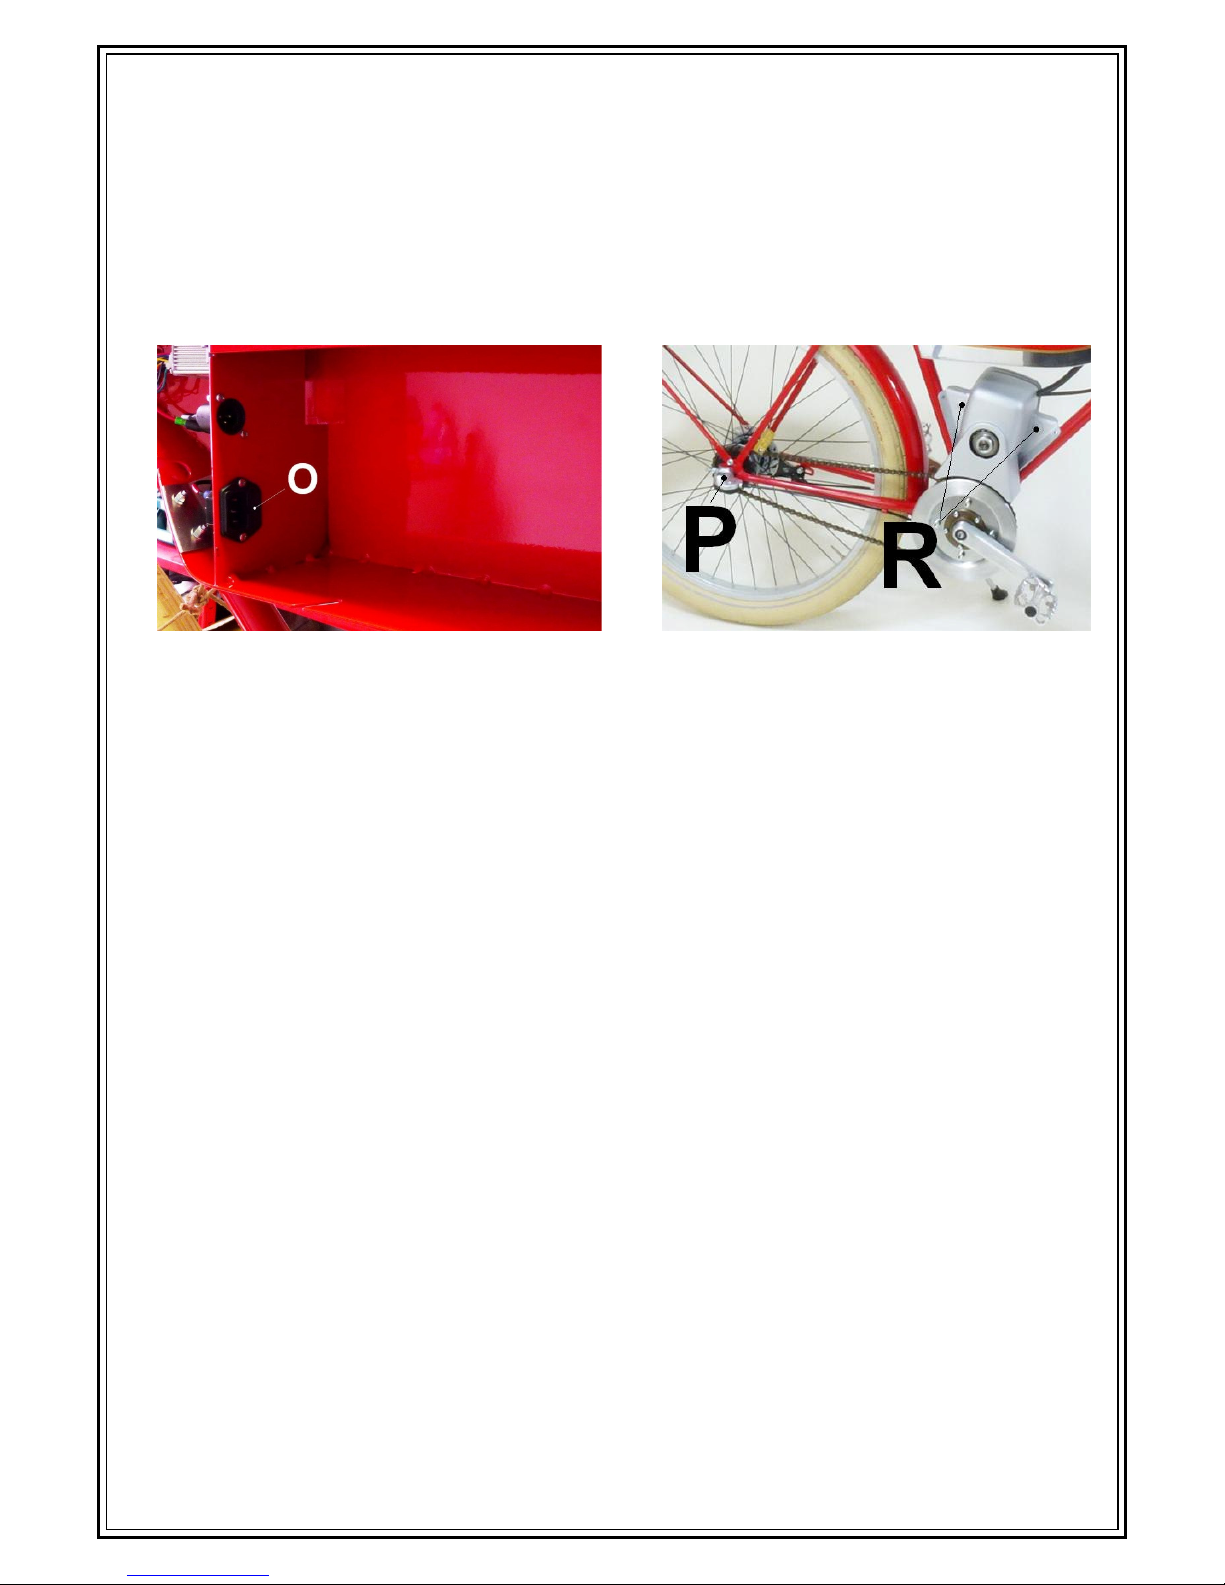
T e motion sensor located be ind t e gear ring determines t e motor support by measuring your pedaling
frequency and support mode.
You can c oose t e support mode (low/medium/ ig ) by switc ing t e t ree-position button located on
andlebar.
•On low support mode and flat ground, a 70kg person can cover up to 70Km on a single c arge
•On medium support mode and fully-c arged, it is possible to ride at 25Km wit almost no
muscular effort
•Hig support mode is meant to overcome garage ramps or ill climbing.
Always c oose t e appropriate gear. Riding at low speed in a ig gear will substantially increase energy
consumption and cause over eating of t e motor. If t e gear is sustainable by pedaling alone, it will also be
suitable for t e motor.
Risks
T e bike must only be used as intended: for relaxed locomotion and transportation; racing, acrobatics,
extreme sports or similar applications are excluded. T e product must not be modified, tampered or
damaged or operated outside of t e described limits. T e ve icle also s ould fit or be adapted to t e
driver: Handlebar saddle position and appropriate frame size.
Luggage racks and towing loads s ould only be used on expert/dealer’s advice.

User guide rev 7 .doc - Page 3
LAMPOCICLO USER GUIDE
www.lampociclo.com info@lampociclo.com
IMPORTANT: Improper use of bike resulting in injuries to ot er people or damage to property is t e
responsibility of t e driver.
Your Lampociclo key points
Note: Lampociclo is a tailor-made product; a feature may become non-standard following any
customization requests
1. Electric motor
2. Motion sensor be ind gear ring
3. Hub gear actuator
4. LED rear lig t wit independent switc
and battery
5. Hub gear and revolving s ifter
6. Support mode button
7. Rec arge external plug
8. LED front lig t wit independent switc
and battery
9. Battery compartment
10. Extractable power key
Content of package
T e Hybrid bike is supplied 95% pre-assembled in a cardboard box. T e box can be used for storage or safe
transportation, suc as return or repair.

User guide rev 7 .doc - Page 4
LAMPOCICLO USER GUIDE
www.lampociclo.com info@lampociclo.com
1. Bike; fully assembled pedal excepted
1. Pedals
2. C arger
3. Power and battery compartment keys; normally tied to saddle or andlebar
Recommendation about battery
•Use only t e c arger supplied wit bike battery.
•If you suspect t e battery compartment is flooded by a liquid, suc
as eavy rain, or pressure ydrowas ing discontinue use of t e
product, allow to dry, and contact customer assistance.
•T e battery s ould only be removed by an appropriately trained
person.
•T e Stand alone battery s ould be c arged in a ventilated area wit
no people standing by, suc as covered balcony or parking spot
•Do not c arge battery at temperature below 0°
•Storing battery below 0° or above 45° may reduce battery life.
•Do not leave t e bike fitted wit battery in a location exposed to direct sunlig t or ig temperatures.
If you suspect battery compartment (tank) as been consistently eated in suc an environment, do
not activate electric assistance and allow it cool before use.
•Do not connect/disconnect/modify product electrical wiring unless you are trained to do so.
•Note: T e battery management will completely cut off power w en t e c arge gets very low. T e
battery management system is made to maintain power output almost unc anged until few minutes
before low c arge automatic cut off.
•C arging battery before reac ing automatic cut-off is recommended in order to extend t e battery life.

User guide rev 7 .doc - Page 5
LAMPOCICLO USER GUIDE
www.lampociclo.com info@lampociclo.com
Unpacking, assembly and first ride
1. Unpacking from s ipping box
1.1.To extract t e bike from box we suggest you to put t e box in a vertical position, old t e bike in
“w eeling position”, pull it towards you. We recommend storing t e box after assembly.
2. Preparing for first use
2.1.Lift t e andlebar, set it to 90° wit front w eel and tig ten it wit an allen key. T e brake levers
will also need to be tig tened wit an allen key.
2.2. Screw in pedals wit a pedal key
3. Electric system: t e battery is supplied alf c arged and will reac maximum performance after 3
c arge/disc arge “brake in” cycles. A full c arge cycle will take up to 6 ours. However, t e first c arge
s ould take muc less. To c arge t e battery follow t e
instructions below:
3.1.Lift and offset t e “gas cup” (A) exposing t e bike plug.
3.2.Connect t e c arger to t e main electric plug (B)
3.3.Connect t e rec arge plug (C) to t e bike plug (D)
3.4.Bot c arger lig ts will become red (E) and t e cooling fan
may start. W en t e c arge is complete one of t e lig ts
will turn green. Please note it is useful to leave t e
c arger connected for an extra 20 minutes, after lig t
turns green, in order to allow internal cells balancing.
3.5.W en ready insert t e “cut off key” on t e bike (F)
3.6.If you wis to use t e bike wit out pedal assistance, simply remove t e “cut off key” (F)
4. Parking: Remove t e “cut off key” (F) to avoid t eft or electric c arge dispersion.

User guide rev 7 .doc - Page 6
LAMPOCICLO USER GUIDE
www.lampociclo.com info@lampociclo.com
Periodical maintenance
1. C eck t e tyre pressure once a mont . Note T e Balloon tyre s ould be inflated at 3 – 4 bars
2. Battery c arge status: you can monitor bike c arge status using a common bike trip computer or
GPS p one. However to extend battery life, avoid using t e battery up to maximum disc arge.for
example t e battery could be rec arged w en approximately alf of its mileage power as been
consumed.
3. T e c ain tension s ould be slig tly tig tened after t e first undred kilometres (Q) leaving 2-3 cm
of play. After first tig tening t is, it s ould not be necessary to retig ten for several years.
Extra maintenance
1. Battery removal
1.1.Open t e side panel wit Key (H)
1.2.Remove t e battery power outlet (I)
1.3.Remove t e battery c arge inlet (L)
1.4.Remove t e elastic older (M)
1.5.Remove t e battery by pulling strap (N)
2. Fuse c ange: Open t e cover (O) integrated to t e plastic plug. A spare fuse is located wit in t e same
cover.
3. Rear w eel removal:
3.1.remove t e gear s ifter (P)

User guide rev 7 .doc - Page 7
LAMPOCICLO USER GUIDE
www.lampociclo.com info@lampociclo.com
3.2. Loosen t e ub bolts, brake retainer and brake cable (Q)
3.3.If necessary remove t e motor carter by loosening screws (R) to remove c ain.
3.4.Remove t e w eel.
Troubleshooting
1. Motor does not start w en pedaling
a. c eck t e key position
b. connect t e c arger and be sure t e lig t turns green after a few minutes
c. rec arge t e battery
d. c eck t e battery plug inside t e battery compartment
e. c eck t e bike fuse
f. c eck for dirt over sensor magnets be ind c ainring
2. Motor stopped during ride and unable to restart
a. Battery is empty, rec arge.
b. c eck t e battery plug inside t e battery compartment
c. c eck t e bike fuse
d. c eck for dirt over sensor magnets be ind c ainring
3. Gear seems to get out position during ride

User guide rev 7 .doc - Page 8
LAMPOCICLO USER GUIDE
www.lampociclo.com info@lampociclo.com
a. C eck t e yellow indicator on t e rear w eel gear actuators is in t e middle position w en
t e s ifter is in second gear, move t e adjuster to bring it in to position
b. C eck online documentation for adjusting specific ub gear model
4. C arger does not start
a. Lig t is green; battery is already c arged
b. C eck c arger fuse
c. Connect c arger to t e mains instead of t e battery
5. Motor does not start after c anging rear tyre
a. Pull rear brake and c eck t e red lig t is on t e rear brake sensor, if not disconnect t e
cable, extract sensor for about 10 cm and put it back in position
Guarantee
As per EU regulation 99/44/CE e 85/577/CEE
Warranty claims are processed via t e dealer w o supplied t e bike or directly by t e manufacturer for
internet purc ased bikes.
Some Bike component claims may be andled directly wit t e original manufacturer.
Warranty will be invalidated if damage is caused by improper use, abuse or accident!
Table of contents