Landa PHW3-11024 User manual

8.917-417.0-D 03/10/20
PHW
Hot Water - Electric Powered - Diesel/Oil Heated
Operator’s Manual
Pressure Washer
RIESGODE ELECTROCUCIÓN—
Conecteelenchufeenuncontactoad-
ecuado.Mantengatodaslas conneccio-
nessecas yarriba delsuelo.No rocie
componenteseléctricos.Desconectela
corrienteeléctrica antesdedarservicio.
RISQUED’ELECTROCUTION—
Relieràdesprisesavecmiseàla terre
seulement.Touslesfi
ls doivent être
maintenussecsetétre suspendus.
Nojamaisprojeter de l’eau sur les
composanteset fi ls électriques.Couper
l’alimentatationélectriqueavantde faire
uneréparation.
RISKOF
ELECTROCUTION.
Connectonlyto
properlygrounded
outlet.Keepall
connectionsdry
andofftheground.
Keepsprayaway
fromelectrical
wiringandcompo-
nents.Disconnect
fromelectrical
supplybefore
servicing.
PROTEJASELOSOJOS
CUANDOseopereesteequipo.
DESLUNETTESDESECURITE
DOIVENTETRE PORTEESlorsque
vousoperezcet appareil.
RISKOFINJURY
—PROTECTIVE
EYEWEARAND
CLOTHINGMUST
BEWORNwhen
operatingthis
machine.
LEAELMANUALOPERACION
ANTESDEUSARSE.ESTEEQUIPO
DEBESERUSADOSOLAMENTE
POROPERADORESCALIFICADOS.
LIRELEMANUEL DE L’OPERATEUR
AVANTUTILISATION.CETAPPAR-
EILDOITETREUTILISEPARDES
OPERATEURSQUALIFIES.
TOREDUCE
THERISKOF
INJURYREAD
OPERATOR’S
MANUAL
CAREFULLY
BEFOREUSING.
THISMACHINE
TOBEUSED
ONLYBY
QUALI-
FIED
OPERATORS.
RISKOF
INJECTIONOR
SEVEREINJURY
TOPERSONS.
Keepclear
ofnozzle.
HOT
DISCHARGE
FLUID.Donot
touchordirect
discharge
streamatpersons.
RIESGODEPENETRACIÓN O
LESIONESSEVERASA PERSONAS.
Manténgasefueradelalcance
deboquilla.
DESCARGADE AGUACALIENTEA
ALTAPRESION—Notoqueni dirija
elfl
ujodelagua a otraspersonas.
RISQUEDE BLESSURES.
Setenir loindes buses.
EAUCHAUDE SOUS PRESSION A
LASORTIE—Ne pas dirigerle jet
d’eauversdes personnes.
RISKOF
EXPLOSION.
Operateonly
whereopenfl
ame
ortorchispermit-
ted.Donot spray
flammableliquids.
RISKOFFIRE.Do
notaddfuelwhen
themachineis
operating.
WARNING
PRECAUCION/ AVERTISSEMENT
RIESGODEEXPLOSION— Use
elproducto enáreasdondeel fuegoo
llamaseanpermitidos.Norocieliqui-
dosinfl
amables.
RIESGODEFUEGO.
Noañadirgasolina
cuandolamáguinaeste trabajando.
RISQUED’EXPLOSION—Utiliser
auxendroitsoù une fl
ammenue est
permise.Nepasvaporiserde liquides
inflammables.
RISQUEDEFEU.
Nepas
ajouterdéssence/defueltandisque la
machineestenoperation
.
98.917-588.0
SPRAYGUN
KICKSBACK.
Holdwith both
hands.
LAPISTOLA SEMUEVECON LA
PRESIÓN—Sostenga con lasdos
manos.
LAPOIGNEEPISTOLET RE-
POUSSE—Teniràdeuxmains.
RISKOF INJURY—
HOTSURFACES
CANCAUSE
BURNS.Useonly
designedgripping
areasof spray gun
andwand.
SUPERFICIESCALIENTES—Use
solamentelas áreasaisladas
delgatilloylalanza.
SURFACESCHAUDES—Toucher
seulementles partiesisolées des
poignéepistoletsetlances.
RIESGODE ASFIXIA. Useelproduc-
toenunareadeventilación adecuada.
RISQUED’ASPHYXIE.Utiliser dans
unendroitbien aéré.
RISKOF
ASPHYXIATION.
Useonlyinwell
ventilatedarea.
WARNING!
!ATENCION/ ATTENTION!
DISCONNECTFROM ELECTRICAL SUPPLYBEFORESERVICING.
DESCONECTELA CORRIENTEELECTRICA ANTES DEDARSERVICIO.
COUPLERL
’ALIMENTATIONELECTRIQUEAVANTDEFAIREUNEREPARATION
.
CAUTION— NEVERUSE:
•Bleach,chlorineproducts and othercorrosive chemicals
•Liquidcontaining solvents(i.e.paint thinner,gasoline,oil)
•Tri-sodiumphosphateproducts
• Ammoniaproducts
• Acid-basedproducts
Thesechemicalswill harmtheunit and will damagethesurface being cleaned.
OPERATING
INSTRUCTIONS
1. Read Operator’s Manual
carefullybeforeusing.
2.
Connectstandardgardenhose
tomachineandturnwater on.
3.Securehighpressurehose to
machine.
4.Securespraynozzle toend
ofwand.
5. Checkpumpoillevel.
6.Tostartunit, turn switchon,
grip wandsecurely and
triggerspraygun.
7.To he at water,turnburner
switchon.
8. To applydetergen t, see
Operator'sManual.
9. Toshutdownmachine, turn
burneroffand allow pumpto
rununtil wateris cool.Flush
detergentlineswithcleanwater
beforeturningpump switch off.
Triggerspraygun torelieve
pressure.
1.Lea el ManualdeOperación
antesdeusarse.
2.
Conectelemangueradejardin
yabrala llave del agua.
3. Conectela manguerade alta
presión.
4.Colo quel aboq u i l laa
lalanza.
5. Reviseelniveldeaceitedela
bomba.
6.Encienda labomba,abrael
gatilloylogre presión.
7.Paracalentar
agua,encienda
el
quemador.
8.Paraaplicarel detergente,
consulteelManualdeOper-
ación.
9.
Alterminar,a
pague el que-
mador,purgueconaguala
mangueradel detergente, y
hagacircularelaguafriaantes
deapagarlabomba.Abrael
gatillopararelevarlapresión.
INSTRUCCIONES
DEOPERACION
1.
Lireattentivement leManuelde
l’Opérateuravantutilisation.
2.Reli erà une prised'eau et
ouvrirl’eau.
3. Relierleboyauhautepression
àl’appareil.
4.Vérifi
erle niveau d’huile de la
pompe.
5. Insérerla buseaubout de la
lance.
6.
Partirlemoteurde la pompe
etpresserla gachettede la
poignéepistolet.
7. Pourchaufferl’eau,allumerle
brûleur.
8.
Pourappliquer dudetergent ,
voirleManueldel'Opérateur.
9. Pourarrêterl’appareil,fermer
lebrûleuretlaisserrefroidir
l’eau propreavantd'arrêter
lapompe.P
resser lapoi-
gnéepistoletpourrelacherla
pression.
MODE
D’EMPLOI
USE DETERGENTSFORBESTRESULTS
8.917-587.0
PHW
8.917-586.0
PUMPBURNER
POWER IGNITIONOVERLOAD
MODELS: PHW3-11024
1.109-078.0
PHW4-22024
1.109-079.0
PHW4-30024
1.109-085.0
PHW4-22024
1.109-091.0
For the Landa Dealer nearest
you, consult our web page at
www.landa.com

2 Landa PHW Operator’s Manual 8.917-417.0 - D
Machine Data Label

3
Table of Contents
Machine Data Label . . . . . . . . . . . . . . . . . . . . . . . . . .2
Table of Contents . . . . . . . . . . . . . . . . . . . . . . . . . . .3
How To Use This Manual . . . . . . . . . . . . . . . . . . . . .4
Safety
Introduction & Safety Information . . . . . . . . . . . . . . .5
Important Safety Information. . . . . . . . . . . . . . . . . . .6
Operations
Component Identification . . . . . . . . . . . . . . . . . . . . .9
Assembly Instructions . . . . . . . . . . . . . . . . . . . . . . .10
Operation Instructions. . . . . . . . . . . . . . . . . . . . . . .11
Detergents & General Cleaning Techniques . . . . .12
Thermal Pump Protection . . . . . . . . . . . . . . . . . . . .12
Shutdown Instructions. . . . . . . . . . . . . . . . . . . . . . .13
Storage . . . . . . . . . . . . . . . . . . . . . . . . . . . . . . . . . .13
Maintenance
Preventative Maintenance . . . . . . . . . . . . . . . . . . .14
Maintenance And Service . . . . . . . . . . . . . . . . . . . .14
Pump Lubrication . . . . . . . . . . . . . . . . . . . . . . . . . .14
Fuel . . . . . . . . . . . . . . . . . . . . . . . . . . . . . . . . . . . . .14
Electrode Setting. . . . . . . . . . . . . . . . . . . . . . . . . . .14
Transformer Check . . . . . . . . . . . . . . . . . . . . . . . . .14
Fuel Control System . . . . . . . . . . . . . . . . . . . . . . . .14
Fuel Pressure Adjustment. . . . . . . . . . . . . . . . . . . .14
Wayne Oil Burner . . . . . . . . . . . . . . . . . . . . . . . . . .15
Fuel Pressure Adjustment. . . . . . . . . . . . . . . . . . . .15
Burner Air Adjustment. . . . . . . . . . . . . . . . . . . . . . . 15
Cleaning of Coils. . . . . . . . . . . . . . . . . . . . . . . . . . .16
Spray Nozzles. . . . . . . . . . . . . . . . . . . . . . . . . . . . . 16
Unloader Valves . . . . . . . . . . . . . . . . . . . . . . . . . . .16
Winterizing Procedure. . . . . . . . . . . . . . . . . . . . . . .16
Low Pressure Diagnosis . . . . . . . . . . . . . . . . . . . . .16
Coil Removal. . . . . . . . . . . . . . . . . . . . . . . . . . . . . .17
Temperature and Pressure Relief Valve. . . . . . . . .17
Optional Time Delay Shutdown Operation . . . . . . .17
Optional Auto Start/stop Timer Operation. . . . . . . .17
Maintenance Schedule . . . . . . . . . . . . . . . . . . . . . .18
Oil Change Record . . . . . . . . . . . . . . . . . . . . . . . . .19
Troubleshooting . . . . . . . . . . . . . . . . . . . . . . . . . . .20
Landa PHW Operator’s Manual 8.917-417.0 - D

4
How To Use This Manual
This manual contains the following sections:
• How to Use This Manual
• Safety
• Operations
• Maintenance
The HOW TO USE THIS MANUAL section will tell you
how to find important information for ordering correct
repair parts.
Parts may be ordered from authorized dealers. When
placing an order for parts, the machine model and
machine serial number are important. Refer to the
MACHINE DATA box which is filled out during the
installation of your machine. The MACHINE DATA box
is located on the inside of the front cover of this manual.
Model:
Date of Purchase:
Serial Number:
Dealer:
Address:
Phone Number:
Sales Representative:
The model and serial numbers will be found on a decal
attached to the pressure washer.
The SAFETY section contains important information
regarding hazardous or unsafe practices of the
machine. Levels of hazards are identified that could
result in product damage, personal injury, or severe
injury resulting in death.
The OPERATIONS section is to familiarize the operator
with the operation and function of the machine.
The MAINTENANCE section contains preventive main-
tenance to keep the machine and its components in
good working condition. They are listed in this general
order:
• Preventative Maintenance
• Maintenance And Service
• Pump Lubrication
• Fuel
• Burner Air Adjustment
• Cleaning of Coils
• Spray Nozzles
• Unloader Valves
• Winterizing Procedure
• Low Pressure Diagnosis
• Coil Removal
• Temperature and Pressure Relief Valve
• Optional Time Delay Shutdown Operation
• Optional Auto Start/Stop Timer Operation
• Maintenance Schedule
• Oil Change Record
• Troubleshooting
The PARTS LIST section contains assembled parts
illustrations and corresponding parts list. The parts lists
include a number of columns of information:
•REF – column refers to the reference number
on the parts illustration.
•PART NO. – column lists the part number for
the part.
•QTY – column lists the quantity of the part used
in that area of the machine.
•DESCRIPTION – column is a brief description
of the part.
•NOTES – column for information not noted by
the other columns.
NOTE: If a service or option kit is installed on your
machine, be sure to keep the KIT INSTRUCTIONS
which came with the kit. It contains replacement parts
numbers needed for ordering future parts.
NOTE: The manual part number is located on the
lower right corner of the front cover.
Landa PHW Operator’s Manual 8.917-417.0 - D

5
Safety
Introduction & Safety Information
Thank you for purchasing this Pressure Washer.
We reserve the right to make changes at any time
without incurring any obligation.
Owner/User Responsibility:
The owner and/or user must have an understanding of
the manufacturer’s operating instructions and warnings
before using this pressure washer. Warning information
should be emphasized and understood. If the operator
is not fluent in English, the manufacturer’s instructions
and warnings shall be read to and discussed with the
operator in the operator’s native language by the
purchaser/owner, making sure that the operator
comprehends its contents.
Owner and/or user must study and maintain for future
reference the manufacturers’ instructions.
The operator must know how to stop the machine
quickly and understand the operation of all controls.
Never permit anyone to operate the engine without
proper instructions.
SAVE THESE INSTRUCTIONS
This manual should be considered a permanent
part of the machine and should remain with it if
machine is resold.
When ordering parts, please specify model and
serial number. Use only identical replacement
parts.
This machine is to be used only by trained opera-
tors.
Landa PHW Operator’s Manual 8.917-417.0 - D

6
Safety
Important Safety Information
WARNING: To reduce the risk of
injury, read operating instructions
carefully before using.
AVERTISSEMENT: Pour réduire le
risque de blessures, lire attentive-
ment les instructions de
fonctionnement avant l'utilisation
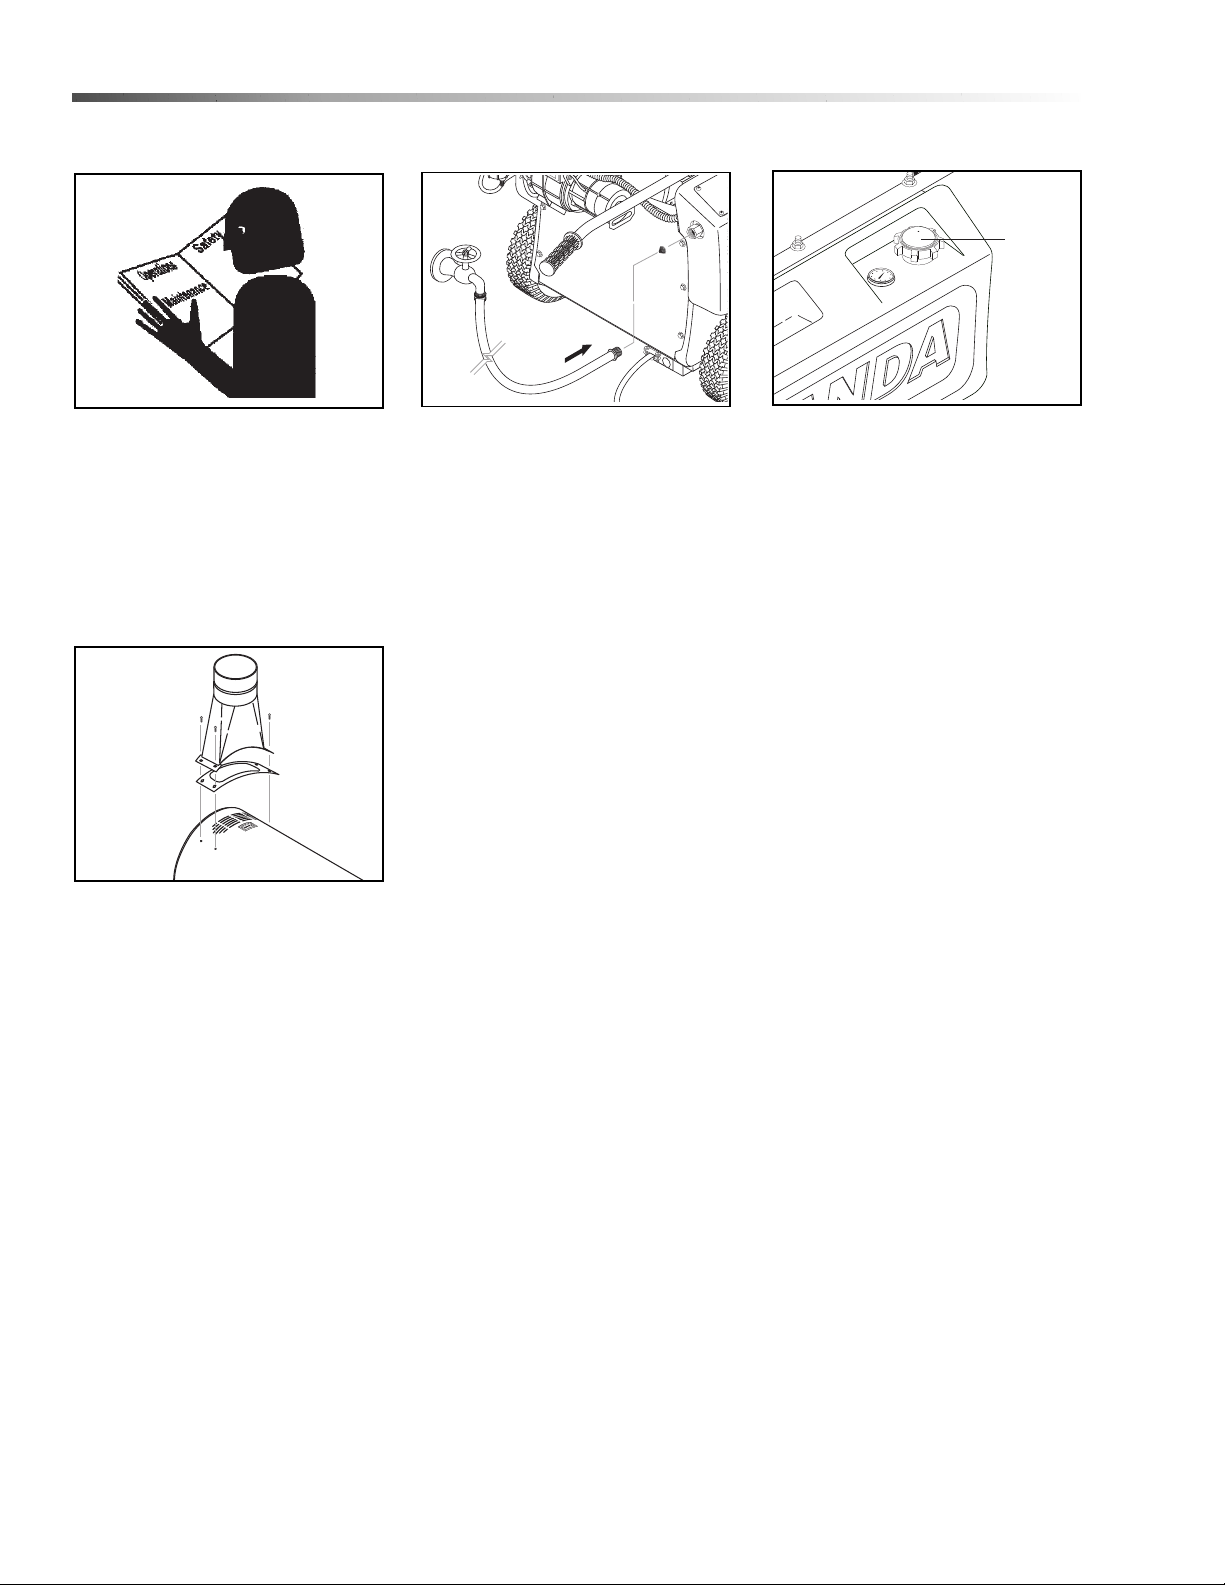
1. Read the owner's manual thor-
oughly. Failure to follow instruc-
tions could cause malfunction of the machine and
result in death, serious bodily injury and/or property
damage.
2. Know how to stop the machine and bleed pressure
quickly. Be thoroughly familiar with the controls.
3. Stay alert — watch what you are doing.
4. All installations must comply with local codes.
Contact your electrician, plumber, utility company
or the selling dealer for specific details. If your
machine is rated 250 volts or less, single phase a
ground fault circuit interrupter (GFCI) will be
provided. If rated more than 250 volts, or more
than single phase this product should only be
connected to a power supply protected by a GFCI.
DANGER: Improper connection of the equipment-
grounding conductor can result in a risk of electro-
cution. Check with a qualified electrician or service
personnel if you are in doubt as to whether the
outlet is properly grounded. Do not modify the plug
provided with the product - if it will not fit the outlet,
have a proper outlet installed by a qualified electri-
cian. Do not use any type of adaptor with this
product
DANGER: Une mauvaise connexion du conducteur
de terre de l'équipement peut entraîner un risque
d'électrocution. Vérifier auprès d'un électricien
qualifié ou du personnel d'entretien si vous avez
des doutes quant à savoir si lasortie est
correctement mise à la masse. NE PAS modifier la
fiche fournie avec le produit - si elle n'entre pas
dans la sortie, faire installer une sortie appropriée
par un électricien qualifié. NE JAMAIS utiliser un
adaptateur avec ce produit.
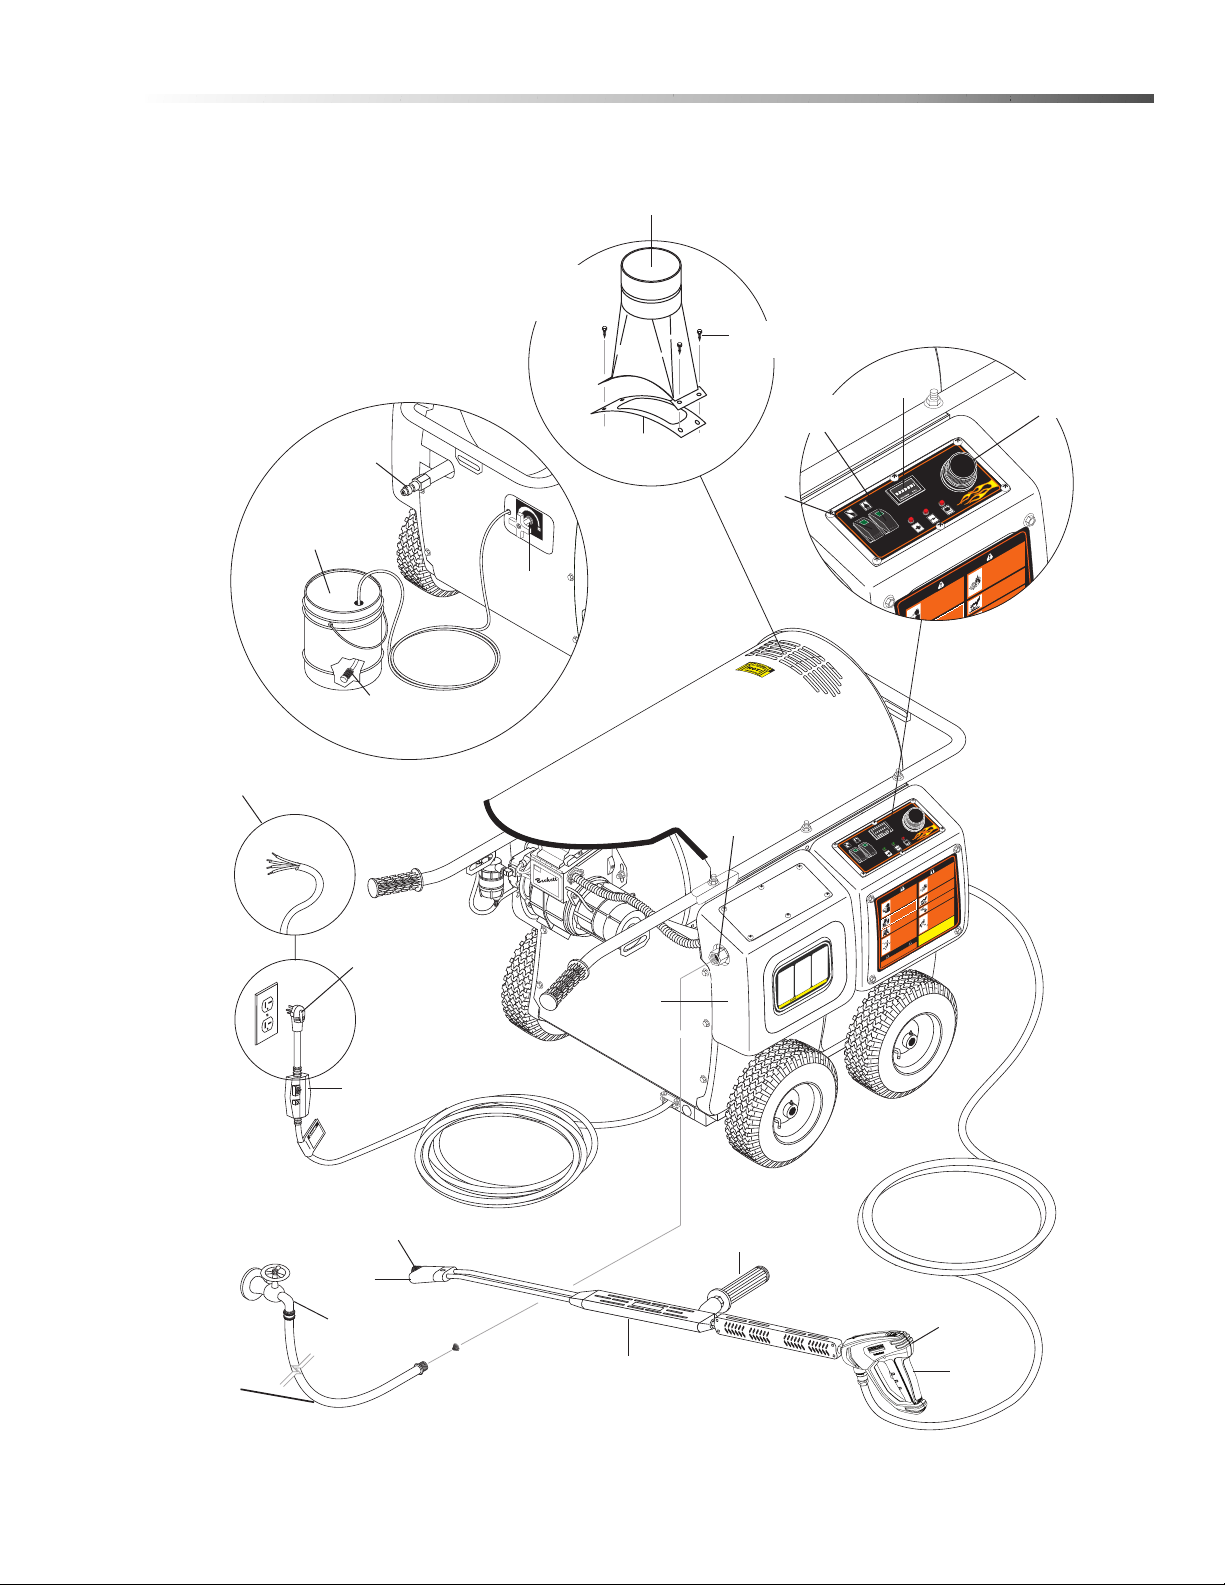
WARNING: Keep wand, hose, and
water spray away from electric
wiring or fatal electric shock may
result.
AVERTISSEMENT: Garder la
lance, le boyau et le jet d'eau à
l'écart de tout câblage électrique
ou des chocs électriques mortels
pourraient survenir
5. To protect the operator from electrical shock, the
machine must be electrically grounded. It is the
responsibility of the owner to connect this machine
to a UL grounded receptacle of proper voltage and
amperage ratings. Do not spray water on or near
electrical components. Do not touch machine with
wet hands or while standing in water. Always
disconnect power before servicing.
WARNING: Flammable liquids can create fumes
which can ignite, causing property damage or
severe injury.
AVERTISSEMENT: Des liquides inflammables
peuvent produire des vapeurs qui peuvent
s'enflammer, causant ainsi des dommages à la
propriété ou des blessures graves.
WARNING: Risk of explosion —
Operate only where open flame or
torch is permitted.
AVERTISSEMENT: Risque d'explo-
sion- Utiliser uniquement dans des
endroits où l'utilisation d'une
flamme nue ou d'une torche est
permise.
6. In oil burning models, use only
kerosene, No. 1 home heating fuel, or diesel. If
diesel is used, add a soot remover to every tankful.
WARNING: Risk of fire — Do not
add fuel when the product is
operating or still hot.
AVERTISSEMENT: Risque
d'incendie -Ne pas ajouter de
carburant pendant que la machine
fonctionner ou est encore chaude.
WARNING: Do not use gasoline
crankcase draining or oil
containing gasoline, solvents or alcohol. Doing so
will result in fire and/or explosion.
AVERTISSEMENT: Ne pas utiliser d'essence, de
Landa PHW Operator’s Manual 8.917-417.0 - D
WARNING
READ OPERATOR’S
MANUAL THOROUGHLY
PRIOR TO USE.
OPERATIONS
SAFETY
MAINTENANCE
KEEP WATER
SPRAY AWAY FROM
ELECTRICAL WIRING.
WARNING
WARNING
RISK OF EXPLOSION:
OPERATE ONLY WHERE
OPEN FLAME OR TORCH
IS PERMITTED
WARNING
RISK OF FIRE.
DO NOT ADD FUEL
WHEN OPERATING
MACHINE.

7
Safety
drainage du carter de moteur ou d'essence
contenant de l'huile, de solvants ou de l'alcool.
Agir de la sorte risquerait de créer un incendie et/
ou une explosion.
7. Oil burning appliances shall be installed only in
locations where combustible dusts and flammable
gases or vapors are not present. Do not store or
use gasoline near this machine.
8. Do not allow acids, caustic or abrasive fluids to
pass through the pump.
9. Never run pump dry or leave spray gun closed
longer than 1-2 minutes.
10. Keep operating area clear of all persons.
WARNING: High pressure spray
can cause paint chips or other
particles to become airborne and
fly at high speeds. To avoid
personal injury, eye, hand and
foot safety devices must be worn.
AVERTISSEMENT: Un jet haute
pression peut écailler la peinture
ou provoquer l'émission d'autres
particules dans l'air et leur projec-
tion à hautes vitesses. Pour éviter les lésions
corporelles, une protection des yeux, du visage,
des mains et des pieds doit être portée lors de l'util-
isation de cet équipement
11. Always wear properly rated eye protection such as
safety goggles or face shied while spraying.
(Safety glasses do not provide full protection.)
WARNING: This machine exceeds
85 db appropriate ear protection
must be worn.
AVERTISSEMENT: Cette machine
excède 85 dB et une protection de
l'ouïe appropriée doit être portée.
WARNING: Hot discharge fluid. Do
not touch or direct discharge
stream at persons or animals or
severe injury or death will result.
AVERTISSEMENT: Liquide de
décharge chaud. Ne pas toucher
ou décharger directement le jet
vers des personnes ou des
animaux,car cela risquerait de
causer des blessures graves ou même la mort.
WARNING: This machine produces hot water and
must have insulated components attached to
protect the operator.
AVERTISSEMENT:Cette machine produit de l'eau
chaude et doit comporter des composants isolés
attachés pour protéger l'opérateur.
WARNING: Risk of injury. Hot
surfaces can cause burns. Use
only designated gripping areas of
spray gun and wand. Do not place
hands or feet on non-insulated
areas of the pressure washer.
AVERTISSEMENT: Risque de
blessures. Les surfaces chaudes
peuvent causer des brûlures. Uti-
liser uniquement les zones de prise désignées du
pistolet pulvérisateur et de la lance. Ne pas placer
les mains ou les pieds sur des endroits non isolés
de la laveuse à pression.
12. To reduce the risk of injury, close supervision is
necessary when a machine is used near children.
Do not allow children to operate the pressure
washer. This machine must be attended during
operation.
WARNING: Grip cleaning wand
securely with both hands before
starting. Failure to do this could
result in injury from a whipping
wand.
AVERTISSEMENT: Agripper la
lance de nettoyage avec les deux
mains avant de commencer. Le
non-respect de cette consigne
pourrait mener à des blessures
causées par le mouvement violent de la lance.
13. Never make adjustments on machine while in
operation.
14. Be certain all quick coupler fittings are secured
before using pressure washer.
Landa PHW Operator’s Manual 8.917-417.0 - D
WARNING
HOT DISCHARGE FLUID:
DO NOT TOUCH OR
DIRECT DISCHARGE
STEAM AT PERSONS.
WARNING
RISK OF INJURY.
HOT SURFACES
CAN CAUSE BURNS
WARNING
TRIGGER GUN KICKS
BACK — HOLD WITH
BOTH HANDS
WARNING
EAR PROTECTION
MUST BE WORN
WARNING
USE PROTECTIVE
EYE WEAR
AND CLOTHING
WHEN OPERATING
THIS EQUIPMENT.

8
Safety
WARNING: High pressure
developed by these machines will
cause personal injury or
equipment damage. Keep clear of
nozzle. Use caution when oper-
ating. Do not direct discharge
stream at people, or severe injury
or death will result.
AVERTISSEMENT: La haute
pression générée par ces
machines causera des lésions corporelles ou des
dommages à l'équipement. Se tenir à l'écart de la
buse. Faire preuve de prudence lors de l'utilisation.
Ne pas décharger directement le jet vers des
personnes ou des animaux, car cela risquerait de
causer des blessures graves ou même la mort.
WARNING: Protect machine from
freezing.
AVERTISSEMENT: Protéger la
machine contre le gel.
15. To keep machine in best
operating conditions, it is
important you protect machine
from freezing. Failure to protect
machine from freezing could
cause malfunction of the machine and result in
death, serious bodily injury, and/or property
damage. Follow storage instructions specified in
this manual.
16. Inlet water must be clean fresh water and no hotter
then 90°F.
DANGER: Risk of asphyxiation.
Use this product only in a well
ventilated area. Running this
product indoors can result in
death due to carbon monoxide, a
poisonous gas you cannot see or
smell. Never operate indoors even
if windows and doors are open.
Only use outdoor and far away
from windows, doors, and
openings or vents.
DANGER: Risque d'asphyxie. Ne pas inhaler les
vapeurs. Utiliser ce produit uniquement dans un
endroit bien ventilé. L'utilisation de ce produit à
l'intérieur peut causer la mort par monoxyde de
carbone, un gaz toxique incolore etinodore. Ne
jamais utiliser à l'intérieur, même si les fenêtres et
les portes sont ouvertes.
17. Avoid installing machines in small areas or near
exhaust fans. Adequate oxygen is needed for
combustion or dangerous carbon monoxide will
result.
18. Manufacturer will not be liable for any changes
made to our standard machines or any compo-
nents not purchased from us.
19. The best insurance against an accident is precau-
tion and knowledge of the machine.
WARNING: Be extremely careful
when using a ladder, scaffolding
or any other relatively unstable
location. The cleaning area
should have adequate slopes and
drainage to reduce the possibility
of a fall due to slippery surfaces.
AVERTISSEMENT: Faire preuve
d'une extrême prudence au
moment d'utiliser une échelle,
des échafaudages ou toute autre surface
relativement instable. La zone de nettoyage doit
avoir une pente et un drainage adéquats pour
réduire la possibilité d'une chute due à une surface
glissante.
20. Do not overreach or stand on unstable support.
Keep good footing and balance at all times.
21. Do not operate this machine when fatigued or
under the influence of alcohol, prescription medica-
tions, or drugs.
WARNING: Do not spray machine
or any people, animals or elec-
trical parts.
AVERTISSEMENT: Ne pas
vaporiser sur la machine ou les
gens, les animaux ou les pièces
électriques.
Follow the maintenance instructions
specified in the manual.
Suivre les instructions d'entretien
spécifiées dans le manuel.
Landa PHW Operator’s Manual 8.917-417.0 - D
WARNING
DO NOT SPRAY
MACHINE OR ANY
PEOPLE, ANIMALS OR
ELECTRICAL PARTS.
WARNING
PROCTECT FROM
FREEZING
DANGER
RISK OF
ASPHYXIATION.
USE THIS PRODUCT
ONLY IN A WELL
VENTILATED AREA.
WARNING
RISK OF INJURY
FROM FALLS WHEN
USING LADDER.
WARNING
RISK OF INJECTION
OR SEVERE INJURY
TO PERSONS. KEEP
CLEAR OF NOZZLE.

9
Operations
Component Identification
Landa PHW Operator’s Manual 8.917-417.0 - D
RIESGODE ELECTROCUCIÓN—
Conecteel enchufeen un contacto ad-
ecuado.Mantengatodaslas conneccio-
nessecasyarriba delsuelo.No rocie
componenteseléctricos.Desconecte la
corrienteeléctrica antes de darservicio.
RISQUED’ELECTROCUTION—
Relierà desprises avec mise à laterre
seulement.T
ouslesfi
lsdoivent être
maintenussecset étre suspendus.
Nojamais projeter de l’eau surles
composanteset filsélectriques.Couper
l’alimentatationélectrique avant defaire
uneréparation.
RISKOF
ELECTROCUTION.
Connectonlyto
properlygrounded
outlet.Keepall
connectionsdry
andoffthe ground.
Keepsprayaway
fromelectrical
wiringand compo-
nents.Disconnect
fromelectrical
supplybefore
servicing.
PROTEJASELOSOJOS
CUANDOseopereesteequipo.
DESLUNETTESDESECURITE
DOIVENTETREPORTEESlorsque
vousoperezcetappareil.
RISKOFINJURY
—PROTECTIVE
EYEWEARAND
CLOTHINGMUST
BEWORNwhen
operatingthis
machine.
LEAELMANUALOPERACION
ANTESDEUSARSE.ESTEEQUIPO
DEBESERUSADOSOLAMENTE
POROPERADORESCALIFICADOS.
LIRELE MANUELDEL’OPERATEUR
AVANTUTILISATION.CETAPPAR-
EILDOIT ETREUTILISEPARDES
OPERATEURSQUALIFIES.
TOREDUCE
THERISKOF
INJURYREAD
OPERATOR’S
MANUAL
CAREFULLY
BEFOREUSING.
THISMACHINE
TOBEUSED
ONLYBY
QUALI-
FIED
OPERATORS.
RISKOF
INJECTIONOR
SEVEREINJURY
TOPERSONS.
Keepclear
ofnozzle.
HOT
DISCHARGE
FLUID.Donot
touchordirect
discharge
streamat persons.
RIESGODEPENETRACIÓN O
LESIONESSEVERASAPERSONAS.
Manténgasefueradel alcance
deboquilla.
DESCARGADE AGUACALIENTEA
ALTAPRESION—Notoquenidirija
elfl
ujo delagua a otras personas.
RISQUEDEBLESSURES.
Setenirloindes buses.
EAUCHAUDESOUSPRESSION A
LASORTIE — Ne pas diriger le jet
d’eauversdes personnes.
RISKOF
EXPLOSION.
Operateonly
whereopen fl
ame
ortorchis permit-
ted.Donotspray
fl
ammable liquids.
RISKOF FIRE.Do
notadd fuel when
themachine is
operating.
WARNING
PRECAUCION/AVERTISSEMENT
RIESGODEEXPLOSION—Use
elproducto en áreasdonde el fuego o
llamaseanpermitidos.Norocie liqui-
dosinfl
amables.
RIESGODEFUEGO.
Noañadirgasolina
cuandolamáguinaestetrabajando.
RISQUED’EXPLOSION—Utiliser
auxendroitsoùunefl
amme nueest
permise.Nepasvaporiser de liquides
infl
ammables.
RISQUEDEFEU.
Nepas
ajouterdéssence/defueltandisquela
machineestenoperation
.
98.917-588.0
SPRAYGUN
KICKSBACK.
Holdwithboth
hands.
LAPISTOLA SEMUEVECONLA
PRESIÓN—Sostenga con las dos
manos.
LAPOIGNEEPISTOLET RE-
POUSSE—Teniràdeuxmains.
RISKOF INJURY—
HOTSURFACES
CANCAUSE
BURNS.Useonly
designedgripping
areasof spraygun
andwand.
SUPERFICIESCALIENTES —Use
solamentelas áreas aisladas
delgatillo ylalanza.
SURFACESCHAUDES—Toucher
seulementles partiesisolées des
poignéepistolets et lances.
RIESGODEASFIXIA.Use el produc-
toen un area de ventilación adecuada.
RISQUED’ASPHYXIE.Utiliserdans
unendroitbien aéré.
RISKOF
ASPHYXIATION.
Useonly in well
ventilatedarea.
WARNING!
!ATENCION/ATTENTION!
DISCONNECTFROM ELECTRICALSUPPLYBEFORESERVICING.
DESCONECTELACORRIENTEELECTRICAANTESDEDARSERVICIO.
COUPLERL
’ALIMENTATIONELECTRIQUEAVANTDEFAIREUNEREPARATION
.
CAUTION—NEVERUSE:
•Bleach,chlorineproductsandothercorrosivechemicals
•Liquidcontainingsolvents(i.e.paintthinner,gasoline,oil)
•Tri-sodiumphosphateproducts
•Ammoniaproducts
•Acid-basedproducts
Thesechemicalswillharmtheunitandwilldamagethesurfacebeingcleaned.
OPERATING
INSTRUCTIONS
1.ReadOperator’sManual
carefullybeforeusing.
2.
Connectstandardgardenhose
tomachineandturnwateron.
3.Securehighpressurehoseto
machine.
4.Securespraynozzletoend
ofwand.
5.Checkpumpoillevel.
6.Tostartunit,turnswitchon,
gripwandsecurelyand
triggerspraygun.
7.Toheatwater,turnburner
switchon.
8.Toapplydetergent,see
Operator'sManual.
9.Toshutdownmachine,turn
burneroffandallowpumpto
rununtilwateriscool.Flush
detergentlineswithcleanwater
beforeturningpumpswitchoff.
Triggersprayguntorelieve
pressure.
1.LeaelManualdeOperación
antesdeusarse.
2.
Conectelemangueradejardin
yabralallavedelagua.
3.Conectelamangueradealta
presión.
4.C
oloquelaboquillaa
lalanza.
5.Reviseelniveldeaceitedela
bomba.
6.Enciendalabomba,abrael
gatilloylogrepresión.
7.Para
calentar
agua,
enciendael
quemador.
8.Paraaplicareldetergente,
consulteelManualdeOper-
ación.
9.
Alt
erminar,apagueelque-
mador,purgueconaguala
manguerad
eldetergente,y
hagacircularelaguafriaantes
deapagarlabomba.Abrael
gatillopararelevarlapresión.
INSTRUCCIONES
DEOPERACION
1.
LireattentivementleManuelde
l’Opérateuravantutilisation.
2.Relieràuneprised'eaue
t
ouvrirl’eau.
3.Relierleboyauhautepression
àl’appareil.
4.Vérifi
erleniveaud’huiledela
pompe.
5.Insérerlabuseauboutdela
lance.
6.
Partirlemoteurdelap
ompe
etpresserlagachettedela
poignéepistolet.
7.Pourchaufferl’eau,allumerle
brûleur.
8.
Pourappliquerdudetergent,
voirleManueldel'Opérateur.
9. Pourarrêterl’appareil,fermer
lebrûleuretlaisserrefroidir
l’eaupropreavantd'arrêter
lapompe.Presserlapoi-
gnéepistoletpourrelacher la
pression.
MODE
D’EMPLOI
USE DETERGENTSFORBESTRESULTS
8.917-587.0
PHW
8.917-586.0
PUMPBURNER
POWERIGNITIONOVERLOAD
PROTEJASELOS OJOS
ANDOseopereesteequipo.
DESECURITE
TEESlorsque
LEAELMANUALOPERACION
ANTESDEUSARSE.ESTEEQUIPO
DEBESERUSADOSOLAMENTE
POROPERADORESCALIFICADOS.
LIRELE MANUELDE L’ OPERATEUR
AVANTUTILISATION. CETAPPAR-
EILDOITETRE UTILISEPARDES
OPERATEURSQUALIFIES.
TOREDUCE
THERISKOF
INJURYREAD
OPERATOR’S
MANUAL
CAREFULLY
BEFOREUSING.
THISMACHINE
TOBEUSED
ONLYBY
QUALI-
FIED
ERATORS.
RRIESGODEPENETRACIÓNO
LESIONESSEVERASA PERSONAS.
Manténgasefueradel alcance
boquilla.
RGADE AGUA CALIENTEA
ON—Notoque ni dirija
traspersonas.
ES
A
RISKOF
EXPLOSION.
Operateonly
whereopen fl
ame
ortorch is permit-
ted.Donotspray
fl
ammable liquids.
RISKOFFIRE.Do
notaddfuelwhen
themachine is
operating.
WARNING
PRECAUCION/AVERTISSEMENT
RIESGODEEXPLOSION—Use
elproducto en áreasdonde el fuego o
llamasean permitidos.No rocieliqui-
dosinfl
amables.
RIESGODEFUEGO.
Noañadir gasolina
cuandola máguina este trabajando.
RISQUED’EXPLOSION—Utiliser
auxendroitsoù une fl
ammenue est
permise.Nepasvaporiser de liquides
infl
ammables.
RISQUEDEFEU.
Nepas
ajouterdéssence/defueltandisquela
machineestenoperation
.
SPRAYGUN
KICKSBACK.
Holdwithboth
hands.
LAPISTOLA SEMUEVECON LA
PRESIÓN—Sostengacon lasdos
manos.
LAPOIGNEEPISTOLETRE-
POUSSE—Tenir à deuxmains.
RISKOFINJURY—
HOTSURFACES
CANCAUSE
BURNS.Useonly
designedgripping
areasof spraygun
andwand.
SUPERFICIESCALIENTES—Use
solamentelasáreas aisladas
delgatillo y la lanza.
SURFACESCHAUDES—Toucher
seulementlesparties isolées des
poignéepistoletset lances.
PHW
8.917-586.0
PUMP BURNER
POWERIGNITIONOVERLOAD
DETERGENT VALVE
VALVULADEDETERENTE
SOUPAPEDEDETERGENT
GFCI
Burner
Switch
No Plug on All
Three Phase
Machines
Water Supply
(not included)
Spray Gun
Trigger
Variable
Pressure
Control Wand
Control
Handle
Pump
Switch
Detergent Bucket
(Not Included)
Water
Supply Hose
(not included)
Nozzle Quick
Coupler
Brass Soap
Nozzle
Adjustable
Thermostat
Hour
Meter
Detergent
Valve
Detergent
Hose
Strainer
8.707-058.0
Flue Adapter
8.717-745.0
Screw
8.718-948.0
Gasket
8.717-425.0
Water
Inlet
PHW4-22024A,G
PHW4-30024A,G
Stackless Top
Adapter Kit
(Optional #8.903-430.0)
Discharge
Nipple
Water
Float
Tank

10
Operations
Assembly Instructions
STEP 1: Read safety, installation
and preventative maintenance
instructions before connecting the
water supply hose to the float tank
inlet swivel connector and turning
on water supply.
STEP 4: Adding exhaust vent pipe
to your oil fired burner is not recom-
mended because it restricts air
flow. This causes carbon build-up,
which affects the operation and
increases maintenance on the coil.
If a stack must be used, refrain
from using 90° bends. If the pipe
can not go straight up then use only
45° bends and go to the next larger
size pipe. The overall pipe length
must not exceed 6 feet in length.
Air adjustments will be required
after installation.
STEP 2: Water source for
machines should be supplied by a
3/4" I.D. garden hose with a city
water pressure of not less than 30
PSI. If the water supply is inade-
quate, or if the garden hose is
kinked, the machine will run very
rough and the burner will not fire.
STEP 3: Fill fuel tank with proper
fuel: kerosene, No. 1 home heating
fuel or diesel.
Landa PHW Operator’s Manual 8.917-417.0 - D
Fuel
Cap

11
Operations
Operation Instructions
STEP 1: Machines must be
stored indoors when not in use.
Location of machine is important.
Avoid installing near combustible
material or in poorly ventilated
areas. Electrical connection to
machine should be the proper
voltage, phase and amperage. See
specifications for particular model.
Plug the power cord into a
grounded receptacle.
STEP 4: Press the pump switch
"ON" and then pull the trigger on
the spray gun to activate pressure
switch which starts machine (For
auto start machines only).
For machines with time delay shut
down, simply press pump switch
"ON" and the machine will start.
Before installing nozzle, turn on
water supply and run machine
allowing water to flush through the
system until clear.
STEP 2: Connect the high pressure
hose quick coupler to discharge
nipple by sliding the quick coupler
collar back and inserting quick
coupler on to discharge nipple and
pushing the quick coupler collar
forward to secure it.
STEP 3: Attach wand to spray gun
using teflon tape on threads to
prevent leakage. Attach swivel
connector on high pressure hose to
spray gun using teflon tape on
threads. Engage safety latch to
prevent from triggering gun.
Landa PHW Operator’s Manual 8.917-417.0 - D
Discharge
Nipple
High Pressure
Hose Quick
Coupler
High
Pressure
Hose
Spray
Gun
Safety
Latch
Wand
Swivel
Connection
RISKOF
EXPLOSION.
Operateonly
whe
re openfl
ame
ch
is permit-
tsp
ray
ids
.
AR
NING
AVE
RTISSEMENT
RIESGO DE EXPLOSION —Use
elproducto en áreasdonde elfuego
llama seanpermitidos.Norocieliqui
-
dosinfl
amables.
RIESGODEFUEGO.
Noañadirgasol
cuando la máguinaestetrabajando.
RISQUE D’EXPLOSION —Utiliser
au
xendroitsoùune fl
ammenueest
mis
e.Nepasvaporiserde liquide
s
able
s.
RISQUEDEFEU.
Ne
p
nc
e/defueltandisquel
a
pera
tion
.
Use
PHW
8.917-586.0
PUMPBURNER
POWERIGNITION OVERLOAD
Adjustable
Thermostat
Pump
Switch
Burner
Switch
Variable Pressure
Control Handle Trigger
Variable Pressure
Wand (VP)
High
Pressure
Nozzle
Brass Soap
Nozzle
STEP 5: Selection of high or low pressure is accompa-
nied by turning the handle. Note: High pressure nozzle
must be inserted at end of wand to obtain high
pressure. To apply soap, see Detergent and General
Cleaning Techniques section.
When a steady stream of water flows from the spray
gun and wand, turn the thermostat knob to the 200°
mark, then push the burner switch. The burner will light
automatically when the spray gun trigger is pulled.
PHW
8.917-586.0
PUMPBURNER
POWERIGNITION OVERLOAD
DETERGENT VALVE
VALVULA DE DETERENTE
SOUPAPEDE DETERGENT
STEAM VALVE
VALVULA DE VAPOR
SOUPAPEDEVAPEUR
Steam
Valve
Detergent
Valve
Burner
Switch
Thermostat STEP 6: STEAM COMBINATION
OPTION: Turn the steam valve counter-
clockwise.
(Detergent will not siphon when the steam
valve is opened.)
Turn burner switch off, pull trigger on
spray gun and allow water to cool.

12
Operations
Detergents & General Cleaning
Techniques
WARNING: Some detergents may
be harmful if inhaled or ingested,
causing severe nausea, fainting or
poisoning. The harmful elements
may cause property damage or
severe injury.
AVERTISSEMENT: Certains
détergents peuvent être
dangereux s'ils sont inhalés ou
ingérés, provoquant de fortes nausées, des
évanouissements et l'empoisonnement. Les
éléments dangereux peuvent causer des
dommages à la propriété ou des blessures graves.
STEP 1: Use Landa detergent
designed specifically for pressure
washers. Household detergents
could damage the pump. Prepare
detergent solution as required by the
manufacturer. Fill a container with
pressure washer detergent. Place the
filter end of detergent pick- up tube
into the detergent container.
STEP 2: Turn detergent valve
counterclockwise until desired
amount of detergent flow is
achieved.
STEP 3: With the motor running,
pull trigger to operate machine.
Liquid detergent is drawn into the machine and mixed
with water. Apply detergent to work area. Do not allow
detergent to dry on surface.
IMPORTANT: You must flush the detergent after
each use by placing the suction tube into a bucket
of clean water. Then run the pressure washer for 1-
2 minutes. Turn detergent valve clockwise after
flushing with clean water to prevent air from
entering pump.
Thermal Pump Protection
If you run your pressure washer for 3 minutes without
pressing the trigger on the spray gun, circulating water
in the pump can reach high temperatures. When the
water reaches this temperature, the pump protector
engages and cools the pump by discharging the warm
water onto the ground. This thermal device prevents
internal damage to the pump.
Cleaning Tips
Pre-rinse cleaning surface with fresh water. Place
detergent suction tube directly into cleaning solution
and apply to surface at low pressure (for best results,
limit your work area to sections approximately 6 feet
square and always apply detergent from bottom to top).
Allow detergent to remain on surface 1-3 minutes. Do
not allow detergent to dry on surface. If surface
appears to be drying, simply wet down surface with
fresh water. If needed, use brush to remove stubborn
dirt. Rinse at high pressure from top to bottom in an
even sweeping motion keeping the spray nozzle
approximately 1 foot from cleaning surface. Use over-
lapping strokes as you clean and rinse any surface. For
best surface cleaning action spray at a slight angle.
Recommendations:
• Before cleaning any surface, an inconspicuous
area should be cleaned to test spray pattern
and distance for maximum cleaning results.
• If painted surfaces are peeling or chipping, use
extreme caution as pressure washer may
remove the loose paint from the surface.
• Keep the spray nozzle a safe distance from the
surface you plan to clean. High pressure wash
a small area, then check the surface for
damage. If no damage is found, continue to
pressure washing.
CAUTION - Never use:
• Bleach, chlorine products and other corrosive
chemicals
• Liquids containing solvents (i.e., paint thinner,
gasoline, oils)
• Tri-sodium phosphate products
• Ammonia products
• Acid-based products
These chemicals will harm the machine and will
damage the surface being cleaned.
Rinsing
It will take a few seconds for the detergent to clear.
Apply safety latch to spray gun. Remove black soap
nozzle from the quick coupler. Select and install the
desired high pressure nozzle. NOTE: You can also stop
detergent from flowing by simply removing detergent
siphon tube from bottle.
Landa PHW Operator’s Manual 8.917-417.0 - D
WARNING
DETERGENT VALVE
VALVULADEDETERENTE
SOUPAPE DE DETERGENT
Detergent
Bucket
(not Included)
Detergent
Pick-Up
Tube
Detergent
Valve

13
Operations
Shutdown Instructions
STEP 1: Remove detergent suction
tube from container and insert into
one (1) gallon of fresh water. Pull
trigger on spray gun and siphon
water for one minute
STEP 4: Turn water off.
STEP 2: Push burner switch off
and open trigger on spray gun,
allowing water to flow, which will
cool down the heating coil.
STEP 3: After water has cooled,
turn the pump switch off.
Landa PHW Operator’s Manual 8.917-417.0 - D
PHW
PUMPBURNER
POWER IGNITIONOVERLOAD
Burner
Switch
Storage
CAUTION: Always store your pressure washer in a
location where the temperature will not fall below
32° F (0°C). The pump in this machine is suscep-
tible to permanent damage if frozen. FREEZE
DAMAGE IS NOT COVERED BY WARRANTY.
ATTENTION: Toujours entreposer la laveuse à
pression dans un endroit où la température ne sera
pas inférieure à X °C (X °F). La pompe sur cette
machine est susceptible de subir des dommages si
elle est exposée au gel. LES DOMMAGES DUS AU
GEL NE SONT PAS COUVERTS PAR LA
GARANTIE.
1. Stop the pressure washer, squeeze spray gun
trigger to release pressure.
2. Detach water supply hose and high pressure hose.
3. Turn on the machine for a few seconds, until
remaining water exits. Turn pump off immediately.
4. Do not allow high pressure hose to become kinked.
5. Store the machine and accessories in a room
which does not reach freezing temperatures.
CAUTION: Failure to follow the above directions
will result in damage to your pressure washer.
ATTENTION: Le non-respect des directives ci-
dessus entraînera des dommages à la laveuse à
pression.

14
Maintenance
Preventative Maintenance
• Use clean fuel - kerosene, No. 1 home heating
fuel or diesel. Clean or replace fuel filter every
100 hours of operation. Avoid water contami-
nated fuel as it will seize up the fuel pump. De-
soot coils monthly or use an additive if diesel is
being used.
• Check to see that water pump is properly lubri-
cated.
• Follow winterizing procedure to prevent freeze
damage to pump and coils.
• Always flush detergents from system after use.
• If water is known to be high in mineral content,
use a water softener on your water system or
use a LANDA recognized coil cleaning deter-
gent.
• Do not allow acidic, caustic or abrasive fluids to
be pumped through the system.
• Always use high grade quality LANDA cleaning
detergents.
• Never run pump dry for extended periods of
time.
• Periodically descale coils per instructions.
• If machine is operated with smoky or eye-
burning exhaust, coils will soot up and prevent
water from reaching maximum operating tem-
perature. See section on burner adjustments.
Maintenance And Service
Pump Lubrication
Use only LANDA SAE 10W-40 weight, non-foaming oil.
Change oil after first 50 hours of use. Thereafter,
change oil every year or at 500 hour intervals. Oil level
should be checked through use of dipstick found on top
of pump or red dot visible through oil gauge window. Oil
should be maintained at that level
Fuel
Use clean (not contaminated with water and debris)
kerosene, No. 1 home heating fuel or diesel. Drain fuel
tank and replace fuel filter every 100 hours of opera-
tion.
Electrode Setting
Ignition Circuit
Periodically inspect wires, spring contact and elec-
trodes for condition, security and proper spacing.
Transformer test: CAUTION: 10,000 volts — use defect
free insulated screwdriver and keep fingers off blade!
Lay blade across one contact: OK if arc will span 1/2"
between end of blade and other contact (see illustration
below).
Transformer Check
Fuel Control System
These machines utilize a fuel solenoid valve located on
the fuel pump to control the flow of fuel to the combus-
tion chamber. This solenoid, which is normally closed,
is activated by the flow switch. When an operator
releases the trigger on the spray gun, the unloader
goes into a by-pass mode, thus stopping electrical
current to the fuel solenoid coil. With the solenoid
closed, the fuel supply to the combustion chamber
ceases. Periodic inspection to insure that the fuel
solenoid valve functions properly is recommended.
This can be done by operating the machine and
checking to see that when the spray gun is in the off
position, the burner is not firing.
Fuel Pressure Adjustment
To adjust fuel pressure, turn the adjusting screw
clockwise to increase, counterclockwise to decrease.
Do not exceed 200 PSI. NOTE: When changing fuel
pump, a bypass plug must be installed in return line
port or fuel pump will not prime.
Burner Nozzle
Keep tip free of surface deposits by wiping with clean,
solvent-saturated cloth, being careful not to plug or
enlarge nozzle. For maximum efficiency, replace nozzle
each season.
Landa PHW Operator’s Manual 8.917-417.0 - D
1/8" Gap
10/32"
1/16"
Electrode
Nozzle
ELYRIA,
OHIO, U.S.A.

15
Maintenance
Wayne Oil Burner
Burner Air Adjustment: The oil burner on this
machine is preset for operation at altitudes below 500
feet. If operated at higher altitudes, it may be necessary
to adjust the air band for a #1 or #2 smoke spot on the
Bacharach scale.
To adjust, start machine and turn burner ON. Loosen
two locking screws found on the air band and close air
band until black smoke appears from burner exhaust
vent. Note air band position. Next, slowly open the air
band until white smoke just starts to appear. Turn air
band halfway back to the previously noted position.
Tighten locking screws.
For higher altitudes, the air band opening may need to
be increased; for lower altitude, the .air band may need
to be decreased.
For higher humidity, the air band opening may need to
be increased; for lower relative humidity, the .air band
may need to be decreased.
For higher ambient temperatures the air band opening
may need to be increased; for lower ambient tempera-
tures, the air band opening may need to be decreased.
Adjust to your operating location’s environment as-
needed for best smoke spot and performance
compliant with local, state, and federal regulations.
Fuel Pressure Adjustment
To adjust fuel pressure, First install a pressure gage
into the port just after the pump fuel exit. Turn the
adjusting screw (located at the regulator port)
clockwise to increase, and counterclockwise to
decrease. Do not exceed 200 psi or lower the pressure
below 130 PSI, when checked at the post-pump
pressure port.
The fuel pressure may need to be adjusted due to
altitude. For every 500 ft altitude above sea level, the
boiling point of water goes down 1 °F. At high altitude
environments, this boiling point change may require the
heat input to be lowered so the water input does not
turn to steam earlier than at the factory settings and
activate the pressure sensors and pressure relief
equipment when the unit is operated and much higher
altitudes from factory settings or local dealer site
settings. Check with your dealer before making local
site fuel pressure adjustments.
Also, as ambient temperature changes seasonally, the
fuel temperature in the feed tank and air temperature
inlet can impact fuel flow. In more extreme tempera-
tures, this local-site adjustment may also require
different fuel nozzles for fuel inlet temperatures that are
at seasonal extremes (higher or lower) in locations
where the temperature changes are beyond moderate
temperatures of between 40°F and 90°F. Colder
temperatures will make for a thicker flow and less fine a
fuel spray while hotter temperatures will make for a
thinner flow a more fine spray with the same nozzle.
Consider alternate nozzle configurations from the
baseline factory-supplied nozzle for operating in such
temperature extremes if performance is not meeting
needs with air band and fuel pressure settings alone.
NOTE: When changing fuel pump, a by-pass plug
must be installed in return line port or fuel pump will
not prime.
Burner Air Adjustment
The oil burner on this machine is preset for operation at
altitudes below 500 feet. If operated at higher altitudes,
it may be necessary to adjust the air band for a #1 or #2
smoke spot on the Bacharach scale.
To adjust, start machine and turn burner ON. Loosen
two locking screws found on the air band and close air
band until black smoke appears from burner exhaust
vent. Note air band position. Next, slowly open the air
band until white smoke just starts to appear. Turn air
band halfway back to the previously noted position.
Tighten locking screws.
For higher altitudes, the air band opening may need to
be increased; for lower altitude, the .air band may need
to be decreased.
For higher humidity, the air band opening may need to
be increased; for lower relative humidity, the .air band
may need to be decreased.
For higher ambient temperatures the air band opening
may need to be increased; for lower ambient tempera-
tures, the air band opening may need to be decreased.
Adjust to your operating location’s environment as-
needed for best smoke spot and performance
compliant with local, state, and federal regulations.
CAUTION: If white smoke appears from burner
exhaust vent during start-up or operation, discon-
tinue use and readjust air bands.
ATTENTION: Si de la fumée blanche s'échappe de
l'évacuation du brûleur pendant le démarrage ou le
fonctionnement, cesser d'utiliser et réajuster les
bandes d'air.
NOTE: If a flue is installed, have a professional
serviceman adjust your burner for a #1 or #2 smoke
spot on the Bacharach scale.
Landa PHW Operator’s Manual 8.917-417.0 - D

16
Maintenance
Cleaning of Coils
In alkaline water areas lime deposits can accumulate
rapidly inside the coil pipes. This growth is increased by
the extreme heat buildup in the coil. In areas where
alkaline water is an extreme problem, periodic use of
Landa Coil Descaler (Part # 8.914-296.0) will remove
lime and other deposits before coil becomes plugged.
Periodic descaling of the heating coil is recom-
mended so please consult your local Landa Dealer
for instructions.
Spray Nozzles
Each machine is equipped with four spray nozzles.
Different spray nozzles are calibrated for each machine
depending on the flow and pressure of that particular
model. Spray nozzles vary in bore size and angle of
spray. Popular spray angles are 15°, 25° and 40°.
When ordering, please specify size and angle of
nozzle. Nozzle size for each machine is located on the
serial plate.
Unloader Valves
Unloader valves are preset and tested at the factory
before shipping. Tampering with the factory setting may
cause personal injury and/or property damage, and will
void the manufacturer's warranty. (Consult your local
LANDA Dealer for the correct procedures.)
Winterizing Procedure
Damage due to freezing is not covered by warranty.
Adhere to the following cold weather procedures
whenever the washer must be stored or operated
outdoors under freezing conditions.
During the winter months, when temperatures drop
below 32° F, protecting your machine against freezing
is necessary. Siphoning a small amount of antifreeze
into the system is recommended. Pouring a 50/50 mix
of antifreeze and water into the float tank and then
siphon 100% antifreeze through the detergent line with
the pump on. If compressed air is available, an air
fitting can be screwed into the float tank strainer fitting
and, by injecting compressed air, all water will be blown
out of the system.
Low Pressure Diagnosis
Refer to the low pressure section of the troubleshooting
guide. If, by referring to the guide, the trouble is found
to be either the unloader or pump, your next step is to
determine which is the problem. This can be done by
eliminating the unloader from the system and attaching
the discharge hose directly to the pump. If high
pressure is present, then the unloader needs repairing
or replacing.
CAUTION: When using this procedure to test
components, keep spray gun open at all times.
ATTENTION: Lorsque cette procédure est utilisée
pour tester les composants, garder le pistolet
pulvérisateur ouvert en tout temps.
Landa PHW Operator’s Manual 8.917-417.0 - D

17
Maintenance
Coil Removal
Removal of the coil because of freeze breakage or to
clean soot from it, can be done quickly and easily.
1. Disconnect hose from pump/unloader to inlet side
of coil.
2. Disconnect the electrical connections to the ther-
mostat or remove thermostat sensor.
3. Remove all the fittings from the discharge and inlet
side of the coil.
4.
Remove burner assembly from combustion
chamber.
5. Remove 3 - 3/8" bolts from either side of coil and
tank assembly (these bolts are used to fasten tank
and handles to chassis).
6. Remove the two 3/8" nuts which are underneath
the bottom wrap (to keep the coil from moving).
7. Remove tank top wrap exposing insulation and
coil. Carefully bend insulation tabs at exhaust
stack.
8. Carefully fold back insulation and remove the coil.
9. Replace or repair any insulation found to be torn or
broken.
10. Reinstall new or cleaned coil by reversing steps 8
through 1.
Temperature and Pressure Relief Valve
(Pump Protector)
Machines with spray gun control offer the operator the
convenience of stopping and starting the flow of water
at the end of the discharge hose. When the spray gun
stops the flow of water, the unloader valve, back at the
machine, opens and recycles the cold water back to the
inlet side of the pump. Recycling for longer than five
minutes causes the cold water within the pump to heat
up. To avoid damage to the pump, a temperature and
pressure relief valve is installed next to the inlet side of
the pump that will open in the event the water tempera-
ture exceeds 140° F. Therefore, while operating the
machine, do not leave the spray gun closed for an
extended period of time.
High Limit Hot Water Thermostat
For safety, PHW machines are equipped with adjust-
able thermostats. If the temperature of the water should
exceed its operating temperature, the adjustable ther-
mostat will turn the burner off until the water cools, then
it will automatically reset itself.
Rupture Disk
If pressure from pump or thermal expansion should
exceed safe limits, the rupture disk will burst, allowing
high pressure to be discharged through hose to ground.
When the disk ruptures, it will need to be replaced.
Optional Time Delay Shutdown Operation
Once the spray gun trigger is released, the shutdown
timer becomes activated. The machine will continue to
run in by-pass mode until the timer reaches its preset
time, 3 minutes. When that time is reached, the
machine shuts down. To restart, push the pump switch
forward.
Optional Auto Start/stop Timer Operation
Once the pump switch is turned on, simply triggering
the spray gun is all it takes to start the machine. Once
the trigger is released the timer will let the machine
bypass water for 15 seconds. It also starts an internal 5
to 60 minute lockout timer. This feature is totally adjust-
able by the operator by adjusting the knob at the top of
the timer. We recommend setting the timer for 15
minutes. To reset the lockout feature, operator must
trigger the spray for 10 full seconds.
Landa PHW Operator’s Manual 8.917-417.0 - D

18
Maintenance
Preventative Maintenance
This pressure washer was produced with the best available materials and quality craftsmanship. However, you as
the owner have certain responsibilities for the correct care of the equipment. Attention to regular preventative main-
tenance procedures will assist in preserving the performance of your equipment. Contact your dealer for mainte-
nance. Regular preventative maintenance will add many hours to the life of your pressure washer. Perform
maintenance more often under severe conditions.
Maintenance Schedule
Replace Fuel Lines Annually
Pump Oil 10W-40
Non-Foaming
Inspect Daily inspect the oil level
Change After first 50 hours, then every 500 hours or annually
Clean Burner Filter Monthly (More often if fuel quality is poor)
Remove Burner Soot Annually
Burner Adjustment/Cleaning Annually
Descale Coil Annually - (more often if required)
Replace High Pressure Nozzle Every 6 months
Replace Quick Connects Annually
Clean Water Screen/Filter Weekly
Clean Float/Supply Tank Every 6 months
Replace HP Hose Annually if there is any sign of wear
Grease Motor Every 10,000 hours
Replace Burner Nozzle Annually
Landa PHW Operator’s Manual 8.917-417.0 - D

19
Maintenance
Oil Change Record
DateOilChanged
Month/Day/Year
Estimated Operating
Hours Since Last Oil
Change
DateOilChanged
Month/Day/Year
Estimated Operating
Hours Since Last Oil
Change
Landa PHW Operator’s Manual 8.917-417.0 - D

20
Maintenance
PROBLEM POSSIBLE CAUSE SOLUTION
LOW OPERATING
PRESSURE
Faulty pressure gauge Test with 2nd gauge. If bad, install new gauge.
Insufficient water supply Use larger garden hose; clean water filter at inlet.
Clean screen inside float tank.
Old, worn or incorrect nozzle Match nozzle number to machine and/or replace with
new nozzle.
Belt slippage Tighten or replace; use correct belt.
Plumbing or hose leak Check plumbing system for leaks. Retape leaks with
teflon tape.
Faulty or mis-adjusted unloader valve
Adjust unloader for proper pressure. Install repair kit
when needed. Test PSI with unloader removed,
taking pressure directly off the pump.
Worn packing in pump Install new packing kit.
Fouled or dirty inlet or discharge
valves in pump Clean inlet and discharge valves.
Worn inlet or discharge valves Replace with valve kit.
Obstruction in spray nozzle Remove obstruction.
Low power supply Check voltage of building and compare with require-
ments. Obtain a different power source.
Detergent metering valve left open
sucking air, or faulty metering valve Close and/or replace metering valve.
BURNER WILL
NOT LIGHT
Little or no fuel Fill tank with fuel.
Improper fuel or water in fuel Drain fuel tank and fill with proper fuel.
Plugged fuel filter Replace as needed.
Mis-adjusted burner air bands Readjust air bands for clean burn.
Little or no fuel pressure from fuel
pump
Increase fuel pressure to specifications and/or
replace fuel pump.
Faulty burner transformer Test transformer for proper arc between contacts.
Replace as needed.
Disconnected or short in electrical
wiring
All wire contacts should be clean and tight. No
breaks in wire.
Burner motor thermal protector
tripped
If tripped, check voltage, connections and exten-
sions for cause. Check fuel pump shaft rotation for
binding causing motor to overheat.
Flex-Coupling slipping on fuel pump
shaft or burner motor shaft Replace if needed.
ON-OFF switch defective Check burner switch for continuity.
Troubleshooting
Landa PHW Operator’s Manual 8.917-417.0 - D
This manual suits for next models
6
Table of contents
Other Landa Pressure Washer manuals

Landa
Landa SDHW Series User manual

Landa
Landa PGHW series User manual

Landa
Landa PGHW4-3000 User manual

Landa
Landa HOT 2-1100 User manual

Landa
Landa MHP4-3000 User manual

Landa
Landa Pgdc4-3500 User manual

Landa
Landa PE User manual

Landa
Landa PE3-1100 User manual

Landa
Landa EHW Series User manual

Landa
Landa VHG User manual

Landa
Landa VNG4-2000 User manual

Landa
Landa MHC3-24324 User manual

Landa
Landa VLP3-1100 Operating instructions

Landa
Landa VNG4-2000 User manual

Landa
Landa PHW User manual

Landa
Landa TR-6000 User manual

Landa
Landa PGHW5-5000 User manual

Landa
Landa SEA Series User manual

Landa
Landa Platinum Series User manual

Landa
Landa ENG Series User manual