Landworks GUO003 User manual

Instruction Manual
REV 10/30/18
48V Electric Earth/Ice Auger
Earth Auger
Ice Auger
WARNING:
Read carefully and understand all INSTRUCTIONS before operating. Failure to follow the safety
rules and other basic safety precautions may result in serious personal injury.
Save these instructions in a safe place and on hand so that they can be read when required.
Keep these instructions to assist in future servicing.
User Manual
Landworks Ice Auger Power Head w/Steel 8"x39" Bit Heavy Duty Electric Cordless
Lithium-Ion Battery & Charger for Ice Burrowing/Drilling & Ice Fishing (Ice Auger 8" Set)
EAN: 6943940762062
EAN: 6943940762055

IMPORTANT SAFEGUARDS
For your own safety, always follow these basic precautions when using
this appliance.
1. Read the user Manual carefully for operating instructions. Read all instruc-
tions in this manual before use.
2. DO NOT use this product for anything other than its intended purpose.
3. DO NOT use attachments other than those available from the manufacturer.
4. DO NOT alter this product in any manner; doing so is dangerous and will void
all warranties.
5. DO NOT allow children or adults weighing under 100 lbs. to operate this unit.
6. DO NOT allow your body, loose clothing, drawstrings, scarves, hats or other
materials to touch the power head, or auger (drill) unit at any time.
7. DO NOT operate under the influence of drugs or alcohol.
8. DO NOT continue to use this product in the event of mechanical or electrical
failure.
9. The blades are very sharp. Use extreme caution when drilling a hole or
replacing the blades. Put the blade guard on after each use.
10. This product produces considerable cutting force that is felt by the operator.
Make sure your feet are firmly planted and the handles are firmly held while
operating this product.
11. During operation, the auger unit could possibly stop. Be prepared at any
time to release the buttons.
12. Check cutting blades and auger shaft screws before and after each use to
make sure they are tight.
13. The battery must be removed before any repairs.
14. When drilling the holes, do not push down on the unit. If auger begins to drill
slowly, blades may need to be sharpened or replaced.
15. When drilling, do not push down too hard. It may bring great load to the unit
and the overload protector will work to stop the unit.
16. In case of getting stuck during the drilling, it may hit big rocks or roots. Do
not continue drilling. Take out rocks or roots, or drill in another place.
17. DO NOT discard the battery into trash can. Discard the battery according to
your local, state, federal or country's regulations.

READY FOR OPERATION
To Charge the Battery for First Use
1. Connect the charger to standard 110 - 240 volt outlet; a red light should appear on the
charger.
NOTE: Always connect charger to standard 110 - 240 volt outlet before connecting battery.
2. Fully insert the charging plug into the battery card slot until you hear a click or see the
battery button toggle back to a flat position. (See Fig. 1 & Fig. 2)
3. Charge the battery until the light on the charger turns solid green.
4. Press the battery button, pull out the charging plug, remove the three-pronged plug from the
outlet, and then disconnect the battery from charger.
5. Press the battery capacity display button, check the battery capacity through LED light.
NOTE: Do not leave the battery on the charger after the charge is completed. Unplug the
charger from the outlet, and then remove the battery.
IMPORTANT
BATTERY MUST BE FULLY CHARGED BEFORE FIRST USE.
E1
Item No.
LAB01
BL482
BL481
LAB01-040
LAB01-030
LAB01-032
LAB01-031
LAB01-029
LAB01-041
Description
Power head (2Ah battery included)
4Ah Lithium Ion Battery
2Ah Lithium Ion Battery
4" Earth Auger
6" Earth Auger
8" Earth Auger
6" Ice Auger
8" Ice Auger
10" Ice Auger
Dimension
20.7"x12.8"x13.6"
6.5"x7"x5"
6.5"x7"x3.5"
30"x4.7"x4.7"
30"x6.7"x6.7"
30"x8.7"x8.7"
41"x6.7"x6.7"
41"x8.7"x8.7"
41"x10.6"x10.6"
Net/Gross Weight
15/18 lbs
3/4 lbs
1.8/2.5 lbs
5.5/7.5 lbs
7.7/10 lbs
10/12 lbs
7.7/10 lbs
10/12 lbs
12/14.5 lbs
SPECIFICATIONS
Charging Plug
Three-Pronged Plug
Lithium Battery
Capacity Display Button &
Battery Status Indicator
Fig.1
Fig.2

To Assemble the Auger to the Power Head
Insert the drive shaft of the power head into the collar of the auger assembly.
Align the hole in the auger shaft with the hole in the power head shaft, completely insert the
bolt into the holes. (See Fig. 3 & Fig. 4)
Installation and Removal of the Battery
1. Completely insert the battery into the power head along the card slot until the battery button
bounces up. (See Fig. 5 & Fig. 6)
2. To remove the battery, press the battery button with the thumb, grab other sides of battery
with other four fingers, and then pull the battery out.
OPERATION
The Landworks Earth Auger or Ice Auger is operated using the 48 volt lithium ion battery
supplied with the unit.
E2
Fig.5
Battery Button
Fig.6
Drive Shaft
Bolt
Power Head
Auger
Fig.3 Fig.4

1. Make sure your footing is secure and that you have the unit in the vertical position firmly in
your hands.
2. Press the operating lock button, then squeeze the operating trigger. Following a one-second
safety delay, the auger will then start drilling. (See Fig. 7)
3. To stop the auger, release the operating trigger.
4. If the auger is stuck or hard to be pulled out, try the reverse function. Press the Reverse
Button, then press the operating lock button and the trigger. The auger will turn in reverse.
After the auger is pulled out, release the operating trigger.(See Fig. 8)
5. When the auger is not in use, remove the battery.
IMPORTANT
DO NOT LEAVE BATTERY ON POWER HEAD WHEN AUGER IS NOT IN USE. ALWAYS
DETACH BATTERY WHEN NOT USING THE AUGER.
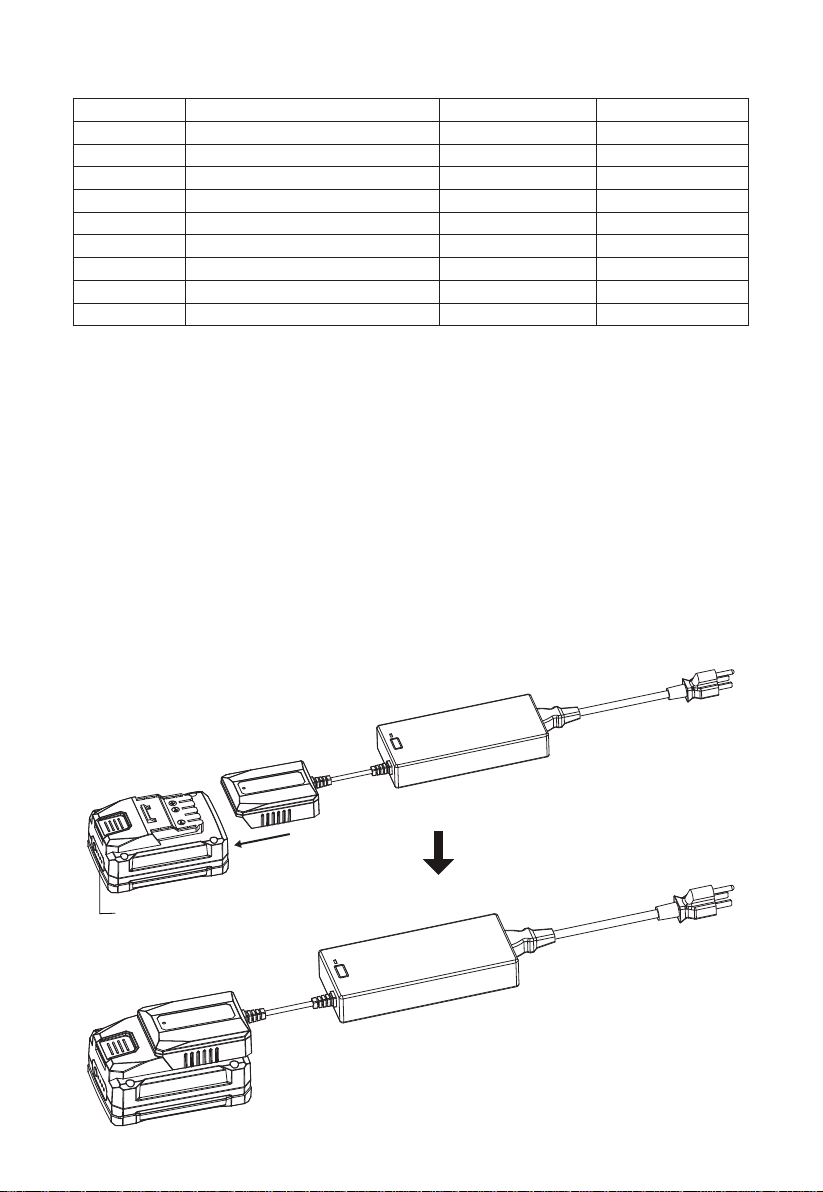
Battery Charging and Monitoring
1. Battery must be fully charged before first use.
2. Plug the charger into a 110-240AC outlet.
3. Always charge the battery at room temperature. If the battery is used in a cold environment,
allow it to warm up for at least an hour before charging. Cold batteries will not be charged
completely and battery components may be damaged.
4. Only charge battery in well ventilated area away from flammable materials such as cloth or
carpeting.
5. During the charging phase, the light on the charger will be red. When the battery is
completely charged, the light will turn to green.
6. To disconnect charger, remove the three-pronged plug from outlet, then disconnect the
charger from the battery.
7. DO NOT leave the charger being connected to the battery for more than 24 hours.
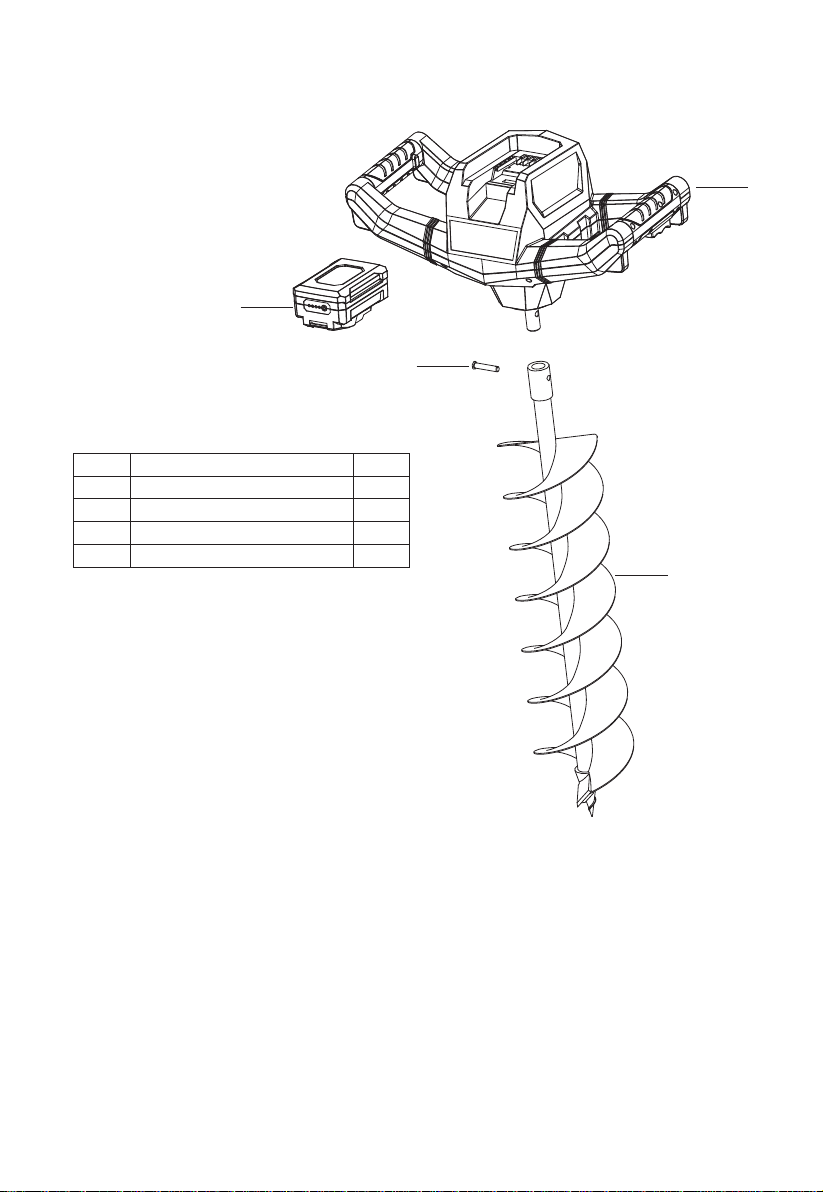
8. The battery status indicator is mounted on the top of the battery to allow you to observe the
level of the battery power while in use. When all the 3 green lights and 1 red light are lit, it
means the power is sufficient. When only the red light is lit, it means it needs to be charged
immediately.To check the charge level, simply press the indicator button.The lights on the
status indicator show the charge level of the battery.
9. When battery power becomes insufficient to drill through ice, turn off the power switch,
disconnect the battery from power head, and re-charge the battery. Do not further discharge
the battery beyond the point it cannot power the auger through the ice. Completely draining
the battery may damage the battery components and increase the likelihood of battery
malfunction, battery fire, or even explosion.
10. If battery becomes warm or hot during charging procedure, disconnect it from charger.
Allow battery to return to room temperature, and attempt to charge again. If this persists a
second time, disconnect battery from charger and contact customer service.
E3
Fig.7
Operating Trigger
Operating Lock Button
Fig.8
Reverse Button
Battery Status Indicator

MAINTENANCE AND STORAGE
1. Charge the battery and leave it off of the unit. DO NOT leave the battery on the charger.
2. Remove the auger from the power head and apply a thin layer of grease to the drive shaft.
3. Remove all debris from auger and power head.
4. Attach the blade guard to bottom of auger.
5. When storing the battery for the off season, fully charge the battery, and store in a dry
location that maintains a temperature of 60-75 degrees F. To help maintain battery life,
charge battery for 10-15 minutes every two months. (Charger may show red after15 minutes
of charging. This is normal.)
NOTE: REMEMBER TO FULLY CHARGE BATTERY BEFORE FIRST USE OF THE
SEASON.
Lithium ion batteries can reach a point where they can no longer hold a charge and need to be
disposed of. Please recycle the battery at your nearest recycling center.
TROUBLE SHOOTING
E4
Problem
Power head will not run
Power head will not
start and the battery
indicates a full charge
Power head starts,
then stops
Auger jumps on ice
Auger cuts slowly
Auger head gets
stuck when drilling.
When drilling, the
unit stops working
after the beep.
When drilling, the
unit suddenly stops
workings without
any warning.
Possible Cause
1. Operating trigger is not
pressed completely.
1. Battery too cold.
1. Battery low on power
2. Battery may be slightly under
temperature
1. Blades damaged or
sharpened incorrectly.
1. Dull blades
1. It may hit big stocks or roots.
2. The load is too big when
pushing down too hard, so
that the overload protector
works to stop the unit.
1. The load is too big when
pushing down, so that the
overload protector works to
stop the unit.
1. The overload protector
works.
2. If only the red light is lit, it
means the battery capacity
is too low.
Solution
1. Press the operating trigger and
hold for 1-3 seconds.
1. Remove the battery from the
unit and place it in a warm
location (inside a jacket pocket,
vehicle or a small cooler with
a warmer).
1. Charge battery.
2. Remove the battery from the
unit and place it in a warm
location (inside a jacket pocket,
vehicle or a small cooler with
a warmer).
1. Replace with new blades.
1. Take the rock or root out, or
drill in another place.
2. Reduce the downward
pressure and let the head
spiral drill down naturally.
1. Release all the triggers and
buttons, and try to operate after
3 seconds.
2. Reduce the downward
pressure and let the head
spiral drill down naturally.
1. Pull out the battery, wait for 3
seconds and insert it to try
again.
2. Charge the battery.

EXPLODED AND PARTS LIST FOR EARTH AUGER
E5
Part No.
1
2
3
4
Description
Power Head
Lithium Battery
Auger
Bolt
Q’ty
1
1
1
1
2
4
1
3

EXPLODED AND PARTS LIST FOR ICE AUGER
Intradin (Shanghai) Machinery Co., Ltd.
www.intradin.com
Part No.
1
2
3
4
6
7
8
9
Description
Power Head
Lithium Battery
Auger
Bolt
Connector
Middle Blade
Side Blade
Blade Guard
Q’ty
1
1
1
1
1
1
2
1
2
4
3
6
8
9
1
7
8

REV 10/30/18
48V Tarière à Terre/Glace Électrique
Manuel d'Instructions
Tarière à Terre
Tarière à Glace
AVERTISSEMENT:
Lisez attentivement et comprenez toutes les INSTRUCTIONS avant l'opération. Les règles et
autres précautions de sécurité de base peuvent entraîner des blessures graves.
Conservez ces instructions dans un endroit sûr et à portée de main afin qu'elles puissent être
lues au besoin. Conservez ces instructions pour faciliter l'entretien ultérieur.

GARANTIES IMPORTANTES
Pour votre propre sécurité, suivez toujours ces précautions de base lors
de l'utilisation de cet appareil.
1. Lisez attentivement le manuel pour les instructions d'utilisation. Lisez toutes
les instructions de ce manuel avant l'utilisation.
2. N'utilisez PAS ce produit à d'autres objectifs pour lesquels il a été conçu.
3. N'utilisez PAS d'accessoires autres que ceux disponibles chez le fabricant.
4. NE modifiez PAS ce produit de quelque manière que ce soit; cela est
dangereux et annulera toutes les garanties.
5. NE laissez PAS les enfants ou les adultes pesant moins de 100 lb. pour faire
fonctionner cet appareil.
6. NE laissez PAS votre corps, vos vêtements amples, vos cordelières, vos
écharpes, vos chapeaux ou d'autres matériaux toucher la tête d'alimenta-
tion ou l'unité de tarière (perceuse) à tout moment.
7. N'opérez PAS sous l'influence de drogues ou d'alcool.
8. NE continuez PAS à utiliser ce produit en cas de panne mécanique ou
électrique.
9. Les lames sont très tranchantes. Soyez extrêmement prudent lorsque vous
percez un trou ou remplacez les lames. Mettez le protège-lame après
chaque utilisation.
10. Ce produit produit une force de coupe considérable qui est ressentie par
l'opérateur.
Assurez-vous que vos pieds sont bien plantés et que les poignées sont
fermement maintenues pendant l'utilisation de ce produit.
11. Pendant le fonctionnement, l'unité de tarière pourrait éventuellement
s'arrêter. Soyez prêt à tout moment à libérer les boutons.
12. Vérifiez les lames de coupe et les vis de l'axe de la tarière avant et après
chaque utilisation pour vous assurer qu'elles sont bien serrées.
13. La batterie doit être retirée avant toute réparation.
14. Lorsque vous percez les trous, n'appuyez pas sur l'unité. Si la tarière
commence à forer lentement, les lames doivent être affûtées ou
remplacées.
15. Lorsque vous percez, ne poussez pas trop fort. Il peut apporter une grande
charge à l'appareil et le protecteur de surcharge fonctionnera pour arrêter
l'appareil.
16. En cas de blocage pendant le forage, il peut heurter de gros rochers ou
racines. Ne continuez pas à forer. Sortez des roches ou des racines, ou
percez dans un autre endroit.
17. NE jetez PAS la batterie dans la poubelle. Jetez la batterie en respectant
les réglementations locales, provinciales, fédérales ou nationales.

PRÊT POUR OPÉRATION
Pour charger la batterie pour la première utilisation
1. Connectez le chargeur à une prise standard de 110 à 240 volts; une lumière rouge devrait
apparaître sur le chargeur.
REMARQUE: Connectez toujours le chargeur à une prise standard de 110 à 240 volts avant
de brancher la batterie.
2. Insérez complètement la fiche de chargement dans la fente de carte de la batterie jusqu'à ce
que le bouton de la batterie rebondisse. (voir Fig. 1 & Fig. 2)
3. Chargez la batterie jusqu'à ce que le voyant du chargeur devienne vert fixe.
4. Appuyez sur le bouton de la batterie, retirez la prise de charge, retirez la fiche à trois
broches de la prise, puis déconnectez la batterie du chargeur.
5. Appuyez sur le bouton d'affichage de la capacité de la batterie, vérifiez la capacité de la
batterie par la lumière LED.
REMARQUE: Ne laissez pas la batterie sur le chargeur une fois la charge terminée.
Débranchez le chargeur de la prise, puis retirez la batterie.
IMPORTANT
LA BATTERIE DOIT ÊTRE CHARGÉE COMPLÈTEMENT
AVANT LA PREMIÈRE UTILISATION.
F1
No. Item
LAB01
BL482
BL481
LAB01-040
LAB01-030
LAB01-032
LAB01-031
LAB01-029
LAB01-041
Description
Tête d'alimentation (2Ah batterie incluse)
4Ah Batterie Lithium Ion
2Ah Lithium Ion Battery
Tarière à Terre 4 "
Tarière à Terre 6 "
Tarière à Terre 8 "
Tarière à Glace 6 "
Tarière à Glace 8 "
Tarière à Glace 10 "
Dimension
20.7"x12.8"x13.6"
6.5"x7"x5"
6.5"x7"x3.5"
30"x4.7"x4.7"
30"x6.7"x6.7"
30"x8.7"x8.7"
41"x6.7"x6.7"
41"x8.7"x8.7"
41"x10.6"x10.6"
Net/Gross Weight
15/18 lbs
3/4 lbs
1.8/2.5 lbs
5.5/7.5 lbs
7.7/10 lbs
10/12 lbs
7.7/10 lbs
10/12 lbs
12/14.5 lbs
CARACTÉRISTIQUES
Fiche de charge
Prise à trois broches
Batterie au lithium
Bouton d'Affichage de Capacité
et Indicateur d'État de Batterie
Fig.1
Fig.2

Pour assembler la tarière à la tête d'alimentation
Insérez l'arbre d'entraînement de la tête d'alimentation dans le collier de l'ensemble de la
tarrière.
Alignez le trou dans l'arbre de la tarrière avec le trou dans l'arbre de la tête d'alimentation.
Insérez complètement le boulon dans les trous. (Voir Fig. 3 & Fig. 4)
Installation et Retrait de la Batterie
1. Insérez complètement la batterie dans la tête d'alimentation le long de la fente de carte
jusqu'à ce que le bouton de la batterie rebondisse. (Voir Fig. 5 & Fig. 6)
2. Pour retirer la batterie, appuyez sur le bouton de batterie avec le pouce, prenez les autres
côtés de la batterie avec quatre autres doigts, puis retirez la batterie. "
OPÉRATION
La tarière à terre ou tarière à glace Landworks fonctionne avec la batterie au lithium-ion de 48
volts fournie avec l'appareil.
1. Assurez-vous que votre pied est bien fixé et que vous avez l'appareil en position verticale
fermement entre vos mains.
2. Appuyez sur le bouton de verrouillage de fonctionnement, puis appuyez sur la gâchette de
fonctionnement. Après un délai de sécurité d'une seconde, la tarière commence alors à
percer. (Voir Fig. 7)
3. Pour arrêter la tarière, relâchez la gâchette de fonctionnement.
F2
Fig.5
Bouton de batterie
Fig.6
Arbre de
transmission Boulon
Tête d'alimentation
Tarière Fig.3 Fig.4

4. Si la tarière est bloquée ou difficile à retirer, essayez la fonction inverse. Appuyez sur le
bouton d'inversion, puis appuyez sur le bouton de verrouillage de fonctionnement et sur la
gâchette. Une fois la tarière retirée, relâchez la gâchette de fonctionnement (voir Fig. 8)
5. Lorsque la tarrière n'est pas utilisée, retirez la batterie.
IMPORTANT
NE LAISSEZ PAS LA BATTERIE SUR LA TÊTE D'ALIMENTATION LORSQUE LA TARRI-
ERE N'EST PAS UTILISÉE. DÉTACHEZ TOUJOURS LA BATTERIE LORSQUE VOUS
N'UTILISEZ PAS LA TARRIERE.
Charge et Surveillance de la Batterie
1. La batterie doit être complètement chargée avant la première utilisation.
2. Branchez le chargeur dans une prise 110-240AC.
3. Chargez toujours la batterie à température ambiante. Si la batterie est utilisée dans un
environnement froid, laissez-la se réchauffer pendant au moins une heure avant de la
recharger. Les batteries froides ne seront pas complètement chargées et les composants de
la batterie pourraient être endommagés.
4. Ne chargez la batterie que dans un endroit bien ventilé, à l'écart des matériaux inflammables
tels que les tissus ou les tapis.
5. Pendant la procédure de charge, la lumière sur le chargeur sera rouge. Lorsque la batterie
est complètement chargée, la lumière devient verte.
6. Pour débrancher le chargeur, retirez la fiche à trois broches de la prise, puis débranchez le
chargeur de la batterie.
7. NE laissez PAS le chargeur branché à la batterie pendant plus de 24 heures.
8. L'indicateur d'état de la batterie est monté sur le dessus de la batterie pour vous permettre
d'observer le niveau de la batterie pendant son utilisation. Lorsque les 3 voyants verts et 1
voyant rouge sont allumés, cela signifie que l'alimentation est suffisante. Lorsque seul le
voyant rouge est allumé, cela signifie qu'il doit être immédiatement chargé. Pour vérifier le
niveau de charge, appuyez simplement sur le bouton d'indicateur. Les voyants de l'indica-
teur d'état indiquent le niveau de charge de la batterie.
9. Lorsque la puissance de la batterie devient insuffisante pour percer la glace, éteignez
l'interrupteur d'alimentation, déconnectez la batterie de la tête d'alimentation et rechargez la
batterie.Ne déchargez pas la batterie au-delà du point où elle ne peut pas traverser la glace.
L'épuisement complet de la batterie peut endommager les composants de la batterie et
augmenter la probabilité de dysfonctionnement de batterie, feu de batterie, ou même
explosion.
10. Si la batterie devient tiède ou chaude pendant la procédure de charge, débranchez-la du
chargeur.Laissez la batterie revenir à la température ambiante et essayez de la recharger
à nouveau. Si cela persiste une seconde fois, débranchez la batterie du chargeur et
contactez le service clientèle. "
F3
Fig.7
Gâchette de
fonctionnement
Bouton de verrouillage
de fonctionnement
Fig.8
Bouton d'inversion
Indicateur d'état
de la batterie

MAINTENANCE ET STOCKAGE
1.
Chargez la batterie et laissez-la hors de l'appareil. NE laissez PAS la batterie sur le chargeur.
2. Retirez la tarrière de la tête d'alimentation et appliquez une fine couche de graisse sur
l'arbre d'entraînement.
3. Retirez tous les débris de la tarrière et de la tête d'alimentation.
4. Fixez le protège-lame au bas de la tarrière.
5. Lorsque vous stockez la batterie pour la saison morte, chargez complètement la batterie et
stockez-la dans un endroit sec qui maintient une température de 60-75 degrés F. Pour aider
à maintenir la vie de la batterie, chargez la batterie pendant 10-15 minutes tous les deux
mois. (Le chargeur peut montrer du rouge après 15 minutes de charge, ce qui est normal.)
REMARQUE: N'OUBLIEZ PAS DE CHARGER LA BATTERIE ENTIÈREMENT AVANT LA
PREMIÈRE UTILISATION DE LA SAISON.
Les batteries au lithium-ion peuvent atteindre un point où elles ne peuvent plus supporter une
charge et doivent être éliminées. Veuillez recycler la batterie au centre de recyclage le plus
proche.
DÉPANNAGE
F4
Problems
La tête d'alimentation
ne fonctionne pas.
La tête d'alimentation
ne démarre pas et la
batterie indique une
charge complète.
La tête d'alimentation
démarre, puis s'arrête.
La tarrière saute sur la
glace.
La tarrière coupe
lentement.
La tête de la tarière se
coince lors du forage.
Lors du forage,
l'appareil cesse de
fonctionner après le
bip.
Lors du forage,
l'appareil s'arrête
soudainement les
travaux sans aucun
avertissement.
Cause Possible
1. La gâchette de fonctionnement
n'est pas enfoncé
complètement.
1. Batterie trop froide.
1. Batterie faible en puissance
2. La batterie peut être
légèrement sous la
température.
1. Lames endommagées ou
aiguisées incorrectement.
1. Lames émoussées
1. Il peut fheurter de gros stocks
ou des racines.
2. La charge est trop grande en
poussant vers le bas trop fort,
de sorte que le protecteur de
surcharge fonctionne pour
arrêter l'appareil.
1. La charge est trop grande en
poussant vers le bas, de
sorte que le protecteur de
surcharge fonctionne pour
arrêter l'appareil.
1. Le protecteur de surcharge
fonctionne.
2. Si seul le voyant rouge est
allumé, cela signifie que la
capacité de la batterie est
trop basse.
Solution
1. Appuyez sur la gâchette de
fonctionnement et maintenez
pendant 1-3 secondes.
1. Retirez la batterie de l'appareil
et placez-la dans un endroit
chaud (dans la poche d'une
veste, dans un véhicule ou
dans un petit refroidisseur
avec un réchaud).
1. Chargez la batterie.
2. Retirez la batterie de l'appareil
et placez-la dans un endroit
chaud (dans la poche d'une
veste, dans un véhicule ou
dans un petit refroidisseur
avec un réchaud).
1. Remplacez avec de nouvelles
lames.
1. Remplacez avec de nouvelles
lames.
1. Sortez la pierre ou la racine,
ou percez à un autre endroit.
2. Réduisez la pression vers le
bas et laissez la tête spirale
forer naturellement.
1. Relâchez toutes les gâchettes
et boutons, et essayez de
fonctionner après 3 secondes.
2. Réduisez la pression vers le
bas et laissez la tête spirale
forer naturellement.
1. Tirez la batterie, attendez 3
secondes et insérez-la pour
essayer à nouveau.
2. Chargez la batterie.

LISTE ÉCLATÉE ET PIÈCES POUR LA TARRIÈRE À TERRE
F5
No. Pièce
1
2
3
4
Description
Tête d'Alimentation
Batterie au lithium
Tarrière
Boulon
Qté
1
1
1
1
2
4
1
3

LISTE ÉCLATÉE ET PIÈCES POUR LA TARRIÈRE À GLACE
Intradin (Shanghai) Machinery Co., Ltd.
www.intradin.com
No. Pièce
1
2
3
4
6
7
8
9
Description
Tête d'Alimentation
Batterie au lithium
Tarrière
Boulon
Connecteur
Lame médiane
Lame latérale
Protège-lame
Qté
1
1
1
1
1
1
2
1
2
4
3
6
8
9
1
7
8
Size: 145x210mm REV 10/30/18 M.YBFM260005157克铜版纸
This manual suits for next models
2
Table of contents
Languages:
Popular Tools manuals by other brands

Jula
Jula 033-995 operating instructions

RIDGID
RIDGID 4P-6 4PIN instructions

Niigata seiki
Niigata seiki AP-03 user manual

Bostitch
Bostitch MCN-KIT2 installation instructions

Powers Fasteners
Powers Fasteners P3600 Operating instructions manual

Rothenberger Industrial
Rothenberger Industrial 072990E Instructions for use