Landworks LWB0301 User manual

Instruction Manual
REV 12/05/19
Portable Winch
WARNING:
Read carefully and understand all INSTRUCTIONS before operating. Failure to follow the safety
rules and other basic safety precautions may result in serious personal injury.
Save these instructions in a safe place and on hand so that they can be read when required.
Keep these instructions to assist in future servicing.

IMPORTANT SAFEGUARDS
For your own safety, please always follow the following basic precautions
when using this product. Failure to observe these instructions could lead
to serious injury or death.
WARNING
CHEMICAL AND FIRE HAZARD
1. Always Know Your Pulling Tool. Take time to fully read the Installation and
Operator's Guide, in order to understand your pulling tool and its operations.
2. Always wear gloves, eye and ear protection.
3. Never store battery pack in a tool box or pocket with nails, screws, keys, etc.
Shorting of battery terminal may cause fire.
4. Always avoid contact with battery leakage, which may occur under extreme
usage or temperature conditions.
5. Always dispose or recycle battery according to local ordinances I regulations.
6. Always protect terminals with insulating tape, prior to disposal, to prevent
shorting.
7. Never attempt to disassemble the battery. No user serviceable parts are
inside.
8. Never charge damaged battery packs, replace damaged pack immediately.
Battery short or fire may result.
9. Never incinerate the battery pack even if it is severely damaged or is
completely worn out.
10. Never operate pulling tool in an environment containing explosive or
combustible material.
11. Always remove the battery when the unit is not in use.
12. Never charge damaged battery packs, replace damaged battery pack
immediately. Battery short or fire may result.
CHARGER USE
1. Always fully charge battery before use.
2. Always use Landworks charger to charge Landworks type battery pack,
Other types of batteries may burst causing damage and injury to person.
3. Never operate charger with damaged cord or plug. Replace them immediately.
4. Never use Landworks charger to charge other batteries.
ELECTRICAL HAZARD
1. Always use properly grounded single phase receptacle protected by a ground
fault circuit interrupter (GFCI).
2. Never remove ground pin from plug.
3. Never route electrical cables across sharp edges.
4. Never route electrical cables through or near moving parts.
5. Never route electrical cables near parts that become hot.
6. Never remove electrical cover from battery charger.
7. Never leave the puling tool power cord plugged in when installing, rigging,
servicing or when the puling too is not being used.
8. Never operate charger if it has received a sharp blow, been dropped or
otherwise damaged in any way.

9. Never charge battery in damp or wet environment.
10. Always charge battery at temperatures between32°F-120°F (0°C-49°).
11. Always store battery at temperatures between 32°F-86°F (0°C-30°C).
12. Always disconnect charger when battery is fully charged.
13. Never probe with conductive object.
14. Always fully charge battery before use.
15. Never completely discharge battery.
16. Always charge battery every six months if not in use.
CUT AND BURN HAZARD
To avoid injury to hands and fingers:
1. Always wear gloves, eye and ear protection.
2. Never short battery terminals because it may cause sparks or burns.
FALLING OR CRUSHING HAZARD
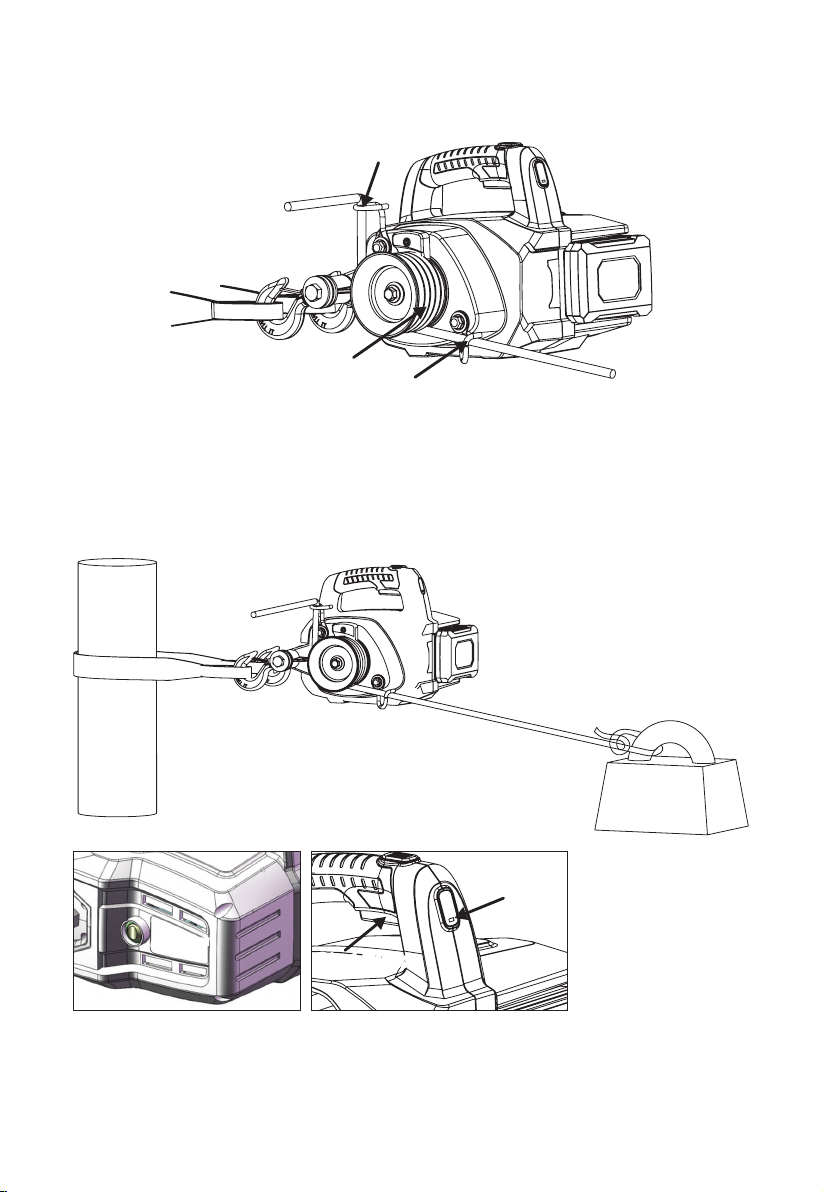
1. Never use pulling tool to secure a load.
2. Never shock load rope. Shock load can damage, overload and break rope.
3. Never use the pulling tool s rope to tow another vehicle or object. Impact
loading during towing can exceed rope strength.
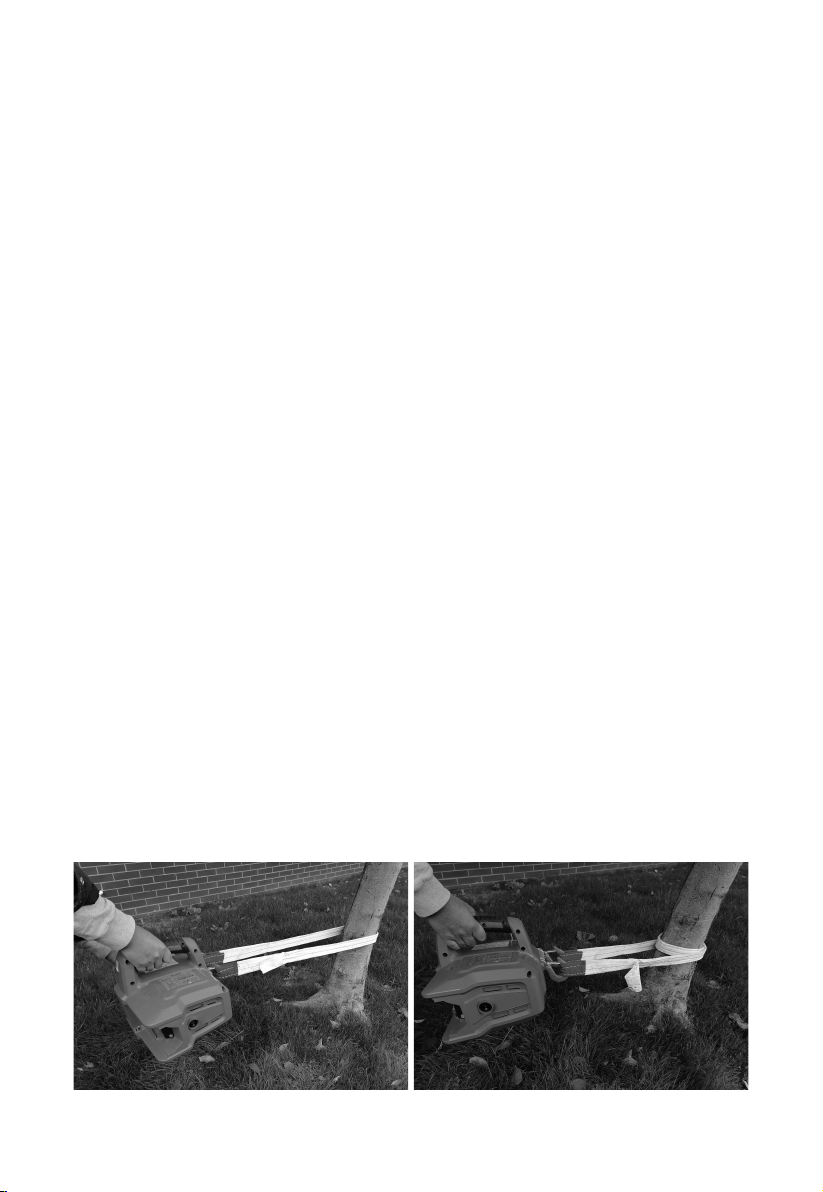
4. Always be certain the anchor you select will withstand the load and the strap
or chain will not slip.
5. Always take time to use appropriate rigging techniques for pulling/lifting.
6. Never exceed pulling tool or rope capacity listed on product data sheet.
7. Never exceed the maximum pulling capacity as1000 Ib. (454 kg).
8. Only use low-stretch rope. Minimum diameter: 10mm (3/8"). Maximum
diameter: 12mm (1/2").
9. Always use suitable anchor point capable of handling load.
10. Always use factory approved mounting hardware, components, and
accessories.
11. Always avoid on/off cycles (jogging or plugging) puling tool This can
damage motor controls and rope.
12. Always use a hook with a latch.
13. Always ensure hook latch is closed and not supporting load.
14. Never apply load to hook tip or latch. Apply load only to the center of hook.
15. Never use a hook whose throat opening has increased, or whose tip is bent
or twisted.
16. Never use bungee straps that develop tremendous and potentially danger-
ous amounts of force when stretched.
17. Always avoid side pulls which can pile up rope at one end of the drum. This
can damage rope or pulling tool.
18. Never use puling tool to lift or move persons.
19. Warning make sure that your clothes are not going to get caught into the.
20. Danger never pull rolling objects that might roll out of youar control.
21. Caution do not touch the capstan drum immediately after operation as it will
get hot and burn bare skin.
22. Caution visually inspect your rope before each usage. If it shows any sign of
deterioration (cut strands, excessive abrasion) replace it.
MOVING PARTS ENTANGLEMENTHAZARD GENERAL SAFETY
1. Always Know Your Pulling Tool. Take time to fully read the Instructions
and/or Operations Guide, in order to understand your pulling tool and its
operations.
2. Never operate this puling tool when under the influence of drugs, alcohol or
medication.

PULLING SAFETY
1. Always keep pulling tool and pulling/lifting load in sight during pulling/lifting
operation.
2. Always require operators and bystanders to be aware of rope and load.
3. Always be aware of stability of load during pulling lifting, keep others away.
Alert all bystanders of any unstable condition.
4. Never touch rope or hook while someone else is at the control switch or
during pulling/lifting operation.
5. Never touch rope or hook while in tension or under load.
6. Always inspect rope, hook, and slings before operating pulling tool, Frayed,
kinked or damaged rope must be replaced immediately. Damaged compo-
nents must be replaced before operation. Protect parts from damage.
OPERATIONAL SAFETY
1. Always stand clear of rope and load and keep others away while pulling/lift-
ing.
2. Always remove any element or obstacle that may interfere with safe
operation of the pulling tool.
3. Never leave the pulling tool power cord plugged in when installing, rigging,
servicing or when the pulling tool is not being used.
4. Always use extreme caution when handing hook and rope during spooling
operations.
5. Never operate or install a pulling tool without reading or understanding the
operator S manual.
6. Never operate this pulling unit if you are under 16 years of age.

LWB0301
LWB0303
BL481
BL482
Portable Winch
Portable Winch
2Ah 48V
Lithium Battery
4Ah 48V
Lithium Battery
DC48V,2Ah
DC48V,4Ah
_
_
1296W
1296W
_
_
1000Lb
454kg
1000Lb
454kg
_
_
0.39in~0.47in
10mm~12mm
0.39in~0.47in
10mm~12mm
_
_
13.3"x13.5"x9.7"
338x343x245mm
13.3"x15"x9.7"
338x381x245mm
6.5"x7"x3.5"
165x178x89mm
6.5"x7"x5"
165x178x127mm
23.4/26 lbs
10.6/11.8kg
24.7/27.3lbs
11.2/12.4kg
1.8/2.5lbs
0.8/1.2kg
3/4lbs
1.4/1.8kg
Net/Gross
weight
Item No. Description Power Volt
Max.
Pulling
force
Rope size Size
SPECIFICATIONS
STRUCTURES
1. Pulling rope: Connect the objects for winching.
2. Guide Hook: Guide the rope wrapping on the capstan drum.
3. Power indicator: The display is light upwhen power on.
4. Lithium battery: 2AH or option 4AH lithium battery to be equipped.
5. Power switch: Turn on/off the power supply. The power will auto shut down within 10
minutes while no operation.
6. Start button: Press/release the control traction tool to start/stop. With power on, press the
start button and the tool will continue to work and press again to stop working.
7. Capsan drum: Wrap the rope around the drum, the more laps kept on the drum, the greater
friction force make the winching less slip.
8. Safety Hook: Connect with the sling and fix the pulling tool.
9. Sling: Go around the anchor point with the sling.
E1

E2
Charging Plug
Plug
Lithium Battery
Capacity Display Button &
Battery Status Indicator
Fig.1
READY FOR OPERATION
To Charge the Battery for First Use
1. Connect the charger to standard 110 - 240 volt outlet; a red light should appear on the
charger. NOTE: Always connect charger to standard 110 - 240 volt outlet before connecting
battery.
2. Fully insert the charging plug into the battery card slot until you hear a click or see the
battery button toggle back to a flat position. (See Fig. 1 & Fig. 2)
3. Charge the battery until the light on the charger turns stable green.(Depending on the
battery capacity, the charging time usually takes 2 to 4 hours)
4. Press the battery button, pull out the charging plug, remove the three-pronged plug from the
outlet, and then disconnect the battery from charger.
5. Press the battery capacity display button, check the battery capacity through LED light.
NOTE: Do not leave the battery on the charger after the charge is completed. Unplug the
charger from the outlet, and then remove the battery.
IMPORTANT
BATTERY MUST BE FULLY CHARGED BEFORE FIRST USE.
Battery Charging and Monitoring
1. Battery must be fully charged before first use.
2. Plug the charger into a 110-240AC outlet.
3. Always charge the battery at room temperature. If the battery is used in a cold environment,
allow it to warm up for at least an hour before charging. Cold batteries will not be charged
completely and battery components may be damaged.
4. Only charge battery in well-ventilated area away from flammable materials such as cloth or
carpeting.
5. During the charging phase, the light on the charger is red. When the battery is completely
charged, the light will turn to green.
6. To disconnect charger, remove the three-pronged plug from outlet, then disconnect the
charger from the battery.

E3
7. DO NOT leave the charger being connected to the battery for more than 24 hours.
8. The battery status indicator is mounted on the top of the battery to allow you to observe the
level of the battery power while in use. When all the 3 green lights and 1 red light are lit, it
means the power is sufficient. When only the red light is lit, it means it needs to be charged
immediately.To check the charge level, simply press the indicator button.The lights on the
status indicator show the charge level of the battery.
9. Completely draining the battery may damage the battery components and increase the
likelihood of battery malfunction, battery fire, or even explosion.
10. If battery becomes warm or hot during charging procedure, disconnect it from charger.
Allow battery to return to room temperature, and attempt to charge again. If this persists a
second time, disconnect battery from charger and contact customer service.
Overload protection
Exceeding traction load will lead to controller protection, thus interrupting the power supply of
the motor. This prevents overheating and potential motor damage. Whenload-exceeding
controller trips, do not attempt to impose the same load. The weight of the load should be
reduced and the traction tool can be restarted after power failure.
MAINTENANCE
Please check whether the rope and hook have signs of wear or damage before and after each
operation. Wear and damaged parts must be replaced. Do not attempt to pulling out or repair
damaged ropes.
Always keep the electrical terminals on the battery pack clean and make sure that the battery is
not broken or damaged.
If there are twists, incisions, worn parts and broken strands in the traction rope, please stop
using them.
WINCH USAGE
1.Using the polyester sling (included with the winch)
Go around the anchor point with the sling. Insert each end of the sling in one of the safety
hooks located on the winch (Figure 1 below).
2.Position the winch in line with the load. When the winch is under tension, it will try to align
itself with the load. The friction of the sling against the anchor point could prevent correct
alignment. If that is the case, release the tension on the rope and position the sling on the
anchor point So that the tension is equally distributed on both winch anchor hooks.
CAUTION don't do this! When you anchor the winch, make sure that you do not do a
complete wrap around the anchor point (Figure 2 below). This set-up will prevent proper
alignment of the winch with the load and will put uneven tension on the winch anchor
hooks.
Fig.2

E4
CAUTION Avoid Installing The Sling On Sharp Edges That Might Damage It. Whether
You Are Using A Post, A Tree Or A Stump, Always Install The Sling Near The Anchor's
Base.
ROPE INSTALLATION
The great variety of situations encountered when winching prevents us from providing specific
instructions; however you need to consider the following points:
1. Rope
Use a low stretch rope, in good condition, with a minimum diameter of 10 mm (3/8") and a
maximum diameter of 12 mm (1/2"),with good knots. Use pulleys to redirect the rope and to
multiply the pulling capacity when the load is near or over the pulling capacity of the winch.
2 .Pulley
Using a pulley at some distance in front of the winch offers many advantages:
●Pulling angle lifts' the load and reduces friction;
●The winch is maintained at a relatively horizontal position;
●Winch and operator are away from the load's path.
3. Direction
Install he rope in such a way that t does not rub against other objects Ty to set-up the rope so
that the front of the load is slightly lifted. Do not pull downwards or through an obstruction.
Generally, if the rope touches the ground while pulling, your installation is incorrect
4. On a hill
WARNING do Not Pull A Load Directly Toward The Winch In A Downward Sl Ope Since It
Could Slide Without You Being Able To Stop It. In That Situation, Use A Pulley At The
Bottom Of The Hill And Position The Winch Outside Of The Load's Path.
5. Pulling a load
WARNING check winch position, rope condition, solidity of the anchor pointe knots
carabiners or shackles in order to prevent injuries or material damage.
OPERATION
1.Completely insert the battery into the power head along the card slot until the battery button
bounces up. To remove the battery, press the battery button, grab other sides of battery with
other four fingers, and then pull the battery out.(Figure.3)
Battery pack
Battery pack button
Fig.3

E5
2. Put the rope into the rope entry hook and under the drum (Figure 4, No. 1)
3. Wrap the rope around the drum (3 or 4 turns) (Figure 4, No. 2)
4. Bring the rope in the rope exit hook (Figure 4, No. 3)
5. Stand about 1 m (3') from the winch and pull gently and horizontally on the rope to get the
slack until you feel the tension rising on the rope;
6. Look at your set-up to make sure that the winch anchor and the rope entry hook are aligned
with the rope; (Figure 5)
7. Check that the rope does not rub against objects along the path;
8. Turn on the power switch, the indicator lights up, press the start button to start the winch.
(Figure 6)
WARNING never put your hands on the capstan drum, the rope guide or the rope entry
hook when the motor is running.
Fig.12
3
2
1Fig.4
Fig.5
≤1000LBS
On/OffOn/Off
Pilot Lamp
Start Button
Start Button
Fig.6

E6
Problem
No operation for
the pulling tool.
Stop working.
Slip between
rope and drum.
Possible Cause
1. Power supply is not
connected.
1. Power shortage for the
battery pack.
2. The tractor exceeds the
upper limit of the pull force.
1. Insufficient friction between
rope and drum.
Solution
1. Check battery whether there is electricity.
2. Whether the power switch is on or not.
3. The downtime is more than 10 minutes
and need to be restarted.
1. Ensurethe full electricity.
2. Reduce the weight of the tractor and
restart it.
1. Check whether there is oil stain on the
rope and drum, and clean the oil stain.
2. The rope is seriously worn and need to
replace a new one.
3. Tension the rope so that the rope is in
full contact with the drum
WINCHING
While winching, position yourself away from the winch in order to see both the winch and the
load. Pull HORIZONTALLY on the rope. The tension you exert on the rope will keep the winch
Cad Pull HORIZO level.
DANGER do not wrap the rope around your handsor yur your body! alos beware of the
rope accumulating in front of you; make sure your feet do not get tangled in it.
1. If the rope slips
If the rope on the drum while winching, add a fourth wrap of rope on the drum. When the winch
reaches its maximum capacity, motor power-off protection. You then have to redo your set-up .
2. How to pause while winching
SLOWLY release the tension on the rope and let i slip on the capstan drum.
CAUTION do not let the rope slip for more that a few seconds on the rum while in
tension – the heat created by the friction could melt or damage the rope.
3. Stopping the winch
1) Release tension gradually to lower the winch gently to the ground
2) Turn off the power switch
Once your job is done, you should clean and dry your winch.
CAUTION inspect the winch, hooks, rope, knots and polyester sling to detect any
damage or signs of wear.
TROUBLE SHOOTING

E7
EXPLODED AND PARTS LIST
Part No.
1
2
3
4
5
6
7
8
9
10
11
12
13
14
15
16
17
18
19
20
Description
Power switch component
Screw st4.2x16f
Block
Casing
Screw ST4.2x16F
Plug assembly
Screw ST4.2x9.5F
Motor assembly
Screw M5x20
Gear cover
Internal gear
Washer
Gear assembly
Bearing 61905
Internal gear
Washer
Screw M5x16
Trigger
Decorative cover
Pressure spring
Q’ty
1
2
1
1
13
1
2
1
3
1
1
1
1
3
1
1
7
1
1
1
Part No.
21
22
23
24
25
26
27
28
29
30
31
32
33
34
35
36
37
38
39
40
Description
The micro switch
Casing
Bearing 61805
Transmission shaft
Block C 42
Aluminum shell
Limit block
Screw M6X18
Rope guid hook
Bolt M8x20
Bolt M10x20
Washer M10-A1
Drum
Large washer A 8
Hook
Screw M12x130
Large washer A 12
Spacer sleeve
Safety hook
Nut M12
Q’ty
1
1
1
1
1
1
1
1
1
2
1
1
1
2
1
1
4
2
2
1

Intradin (Shanghai) Machinery Co., Ltd.
www.intradin.com
Size: 145x210mm REV 12/05/19 2.09.05.01.592157克铜版纸
This manual suits for next models
1
Table of contents
Popular Winch manuals by other brands

Portable Winch
Portable Winch PORTABLE CAPSTAN WINCH PCW5000 user guide

Comeup
Comeup CWS-80 manual

Harken
Harken 20.2 PTBBB Installation and maintenance manual

Vikre Handel AS
Vikre Handel AS T-X5000 Assembly & operating instructions

Comeup
Comeup CP-300 quick start guide

Landig
Landig ZE 4420 operating instructions

Comeup
Comeup HV-10 quick start guide

Kolpin Outdoors
Kolpin Outdoors Polaris RZR XP 1000 Product instructions

Superwinch
Superwinch PRO Series owner's manual

Warn
Warn PULLZALL 24Vdc Service guide

Warrior Winches
Warrior Winches T1000 owner's manual

Ingersol Rand
Ingersol Rand FORCE 5i Man Rider FA Series Product information